oil FORD EXPLORER 2021 User Guide
[x] Cancel search | Manufacturer: FORD, Model Year: 2021, Model line: EXPLORER, Model: FORD EXPLORER 2021Pages: 577, PDF Size: 9.79 MB
Page 200 of 577
•
Incorrect fuel for climatic conditions.
• Incorrect engine oil viscosity for
climactic conditions.
Note: Some vehicles have a lifetime fuel
filter that is integrated with the fuel tank.
Regular maintenance or replacement is not
needed.
Note: If these checks do not help you
correct the concern, have your vehicle
checked as soon as possible.
Noise Emissions Warranty,
Prohibited Tampering Acts and
Maintenance
On January 1, 1978, Federal regulation
became effective governing the noise
emission on trucks over 10,000 lb
(4,536 kg) Gross Vehicle Weight Rating
(GVWR). The preceding statements
concerning prohibited tampering acts and
maintenance, and the noise warranty
found in the Warranty Guide, are
applicable to complete chassis cabs over
10,000 lb (4,536 kg)
GVWR.
CATALYTIC CONVERTER WARNING:
Do not park, idle or
drive your vehicle on dry grass or other
dry ground cover. The emission system
heats up the engine compartment and
exhaust system, creating the risk of fire. WARNING:
The normal operating
temperature of the exhaust system is
very high. Never work around or attempt
to repair any part of the exhaust system
until it has cooled. Use special care when
working around the catalytic converter.
The catalytic converter heats up to a very
high temperature after only a short
period of engine operation and stays hot
after the engine is switched off. WARNING:
Exhaust leaks may
result in entry of harmful and potentially
lethal fumes into the passenger
compartment. If you smell exhaust
fumes inside your vehicle, have your
vehicle inspected immediately. Do not
drive if you smell exhaust fumes.
Your vehicle has various emission control
components and a catalytic converter that
enables it to comply with applicable
exhaust emission standards.
To make sure that the catalytic converter
and other emission control components
continue to work properly:
• Do not crank the engine for more than
10 seconds at a time.
• Do not run the engine with a spark plug
lead disconnected.
• Do not push-start or tow-start your
vehicle. Use booster cables. See Jump
Starting the Vehicle
(page 300).
• Use only the specified fuel listed.
• Do not switch the ignition off when your
vehicle is moving.
• Avoid running out of fuel.
• Have the items listed in scheduled
maintenance information performed
according to the specified schedule.
Note: Resulting component damage may
not be covered by the vehicle Warranty.
The scheduled maintenance items listed
in scheduled maintenance information are
essential to the life and performance of
your vehicle and to its emissions system.
If you use anything other than Ford,
Motorcraft or Ford-authorized parts for
maintenance replacements or for service
of components affecting emission control,
such non-Ford parts should be equivalent
to genuine Ford Motor Company parts in
performance and durability.
197
Explorer (CTW), enUSA, Edition date: 202007, Second-Printing Engine Emission Control
Page 298 of 577
REDUCED ENGINE
PERFORMANCE
WARNING: If you continue to drive
your vehicle when the engine is
overheating, the engine could stop
without warning. Failure to follow this
instruction could result in the loss of
control of your vehicle.
If the engine coolant temperature gauge
needle moves to the upper limit position,
the engine is overheating. See Gauges
(page 106).
You must only drive your vehicle for a short
distance if the engine overheats. The
distance you can travel depends on
ambient temperature, vehicle load and
terrain. The engine continues to operate
with limited power for a short period of
time.
If the engine temperature continues to rise,
the fuel supply to the engine reduces. The
air conditioning switches off and the engine
cooling fan operates continually.
1. Gradually reduce your speed and stop your vehicle as soon as it is safe to do
so.
2. Immediately switch the engine off to prevent severe engine damage.
3. Wait for the engine to cool down.
4. Check the coolant level. See
Engine
Coolant Check (page 331).
5. Have your vehicle checked as soon as possible.
ECONOMICAL DRIVING
Fuel economy is affected by several things
such as how you drive, the conditions you
drive under and how you maintain your
vehicle. You may improve your fuel economy by
keeping these things in mind:
•
Accelerate and slow down in a smooth,
moderate fashion.
• Drive at steady speeds.
• Anticipate stops; slowing down may
eliminate the need to stop.
• Combine errands and minimize
stop-and-go driving.
• Close the windows for high-speed
driving.
• Drive at reasonable speeds (traveling
at
55 mph (88 km/h) uses 15% less
fuel than traveling at 65 mph
(105 km/h)).
• Keep the tires properly inflated and use
only the recommended size.
• Use the recommended engine oil.
• Perform all regularly scheduled
maintenance.
Avoid these actions; they reduce your fuel
economy:
• Sudden accelerations or hard
accelerations.
• Revving the engine before switching it
off.
• Idle for periods longer than one minute.
• Warm up your vehicle on cold
mornings.
• Use the air conditioner or front
defroster.
• Use the speed control in hilly terrain.
• Rest your foot on the brake pedal while
driving.
• Drive a heavily loaded vehicle or tow a
trailer.
295
Explorer (CTW), enUSA, Edition date: 202007, Second-Printing Driving Hints
Page 316 of 577
Protected Component
Fuse Rating
Fuse or Relay
Number
Body control module - battery power in
feed 1.
40A
1
Power outlet main console bin.
20A
2
Body control module - battery power in
feed 2.
40A
3
Fuel pump.
30A
4
Powertrain control module keep alive
power.
5A
5
Powertrain control module power.
20A
6
Canister vent solenoid.
20A
7
Evaporative leak control module.
Exhaust gas heat recovery (hybrid electric
vehicle).
Tank pressure control valve (hybrid electric
vehicle).
Refueling valve (plug-in hybrid electric
vehicle).
Vapor blocking valve.
Universal exhaust gas oxygen 11.
Universal exhaust gas oxygen 21.
Catalyst monitor sensor 12.
Catalyst monitor sensor 22.
Canister purge valve.
Cooling fan relay coil.
20A
8
Battery interrupt box.
Transmission oil pump.
Auxiliary coolant pump.
Fuel flap door (hybrid electric vehicle).
Engine coolant bypass valve.
Active grille shutters.
Ignition coils.
20A
9
Front blower motor relay.
40A
13
Transmission oil pump.
15A
14
A/C compressor variable clutch.
Auxiliary pumps (hybrid electric vehicle).
313
Explorer (CTW), enUSA, Edition date: 202007, Second-Printing Fuses
Page 326 of 577
5. Support the hood with the prop rod.
Closing the Hood WARNING: Make sure that you fully
latch the hood before driving. Failure to
follow this instruction could result in
personal injury or death.
1. Remove the prop rod from the catch and secure it correctly in the clip.
2. Lower the hood and allow it to drop under its own weight for the last
10– 14 in (25– 35 cm)
.
Note: Make sure that the hood is correctly
closed.
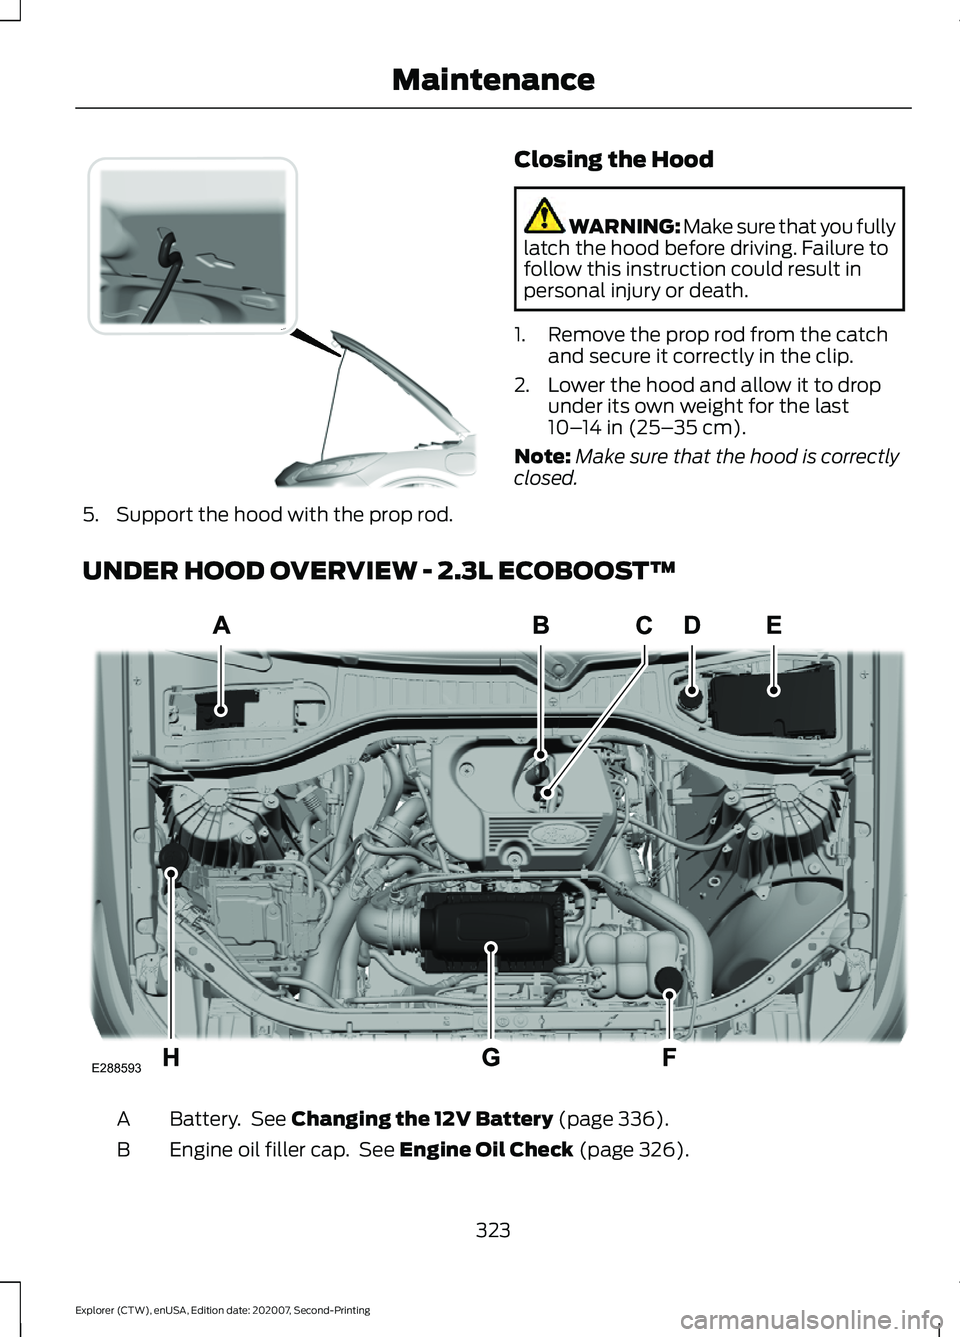
UNDER HOOD OVERVIEW - 2.3L ECOBOOST™ Battery. See
Changing the 12V Battery (page 336).
A
Engine oil filler cap. See
Engine Oil Check (page 326).
B
323
Explorer (CTW), enUSA, Edition date: 202007, Second-Printing MaintenanceE318379 E288593
Page 327 of 577
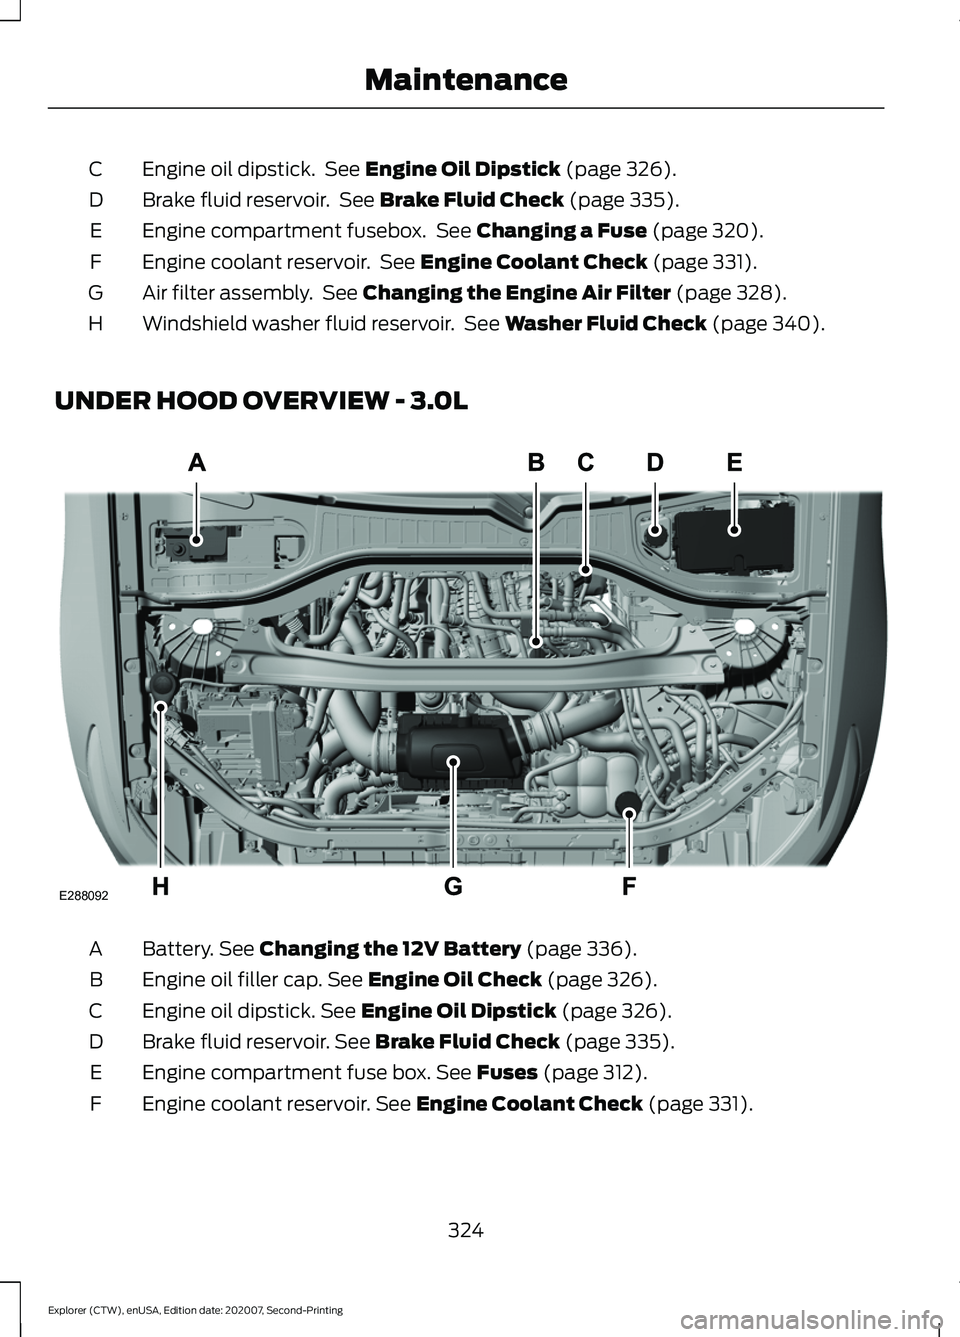
Engine oil dipstick. See Engine Oil Dipstick (page 326).
C
Brake fluid reservoir. See
Brake Fluid Check (page 335).
D
Engine compartment fusebox. See
Changing a Fuse (page 320).
E
Engine coolant reservoir. See
Engine Coolant Check (page 331).
F
Air filter assembly. See
Changing the Engine Air Filter (page 328).
G
Windshield washer fluid reservoir. See
Washer Fluid Check (page 340).
H
UNDER HOOD OVERVIEW - 3.0L Battery.
See Changing the 12V Battery (page 336).
A
Engine oil filler cap.
See Engine Oil Check (page 326).
B
Engine oil dipstick.
See Engine Oil Dipstick (page 326).
C
Brake fluid reservoir.
See Brake Fluid Check (page 335).
D
Engine compartment fuse box.
See Fuses (page 312).
E
Engine coolant reservoir.
See Engine Coolant Check (page 331).
F
324
Explorer (CTW), enUSA, Edition date: 202007, Second-Printing MaintenanceE288092
Page 328 of 577
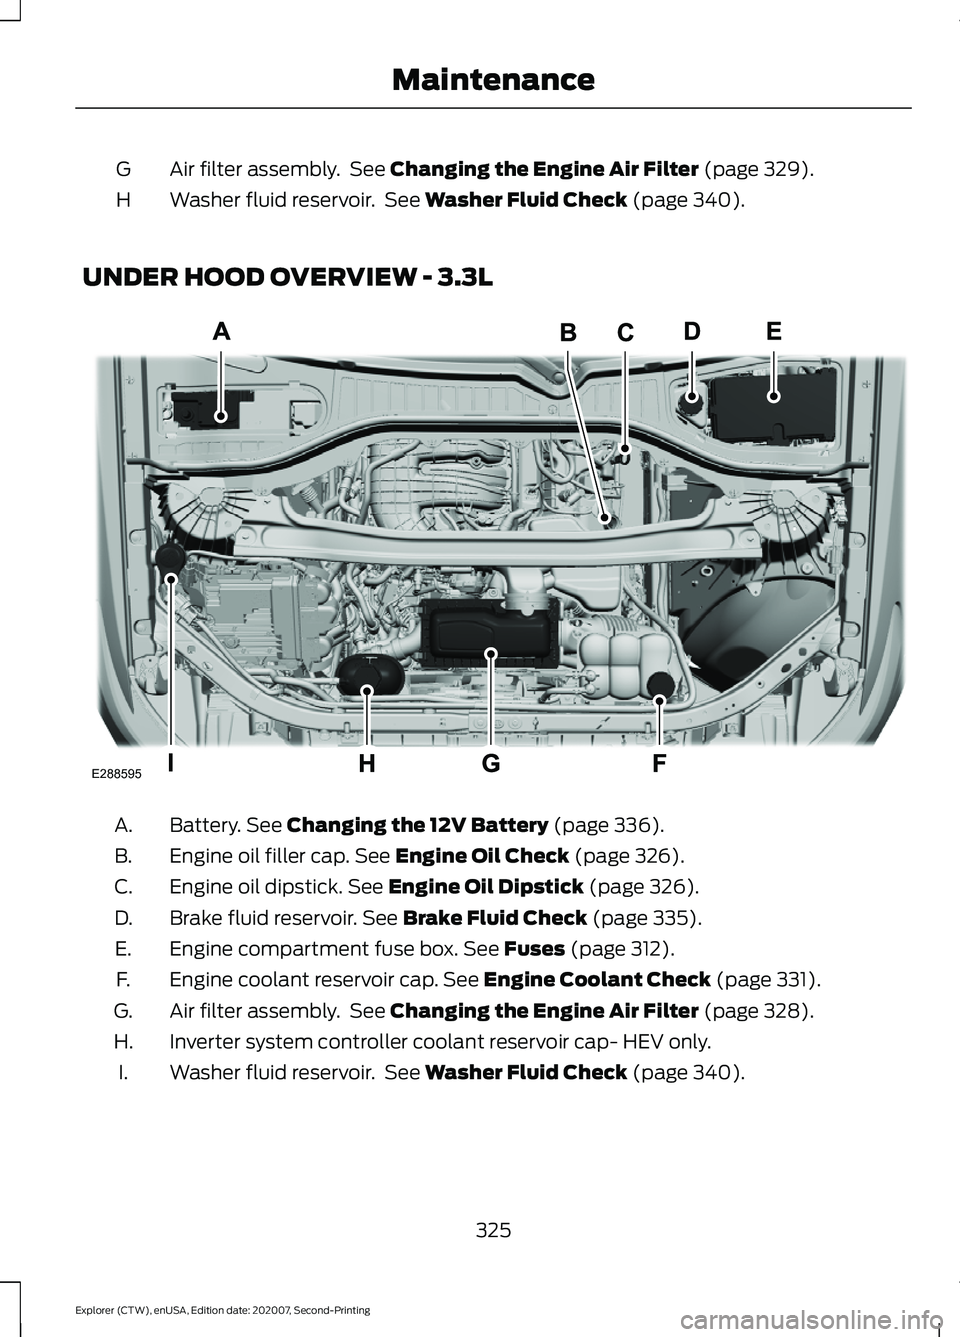
Air filter assembly. See Changing the Engine Air Filter (page 329).
G
Washer fluid reservoir. See
Washer Fluid Check (page 340).
H
UNDER HOOD OVERVIEW - 3.3L Battery.
See Changing the 12V Battery (page 336).
A.
Engine oil filler cap.
See Engine Oil Check (page 326).
B.
Engine oil dipstick.
See Engine Oil Dipstick (page 326).
C.
Brake fluid reservoir.
See Brake Fluid Check (page 335).
D.
Engine compartment fuse box.
See Fuses (page 312).
E.
Engine coolant reservoir cap.
See Engine Coolant Check (page 331).
F.
Air filter assembly. See
Changing the Engine Air Filter (page 328).
G.
Inverter system controller coolant reservoir cap- HEV only.
H.
Washer fluid reservoir. See
Washer Fluid Check (page 340).
I.
325
Explorer (CTW), enUSA, Edition date: 202007, Second-Printing MaintenanceE288595
Page 329 of 577
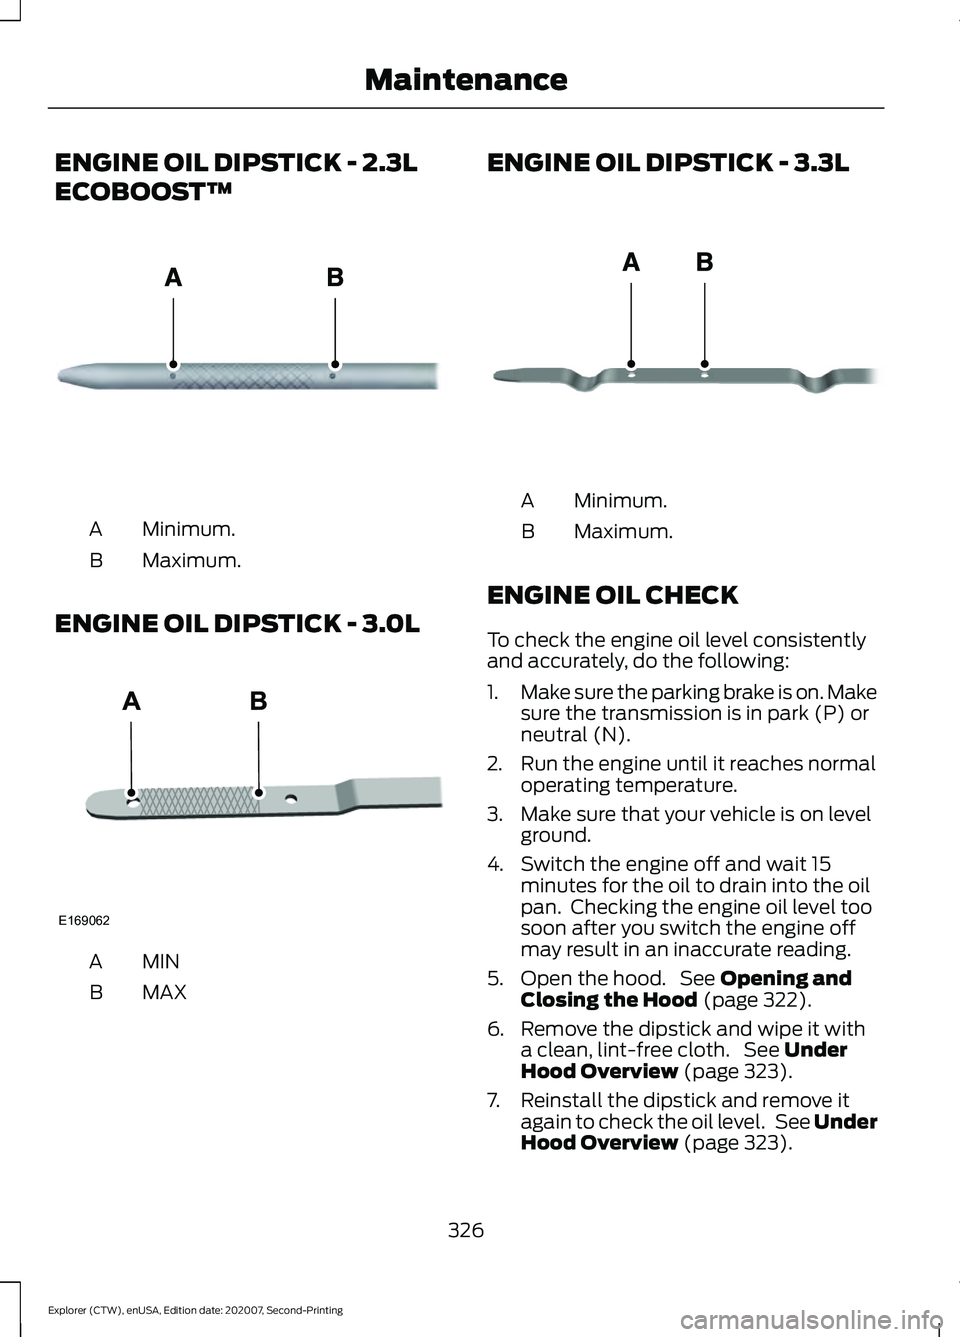
ENGINE OIL DIPSTICK - 2.3L
ECOBOOST™
Minimum.
A
Maximum.
B
ENGINE OIL DIPSTICK - 3.0L MINA
MAX
B ENGINE OIL DIPSTICK - 3.3L
Minimum.
A
Maximum.
B
ENGINE OIL CHECK
To check the engine oil level consistently
and accurately, do the following:
1. Make sure the parking brake is on. Make
sure the transmission is in park (P) or
neutral (N).
2. Run the engine until it reaches normal operating temperature.
3. Make sure that your vehicle is on level ground.
4. Switch the engine off and wait 15 minutes for the oil to drain into the oil
pan. Checking the engine oil level too
soon after you switch the engine off
may result in an inaccurate reading.
5. Open the hood. See Opening and
Closing the Hood (page 322).
6. Remove the dipstick and wipe it with a clean, lint-free cloth. See
Under
Hood Overview (page 323).
7. Reinstall the dipstick and remove it again to check the oil level. See Under
Hood Overview
(page 323).
326
Explorer (CTW), enUSA, Edition date: 202007, Second-Printing MaintenanceE161560 E169062 E146429
Page 330 of 577
8.
Make sure that the oil level is between
the maximum and minimum marks. If
the oil level is at the minimum mark,
add oil immediately. See Capacities
and Specifications (page 391).
9. If the oil level is correct, replace the dipstick and make sure it is fully seated.
Note: Do not remove the dipstick when the
engine is running.
Note: If the oil level is between the
maximum and minimum marks, the oil level
is acceptable. Do not add oil.
Note: The oil consumption of new engines
reaches its normal level after approximately
3,000 mi (5,000 km)
.
Adding Engine Oil WARNING: Do not remove the filler
cap when the engine is running.
Do not use supplemental engine oil
additives because they are unnecessary
and could lead to engine damage that may
not be covered by the vehicle Warranty. Only use oils certified for gasoline engines
by the American Petroleum Institute (API).
An oil with this trademark symbol
conforms to the current engine and
emission system protection standards and
fuel economy requirements of the
International Lubricants Specification
Advisory Committee (ILSAC).
To top up the engine oil level do the
following:
1. Clean the area surrounding the engine
oil filler cap before you remove it.
2. Remove the engine oil filler cap. See Under Hood Overview
(page 323).
Turn it counterclockwise and remove
it.
3. Add engine oil that meets our specifications. See
Capacities and
Specifications (page 391). You may
have to use a funnel to pour the engine
oil into the opening.
4. Recheck the oil level.
5. If the oil level is correct, replace the dipstick and make sure it is fully seated.
6. Replace the engine oil filler cap. Turn it clockwise until you feel a strong
resistance.
Note: Do not add oil further than the
maximum mark. Oil levels above the
maximum mark may cause engine damage.
Note: Make sure you install the oil filler cap
correctly.
Note: Soak up any spillage with an
absorbent cloth immediately.
OIL CHANGE INDICATOR
RESET
Use the information display controls on
the steering wheel to reset the oil change
indicator.
327
Explorer (CTW), enUSA, Edition date: 202007, Second-Printing MaintenanceE142732
Page 331 of 577
From the main menu scroll to:
Action and description
Message
Press the right arrow button,
then from this menu scroll
to the following message.
Settings
Press the right arrow button,
then from this menu scroll
to the following message.
Vehicle
Press and hold the OK
button until the instrument
cluster displays the
following message.
Hold OK to
Reset
Reset Successful
When the oil change indic-
ator resets the instrument
cluster displays 100%.
Remaining Life
{00}%
If the instrument cluster
displays one of the following
messages, repeat the
process.
Not Reset
Reset Cancelled
CHANGING THE ENGINE AIR
FILTER - 2.3L ECOBOOST™ WARNING:
To reduce the risk of
vehicle damage and personal burn
injuries, do not start your engine with the
air cleaner removed and do not remove
it while the engine is running. When changing the engine air filter, do not
allow debris or foreign material to enter
the air induction system. Engine
components are susceptible to damage
not covered by the vehicle Warranty.
Change the air filter element at the correct
interval. See
Scheduled Maintenance
(page 482).
Incorrect component use can cause
damage not covered by the vehicle
Warranty. See
Motorcraft Parts (page
388).
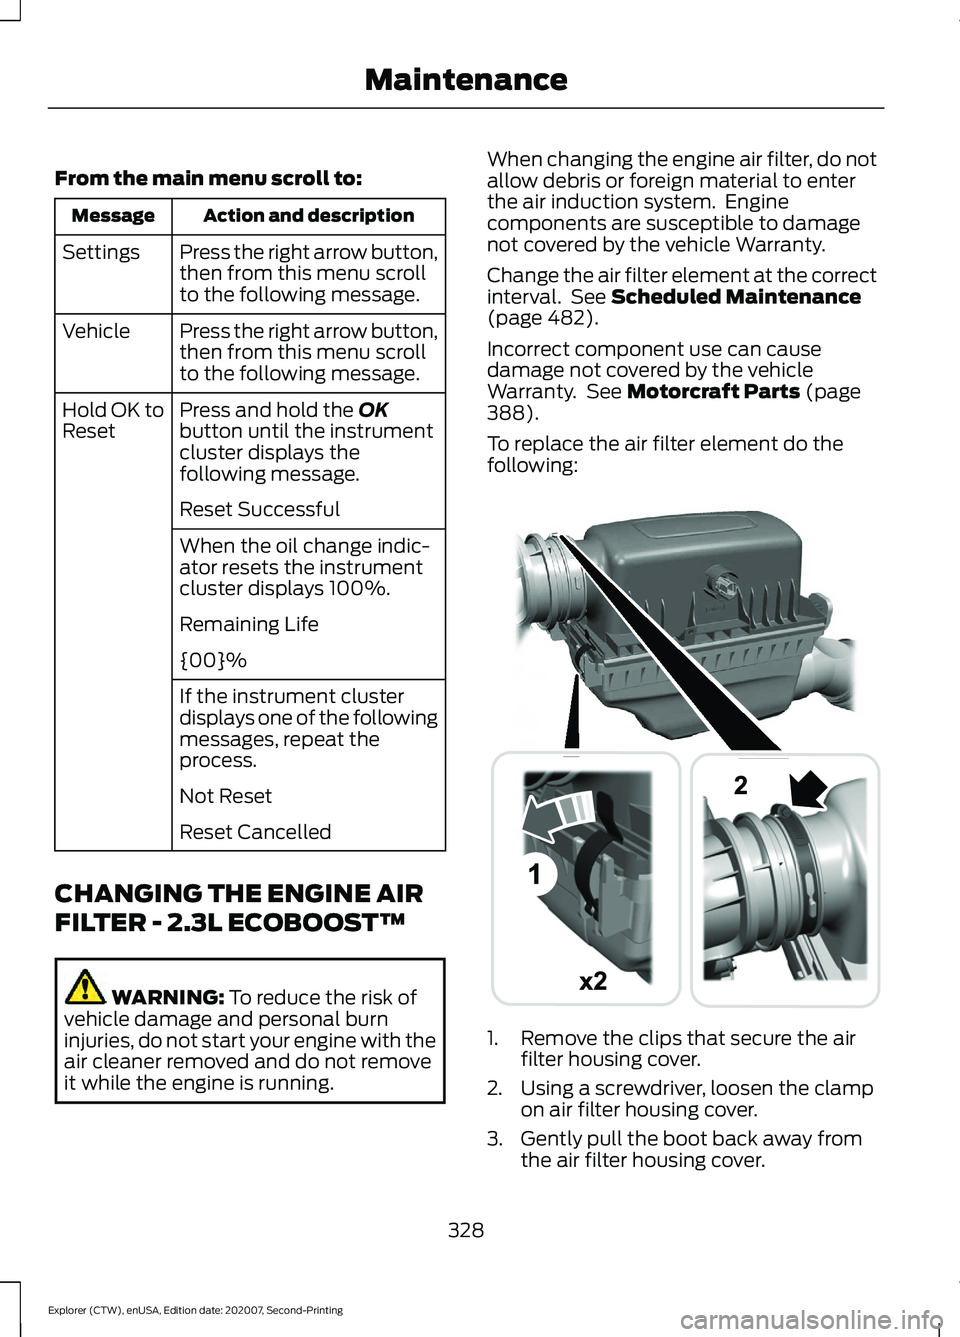
To replace the air filter element do the
following: 1. Remove the clips that secure the air
filter housing cover.
2. Using a screwdriver, loosen the clamp on air filter housing cover.
3. Gently pull the boot back away from the air filter housing cover.
328
Explorer (CTW), enUSA, Edition date: 202007, Second-Printing MaintenanceE294782
Page 349 of 577
•
Never wash or rinse the engine while it
is hot or running; water in the running
engine may cause internal damage.
• Never wash or rinse any ignition coil,
spark plug wire or spark plug well, or
the area in and around these locations.
• Cover the battery, power distribution
box, and air filter assembly to prevent
water damage when cleaning the
engine.
CLEANING THE WINDOWS AND
WIPER BLADES
Car wash chemicals and environmental
fallout can result in windshield and wiper
blade contamination. Dirty windshield and
wipers will result in poor windshield wiper
operation. Keep the windshield and wiper
blades clean to maintain windshield wiper
performance.
To clean the windshield and wiper blades:
• Clean the windshield with a
non-abrasive glass cleaner. When
cleaning the interior of the windshield,
avoid getting any glass cleaner on the
instrument panel or door panels. Wipe
any glass cleaner off these surfaces
immediately.
• For windshields contaminated with
tree sap, chemicals, wax or bugs, clean
the entire windshield using steel wool
(no greater than 0000 grade) in a
circular motion and rinse with water.
• Clean the wiper blades with isopropyl
rubbing alcohol or windshield washer
concentrate.
Note: Do not use razor blades or other
sharp objects to clean or remove decals
from the inside of the heated rear window.
The vehicle warranty does not cover
damage caused to the heated rear window
grid lines. CLEANING THE INTERIOR WARNING: Do not use cleaning
solvents, bleach or dye on the vehicle's
seatbelts, as these actions may weaken
the belt webbing. WARNING:
On vehicles equipped
with seat-mounted airbags, do not use
chemical solvents or strong detergents.
Such products could contaminate the
side airbag system and affect
performance of the side airbag in a crash.
For fabric, carpets, cloth seats and seats
equipped with side airbags:
• Remove dust and loose dirt with a
vacuum cleaner.
• Remove light stains and soil with
Motorcraft Professional Strength
Carpet & Upholstery Cleaner.
• If grease or tar is present on the
material, spot-clean the area first with
Motorcraft Spot and Stain Remover. In
Canada, use Motorcraft Multi-Purpose
Cleaner.
• If a ring forms on the fabric after spot
cleaning, clean the entire area
immediately (but do not oversaturate)
or the ring will set.
• Do not use household cleaning
products or glass cleaners, which can
stain and discolor the fabric and affect
the flame retardant abilities of the seat
materials.
Mirrors
Do not clean the housing or glass of any
mirror with harsh abrasives, fuel or other
petroleum or ammonia-based cleaning
products.
346
Explorer (CTW), enUSA, Edition date: 202007, Second-Printing Vehicle Care