Ac drain FORD EXPLORER 2021 Owners Manual
[x] Cancel search | Manufacturer: FORD, Model Year: 2021, Model line: EXPLORER, Model: FORD EXPLORER 2021Pages: 577, PDF Size: 9.79 MB
Page 75 of 577
Illuminated Exit
The interior lamps and some exterior
lamps illuminate when all doors close and
you switch the ignition off.
The lamps turn off if all the doors remain
closed and:
•
25 seconds have elapsed.
• You lock your vehicle from the outside.
Battery Saver
If you leave the courtesy lamps, interior
lamps or headlamps on, the battery saver
shuts them off 10 minutes after you switch
the ignition off.
Battery Saver for Intelligent Access
Keys (If Equipped)
If you leave the ignition switched on and
the engine is not running, the battery saver
turns the ignition off when it detects a
certain amount of battery drain, or after
45 minutes have elapsed.
KEYLESS ENTRY (IF EQUIPPED)
SECURICODE™ Keyless Entry
Keypad
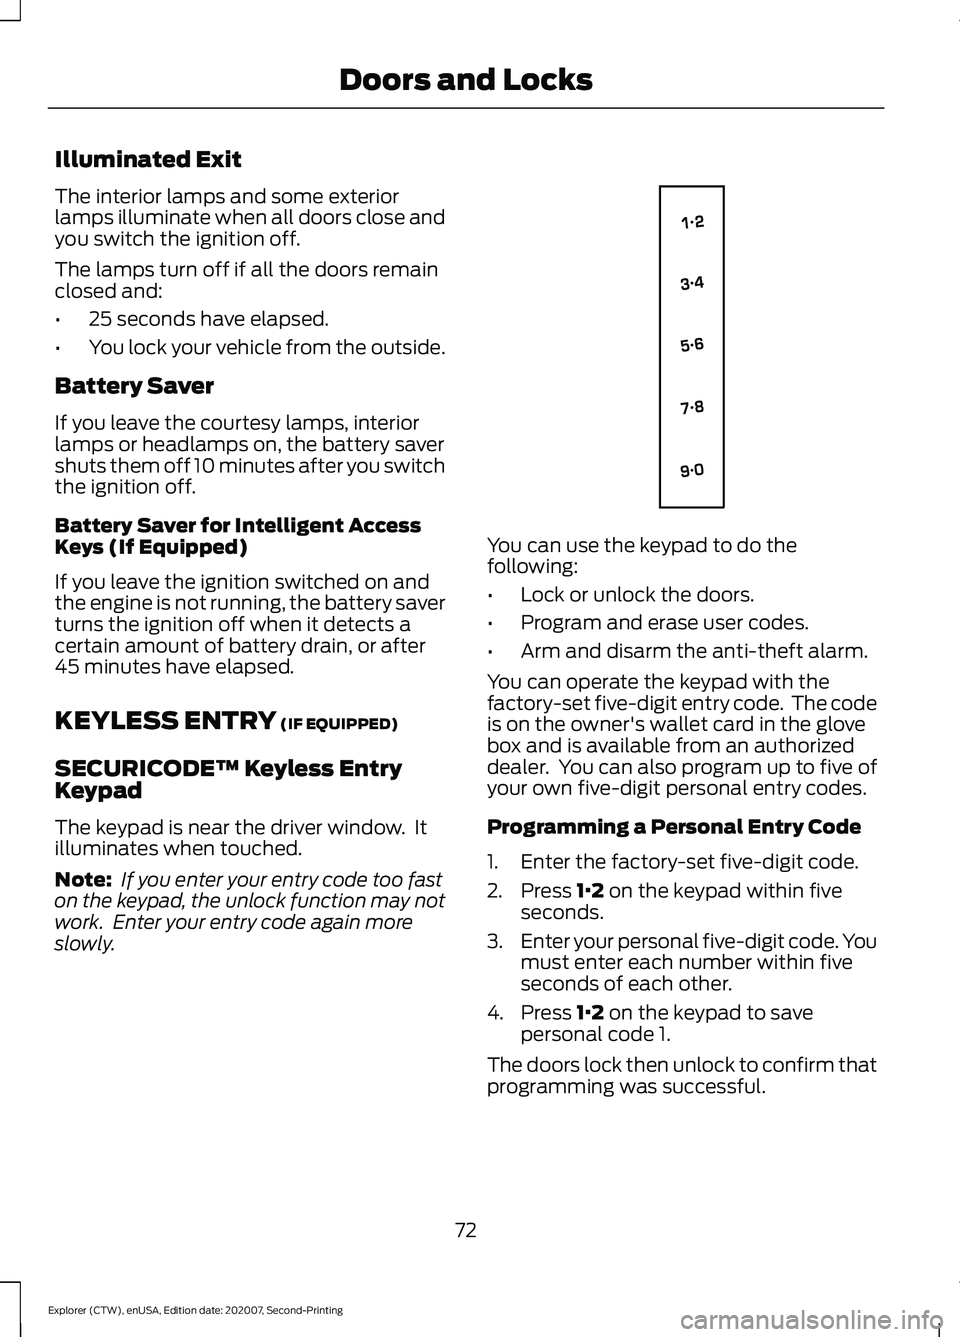
The keypad is near the driver window. It
illuminates when touched.
Note: If you enter your entry code too fast
on the keypad, the unlock function may not
work. Enter your entry code again more
slowly. You can use the keypad to do the
following:
•
Lock or unlock the doors.
• Program and erase user codes.
• Arm and disarm the anti-theft alarm.
You can operate the keypad with the
factory-set five-digit entry code. The code
is on the owner's wallet card in the glove
box and is available from an authorized
dealer. You can also program up to five of
your own five-digit personal entry codes.
Programming a Personal Entry Code
1. Enter the factory-set five-digit code.
2. Press
1·2 on the keypad within five
seconds.
3. Enter your personal five-digit code. You
must enter each number within five
seconds of each other.
4. Press
1·2 on the keypad to save
personal code 1.
The doors lock then unlock to confirm that
programming was successful.
72
Explorer (CTW), enUSA, Edition date: 202007, Second-Printing Doors and LocksE138637
Page 193 of 577
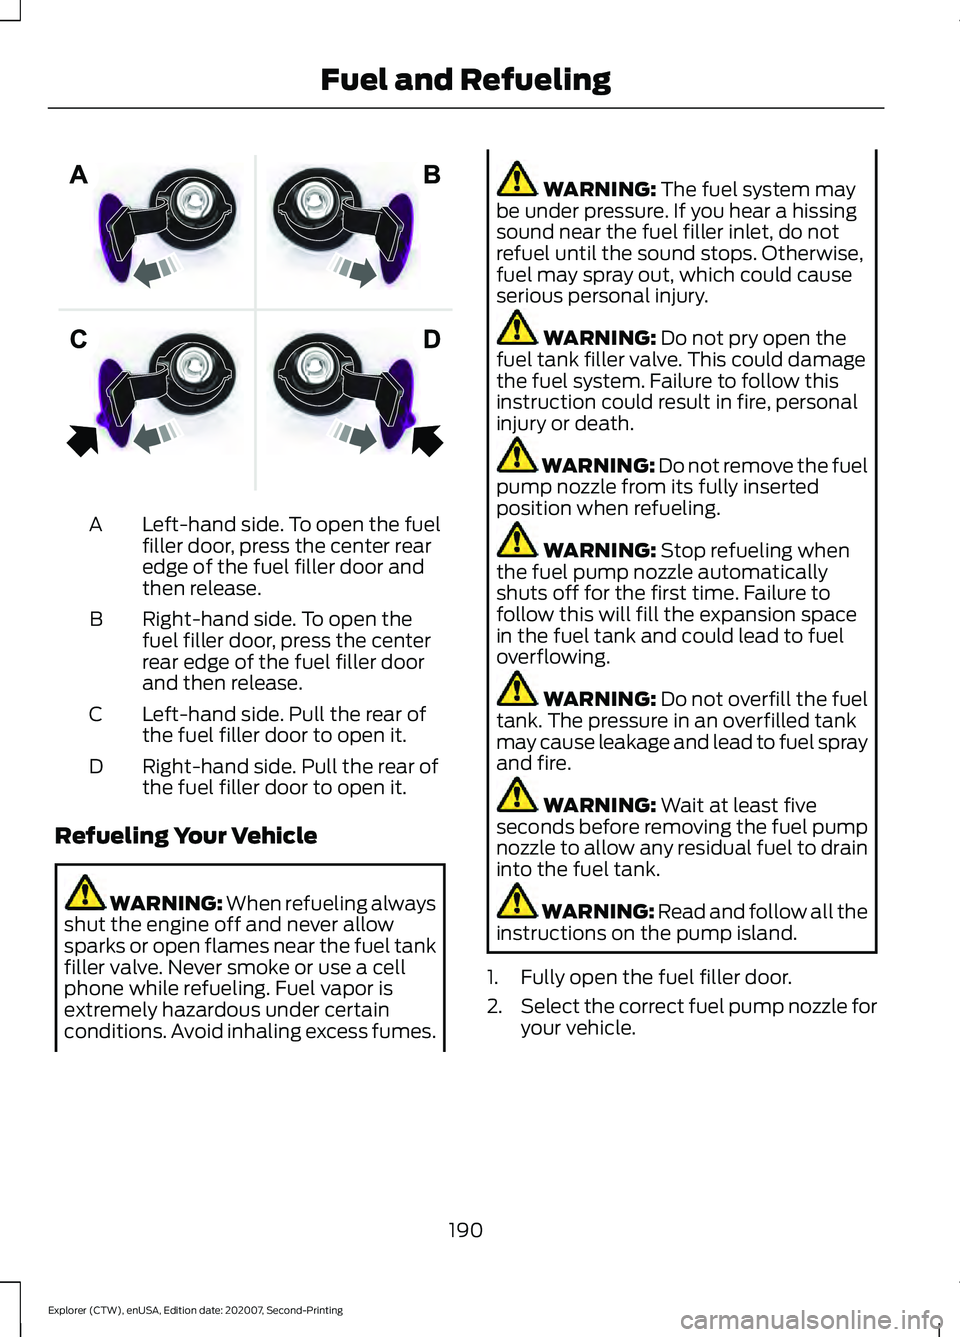
Left-hand side. To open the fuel
filler door, press the center rear
edge of the fuel filler door and
then release.
A
Right-hand side. To open the
fuel filler door, press the center
rear edge of the fuel filler door
and then release.
B
Left-hand side. Pull the rear of
the fuel filler door to open it.
C
Right-hand side. Pull the rear of
the fuel filler door to open it.
D
Refueling Your Vehicle WARNING: When refueling always
shut the engine off and never allow
sparks or open flames near the fuel tank
filler valve. Never smoke or use a cell
phone while refueling. Fuel vapor is
extremely hazardous under certain
conditions. Avoid inhaling excess fumes. WARNING: The fuel system may
be under pressure. If you hear a hissing
sound near the fuel filler inlet, do not
refuel until the sound stops. Otherwise,
fuel may spray out, which could cause
serious personal injury. WARNING:
Do not pry open the
fuel tank filler valve. This could damage
the fuel system. Failure to follow this
instruction could result in fire, personal
injury or death. WARNING: Do not remove the fuel
pump nozzle from its fully inserted
position when refueling. WARNING:
Stop refueling when
the fuel pump nozzle automatically
shuts off for the first time. Failure to
follow this will fill the expansion space
in the fuel tank and could lead to fuel
overflowing. WARNING:
Do not overfill the fuel
tank. The pressure in an overfilled tank
may cause leakage and lead to fuel spray
and fire. WARNING:
Wait at least five
seconds before removing the fuel pump
nozzle to allow any residual fuel to drain
into the fuel tank. WARNING: Read and follow all the
instructions on the pump island.
1. Fully open the fuel filler door.
2. Select the correct fuel pump nozzle for
your vehicle.
190
Explorer (CTW), enUSA, Edition date: 202007, Second-Printing Fuel and RefuelingE206911
Page 195 of 577
3. Apply the parking brake.
4. Fully open the fuel filler door.
5. Check the fuel tank filler valve for any
debris that may be restricting its
movement.
6. Remove any debris from the fuel tank filler valve.
7. Fully insert a fuel pump nozzle or the fuel filler funnel provided with your
vehicle into the fuel filler pipe. See
Fuel Filler Funnel Location (page
187). This action should dislodge any
debris that may be preventing the fuel
tank filler valve from fully closing.
8. Remove the fuel pump nozzle or fuel filler funnel from the fuel filler pipe.
9. Fully close the fuel filler door.
Note: The message may not immediately
reset. If the message continues to appear
and a warning lamp illuminates, see your
authorized dealer as soon as possible.
REFUELING - HYBRID
ELECTRIC VEHICLE (HEV) WARNING: When refueling always
shut the engine off and never allow
sparks or open flames near the fuel tank
filler valve. Never smoke or use a cell
phone while refueling. Fuel vapor is
extremely hazardous under certain
conditions. Avoid inhaling excess fumes. WARNING:
The fuel system may
be under pressure. If you hear a hissing
sound near the fuel filler inlet, do not
refuel until the sound stops. Otherwise,
fuel may spray out, which could cause
serious personal injury. WARNING:
Do not pry open the
fuel tank filler valve. This could damage
the fuel system. Failure to follow this
instruction could result in fire, personal
injury or death. WARNING: Do not remove the fuel
pump nozzle from its fully inserted
position when refueling. WARNING:
Stop refueling when
the fuel pump nozzle automatically
shuts off for the first time. Failure to
follow this will fill the expansion space
in the fuel tank and could lead to fuel
overflowing. WARNING:
Do not overfill the fuel
tank. The pressure in an overfilled tank
may cause leakage and lead to fuel spray
and fire. WARNING:
Wait at least five
seconds before removing the fuel pump
nozzle to allow any residual fuel to drain
into the fuel tank. WARNING: Read and follow all the
instructions on the pump island.
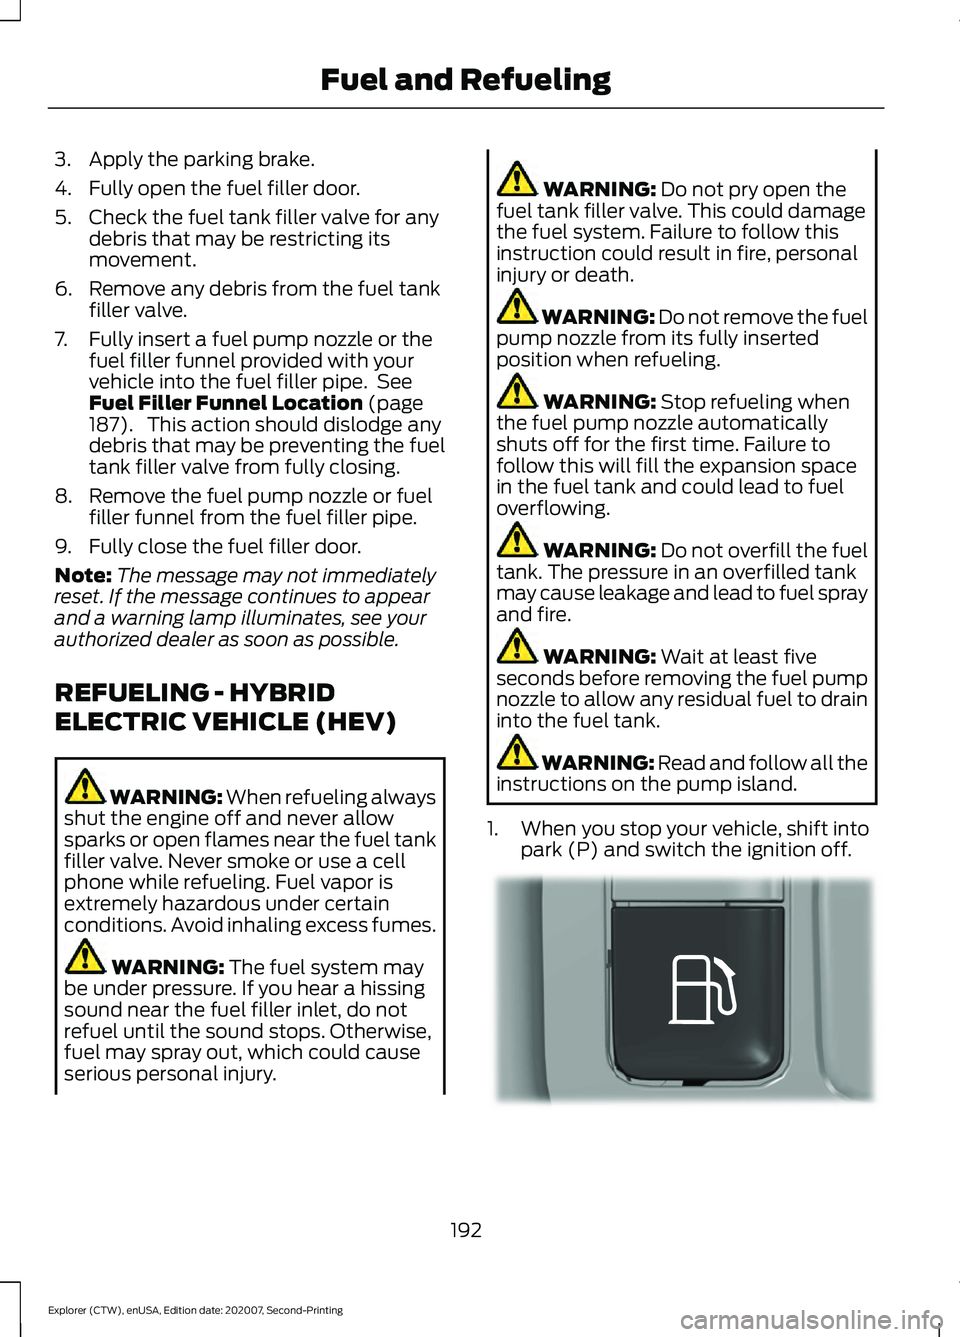
1. When you stop your vehicle, shift into park (P) and switch the ignition off. 192
Explorer (CTW), enUSA, Edition date: 202007, Second-Printing Fuel and RefuelingE293006
Page 329 of 577
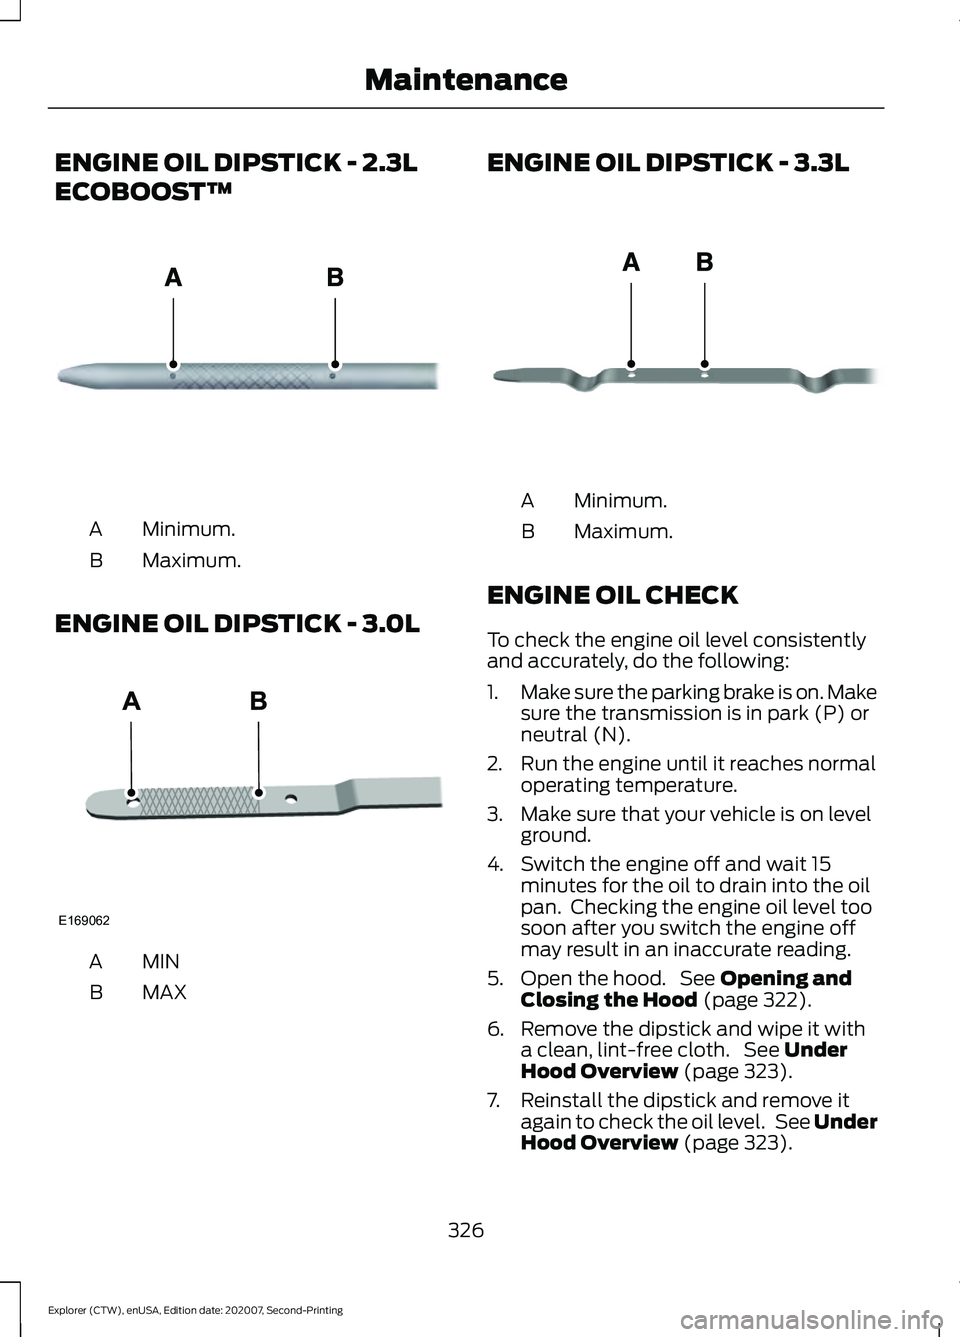
ENGINE OIL DIPSTICK - 2.3L
ECOBOOST™
Minimum.
A
Maximum.
B
ENGINE OIL DIPSTICK - 3.0L MINA
MAX
B ENGINE OIL DIPSTICK - 3.3L
Minimum.
A
Maximum.
B
ENGINE OIL CHECK
To check the engine oil level consistently
and accurately, do the following:
1. Make sure the parking brake is on. Make
sure the transmission is in park (P) or
neutral (N).
2. Run the engine until it reaches normal operating temperature.
3. Make sure that your vehicle is on level ground.
4. Switch the engine off and wait 15 minutes for the oil to drain into the oil
pan. Checking the engine oil level too
soon after you switch the engine off
may result in an inaccurate reading.
5. Open the hood. See Opening and
Closing the Hood (page 322).
6. Remove the dipstick and wipe it with a clean, lint-free cloth. See
Under
Hood Overview (page 323).
7. Reinstall the dipstick and remove it again to check the oil level. See Under
Hood Overview
(page 323).
326
Explorer (CTW), enUSA, Edition date: 202007, Second-Printing MaintenanceE161560 E169062 E146429
Page 335 of 577
It is very important to use prediluted
coolant approved to the correct
specification in order to avoid plugging the
small passageways in the engine cooling
system. See Capacities and
Specifications (page 391). Do not mix
different colors or types of coolant in your
vehicle. Mixing of engine coolants or using
an incorrect coolant may harm the engine
or cooling system components and may
not be covered by the vehicle Warranty.
Note: If prediluted coolant is not available,
use the approved concentrated coolant
diluting it to 50/50 with distilled water. See
Capacities and Specifications (page 391).
Using water that has not been deionised
may contribute to deposit formation,
corrosion and plugging of the small cooling
system passageways.
Note: Coolants marketed for all makes and
models may not be approved to our
specifications and may cause damage to
the cooling system. Resulting component
damage may not be covered by the vehicle
Warranty.
If the coolant level is at or below the
minimum mark, add prediluted coolant
immediately.
To top up the coolant level do the
following:
1. Unscrew the cap slowly. Any pressure escapes as you unscrew the cap.
2. Add prediluted coolant approved to the correct specification. See
Capacities and Specifications (page
391
).
3. Add enough prediluted coolant to reach the correct level.
4. Replace the coolant reservoir cap. Turn
the cap clockwise until it contacts the
hard stop. 5. Check the coolant level in the coolant
reservoir the next few times you drive
your vehicle. If necessary, add enough
prediluted engine coolant to bring the
coolant level to the correct level.
If you have to add more than
1.1 qt (1 L) of
engine coolant per month, have your
vehicle checked as soon as possible.
Operating an engine with a low level of
coolant can result in engine overheating
and possible engine damage.
In case of emergency, you can add a large
amount of water without engine coolant
in order to reach a vehicle service location.
In this instance, qualified personnel:
1. Must drain the cooling system.
2. Chemically clean the coolant system.
3. Refill with engine coolant as soon as possible.
Water alone, without engine coolant, can
cause engine damage from corrosion,
overheating or freezing.
Do not use the following as a coolant
substitute:
• Alcohol.
• Methanol.
• Brine.
• Any coolant mixed with alcohol or
methanol antifreeze.
Alcohol and other liquids can cause engine
damage from overheating or freezing.
Do not add extra inhibitors or additives to
the coolant. These can be harmful and
compromise the corrosion protection of
the coolant.
Recycled Coolant
We do not recommend the use of recycled
coolant as an approved recycling process
is not yet available.
Note: Dispose of used coolant in the
appropriate manner.
332
Explorer (CTW), enUSA, Edition date: 202007, Second-Printing Maintenance
Page 340 of 577
WARNING: Battery posts,
terminals and related accessories
contain lead and lead compounds,
chemicals known to the State of
California to cause cancer and
reproductive harm. Wash your hands
after handling
. WARNING:
This vehicle may have
more than one battery. Removing the
battery cables from only one battery
does not disconnect your vehicle
electrical system. Make sure you
disconnect the battery cables from all
batteries when disconnecting power.
Failure to do so may cause serious
personal injury or property damage. WARNING:
For vehicles with
Auto-Start-Stop the battery requirement
is different. You must replace the battery
with one of exactly the same
specification.
The battery is in the engine compartment.
See
Under Hood Overview (page 323).
Your vehicle has a maintenance-free
battery. It does not require additional
water during service.
If the vehicle battery has a cover and vent
hose, make sure you correctly install it after
cleaning or replacing the battery.
For longer, trouble-free operation, keep the
top of the battery clean and dry and the
battery cables tightly fastened to the
battery terminals. If any corrosion is
present on the battery or terminals, remove
the cables from the terminals and clean
with a wire brush. You can neutralize the
acid with a solution of baking soda and
water.
We recommend that you disconnect the
negative battery cable terminal from the
battery if you plan to store your vehicle for
an extended period. Note:
If you only disconnect the negative
battery cable terminal, make sure it is
isolated or placed away from the battery
terminal to avoid unintended connection or
arcing.
If you replace the battery make sure it
matches the electrical requirements of
your vehicle.
If you disconnect or replace the battery
and your vehicle has an automatic
transmission, it must relearn its adaptive
strategy. Because of this, the transmission
may shift firmly when first driven. This is
normal operation while the transmission
fully updates its operation to optimum
shift feel.
Battery Management System
(If
Equipped)
The battery management system monitors
battery conditions and takes actions to
extend battery life. If excessive battery
drain is detected, the system temporarily
disables some electrical systems to
protect the battery.
Systems included are:
• Heated rear window.
• Heated seats.
• Climate control.
• Heated steering wheel.
• Audio unit.
• Navigation system.
A message may appear in the information
displays to alert you that battery
protection actions are active. These
messages are only for notification that an
action is taking place, and not intended to
indicate an electrical problem or that the
battery requires replacement.
337
Explorer (CTW), enUSA, Edition date: 202007, Second-Printing Maintenance
Page 348 of 577
•
Use a spray with a 40 degree wide
spray angle pattern.
• Keep the nozzle at a 12 in (305 mm)
distance and 90 degree angle to your
vehicle's surface.
Note: Holding the pressure washer nozzle
at an angle to the vehicle's surface may
damage graphics and cause the edges to
peel away from the vehicle's surface.
Underbody
Regularly clean the underside of your
vehicle using water. Keep body and door
drain holes free of debris or foreign
material.
Under Hood
For removing black rubber marks from
under the hood we recommend Motorcraft
Wheel and Tire Cleaner or Motorcraft Bug
and Tar Remover.
WAXING
Regular waxing is necessary to protect your
car's paint from the elements. We
recommend that you wash and wax the
painted surface once or twice a year.
When washing and waxing, park your
vehicle in a shaded area out of direct
sunlight. Always wash your vehicle before
applying wax.
• Use a quality wax that does not contain
abrasives.
• Follow the manufacturer ’s instructions
to apply and remove the wax.
• Apply a small amount of wax in a
back-and-forth motion, not in circles. •
Do not allow wax to come in contact
with any non-body (low-gloss black)
colored trim. The wax will discolor or
stain the parts over time.
•Roof racks.
• Bumpers.
• Grained door handles.
• Side moldings.
• Mirror housings.
• Windshield cowl area.
• Do not apply wax to glass areas.
• After waxing, your car's paint should
feel smooth, and be free of streaks and
smudges.
CLEANING THE ENGINE
Engines are more efficient when they are
clean because grease and dirt buildup keep
the engine warmer than normal.
When washing:
• Take care when using a power washer
to clean the engine. The high-pressure
fluid could penetrate the sealed parts
and cause damage.
• Do not spray a hot engine with cold
water to avoid cracking the engine
block or other engine components.
• Spray Motorcraft Engine Shampoo and
Degreaser on all parts that require
cleaning and pressure rinse clean. In
Canada, use Motorcraft Engine
Shampoo.
Note: If your vehicle has an engine cover
remove the cover before application of
Motorcraft Engine Shampoo and Degreaser.
Immediately rinse away any over spray.
345
Explorer (CTW), enUSA, Edition date: 202007, Second-Printing Vehicle Care
Page 487 of 577
Check Every Month
Engine oil level.
Function of all interior and exterior lights.
Tires (including spare) for wear and proper pressure. Windshield washer fluid level.
Holes and slots in the tail pipe to make sure they are functional and clear of debris. Check Every Six Months
Battery connections. Clean if necessary.
Body and door drain holes for obstructions. Clean if necessary. Cooling system fluid level and coolant strength.
Door weatherstrips for wear. Lubricate if necessary.
Hinges, latches and outside locks for proper operation. Lubricate if necessary. Parking brake for proper operation.
Seatbelts and seat latches for wear and function.
Safety warning lamps (brake, ABS, airbag and seatbelt) for operation.
Washer spray and wiper operation. Clean or replace blades as necessary.
Multi-Point Inspection
In order to keep your vehicle running right,
it is important to have the systems on your
vehicle checked regularly. This can help
identify potential issues and prevent major
problems. We recommend having the
following multi-point inspection performed
at every scheduled maintenance interval
to help make sure your vehicle keeps
running great.
484
Explorer (CTW), enUSA, Edition date: 202007, Second-Printing Scheduled Maintenance