air suspension FORD EXPLORER 2021 Owners Manual
[x] Cancel search | Manufacturer: FORD, Model Year: 2021, Model line: EXPLORER, Model: FORD EXPLORER 2021Pages: 577, PDF Size: 9.79 MB
Page 215 of 577
Your vehicle has anti-lock brakes, therefore
apply the brakes steadily. Do not
“pump”
the brakes.
Driving on Snow and Ice WARNING: If you are driving in
slippery conditions that require tire
chains or cables, then it is critical that
you drive cautiously. Keep speeds down,
allow for longer stopping distances and
avoid aggressive steering to reduce the
chances of a loss of vehicle control
which can lead to serious injury or death.
If the rear end of your vehicle slides while
cornering, steer in the direction of the
slide until you regain control of your
vehicle.
Note: Excessive tire slippage can cause
driveline damage.
4WD vehicles have advantages over 2WD
vehicles in snow and ice but can skid like
any other vehicle.
Should you start to slide while driving on
snowy or icy roads, turn the steering wheel
in the direction of the slide until you regain
control.
Avoid sudden applications of power and
quick changes of direction on snow and
ice. Apply the accelerator slowly and
steadily when starting from a full stop.
Avoid sudden braking as well. Although a
4WD vehicle could accelerate better than
a two-wheel drive vehicle in snow and ice,
it will not stop any faster, because as in
other vehicles, braking occurs at all four
wheels. Do not become overconfident as
to road conditions. Make sure you allow sufficient distance
between you and other vehicles for
stopping. Drive slower than usual and
consider using one of the lower gears. In
emergency stopping situations, apply the
brake steadily. Since your vehicle comes
with a four wheel (ABS), do not
“pump”
the brakes. See Hints on Driving With
Anti-Lock Brakes (page 215).
Maintenance and Modifications
The suspension and steering systems on
your vehicle have been designed and
tested to provide predictable performance
whether loaded or empty and durable load
carrying capability. For this reason, we
strongly recommend that you do not make
modifications such as adding or removing
parts (such as lowering kits or stabilizer
bars) or by using replacement parts not
equivalent to the original factory
equipment.
Any modifications to a vehicle that raise
the center of gravity can make it more likely
the vehicle will rollover as a result of a loss
of control. We strongly recommend that
caution be used with any vehicle equipped
with a high load or device (such as ladder
or luggage racks).
Failure to maintain your vehicle properly
could void the warranty, increase your
repair cost, reduce vehicle performance
and operational capabilities and adversely
affect driver and passenger safety.
Frequent inspection of vehicle chassis
components is recommended if the vehicle
is subjected to off-highway usage.
212
Explorer (CTW), enUSA, Edition date: 202007, Second-Printing Four-Wheel Drive
(If Equipped)
Page 368 of 577
If you feel a sudden vibration or
ride disturbance while driving, or
you suspect your tire or vehicle
has been damaged, immediately
reduce your speed. Drive with
caution until you can safely pull
off the road. Stop and inspect the
tires for damage. If a tire is
under-inflated or damaged,
deflate it, remove wheel and
replace it with your spare tire and
wheel. If you cannot detect a
cause, have the vehicle towed to
the nearest repair facility or tire
dealer to have the vehicle
inspected.
Tire and Wheel Alignment
A bad jolt from hitting a curb or
pothole can cause the front end
of your vehicle to become
misaligned or cause damage to
your tires. If your vehicle seems to
pull to one side when you are
driving, the wheels may be out of
alignment. Have an authorized
dealer check the wheel alignment
periodically.
Wheel misalignment in the front
or the rear can cause uneven and
rapid treadwear of your tires and
should be corrected by an
authorized dealer. Front-wheel
drive vehicles and those with an
independent rear suspension (if
equipped) may require alignment
of all four wheels.
The tires should also be balanced
periodically. An unbalanced tire
and wheel assembly may result in
irregular tire wear.
Tire Rotation WARNING: If the tire label
shows different tire pressures for
the front and rear tires and the
vehicle has a tire pressure
monitoring system, then you
need to update the settings for
the system sensors. Always
perform the system reset
procedure after tire rotation. If
you do not reset the system, it
may not provide a low tire
pressure warning when
necessary.
Note: If your tires show uneven
wear, ask an authorized dealer to
check for and correct any wheel
misalignment, tire imbalance or
mechanical problem involved
before tire rotation.
Note: Your vehicle may be
equipped with a dissimilar spare
wheel and tire assembly. A
dissimilar spare wheel and tire
assembly is defined as a spare
wheel and tire assembly that is
different in brand, size or
appearance from the road tires and
wheels. If you have a dissimilar
spare wheel and tire assembly, it is
intended for temporary use only
and should not be used in a tire
rotation.
Note: After having your tires
rotated, inflation pressure must be
checked and adjusted to the
vehicle requirements.
365
Explorer (CTW), enUSA, Edition date: 202007, Second-Printing Wheels and Tires
Page 370 of 577
WARNING: Snow tires must be the
same size, load index and speed rating
as those originally provided by Ford. Use
of any tire or wheel not recommended
by Ford can affect the safety and
performance of your vehicle, which could
result in an increased risk of loss of
control, vehicle rollover, personal injury
and death. Additionally, the use of
non-recommended tires and wheels can
cause steering, suspension, axle, transfer
case or power transfer unit failure.
Follow the Ford recommended tire
inflation pressure found on the Safety
Compliance Certification Label (on the
door hinge pillar, door latch post or the
door edge that meets the door latch
post, next to the driver seat), or Tire
Label on the B-Pillar or the edge of the
driver door. Failure to follow the tire
pressure recommendations can cause
uneven treadwear patterns and
adversely affect the way your vehicle
handles.
Only use snow chains on rear wheels.
Install snow chains in pairs. Do not use
self-tensioning snow chains.
Only use snow chains on the following
specified tire sizes:
• 255/60R18
•Only install chains that are 10 mm
or less.
• 255/65R18
•Only install chains that are 10 mm
or less. •
265/60R18
•Only install chains that are 10 mm
or less.
• 255/55R20
•Only install chains that are 10 mm
or less.
We recommend you use steel wheels of
the same size and specification if snow
chains are required because chains may
chip aluminum wheels.
Follow these guidelines when using snow
tires and traction devices:
• If possible, avoid fully loading your
vehicle.
• Purchase snow chains from a
manufacturer that clearly labels body
to tire dimension restrictions.
• When driving with snow chains do not
exceed
30 mph (50 km/h) or the
maximum speed recommended by the
chain manufacturer, whichever is less.
• Drive cautiously. If you hear the snow
chains rub or bang against the vehicle,
stop and tighten them. If this does not
work, remove the snow chains to
prevent vehicle damage.
• Remove the snow chains when they
are no longer needed. Do not use snow
chains on dry roads.
• If a temporary spare wheel is mounted
on your vehicle, do not use snow chains
on the axle with the temporary spare
wheel.
• Use snow chains that fit against the
sidewall of the tire to prevent the
chains from touching the wheel rims
or suspension, see following
illustration.
367
Explorer (CTW), enUSA, Edition date: 202007, Second-Printing Wheels and Tires
Page 379 of 577
WARNING: Do not work on your
vehicle when the jack is the only support
as your vehicle could slip off the jack.
Failure to follow this instruction could
result in personal injury or death. WARNING:
Use only the specified
jacking points. If you use other positions,
you may damage the body, steering,
suspension, engine, braking system or
the fuel lines. WARNING:
Never place anything
between the vehicle jack and your
vehicle. WARNING:
Never place anything
between the vehicle jack and the ground. WARNING:
Park your vehicle so
that you do not obstruct the flow of
traffic or place yourself in any danger and
set up a warning triangle. WARNING:
Do not attempt to
change a tire on the side of the vehicle
close to moving traffic. Pull far enough
off the road to avoid the danger of being
hit when operating the jack or changing
the wheel.
Note: Passengers should not remain in your
vehicle when the vehicle is being jacked.
Note: Jack at the specified locations to
avoid damage to the vehicle. Note:
No maintenance or additional
lubrication of your jack is required over the
service life of your vehicle.
1. Park on a level surface, set the parking
brake and switch on the hazard
flashers.
2. Apply the parking brake, place the transmission in park (P) or reverse (R)
for manual transmission. Turn the
engine off.
3. If your vehicle has air suspension, use the touch screen to switch on the Air
Suspension Service Mode prior to
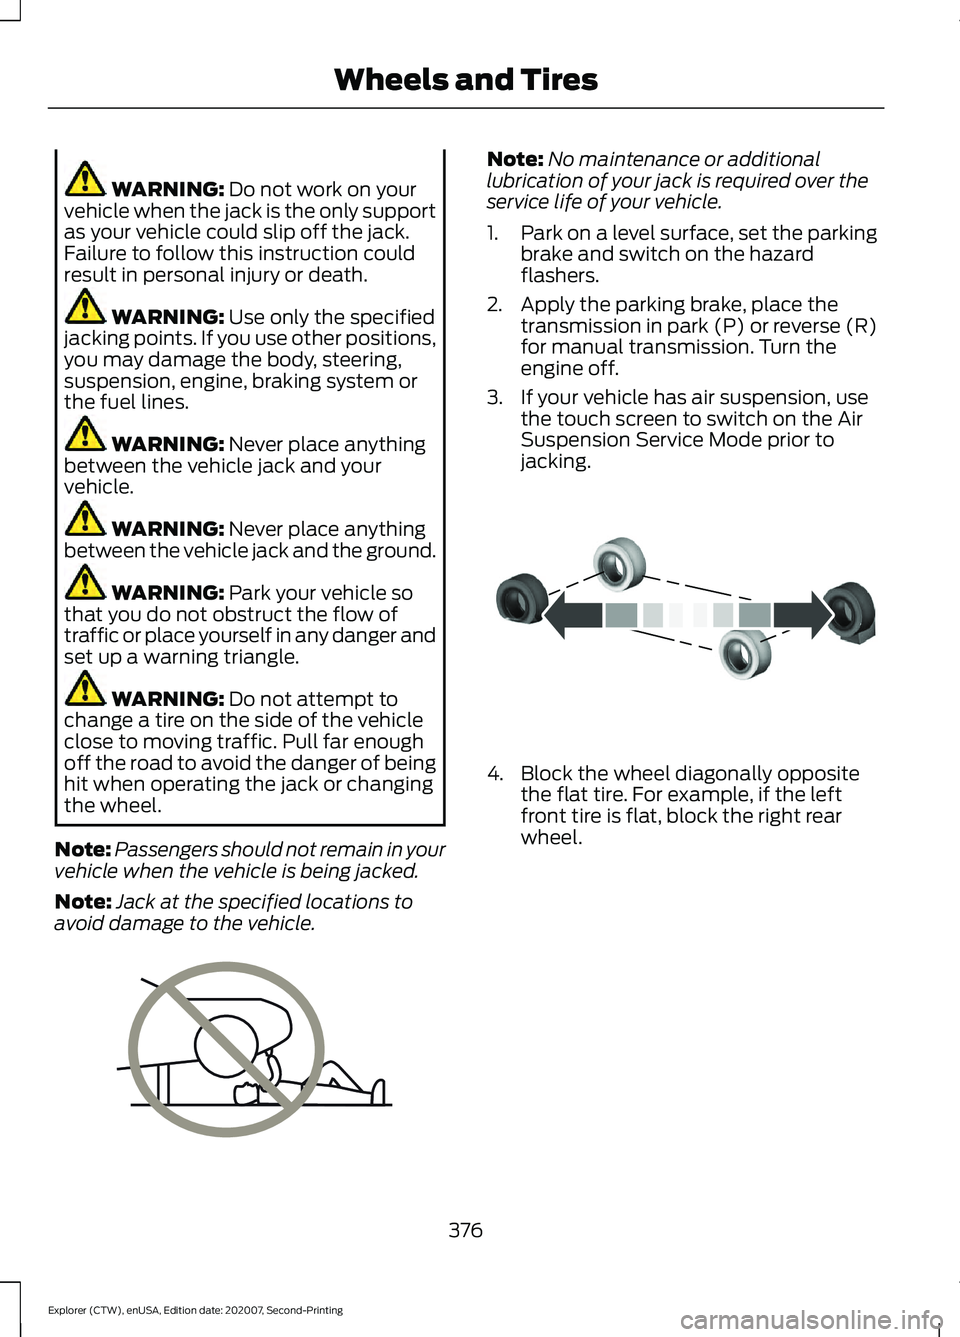
jacking. 4. Block the wheel diagonally opposite
the flat tire. For example, if the left
front tire is flat, block the right rear
wheel.
376
Explorer (CTW), enUSA, Edition date: 202007, Second-Printing Wheels and TiresE166722 E142551
Page 382 of 577
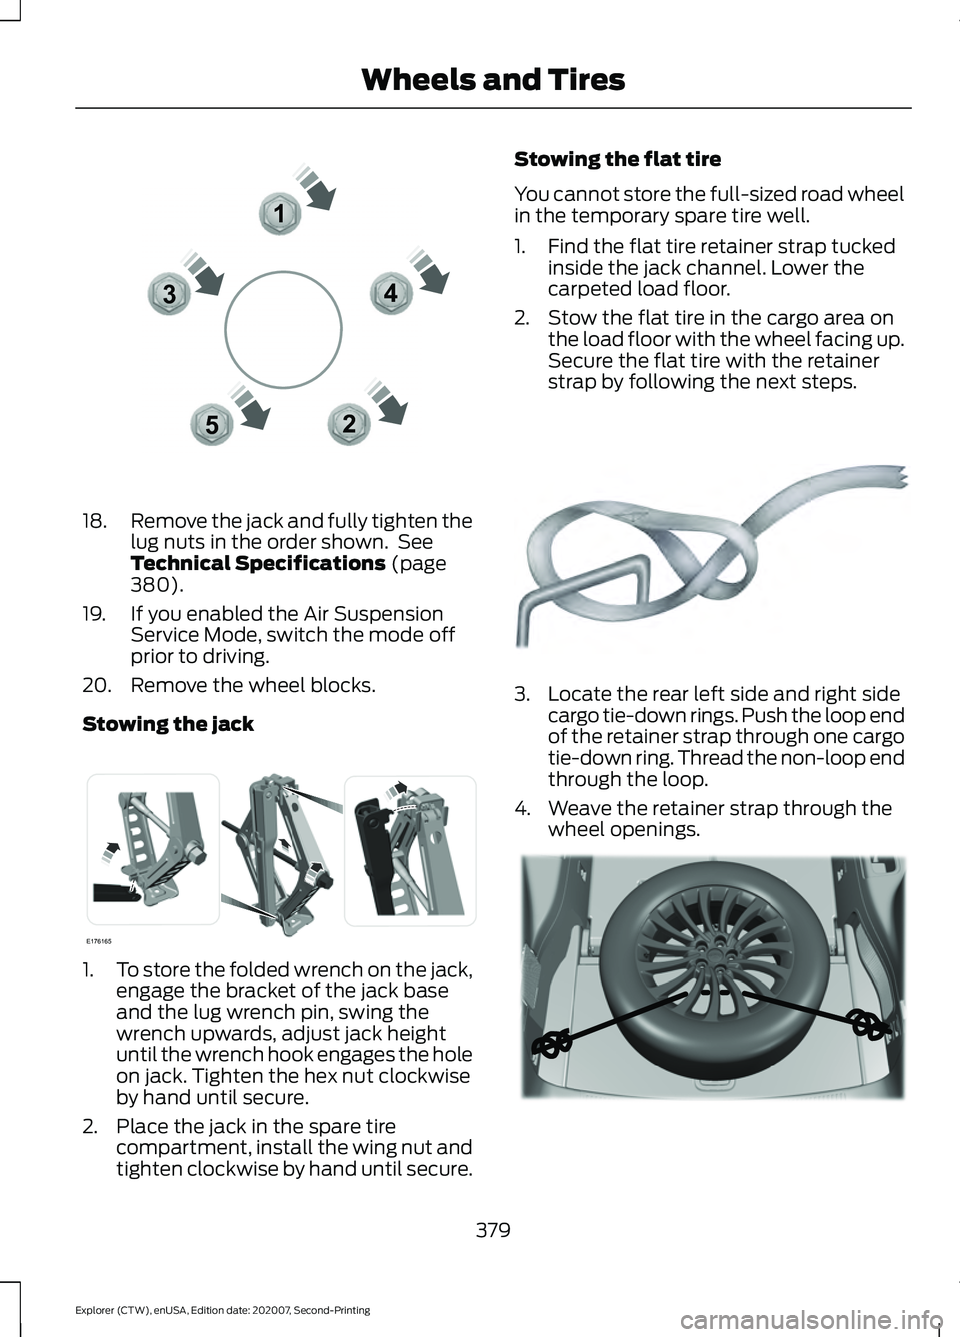
18.
Remove the jack and fully tighten the
lug nuts in the order shown. See
Technical Specifications (page
380).
19. If you enabled the Air Suspension Service Mode, switch the mode off
prior to driving.
20. Remove the wheel blocks.
Stowing the jack 1.
To store the folded wrench on the jack,
engage the bracket of the jack base
and the lug wrench pin, swing the
wrench upwards, adjust jack height
until the wrench hook engages the hole
on jack. Tighten the hex nut clockwise
by hand until secure.
2. Place the jack in the spare tire compartment, install the wing nut and
tighten clockwise by hand until secure. Stowing the flat tire
You cannot store the full-sized road wheel
in the temporary spare tire well.
1. Find the flat tire retainer strap tucked
inside the jack channel. Lower the
carpeted load floor.
2. Stow the flat tire in the cargo area on the load floor with the wheel facing up.
Secure the flat tire with the retainer
strap by following the next steps. 3. Locate the rear left side and right side
cargo tie-down rings. Push the loop end
of the retainer strap through one cargo
tie-down ring. Thread the non-loop end
through the loop.
4. Weave the retainer strap through the wheel openings. 379
Explorer (CTW), enUSA, Edition date: 202007, Second-Printing Wheels and Tires12
3
4
5E306781 E176165 E142906 E294325
Page 488 of 577
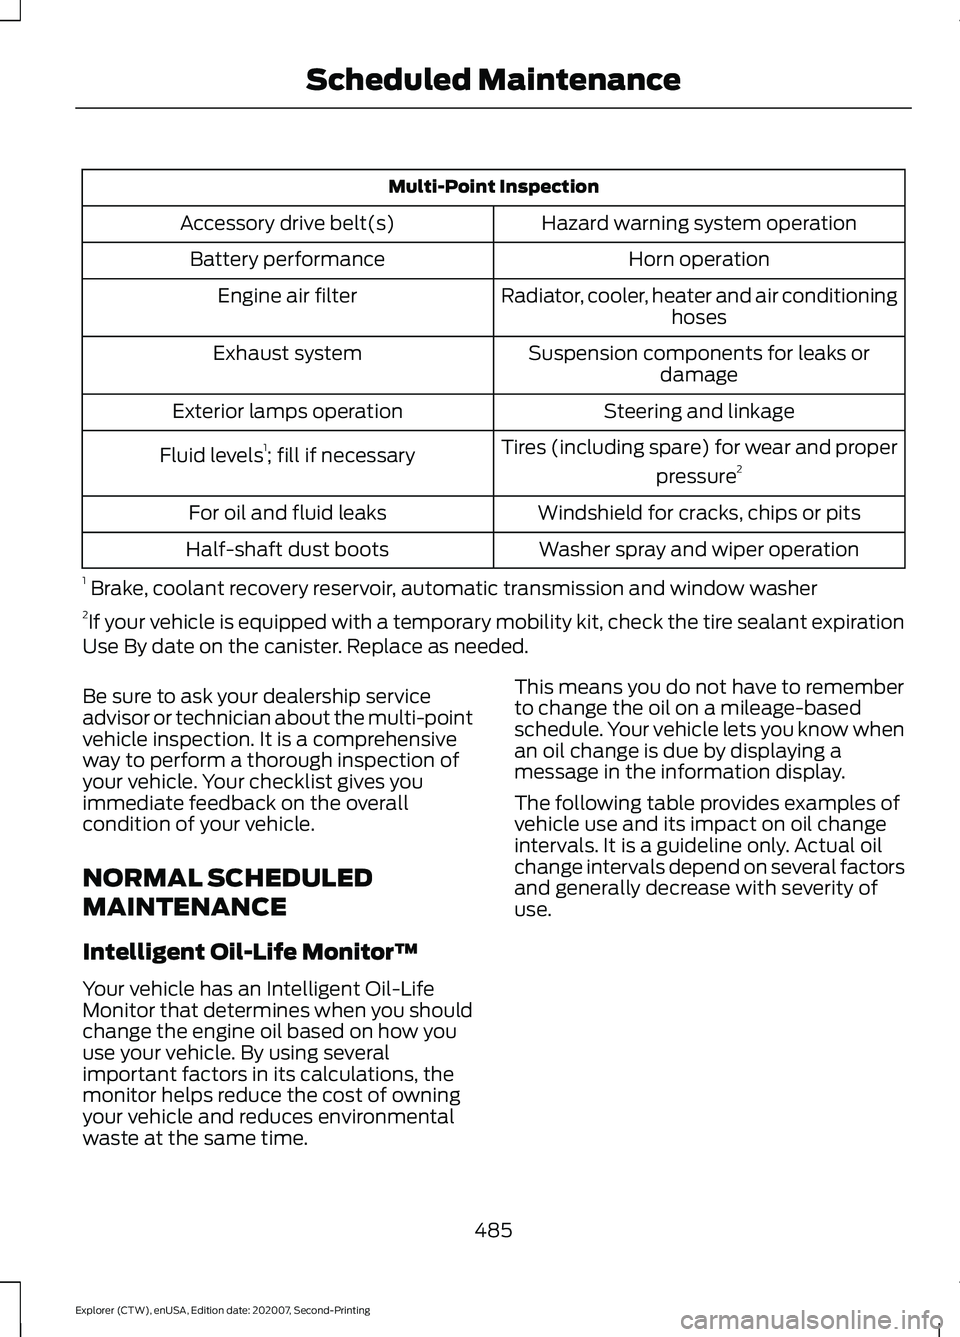
Multi-Point Inspection
Hazard warning system operation
Accessory drive belt(s)
Horn operation
Battery performance
Radiator, cooler, heater and air conditioninghoses
Engine air filter
Suspension components for leaks ordamage
Exhaust system
Steering and linkage
Exterior lamps operation
Tires (including spare) for wear and properpressure2
Fluid levels 1
; fill if necessary
Windshield for cracks, chips or pits
For oil and fluid leaks
Washer spray and wiper operation
Half-shaft dust boots
1 Brake, coolant recovery reservoir, automatic transmission and window washer
2 If your vehicle is equipped with a temporary mobility kit, check the tire sealant expiration
Use By date on the canister. Replace as needed.
Be sure to ask your dealership service
advisor or technician about the multi-point
vehicle inspection. It is a comprehensive
way to perform a thorough inspection of
your vehicle. Your checklist gives you
immediate feedback on the overall
condition of your vehicle.
NORMAL SCHEDULED
MAINTENANCE
Intelligent Oil-Life Monitor™
Your vehicle has an Intelligent Oil-Life
Monitor that determines when you should
change the engine oil based on how you
use your vehicle. By using several
important factors in its calculations, the
monitor helps reduce the cost of owning
your vehicle and reduces environmental
waste at the same time. This means you do not have to remember
to change the oil on a mileage-based
schedule. Your vehicle lets you know when
an oil change is due by displaying a
message in the information display.
The following table provides examples of
vehicle use and its impact on oil change
intervals. It is a guideline only. Actual oil
change intervals depend on several factors
and generally decrease with severity of
use.
485
Explorer (CTW), enUSA, Edition date: 202007, Second-Printing Scheduled Maintenance
Page 490 of 577
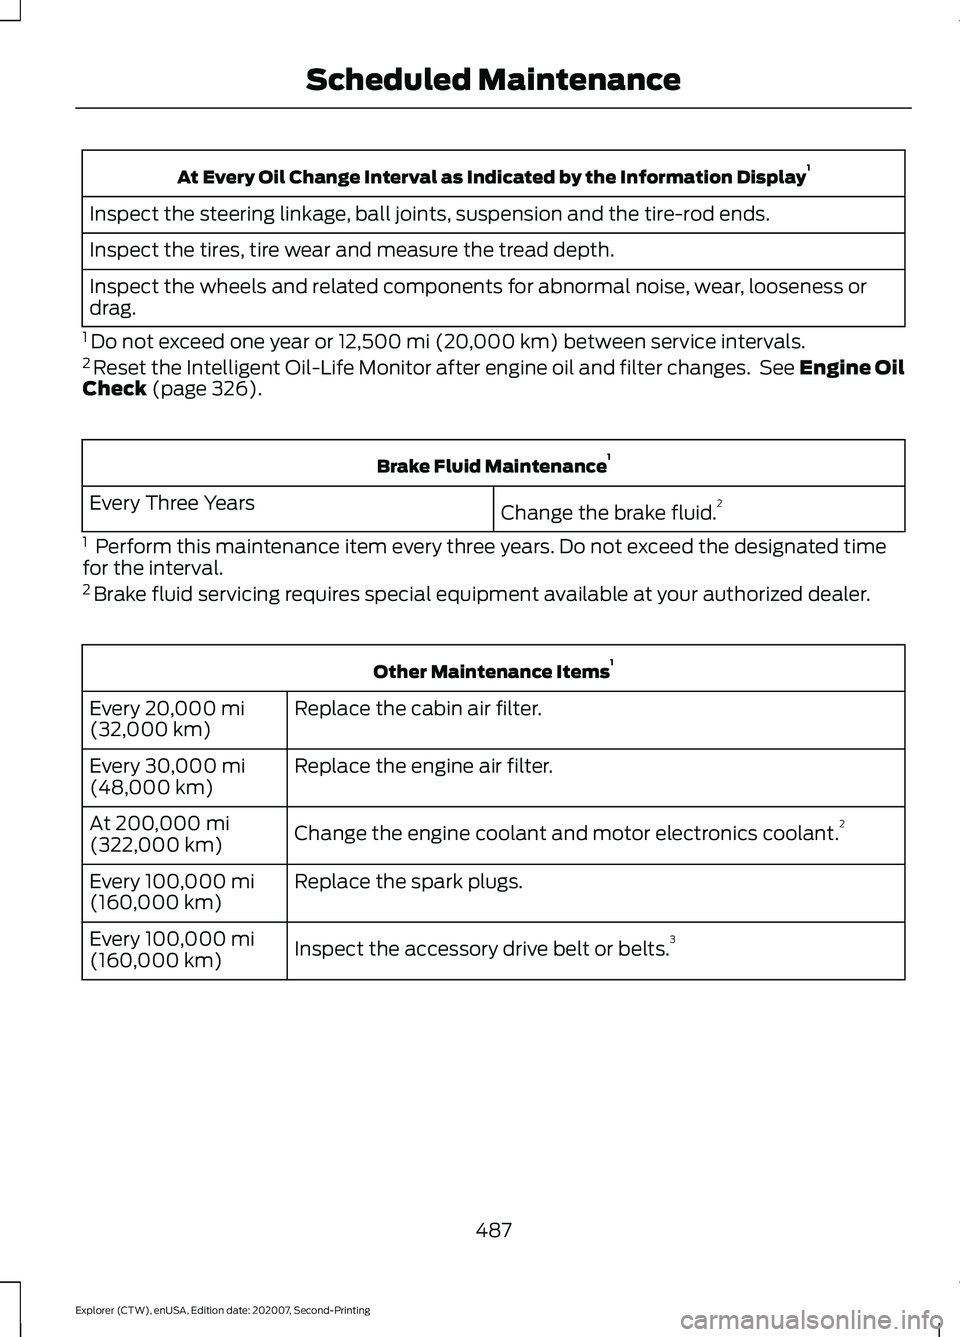
At Every Oil Change Interval as Indicated by the Information Display
1
Inspect the steering linkage, ball joints, suspension and the tire-rod ends.
Inspect the tires, tire wear and measure the tread depth.
Inspect the wheels and related components for abnormal noise, wear, looseness or
drag.
1 Do not exceed one year or 12,500 mi (20,000 km) between service intervals.
2 Reset the Intelligent Oil-Life Monitor after engine oil and filter changes. See Engine Oil
Check
(page 326). Brake Fluid Maintenance
1
Change the brake fluid. 2
Every Three Years
1 Perform this maintenance item every three years. Do not exceed the designated time
for the interval.
2 Brake fluid servicing requires special equipment available at your authorized dealer. Other Maintenance Items
1
Replace the cabin air filter.
Every
20,000 mi
(32,000 km)
Replace the engine air filter.
Every
30,000 mi
(48,000 km)
Change the engine coolant and motor electronics coolant. 2
At
200,000 mi
(322,000 km)
Replace the spark plugs.
Every
100,000 mi
(160,000 km)
Inspect the accessory drive belt or belts. 3
Every
100,000 mi
(160,000 km)
487
Explorer (CTW), enUSA, Edition date: 202007, Second-Printing Scheduled Maintenance