brakes FORD EXPLORER 2021 Owners Manual
[x] Cancel search | Manufacturer: FORD, Model Year: 2021, Model line: EXPLORER, Model: FORD EXPLORER 2021Pages: 577, PDF Size: 9.79 MB
Page 7 of 577
Starting a Gasoline Engine
.......................173
Starting a Hybrid Electric Vehicle System ........................................................................\
.
176
Engine Block Heater ...................................
178
Unique Driving Characteristics
Auto-Start-Stop ..........................................
180
Hybrid Vehicle Operation .........................
182
Hybrid Vehicle Frequently Asked Questions ...................................................
184
Fuel and Refueling
Safety Precautions .....................................
185
Fuel Quality - E85 .......................................
185
Fuel Quality - Gasoline ..............................
187
Fuel Filler Funnel Location .......................
187
Running Out of Fuel ....................................
187
Refueling - Excluding: Hybrid Electric Vehicle (HEV) ...........................................
189
Refueling - Hybrid Electric Vehicle (HEV) ........................................................................\
.
192
Fuel Consumption ......................................
194
Engine Emission Control
Emission Law ................................................
196
Catalytic Converter .....................................
197
High Voltage Battery
General Information - Hybrid Electric Vehicle (HEV) ..........................................
200
Transmission
Automatic Transmission ..........................
201
Four-Wheel Drive
Principle of Operation ...............................
207
Using Four-Wheel Drive ...........................
207
Rear Axle
Limited Slip Differential ............................
213Brakes
General Information
...................................
214
Hints on Driving With Anti-Lock Brakes ........................................................................\
.
215
Electric Parking Brake ................................
215
Hill Start Assist ..............................................
217
Auto Hold ........................................................
218
Reverse Braking Assist
What Is Reverse Braking Assist .............
220
Reverse Braking Assist Precautions .....
220
Switching Reverse Braking Assist On and Off ..................................................................
221
Overriding Reverse Braking Assist .........
221
Reverse Braking Assist Indicators ..........
221
Reverse Braking Assist – Troubleshooting ......................................
222
Traction Control
Principle of Operation ...............................
224
Using Traction Control ..............................
224
Stability Control
Principle of Operation ...............................
225
Using Stability Control ..............................
226
Hill Descent Control
What Is Hill Descent Control ..................
228
Switching Hill Descent Control On and Off ................................................................
228
Setting the Hill Descent Speed .............
228
Hill Descent Control Indicator ................
229
Parking Aids
Principle of Operation ...............................
230
Rear Parking Aid ..........................................
230
Front Parking Aid .........................................
232
Side Sensing System .................................
234
Active Park Assist .......................................
235
Rear View Camera ......................................
238
4
Explorer (CTW), enUSA, Edition date: 202007, Second-Printing Table of Contents
Page 18 of 577
WARNING: Do not connect
wireless plug-in devices to the data link
connector. Unauthorized third parties
could gain access to vehicle data and
impair the performance of safety related
systems. Only allow repair facilities that
follow our service and repair instructions
to connect their equipment to the data
link connector.
We respect your privacy and are
committed to protecting it. The
information contained in this manual was
correct at the time of publication, but as
technology rapidly changes, we
recommend that you visit the local Ford
website for the latest information.
Your vehicle has electronic control units
that have data recording functionality and
the ability to permanently or temporarily
store data. This data could include
information on the condition and status of
your vehicle, vehicle maintenance
requirements, events and malfunctions.
The types of data that can be recorded are
described in this section. Some of the data
recorded is stored in event logs or error
logs.
Note: Error logs are reset following a service
or repair.
Note: We may provide information in
response to requests from law enforcement,
other government authorities and third
parties acting with lawful authority or
through a legal process. Such information
could be used by them in legal proceedings.
Data recorded includes, for example:
• Operating states of system
components, for example fuel level,
tire pressure and battery charge level.
• Vehicle and component status, for
example wheel speed, deceleration,
lateral acceleration and seatbelt
status. •
Events or errors in essential systems,
for example headlamps and brakes.
• System responses to driving situations,
for example airbag deployment and
stability control.
• Environmental conditions, for example
temperature.
Some of this data, when used in
combination with other information, for
example an accident report, damage to a
vehicle or eyewitness statements, could
be associated with a specific person.
Services That We Provide
If you use our services, we collect and use
data, for example account information,
vehicle location and driving characteristics,
that could identify you. We transmit this
data through a dedicated, protected
connection. We only collect and use data
to enable your use of our services to which
you have subscribed, with your consent or
where permitted by law. For additional
information, see the terms and conditions
of the services to which you have
subscribed.
For additional information about our
privacy policy, refer to the local Ford
website.
Services That Third Parties
Provide
We recommend that you review the terms
and conditions and data privacy
information for any services equipped with
your vehicle or to which you subscribe. We
take no responsibility for services that third
parties provide.
15
Explorer (CTW), enUSA, Edition date: 202007, Second-Printing Data Privacy
Page 43 of 577
Pregnant women should always wear their
seatbelt. Position the lap belt portion of a
combination lap and shoulder belt low
across the hips below the belly and worn
as tight as comfort allows. Position the
shoulder belt to cross the middle of the
shoulder and the center of the chest.
Seatbelt Locking Modes
WARNING: If your vehicle is
involved in a crash, have the seatbelts
and associated components inspected
as soon as possible. Failure to follow this
instruction could result in personal injury
or death.
All safety restraints in the vehicle are
combination lap and shoulder belts. The
driver seatbelt has the first type of locking
mode, and the front outboard passenger
and rear seat seatbelts have both types of
locking modes described as follows:
Vehicle Sensitive Mode
This is the normal retractor mode, which
allows free shoulder belt length
adjustment to your movements and
locking in response to vehicle movement.
For example, if the driver brakes suddenly
or turns a corner sharply, or the vehicle
receives an impact of about
5 mph
(8 km/h) or more, the combination
seatbelts lock to help reduce forward
movement of the driver and passengers.
In addition, the design of the retractor is to
lock if you pull the webbing out too quickly.
If the seatbelt retractor locks, slowly lower
the height adjuster to allow the seatbelt
to retract. If the retractor does not unlock,
pull the seatbelt out slowly then feed a small length of webbing back toward the
stowed position. For rear seatbelts, recline
the rear seat backrest or push the seat
backrest cushion away from the seatbelt.
Feed a small length of webbing back
toward the stowed position.
Automatic Locking Mode
In this mode, the shoulder belt
automatically pre-locks. The belt retracts
to remove any slack in the shoulder belt.
The automatic locking mode is not
available on the driver seatbelt.
When to Use the Automatic Locking
Mode
Use this mode any time you install a child
safety seat, except a booster, in passenger
front or rear seating positions. Properly
restrain children 12 years old and under in
a rear seating position whenever possible.
See
Child Safety (page 23).
How to Use the Automatic Locking
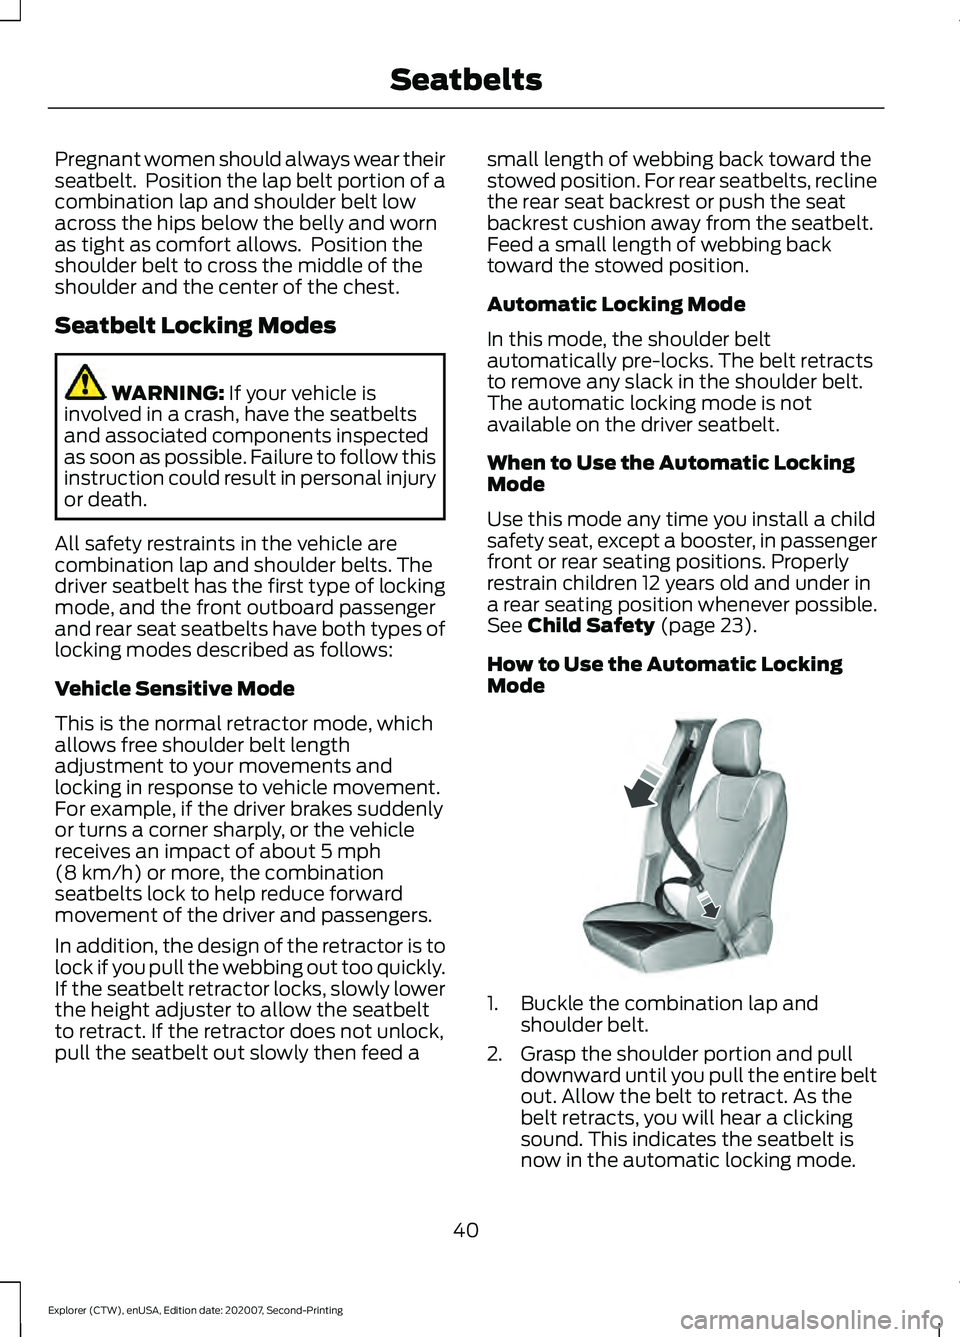
Mode 1. Buckle the combination lap and
shoulder belt.
2. Grasp the shoulder portion and pull downward until you pull the entire belt
out. Allow the belt to retract. As the
belt retracts, you will hear a clicking
sound. This indicates the seatbelt is
now in the automatic locking mode.
40
Explorer (CTW), enUSA, Edition date: 202007, Second-Printing SeatbeltsE142591
Page 127 of 577
Action
Message
The battery management system determines that the 12V batteryis at a low state of charge. Start the engine to charge the batteryor charge the battery using an aftermarket battery charger. This
message clears once you restart your vehicle and the battery state of charge has recovered.
Battery State of
Charge Low
The battery management system determines that the battery is ata low state of charge. Turn the ignition off as soon as possible toprotect the battery. This message will clear once the vehicle has
been started and the battery state of charge has recovered. Turning off unnecessary electrical loads will allow faster battery state-of- charge recovery.
Turn Power Off To
Save Battery
Displays when the battery management system detects an
extended low-voltage condition. Various vehicle features will be disabled to help preserve the battery. Turn off as many of the
electrical loads as soon as possible to improve system voltage. If
the system voltage has recovered, the disabled features will operate again as normal.
Low Battery
Features Tempor- arily Turned Off
Battery and Charging System (High Voltage) Action
Message
Displays when the stop safety hazard warning lamp is illuminated.This indicates an electrical component that requires service. This causes the vehicle to shut down or enter into limited operating mode.
Stop Safely Now
Blind Spot Information and Cross Traffic Alert System Action
Message
A system error has occurred. Have the system checked as soon as possible.
Blind Spot System
Fault
The system sensors are blocked. See Blind Spot Information
System (page 264).
Blind Spot Not
Available Sensor Blocked See Manual
The system detects a vehicle and automatically applied the brakes.
Cross Traffic Alert
Applying Brakes
124
Explorer (CTW), enUSA, Edition date: 202007, Second-Printing Information Displays
Page 135 of 577
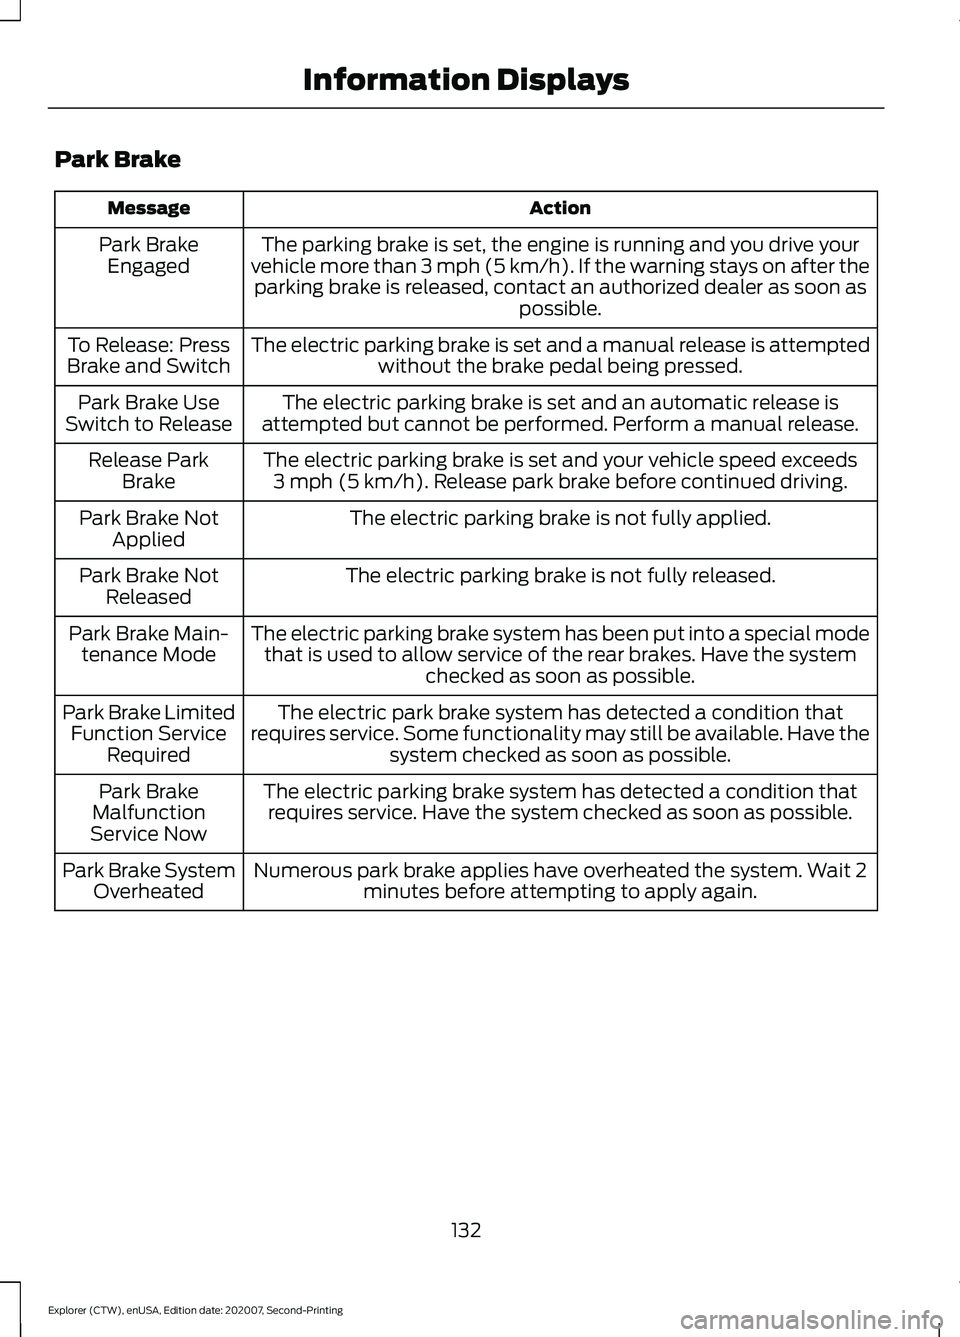
Park Brake
Action
Message
The parking brake is set, the engine is running and you drive your
vehicle more than 3 mph (5 km/h). If the warning stays on after the parking brake is released, contact an authorized dealer as soon as possible.
Park Brake
Engaged
The electric parking brake is set and a manual release is attemptedwithout the brake pedal being pressed.
To Release: Press
Brake and Switch
The electric parking brake is set and an automatic release is
attempted but cannot be performed. Perform a manual release.
Park Brake Use
Switch to Release
The electric parking brake is set and your vehicle speed exceeds3 mph (5 km/h). Release park brake before continued driving.
Release Park
Brake
The electric parking brake is not fully applied.
Park Brake Not
Applied
The electric parking brake is not fully released.
Park Brake Not
Released
The electric parking brake system has been put into a special modethat is used to allow service of the rear brakes. Have the system checked as soon as possible.
Park Brake Main-
tenance Mode
The electric park brake system has detected a condition that
requires service. Some functionality may still be available. Have the system checked as soon as possible.
Park Brake Limited
Function Service Required
The electric parking brake system has detected a condition thatrequires service. Have the system checked as soon as possible.
Park Brake
Malfunction
Service Now
Numerous park brake applies have overheated the system. Wait 2minutes before attempting to apply again.
Park Brake System
Overheated
132
Explorer (CTW), enUSA, Edition date: 202007, Second-Printing Information Displays
Page 178 of 577
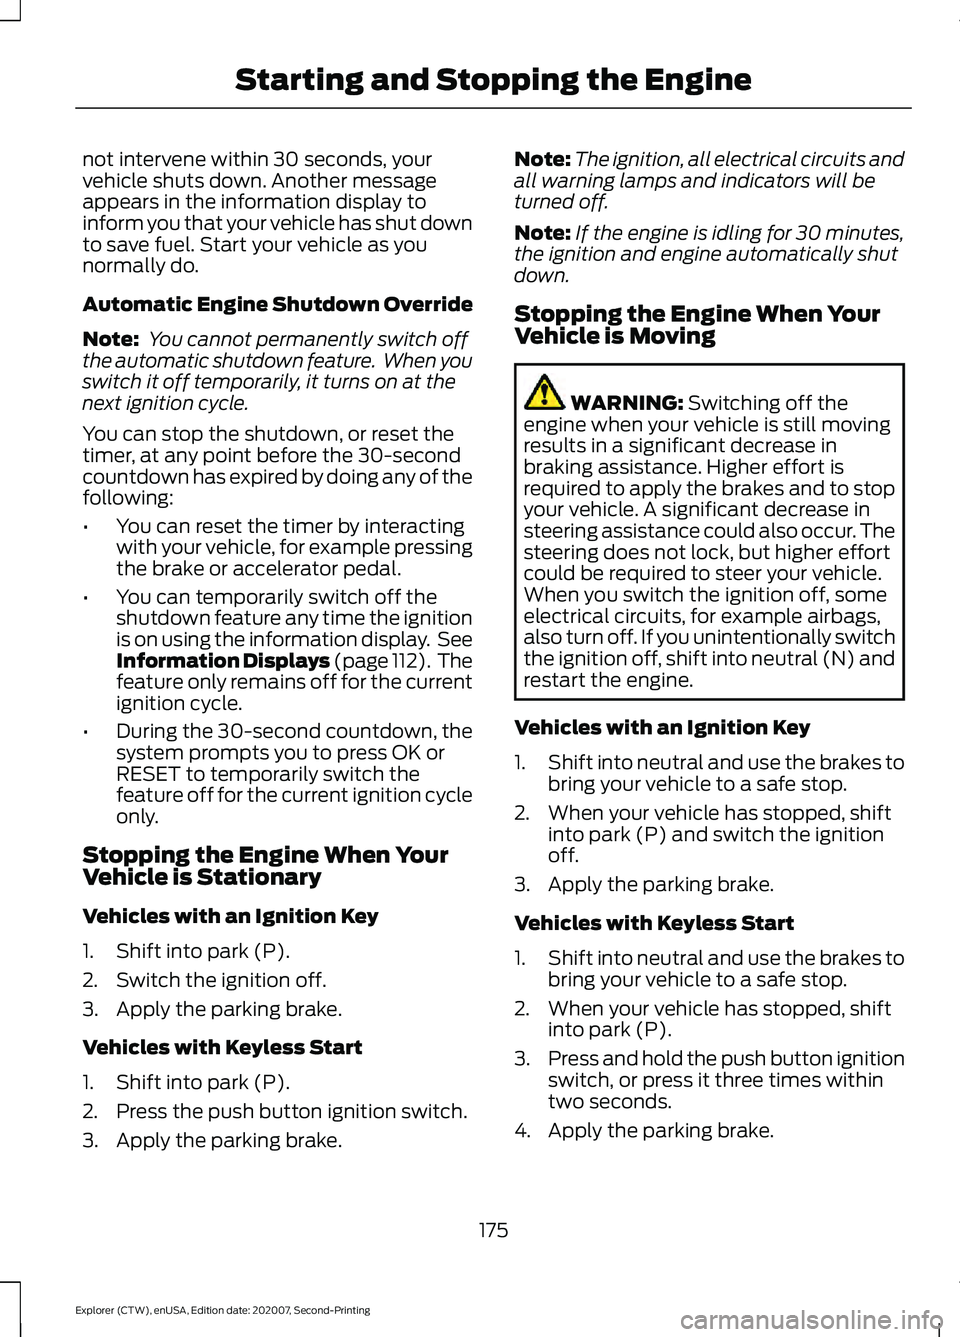
not intervene within 30 seconds, your
vehicle shuts down. Another message
appears in the information display to
inform you that your vehicle has shut down
to save fuel. Start your vehicle as you
normally do.
Automatic Engine Shutdown Override
Note:
You cannot permanently switch off
the automatic shutdown feature. When you
switch it off temporarily, it turns on at the
next ignition cycle.
You can stop the shutdown, or reset the
timer, at any point before the 30-second
countdown has expired by doing any of the
following:
• You can reset the timer by interacting
with your vehicle, for example pressing
the brake or accelerator pedal.
• You can temporarily switch off the
shutdown feature any time the ignition
is on using the information display. See
Information Displays (page 112). The
feature only remains off for the current
ignition cycle.
• During the 30-second countdown, the
system prompts you to press OK or
RESET to temporarily switch the
feature off for the current ignition cycle
only.
Stopping the Engine When Your
Vehicle is Stationary
Vehicles with an Ignition Key
1. Shift into park (P).
2. Switch the ignition off.
3. Apply the parking brake.
Vehicles with Keyless Start
1. Shift into park (P).
2. Press the push button ignition switch.
3. Apply the parking brake. Note:
The ignition, all electrical circuits and
all warning lamps and indicators will be
turned off.
Note: If the engine is idling for 30 minutes,
the ignition and engine automatically shut
down.
Stopping the Engine When Your
Vehicle is Moving WARNING: Switching off the
engine when your vehicle is still moving
results in a significant decrease in
braking assistance. Higher effort is
required to apply the brakes and to stop
your vehicle. A significant decrease in
steering assistance could also occur. The
steering does not lock, but higher effort
could be required to steer your vehicle.
When you switch the ignition off, some
electrical circuits, for example airbags,
also turn off. If you unintentionally switch
the ignition off, shift into neutral (N) and
restart the engine.
Vehicles with an Ignition Key
1. Shift into neutral and use the brakes to
bring your vehicle to a safe stop.
2. When your vehicle has stopped, shift into park (P) and switch the ignition
off.
3. Apply the parking brake.
Vehicles with Keyless Start
1. Shift into neutral and use the brakes to
bring your vehicle to a safe stop.
2. When your vehicle has stopped, shift into park (P).
3. Press and hold the push button ignition
switch, or press it three times within
two seconds.
4. Apply the parking brake.
175
Explorer (CTW), enUSA, Edition date: 202007, Second-Printing Starting and Stopping the Engine
Page 180 of 577
Within 20 seconds of switching your
vehicle off, press the brake pedal and press
the push button ignition switch. After 20
seconds, you can no longer start your
vehicle if it does not detect a valid passive
key.
Once your vehicle starts, it remains running
until you press the push button ignition
switch, even if your vehicle does not detect
a valid passive key. You cannot start your
vehicle if the system does not detect a
valid passive key within 20 seconds.
Automatic Engine Shutdown
For vehicles with a keyless ignition, this
feature shuts down the engine if it has
been idling for an extended period. The
ignition also turns off in order to save
battery power. Before your vehicle shuts
down, a message appears in the
information display showing a timer
counting down from 30 seconds. If you do
not intervene within 30 seconds, your
vehicle shuts down. Another message
appears in the information display to
inform you that your vehicle has shut down
to save fuel. Start your vehicle as you
normally do.
Note:
Automatic Engine Shutdown may be
more frequent for hybrid vehicles.
Automatic Engine Shutdown Override
Note: You cannot permanently switch off
the automatic shutdown feature. When you
switch it off temporarily, it turns on at the
next ignition cycle. You can stop the shutdown, or reset the
timer, at any point before the 30-second
countdown expires by doing any of the
following:
•
You can reset the timer by interacting
with your vehicle, for example pressing
the brake or accelerator pedal.
• You can temporarily switch off the
shutdown feature any time the ignition
is on using the information display. See
Information Displays (page 112). The
feature only remains off for the current
ignition cycle.
• During the 30-second countdown, the
system prompts you to press OK or
RESET to temporarily switch the
feature off for the current ignition cycle
only.
Switching Off Your Vehicle When
It Is Stationary
1. Put the transmission in park (P).
2. Press the push button ignition switch once.
3. Apply the parking brake.
Note: This switches off the ignition, warning
lamps and indicators.
Switching Off Your Vehicle When
It Is Moving WARNING: Switching off the
engine when your vehicle is still moving
results in a significant decrease in
braking assistance. Higher effort is
required to apply the brakes and to stop
your vehicle. A significant decrease in
steering assistance could also occur. The
steering does not lock, but higher effort
177
Explorer (CTW), enUSA, Edition date: 202007, Second-Printing Starting and Stopping the Engine
Page 181 of 577
could be required to steer your vehicle.
When you switch the ignition off, some
electrical circuits, for example airbags,
also turn off. If you unintentionally switch
the ignition off, shift into neutral (N) and
restart the engine.
1. Put the transmission into neutral (N) and use the brakes to bring your vehicle
to a safe stop.
2. When your vehicle has stopped, put the transmission in park (P).
3. Press and hold the push button ignition
switch for one second, or press it three
times within two seconds.
4. Apply the parking brake.
Guarding Against Exhaust Fumes WARNING: Exhaust leaks may
result in entry of harmful and potentially
lethal fumes into the passenger
compartment. If you smell exhaust
fumes inside your vehicle, have your
vehicle inspected immediately. Do not
drive if you smell exhaust fumes.
Important Ventilating Information
If you stop your vehicle and then leave the
engine idling for long periods of time, we
recommend that you do one of the
following:
• Open the windows at least 1 in (3 cm).
• Set your climate control to outside air. ENGINE BLOCK HEATER
(IF
EQUIPPED) WARNING:
Failure to follow engine
block heater instructions could result in
property damage or serious personal
injury. WARNING: Do not use your heater
with ungrounded electrical systems or
two-pronged adapters. There is a risk of
electrical shock. WARNING:
Do not fully close the
hood, or allow it to drop under its own
weight when using the engine block
heater. This could damage the power
cable and may cause an electrical short
resulting in fire, injury and property
damage.
Note: The heater is most effective when
outdoor temperatures are below
0°F
(-18°C).
The heater acts as a starting aid by
warming the engine coolant. This allows
the climate control system to respond
quickly. The equipment includes a heater
element, installed in the engine block and
a wire harness. You can connect the
system to a grounded 120-volt AC
electrical source.
We recommend that you do the following
for a safe and correct operation:
• Use a 16-gauge outdoor extension cord
that is product certified by
Underwriter ’s Laboratory (UL) or
Canadian Standards Association
(CSA). This extension cord must be
suitable for use outdoors, in cold
178
Explorer (CTW), enUSA, Edition date: 202007, Second-Printing Starting and Stopping the Engine
Page 206 of 577
Note:
This feature may not work properly
if the door ajar switch is malfunctioning. If
your door ajar indicator does not illuminate
when you open the driver door, or the
indicator illuminates with the driver door
closed, or Transmission not in Park cluster
message still displays when the shifter has
already selected reverse (R), neutral (N), or
drive (D) and driver door remains closed,
see your authorized dealer.
Stay in Neutral Mode
Note: Stay in neutral mode is a temporary
vehicle state that works with the engine
being in the running or OFF state. Once in
this mode, sufficient battery voltage must
be maintained or your vehicle returns to park
if the feature is left active for extended time
when engine is OFF.
Failure to follow this instruction could
result in vehicle damage not covered by
the vehicle Warranty.
Note: When entering an automatic car
wash, always enter the Stay in Neutral
Mode. Stay in Neutral Mode must be
enabled, if you are exiting the vehicle before
the car wash.
Extended usage of Stay in Neutral mode
may result in a battery voltage reduction
to level where the vehicle may no longer
start.
Do not tow your vehicle in this mode.
With the transmission selector in Stay in
Neutral Mode, you can start your vehicle
and it is free to roll.
To enter Stay in Neutral mode, do the
following:
1. Bring your vehicle to a complete stop.
2. Shift into neutral (N).
3. Press the manual (M) or low (L) button
within five seconds after shifting to
neutral (N). Note:
Stay in Neutral Mode confirmation
message appears in the information display
when your vehicle has entered Stay in
Neutral mode and the neutral (N) button
on the transmission selector slowly blinks.
To exit Stay in Neutral mode, press the
brake pedal and shift to park (P) or start
the engine and apply brakes to shift to
another driving range, for example drive
(D) or reverse (R).
Tow Mode (If Equipped) To activate tow mode, use the
drive mode switch on the center
console.
See Selecting a Drive
Mode (page 278).
The indicator light illuminates and a
message displays in the instrument cluster
when the system becomes active. Select
a different mode to turn the system off.
The Tow Mode Feature:
• Moves upshifts to higher engine speeds
to reduce the frequency of
transmission shifting.
• Provides engine braking in all forward
gears, which slows your vehicle and
assist you in controlling your vehicle
when descending a grade.
• Depending on driving conditions and
load conditions, it may downshift the
transmission, slow your vehicle and
control your vehicle speed when
descending a hill, without pressing the
accelerator pedal. The amount of
downshift braking provided varies
based upon the amount you press the
brake pedal.
The tow mode feature improves
transmission operation when towing a
trailer or a heavy load. All transmission
gear ranges are available when using tow
mode.
203
Explorer (CTW), enUSA, Edition date: 202007, Second-Printing TransmissionE161509
Page 208 of 577
WARNING: If the parking brake is
fully released, but the brake warning
lamp remains illuminated, the brakes
may not be working properly. Have your
vehicle checked as soon as possible. WARNING:
Do not drive your
vehicle until you verify that the
stoplamps are working.
Use the manual park release to move your
transmission from the park (P) position in
the event of an electrical malfunction or
emergency.
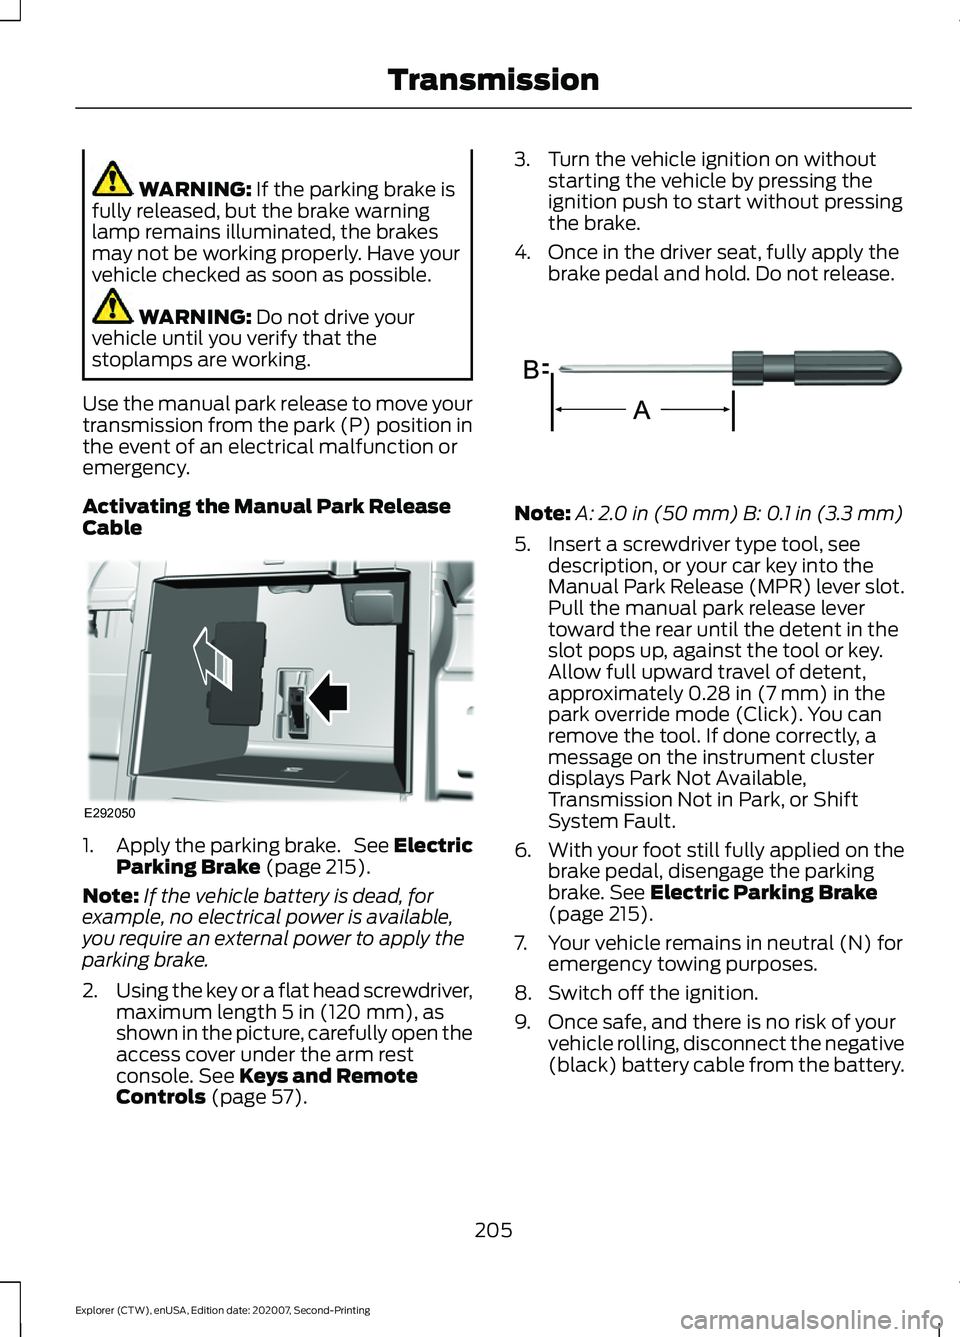
Activating the Manual Park Release
Cable 1.
Apply the parking brake. See Electric
Parking Brake
(page 215).
Note: If the vehicle battery is dead, for
example, no electrical power is available,
you require an external power to apply the
parking brake.
2. Using the key or a flat head screwdriver,
maximum length
5 in (120 mm), as
shown in the picture, carefully open the
access cover under the arm rest
console.
See Keys and Remote
Controls (page 57). 3. Turn the vehicle ignition on without
starting the vehicle by pressing the
ignition push to start without pressing
the brake.
4. Once in the driver seat, fully apply the brake pedal and hold. Do not release. Note:
A:
2.0 in (50 mm) B: 0.1 in (3.3 mm)
5. Insert a screwdriver type tool, see description, or your car key into the
Manual Park Release (MPR) lever slot.
Pull the manual park release lever
toward the rear until the detent in the
slot pops up, against the tool or key.
Allow full upward travel of detent,
approximately
0.28 in (7 mm) in the
park override mode (Click). You can
remove the tool. If done correctly, a
message on the instrument cluster
displays Park Not Available,
Transmission Not in Park, or Shift
System Fault.
6. With your foot still fully applied on the
brake pedal, disengage the parking
brake.
See Electric Parking Brake
(page 215).
7. Your vehicle remains in neutral (N) for emergency towing purposes.
8. Switch off the ignition.
9. Once safe, and there is no risk of your vehicle rolling, disconnect the negative
(black) battery cable from the battery.
205
Explorer (CTW), enUSA, Edition date: 202007, Second-Printing TransmissionE292050 E317360