automatic transmission FORD EXPLORER SPORT 2001 1.G User Guide
[x] Cancel search | Manufacturer: FORD, Model Year: 2001, Model line: EXPLORER SPORT, Model: FORD EXPLORER SPORT 2001 1.GPages: 256, PDF Size: 2.12 MB
Page 148 of 256

Driving while you tow
When towing a trailer:
²Ensure that you turn off your speed control. The speed control may
shut off automatically when you are towing on long, steep grades.
²Consult your local motor vehicle speed regulations for towing a trailer.
²Use a lower gear when towing up or down steep hills. This will
eliminate excessive downshifting and upshifting for optimum fuel
economy and transmission cooling.
²Anticipate stops and brake gradually.
Exceeding the GCWR rating may cause internal transmission
damage and void your warranty coverage.
Servicing after towing
If you tow a trailer for long distances, your vehicle will require more
frequent service intervals. Refer to your scheduled maintenance guide for
more information.
Trailer towing tips
²Practice turning, stopping and backing up before starting on a trip to
get the feel of the vehicle trailer combination. When turning, make
wider turns so the trailer wheels will clear curbs and other obstacles.
²Allow more distance for stopping with a trailer attached.
²The trailer tongue weight should be no more than 10±15% of the
loaded trailer weight.
²After you have traveled 80 km (50 miles), thoroughly check your
hitch, electrical connections and trailer wheel lug nuts.
²When stopped in traffic for long periods of time in hot weather, place
the gearshift in P (Park) (automatic transmissions) or N (Neutral)
(manual transmissions). This aids engine cooling and air conditioner
efficiency.
²Vehicles with trailers should not be parked on a grade. If you must
park on a grade, place wheel chocks under the trailer's wheels.
Launching or retrieving a boat
When backing down a ramp during boat launching or retrieval:
²do not allow the static water level to rise above the bottom edge of
the rear bumper and
Driving
148
Page 149 of 256

²do not allow waves to break higher than 15 cm (6 inches) above the
bottom edge of the rear bumper.
Exceeding these limits may allow water to enter critical vehicle
components, adversely affecting driveability, emissions, reliability and
causing internal transmission damage.
Replace the rear axle lubricant any time the axle has been submerged in
water. Rear axle lubricant quantities are not to be checked or changed
unless a leak is suspected or repair required.
Disconnect the wiring to the trailer before backing the trailer into the
water. Reconnect the wiring to the trailer after the trailer is removed
from the water.
Recreational towing
All Rear Wheel Drive (RWD) vehicles with automatic transmissions
This applies to all cars and 4x2 trucks/sport utilities with rear wheel
drive capability.
An example of recreational towing is towing your vehicle behind a
motorhome. The following recreational towing guidelines are designed to
ensure that your transmission is not damaged.
²Place the transmission in N (Neutral).
²Maximum speed is 56 km/h (35 mph).
²Maximum distance is 80 km (50 miles).
If a distance of 80 km (50 miles) or a speed of 56 km/h (35 mph)
must be exceeded, you must disconnect the driveshaft. Ford
recommends the driveshaft be removed/installed only by a
qualified technician. See your local dealer for driveshaft
removal/installation.
Improper removal/installation of the driveshaft can cause
transmission fluid loss, damage to the driveshaft and internal
transmission components.
In case of a roadside emergency with a disabled vehicle (without access
to wheel dollies, a car hauling trailer or a flatbed transport vehicle), your
vehicle can be flat towed (all wheels on the ground) under the following
conditions:
²Release the parking brake.
²Turn the ignition to the OFF position.
Driving
149
Page 150 of 256

²Place the transmission in N (Neutral).
²Do not exceed a distance of 80 km (50 miles).
²Do not exceed 56 km/h (35 mph) vehicle speed.
RWD vehicles with 4x4 electronic shift transfer case and automatic
transmission
Regarding recreational towing or having your vehicle towed, 4x4 vehicles
with electronic shift on the fly cannot be towed with any wheels on the
ground (with the exception of moving it as a disabled vehicle off the
road out of traffic).
Driving
150
Page 163 of 256
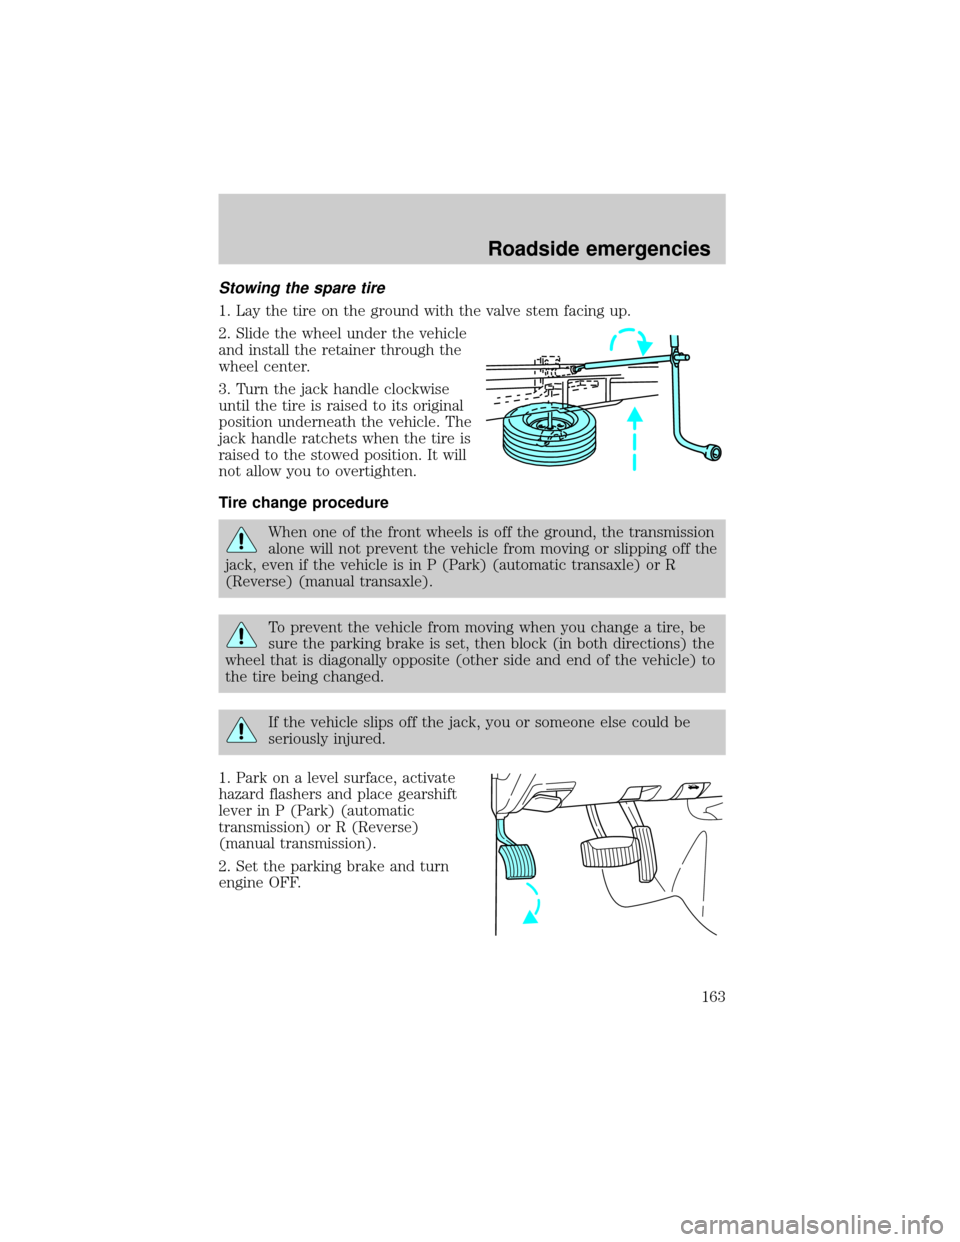
Stowing the spare tire
1. Lay the tire on the ground with the valve stem facing up.
2. Slide the wheel under the vehicle
and install the retainer through the
wheel center.
3. Turn the jack handle clockwise
until the tire is raised to its original
position underneath the vehicle. The
jack handle ratchets when the tire is
raised to the stowed position. It will
not allow you to overtighten.
Tire change procedure
When one of the front wheels is off the ground, the transmission
alone will not prevent the vehicle from moving or slipping off the
jack, even if the vehicle is in P (Park) (automatic transaxle) or R
(Reverse) (manual transaxle).
To prevent the vehicle from moving when you change a tire, be
sure the parking brake is set, then block (in both directions) the
wheel that is diagonally opposite (other side and end of the vehicle) to
the tire being changed.
If the vehicle slips off the jack, you or someone else could be
seriously injured.
1. Park on a level surface, activate
hazard flashers and place gearshift
lever in P (Park) (automatic
transmission) or R (Reverse)
(manual transmission).
2. Set the parking brake and turn
engine OFF.
Roadside emergencies
163
Page 167 of 256
Do not attempt to push-start your vehicle. Automatic
transmissions do not have push-start capability; also, the
catalytic conveter may become damaged.
Preparing your vehicle
When the battery is disconnected or a new battery is installed, the
transmission must relearn its adaptive strategy. As a result of this, the
transmission may shift firmly. This operation is considered normal and
will not affect function or durability of the transmission. Over time, the
adaptive learning process will fully update transmission operation to its
optimum shift feel.
1.Use only a 12±volt supply to start your vehicle.
2. Do not disconnect the battery of the disabled vehicle as this could
damage the vehicle's electrical system.
3. Park the booster vehicle close to the hood of the disabled vehicle
making sure the two vehiclesdo nottouch. Set the parking brake on
both vehicles and stay clear of the engine cooling fan and other moving
parts.
4. Check all battery terminals and remove any excessive corrosion before
you attach the battery cables. Ensure that vent caps are tight and level.
5. Turn the heater fan on in both vehicles to protect any electrical
surges. Turn all other accessories off.
Connecting the jumper cables
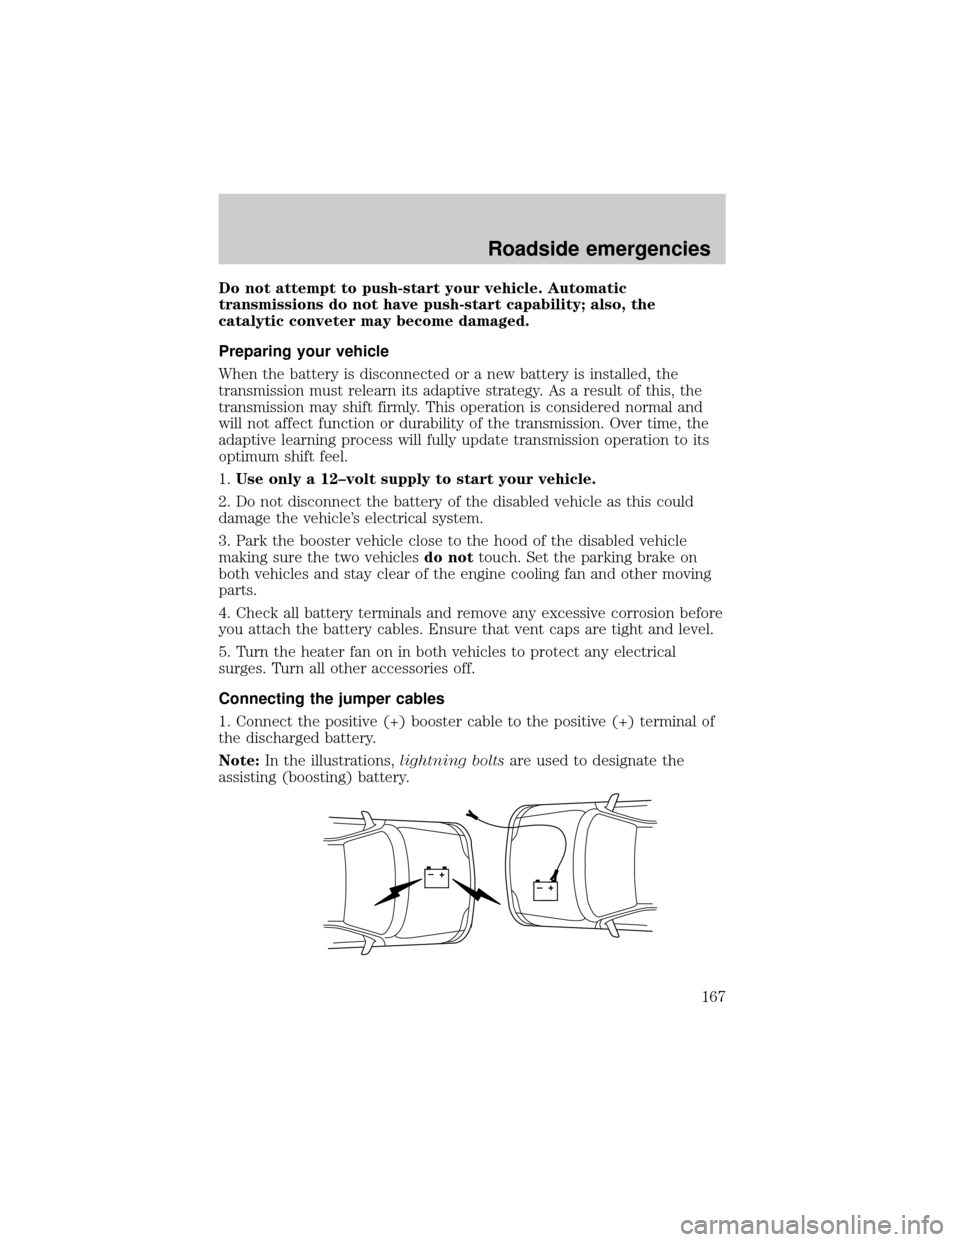
1. Connect the positive (+) booster cable to the positive (+) terminal of
the discharged battery.
Note:In the illustrations,lightning boltsare used to designate the
assisting (boosting) battery.
+–+–
Roadside emergencies
167
Page 176 of 256
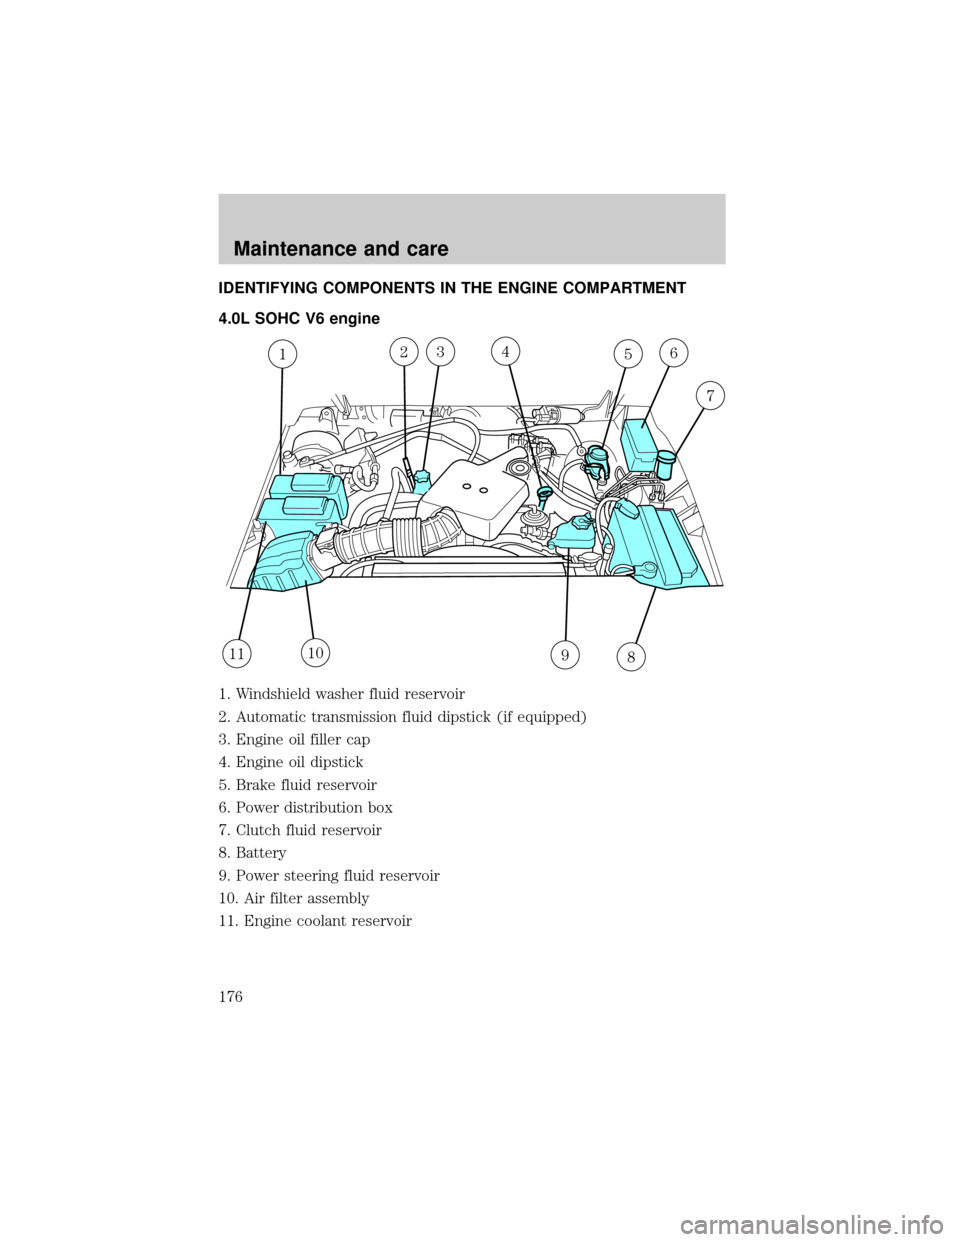
IDENTIFYING COMPONENTS IN THE ENGINE COMPARTMENT
4.0L SOHC V6 engine
1. Windshield washer fluid reservoir
2. Automatic transmission fluid dipstick (if equipped)
3. Engine oil filler cap
4. Engine oil dipstick
5. Brake fluid reservoir
6. Power distribution box
7. Clutch fluid reservoir
8. Battery
9. Power steering fluid reservoir
10. Air filter assembly
11. Engine coolant reservoir
12345
981110
6
7
Maintenance and care
176
Page 188 of 256
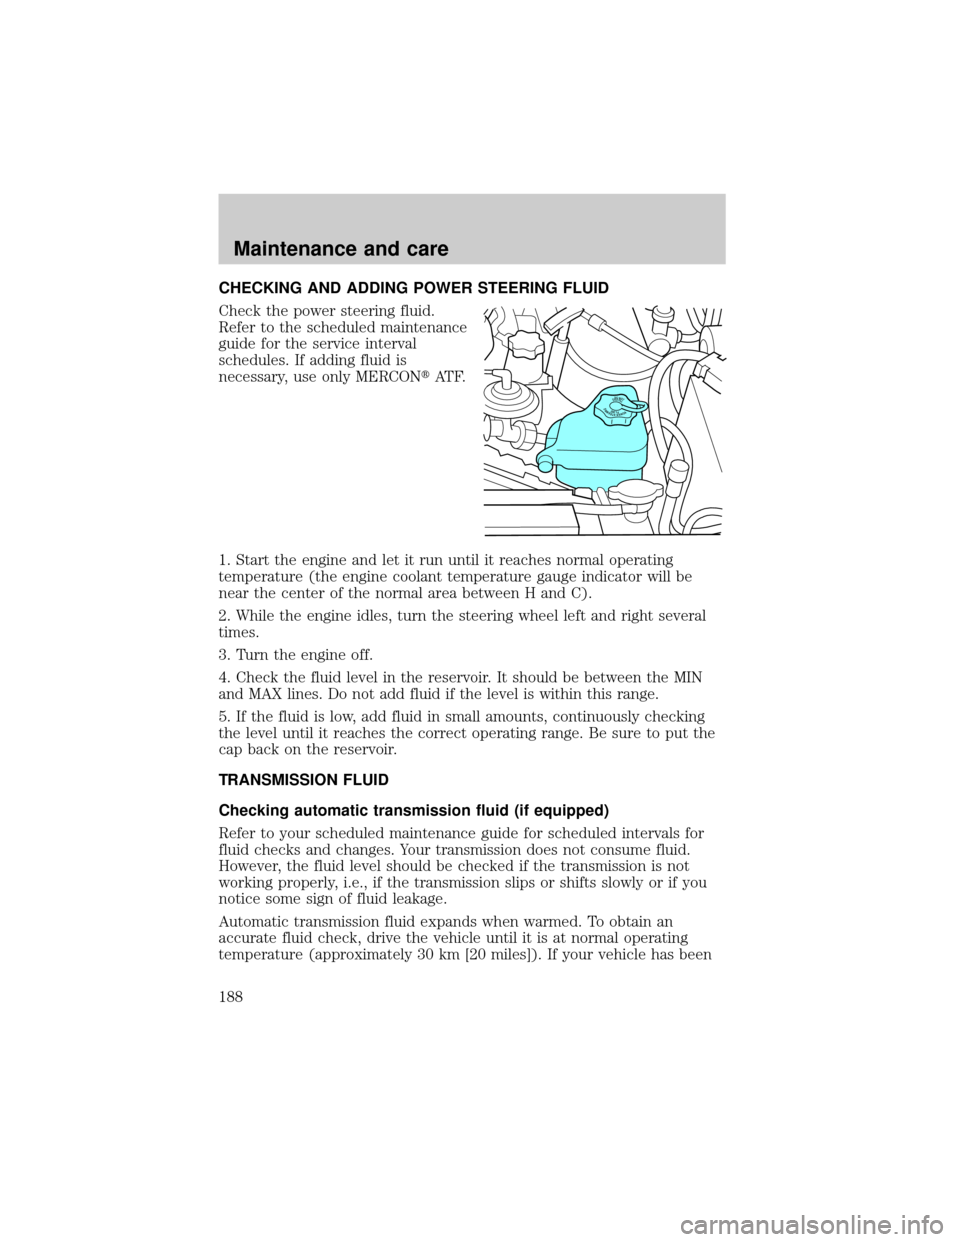
CHECKING AND ADDING POWER STEERING FLUID
Check the power steering fluid.
Refer to the scheduled maintenance
guide for the service interval
schedules. If adding fluid is
necessary, use only MERCONtAT F.
1. Start the engine and let it run until it reaches normal operating
temperature (the engine coolant temperature gauge indicator will be
near the center of the normal area between H and C).
2. While the engine idles, turn the steering wheel left and right several
times.
3. Turn the engine off.
4. Check the fluid level in the reservoir. It should be between the MIN
and MAX lines. Do not add fluid if the level is within this range.
5. If the fluid is low, add fluid in small amounts, continuously checking
the level until it reaches the correct operating range. Be sure to put the
cap back on the reservoir.
TRANSMISSION FLUID
Checking automatic transmission fluid (if equipped)
Refer to your scheduled maintenance guide for scheduled intervals for
fluid checks and changes. Your transmission does not consume fluid.
However, the fluid level should be checked if the transmission is not
working properly, i.e., if the transmission slips or shifts slowly or if you
notice some sign of fluid leakage.
Automatic transmission fluid expands when warmed. To obtain an
accurate fluid check, drive the vehicle until it is at normal operating
temperature (approximately 30 km [20 miles]). If your vehicle has been
DONOTOVERFILLPOWERSTEERINGFLUID
Maintenance and care
188
Page 190 of 256
![FORD EXPLORER SPORT 2001 1.G User Guide The transmission fluid should be in
this range if at ambient temperature
(10ÉC-35ÉC [50ÉF-95ÉF]).
High fluid level
Fluid levels above the safe range
may result in transmission failure.
An overfill FORD EXPLORER SPORT 2001 1.G User Guide The transmission fluid should be in
this range if at ambient temperature
(10ÉC-35ÉC [50ÉF-95ÉF]).
High fluid level
Fluid levels above the safe range
may result in transmission failure.
An overfill](/img/11/4989/w960_4989-189.png)
The transmission fluid should be in
this range if at ambient temperature
(10ÉC-35ÉC [50ÉF-95ÉF]).
High fluid level
Fluid levels above the safe range
may result in transmission failure.
An overfill condition of transmission
fluid may cause shift and/or
engagement concerns and/or
possible damage.
High fluid levels can be caused by an overheating condition.
Adjusting automatic transmission fluid levels
Before adding any fluid, make sure the correct type is used. The type of
fluid used is normally indicated on the dipstick and also in the
Lubricant specificationssection in theCapacities and specifications
chapter.
Use of a non-approved automatic transmission fluid may cause
internal transmission component damage.
If necessary, add fluid in 250 ml (1/2 pint) increments through the filler
tube until the level is correct.
If an overfill occurs, excess fluid
should be removed by a qualified
technician.
An overfill condition of
transmission fluid may cause
shift and/or engagement concerns and/or possible damage.
Maintenance and care
190
Page 224 of 256
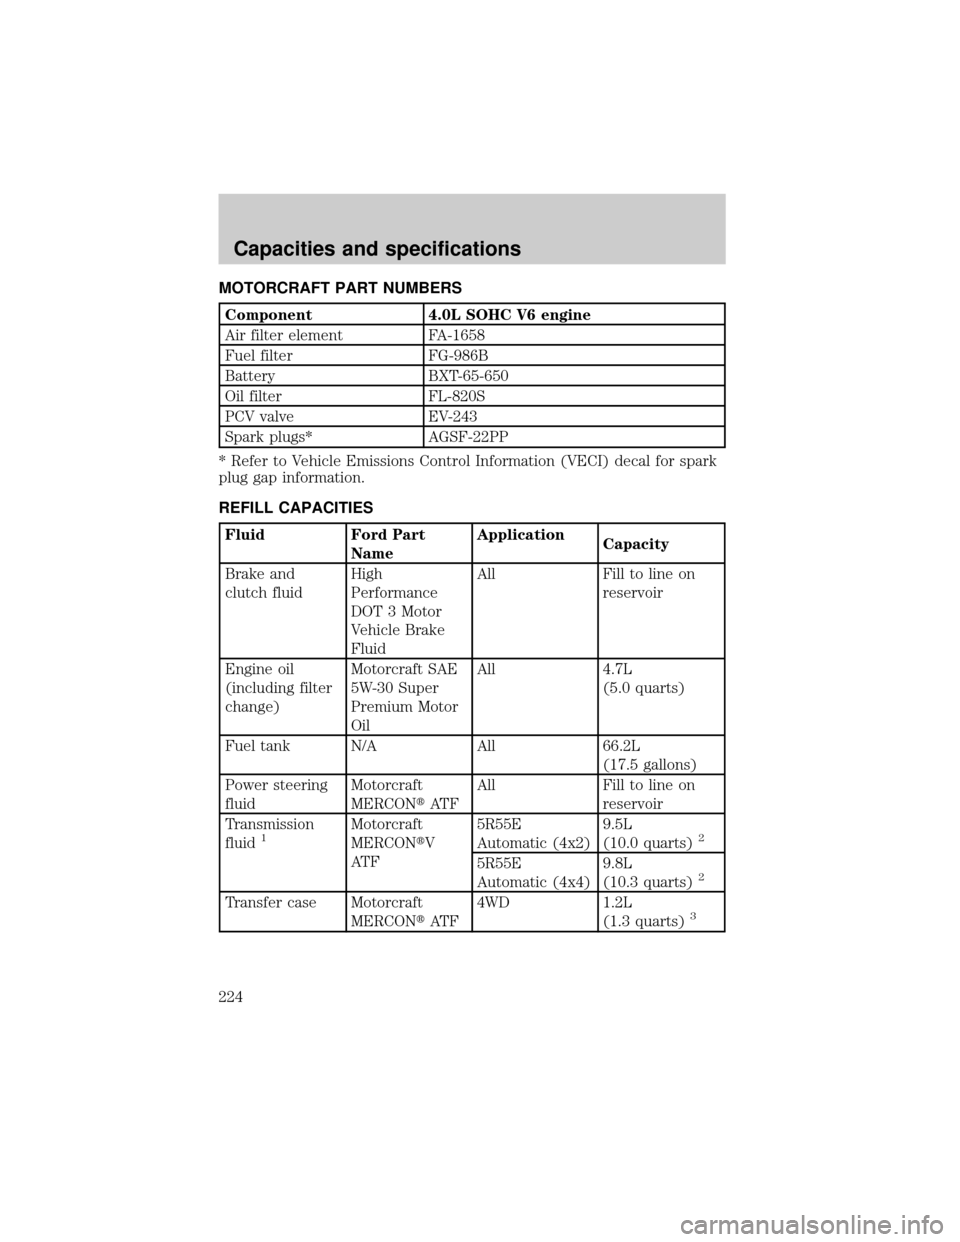
MOTORCRAFT PART NUMBERS
Component 4.0L SOHC V6 engine
Air filter element FA-1658
Fuel filter FG-986B
Battery BXT-65-650
Oil filter FL-820S
PCV valve EV-243
Spark plugs* AGSF-22PP
* Refer to Vehicle Emissions Control Information (VECI) decal for spark
plug gap information.
REFILL CAPACITIES
Fluid Ford Part
NameApplication
Capacity
Brake and
clutch fluidHigh
Performance
DOT 3 Motor
Vehicle Brake
FluidAll Fill to line on
reservoir
Engine oil
(including filter
change)Motorcraft SAE
5W-30 Super
Premium Motor
OilAll 4.7L
(5.0 quarts)
Fuel tank N/A All 66.2L
(17.5 gallons)
Power steering
fluidMotorcraft
MERCONtAT FAll Fill to line on
reservoir
Transmission
fluid
1Motorcraft
MERCONtV
AT F5R55E
Automatic (4x2)9.5L
(10.0 quarts)2
5R55E
Automatic (4x4)9.8L
(10.3 quarts)2
Transfer case Motorcraft
MERCONtAT F4WD 1.2L
(1.3 quarts)3
Capacities and specifications
224
Page 225 of 256
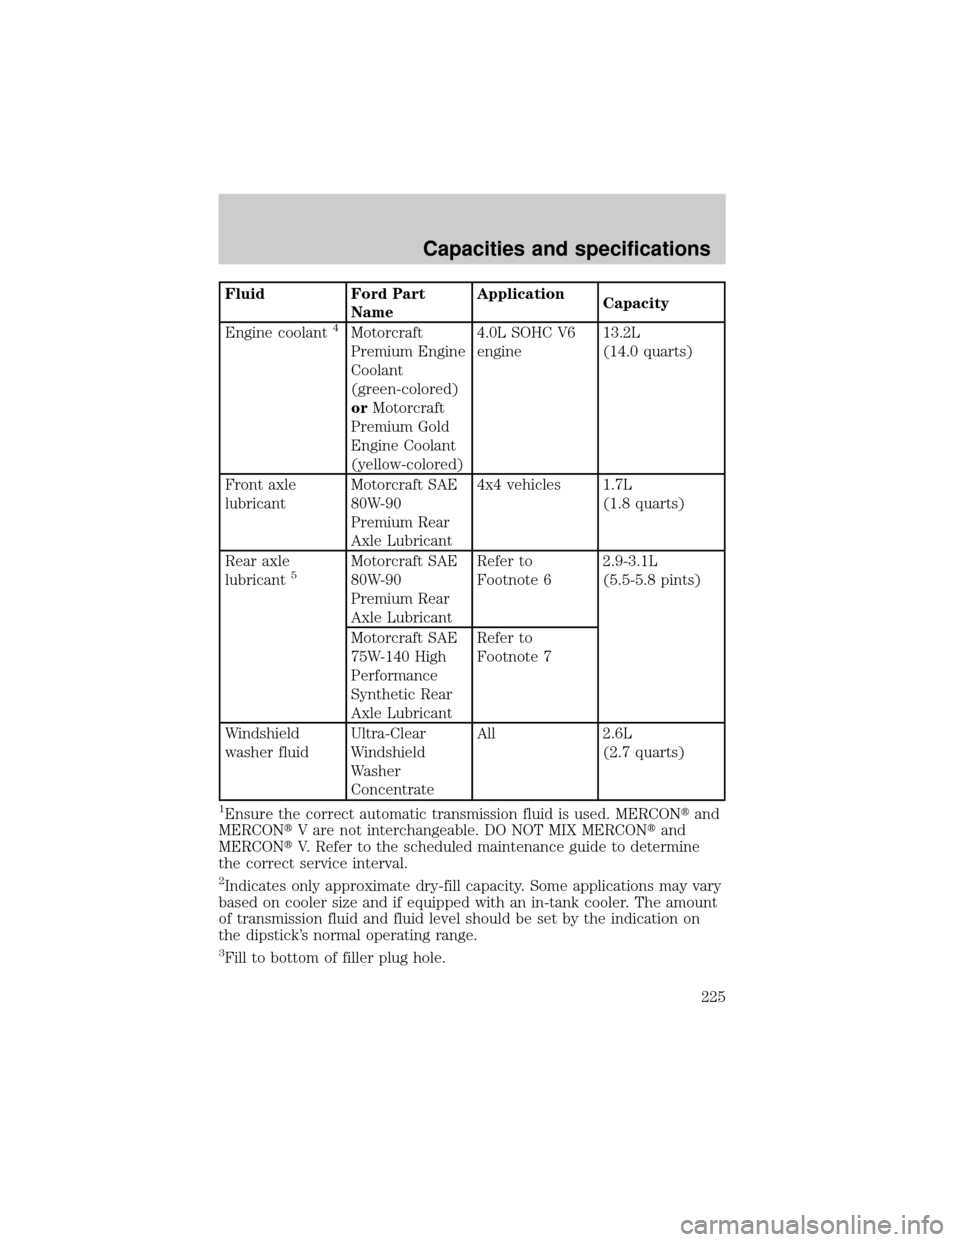
Fluid Ford Part
NameApplication
Capacity
Engine coolant
4Motorcraft
Premium Engine
Coolant
(green-colored)
orMotorcraft
Premium Gold
Engine Coolant
(yellow-colored)4.0L SOHC V6
engine13.2L
(14.0 quarts)
Front axle
lubricantMotorcraft SAE
80W-90
Premium Rear
Axle Lubricant4x4 vehicles 1.7L
(1.8 quarts)
Rear axle
lubricant
5Motorcraft SAE
80W-90
Premium Rear
Axle LubricantRefer to
Footnote 62.9-3.1L
(5.5-5.8 pints)
Motorcraft SAE
75W-140 High
Performance
Synthetic Rear
Axle LubricantRefer to
Footnote 7
Windshield
washer fluidUltra-Clear
Windshield
Washer
ConcentrateAll 2.6L
(2.7 quarts)
1Ensure the correct automatic transmission fluid is used. MERCONtand
MERCONtV are not interchangeable. DO NOT MIX MERCONtand
MERCONtV. Refer to the scheduled maintenance guide to determine
the correct service interval.
2Indicates only approximate dry-fill capacity. Some applications may vary
based on cooler size and if equipped with an in-tank cooler. The amount
of transmission fluid and fluid level should be set by the indication on
the dipstick's normal operating range.
3Fill to bottom of filler plug hole.
Capacities and specifications
225