manual transmission FORD EXPLORER SPORT 2001 1.G Owners Manual
[x] Cancel search | Manufacturer: FORD, Model Year: 2001, Model line: EXPLORER SPORT, Model: FORD EXPLORER SPORT 2001 1.GPages: 256, PDF Size: 2.12 MB
Page 101 of 256
One time disable
Any time the safety belt is buckled and then unbuckled during an ignition
ON cycle, Belt Minder will be disabled for that ignition cycle only.
Deactivating/activating the belt minder feature
Read steps1-9thoroughly before proceeding with the
deactivation/activation programming procedure.
The Belt Minder feature can be deactivated/activated by performing the
following procedure:
Before following the procedure, make sure that:
²The parking brake is set.
²The gearshift is in P (Park) (automatic transmission) or the neutral
position (manual transmission).
²The ignition switch is in the OFF position.
²All vehicle doors are closed.
²The driver's safety belt is unbuckled.
²The parklamps/headlamps are in OFF position (If vehicle is equipped
with Autolamps, this will not affect the procedure).
To reduce the risk of injury, do not deactivate/activate the Belt
Minder feature while driving the vehicle.
1. Turn the ignition switch to the RUN (or ON) position. (DO NOT
START THE ENGINE.)
2. Wait until the safety belt warning light turns off. (Approximately 1±2
minutes.)
²Steps 3±5 must be completed within 60 seconds or the procedure will
have to be repeated.
3. Buckle then unbuckle the safety belt three times, ending with the
safety belt unbuckled. This can be done before or during Belt Minder
warning activation.
4. Turn on the parklamps/headlamps, turn off the parklamps/headlamps.
5. Buckle then unbuckle the safety belt three times, ending with the
safety belt unbuckled.
²After step 5 the safety belt warning light will be turned on for three
seconds.
Seating and safety restraints
101
Page 127 of 256
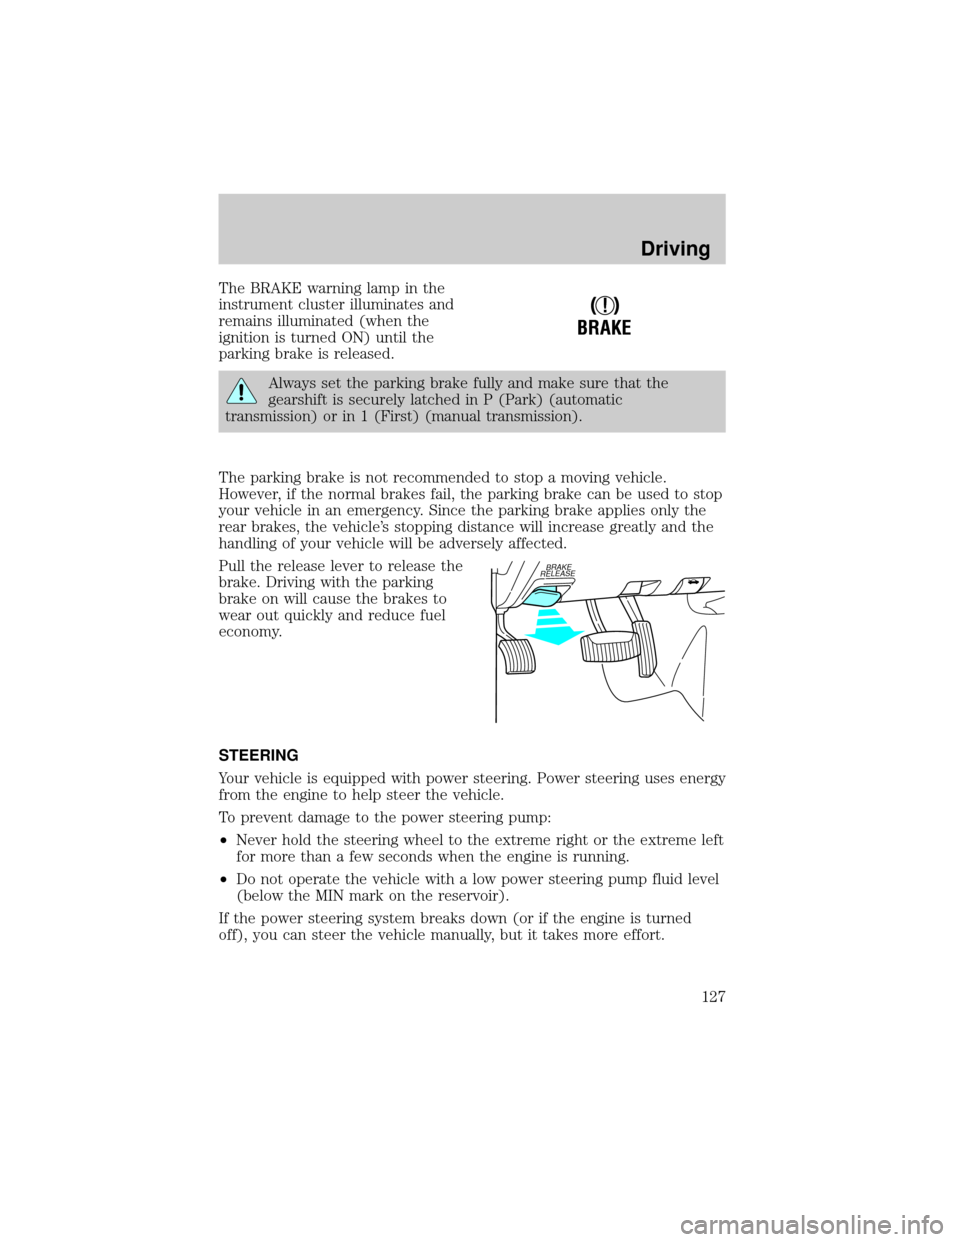
The BRAKE warning lamp in the
instrument cluster illuminates and
remains illuminated (when the
ignition is turned ON) until the
parking brake is released.
Always set the parking brake fully and make sure that the
gearshift is securely latched in P (Park) (automatic
transmission) or in 1 (First) (manual transmission).
The parking brake is not recommended to stop a moving vehicle.
However, if the normal brakes fail, the parking brake can be used to stop
your vehicle in an emergency. Since the parking brake applies only the
rear brakes, the vehicle's stopping distance will increase greatly and the
handling of your vehicle will be adversely affected.
Pull the release lever to release the
brake. Driving with the parking
brake on will cause the brakes to
wear out quickly and reduce fuel
economy.
STEERING
Your vehicle is equipped with power steering. Power steering uses energy
from the engine to help steer the vehicle.
To prevent damage to the power steering pump:
²Never hold the steering wheel to the extreme right or the extreme left
for more than a few seconds when the engine is running.
²Do not operate the vehicle with a low power steering pump fluid level
(below the MIN mark on the reservoir).
If the power steering system breaks down (or if the engine is turned
off), you can steer the vehicle manually, but it takes more effort.
!
BRAKE
BRAKE
RELEASE
Driving
127
Page 133 of 256
1 (First)
Use 1 (First) to provide maximum
engine braking on steep
downgrades. Upshifts can be made
by shifting to 2 (Second) or to
(Overdrive). Selecting 1 (Low) at
higher speeds causes the transmission to shift to a lower gear and will
shift to 1 (First) after the vehicle decelerates to the proper vehicle
speed.
Forced Downshifts
To gain acceleration in(Overdrive) or Drive (O/D OFF) when
passing another vehicle, push the accelerator to the floor. The
transmission will downshift to the appropriate gear: fourth, third, second
or first gear.
Driving a manual transmission (if equipped)
Using the clutch
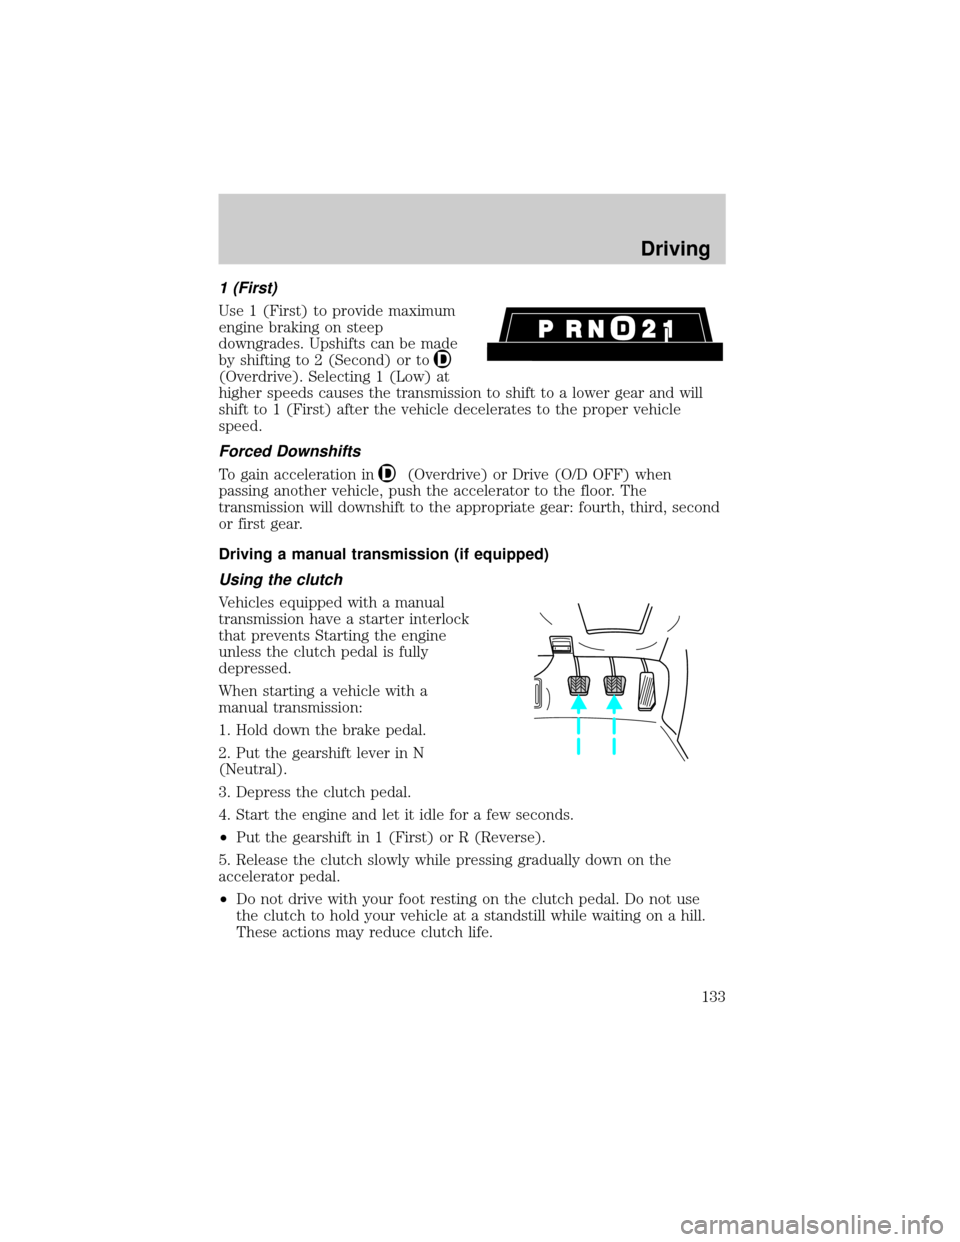
Vehicles equipped with a manual
transmission have a starter interlock
that prevents Starting the engine
unless the clutch pedal is fully
depressed.
When starting a vehicle with a
manual transmission:
1. Hold down the brake pedal.
2. Put the gearshift lever in N
(Neutral).
3. Depress the clutch pedal.
4. Start the engine and let it idle for a few seconds.
²Put the gearshift in 1 (First) or R (Reverse).
5. Release the clutch slowly while pressing gradually down on the
accelerator pedal.
²Do not drive with your foot resting on the clutch pedal. Do not use
the clutch to hold your vehicle at a standstill while waiting on a hill.
These actions may reduce clutch life.
Driving
133
Page 145 of 256
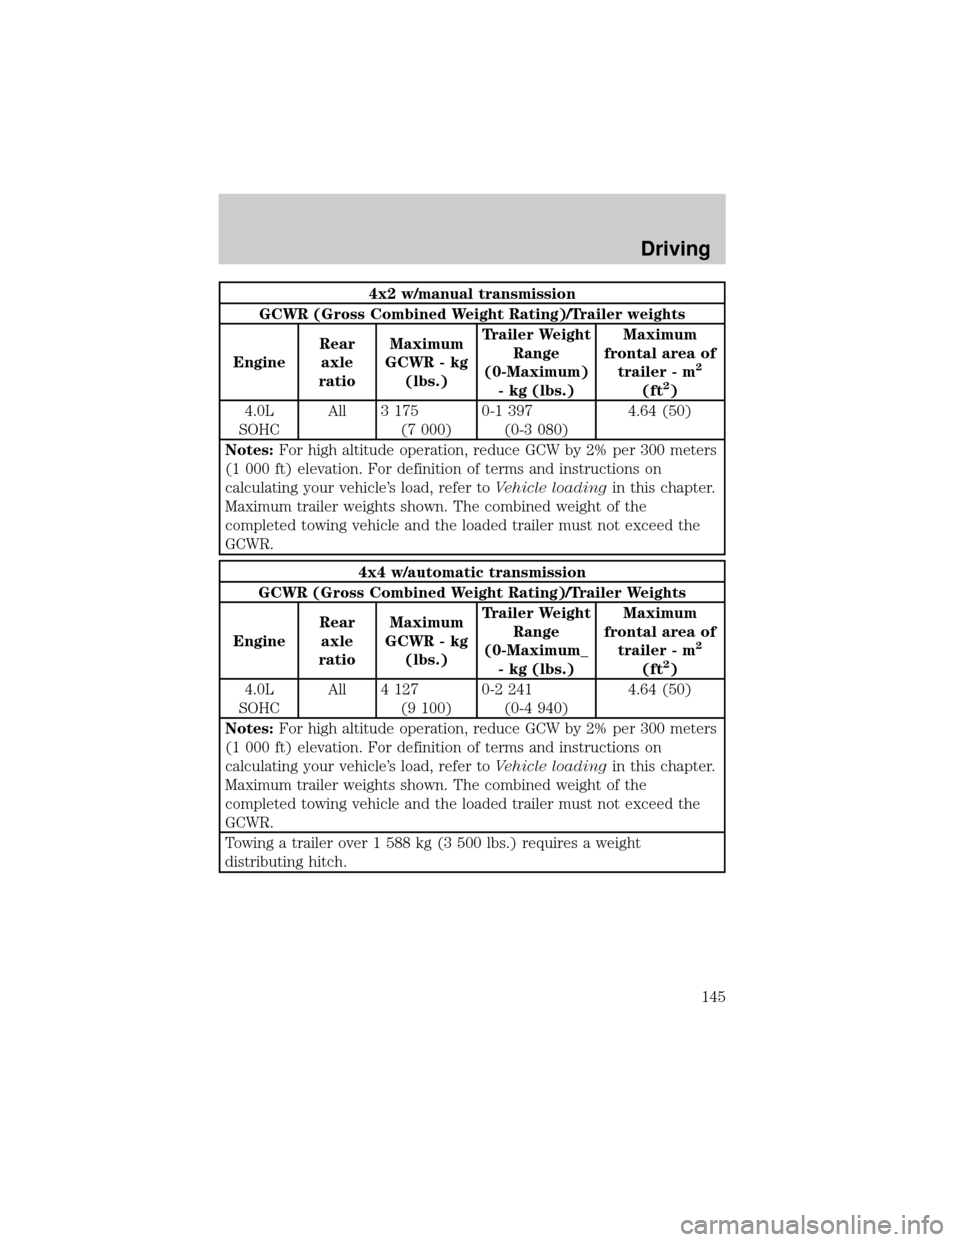
4x2 w/manual transmission
GCWR (Gross Combined Weight Rating)/Trailer weights
EngineRear
axle
ratioMaximum
GCWR - kg
(lbs.)Trailer Weight
Range
(0-Maximum)
- kg (lbs.)Maximum
frontal area of
trailer - m
2
(ft2)
4.0L
SOHCAll 3 175
(7 000)0-1 397
(0-3 080)4.64 (50)
Notes:For high altitude operation, reduce GCW by 2% per 300 meters
(1 000 ft) elevation. For definition of terms and instructions on
calculating your vehicle's load, refer toVehicle loadingin this chapter.
Maximum trailer weights shown. The combined weight of the
completed towing vehicle and the loaded trailer must not exceed the
GCWR.
4x4 w/automatic transmission
GCWR (Gross Combined Weight Rating)/Trailer Weights
EngineRear
axle
ratioMaximum
GCWR - kg
(lbs.)Trailer Weight
Range
(0-Maximum_
- kg (lbs.)Maximum
frontal area of
trailer - m
2
(ft2)
4.0L
SOHCAll 4 127
(9 100)0-2 241
(0-4 940)4.64 (50)
Notes:For high altitude operation, reduce GCW by 2% per 300 meters
(1 000 ft) elevation. For definition of terms and instructions on
calculating your vehicle's load, refer toVehicle loadingin this chapter.
Maximum trailer weights shown. The combined weight of the
completed towing vehicle and the loaded trailer must not exceed the
GCWR.
Towing a trailer over 1 588 kg (3 500 lbs.) requires a weight
distributing hitch.
Driving
145
Page 146 of 256
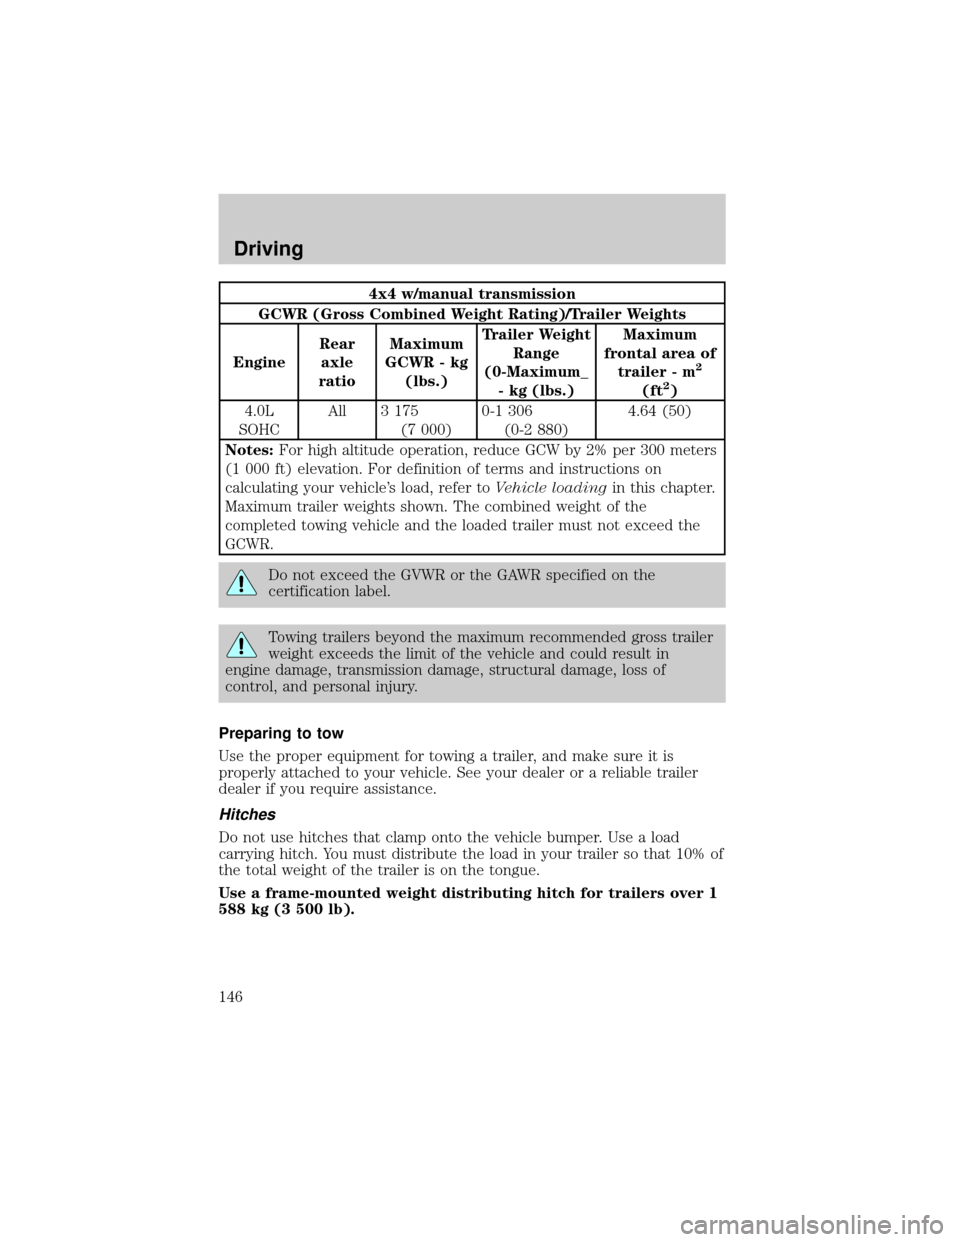
4x4 w/manual transmission
GCWR (Gross Combined Weight Rating)/Trailer Weights
EngineRear
axle
ratioMaximum
GCWR - kg
(lbs.)Trailer Weight
Range
(0-Maximum_
- kg (lbs.)Maximum
frontal area of
trailer - m
2
(ft2)
4.0L
SOHCAll 3 175
(7 000)0-1 306
(0-2 880)4.64 (50)
Notes:For high altitude operation, reduce GCW by 2% per 300 meters
(1 000 ft) elevation. For definition of terms and instructions on
calculating your vehicle's load, refer toVehicle loadingin this chapter.
Maximum trailer weights shown. The combined weight of the
completed towing vehicle and the loaded trailer must not exceed the
GCWR.
Do not exceed the GVWR or the GAWR specified on the
certification label.
Towing trailers beyond the maximum recommended gross trailer
weight exceeds the limit of the vehicle and could result in
engine damage, transmission damage, structural damage, loss of
control, and personal injury.
Preparing to tow
Use the proper equipment for towing a trailer, and make sure it is
properly attached to your vehicle. See your dealer or a reliable trailer
dealer if you require assistance.
Hitches
Do not use hitches that clamp onto the vehicle bumper. Use a load
carrying hitch. You must distribute the load in your trailer so that 10% of
the total weight of the trailer is on the tongue.
Use a frame-mounted weight distributing hitch for trailers over 1
588 kg (3 500 lb).
Driving
146
Page 148 of 256

Driving while you tow
When towing a trailer:
²Ensure that you turn off your speed control. The speed control may
shut off automatically when you are towing on long, steep grades.
²Consult your local motor vehicle speed regulations for towing a trailer.
²Use a lower gear when towing up or down steep hills. This will
eliminate excessive downshifting and upshifting for optimum fuel
economy and transmission cooling.
²Anticipate stops and brake gradually.
Exceeding the GCWR rating may cause internal transmission
damage and void your warranty coverage.
Servicing after towing
If you tow a trailer for long distances, your vehicle will require more
frequent service intervals. Refer to your scheduled maintenance guide for
more information.
Trailer towing tips
²Practice turning, stopping and backing up before starting on a trip to
get the feel of the vehicle trailer combination. When turning, make
wider turns so the trailer wheels will clear curbs and other obstacles.
²Allow more distance for stopping with a trailer attached.
²The trailer tongue weight should be no more than 10±15% of the
loaded trailer weight.
²After you have traveled 80 km (50 miles), thoroughly check your
hitch, electrical connections and trailer wheel lug nuts.
²When stopped in traffic for long periods of time in hot weather, place
the gearshift in P (Park) (automatic transmissions) or N (Neutral)
(manual transmissions). This aids engine cooling and air conditioner
efficiency.
²Vehicles with trailers should not be parked on a grade. If you must
park on a grade, place wheel chocks under the trailer's wheels.
Launching or retrieving a boat
When backing down a ramp during boat launching or retrieval:
²do not allow the static water level to rise above the bottom edge of
the rear bumper and
Driving
148
Page 163 of 256
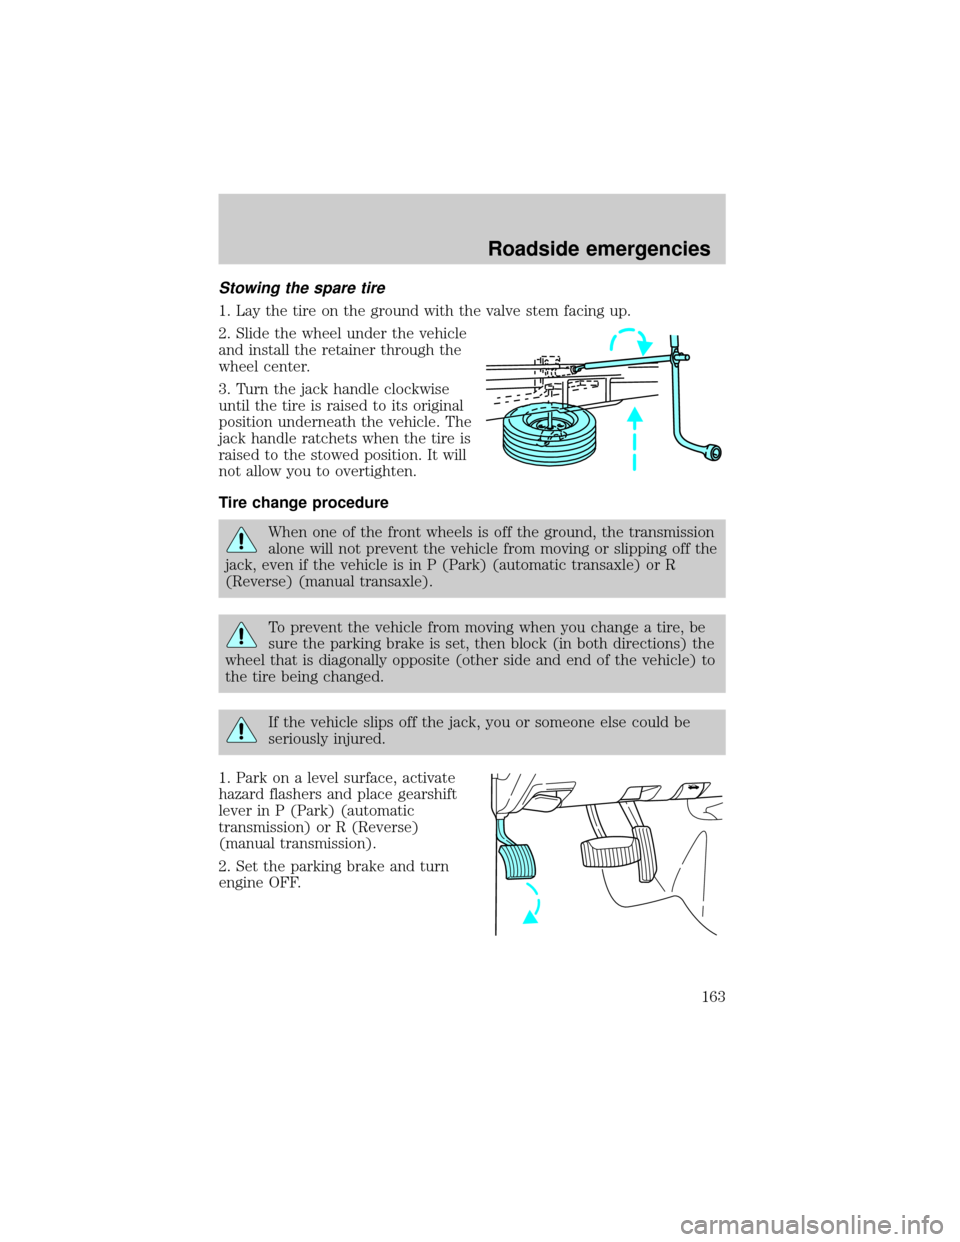
Stowing the spare tire
1. Lay the tire on the ground with the valve stem facing up.
2. Slide the wheel under the vehicle
and install the retainer through the
wheel center.
3. Turn the jack handle clockwise
until the tire is raised to its original
position underneath the vehicle. The
jack handle ratchets when the tire is
raised to the stowed position. It will
not allow you to overtighten.
Tire change procedure
When one of the front wheels is off the ground, the transmission
alone will not prevent the vehicle from moving or slipping off the
jack, even if the vehicle is in P (Park) (automatic transaxle) or R
(Reverse) (manual transaxle).
To prevent the vehicle from moving when you change a tire, be
sure the parking brake is set, then block (in both directions) the
wheel that is diagonally opposite (other side and end of the vehicle) to
the tire being changed.
If the vehicle slips off the jack, you or someone else could be
seriously injured.
1. Park on a level surface, activate
hazard flashers and place gearshift
lever in P (Park) (automatic
transmission) or R (Reverse)
(manual transmission).
2. Set the parking brake and turn
engine OFF.
Roadside emergencies
163
Page 173 of 256

²Place the transmission in N (Neutral).
²Do not exceed a distance of 80 km (50 miles).
²Do not exceed 56 km/h (35 mph) vehicle speed.
With a disabled vehicle (without access to wheel dollies, car hauling
trailer or flatbed transport vehicle) your vehicle can be towed (all wheels
on the ground) under the folling conditions:
Ford Motor Company provides a towing manual for all authorized tow
truck operators. Have your tow truck operator refer to this manual for
proper hook-up and towing procedures for your vehicle.
Roadside emergencies
173
Page 249 of 256

charging system ........................13
check coolant ............................13
check engine .............................10
cruise indicator .........................15
door ajar ....................................14
fuel cap light .............................11
high beam .................................13
overdrive off ..............................14
safety belt .................................12
speed control ............................61
turn signal indicator .................13
Load limits .................................141
GAWR ......................................141
GVWR ......................................141
trailer towing ..........................141
Loading instructions .................142
Locks
autolock .....................................82
doors ..........................................70
Lubricant specifications ...226, 228
Lumbar support, seats ...............90
M
Manual transmission .................133
fluid capacities ........................224
lubricant specifications ..........228
reverse .....................................134
Mirrors
cleaning ...................................223
fold away ...................................71
side view mirrors (power) .......70
Moon roof ....................................65
Motorcraft parts ................206, 224
O
Octane rating ............................203Odometer .....................................17
Oil (see Engine oil) ..................177
Overdrive .....................................63
P
Panic alarm feature, remote
entry system ................................77
Parking brake ............................126
Parts (see Motorcraft parts) ....224
Power distribution box (see
Fuses) ........................................158
Power door locks ........................70
Power steering ..........................127
fluid, checking and adding ....188
fluid, refill capacity ................224
fluid, specifications .........226, 228
Preparing to drive your vehicle 128
R
Radio ............................................28
Rear window defroster ...............26
Relays ........................................154
Remote entry system ...........75, 77
illuminated entry ......................79
locking/unlocking doors .....76, 79
panic alarm ...............................77
replacement/additional
transmitters ...............................78
replacing the batteries .............77
S
Safety belts (see Safety
restraints) ........................15, 93±98
Safety defects, reporting ..........244
Index
249
Page 250 of 256

Safety restraints ....................93±98
belt minder ...............................99
cleaning the safety belts .......102,
223
extension assembly ..................98
for adults .............................94±97
for children .............................112
warning light and chime ...12, 15,
98±99
Safety seats for children ..........113
Seat belts (see Safety
restraints) ....................................93
Seats
child safety seats ....................113
cleaning ...................................222
SecuriLock passive anti-theft
system ....................................83±85
Servicing your vehicle ..............174
Snowplowing .................................4
Spark plugs, specifications ......224,
228±229
Special notice ................................4
ambulance conversions ..............4
utility-type vehicles ....................5
Specification chart,
lubricants ...........................226, 228
Speed control ..............................57
Speedometer ...............................16
Starting your vehicle ........120, 122
jump starting ..........................166
Steering wheel
tilting .........................................62T
Tachometer .................................18
Tires ...........................161, 195±196
changing ..........................161, 163
checking the pressure ............196
replacing ..................................198
rotating ....................................197
snow tires and chains ............199
tire grades ...............................196
treadwear ................................195
Towing .......................................143
recreational towing .................149
trailer towing ..........................143
wrecker ....................................172
Traction-lok rear axle ...............128
Transfer case
fluid checking .........................191
Transmission
automatic operation ...............129
fluid, checking and adding
(automatic) .............................188
fluid, refill capacities ..............224
lubricant specifications ..226, 228
manual operation ....................133
Trip odometer .............................17
Turn signal ............................13, 56
V
Vehicle dimensions ...................229
Vehicle Identification Number
(VIN) ..........................................231
Vehicle loading ..........................141
Ventilating your vehicle ...........124
Index
250