flat tire FORD EXPLORER SPORT TRAC 2003 Owners Manual
[x] Cancel search | Manufacturer: FORD, Model Year: 2003, Model line: EXPLORER SPORT TRAC, Model: FORD EXPLORER SPORT TRAC 2003Pages: 216, PDF Size: 1.75 MB
Page 112 of 216
Parking brake
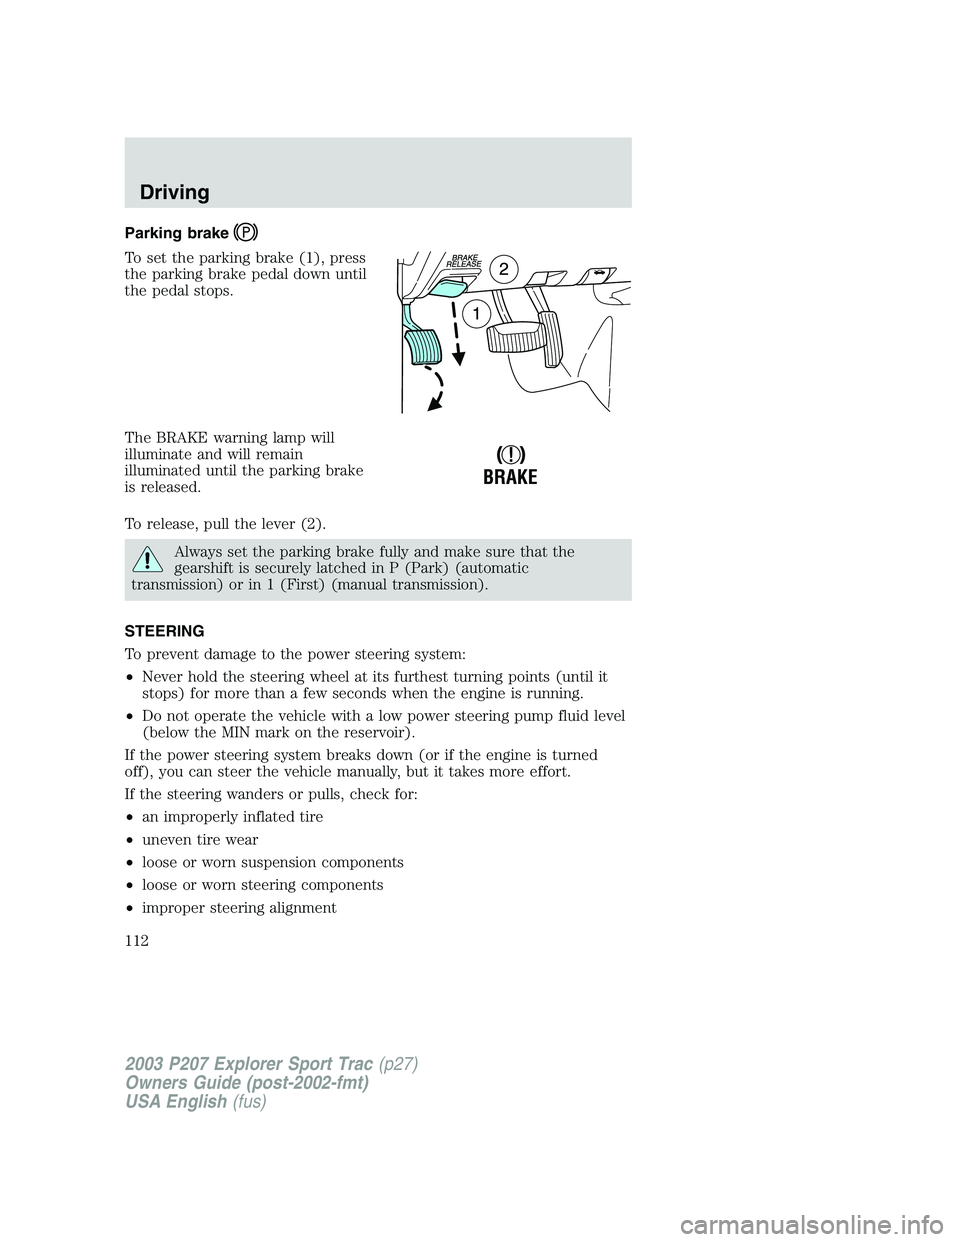
To set the parking brake (1), press
the parking brake pedal down until
the pedal stops.
The BRAKE warning lamp will
illuminate and will remain
illuminated until the parking brake
is released.
To release, pull the lever (2).
Always set the parking brake fully and make sure that the
gearshift is securely latched in P (Park) (automatic
transmission) or in 1 (First) (manual transmission).
STEERING
To prevent damage to the power steering system:
•Never hold the steering wheel at its furthest turning points (until it
stops) for more than a few seconds when the engine is running.
•Do not operate the vehicle with a low power steering pump fluid level
(below the MIN mark on the reservoir).
If the power steering system breaks down (or if the engine is turned
off), you can steer the vehicle manually, but it takes more effort.
If the steering wanders or pulls, check for:
•an improperly inflated tire
•uneven tire wear
•loose or worn suspension components
•loose or worn steering components
•improper steering alignment
!
BRAKE
2003 P207 Explorer Sport Trac(p27)
Owners Guide (post-2002-fmt)
USA English(fus)
Driving
112
Page 123 of 216
Parking
On some 4WD vehicles, when the transfer case is in the N (Neutral)
position, the engine and transmission are disconnected from the rest of
the driveline. Therefore, the vehicle is free to roll even if the automatic
transmission is in P (Park) or the manual transmission is in gear. Do not
leave the vehicle unattended with the transfer case in N (Neutral)
position. Always set the parking brake fully and turn off the ignition
when leaving the vehicle.
Normal characteristics
On some 4WD vehicles, the initial shift from two-wheel drive to
four–wheel drive while the vehicle is moving can cause some momentary
clunk and ratcheting sounds. This is normal and should be no cause for
concern.
Driving on sand, mud and water
When driving over sand, avoid reducing the tire pressures; instead, shift
to a lower gear. Apply the accelerator slowly and avoid spinning the
wheels. If you must reduce the tire pressure, make sure you re-inflate
the tires as soon as possible. Avoid excessive speed because vehicle
momentum can work against your vehicle and cause it to become stuck.
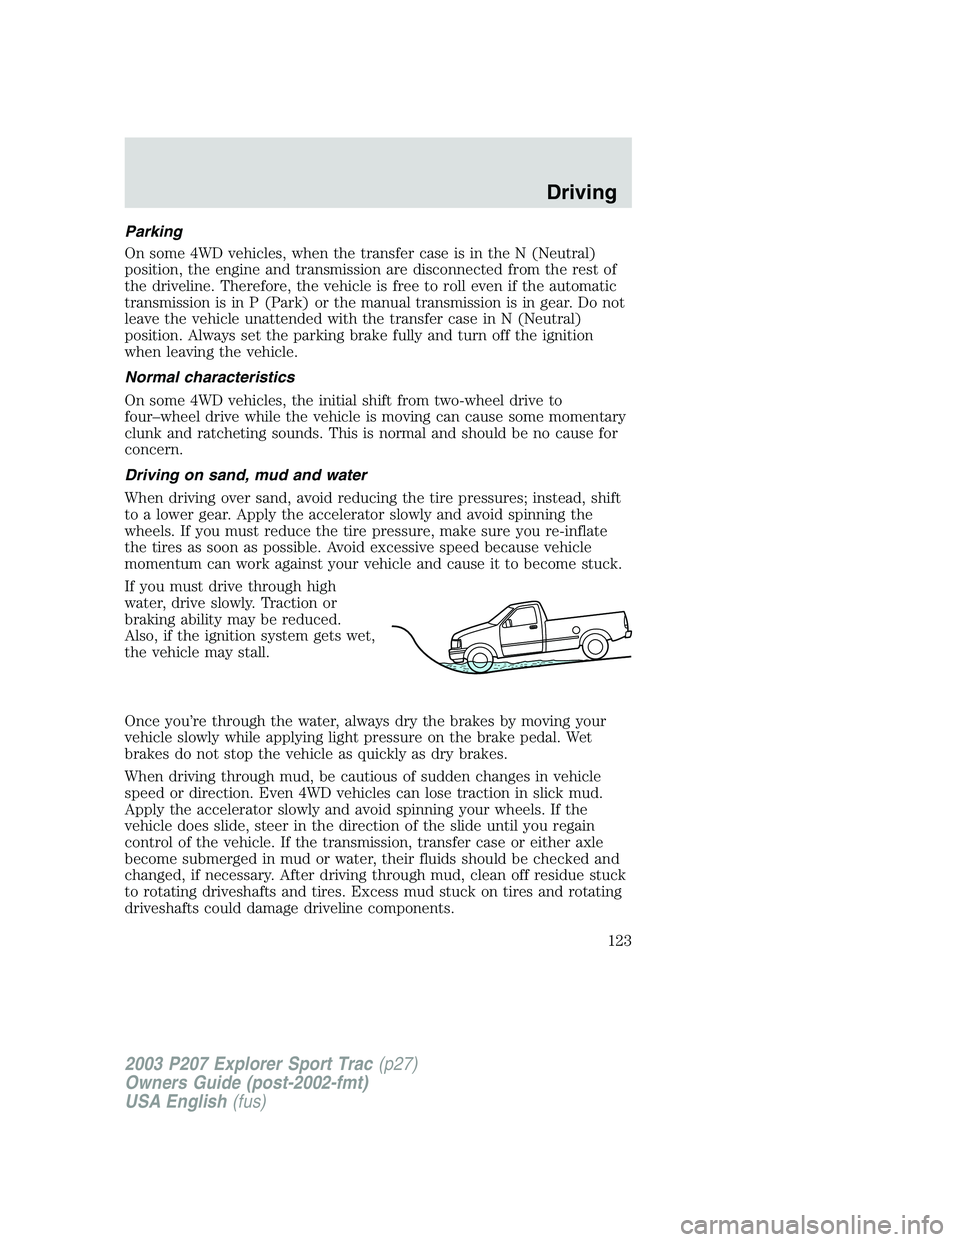
If you must drive through high
water, drive slowly. Traction or
braking ability may be reduced.
Also, if the ignition system gets wet,
the vehicle may stall.
Once you’re through the water, always dry the brakes by moving your
vehicle slowly while applying light pressure on the brake pedal. Wet
brakes do not stop the vehicle as quickly as dry brakes.
When driving through mud, be cautious of sudden changes in vehicle
speed or direction. Even 4WD vehicles can lose traction in slick mud.
Apply the accelerator slowly and avoid spinning your wheels. If the
vehicle does slide, steer in the direction of the slide until you regain
control of the vehicle. If the transmission, transfer case or either axle
become submerged in mud or water, their fluids should be checked and
changed, if necessary. After driving through mud, clean off residue stuck
to rotating driveshafts and tires. Excess mud stuck on tires and rotating
driveshafts could damage driveline components.
2003 P207 Explorer Sport Trac(p27)
Owners Guide (post-2002-fmt)
USA English(fus)
Driving
123
Page 135 of 216
GETTING ROADSIDE ASSISTANCE
To fully assist you should you have a vehicle concern, Ford Motor
Company offers a complimentary roadside assistance program. This
program is separate from the New Vehicle Limited Warranty. The service
is available:
•24–hours, seven days a week
•
for the New Vehicle Limited Warranty period of three years or 60,000 km
(36,000 miles), whichever occurs first on Ford and Mercury vehicles, and
four years or 80,000 km (50,000 miles) on Lincoln vehicles*.
Roadside assistance will cover:
•changing a flat tire
•jump-starts
•lock-out assistance
•limited fuel delivery*
•towing of your disabled vehicle to the nearest Ford Motor Company
dealership, or your selling dealer if within 25 kms (15.5 miles) of the
nearest Ford Motor Company dealership (one tow per disablement).
Even non-warranty related tows, like accidents or getting stuck in the
mud or snow, are covered (some exclusions apply, such as impound
towing or repossession).
* Canadian customers refer to your Owner Information Guide for
information on coverage period and exact fuel amounts..
Using roadside assistance
Complete the roadside assistance identification card and place it in your
wallet for quick reference. In the United States, this card is found in the
Owner Guide portfolio in the glove compartment in Ford vehicles and is
mailed to you if you own a Mercury or Lincoln. In Canada, the card is
found in the Roadside Assistance book in the glove compartment.
U.S. Ford or Mercury vehicle customers who require roadside assistance,
call 1–800–241–3673; Lincoln vehicle customers call 1–800–521–4140.
Canadian customers who require roadside assistance, call
1–800–665–2006.
If you need to arrange roadside assistance for yourself, Ford Motor
Company will reimburse a reasonable amount. To obtain reimbursement
information, U.S. Ford or Mercury vehicles customers call
1-800-241-3673; Lincoln vehicle customers call 1–800–521–4140.
2003 P207 Explorer Sport Trac(p27)
Owners Guide (post-2002-fmt)
USA English(fus)
Roadside Emergencies
Roadside Emergencies
135
Page 145 of 216
Fuse/Relay
LocationFuse Amp
RatingPower Distribution Box Description
47A 20A Circuit
breakerWindows
47B – Not used
48 – Window safety relay
49 – Starter relay
50A – Not used
50B – Fuel pump relay
51 – Not used
52 – Not used
53 – PCM diode
54 – PCM relay
55 – Blower relay
56A – Horn relay
56B – A/C clutch solenoid
CHANGING A FLAT TIRE
If you get a flat tire while driving:
•do not brake heavily.
•gradually decrease the vehicle’s speed.
•hold the steering wheel firmly.
•slowly move to a safe place on the side of the road.
The use of tire sealants is not recommended and may
compromise the integrity of your tires.
Spare tire information
The spare tire can be used as a spare or a regular tire.
2003 P207 Explorer Sport Trac(p27)
Owners Guide (post-2002-fmt)
USA English(fus)
Roadside Emergencies
145
Page 148 of 216
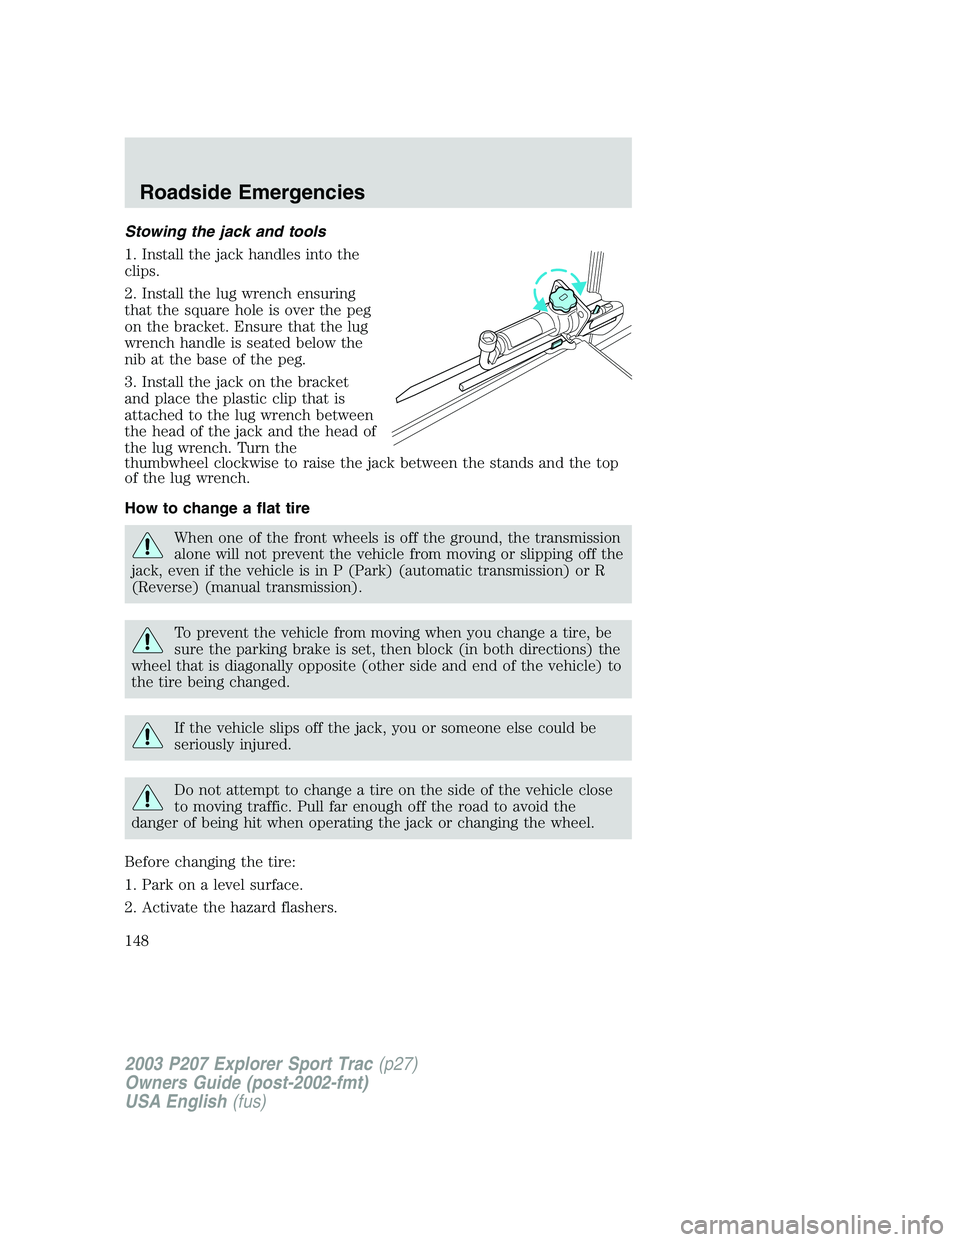
Stowing the jack and tools
1. Install the jack handles into the
clips.
2. Install the lug wrench ensuring
that the square hole is over the peg
on the bracket. Ensure that the lug
wrench handle is seated below the
nib at the base of the peg.
3. Install the jack on the bracket
and place the plastic clip that is
attached to the lug wrench between
the head of the jack and the head of
the lug wrench. Turn the
thumbwheel clockwise to raise the jack between the stands and the top
of the lug wrench.
How to change a flat tire
When one of the front wheels is off the ground, the transmission
alone will not prevent the vehicle from moving or slipping off the
jack, even if the vehicle is in P (Park) (automatic transmission) or R
(Reverse) (manual transmission).
To prevent the vehicle from moving when you change a tire, be
sure the parking brake is set, then block (in both directions) the
wheel that is diagonally opposite (other side and end of the vehicle) to
the tire being changed.
If the vehicle slips off the jack, you or someone else could be
seriously injured.
Do not attempt to change a tire on the side of the vehicle close
to moving traffic. Pull far enough off the road to avoid the
danger of being hit when operating the jack or changing the wheel.
Before changing the tire:
1. Park on a level surface.
2. Activate the hazard flashers.
2003 P207 Explorer Sport Trac(p27)
Owners Guide (post-2002-fmt)
USA English(fus)
Roadside Emergencies
148
Page 149 of 216
3. Place the gearshift lever in P (Park) (automatic transmission) or R
(Reverse) (manual transmission).
4. Set the parking brake.
5. Turn off the ignition.
To change the tire:
Note:Passengers should not remain in the vehicle when the vehicle is
being jacked.
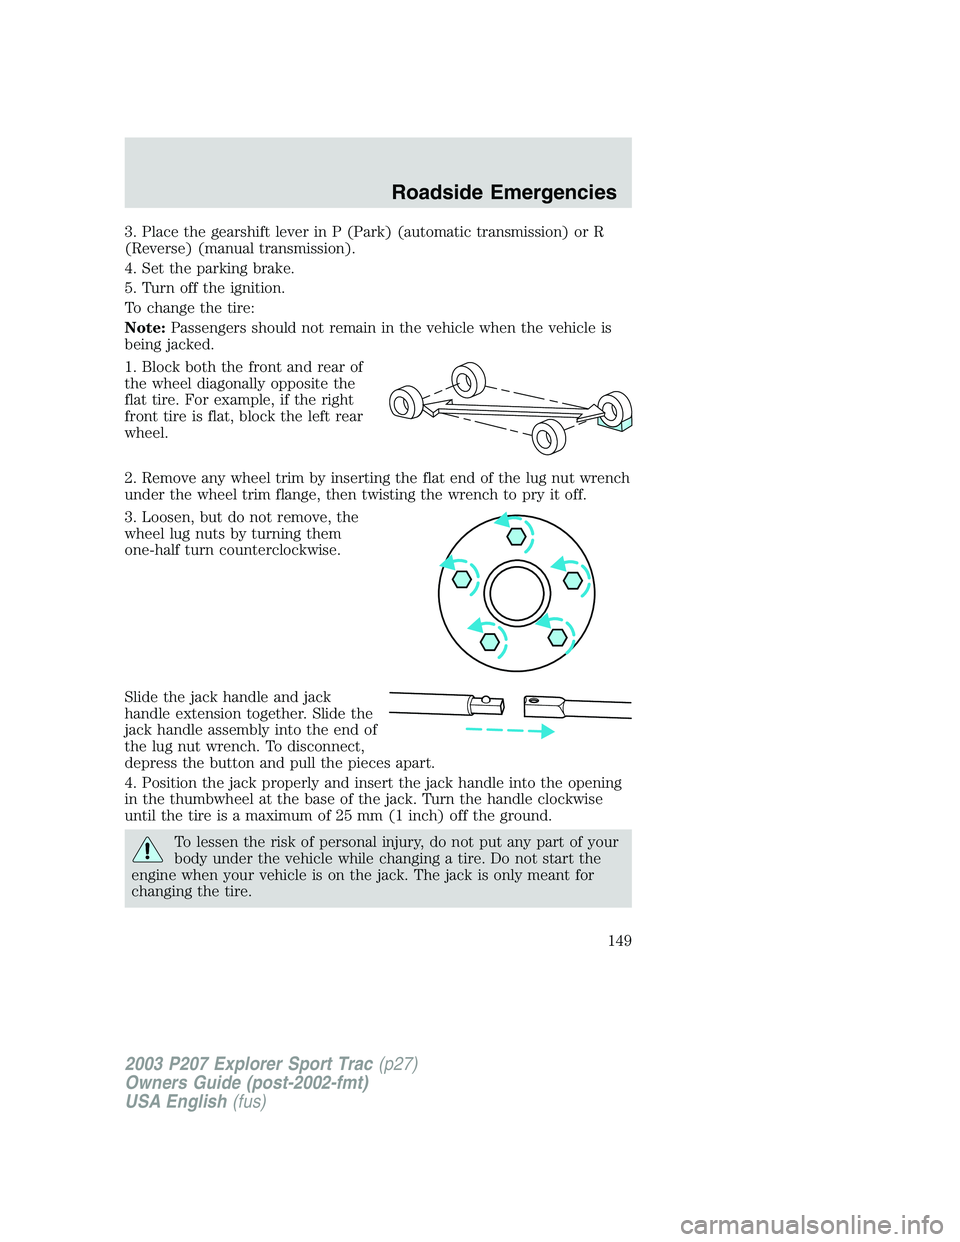
1. Block both the front and rear of
the wheel diagonally opposite the
flat tire. For example, if the right
front tire is flat, block the left rear
wheel.
2. Remove any wheel trim by inserting the flat end of the lug nut wrench
under the wheel trim flange, then twisting the wrench to pry it off.
3. Loosen, but do not remove, the
wheel lug nuts by turning them
one-half turn counterclockwise.
Slide the jack handle and jack
handle extension together. Slide the
jack handle assembly into the end of
the lug nut wrench. To disconnect,
depress the button and pull the pieces apart.
4. Position the jack properly and insert the jack handle into the opening
in the thumbwheel at the base of the jack. Turn the handle clockwise
until the tire is a maximum of 25 mm (1 inch) off the ground.
To lessen the risk of personal injury, do not put any part of your
body under the vehicle while changing a tire. Do not start the
engine when your vehicle is on the jack. The jack is only meant for
changing the tire.
2003 P207 Explorer Sport Trac(p27)
Owners Guide (post-2002-fmt)
USA English(fus)
Roadside Emergencies
149
Page 151 of 216
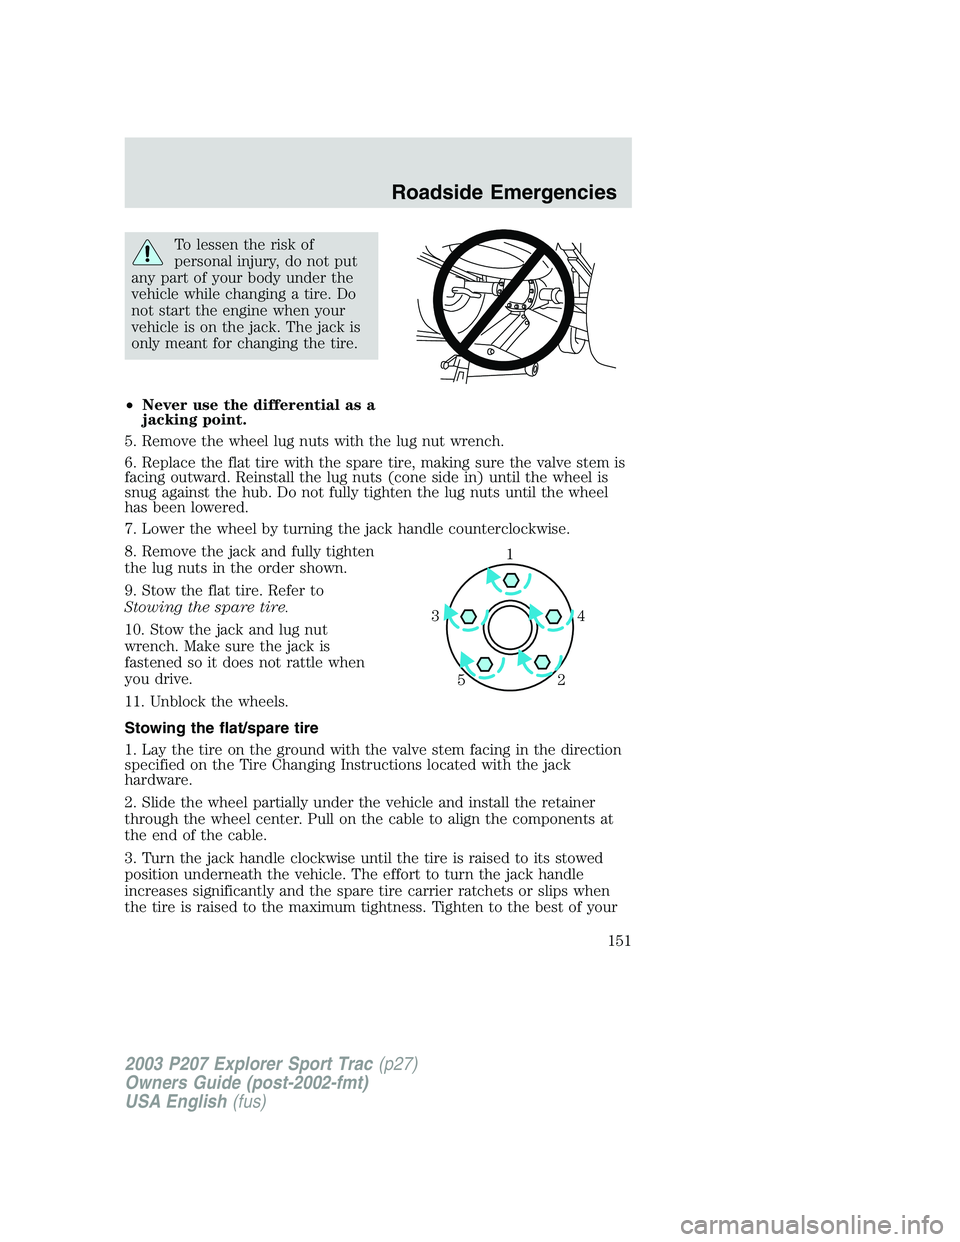
To lessen the risk of
personal injury, do not put
any part of your body under the
vehicle while changing a tire. Do
not start the engine when your
vehicle is on the jack. The jack is
only meant for changing the tire.
•Never use the differential as a
jacking point.
5. Remove the wheel lug nuts with the lug nut wrench.
6. Replace the flat tire with the spare tire, making sure the valve stem is
facing outward. Reinstall the lug nuts (cone side in) until the wheel is
snug against the hub. Do not fully tighten the lug nuts until the wheel
has been lowered.
7. Lower the wheel by turning the jack handle counterclockwise.
8. Remove the jack and fully tighten
the lug nuts in the order shown.
9. Stow the flat tire. Refer to
Stowing the spare tire.
10. Stow the jack and lug nut
wrench. Make sure the jack is
fastened so it does not rattle when
you drive.
11. Unblock the wheels.
Stowing the flat/spare tire
1. Lay the tire on the ground with the valve stem facing in the direction
specified on the Tire Changing Instructions located with the jack
hardware.
2. Slide the wheel partially under the vehicle and install the retainer
through the wheel center. Pull on the cable to align the components at
the end of the cable.
3. Turn the jack handle clockwise until the tire is raised to its stowed
position underneath the vehicle. The effort to turn the jack handle
increases significantly and the spare tire carrier ratchets or slips when
the tire is raised to the maximum tightness. Tighten to the best of your
1
4 3
2 5
2003 P207 Explorer Sport Trac(p27)
Owners Guide (post-2002-fmt)
USA English(fus)
Roadside Emergencies
151
Page 152 of 216
ability, to the point where the ratchet/slip occurs, if possible. The spare
tire carrier will not allow you to overtighten. If the spare tire carrier
ratchets or slips with little effort, take the vehicle to your dealer for
assistance at your earliest convenience.
4. Check that the tire lies flat against the frame and is properly
tightened. Try to push or pull, then turn the tire to be sure it will not
move. Loosen and retighten, if necessary. Failure to properly stow the
spare tire may result in failure of the winch cable and loss of the tire.
5. Repeat this tightness check procedure when servicing the spare tire
pressure (every six months, per scheduled maintenance guide), or at any
time that the spare tire is disturbed through service of other
components.
6. If removed, install the spare tire lock (if equipped) into the bumper
drive tube with the spare tire lock key (if equipped) and jack handle.
JUMP STARTING YOUR VEHICLE
The gases around the battery can explode if exposed to flames,
sparks, or lit cigarettes. An explosion could result in injury or
vehicle damage.
Batteries contain sulfuric acid which can burn skin, eyes and
clothing, if contacted.
Do not attempt to push-start your vehicle. Automatic
transmissions do not have push-start capability; also, the
catalytic converter may become damaged.
Preparing your vehicle
When the battery is disconnected or a new battery is installed, the
transmission must relearn its shift strategy. As a result, the transmission
may have firm and/or soft shifts. This operation is considered normal and
will not affect function or durability of the transmission. Over time, the
adaptive learning process will fully update transmission operation.
1.Use only a 12–volt supply to start your vehicle.
2. Do not disconnect the battery of the disabled vehicle as this could
damage the vehicle’s electrical system.
3. Park the booster vehicle close to the hood of the disabled vehicle
making sure the two vehiclesdo nottouch. Set the parking brake on
both vehicles and stay clear of the engine cooling fan and other moving
parts.
2003 P207 Explorer Sport Trac(p27)
Owners Guide (post-2002-fmt)
USA English(fus)
Roadside Emergencies
152
Page 197 of 216
The traction grade assigned to this tire is based on
straight-ahead braking traction tests, and does not include
acceleration, cornering, hydroplaning or peak traction characteristics.
Temperature A B C
The temperature grades are A (the highest), B and C, representing the
tire’s resistance to the generation of heat and its ability to dissipate heat
when tested under controlled conditions on a specified indoor laboratory
test wheel. Sustained high temperature can cause the material of the tire
to degenerate and reduce tire life, and excessive temperature can lead to
sudden tire failure. The grade C corresponds to a level of performance
which all passenger car tires must meet under the Federal Motor Vehicle
Safety Standard No. 109. Grades B and A represent higher levels of
performance on the laboratory test wheel than the minimum required by
law.
The temperature grade for this tire is established for a tire that
is properly inflated and not overloaded. Excessive speed,
underinflation, or excessive loading, either separately or in
combination, can cause heat buildup and possible tire failure.
SERVICING YOUR TIRES
Checking the tire pressure
•Use an accurate tire gauge.
•Check the pressure when the tires are cold, after the vehicle has been
parked for at least one hour or has been driven less than 5 km
(3 miles).
•Adjust tire pressure to recommended specifications found on the
Certifications Label.
•Check tires for proper air pressure monthly. Check spare tire for
proper air pressure every six months.
Improperly inflated tires can affect vehicle handling and can fail
suddenly, possibly resulting in loss of vehicle control, vehicle
rollover and/or personal injury.
2003 P207 Explorer Sport Trac(p27)
Owners Guide (post-2002-fmt)
USA English(fus)
Maintenance and Specifications
197