change wheel FORD F-150 2019 Owner's Manual
[x] Cancel search | Manufacturer: FORD, Model Year: 2019, Model line: F-150, Model: FORD F-150 2019Pages: 644, PDF Size: 14.81 MB
Page 361 of 644
Note:
If the oil level is between the full and
minimum marks, the oil level is acceptable.
Do not add oil.
Note: The oil consumption of new engines
reaches its normal level after approximately
3,000 mi (5,000 km).
Adding Engine Oil WARNING:
Do not remove the
filler cap when the engine is running.
Do not use supplemental engine oil
additives because they are unnecessary
and could lead to engine damage that may
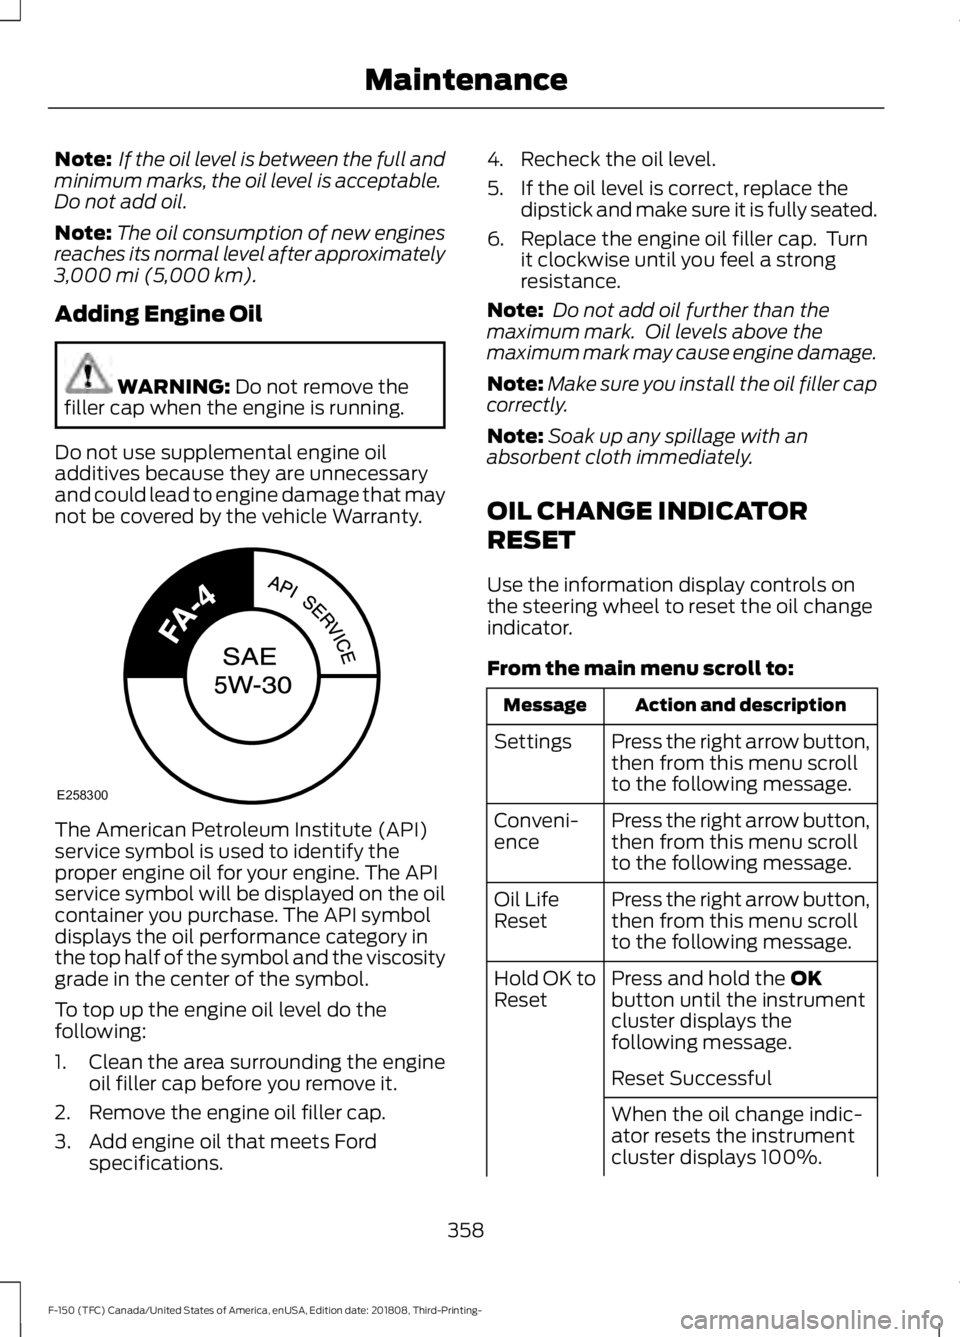
not be covered by the vehicle Warranty. The American Petroleum Institute (API)
service symbol is used to identify the
proper engine oil for your engine. The API
service symbol will be displayed on the oil
container you purchase. The API symbol
displays the oil performance category in
the top half of the symbol and the viscosity
grade in the center of the symbol.
To top up the engine oil level do the
following:
1. Clean the area surrounding the engine
oil filler cap before you remove it.
2. Remove the engine oil filler cap.
3. Add engine oil that meets Ford specifications. 4. Recheck the oil level.
5. If the oil level is correct, replace the
dipstick and make sure it is fully seated.
6. Replace the engine oil filler cap. Turn it clockwise until you feel a strong
resistance.
Note: Do not add oil further than the
maximum mark. Oil levels above the
maximum mark may cause engine damage.
Note: Make sure you install the oil filler cap
correctly.
Note: Soak up any spillage with an
absorbent cloth immediately.
OIL CHANGE INDICATOR
RESET
Use the information display controls on
the steering wheel to reset the oil change
indicator.
From the main menu scroll to: Action and description
Message
Press the right arrow button,
then from this menu scroll
to the following message.
Settings
Press the right arrow button,
then from this menu scroll
to the following message.
Conveni-
ence
Press the right arrow button,
then from this menu scroll
to the following message.
Oil Life
Reset
Press and hold the
OK
button until the instrument
cluster displays the
following message.
Hold OK to
Reset
Reset Successful
When the oil change indic-
ator resets the instrument
cluster displays 100%.
358
F-150 (TFC) Canada/United States of America, enUSA, Edition date: 201808, Third-Printing- MaintenanceE258300
Page 387 of 644
General
•
Store all vehicles in a dry, ventilated
place.
• Protect from sunlight, if possible.
• If vehicles are stored outside, they
require regular maintenance to protect
against rust and damage.
Body
• Wash your vehicle thoroughly to
remove dirt, grease, oil, tar or mud from
exterior surfaces, rear-wheel housing
and the underside of front fenders.
• Periodically wash your vehicle if it is
stored in exposed locations.
• Touch-up exposed or primed metal to
prevent rust.
• Cover chrome and stainless steel parts
with a thick coat of auto wax to prevent
discoloration. Re-wax as necessary
when you wash your vehicle.
• Lubricate all hood, door and luggage
compartment hinges and latches with
a light grade oil.
• Cover interior trim to prevent fading.
• Keep all rubber parts free from oil and
solvents.
Engine
• Change the engine oil and filter prior to
storage because used engine oil
contains contaminates which may
cause engine damage.
• Start the engine every 15 days for a
minimum of 15 minutes. Run at fast idle
with the climate controls set to defrost
until the engine reaches normal
operating temperature. •
With your foot on the brake, shift
through all the gears while the engine
is running.
• We recommend that you change the
engine oil before you use your vehicle
again.
Fuel system
• Fill the fuel tank with high-quality fuel
until the first automatic shutoff of the
fuel pump nozzle.
Cooling system
• Protect against freezing temperatures.
• When removing your vehicle from
storage, check coolant fluid level.
Confirm that there are no cooling
system leaks and that fluid is at the
recommended level.
Battery
• Check and recharge as necessary. Keep
connections clean.
• If storing your vehicle for more than 30
days without recharging the battery,
we recommend that you disconnect
the battery cables to maintain battery
charge for quick starting.
Note: It is necessary to reset memory
features if battery cables are disconnected.
Brakes
• Make sure the brakes and parking brake
release fully.
Tires
• Maintain recommended air pressure.
384
F-150 (TFC) Canada/United States of America, enUSA, Edition date: 201808, Third-Printing- Vehicle Care
Page 393 of 644
describes the fundamental
characteristics of the tire and also
provides a U.S. DOT Tire
Identification Number for safety
standard certification and in case
of a recall.
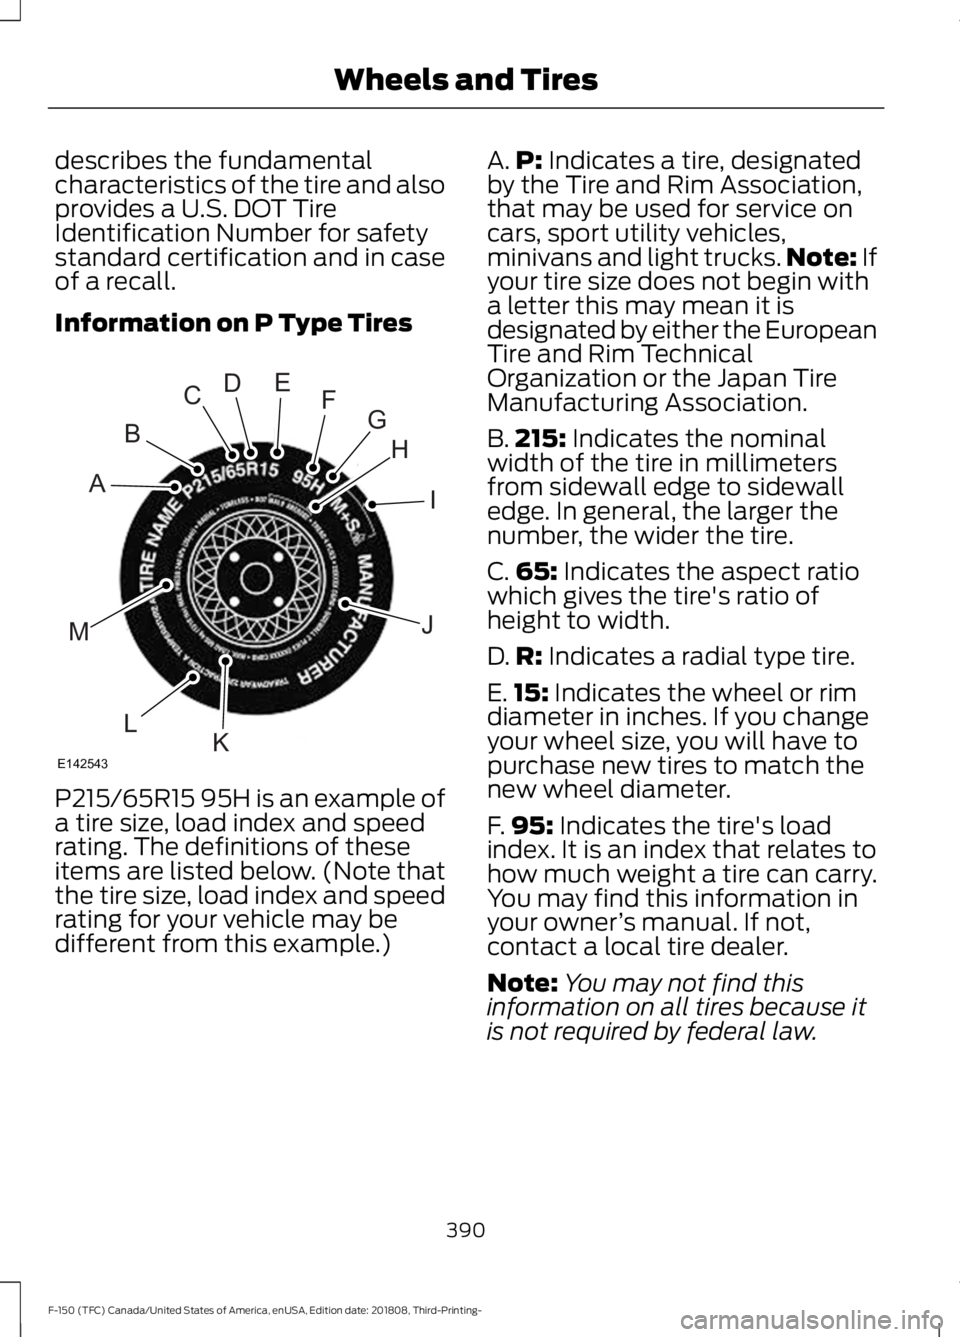
Information on P Type Tires
P215/65R15 95H is an example of
a tire size, load index and speed
rating. The definitions of these
items are listed below. (Note that
the tire size, load index and speed
rating for your vehicle may be
different from this example.) A.
P: Indicates a tire, designated
by the Tire and Rim Association,
that may be used for service on
cars, sport utility vehicles,
minivans and light trucks. Note:
If
your tire size does not begin with
a letter this may mean it is
designated by either the European
Tire and Rim Technical
Organization or the Japan Tire
Manufacturing Association.
B. 215:
Indicates the nominal
width of the tire in millimeters
from sidewall edge to sidewall
edge. In general, the larger the
number, the wider the tire.
C. 65:
Indicates the aspect ratio
which gives the tire's ratio of
height to width.
D. R:
Indicates a radial type tire.
E. 15:
Indicates the wheel or rim
diameter in inches. If you change
your wheel size, you will have to
purchase new tires to match the
new wheel diameter.
F. 95:
Indicates the tire's load
index. It is an index that relates to
how much weight a tire can carry.
You may find this information in
your owner ’s manual. If not,
contact a local tire dealer.
Note: You may not find this
information on all tires because it
is not required by federal law.
390
F-150 (TFC) Canada/United States of America, enUSA, Edition date: 201808, Third-Printing- Wheels and TiresH
I
J
KL
M
A
B
CDEFG
E142543
Page 397 of 644
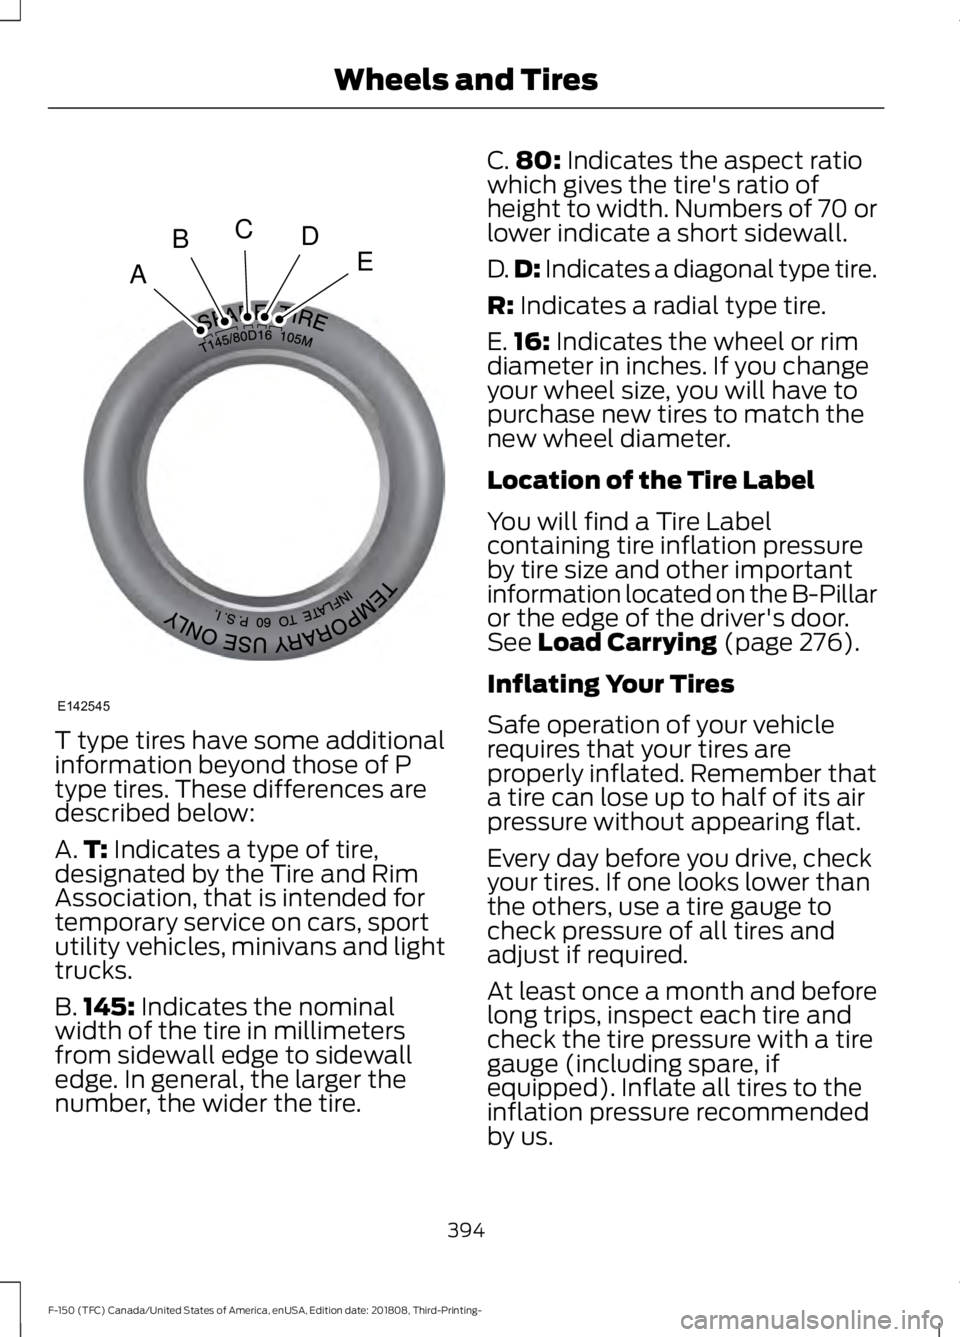
T type tires have some additional
information beyond those of P
type tires. These differences are
described below:
A.
T: Indicates a type of tire,
designated by the Tire and Rim
Association, that is intended for
temporary service on cars, sport
utility vehicles, minivans and light
trucks.
B. 145:
Indicates the nominal
width of the tire in millimeters
from sidewall edge to sidewall
edge. In general, the larger the
number, the wider the tire. C.
80:
Indicates the aspect ratio
which gives the tire's ratio of
height to width. Numbers of 70 or
lower indicate a short sidewall.
D. D:
Indicates a diagonal type tire.
R:
Indicates a radial type tire.
E. 16:
Indicates the wheel or rim
diameter in inches. If you change
your wheel size, you will have to
purchase new tires to match the
new wheel diameter.
Location of the Tire Label
You will find a Tire Label
containing tire inflation pressure
by tire size and other important
information located on the B-Pillar
or the edge of the driver's door.
See
Load Carrying (page 276).
Inflating Your Tires
Safe operation of your vehicle
requires that your tires are
properly inflated. Remember that
a tire can lose up to half of its air
pressure without appearing flat.
Every day before you drive, check
your tires. If one looks lower than
the others, use a tire gauge to
check pressure of all tires and
adjust if required.
At least once a month and before
long trips, inspect each tire and
check the tire pressure with a tire
gauge (including spare, if
equipped). Inflate all tires to the
inflation pressure recommended
by us.
394
F-150 (TFC) Canada/United States of America, enUSA, Edition date: 201808, Third-Printing- Wheels and TiresA
BCDE
E142545
Page 398 of 644
You are strongly urged to buy a
reliable tire pressure gauge, as
automatic service station gauges
may be inaccurate. We
recommend the use of a digital or
dial-type tire pressure gauge
rather than a stick-type tire
pressure gauge.
Use the recommended cold
inflation pressure for optimum tire
performance and wear.
Under-inflation or over-inflation
may cause uneven treadwear
patterns.
WARNING: Under-inflation
is the most common cause of
tire failures and may result in
severe tire cracking, tread
separation or blowout, with
unexpected loss of vehicle
control and increased risk of
injury. Under-inflation increases
sidewall flexing and rolling
resistance, resulting in heat
buildup and internal damage to
the tire. It also may result in
unnecessary tire stress, irregular
wear, loss of vehicle control and
accidents. A tire can lose up to
half of its air pressure and not
appear to be flat!
Always inflate your tires to the our
recommended inflation pressure
even if it is less than the maximum
inflation pressure information
found on the tire. Our
recommended tire inflation
pressure is found on the Safety
Compliance Certification Label or Tire Label (affixed to either the
door hinge pillar, door-latch post,
or the door edge that meets the
door-latch post, next to the
driver's seating position), or Tire
Label located on the B-pillar or
the edge of the driver's door.
Failure to follow the tire pressure
recommendations can cause
uneven treadwear patterns and
adversely affect the way your
vehicle handles.
Note:
Do not reduce tire pressure
to change the ride characteristics
of the vehicle. If you do not
maintain the inflation pressure at
the levels specified by us, your
vehicle may experience a condition
known as shimmy. Shimmy is a
severe vibration and oscillation in
the steering wheel after the vehicle
travels over a bump or dip in the
road that does not dampen out by
itself. Shimmy may result from
significant under-inflation of the
tires, improper tires (load range,
size, or type), or vehicle
modifications such as lift-kits. In
the event that your vehicle
experiences shimmy, you should
slowly reduce speed by either lifting
off the accelerator pedal or lightly
applying the brakes. The shimmy
will cease as the vehicle speed
decreases.
Maximum Inflation Pressure is
the tire manufacturer's maximum
permissible pressure and the
pressure at which the maximum
load can be carried by the tire. This
pressure is normally higher than
395
F-150 (TFC) Canada/United States of America, enUSA, Edition date: 201808, Third-Printing- Wheels and Tires
Page 399 of 644

the manufacturer
’s recommended
cold inflation pressure which can
be found on the Safety
Compliance Certification Label
(affixed to either the door hinge
pillar, door-latch post, or the door
edge that meets the door-latch
post, next to the driver's seating
position), or Tire Label located on
the B-pillar or the edge of the
driver's door. The cold inflation
pressure should never be set lower
than the recommended pressure
on the Safety Compliance
Certification Label or Tire Label.
When weather temperature
changes occur, tire inflation
pressures also change. A 10°F
(6°C) temperature drop can
cause a corresponding drop of 1
psi (7 kPa) in inflation pressure.
Check your tire pressures
frequently and adjust them to the
proper pressure which can be
found on the Safety Compliance
Certification Label or Tire Label.
To check the pressure in your
tire(s):
1. Make sure the tires are cool,
meaning they are not hot from
driving even a mile. Note:
If you are checking tire
pressure when the tire is hot, (for
example, driven more than 1 mile
[1.6 kilometers]), never bleed or
reduce air pressure. The tires are
hot from driving and it is normal for
pressures to increase above
recommended cold pressures. A
hot tire at or below recommended
cold inflation pressure could be
significantly under-inflated.
Note: If you have to drive a
distance to get air for your tire(s),
check and record the tire pressure
first and add the appropriate air
pressure when you get to the
pump. It is normal for tires to heat
up and the air pressure inside to go
up as you drive.
2. Remove the cap from the valve
on one tire, then firmly press the
tire gauge onto the valve and
measure the pressure.
3. Add enough air to reach the
recommended air pressure.
Note: If you overfill the tire, release
air by pressing on the metal stem
in the center of the valve. Then
recheck the pressure with your tire
gauge.
4. Replace the valve cap.
5. Repeat this procedure for each
tire, including the spare.
396
F-150 (TFC) Canada/United States of America, enUSA, Edition date: 201808, Third-Printing- Wheels and Tires
Page 407 of 644

When the malfunction indicator is
illuminated, the system may not be able
to detect or signal low tire pressure as
intended. TPMS malfunctions may occur
for a variety of reasons, including the
installation of replacement or alternate
tires or wheels on the vehicle that prevent
the TPMS from functioning properly.
Always check the TPMS malfunction
telltale after replacing one or more tires or
wheels on your vehicle to ensure that the
replacement or alternate tires and wheels
allow the TPMS to continue to function
properly.
This device complies with part 15 of the
FCC Rules and with Licence exempt RSS
Standards of Industry Canada. Operation
is subject to the following two conditions:
•
This device may not cause harmful
interference.
• This device must accept any
interference received, including
interference that may cause undesired
operation. WARNING: Changes or
modifications not expressively approved
by the party responsible for compliance
could void the user's authority to operate
the equipment. The term "IC:" before the
radio certification number only signifies
that Industry Canada technical
specifications were met. Changing Tires With a Tire
Pressure Monitoring System Note:
Each road tire is equipped with a tire
pressure sensor located inside the wheel
and tire assembly cavity. The pressure
sensor is attached to the valve stem. The
pressure sensor is covered by the tire and is
not visible unless the tire is removed. Take
care when changing the tire to avoid
damaging the sensor.
You should always have your tires serviced
by an authorized dealer.
Periodically check the tire pressure, at least
monthly, using an accurate tire gauge. See
Inflating Your Tires in this chapter.
Understanding Your Tire Pressure
Monitoring System
The tire pressure monitoring system
measures pressure in your four road tires
and sends the tire pressure readings to
your vehicle.
404
F-150 (TFC) Canada/United States of America, enUSA, Edition date: 201808, Third-Printing- Wheels and TiresE142549
Page 413 of 644
When driving with the full-size dissimilar
spare wheel and tire assembly, it is
recommended that you do not:
•
Exceed 50 mph (80 km/h) in 4WD.
• Engage 4WD unless the vehicle is
stationary.
• Use 4WD on dry pavement.
The usage of a full-size dissimilar spare
wheel and tire assembly can lead to
impairment of the following:
• Handling, stability and braking
performance.
• Comfort and noise.
• Ground clearance and parking at curbs.
• Winter weather driving capability.
• Wet weather driving capability.
• Four-wheel drive capability.
When driving with the full-size dissimilar
spare wheel and tire assembly additional
caution should be given to:
• Towing a trailer.
• Driving vehicles equipped with a
camper body.
• Driving vehicles with a load on the
cargo rack.
Drive cautiously when using a full-size
dissimilar spare wheel and tire assembly
and seek service as soon as possible.
Tire Change Procedure WARNING:
When one of the front
wheels is off the ground, the
transmission alone will not prevent the
vehicle from moving or slipping off the
jack, even if the transmission is in park
(P). WARNING:
To help prevent your
vehicle from moving when changing a
wheel, shift the transmission into park
(P), set the parking brake and use an
appropriate block or wheel chock to
secure the wheel diagonally opposite to
the wheel being changed. For example,
when changing the front left wheel,
place an appropriate block or wheel
chock on the right rear wheel. WARNING:
Do not work on your
vehicle when the jack is the only support.
If the vehicle slips off the jack, you or
someone else could be seriously injured. WARNING:
Do not attempt to
change a tire on the side of the vehicle
close to moving traffic. Pull far enough
off the road to avoid the danger of being
hit when operating the jack or changing
the wheel. WARNING:
Always use the jack
provided as original equipment with your
vehicle. If using a jack other than the one
provided, make sure the jack capacity is
adequate for the vehicle weight,
including any vehicle cargo or
modifications. If you are unsure if the jack
capacity is adequate, contact the
authorized dealer. WARNING:
No person should
place any portion of their body under a
vehicle that is supported by a jack. WARNING: The jack supplied with
this vehicle is only intended for changing
wheels. Do not use the vehicle jack other
than when you are changing a wheel in
an emergency.
410
F-150 (TFC) Canada/United States of America, enUSA, Edition date: 201808, Third-Printing- Wheels and Tires
Page 431 of 644

CAPACITIES AND SPECIFICATIONS - 2.7L ECOBOOST™
Capacities
WARNING: The air conditioning refrigerant system contains refrigerant under
high pressure. Only qualified personnel should service the air conditioning refrigerant
system. Opening the air conditioning refrigerant system can cause personal injury. Capacity
Item
6.0 qt (5.7 L)
Engine oil (with oil filter)
15.1 qt (14.3 L)
Engine coolant
Between MIN/MAX on brake fluid reservoir
Brake fluid
3.5 pt (1.7 L)
Front axle fluid (Four-wheel drive)
5.5 pt (2.6 L)
Rear axle fluid
13.2 qt (12.5 L)1
Automatic transmission fluid
1.5 qt (1.4 L)
Transfer case fluid
Four-wheel drive (Electronic Shift-on-the-
Fly)
1.5 qt (1.4 L)
Transfer case fluid
Automatic four-wheel drive (Torque on
demand)
Fill as required
Windshield washer fluid
23.0 gal (87.1 L)
Fuel tank (Regular Cab and SuperCab)
26.0 gal (98.4 L)
Fuel tank (SuperCrew Cab)
36.0 gal (136.3 L)
Fuel tank
(Optional)
29 oz (0.82 kg)
A/C Refrigerant (U.S. and Canada)
31 oz (0.88 kg)
A/C Refrigerant (Mexico)
2.7 fl oz (80 ml)
A/C Refrigerant Compressor Oil
1 Approximate dry fill capacity. Actual amount could vary during fluid changes.
428
F-150 (TFC) Canada/United States of America, enUSA, Edition date: 201808, Third-Printing- Capacities and Specifications
Page 436 of 644

Capacity
Item
1.5 qt (1.4 L)
Transfer case fluid.
Four-wheel drive (Electronic Shift-on-the-
Fly).
1.5 qt (1.4 L)
Transfer case fluid.
Automatic four-wheel drive (Torque on
demand).
Fill as required
Windshield washer fluid.
26 gal (98.4 L)
Fuel tank.
22.5 qt (21.3 L)
Diesel Exhaust Fluid (DEF).
29 oz (0.82 kg)
A/C refrigerant.
2.7 fl oz (80 ml)
A/C refrigerant compressor oil.
1 Approximate dry fill capacity. Actual amount may vary during fluid changes.
Specifications
Materials Specification
Name
WSS-M2C214-B1
Recommended motor oil (U.S.):
Motorcraft® SAE 5W-30 Diesel Motor Oil
XO-5W30-QFA
WSS-M2C214-B1
Recommended motor oil (Canada):
Motorcraft® SAE 5W-30 Diesel Motor Oil
CXO-5W30-LFA
WSS-M97B57-A2
Engine coolant (U.S. and Mexico):
Motorcraft® Yellow Prediluted Antifreeze/Coolant
VC-13DL-G
WSS-M97B57-A2
Engine coolant (Canada):
Motorcraft® Yellow Prediluted Antifreeze/Coolant
CVC-13DL-G
WSS-M99C130-A
Diesel Exhaust Fluid (DEF) (U.S.):
Motorcraft® Diesel Exhaust Fluid
PM-27-GAL / PM-27-JUG
WSS-M99C130-A
Diesel Exhaust Fluid (DEF) (Canada):
Motorcraft® Diesel Exhaust Fluid
CPM-27-J
433
F-150 (TFC) Canada/United States of America, enUSA, Edition date: 201808, Third-Printing- Capacities and Specifications