hood open FORD F-150 2020 User Guide
[x] Cancel search | Manufacturer: FORD, Model Year: 2020, Model line: F-150, Model: FORD F-150 2020Pages: 625, PDF Size: 7.98 MB
Page 358 of 625
GENERAL INFORMATION
Have your vehicle serviced regularly to help
maintain its roadworthiness and resale
value. There is a large network of
authorized dealers that are there to help
you with their professional servicing
expertise. We believe that their specially
trained technicians are best qualified to
service your vehicle properly and expertly.
They are supported by a wide range of
highly specialized tools developed
specifically for servicing your vehicle.
If your vehicle requires professional service,
an authorized dealer can provide the
necessary parts and service. Check your
warranty information to find out which
parts and services are covered.
Use only recommended fuels, lubricants,
fluids and service parts conforming to
specifications. Motorcraft® parts are
designed and built to provide the best
performance in your vehicle.
Precautions
•
Do not work on a hot engine.
• Make sure that nothing gets caught in
moving parts.
• Do not work on a vehicle with the
engine running in an enclosed space,
unless you are sure you have enough
ventilation.
• Keep all open flames and other burning
material (such as cigarettes) away
from the battery and all fuel related
parts.
Working with the Engine Off
1. Set the parking brake and shift the transmission to park (P).
2. Switch off the engine.
3. Block the wheels. Working with the Engine On WARNING: To reduce the risk of
vehicle damage and personal burn
injuries, do not start your engine with the
air cleaner removed and do not remove
it while the engine is running.
1. Set the parking brake and shift the transmission to park (P).
2. Block the wheels.
OPENING AND CLOSING THE
HOOD
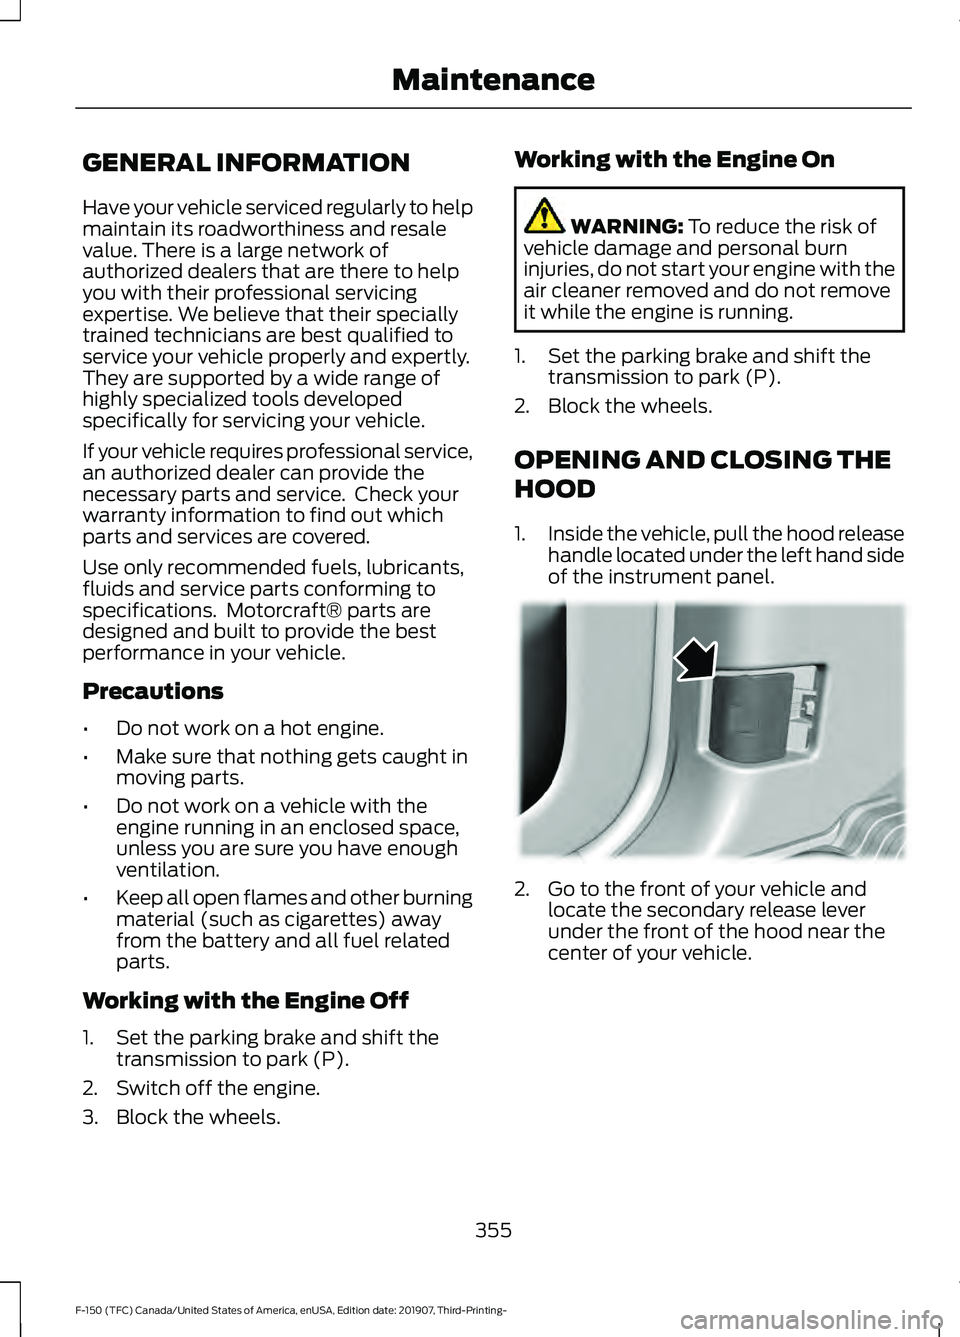
1. Inside the vehicle, pull the hood release
handle located under the left hand side
of the instrument panel. 2. Go to the front of your vehicle and
locate the secondary release lever
under the front of the hood near the
center of your vehicle.
355
F-150 (TFC) Canada/United States of America, enUSA, Edition date: 201907, Third-Printing- Maintenance E166491
Page 359 of 625
3. Raise the hood until the lift cylinders
hold it open.
4. To close, lower the hood and make sure that it is closed properly and fully
latched.
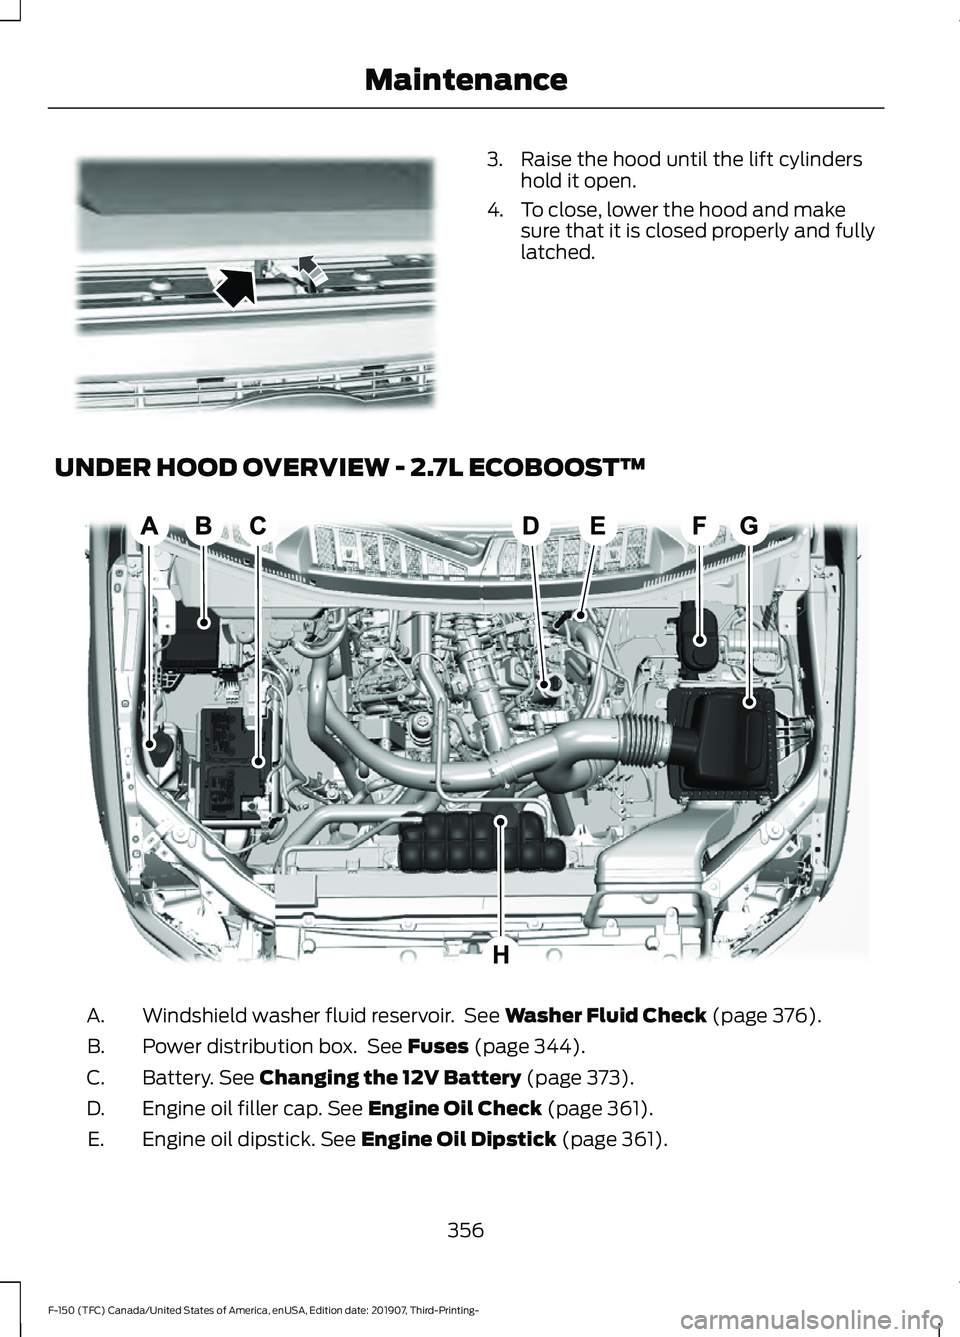
UNDER HOOD OVERVIEW - 2.7L ECOBOOST™ Windshield washer fluid reservoir. See Washer Fluid Check (page 376).
A.
Power distribution box. See
Fuses (page 344).
B.
Battery.
See Changing the 12V Battery (page 373).
C.
Engine oil filler cap.
See Engine Oil Check (page 361).
D.
Engine oil dipstick.
See Engine Oil Dipstick (page 361).
E.
356
F-150 (TFC) Canada/United States of America, enUSA, Edition date: 201907, Third-Printing- MaintenanceE190266 E307225
Page 364 of 625
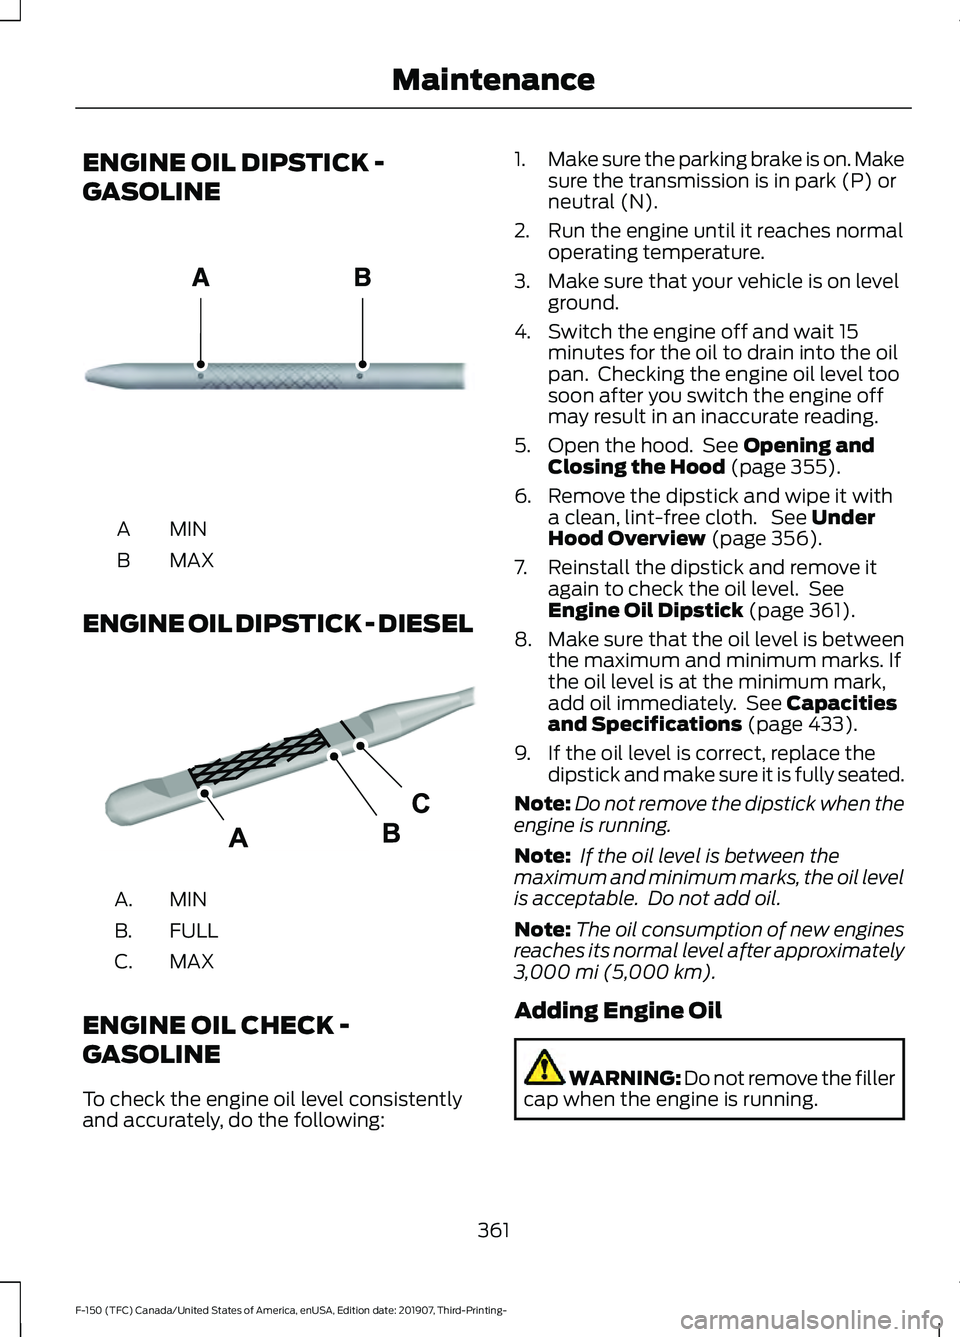
ENGINE OIL DIPSTICK -
GASOLINE
MINA
MAX
B
ENGINE OIL DIPSTICK - DIESEL MINA.
FULL
B.
MAX
C.
ENGINE OIL CHECK -
GASOLINE
To check the engine oil level consistently
and accurately, do the following: 1.
Make sure the parking brake is on. Make
sure the transmission is in park (P) or
neutral (N).
2. Run the engine until it reaches normal operating temperature.
3. Make sure that your vehicle is on level ground.
4. Switch the engine off and wait 15 minutes for the oil to drain into the oil
pan. Checking the engine oil level too
soon after you switch the engine off
may result in an inaccurate reading.
5. Open the hood. See Opening and
Closing the Hood (page 355).
6. Remove the dipstick and wipe it with a clean, lint-free cloth. See
Under
Hood Overview (page 356).
7. Reinstall the dipstick and remove it again to check the oil level. See
Engine Oil Dipstick
(page 361).
8. Make sure that the oil level is between
the maximum and minimum marks. If
the oil level is at the minimum mark,
add oil immediately. See
Capacities
and Specifications (page 433).
9. If the oil level is correct, replace the dipstick and make sure it is fully seated.
Note: Do not remove the dipstick when the
engine is running.
Note: If the oil level is between the
maximum and minimum marks, the oil level
is acceptable. Do not add oil.
Note: The oil consumption of new engines
reaches its normal level after approximately
3,000 mi (5,000 km)
.
Adding Engine Oil WARNING: Do not remove the filler
cap when the engine is running.
361
F-150 (TFC) Canada/United States of America, enUSA, Edition date: 201907, Third-Printing- MaintenanceE161560 E249448
Page 365 of 625
Do not use supplemental engine oil
additives because they are unnecessary
and could lead to engine damage that may
not be covered by the vehicle Warranty.
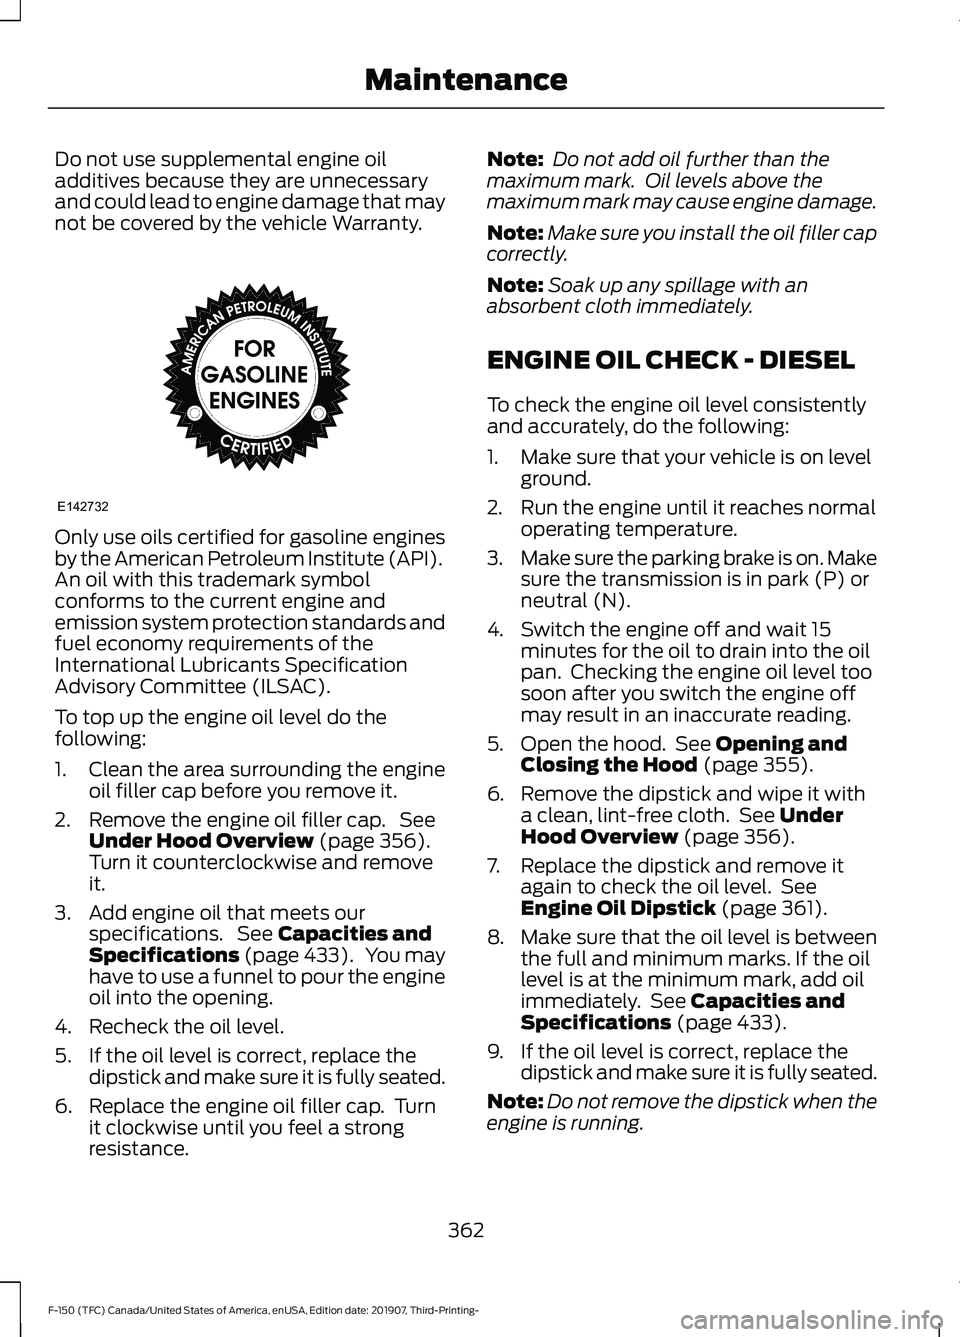
Only use oils certified for gasoline engines
by the American Petroleum Institute (API).
An oil with this trademark symbol
conforms to the current engine and
emission system protection standards and
fuel economy requirements of the
International Lubricants Specification
Advisory Committee (ILSAC).
To top up the engine oil level do the
following:
1. Clean the area surrounding the engine
oil filler cap before you remove it.
2. Remove the engine oil filler cap. See Under Hood Overview (page 356).
Turn it counterclockwise and remove
it.
3. Add engine oil that meets our specifications. See
Capacities and
Specifications (page 433). You may
have to use a funnel to pour the engine
oil into the opening.
4. Recheck the oil level.
5. If the oil level is correct, replace the dipstick and make sure it is fully seated.
6. Replace the engine oil filler cap. Turn it clockwise until you feel a strong
resistance. Note:
Do not add oil further than the
maximum mark. Oil levels above the
maximum mark may cause engine damage.
Note: Make sure you install the oil filler cap
correctly.
Note: Soak up any spillage with an
absorbent cloth immediately.
ENGINE OIL CHECK - DIESEL
To check the engine oil level consistently
and accurately, do the following:
1. Make sure that your vehicle is on level ground.
2. Run the engine until it reaches normal operating temperature.
3. Make sure the parking brake is on. Make
sure the transmission is in park (P) or
neutral (N).
4. Switch the engine off and wait 15 minutes for the oil to drain into the oil
pan. Checking the engine oil level too
soon after you switch the engine off
may result in an inaccurate reading.
5. Open the hood. See
Opening and
Closing the Hood (page 355).
6. Remove the dipstick and wipe it with a clean, lint-free cloth. See
Under
Hood Overview (page 356).
7. Replace the dipstick and remove it again to check the oil level. See
Engine Oil Dipstick
(page 361).
8. Make sure that the oil level is between
the full and minimum marks. If the oil
level is at the minimum mark, add oil
immediately. See
Capacities and
Specifications (page 433).
9. If the oil level is correct, replace the dipstick and make sure it is fully seated.
Note: Do not remove the dipstick when the
engine is running.
362
F-150 (TFC) Canada/United States of America, enUSA, Edition date: 201907, Third-Printing- MaintenanceE142732
Page 368 of 625
Note:
Failure to use the correct air filter
element may result in severe engine
damage. Resulting component damage
may not be covered by the vehicle Warranty.
Change the air filter element at the correct
service interval. See Scheduled
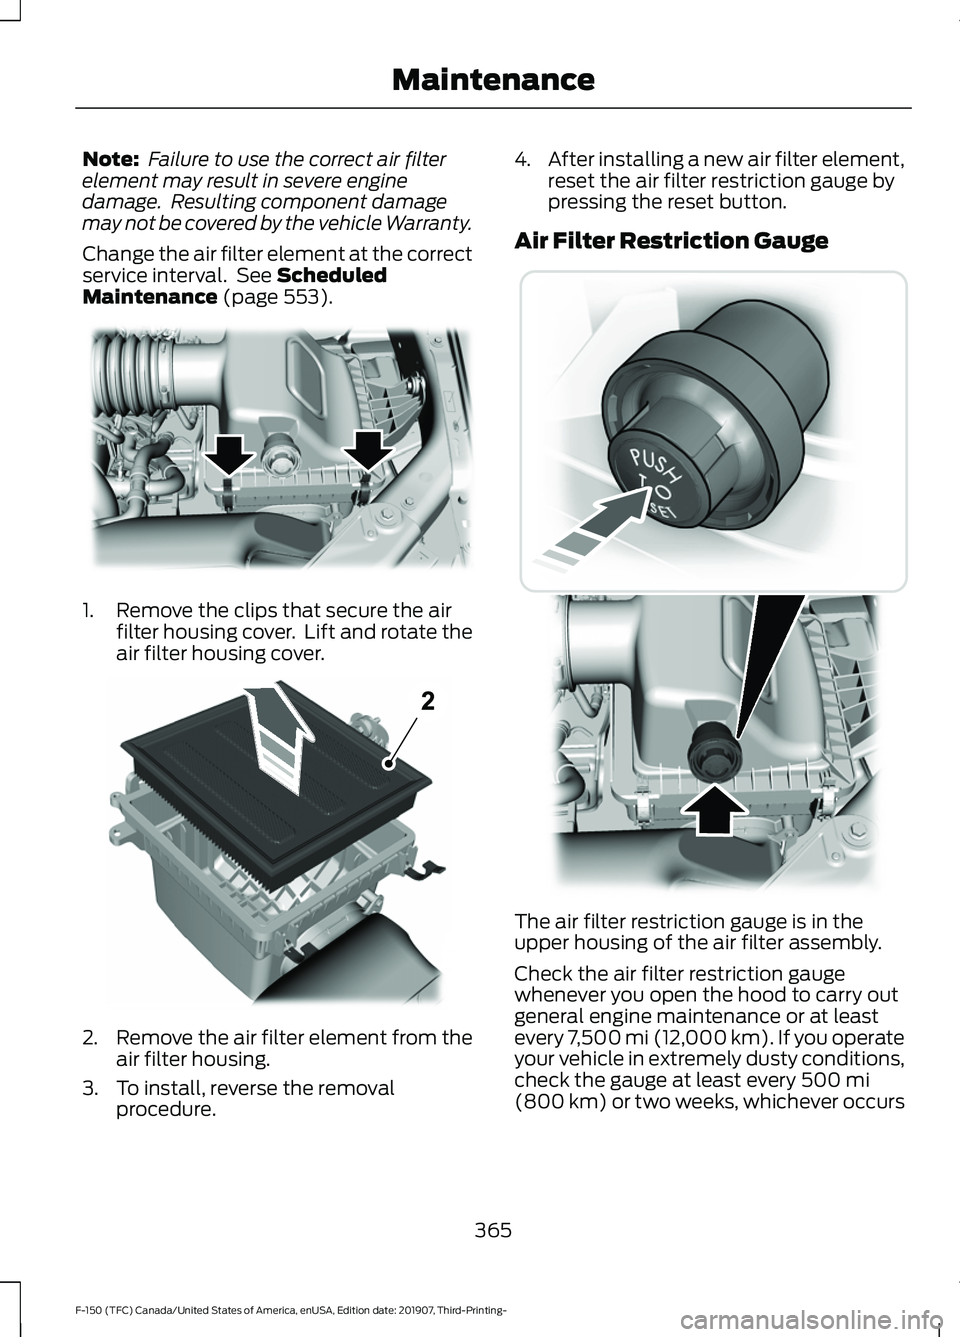
Maintenance (page 553). 1. Remove the clips that secure the air
filter housing cover. Lift and rotate the
air filter housing cover. 2.
Remove the air filter element from the
air filter housing.
3. To install, reverse the removal procedure. 4.
After installing a new air filter element,
reset the air filter restriction gauge by
pressing the reset button.
Air Filter Restriction Gauge The air filter restriction gauge is in the
upper housing of the air filter assembly.
Check the air filter restriction gauge
whenever you open the hood to carry out
general engine maintenance or at least
every 7,500 mi (12,000 km). If you operate
your vehicle in extremely dusty conditions,
check the gauge at least every
500 mi
(800 km) or two weeks, whichever occurs
365
F-150 (TFC) Canada/United States of America, enUSA, Edition date: 201907, Third-Printing- MaintenanceE254171 E254172 E254173
Page 369 of 625
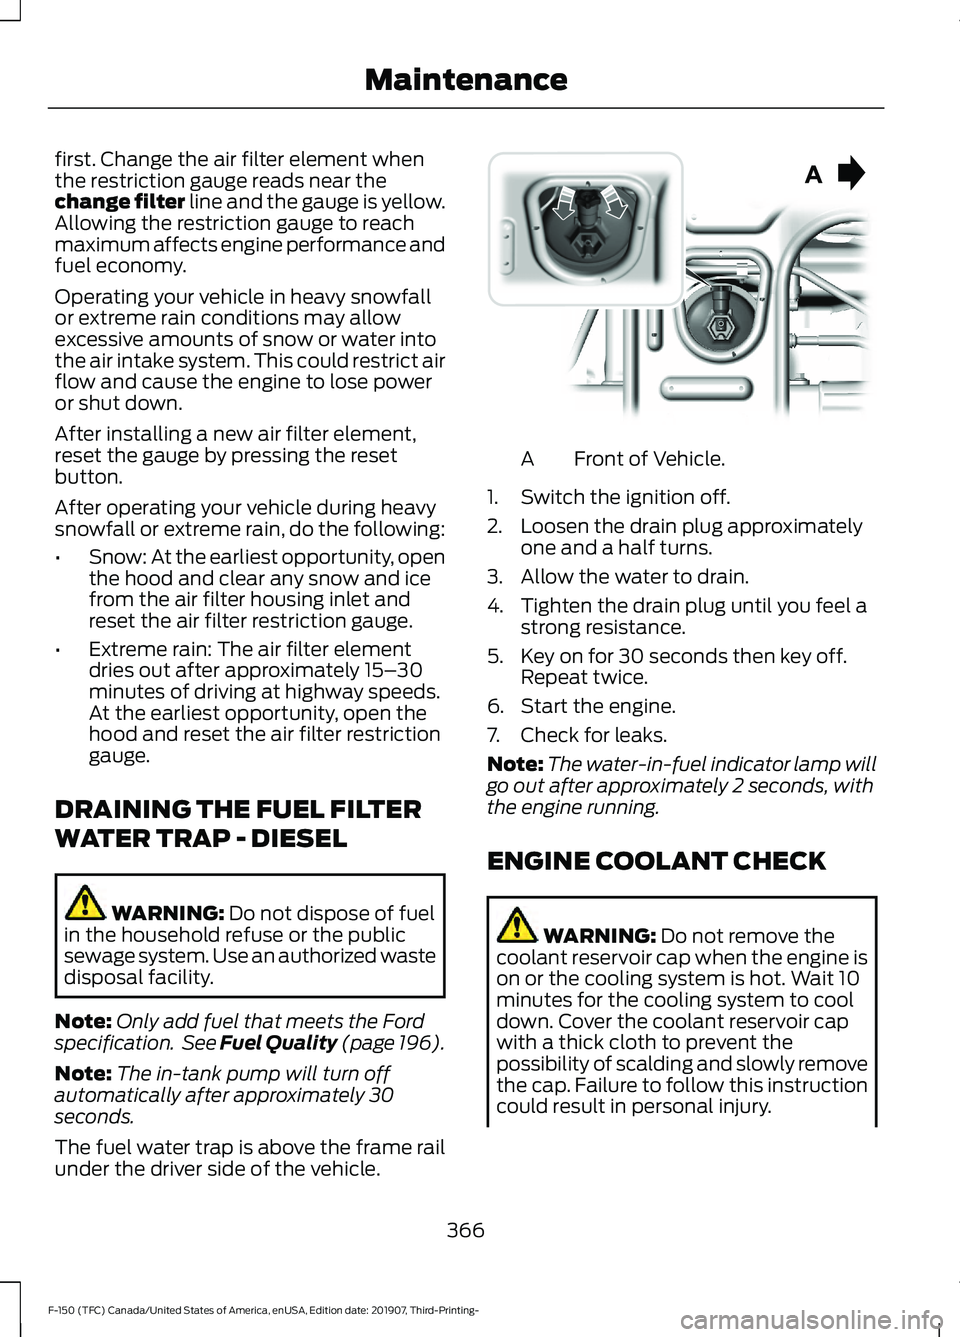
first. Change the air filter element when
the restriction gauge reads near the
change filter line and the gauge is yellow.
Allowing the restriction gauge to reach
maximum affects engine performance and
fuel economy.
Operating your vehicle in heavy snowfall
or extreme rain conditions may allow
excessive amounts of snow or water into
the air intake system. This could restrict air
flow and cause the engine to lose power
or shut down.
After installing a new air filter element,
reset the gauge by pressing the reset
button.
After operating your vehicle during heavy
snowfall or extreme rain, do the following:
•
Snow: At the earliest opportunity, open
the hood and clear any snow and ice
from the air filter housing inlet and
reset the air filter restriction gauge.
• Extreme rain: The air filter element
dries out after approximately 15– 30
minutes of driving at highway speeds.
At the earliest opportunity, open the
hood and reset the air filter restriction
gauge.
DRAINING THE FUEL FILTER
WATER TRAP - DIESEL WARNING: Do not dispose of fuel
in the household refuse or the public
sewage system. Use an authorized waste
disposal facility.
Note: Only add fuel that meets the Ford
specification. See
Fuel Quality (page 196).
Note: The in-tank pump will turn off
automatically after approximately 30
seconds.
The fuel water trap is above the frame rail
under the driver side of the vehicle. Front of Vehicle.
A
1. Switch the ignition off.
2. Loosen the drain plug approximately one and a half turns.
3. Allow the water to drain.
4. Tighten the drain plug until you feel a strong resistance.
5. Key on for 30 seconds then key off. Repeat twice.
6. Start the engine.
7. Check for leaks.
Note: The water-in-fuel indicator lamp will
go out after approximately 2 seconds, with
the engine running.
ENGINE COOLANT CHECK WARNING:
Do not remove the
coolant reservoir cap when the engine is
on or the cooling system is hot. Wait 10
minutes for the cooling system to cool
down. Cover the coolant reservoir cap
with a thick cloth to prevent the
possibility of scalding and slowly remove
the cap. Failure to follow this instruction
could result in personal injury.
366
F-150 (TFC) Canada/United States of America, enUSA, Edition date: 201907, Third-Printing- Maintenance E254226
Page 378 of 625
Electrical Accessory Installation
To make sure the battery management
system works correctly, do not connect an
electrical device ground connection
directly to the battery negative post. This
can cause inaccurate measurements of
the battery condition and potential
incorrect system operation.
Note:
If you add electrical accessories or
components to the vehicle, it may adversely
affect battery performance and durability.
This may also affect the performance of
other electrical systems in the vehicle.
ADJUSTING THE HEADLAMPS
Vertical Aim Adjustment
The headlamps on your vehicle are
properly aimed at the assembly plant. If
your vehicle has been in an accident,
contact an authorized dealer to check and
realign your headlamps.
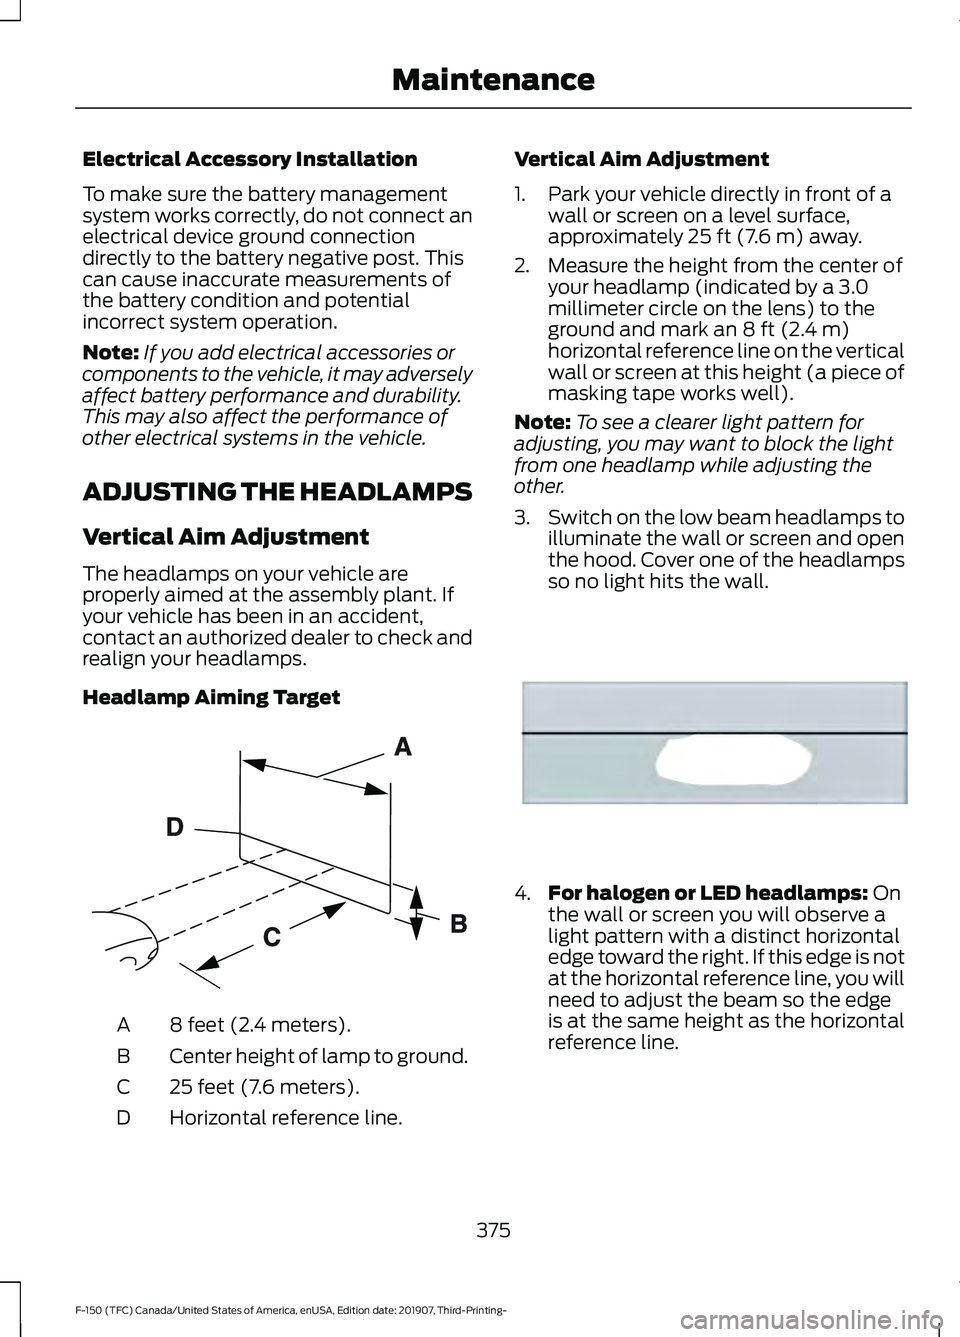
Headlamp Aiming Target 8 feet (2.4 meters).
A
Center height of lamp to ground.
B
25 feet (7.6 meters).
C
Horizontal reference line.
D Vertical Aim Adjustment
1. Park your vehicle directly in front of a
wall or screen on a level surface,
approximately 25 ft (7.6 m) away.
2. Measure the height from the center of your headlamp (indicated by a 3.0
millimeter circle on the lens) to the
ground and mark an
8 ft (2.4 m)
horizontal reference line on the vertical
wall or screen at this height (a piece of
masking tape works well).
Note: To see a clearer light pattern for
adjusting, you may want to block the light
from one headlamp while adjusting the
other.
3. Switch on the low beam headlamps to
illuminate the wall or screen and open
the hood. Cover one of the headlamps
so no light hits the wall. 4.
For halogen or LED headlamps:
On
the wall or screen you will observe a
light pattern with a distinct horizontal
edge toward the right. If this edge is not
at the horizontal reference line, you will
need to adjust the beam so the edge
is at the same height as the horizontal
reference line.
375
F-150 (TFC) Canada/United States of America, enUSA, Edition date: 201907, Third-Printing- MaintenanceE142592 E167358
Page 382 of 625
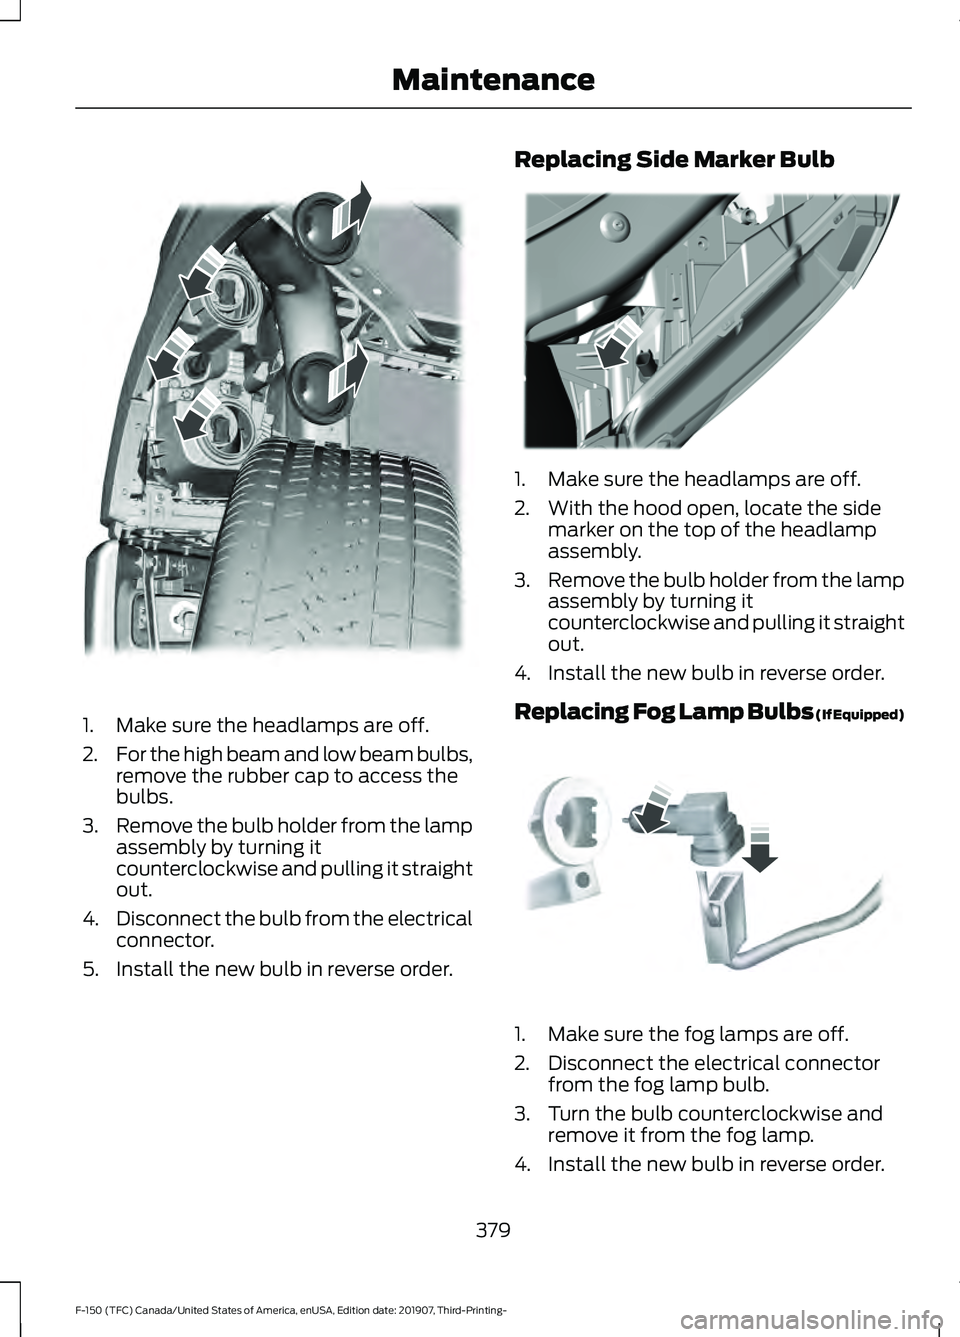
1. Make sure the headlamps are off.
2.
For the high beam and low beam bulbs,
remove the rubber cap to access the
bulbs.
3. Remove the bulb holder from the lamp
assembly by turning it
counterclockwise and pulling it straight
out.
4. Disconnect the bulb from the electrical
connector.
5. Install the new bulb in reverse order. Replacing Side Marker Bulb
1. Make sure the headlamps are off.
2. With the hood open, locate the side
marker on the top of the headlamp
assembly.
3. Remove the bulb holder from the lamp
assembly by turning it
counterclockwise and pulling it straight
out.
4. Install the new bulb in reverse order.
Replacing Fog Lamp Bulbs (If Equipped) 1. Make sure the fog lamps are off.
2. Disconnect the electrical connector
from the fog lamp bulb.
3. Turn the bulb counterclockwise and remove it from the fog lamp.
4. Install the new bulb in reverse order.
379
F-150 (TFC) Canada/United States of America, enUSA, Edition date: 201907, Third-Printing- MaintenanceE183763 E183764 E163826
Page 611 of 625
Using Seek, Fast Forward and
Reverse............................................................. 482
Audio Unit - Vehicles Without: SYNC 3.......................................................................478
Accessing the Apps Menu.............................. 479
Accessing the Clock Settings........................ 479
Accessing the Media Source Menu.............479
Accessing the Phone Features..................... 479
Accessing the Settings Menu........................ 479
Accessing the Sound Settings...................... 479
Adjusting the Volume....................................... 479
Changing Radio Stations................................ 479
Listening to the Radio..................................... 480
Playing or Pausing Media............................... 480
Switching Radio Text On and Off...............480
Switching Repeat Mode On and Off.........480
Switching Shuffle Mode On and Off.........480
Switching the Audio Unit On and Off.......480
Switching the Display On and Off..............480
Using Seek, Fast Forward and Reverse............................................................ 480
Using the Display Control.............................. 480
Using the Number Block................................ 480
Autolamps........................................................96 Windshield Wiper Activated
Headlamps........................................................ 96
Automatic Climate Control.......................152 Directing the Airflow.......................................... 152
Setting the Blower Motor Speed.................. 153
Setting the Temperature.................................. 153
Switching Auto Mode On and Off................153
Switching Dual Zone Mode On and Off........................................................................\
153
Switching Maximum Air Conditioning On and Off............................................................... 153
Switching Maximum Defrost On and Off........................................................................\
153
Switching Recirculated Air On and Off....................................................................... 154
Switching the Air Conditioning On and Off........................................................................\
153
Switching the Climate Control On and Off........................................................................\
153
Automatic High Beam Control.................101
Automatic High Beam Control Indicators.......................................................101
Automatic Transmission
............................217
Brake-Shift Interlock........................................ 220If Your Vehicle Gets Stuck in Mud or
Snow.................................................................. 222
Understanding the Shift Positions of your Automatic Transmission............................. 217
Understanding your SelectShift™ Automatic Transmission............................. 219
Automatic Transmission Fluid Check..............................................................371
Auto-Start-Stop...........................................190 Disabling Auto-Start-Stop............................... 191
Enabling Auto-Start-Stop.............................. 190
Autowipers
.......................................................93
Auxiliary Power Points................................175
400 Watt AC Power Point............................... 175
DC Power Point.................................................... 175
Locations................................................................ 176
B
Battery See: Changing the 12V Battery...................... 373
Bed Access
....................................................286
Box Side Step..................................................... 286
Bed Extender...................................................80 Grocery Mode......................................................... 81
Tailgate Mode....................................................... 80
Bed Ramps
.....................................................287
Installing the Ramp Holder........................... 289
Stowing the Bed Ramp................................... 288
Using the Bed Ramp......................................... 287
Blind Spot Information System.............266 Blind Spot Information System with Trailer
Tow..................................................................... 267
Switching the System On and Off...............270
System Errors...................................................... 270
Using the Blind Spot Information System.............................................................. 267
BLIS See: Blind Spot Information System.........266
Body Styling Kits.........................................390
Bonnet Lock See: Opening and Closing the Hood..........355
Booster Seats
..................................................35
Types of Booster Seats...................................... 35
Brake Fluid Check.........................................372 Brake Fluid Service Interval............................ 372
Brakes...............................................................233 General Information.......................................... 233
608
F-150 (TFC) Canada/United States of America, enUSA, Edition date: 201907, Third-Printing- Index
Page 618 of 625
Hints on Controlling the Interior Climate
- Vehicles With: Automatic
Temperature Control................................154
Defogging the Side Windows in Cold
Weather............................................................. 155
General Hints....................................................... 154
Quickly Cooling the Interior............................. 155
Quickly Heating the Interior............................ 154
Recommended Settings for Cooling...........155
Recommended Settings for Heating..........155
Hints on Controlling the Interior Climate - Vehicles With: Manual Temperature
Control...........................................................155
Defogging the Side Windows in Cold Weather............................................................. 156
General Hints....................................................... 155
Quickly Cooling the Interior............................. 155
Quickly Heating the Interior............................ 155
Recommended Settings for Cooling...........155
Recommended Settings for Heating..........155
Vehicle Stationary for Extended Periods During Extreme High Ambient
Temperatures.................................................. 156
Hints on Driving With Anti-Lock Brakes
...........................................................234
Hood Lock See: Opening and Closing the Hood..........355
Horn......................................................................91
How Does the Rear Occupant Alert System Work
...............................................169
I
Ignition Switch...............................................179
In California (U.S. Only)
............................338
Information Display Control........................91
Information Displays...................................120 General Information.......................................... 120
Information Messages................................132 4WD........................................................................\
. 149
Active Park............................................................. 133
Adaptive Cruise Control................................... 133
AdvanceTrac and Traction Control..............134
Airbag...................................................................... 134
Alarm and Security............................................ 135
Battery and Charging System........................ 135
Blind Spot Information and Cross Traffic Alert System.................................................... 136Diesel Messages.................................................
136
Doors and Locks................................................. 139
Driver Alert............................................................. 139
Drivetrain............................................................... 140
Engine..................................................................... 140
Fuel........................................................................\
.. 140
Keys and Intelligent Access............................. 141
Lane Keeping System....................................... 142
Maintenance......................................................... 142
MyKey...................................................................... 143
Off Road................................................................. 143
Park Aid.................................................................. 144
Park Brake............................................................. 144
Power Steering.................................................... 145
Pre-Collision Assist............................................ 145
Pro Trailer Backup Assist................................. 146
Remote Start........................................................ 147
Seats........................................................................\
147
Side-Wind.............................................................. 147
Starting System ................................................. 148
Tire Pressure Monitoring System.................148
Trailer...................................................................... 148
Installing Child Restraints
...........................24
Child Seats.............................................................. 24
Combining Seatbelt and LATCH Lower Anchors for Attaching Child Safety
Seats.................................................................... 32
Front Seat Tether Strap Attachment (Regular Cab)................................................... 33
Rear Seat Tether Strap Attachment (Crew Cab and Super Cab)...................................... 34
Use of Inboard Lower Anchors from the Outermost Seating Positions (Center
Seating Use) ..................................................... 32
Using Inflatable Seatbelts (Rear Seat Outermost Positions).................................... 28
Using Lap and Shoulder Belts (Except Front Center Position of Super Cab and Crew
Cab)...................................................................... 24
Using Lap and Shoulder Belts (Front Center Position of Super Cab and Crew
Cab)...................................................................... 26
Using Lower Anchors and Tethers for CHildren (LATCH)............................................. 31
Using Tether Straps............................................. 32
Instrument Cluster
.........................................111
Instrument Lighting Dimmer.....................96
Instrument Panel...........................................20
615
F-150 (TFC) Canada/United States of America, enUSA, Edition date: 201907, Third-Printing- Index