maintenance FORD F-150 2021 Service Manual
[x] Cancel search | Manufacturer: FORD, Model Year: 2021, Model line: F-150, Model: FORD F-150 2021Pages: 796, PDF Size: 13.89 MB
Page 531 of 796
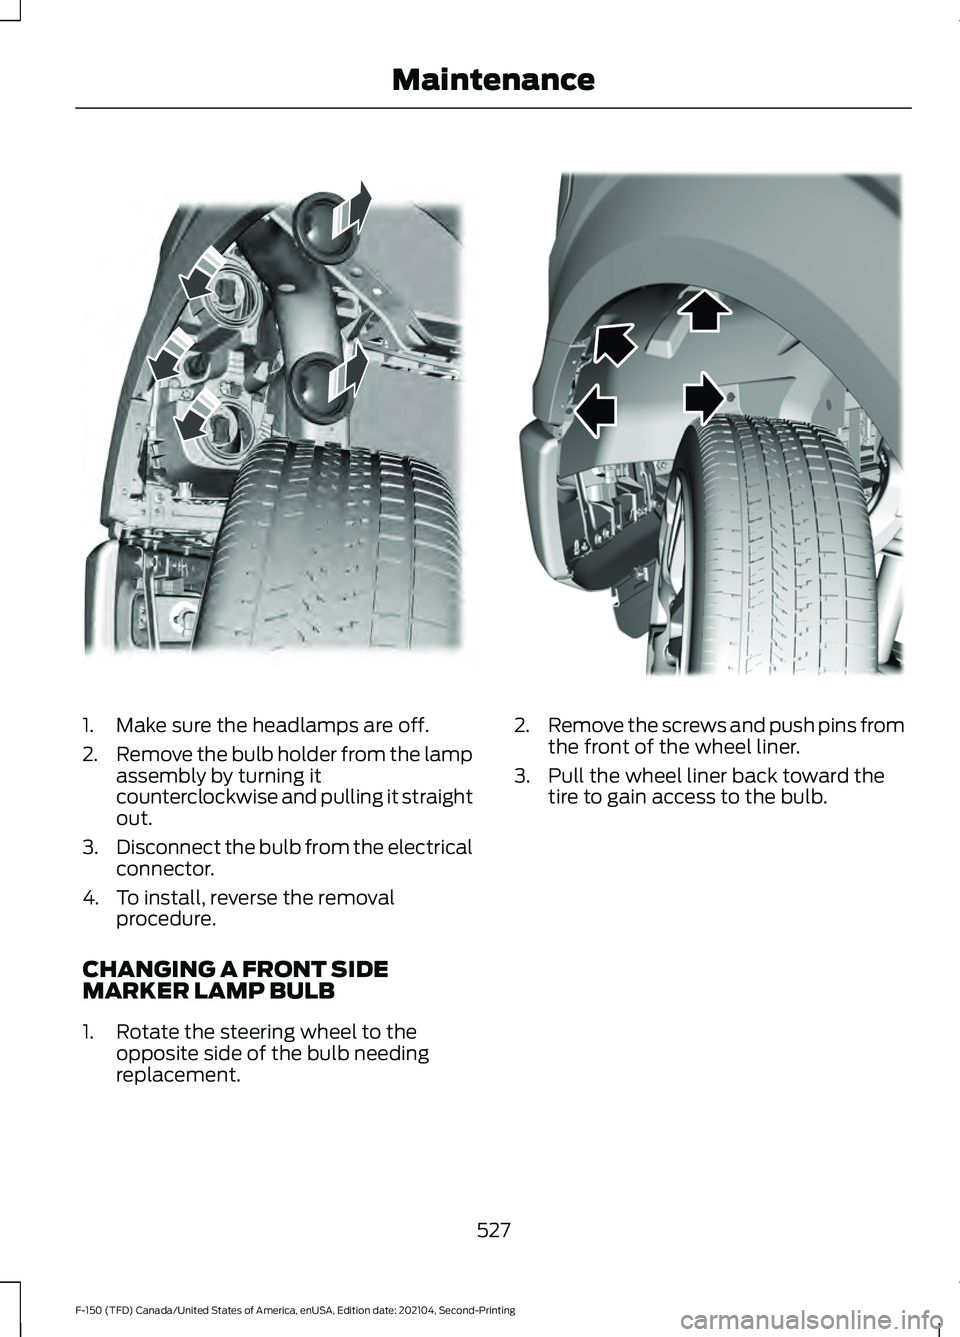
1. Make sure the headlamps are off.
2.
Remove the bulb holder from the lamp
assembly by turning it
counterclockwise and pulling it straight
out.
3. Disconnect the bulb from the electrical
connector.
4. To install, reverse the removal procedure.
CHANGING A FRONT SIDE
MARKER LAMP BULB
1. Rotate the steering wheel to the opposite side of the bulb needing
replacement. 2.
Remove the screws and push pins from
the front of the wheel liner.
3. Pull the wheel liner back toward the tire to gain access to the bulb.
527
F-150 (TFD) Canada/United States of America, enUSA, Edition date: 202104, Second-Printing MaintenanceE183763 E183762
Page 532 of 796
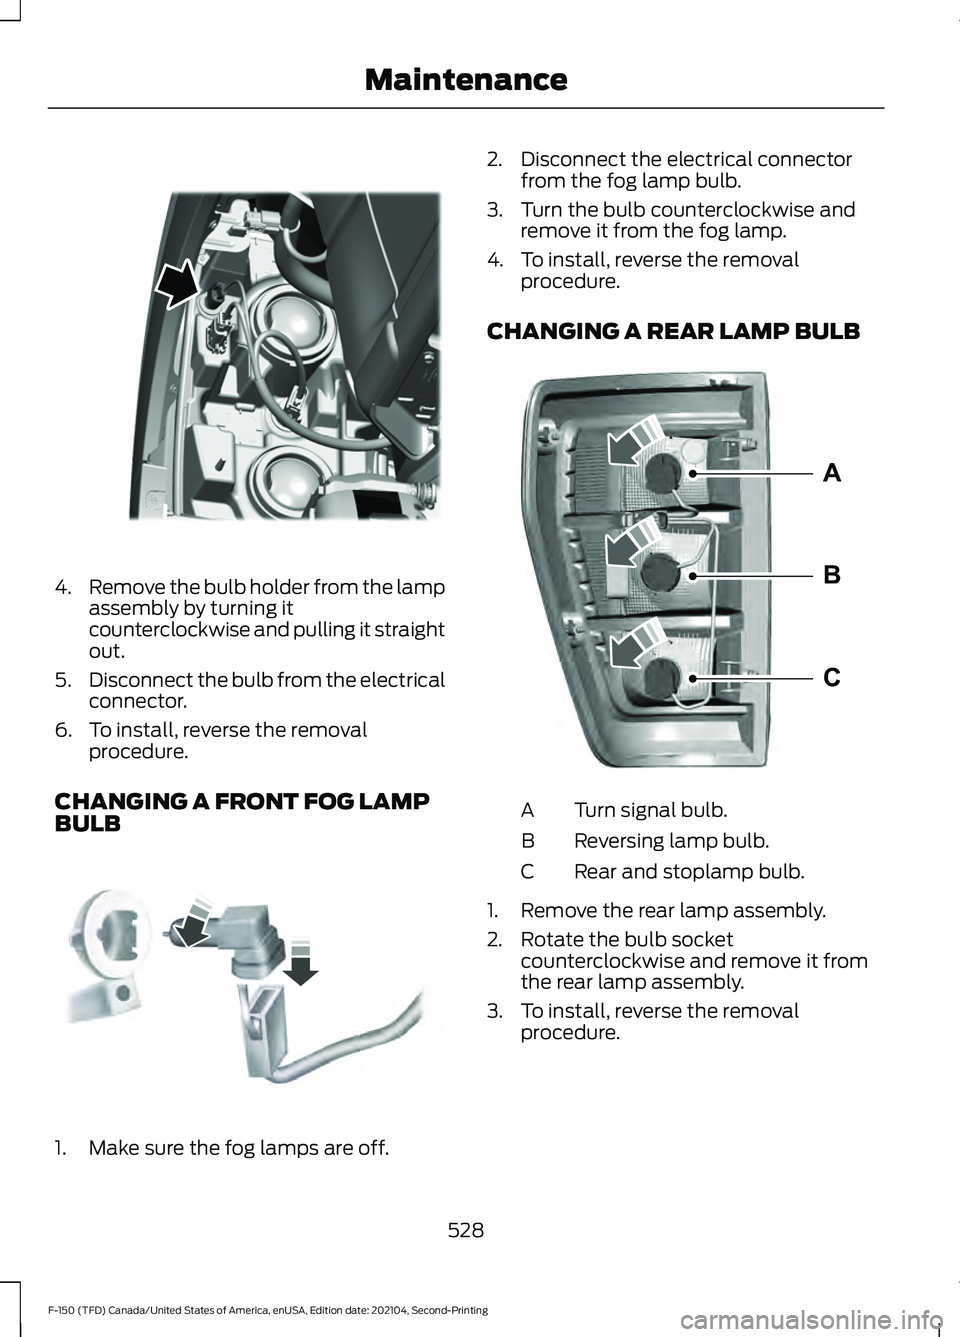
4.
Remove the bulb holder from the lamp
assembly by turning it
counterclockwise and pulling it straight
out.
5. Disconnect the bulb from the electrical
connector.
6. To install, reverse the removal procedure.
CHANGING A FRONT FOG LAMP
BULB 1. Make sure the fog lamps are off. 2. Disconnect the electrical connector
from the fog lamp bulb.
3. Turn the bulb counterclockwise and remove it from the fog lamp.
4. To install, reverse the removal procedure.
CHANGING A REAR LAMP BULB Turn signal bulb.
A
Reversing lamp bulb.
B
Rear and stoplamp bulb.
C
1. Remove the rear lamp assembly.
2. Rotate the bulb socket counterclockwise and remove it from
the rear lamp assembly.
3. To install, reverse the removal procedure.
528
F-150 (TFD) Canada/United States of America, enUSA, Edition date: 202104, Second-Printing MaintenanceE338050 E163826 A
B
CE358899
Page 533 of 796
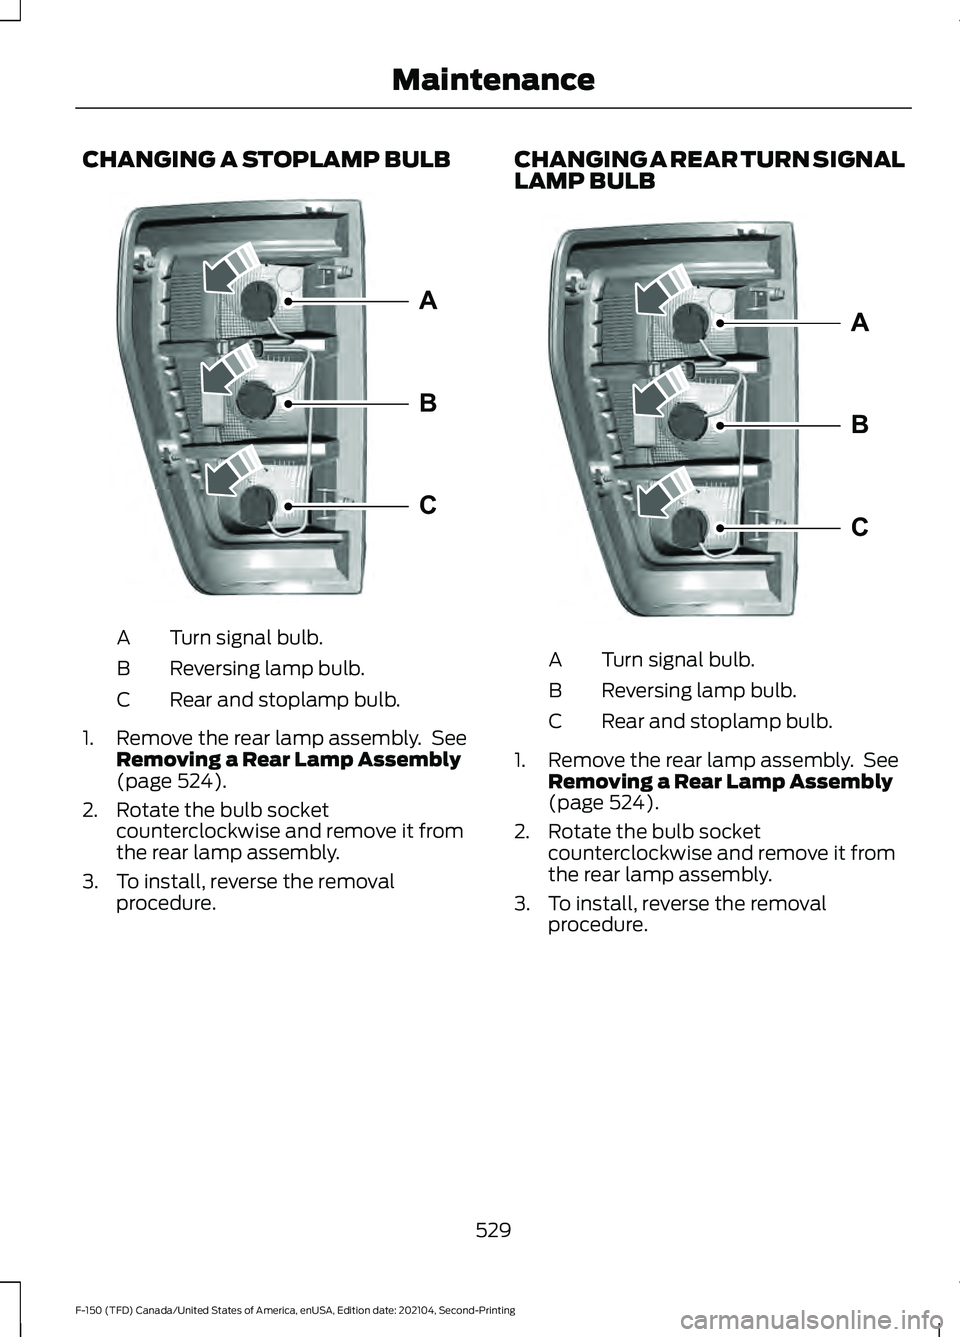
CHANGING A STOPLAMP BULB
Turn signal bulb.
A
Reversing lamp bulb.
B
Rear and stoplamp bulb.
C
1. Remove the rear lamp assembly. See Removing a Rear Lamp Assembly
(page 524).
2. Rotate the bulb socket counterclockwise and remove it from
the rear lamp assembly.
3. To install, reverse the removal procedure. CHANGING A REAR TURN SIGNAL
LAMP BULB
Turn signal bulb.
A
Reversing lamp bulb.
B
Rear and stoplamp bulb.
C
1. Remove the rear lamp assembly. See Removing a Rear Lamp Assembly
(page 524).
2. Rotate the bulb socket counterclockwise and remove it from
the rear lamp assembly.
3. To install, reverse the removal procedure.
529
F-150 (TFD) Canada/United States of America, enUSA, Edition date: 202104, Second-Printing MaintenanceA
B
CE358899 A
B
CE358899
Page 534 of 796
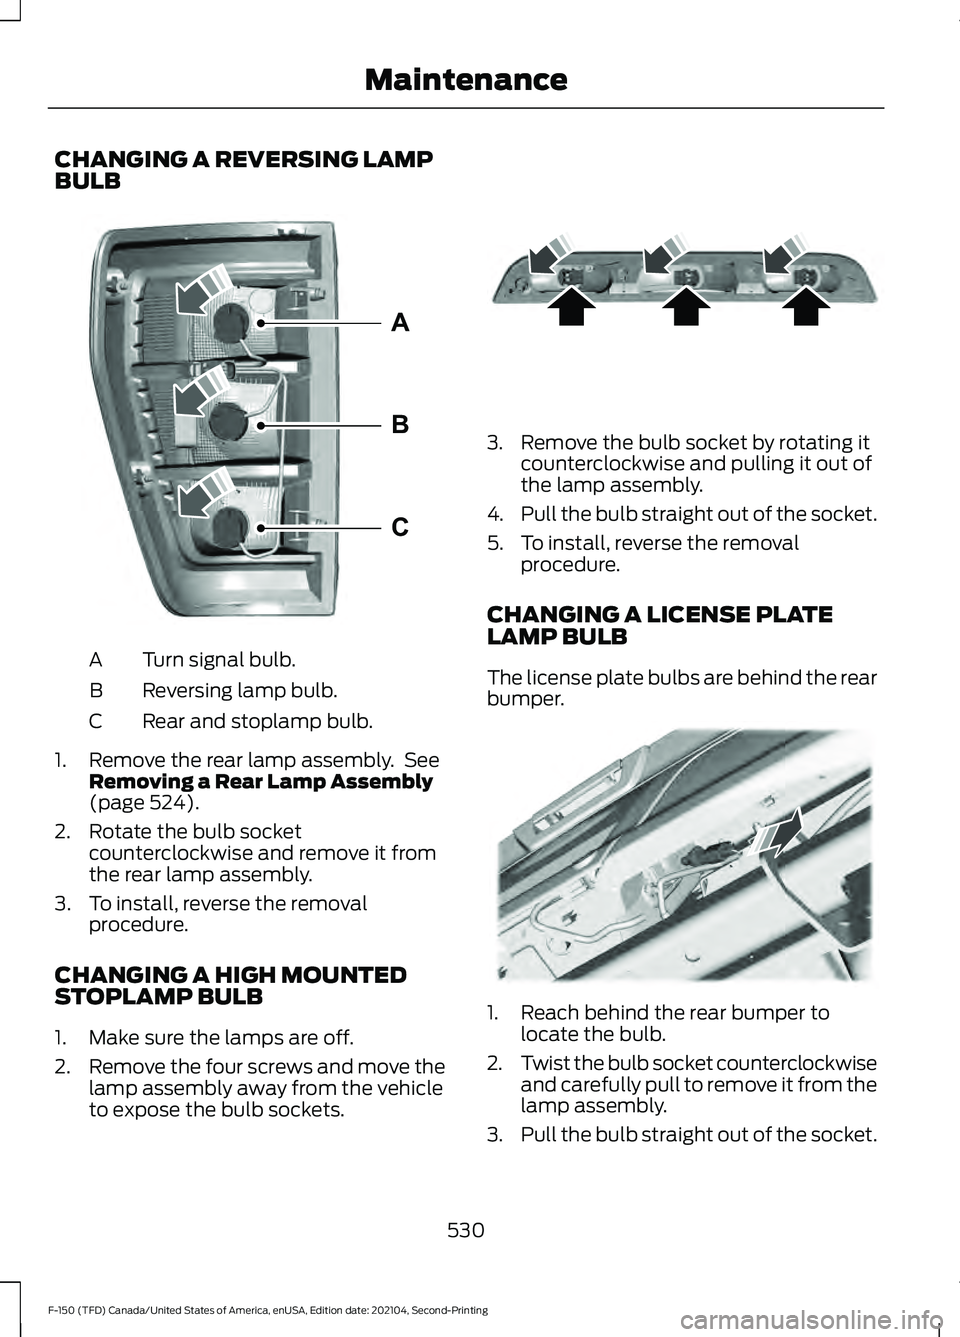
CHANGING A REVERSING LAMP
BULB
Turn signal bulb.
A
Reversing lamp bulb.
B
Rear and stoplamp bulb.
C
1. Remove the rear lamp assembly. See Removing a Rear Lamp Assembly
(page 524).
2. Rotate the bulb socket counterclockwise and remove it from
the rear lamp assembly.
3. To install, reverse the removal procedure.
CHANGING A HIGH MOUNTED
STOPLAMP BULB
1. Make sure the lamps are off.
2. Remove the four screws and move the
lamp assembly away from the vehicle
to expose the bulb sockets. 3. Remove the bulb socket by rotating it
counterclockwise and pulling it out of
the lamp assembly.
4. Pull the bulb straight out of the socket.
5. To install, reverse the removal procedure.
CHANGING A LICENSE PLATE
LAMP BULB
The license plate bulbs are behind the rear
bumper. 1. Reach behind the rear bumper to
locate the bulb.
2. Twist the bulb socket counterclockwise
and carefully pull to remove it from the
lamp assembly.
3. Pull the bulb straight out of the socket.
530
F-150 (TFD) Canada/United States of America, enUSA, Edition date: 202104, Second-Printing MaintenanceA
B
CE358899 E187290 E187794
Page 535 of 796
4. To install, reverse the removal
procedure.
INTERIOR BULBS
INTERIOR BULB SPECIFICATION
CHART
Your vehicle has LED lamps. These are not
serviceable items. See an authorized dealer
if they fail.
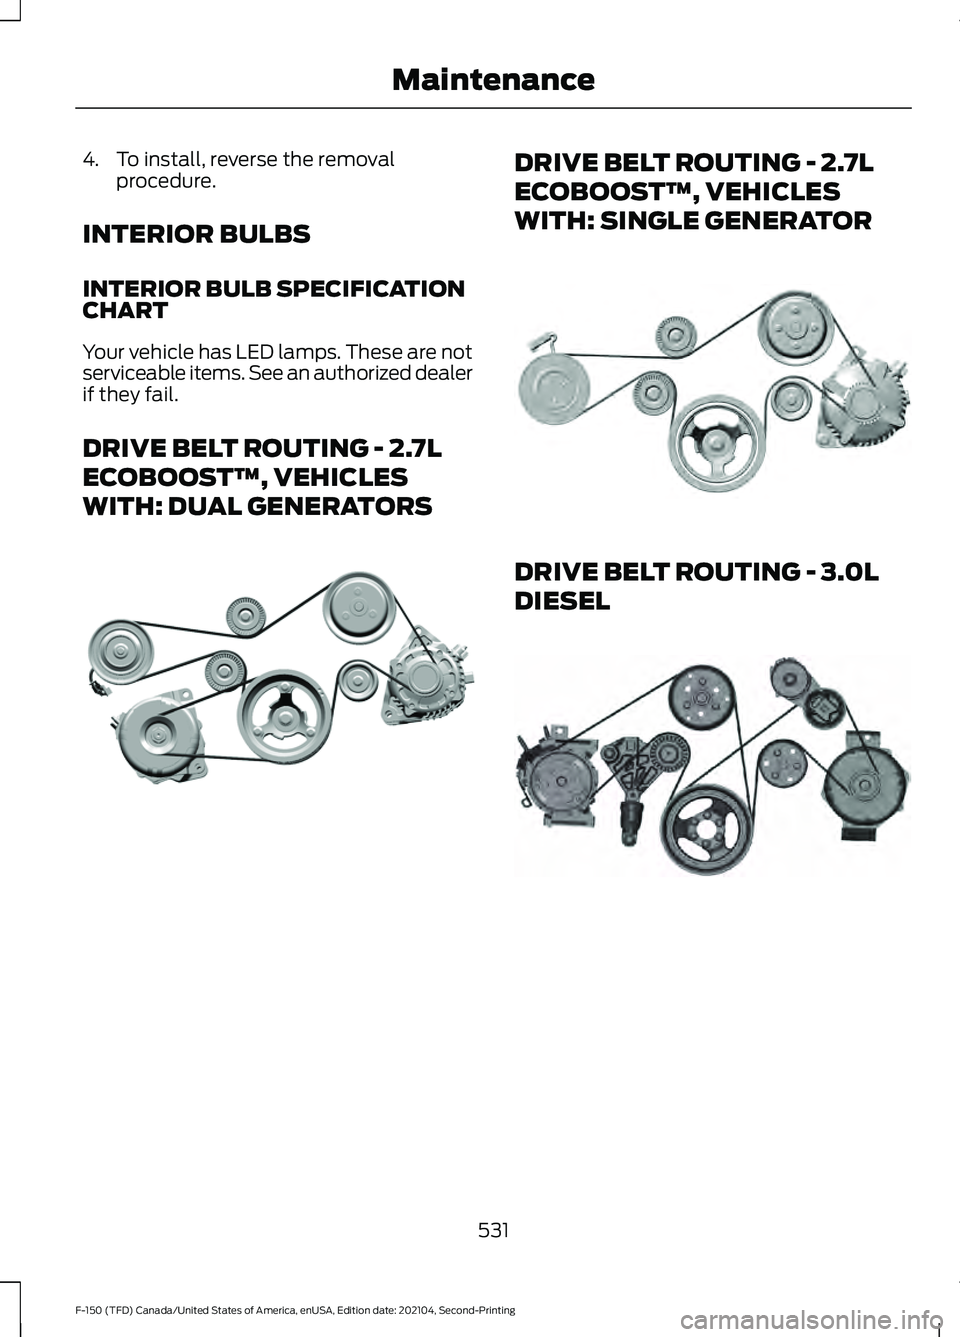
DRIVE BELT ROUTING - 2.7L
ECOBOOST™, VEHICLES
WITH: DUAL GENERATORS DRIVE BELT ROUTING - 2.7L
ECOBOOST™, VEHICLES
WITH: SINGLE GENERATOR
DRIVE BELT ROUTING - 3.0L
DIESEL
531
F-150 (TFD) Canada/United States of America, enUSA, Edition date: 202104, Second-Printing MaintenanceE312231 E176088 E249449
Page 536 of 796
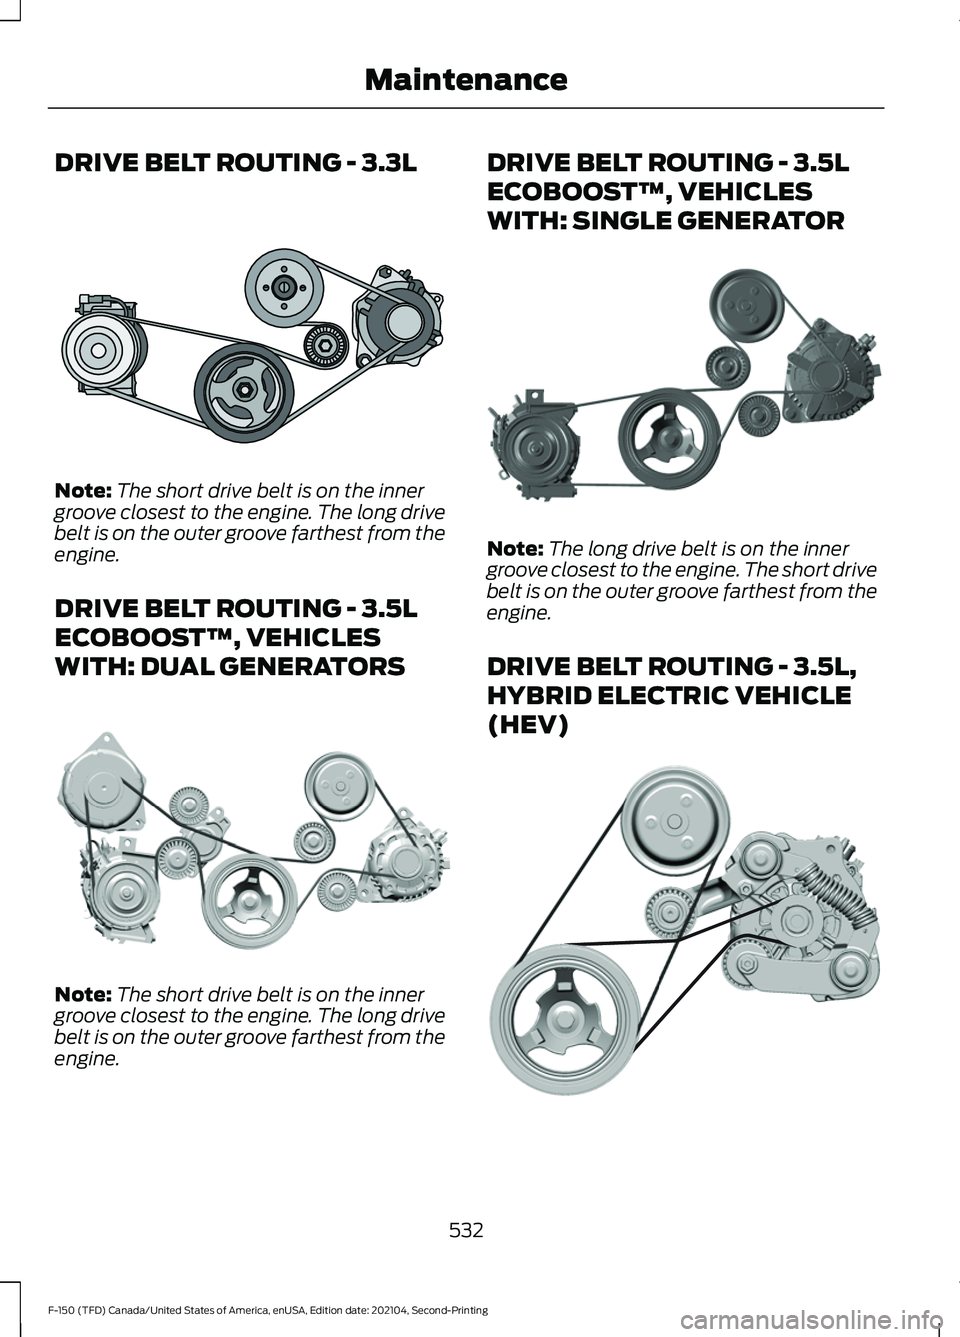
DRIVE BELT ROUTING - 3.3L
Note:
The short drive belt is on the inner
groove closest to the engine. The long drive
belt is on the outer groove farthest from the
engine.
DRIVE BELT ROUTING - 3.5L
ECOBOOST™, VEHICLES
WITH: DUAL GENERATORS Note:
The short drive belt is on the inner
groove closest to the engine. The long drive
belt is on the outer groove farthest from the
engine. DRIVE BELT ROUTING - 3.5L
ECOBOOST™, VEHICLES
WITH: SINGLE GENERATOR
Note:
The long drive belt is on the inner
groove closest to the engine. The short drive
belt is on the outer groove farthest from the
engine.
DRIVE BELT ROUTING - 3.5L,
HYBRID ELECTRIC VEHICLE
(HEV) 532
F-150 (TFD) Canada/United States of America, enUSA, Edition date: 202104, Second-Printing MaintenanceE167467 E313075 E347332 E312206
Page 537 of 796
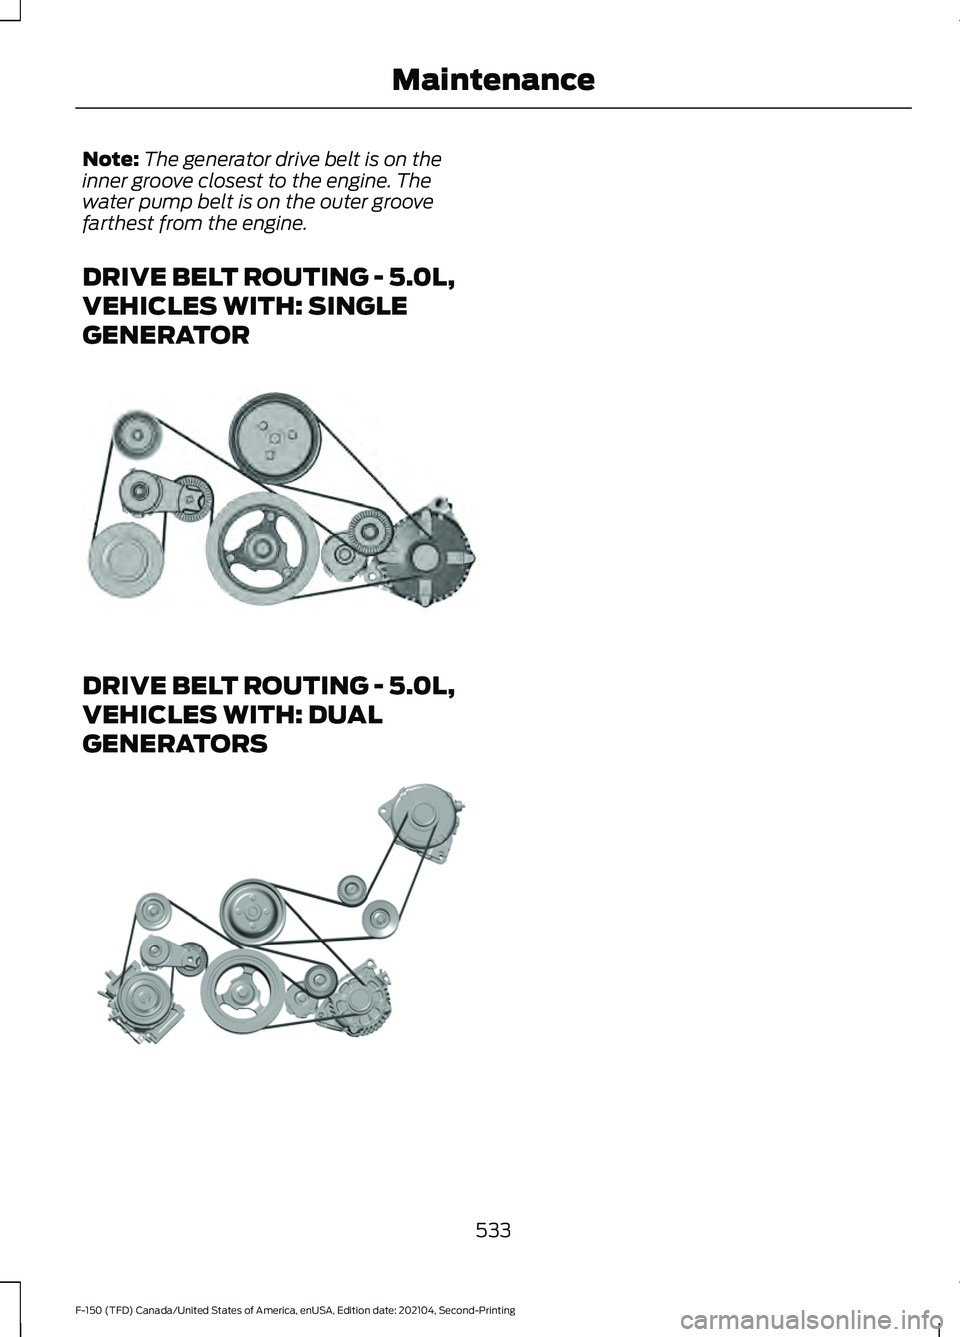
Note:
The generator drive belt is on the
inner groove closest to the engine. The
water pump belt is on the outer groove
farthest from the engine.
DRIVE BELT ROUTING - 5.0L,
VEHICLES WITH: SINGLE
GENERATOR DRIVE BELT ROUTING - 5.0L,
VEHICLES WITH: DUAL
GENERATORS
533
F-150 (TFD) Canada/United States of America, enUSA, Edition date: 202104, Second-Printing MaintenanceE249450 E312204
Page 542 of 796
With King Ranch Edition
Your vehicle has seating covered in
premium, top-grain leather that is
extremely durable, but still requires special
care and maintenance in order to preserve
longevity and comfort.
Regular cleaning and conditioning
maintains the appearance of the leather.
Scratches
Because the leather in the seat comes
from genuine steer hides, there may be
evidence of naturally occurring markings,
such as small scars. These markings give
character to the seating covers and are
considered to be proof of a genuine leather
product.
To lessen the appearance of certain
scratches and other wear marks, apply
conditioner on the affected area.
Conditioning
•
Clean the surfaces using the steps
outlined in the cleaning leather and
vinyl section.
• Make sure the leather is dry then apply
a nickel-sized amount of conditioner
to a clean, dry cloth.
• Rub the conditioner into the leather
until it disappears. Allow the
conditioner to dry, then repeat the
process for the entire interior. If a film
appears, wipe it off with a dry, clean
cloth.
For additional information, visit:
www .kr s a ddl e shop . c om
CLEANING CARPETS AND FLOOR
MATS
We recommend that you only clean your
carpets in the following way:
1. Remove dust and loose dirt with a
vacuum cleaner. 2. Wipe the surface with a soft, damp
cloth and a mild soap and water
solution. Dry the area with a clean, soft
cloth.
3. For additional information and assistance, we recommend that you
contact an authorized dealer.
For heavy stains, spot clean the area. If a
ring forms on the fabric, clean the entire
area immediately, but do not oversaturate
or the ring could set.
We recommend that you only clean your
floor mats in the following way:
1. Remove dust and loose dirt with a vacuum cleaner.
2. Wash rubber floor mats using mild soap and lukewarm or cold water.
3. Completely dry the floor mat before placing them back in your vehicle.
CLEANING SEATBELTS WARNING: Do not use cleaning
solvents, bleach or dye on the vehicle's
seatbelts, as these actions may weaken
the belt webbing.
1. Wipe the surface with a soft, damp cloth and a mild soap and water
solution. Dry the area with a clean, soft
cloth.
CLEANING MOONROOF TRACKS
1. Remove debris from the tracks with a vacuum cleaner.
2. Wipe the bulb seal and mating painted
roof metal surface with a soft, damp
cloth and a mild soap and water
solution.
Note: The moonroof rail tracks are greased
to maintain proper functionality. Do not
wipe off the grease.
538
F-150 (TFD) Canada/United States of America, enUSA, Edition date: 202104, Second-Printing Vehicle Care
Page 544 of 796
PREPARING YOUR VEHICLE
FOR STORAGE
If you plan on storing your vehicle for 30
days or more, the following maintenance
recommendations ensures your vehicle
stays in good operating condition.
Under various conditions, long-term
storage may lead to degraded engine
performance or failure unless you use
specific precautions to preserve your
vehicle.
General
•
Store all vehicles in a dry, ventilated
place.
• If vehicles are stored outside, they
require regular maintenance to protect
against rust and weather damage.
• Make sure all linkages, cables, levers
and pins under your vehicle are covered
with grease to prevent rust.
• Move vehicles at least 25 ft (7.5 m)
every 15 days to lubricate working parts
and prevent corrosion.
• Fill the fuel tank with high-quality fuel
until the first automatic shutoff of the
fuel pump nozzle.
Engine
• Change the engine oil and filter prior to
storage because used engine oil
contains contaminants which may
cause engine damage.
• Start the engine every 15 days for a
minimum of 15 minutes. Run at fast
idle with the climate controls set to
defrost until the engine reaches normal
operating temperature.
• With your foot on the brake, shift
through all the gears while the engine
is running. Body
•
Wash your vehicle thoroughly to
remove dirt, grease, oil, tar or mud from
exterior surfaces, rear-wheel housings
and the underside of front fenders.
• Periodically wash your vehicle if it is
stored in exposed locations.
• Touch-up exposed or primed metal to
prevent rust.
• Cover chrome and stainless steel parts
with a thick coat of auto wax to prevent
discoloration. Re-wax as necessary
when you wash your vehicle.
• Lubricate all hood, door and luggage
compartment hinges and latches with
a light grade oil.
• Cover interior trim to prevent fading.
• Keep all rubber parts free from oil and
solvents.
Hybrid Battery Systems
We recommend the following actions for
your vehicle:
• When storing your vehicle for greater
than 30 days the state of charge
should be approximately 50%.
Additionally we recommend
disconnecting the 12V battery which
will reduce system loads on the HV
battery.
12 Volt Battery
• Check and recharge as necessary. Keep
connections clean.
Note: It is necessary to reset memory
features if you disconnect the battery
cables.
Brakes
Make sure the brakes and parking brake
release fully.
540
F-150 (TFD) Canada/United States of America, enUSA, Edition date: 202104, Second-Printing Storing Your Vehicle
Page 563 of 796
WHAT IS THE TIRE PRESSURE
MONITORING SYSTEM
The tire pressure monitoring
system measures the vehicle's
tire pressures. A warning lamp
illuminates if one or more tires are
significantly underinflated or if there is a
system malfunction.
TIRE PRESSURE MONITORING
SYSTEM OVERVIEW WARNING: If the tire pressure
monitor sensor becomes damaged it
may not function. WARNING:
Under-inflation is the
most common cause of tire failures and
may result in severe tire cracking, tread
separation or blowout, with unexpected
loss of vehicle control and increased risk
of injury. Under-inflation increases
sidewall flexing and rolling resistance,
resulting in heat buildup and internal
damage to the tire. It also may result in
unnecessary tire stress, irregular wear,
loss of vehicle control and accidents. A
tire can lose up to half of its air pressure
and not appear to be flat! WARNING:
To determine the
required pressure(s) for your vehicle, see
the Safety Compliance Certification
Label (on the door hinge pillar,
door-latch post or the door edge that
meets the door-latch post, next to the
driver seat) or the Tire Label on the
B-Pillar or the edge of the driver door. Each tire, including the spare (if provided),
should be checked monthly when cold and
inflated to the inflation pressure
recommended by the vehicle manufacturer
on the vehicle placard or tire inflation
pressure label. (If your vehicle has tires of
a different size than the size indicated on
the vehicle placard or tire inflation pressure
label, you should determine the proper tire
inflation pressure for those tires).
As an added safety feature, your vehicle
has been equipped with a Tire Pressure
Monitoring System (TPMS) that
illuminates a low tire pressure telltale
when one or more of your tires is
significantly under-inflated. Accordingly,
when the low tire pressure telltale
illuminates, you should stop and check
your tires as soon as possible, and inflate
them to the proper pressure. Driving on a
significantly under-inflated tire causes the
tire to overheat and can lead to tire failure.
Under-inflation also reduces fuel efficiency
and tire tread life, and may affect the
vehicle
’s handling and stopping ability.
Please note that the TPMS is not a
substitute for proper tire maintenance, and
it is the driver ’s responsibility to maintain
correct tire pressure, even if under-inflation
has not reached the level to trigger
illumination of the TPMS low tire pressure
telltale.
Your vehicle has also been equipped with
a TPMS malfunction indicator to indicate
when the system is not operating properly.
The TPMS malfunction indicator is
combined with the low tire pressure
telltale. When the system detects a
malfunction, the telltale will flash for
approximately one minute and then remain
continuously illuminated. This sequence
will continue upon subsequent vehicle
start-ups as long as the malfunction exists.
559
F-150 (TFD) Canada/United States of America, enUSA, Edition date: 202104, Second-Printing Tire Pressure Monitoring System