key FORD F-150 2021 Manual PDF
[x] Cancel search | Manufacturer: FORD, Model Year: 2021, Model line: F-150, Model: FORD F-150 2021Pages: 796, PDF Size: 13.89 MB
Page 489 of 796
Post-Incident
1. Do not store a severely damaged
vehicle with a lithium-ion battery inside
a structure or within 50 ft (15 m) of any
structure or vehicle.
2. Make sure that passenger and luggage
compartments remain ventilated.
3. As with any vehicle, call emergency assistance immediately if you see
sparks, smoke or flames coming from
the vehicle.
SWITCHING THE HAZARD
FLASHERS ON AND OFF The hazard flasher button is on
the instrument panel. Press the
button to switch the hazard
flashers on if your vehicle is creating a
safety hazard for other road users.
When you switch the hazard flashers on,
all front and rear direction indicators flash.
Note: The hazard flashers operate when
the ignition is in any position, or if the key is
not in the ignition. The battery loses charge
and could have insufficient power to restart
your vehicle.
Press the button again to switch them off.
JUMP STARTING THE VEHICLE
JUMP STARTING PRECAUTIONS WARNING: Batteries normally
produce explosive gases which can
cause personal injury. Therefore, do not
allow flames, sparks or lighted
substances to come near the battery.
When working near the battery, always
shield your face and protect your eyes.
Always provide correct ventilation. WARNING:
Keep batteries out of
reach of children. Batteries contain
sulfuric acid. Avoid contact with skin,
eyes or clothing. Shield your eyes when
working near the battery to protect
against possible splashing of acid
solution. In case of acid contact with skin
or eyes, flush immediately with water for
a minimum of 15 minutes and get prompt
medical attention. If acid is swallowed,
call a physician immediately. WARNING:
Use only adequately
sized cables with insulated clamps. WARNING:
Make sure that the
cables are clear of any moving parts and
fuel delivery system parts. WARNING: Connect batteries with
only the same nominal voltage. WARNING: If the engine is running
while the hood is open, stay clear of
moving engine components. Failure to
follow this warning could result in serious
personal injury or death.
Do not attempt to push-start an automatic
transmission vehicle. This could cause
transmission damage.
Do not disconnect the battery of the
disabled vehicle. This could damage your
vehicle's electrical system.
PREPARING THE VEHICLE
Use only a 12 volt supply to start your
vehicle.
Park the booster vehicle close to the hood
of the disabled vehicle, making sure the
two vehicles do not touch.
485
F-150 (TFD) Canada/United States of America, enUSA, Edition date: 202104, Second-Printing Crash and Breakdown Information
Page 494 of 796
TOWING YOUR VEHICLE
PRECAUTIONS
Use the following guidelines when towing
your vehicle. Failure to follow this
instruction could result in vehicle damage
not covered by the vehicle warranty.
Note:
Make sure you properly secure your
vehicle to the tow vehicle.
Note: If you are unsure of the vehicle ’s
configuration, contact an authorized dealer.
RECREATIONALLY TOWING
YOUR VEHICLE - 4X4 WARNING: Do not disconnect the
battery when recreationally towing your
vehicle. This prevents the transfer case
from shifting properly and could cause
the vehicle to roll, even if the
transmission is in park (P). WARNING:
Placing the transfer
case in its neutral position could cause
your vehicle to freely roll. Make sure you
press and hold the brake pedal and the
vehicle is in a secure, safe position when
you place the transfer case in its neutral
position.
Follow these guidelines if you have a need
for recreational towing. An example of
recreational towing would be towing your
vehicle behind a motorhome. These
guidelines are to make sure that you do
not damage the transmission. You can only tow your vehicle with all
wheels on the ground by placing the
transfer case in its neutral position and
engaging the recreational tow feature.
Perform the following steps after
positioning your vehicle behind the tow
vehicle and properly securing them
together.
Note:
Put your climate control system in
recirculated air mode to prevent exhaust
fumes from entering your vehicle.
Note: Failure to put the transfer case in its
neutral position can damage vehicle
components.
Note: You can check the towing status at
any time by opening the driver door or
turning the ignition to the accessory or on
position. Neutral Tow Enabled Leave
Transmission in Neutral
appears in the
instrument cluster display to confirm you
can recreationally tow your vehicle.
Note: If your vehicle has an anti-theft
alarm, make sure you switch perimeter
sensing on when towing. See
Setting the
Alarm Security Level (page 135).
Switching
Neutral Tow On
1. Start your vehicle.
2. Press the 2H button on the four-wheel
drive mode control.
3. Place your vehicle in temporary neutral
mode. See
Entering Temporary
Neutral Mode (page 286).
4. Switch your vehicle off by pressing the
push button ignition switch once or
turning the key as far toward the off
position as possible. A message
appears in the instrument cluster
display.
5. Switch your vehicle to accessory mode
by pressing the push button ignition
switch once without pressing the brake
pedal or by turning the key to the on
position.
490
F-150 (TFD) Canada/United States of America, enUSA, Edition date: 202104, Second-Printing Towing Your Vehicle
Page 495 of 796
6. Press and hold the brake pedal.
7. Using the instrument cluster controls
on the steering wheel, select Settings.
8. Select Neutral Tow.
9. Press and hold the
OK button until a
confirmation message appears in the
information display.
Note: If completed successfully, the
information display shows
Neutral Tow
Enabled Leave Transmission in Neutral.
This indicates that your vehicle is safe to
tow with all wheels on the ground.
Note: If you do not see a confirmation
message in the instrument cluster display,
you must perform the procedure again from
the beginning.
Note: You may hear noise as the transfer
case shifts into its neutral position. This is
normal.
10. Release the brake pedal.
11. Leave the transmission in neutral (N)
and switch your vehicle off by
pressing the push button ignition
switch once without pressing the
brake pedal or turning the key as far
toward the off position.
Note: Vehicles with keys do not turn to the
off position when the transmission is in
neutral (N). You must leave the key in the
ignition when towing. Use the keyless entry
keypad or an extra set of keys to lock and
unlock your vehicle.
Switching
Neutral Tow Off
1. With your vehicle properly secured to the tow vehicle, press and hold the
brake pedal and start the engine.
2. Switch your vehicle off by pressing the
push button ignition switch once or
turning the key as far towards the off
position and release the brake pedal. 3. Place your vehicle in accessory mode
by pressing the push button ignition
switch once without pressing the brake
pedal or by turning the ignition key to
the on position.
4. Press and hold the brake pedal.
5. Shift into park (P).
6. Release the brake pedal.
Note: If completed successfully, the
instrument cluster displays 2H and Neutral
Tow Disabled
.
Note: You must perform the switching
neutral tow on and switching neutral tow
off procedures again from the beginning if
the indicator light and message do not
display.
Note: You may hear a noise as the transfer
case shifts out of its neutral position. This
is normal.
7. Apply the parking brake, then disconnect your vehicle from the tow
vehicle.
8. Release the parking brake, start the engine, and shift into drive (D) to make
sure the transfer case is out of the
neutral tow position.
9. If the transfer case does not successfully shift out of its neutral
position, set the parking brake. Have
your vehicle checked as soon as
possible.
Resolving the
Shift Delayed Drive
Forward Message
1. Press and hold the brake pedal.
2. Start your vehicle.
3. Shift into neutral (N).
4. With the vehicle running, shift into drive
(D) and let the vehicle roll forward up
to
3 ft (1 m).
491
F-150 (TFD) Canada/United States of America, enUSA, Edition date: 202104, Second-Printing Towing Your Vehicle
Page 504 of 796
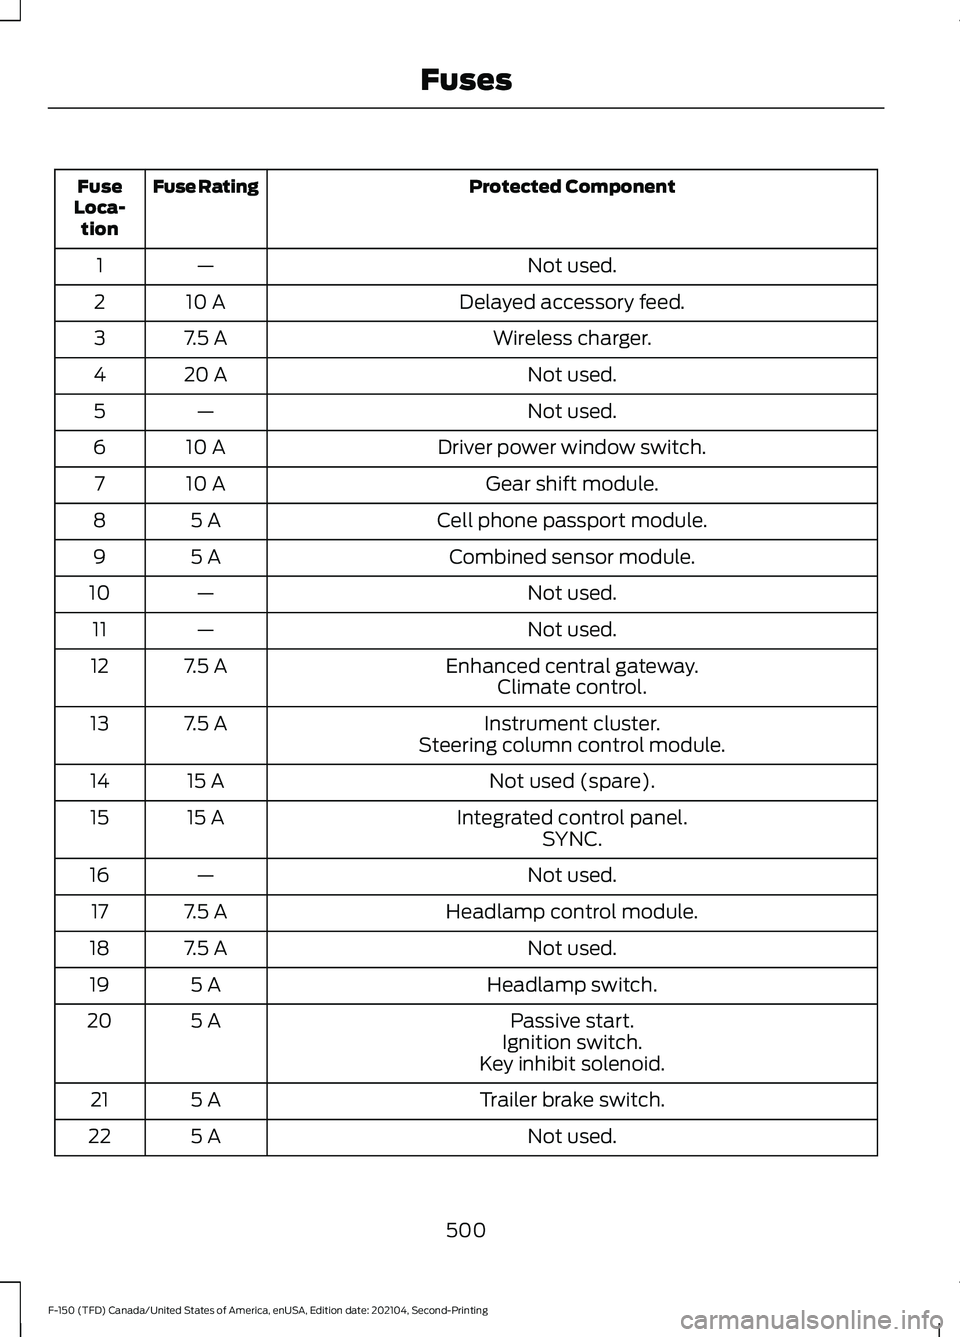
Protected Component
Fuse Rating
Fuse
Loca- tion
Not used.
—
1
Delayed accessory feed.
10 A
2
Wireless charger.
7.5 A
3
Not used.
20 A
4
Not used.
—
5
Driver power window switch.
10 A
6
Gear shift module.
10 A
7
Cell phone passport module.
5 A
8
Combined sensor module.
5 A
9
Not used.
—
10
Not used.
—
11
Enhanced central gateway.
7.5 A
12
Climate control.
Instrument cluster.
7.5 A
13
Steering column control module.
Not used (spare).
15 A
14
Integrated control panel.
15 A
15
SYNC.
Not used.
—
16
Headlamp control module.
7.5 A
17
Not used.
7.5 A
18
Headlamp switch.
5 A
19
Passive start.
5 A
20
Ignition switch.
Key inhibit solenoid.
Trailer brake switch.
5 A
21
Not used.
5 A
22
500
F-150 (TFD) Canada/United States of America, enUSA, Edition date: 202104, Second-Printing Fuses
Page 565 of 796
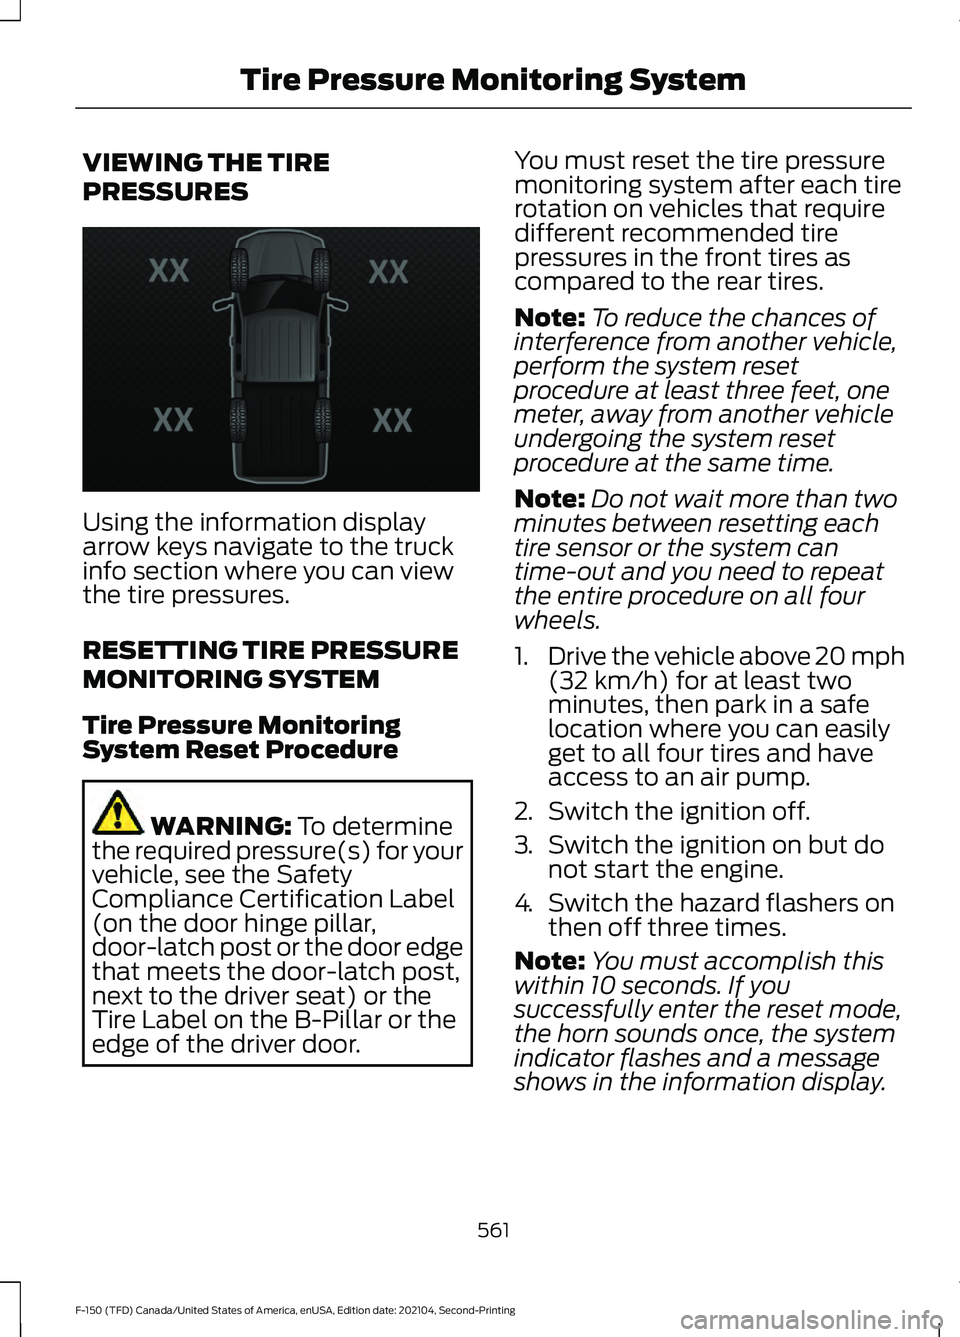
VIEWING THE TIRE
PRESSURES
Using the information display
arrow keys navigate to the truck
info section where you can view
the tire pressures.
RESETTING TIRE PRESSURE
MONITORING SYSTEM
Tire Pressure Monitoring
System Reset Procedure
WARNING: To determine
the required pressure(s) for your
vehicle, see the Safety
Compliance Certification Label
(on the door hinge pillar,
door-latch post or the door edge
that meets the door-latch post,
next to the driver seat) or the
Tire Label on the B-Pillar or the
edge of the driver door. You must reset the tire pressure
monitoring system after each tire
rotation on vehicles that require
different recommended tire
pressures in the front tires as
compared to the rear tires.
Note:
To reduce the chances of
interference from another vehicle,
perform the system reset
procedure at least three feet, one
meter, away from another vehicle
undergoing the system reset
procedure at the same time.
Note: Do not wait more than two
minutes between resetting each
tire sensor or the system can
time-out and you need to repeat
the entire procedure on all four
wheels.
1. Drive the vehicle above 20 mph
(32 km/h)
for at least two
minutes, then park in a safe
location where you can easily
get to all four tires and have
access to an air pump.
2. Switch the ignition off.
3. Switch the ignition on but do
not start the engine.
4. Switch the hazard flashers on
then off three times.
Note: You must accomplish this
within 10 seconds. If you
successfully enter the reset mode,
the horn sounds once, the system
indicator flashes and a message
shows in the information display.
561
F-150 (TFD) Canada/United States of America, enUSA, Edition date: 202104, Second-Printing Tire Pressure Monitoring SystemE224333
Page 572 of 796
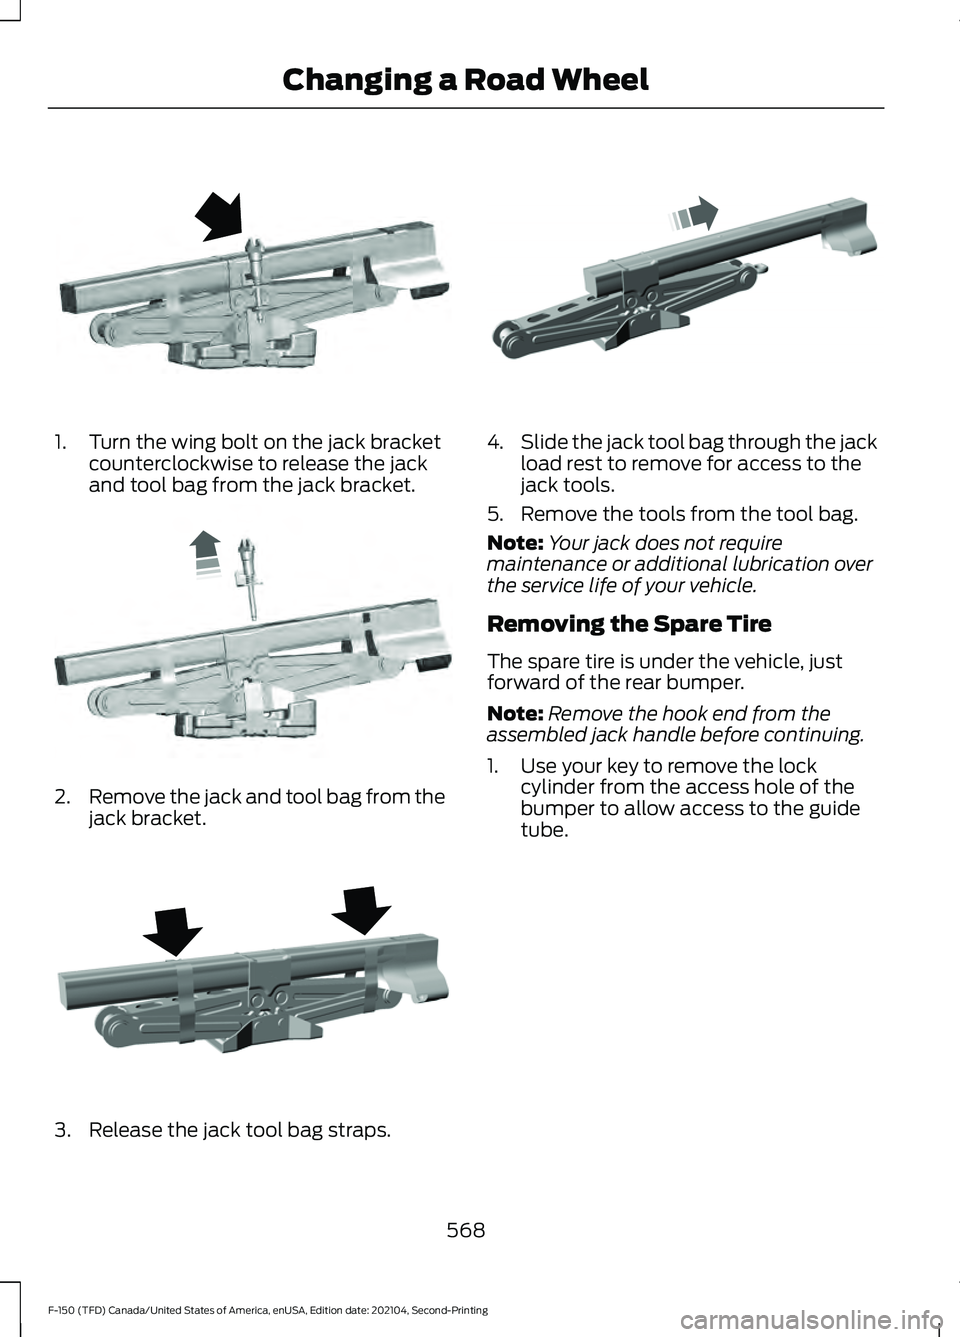
1. Turn the wing bolt on the jack bracket
counterclockwise to release the jack
and tool bag from the jack bracket. 2.
Remove the jack and tool bag from the
jack bracket. 3. Release the jack tool bag straps. 4.
Slide the jack tool bag through the jack
load rest to remove for access to the
jack tools.
5. Remove the tools from the tool bag.
Note: Your jack does not require
maintenance or additional lubrication over
the service life of your vehicle.
Removing the Spare Tire
The spare tire is under the vehicle, just
forward of the rear bumper.
Note: Remove the hook end from the
assembled jack handle before continuing.
1. Use your key to remove the lock cylinder from the access hole of the
bumper to allow access to the guide
tube.
568
F-150 (TFD) Canada/United States of America, enUSA, Edition date: 202104, Second-Printing Changing a Road WheelE323384 E327650 E323386 E327651
Page 575 of 796
1. Lay the tire on the ground with the
valve stem facing up.
2. Slide the wheel partially under the vehicle and install the retainer through
the wheel center. Pull on the cable to
align the components at the end of the
cable.
3. Turn the jack handle clockwise until you raise the tire to its stowed position
underneath the vehicle. The effort to
turn the jack handle increases
significantly and the spare tire carrier
ratchets or slips when you raise the tire
to the maximum tightness. Tighten to
the point where the ratchet or slip
occurs a minimum of three times, as
indicated by an audible click each time.
The spare tire carrier does not allow
you to overtighten. If the spare tire
carrier ratchets or slips with little effort,
have your vehicle checked as soon as
possible.
4. Check that the tire lies flat against the frame and you properly tighten it. Try
to push or pull, then turn the tire to be
sure it does not move. Loosen and
retighten, if necessary. Failure to
properly stow the spare tire could
result in failure of the winch cable and
loss of the tire.
5. Repeat this tightness check procedure
when servicing the spare tire pressure,
every six months, as per your scheduled
maintenance information, or at any
time that the spare tire gets disturbed
through service of other components.
6. If removed, install the spare tire lock into the bumper drive tube with the
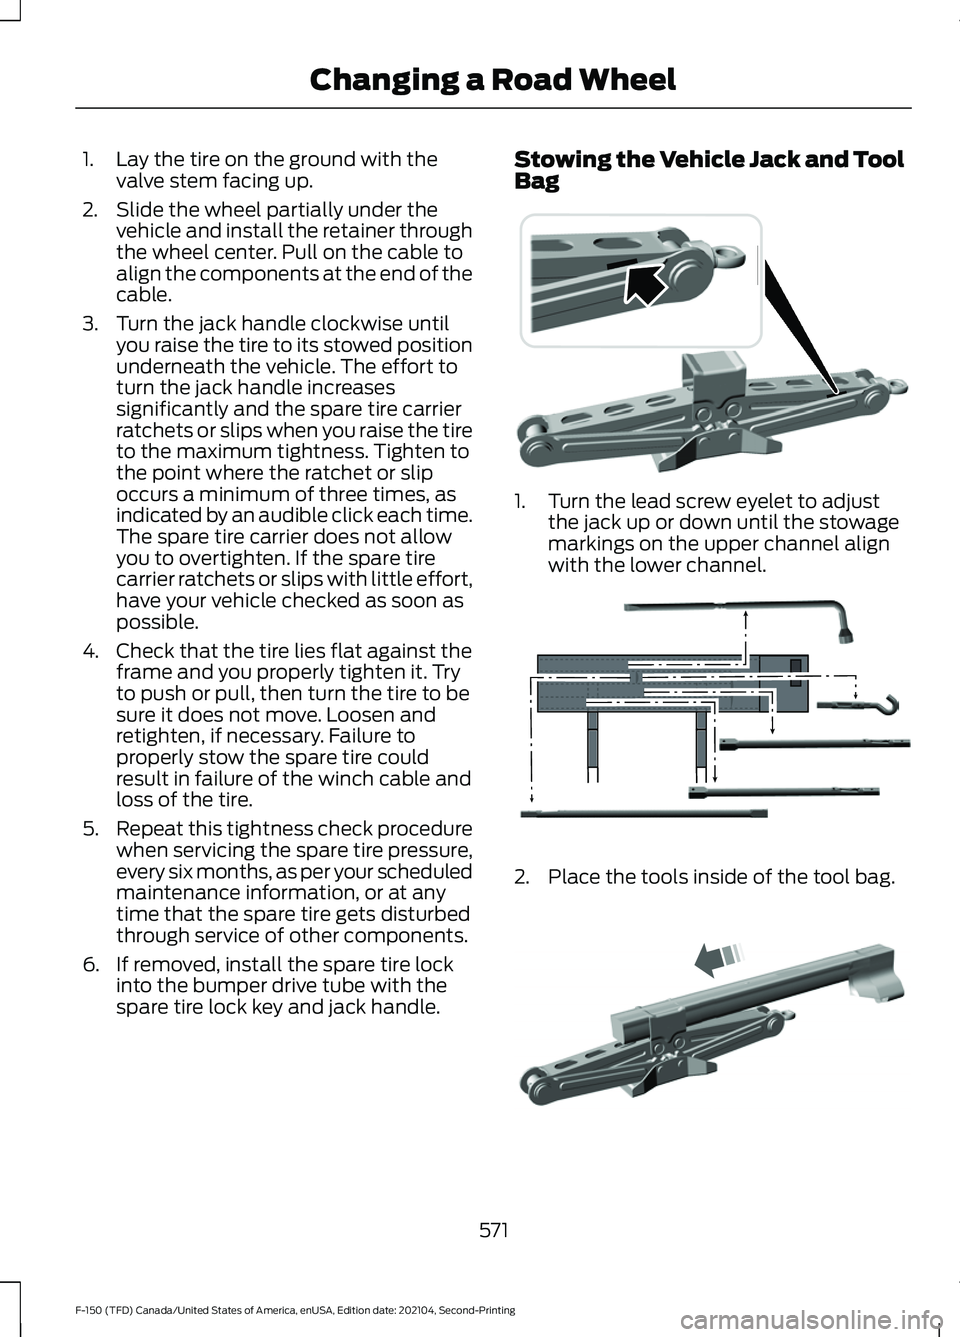
spare tire lock key and jack handle. Stowing the Vehicle Jack and Tool
Bag
1. Turn the lead screw eyelet to adjust
the jack up or down until the stowage
markings on the upper channel align
with the lower channel. 2. Place the tools inside of the tool bag.
571
F-150 (TFD) Canada/United States of America, enUSA, Edition date: 202104, Second-Printing Changing a Road Wheel E323394 E323393 E327653
Page 641 of 796
CENTER DISPLAY
PRECAUTIONS
WARNING: Driving while distracted
can result in loss of vehicle control, crash
and injury. We strongly recommend that
you use extreme caution when using any
device that may take your focus off the
road. Your primary responsibility is the
safe operation of your vehicle. We
recommend against the use of any
hand-held device while driving and
encourage the use of voice-operated
systems when possible. Make sure you
are aware of all applicable local laws
that may affect the use of electronic
devices while driving. CENTER DISPLAY
LIMITATIONS
Speed-restricted Features
For your safety, some features are not
available while the vehicle is in motion at
or above 6 mph (10 km/h).
Settings that are not critical while driving
your vehicle will be shown as restricted on
your display. See the following chart for
specific examples. Restricted Features
System updates.
System Functionality
Personal profiles setup.
Valet mode setup.
Driver assistance settings.
Auto start-stop speed threshold.
30 minute max idle.
Vehicle Settings
MyKey setup.
Keyless entry keypad code setup.
Restricted features will become available
again once the vehicle is no longer in
motion.
STATUS BAR
The bar is on top of the display and
indicates the status of your vehicle's
features. Audio System Audio system muted.
Connected Device Cell phone microphone muted.
637
F-150 (TFD) Canada/United States of America, enUSA, Edition date: 202104, Second-Printing Center Display OverviewE353221
Page 647 of 796
PHONE PRECAUTIONS
WARNING: Driving while distracted
can result in loss of vehicle control, crash
and injury. We strongly recommend that
you use extreme caution when using any
device that may take your focus off the
road. Your primary responsibility is the
safe operation of your vehicle. We
recommend against the use of any
hand-held device while driving and
encourage the use of voice-operated
systems when possible. Make sure you
are aware of all applicable local laws
that may affect the use of electronic
devices while driving.
CONNECTING YOUR PHONE
Go to the settings menu on your device and
switch Bluetooth® on. Press the phone option on the
feature bar.
1. Press
Add Phone.
Note: A prompt alerts you to search for your
vehicle on your cell phone.
2. Select your vehicle on your cell phone.
Note: A number appears on your cell phone
and on the touchscreen.
3. Confirm the number on your cell phone
matches the number on the
touchscreen.
Note: The touchscreen indicates that you
have successfully paired your cell phone.
4. Download the phonebook from your cell phone when you are prompted.
Note: If you pair more than one cell phone,
use the phone settings on the center display
to specify the primary phone. You can
change this setting at any time. PHONE MENU
This menu becomes available after pairing
a phone.
Recent Call List
Display and select an entry from a list of
previous calls.
Contacts
Display a smart search form to look up your
contacts. Use the List button to
alphabetically sort your contacts.
Favorites
Display the list of favorite contacts that
are set up on your phone.
Messaging
Displays the list of text messages to read,
listen to, or respond to.
Email
Displays the list of emails to read, listen to,
or respond to.
Phone List
Display the list of paired or connected
devices that you can select.
Note:
Up to 12 devices can be stored.
Do Not Disturb
Reject incoming calls and switch ring tones
and alerts off.
Phone Keypad
Directly dial a number.
643
F-150 (TFD) Canada/United States of America, enUSA, Edition date: 202104, Second-Printing Phone
Page 649 of 796
MAKING AND RECEIVING A
PHONE CALL
Making Calls
To call a number in your contacts,
select:
Action and Description
Menu Item
You can then select the
name of the contact you
want to call. Any numbers
stored for that contact
display along with any
stored contact photos. You
can then select the
number that you want to
call. The system begins the
call.
Contacts
To call a number from your recent calls,
select: Action and Description
Menu Item
You can then select an
entry that you want to call.
The system begins the call.
Recent Call
List
To call a number from your favorites,
select: Action and Description
Menu Item
You can then select an
entry that you want to call.
The system begins the call.
Favorites
To call a number that is not stored in
your phone, select: Action and Description
Menu Item
Select the digits of the
number you wish to call.
Phone
Keypad
The system begins the call.
Call Pressing the backspace button deletes the
last digit you typed.
Receiving Calls
During an incoming call, an audible tone
sounds. Caller information appears in the
display if it is available.
To accept the call, select:
Menu Item
Accept
Note: You can also accept the call by
pressing the phone button on the steering
wheel.
To reject the call, select: Menu Item
Reject
Ignore the call by doing nothing. The
system logs it as a missed call.
During a Phone Call
During a phone call, the contacts name
and number display on the screen along
with the call duration.
The phone status items are also visible:
• Signal Strength.
• Battery.
You can select any of the following during
an active phone call:
645
F-150 (TFD) Canada/United States of America, enUSA, Edition date: 202104, Second-Printing Phone