door lock FORD F-250 2019 Owner's Manual
[x] Cancel search | Manufacturer: FORD, Model Year: 2019, Model line: F-250, Model: FORD F-250 2019Pages: 666, PDF Size: 13.6 MB
Page 185 of 666
Note:
The heater is most effective when
outdoor temperatures are below 0°F
(-18°C).
For cold climates that are below
0°F
(-18°C) needing a temporary battery
installation. Order the cold climate pack.
The heater acts as a starting aid by
warming the engine coolant. This allows
the climate control system to respond
quickly. The equipment includes a heater
element (installed in the engine block) and
a wire harness. You can connect the
system to a grounded 120-volt AC
electrical source. We recommend that you do the following
for a safe and correct operation:
•
Make sure your vehicle is parked in a
clean area, clear of combustibles.
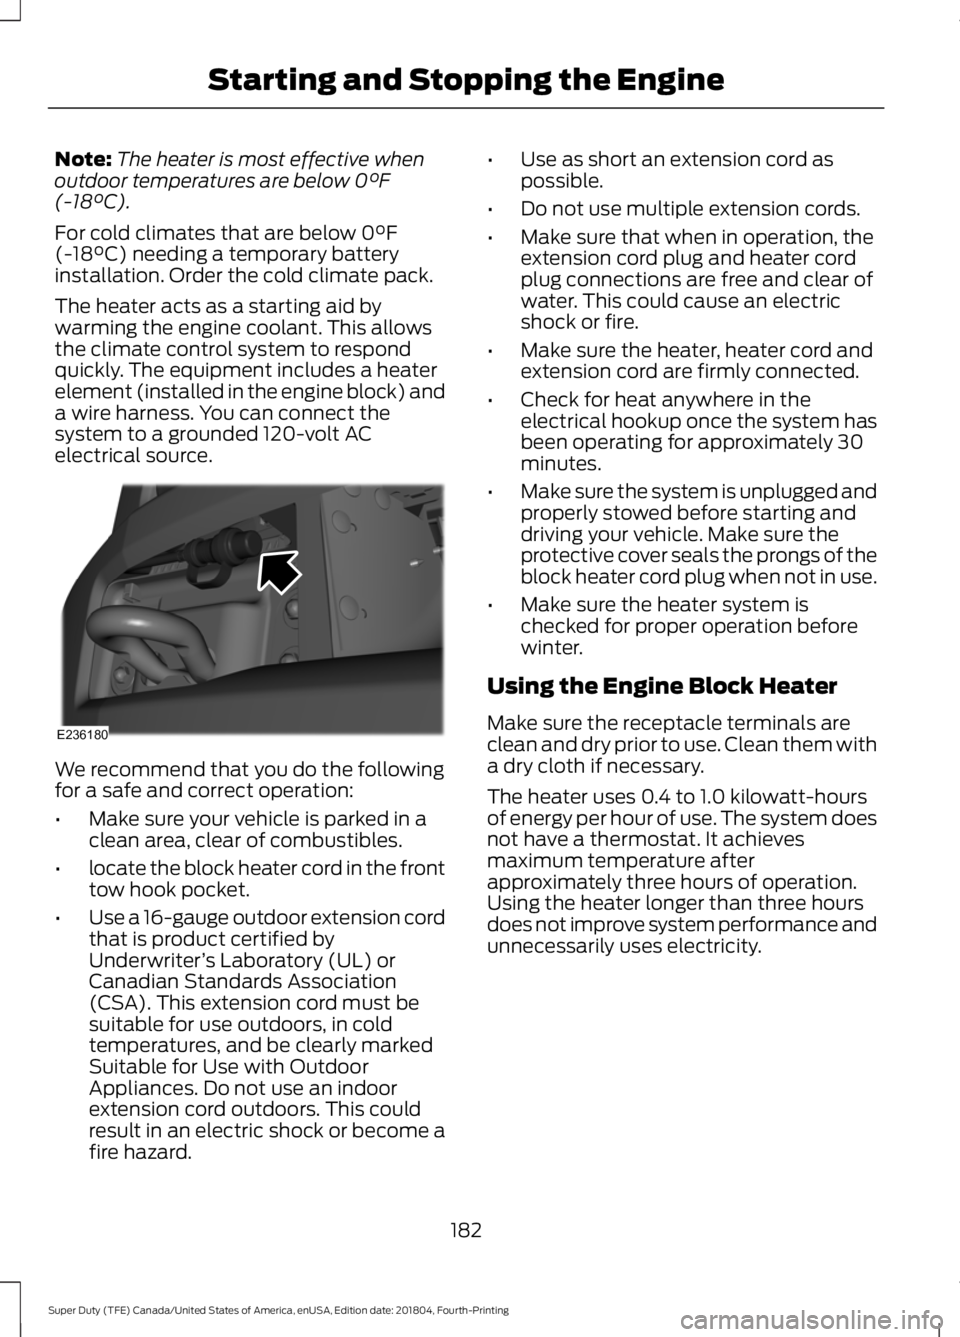
• locate the block heater cord in the front
tow hook pocket.
• Use a 16-gauge outdoor extension cord
that is product certified by
Underwriter ’s Laboratory (UL) or
Canadian Standards Association
(CSA). This extension cord must be
suitable for use outdoors, in cold
temperatures, and be clearly marked
Suitable for Use with Outdoor
Appliances. Do not use an indoor
extension cord outdoors. This could
result in an electric shock or become a
fire hazard. •
Use as short an extension cord as
possible.
• Do not use multiple extension cords.
• Make sure that when in operation, the
extension cord plug and heater cord
plug connections are free and clear of
water. This could cause an electric
shock or fire.
• Make sure the heater, heater cord and
extension cord are firmly connected.
• Check for heat anywhere in the
electrical hookup once the system has
been operating for approximately 30
minutes.
• Make sure the system is unplugged and
properly stowed before starting and
driving your vehicle. Make sure the
protective cover seals the prongs of the
block heater cord plug when not in use.
• Make sure the heater system is
checked for proper operation before
winter.
Using the Engine Block Heater
Make sure the receptacle terminals are
clean and dry prior to use. Clean them with
a dry cloth if necessary.
The heater uses 0.4 to 1.0 kilowatt-hours
of energy per hour of use. The system does
not have a thermostat. It achieves
maximum temperature after
approximately three hours of operation.
Using the heater longer than three hours
does not improve system performance and
unnecessarily uses electricity.
182
Super Duty (TFE) Canada/United States of America, enUSA, Edition date: 201804, Fourth-Printing Starting and Stopping the EngineE236180
Page 192 of 666
WARNING: Wait at least 10
seconds before removing the fuel pump
nozzle to allow any residual fuel to drain
into the fuel tank. WARNING:
Stop refueling after
the fuel pump nozzle automatically
shuts off for the second time. Failure to
follow this will fill the expansion space
in the fuel tank and could lead to fuel
overflowing. WARNING: Do not remove the fuel
pump nozzle from its fully inserted
position when refueling.
Use the following guidelines to avoid
electrostatic charge build-up when filling
an ungrounded fuel container:
• Place approved fuel container on the
ground.
• Do not fill a fuel container while it is in
the vehicle (including the cargo area).
• Keep the fuel pump nozzle in contact
with the fuel container while filling.
• Do not use a device that would hold
the fuel pump handle in the fill position.
Fuel Filler Cap WARNING:
The fuel system may
be under pressure. If you hear a hissing
sound near the fuel filler door, do not
refuel until the sound stops. Otherwise,
fuel may spray out, which could cause
serious personal injury. WARNING:
If you do not use the
proper fuel filler cap, excessive pressure
or vacuum in the fuel tank may damage
the fuel system or cause the fuel cap to
disengage in a collision, which may result
in possible personal injury. Note:
If you must replace the fuel filler cap,
replace it with a fuel filler cap that is
designed for your vehicle. The customer
warranty may be void for any damage to the
fuel tank or fuel system if the correct
genuine Ford, Motorcraft or other certified
fuel filler cap is not used.
Your fuel tank filler cap has an indexed
design with a 1/4th turn on and off feature.
When fueling your vehicle:
1. Put your vehicle in park (P).
2. Switch the engine off.
3. Carefully turn the filler cap counterclockwise until it spins off.
4. Pull to remove the cap from the fuel filler pipe.
5. To install the cap, align the tabs on the
cap with the notches on the filler pipe.
6. Turn the filler cap clockwise 1/4 of a turn clockwise until it clicks at least
once.
If the Check Fuel Cap light or a Check Fuel
Cap message appears in the instrument
cluster and stays on after you start the
engine, you may not have installed the fuel
filler properly.
If the fuel cap light remains on, at the next
opportunity, safely pull off of the road,
remove the fuel filler cap, align the cap
properly and reinstall it. The check fuel cap
light or Check fuel cap message may not
reset immediately. It may take several
driving cycles for the indicators to turn off.
A driving cycle consists of an engine
start-up (after four or more hours with the
engine off) followed by normal city and
highway driving.
REFUELING - DIESEL WARNING:
Read and follow all
the instructions on the pump island.
189
Super Duty (TFE) Canada/United States of America, enUSA, Edition date: 201804, Fourth-Printing Fuel and Refueling
Page 194 of 666
Truck stops have pumps and nozzles
designed for larger, heavy-duty trucks.
When refueling at truck stops: if the nozzle
shuts off repeatedly when refueling, wait
5–
10 seconds; then use a slower rate of
flow, do not depress the nozzle trigger as
far.
Refueling
When fueling your vehicle do the following:
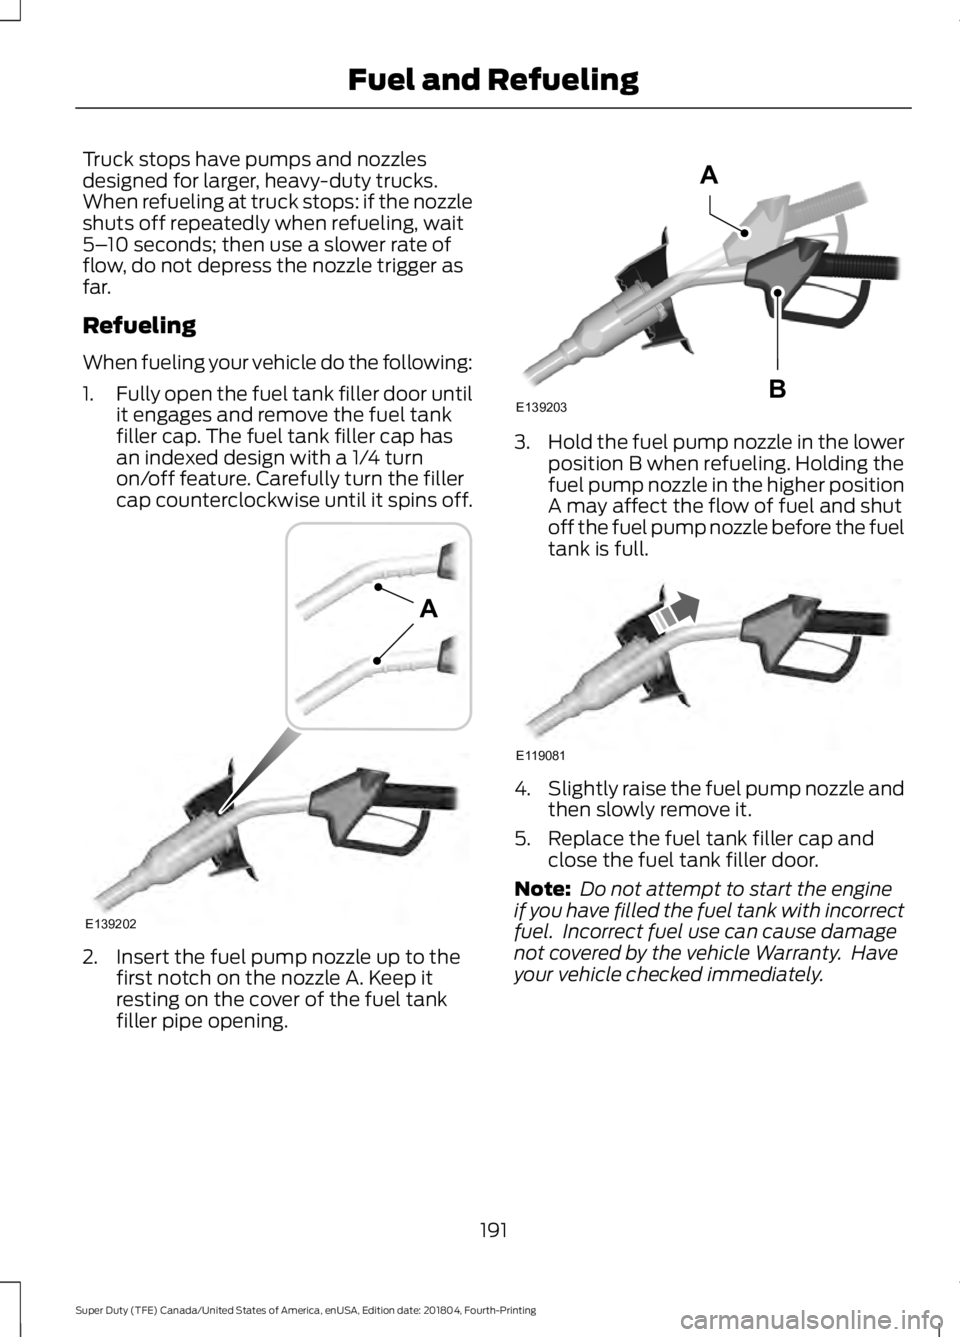
1. Fully open the fuel tank filler door until
it engages and remove the fuel tank
filler cap. The fuel tank filler cap has
an indexed design with a 1/4 turn
on/off feature. Carefully turn the filler
cap counterclockwise until it spins off. 2. Insert the fuel pump nozzle up to the
first notch on the nozzle A. Keep it
resting on the cover of the fuel tank
filler pipe opening. 3.
Hold the fuel pump nozzle in the lower
position B when refueling. Holding the
fuel pump nozzle in the higher position
A may affect the flow of fuel and shut
off the fuel pump nozzle before the fuel
tank is full. 4.
Slightly raise the fuel pump nozzle and
then slowly remove it.
5. Replace the fuel tank filler cap and close the fuel tank filler door.
Note: Do not attempt to start the engine
if you have filled the fuel tank with incorrect
fuel. Incorrect fuel use can cause damage
not covered by the vehicle Warranty. Have
your vehicle checked immediately.
191
Super Duty (TFE) Canada/United States of America, enUSA, Edition date: 201804, Fourth-Printing Fuel and RefuelingE139202
A E139203
A
B E119081
Page 253 of 666
System Warnings
Note:
The system will not issue warnings
below approximately 40 mph (64 km/h).
The warning system is in two stages. At
first the system issues a temporary warning
that you need to take a rest. This message
will only appear for a short time. If the
system detects further reduction in driving
alertness, another warning may be issued
which will remain in the information display
for a longer time. Press OK on the steering
wheel control to clear the warning. When
active the system will run automatically in
the background and only issue a warning
if required.
Resetting the System
You can reset the system by either:
• Switching the ignition off and on.
• Stopping the vehicle and then opening
and closing the driver ’s door.
LANE KEEPING SYSTEM
(IF
EQUIPPED) WARNING:
You are responsible
for controlling your vehicle at all times.
The system is designed to be an aid and
does not relieve you of your responsibility
to drive with due care and attention.
Failure to follow this instruction could
result in the loss of control of your
vehicle, personal injury or death. WARNING:
Always drive with due
care and attention when using and
operating the controls and features on
your vehicle. WARNING:
In cold and severe
weather conditions the system may not
function. Rain, snow and spray can all
limit sensor performance. WARNING:
The system will not
operate if the sensor cannot track the
road lane markings. WARNING:
The sensor may
incorrectly track lane markings as other
structures or objects. This can result in
a false or missed warning. WARNING:
Large contrasts in
outside lighting can limit sensor
performance. WARNING:
The system may not
operate properly if the sensor is blocked.
Keep the windshield free from
obstruction. WARNING:
If damage occurs in
the immediate area surrounding the
sensor, have your vehicle checked as
soon as possible. WARNING:
The system may not
correctly operate if your vehicle is fitted
with a suspension kit not approved by
us.
Note: The system works as long as the
camera can detect one lane marking at a
speed above
40 mph (64 km/h).
Note: The system may not function with a
blocked camera, or if the windshield is
damaged or dirty.
250
Super Duty (TFE) Canada/United States of America, enUSA, Edition date: 201804, Fourth-Printing Driving Aids
Page 301 of 666
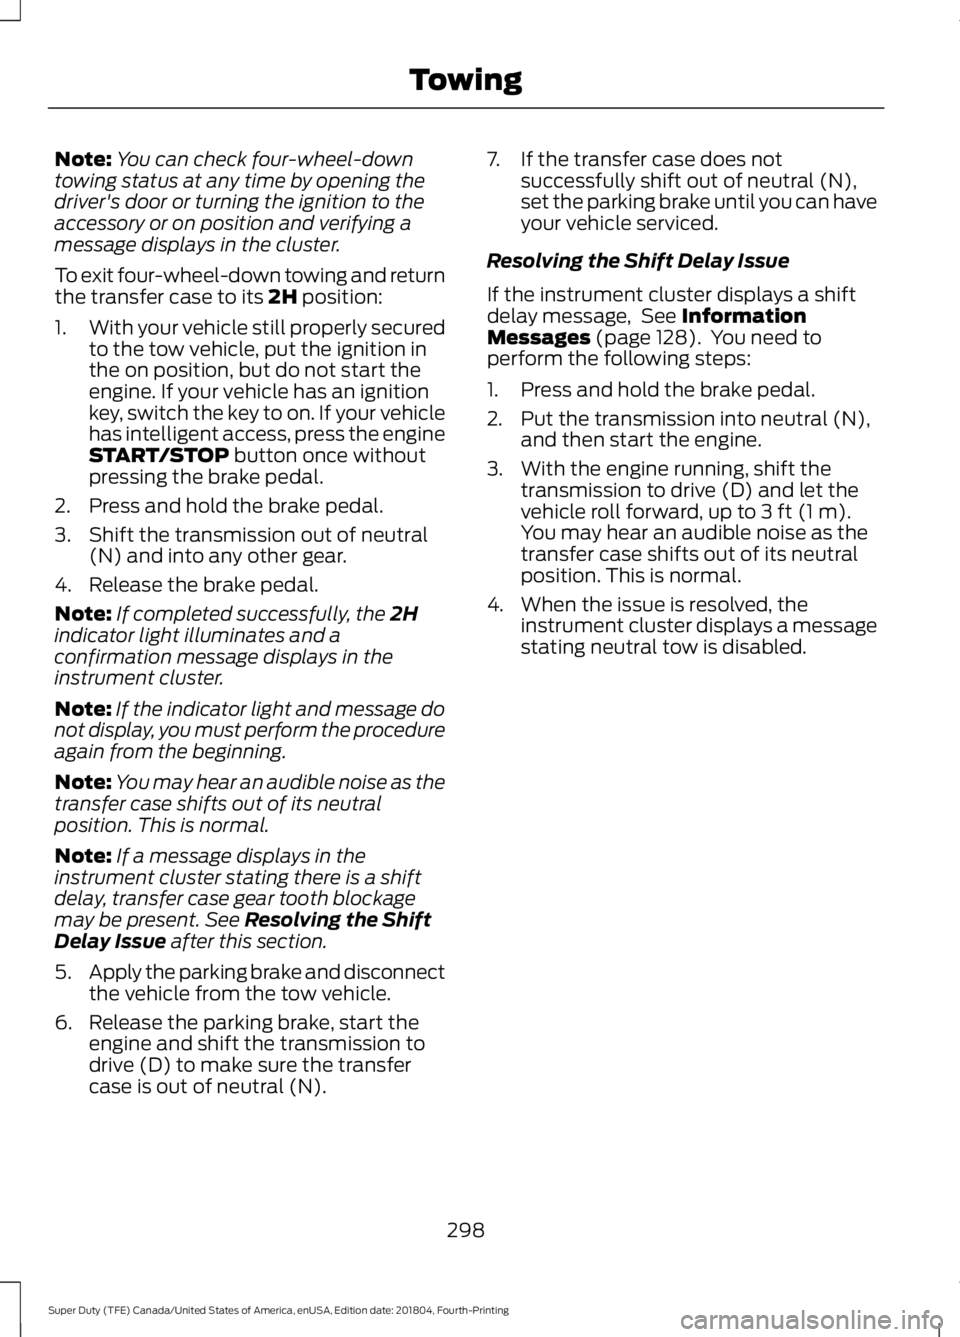
Note:
You can check four-wheel-down
towing status at any time by opening the
driver's door or turning the ignition to the
accessory or on position and verifying a
message displays in the cluster.
To exit four-wheel-down towing and return
the transfer case to its 2H position:
1. With your vehicle still properly secured
to the tow vehicle, put the ignition in
the on position, but do not start the
engine. If your vehicle has an ignition
key, switch the key to on. If your vehicle
has intelligent access, press the engine
START/STOP
button once without
pressing the brake pedal.
2. Press and hold the brake pedal.
3. Shift the transmission out of neutral (N) and into any other gear.
4. Release the brake pedal.
Note: If completed successfully, the
2H
indicator light illuminates and a
confirmation message displays in the
instrument cluster.
Note: If the indicator light and message do
not display, you must perform the procedure
again from the beginning.
Note: You may hear an audible noise as the
transfer case shifts out of its neutral
position. This is normal.
Note: If a message displays in the
instrument cluster stating there is a shift
delay, transfer case gear tooth blockage
may be present. See
Resolving the Shift
Delay Issue after this section.
5. Apply the parking brake and disconnect
the vehicle from the tow vehicle.
6. Release the parking brake, start the engine and shift the transmission to
drive (D) to make sure the transfer
case is out of neutral (N). 7. If the transfer case does not
successfully shift out of neutral (N),
set the parking brake until you can have
your vehicle serviced.
Resolving the Shift Delay Issue
If the instrument cluster displays a shift
delay message, See
Information
Messages (page 128). You need to
perform the following steps:
1. Press and hold the brake pedal.
2. Put the transmission into neutral (N), and then start the engine.
3. With the engine running, shift the transmission to drive (D) and let the
vehicle roll forward, up to
3 ft (1 m).
You may hear an audible noise as the
transfer case shifts out of its neutral
position. This is normal.
4. When the issue is resolved, the instrument cluster displays a message
stating neutral tow is disabled.
298
Super Duty (TFE) Canada/United States of America, enUSA, Edition date: 201804, Fourth-Printing Towing
Page 328 of 666
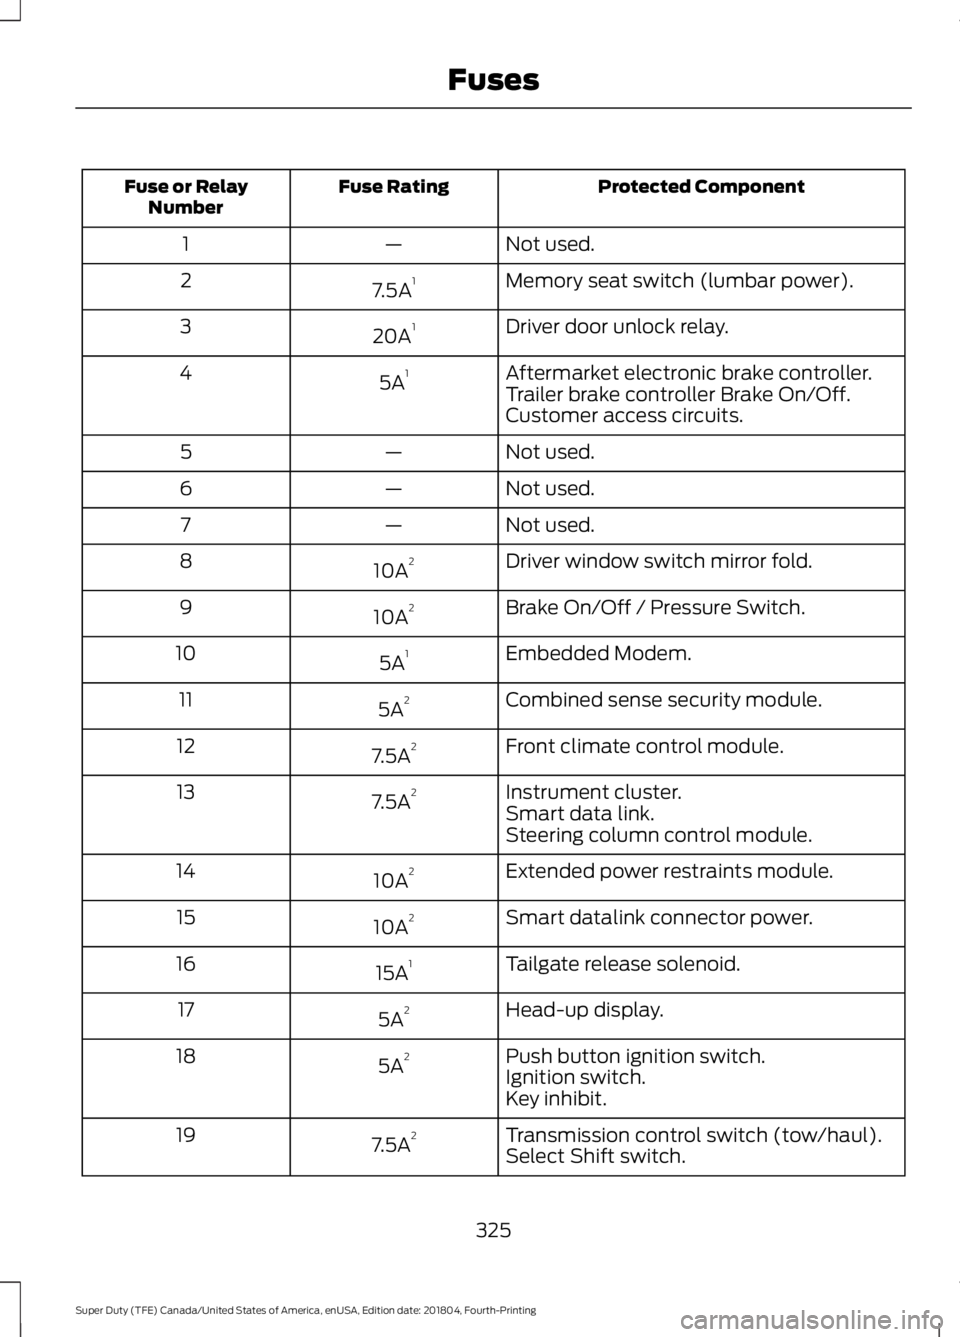
Protected Component
Fuse Rating
Fuse or Relay
Number
Not used.
—
1
Memory seat switch (lumbar power).
7.5A 1
2
Driver door unlock relay.
20A 1
3
Aftermarket electronic brake controller.
5A 1
4
Trailer brake controller Brake On/Off.
Customer access circuits.
Not used.
—
5
Not used.
—
6
Not used.
—
7
Driver window switch mirror fold.
10A 2
8
Brake On/Off / Pressure Switch.
10A 2
9
Embedded Modem.
5A 1
10
Combined sense security module.
5A 2
11
Front climate control module.
7.5A 2
12
Instrument cluster.
7.5A 2
13
Smart data link.
Steering column control module.
Extended power restraints module.
10A 2
14
Smart datalink connector power.
10A 2
15
Tailgate release solenoid.
15A 1
16
Head-up display.
5A 2
17
Push button ignition switch.
5A 2
18
Ignition switch.
Key inhibit.
Transmission control switch (tow/haul).
7.5A 2
19
Select Shift switch.
325
Super Duty (TFE) Canada/United States of America, enUSA, Edition date: 201804, Fourth-Printing Fuses
Page 329 of 666
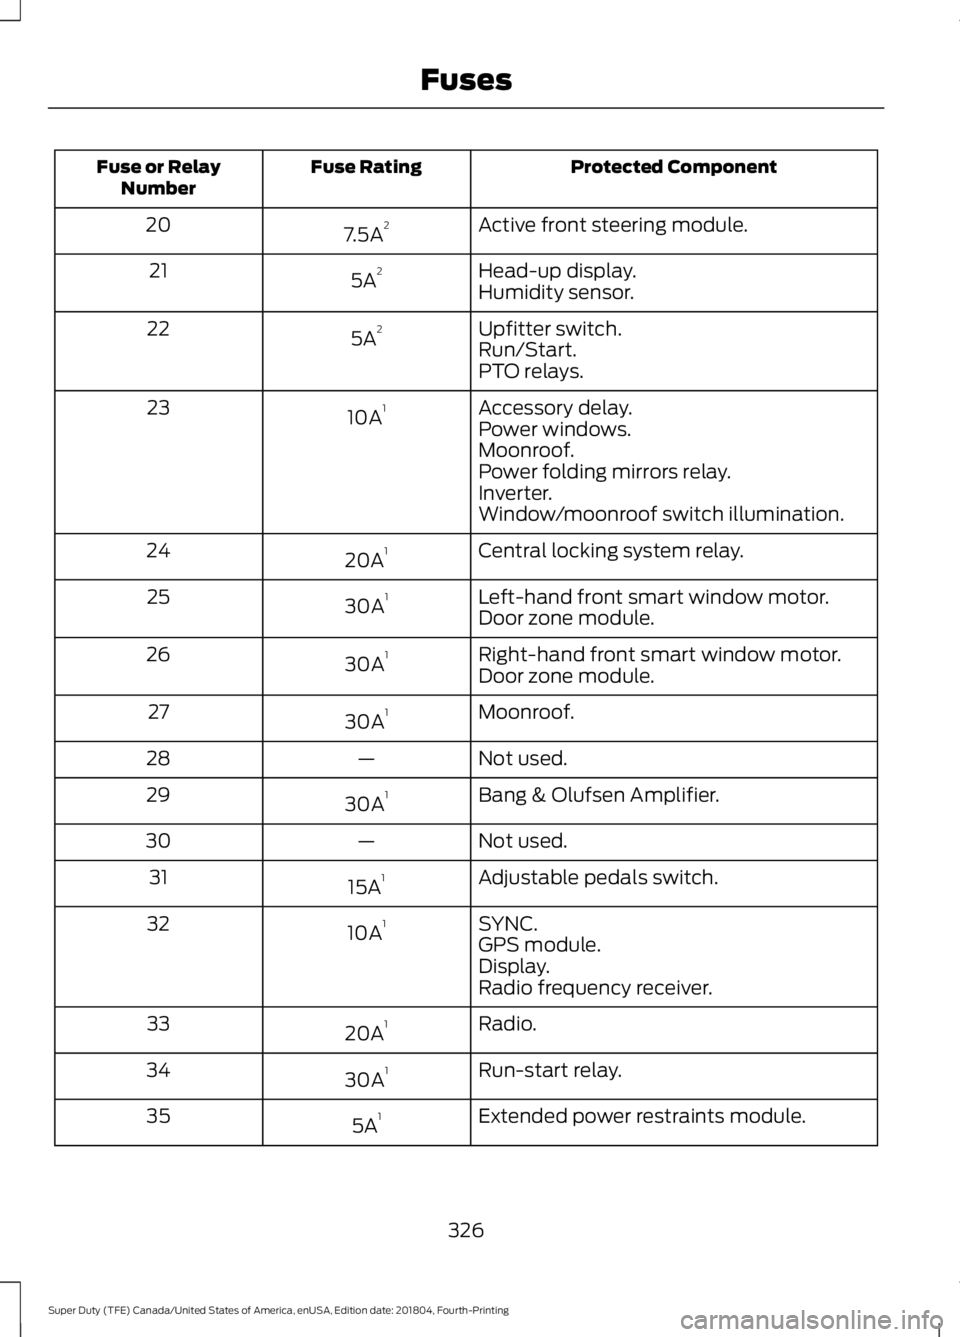
Protected Component
Fuse Rating
Fuse or Relay
Number
Active front steering module.
7.5A 2
20
Head-up display.
5A 2
21
Humidity sensor.
Upfitter switch.
5A 2
22
Run/Start.
PTO relays.
Accessory delay.
10A 1
23
Power windows.
Moonroof.
Power folding mirrors relay.
Inverter.
Window/moonroof switch illumination.
Central locking system relay.
20A 1
24
Left-hand front smart window motor.
30A 1
25
Door zone module.
Right-hand front smart window motor.
30A 1
26
Door zone module.
Moonroof.
30A 1
27
Not used.
—
28
Bang & Olufsen Amplifier.
30A 1
29
Not used.
—
30
Adjustable pedals switch.
15A 1
31
SYNC.
10A 1
32
GPS module.
Display.
Radio frequency receiver.
Radio.
20A 1
33
Run-start relay.
30A 1
34
Extended power restraints module.
5A 1
35
326
Super Duty (TFE) Canada/United States of America, enUSA, Edition date: 201804, Fourth-Printing Fuses
Page 374 of 666
WAXING
Regular waxing is necessary to protect your
car's paint from the elements. We
recommend that you wash and wax the
painted surface once or twice a year.
When washing and waxing, park your
vehicle in a shaded area out of direct
sunlight. Always wash your vehicle before
applying wax.
•
Use a quality wax that does not contain
abrasives.
• Follow the manufacturer ’s instructions
to apply and remove the wax.
• Apply a small amount of wax in a
back-and-forth motion, not in circles.
• Do not allow wax to come in contact
with any non-body (low-gloss black)
colored trim. The wax will discolor or
stain the parts over time.
•Roof racks.
• Bumpers.
• Grained door handles.
• Side moldings.
• Mirror housings.
• Windshield cowl area.
• Do not apply wax to glass areas.
• After waxing, your car's paint should
feel smooth, and be free of streaks and
smudges.
CLEANING THE ENGINE
Engines are more efficient when they are
clean because grease and dirt buildup keep
the engine warmer than normal. When washing:
•
Take care when using a power washer
to clean the engine. The high-pressure
fluid could penetrate the sealed parts
and cause damage.
• Do not spray a hot engine with cold
water to avoid cracking the engine
block or other engine components.
• Spray Motorcraft Engine Shampoo and
Degreaser on all parts that require
cleaning and pressure rinse clean. In
Canada, use Motorcraft Engine
Shampoo.
Note: If your vehicle has an engine cover
remove the cover before application of
Motorcraft Engine Shampoo and Degreaser.
Immediately rinse away any over spray.
• Never wash or rinse the engine while it
is hot or running; water in the running
engine may cause internal damage.
• Never wash or rinse any ignition coil,
spark plug wire or spark plug well, or
the area in and around these locations.
• Cover the battery, power distribution
box, and air filter assembly to prevent
water damage when cleaning the
engine.
CLEANING THE EXHAUST -
6.7L DIESEL WARNING: Failure to maintain the
functional holes, in the tailpipe section
of the exhaust, clean and free of debris
or foreign material may result in the
holes becoming blocked or plugged. Do
not modify or remove the tail-pipe
371
Super Duty (TFE) Canada/United States of America, enUSA, Edition date: 201804, Fourth-Printing Vehicle Care
Page 375 of 666
section. Blocked or plugged holes or
removal/modification of the system
could result in elevated exhaust gas
temperatures which may result in
vehicle/property damage or personal
injury.
WARNING: The normal operating
temperature of the exhaust system is
very high. Never work around or attempt
to repair any part of the exhaust system
until it has cooled. Use special care when
working around the diesel oxidation
catalytic converter and/or the diesel
particulate filter (DPF). The diesel
oxidation catalytic converter and/or the
DPF heats up to a high temperature after
only a short period of engine operation
and can stay hot even after the engine
is turned off. Failure to follow these
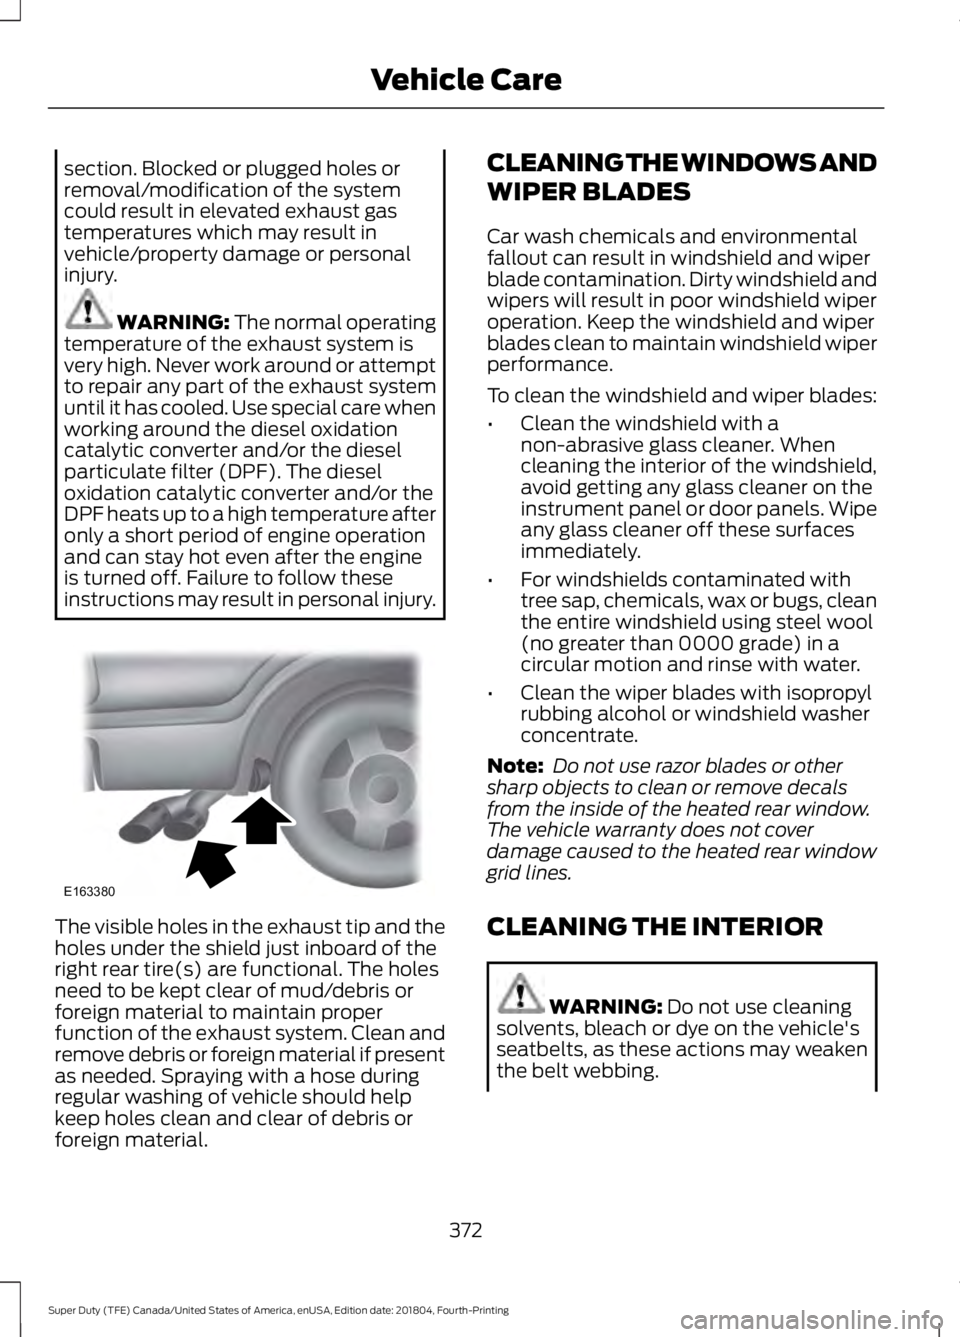
instructions may result in personal injury. The visible holes in the exhaust tip and the
holes under the shield just inboard of the
right rear tire(s) are functional. The holes
need to be kept clear of mud/debris or
foreign material to maintain proper
function of the exhaust system. Clean and
remove debris or foreign material if present
as needed. Spraying with a hose during
regular washing of vehicle should help
keep holes clean and clear of debris or
foreign material. CLEANING THE WINDOWS AND
WIPER BLADES
Car wash chemicals and environmental
fallout can result in windshield and wiper
blade contamination. Dirty windshield and
wipers will result in poor windshield wiper
operation. Keep the windshield and wiper
blades clean to maintain windshield wiper
performance.
To clean the windshield and wiper blades:
•
Clean the windshield with a
non-abrasive glass cleaner. When
cleaning the interior of the windshield,
avoid getting any glass cleaner on the
instrument panel or door panels. Wipe
any glass cleaner off these surfaces
immediately.
• For windshields contaminated with
tree sap, chemicals, wax or bugs, clean
the entire windshield using steel wool
(no greater than 0000 grade) in a
circular motion and rinse with water.
• Clean the wiper blades with isopropyl
rubbing alcohol or windshield washer
concentrate.
Note: Do not use razor blades or other
sharp objects to clean or remove decals
from the inside of the heated rear window.
The vehicle warranty does not cover
damage caused to the heated rear window
grid lines.
CLEANING THE INTERIOR WARNING:
Do not use cleaning
solvents, bleach or dye on the vehicle's
seatbelts, as these actions may weaken
the belt webbing.
372
Super Duty (TFE) Canada/United States of America, enUSA, Edition date: 201804, Fourth-Printing Vehicle CareE163380
Page 499 of 666
Action and Description
Menu Item
Item
This bar displays icons and messages pertaining to current
system activities including climate settings, voice
commands and phone functions such as text messages.
Status Bar
A
This button is available on the main screens. Pressing it
takes you to the home screen view.
Home
B
This shows the current time. You can set the clock manually
or have it controlled by the vehicle's GPS location. See
Settings (page 544).
Clock
C
This displays the current outside temperature.
Outside
Temperature
D
You can touch any of the buttons on this bar to select a
feature.
Feature Bar
E
The touchscreen allows you quick access
to all of your comfort, navigation,
communication and entertainment
options. Using the status and feature bar
you can quickly select the feature you want
to use.
Note: Your system is equipped with a
feature that allows you to access and
control audio features for 10 minutes after
you switch the ignition off (and no doors
open). The Status Bar
Additional icons also display in the status
bar depending on market, vehicle options
and current operation. If a feature is not
active, the icon does not display. Certain
icons may move to the left or right
depending on what options are active.
496
Super Duty (TFE) Canada/United States of America, enUSA, Edition date: 201804, Fourth-Printing SYNC™ 3
(If Equipped)