ignition FORD F-250 2019 Owner's Manual
[x] Cancel search | Manufacturer: FORD, Model Year: 2019, Model line: F-250, Model: FORD F-250 2019Pages: 666, PDF Size: 13.6 MB
Page 82 of 666
2.
Switch the ignition from off to on. Keep
the ignition on for at least 3 seconds,
but no more than 10 seconds.
3. Switch the ignition off and remove the
first coded key from the ignition.
4. After at least 3 seconds but within 10 seconds of switching the ignition off,
insert the second previously coded key
into the ignition.
5. Switch the ignition from off to on. Keep
the ignition on for at least 3 seconds,
but no more than 10 seconds.
6. Switch the ignition off and remove the
second previously programmed coded
key from the ignition.
7. After at least 3 seconds but within 10 seconds of switching the ignition off
and removing the previously
programmed coded key, insert the new
unprogrammed key into the ignition.
8. Switch the ignition from off to on. Keep
the ignition on for at least six seconds.
9. Remove the newly programmed coded
key from the ignition.
If you have successfully programmed the
new integrated keyhead transmitter, it will
start your vehicle and operate the remote
entry system.
If programming was unsuccessful, wait 10
seconds and repeat steps 1 through 9. If
you are still unsuccessful, take your vehicle
to your authorized dealer.
Programming a Spare Intelligent
Access Key
Note: Do not place the device on the
wireless accessory charging area when
programming intelligent access keys.
Note: You can program a maximum of six
keys to your vehicle. All six must be
intelligent access keys. This procedure programs both the vehicle
immobilizer keycode and the remote
control to your vehicle.
You must have two previously
programmed intelligent access keys inside
your vehicle and the new unprogrammed
intelligent access key readily accessible.
Contact an authorized dealer to have the
spare key programmed if two previously
programmed keys are not available.
Make sure that the ignition is switched off
before beginning this procedure. Make sure
that you close all the doors before
beginning and that they remain closed
throughout the procedure. Carry out all
steps within 30 seconds of starting the
sequence. Stop and wait for at least one
minute before starting again if you carry
out any steps out of sequence.
Read and understand the entire procedure
before you begin.
79
Super Duty (TFE) Canada/United States of America, enUSA, Edition date: 201804, Fourth-Printing Security
Page 83 of 666
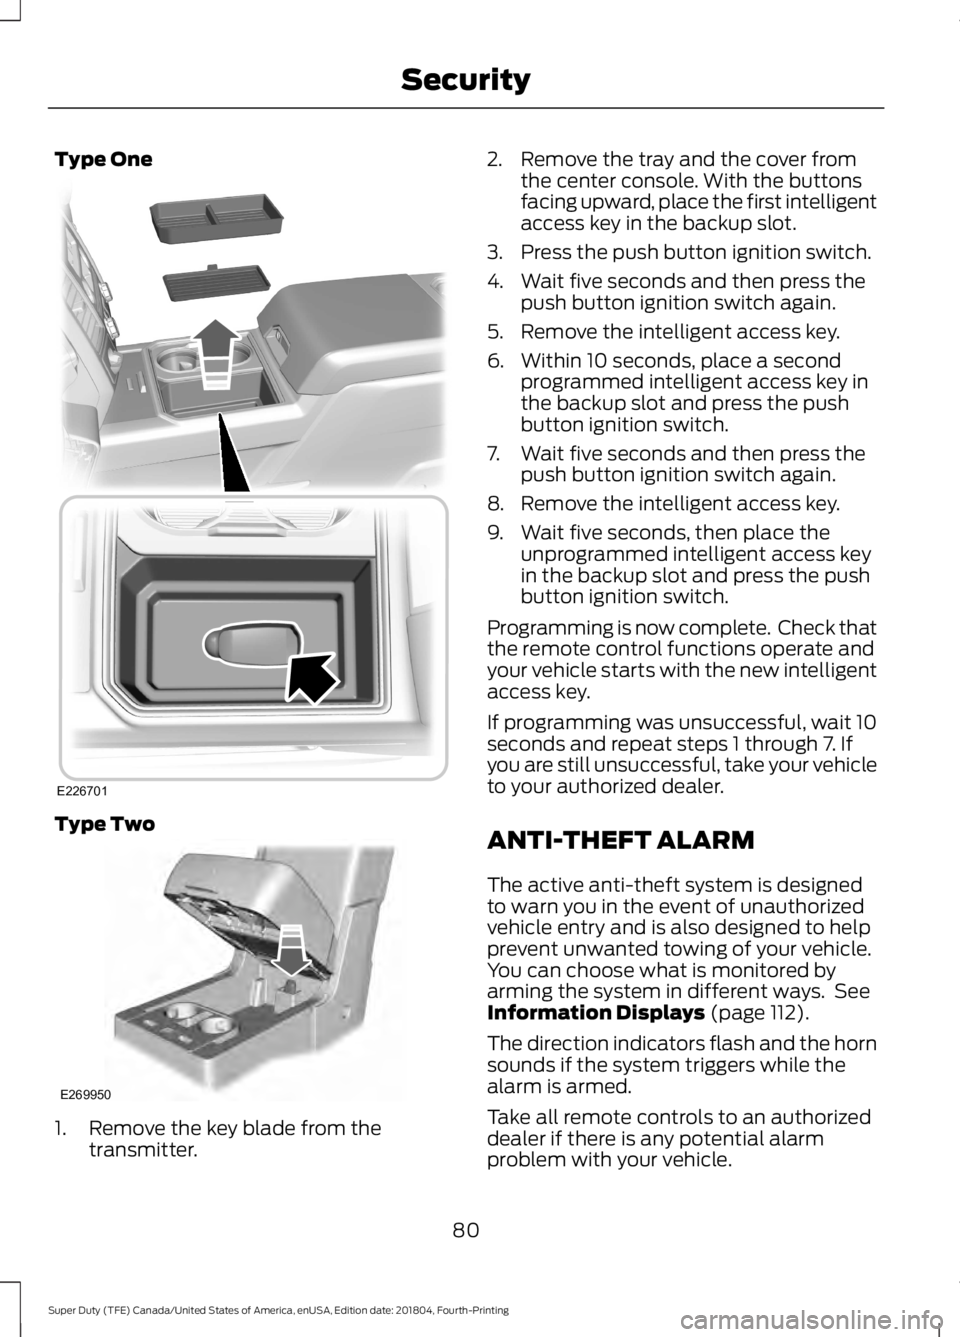
Type One
Type Two
1. Remove the key blade from the
transmitter. 2. Remove the tray and the cover from
the center console. With the buttons
facing upward, place the first intelligent
access key in the backup slot.
3. Press the push button ignition switch.
4. Wait five seconds and then press the push button ignition switch again.
5. Remove the intelligent access key.
6. Within 10 seconds, place a second programmed intelligent access key in
the backup slot and press the push
button ignition switch.
7. Wait five seconds and then press the push button ignition switch again.
8. Remove the intelligent access key.
9. Wait five seconds, then place the unprogrammed intelligent access key
in the backup slot and press the push
button ignition switch.
Programming is now complete. Check that
the remote control functions operate and
your vehicle starts with the new intelligent
access key.
If programming was unsuccessful, wait 10
seconds and repeat steps 1 through 7. If
you are still unsuccessful, take your vehicle
to your authorized dealer.
ANTI-THEFT ALARM
The active anti-theft system is designed
to warn you in the event of unauthorized
vehicle entry and is also designed to help
prevent unwanted towing of your vehicle.
You can choose what is monitored by
arming the system in different ways. See
Information Displays (page 112).
The direction indicators flash and the horn
sounds if the system triggers while the
alarm is armed.
Take all remote controls to an authorized
dealer if there is any potential alarm
problem with your vehicle.
80
Super Duty (TFE) Canada/United States of America, enUSA, Edition date: 201804, Fourth-Printing SecurityE226701 E269950
Page 84 of 666
Using the System
You can select two levels of alarm security.
You can change the level of security when
the ignition is switched off through the
information display with the two options
below:
Perimeter Only (If Equipped)
Perimeter only monitors the following:
•
Doors.
• Hood.
• Tailgate.
All Sensors (If Equipped)
All sensors monitors the following:
• Doors.
• Hood.
• Tailgate.
• Movement inside your vehicle.
• Change in vehicle inclination, for
example, unwanted towing.
Note: Do not choose all sensors monitor
mode when the vehicle is in transport or if
movement within the vehicle is likely to
occur.
Note: For correct operation of the interior
motion detection system, make sure you
close all the windows prior to arming the
system. This helps prevent accidental alarm
activation due to external influences.
Additionally, the interior motion sensing
system does not arm if any door is ajar.
Arming the Alarm
The alarm is ready to arm when there is
not a key in the ignition. Lock your vehicle
using the remote control or keyless entry
keypad. You can also lock your vehicle
using the lock sensor on the exterior door
handle if your vehicle is equipped with
intelligent access. See Locking and
Unlocking (page 69). The direction indicators flash once after
you lock your vehicle. This indicates the
alarm is in the pre-armed mode. It fully
arms after 20 seconds.
Disarming the Alarm
Disarm the alarm by any of the following
actions:
•
Press the power door unlock button
within the 20-second pre-armed mode.
• Unlock the doors with the remote
control or keyless entry keypad. If
equipped with intelligent access, you
can use the unlock sensor on the
exterior door handle. See
Locking and
Unlocking (page 69).
• Switch the ignition on or start your
vehicle.
• Use a key in the driver door lock
cylinder to unlock your vehicle, then
switch the ignition on within 12
seconds.
81
Super Duty (TFE) Canada/United States of America, enUSA, Edition date: 201804, Fourth-Printing Security
Page 88 of 666
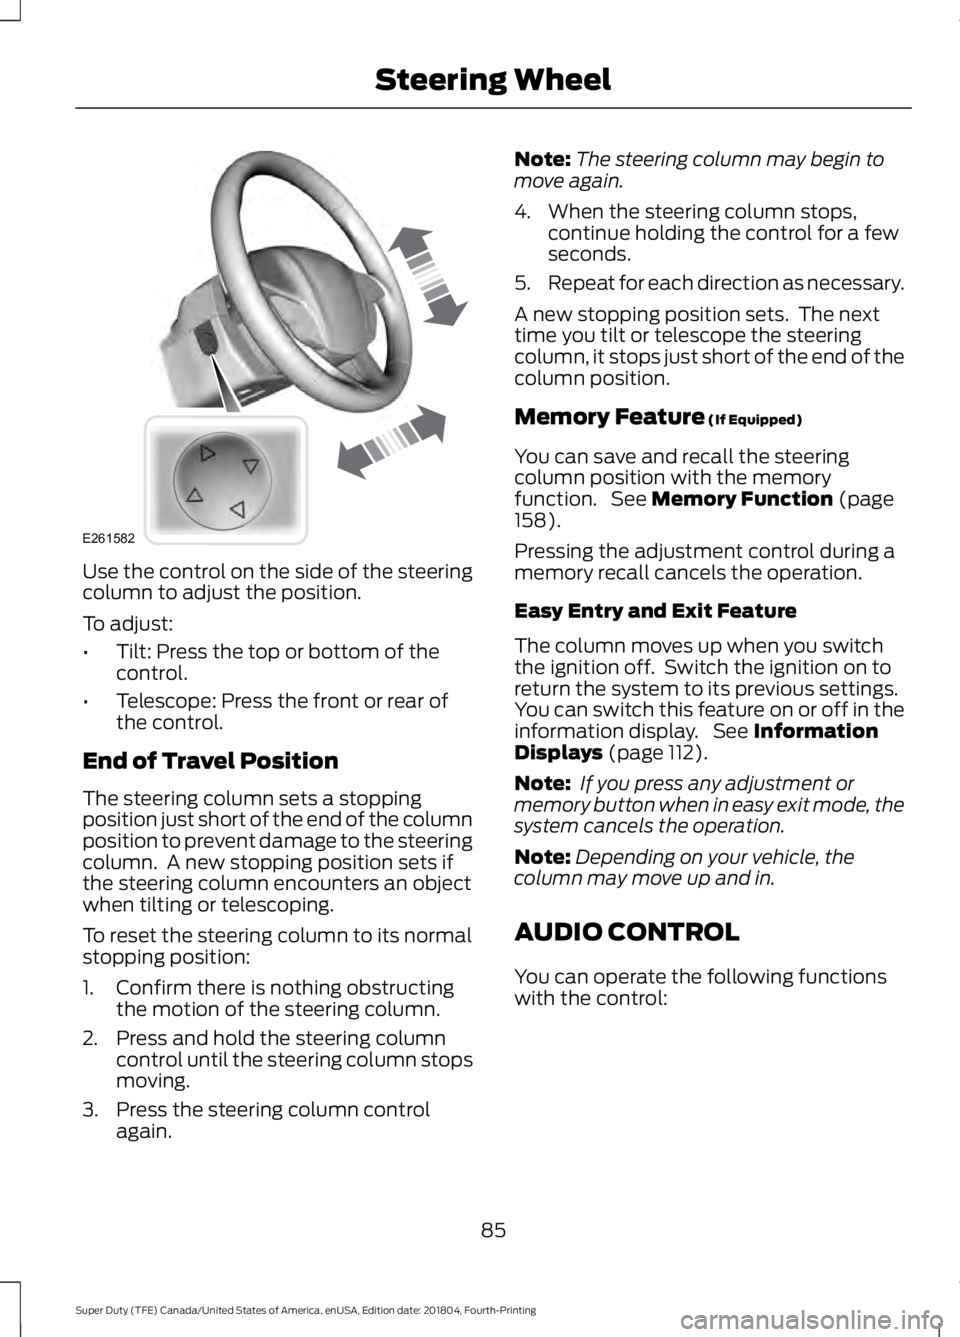
Use the control on the side of the steering
column to adjust the position.
To adjust:
•
Tilt: Press the top or bottom of the
control.
• Telescope: Press the front or rear of
the control.
End of Travel Position
The steering column sets a stopping
position just short of the end of the column
position to prevent damage to the steering
column. A new stopping position sets if
the steering column encounters an object
when tilting or telescoping.
To reset the steering column to its normal
stopping position:
1. Confirm there is nothing obstructing the motion of the steering column.
2. Press and hold the steering column control until the steering column stops
moving.
3. Press the steering column control again. Note:
The steering column may begin to
move again.
4. When the steering column stops, continue holding the control for a few
seconds.
5. Repeat for each direction as necessary.
A new stopping position sets. The next
time you tilt or telescope the steering
column, it stops just short of the end of the
column position.
Memory Feature (If Equipped)
You can save and recall the steering
column position with the memory
function. See
Memory Function (page
158).
Pressing the adjustment control during a
memory recall cancels the operation.
Easy Entry and Exit Feature
The column moves up when you switch
the ignition off. Switch the ignition on to
return the system to its previous settings.
You can switch this feature on or off in the
information display. See
Information
Displays (page 112).
Note: If you press any adjustment or
memory button when in easy exit mode, the
system cancels the operation.
Note: Depending on your vehicle, the
column may move up and in.
AUDIO CONTROL
You can operate the following functions
with the control:
85
Super Duty (TFE) Canada/United States of America, enUSA, Edition date: 201804, Fourth-Printing Steering WheelE261582
Page 95 of 666
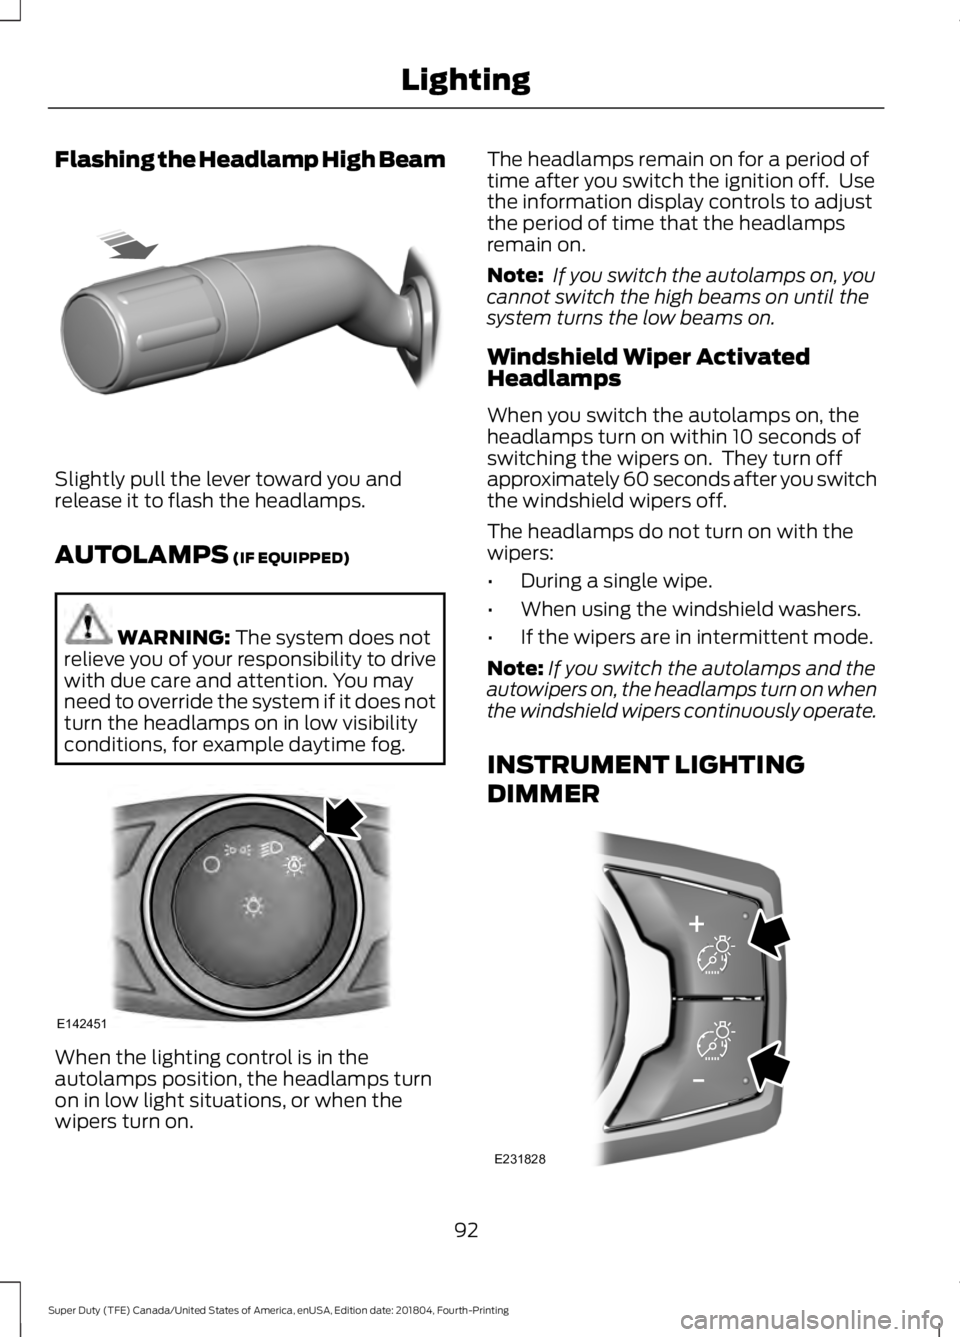
Flashing the Headlamp High Beam
Slightly pull the lever toward you and
release it to flash the headlamps.
AUTOLAMPS (IF EQUIPPED)
WARNING:
The system does not
relieve you of your responsibility to drive
with due care and attention. You may
need to override the system if it does not
turn the headlamps on in low visibility
conditions, for example daytime fog. When the lighting control is in the
autolamps position, the headlamps turn
on in low light situations, or when the
wipers turn on. The headlamps remain on for a period of
time after you switch the ignition off. Use
the information display controls to adjust
the period of time that the headlamps
remain on.
Note:
If you switch the autolamps on, you
cannot switch the high beams on until the
system turns the low beams on.
Windshield Wiper Activated
Headlamps
When you switch the autolamps on, the
headlamps turn on within 10 seconds of
switching the wipers on. They turn off
approximately 60 seconds after you switch
the windshield wipers off.
The headlamps do not turn on with the
wipers:
• During a single wipe.
• When using the windshield washers.
• If the wipers are in intermittent mode.
Note: If you switch the autolamps and the
autowipers on, the headlamps turn on when
the windshield wipers continuously operate.
INSTRUMENT LIGHTING
DIMMER 92
Super Duty (TFE) Canada/United States of America, enUSA, Edition date: 201804, Fourth-Printing LightingE311233 E142451 E231828
Page 96 of 666
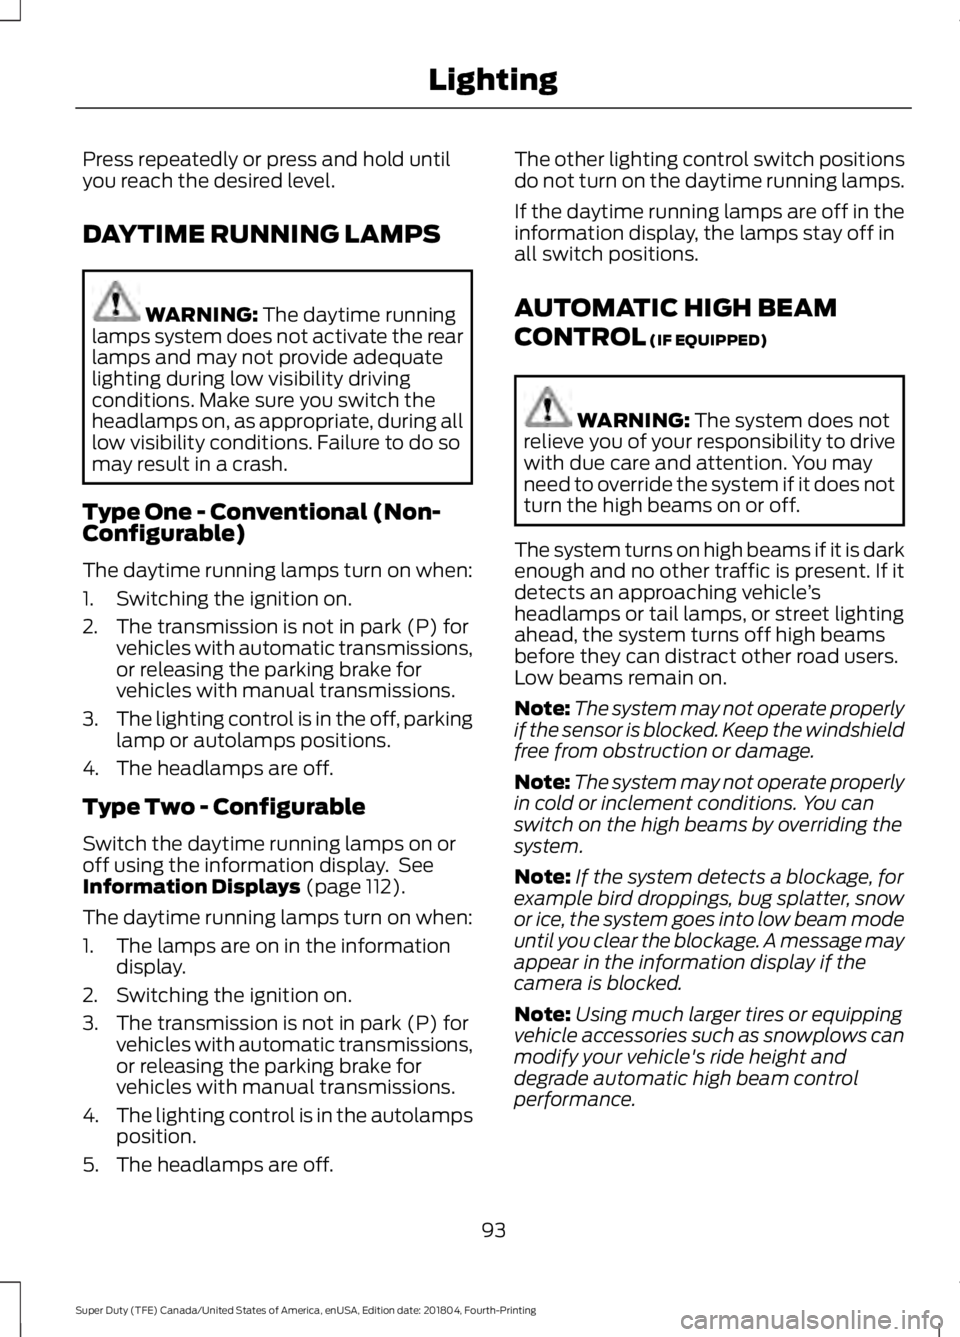
Press repeatedly or press and hold until
you reach the desired level.
DAYTIME RUNNING LAMPS
WARNING: The daytime running
lamps system does not activate the rear
lamps and may not provide adequate
lighting during low visibility driving
conditions. Make sure you switch the
headlamps on, as appropriate, during all
low visibility conditions. Failure to do so
may result in a crash.
Type One - Conventional (Non-
Configurable)
The daytime running lamps turn on when:
1. Switching the ignition on.
2. The transmission is not in park (P) for vehicles with automatic transmissions,
or releasing the parking brake for
vehicles with manual transmissions.
3. The lighting control is in the off, parking
lamp or autolamps positions.
4. The headlamps are off.
Type Two - Configurable
Switch the daytime running lamps on or
off using the information display. See
Information Displays
(page 112).
The daytime running lamps turn on when:
1. The lamps are on in the information display.
2. Switching the ignition on.
3. The transmission is not in park (P) for vehicles with automatic transmissions,
or releasing the parking brake for
vehicles with manual transmissions.
4. The lighting control is in the autolamps
position.
5. The headlamps are off. The other lighting control switch positions
do not turn on the daytime running lamps.
If the daytime running lamps are off in the
information display, the lamps stay off in
all switch positions.
AUTOMATIC HIGH BEAM
CONTROL
(IF EQUIPPED)
WARNING:
The system does not
relieve you of your responsibility to drive
with due care and attention. You may
need to override the system if it does not
turn the high beams on or off.
The system turns on high beams if it is dark
enough and no other traffic is present. If it
detects an approaching vehicle ’s
headlamps or tail lamps, or street lighting
ahead, the system turns off high beams
before they can distract other road users.
Low beams remain on.
Note: The system may not operate properly
if the sensor is blocked. Keep the windshield
free from obstruction or damage.
Note: The system may not operate properly
in cold or inclement conditions. You can
switch on the high beams by overriding the
system.
Note: If the system detects a blockage, for
example bird droppings, bug splatter, snow
or ice, the system goes into low beam mode
until you clear the blockage. A message may
appear in the information display if the
camera is blocked.
Note: Using much larger tires or equipping
vehicle accessories such as snowplows can
modify your vehicle's ride height and
degrade automatic high beam control
performance.
93
Super Duty (TFE) Canada/United States of America, enUSA, Edition date: 201804, Fourth-Printing Lighting
Page 101 of 666
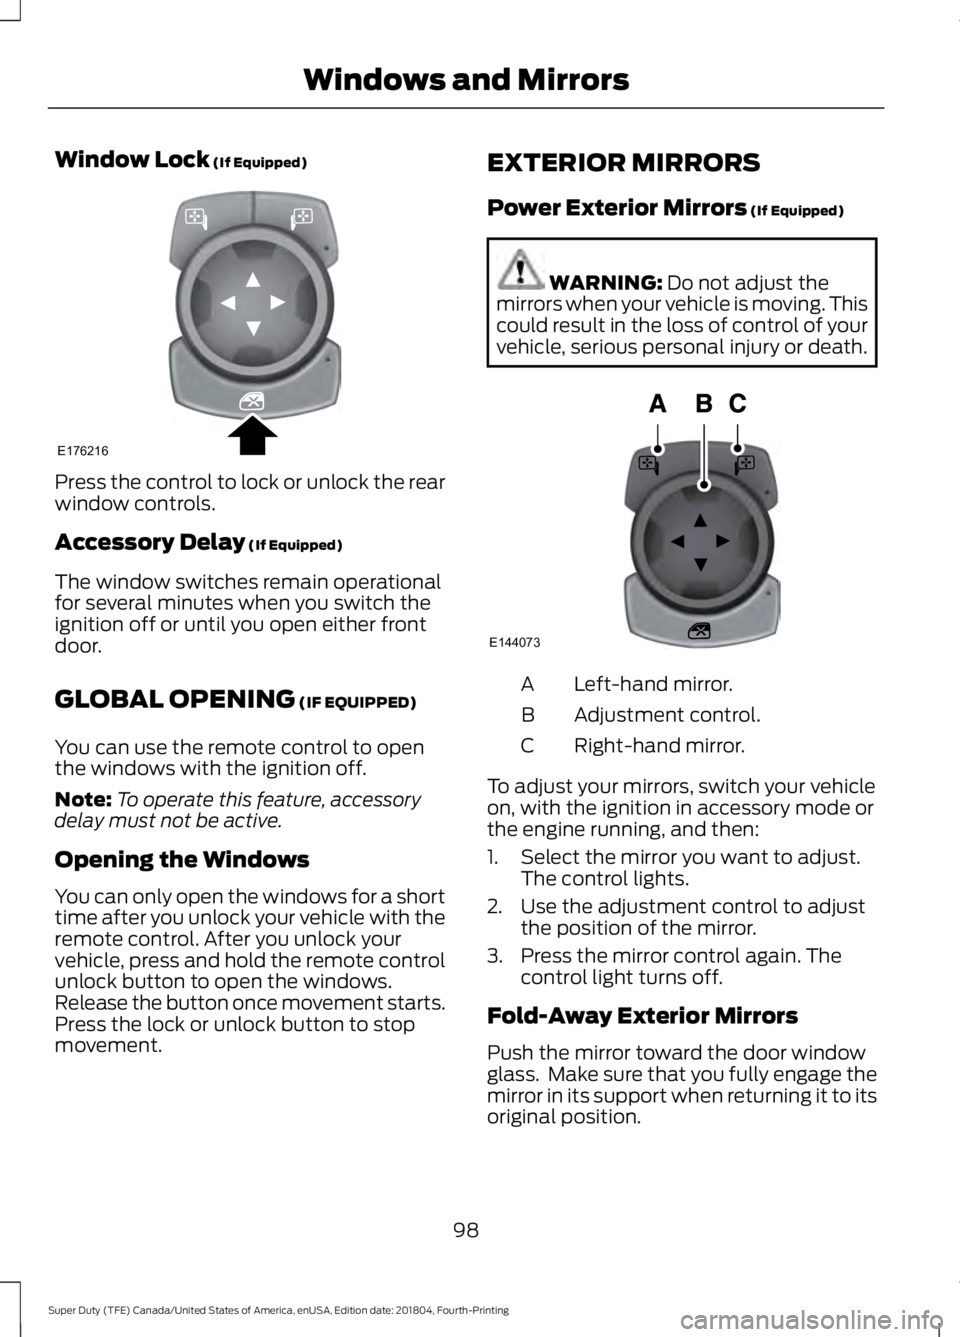
Window Lock (If Equipped)
Press the control to lock or unlock the rear
window controls.
Accessory Delay
(If Equipped)
The window switches remain operational
for several minutes when you switch the
ignition off or until you open either front
door.
GLOBAL OPENING
(IF EQUIPPED)
You can use the remote control to open
the windows with the ignition off.
Note: To operate this feature, accessory
delay must not be active.
Opening the Windows
You can only open the windows for a short
time after you unlock your vehicle with the
remote control. After you unlock your
vehicle, press and hold the remote control
unlock button to open the windows.
Release the button once movement starts.
Press the lock or unlock button to stop
movement. EXTERIOR MIRRORS
Power Exterior Mirrors
(If Equipped) WARNING:
Do not adjust the
mirrors when your vehicle is moving. This
could result in the loss of control of your
vehicle, serious personal injury or death. Left-hand mirror.
A
Adjustment control.
B
Right-hand mirror.
C
To adjust your mirrors, switch your vehicle
on, with the ignition in accessory mode or
the engine running, and then:
1. Select the mirror you want to adjust. The control lights.
2. Use the adjustment control to adjust the position of the mirror.
3. Press the mirror control again. The control light turns off.
Fold-Away Exterior Mirrors
Push the mirror toward the door window
glass. Make sure that you fully engage the
mirror in its support when returning it to its
original position.
98
Super Duty (TFE) Canada/United States of America, enUSA, Edition date: 201804, Fourth-Printing Windows and MirrorsE176216 E144073
Page 110 of 666
WARNING LAMPS AND
INDICATORS
The following warning lamps and
indicators alert you to a vehicle condition
that may become serious. Some lamps
illuminate when you start your vehicle to
make sure they work. If any lamps remain
on after starting your vehicle, refer to the
respective system warning lamp for further
information.
Note:
Some warning indicators appear in
the information display and operate the
same as a warning lamp but do not
illuminate when you start your vehicle.
Adaptive Cruise Control (If Equipped) The speed control system
indicator light changes color to
indicate what mode the system
is in. See Using Adaptive Cruise Control
(page
242).
On (white light): Illuminates when the
adaptive cruise control system is turned
on. Turns off when the speed control
system is turned off.
Engaged (green light): Illuminates when
the adaptive cruise control system is
engaged. Turns off when the speed control
system is disengaged.
Adaptive Steering
(If Equipped) The adaptive steering system
indicator illuminates if the
system detects a fault during the
continuous diagnostic checks. Adaptive Steering Initialization (yellow,
flashing): The adaptive steering system
has detected a difference between
steering wheel angle and the desired road
wheel angle. The steering wheel adjusts
itself to correct this difference. This
adjustment is part of normal system
operation.
Adaptive Steering Off (yellow, solid): The
adaptive steering system is off. It is
possible that the steering wheel may not
be straight when the vehicle is driving
straight ahead. If this message persists,
see an authorized dealer.
Adaptive Steering Loss (red, solid): The
adaptive steering system integrity cannot
be verified. Do not drive the vehicle and
contact an authorized dealer immediately.
See
Steering (page 260).
Anti-Lock Braking System It illuminates momentarily when
you switch on the ignition to
confirm that the lamp is
functional. If it does not illuminate when
you switch on the ignition or begins to flash
at anytime, have the system checked as
soon as possible.
If it illuminates when you are driving, this
indicates a malfunction. You will continue
to have the normal braking system
(without ABS) unless the brake system
warning lamp is also illuminated. Have the
system checked as soon as possible.
Automatic High Beam
(If Equipped) Illuminates when this feature is
on. See
Automatic High Beam
Control (page 93).
107
Super Duty (TFE) Canada/United States of America, enUSA, Edition date: 201804, Fourth-Printing Instrument ClusterE144524 E223375
Page 111 of 666
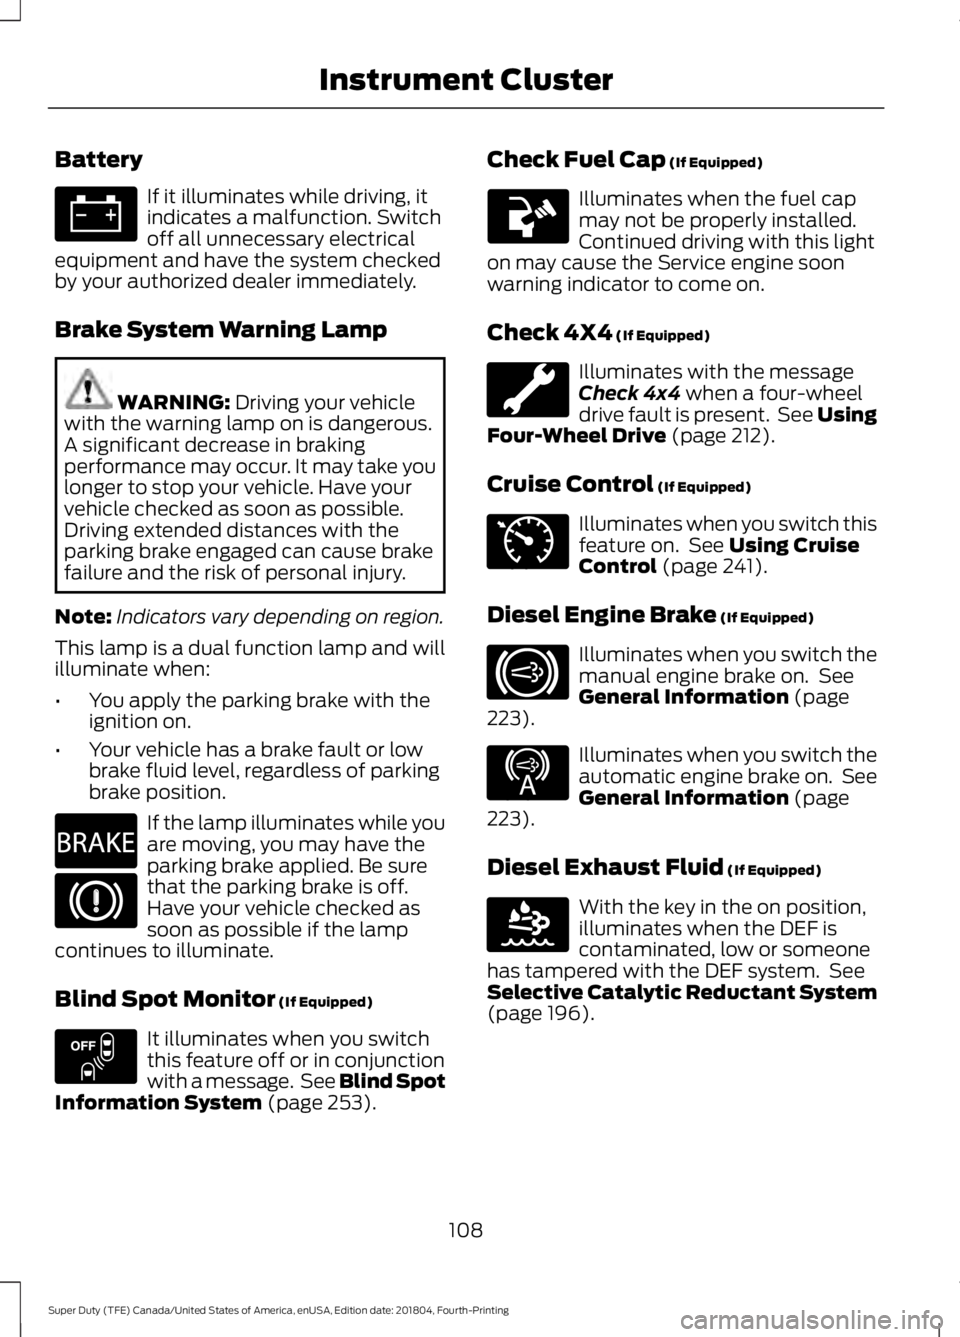
Battery
If it illuminates while driving, it
indicates a malfunction. Switch
off all unnecessary electrical
equipment and have the system checked
by your authorized dealer immediately.
Brake System Warning Lamp WARNING: Driving your vehicle
with the warning lamp on is dangerous.
A significant decrease in braking
performance may occur. It may take you
longer to stop your vehicle. Have your
vehicle checked as soon as possible.
Driving extended distances with the
parking brake engaged can cause brake
failure and the risk of personal injury.
Note: Indicators vary depending on region.
This lamp is a dual function lamp and will
illuminate when:
• You apply the parking brake with the
ignition on.
• Your vehicle has a brake fault or low
brake fluid level, regardless of parking
brake position. If the lamp illuminates while you
are moving, you may have the
parking brake applied. Be sure
that the parking brake is off.
Have your vehicle checked as
soon as possible if the lamp
continues to illuminate.
Blind Spot Monitor
(If Equipped) It illuminates when you switch
this feature off or in conjunction
with a message. See Blind Spot
Information System
(page 253). Check Fuel Cap
(If Equipped) Illuminates when the fuel cap
may not be properly installed.
Continued driving with this light
on may cause the Service engine soon
warning indicator to come on.
Check 4X4
(If Equipped) Illuminates with the message
Check 4x4
when a four-wheel
drive fault is present. See Using
Four-Wheel Drive (page 212).
Cruise Control
(If Equipped) Illuminates when you switch this
feature on. See
Using Cruise
Control (page 241).
Diesel Engine Brake
(If Equipped) Illuminates when you switch the
manual engine brake on. See
General Information
(page
223). Illuminates when you switch the
automatic engine brake on. See
General Information
(page
223).
Diesel Exhaust Fluid
(If Equipped) With the key in the on position,
illuminates when the DEF is
contaminated, low or someone
has tampered with the DEF system. See
Selective Catalytic Reductant System
(page
196).
108
Super Duty (TFE) Canada/United States of America, enUSA, Edition date: 201804, Fourth-Printing Instrument Cluster E270480 E151262 E71340 E171217 E234452 E163176
Page 112 of 666
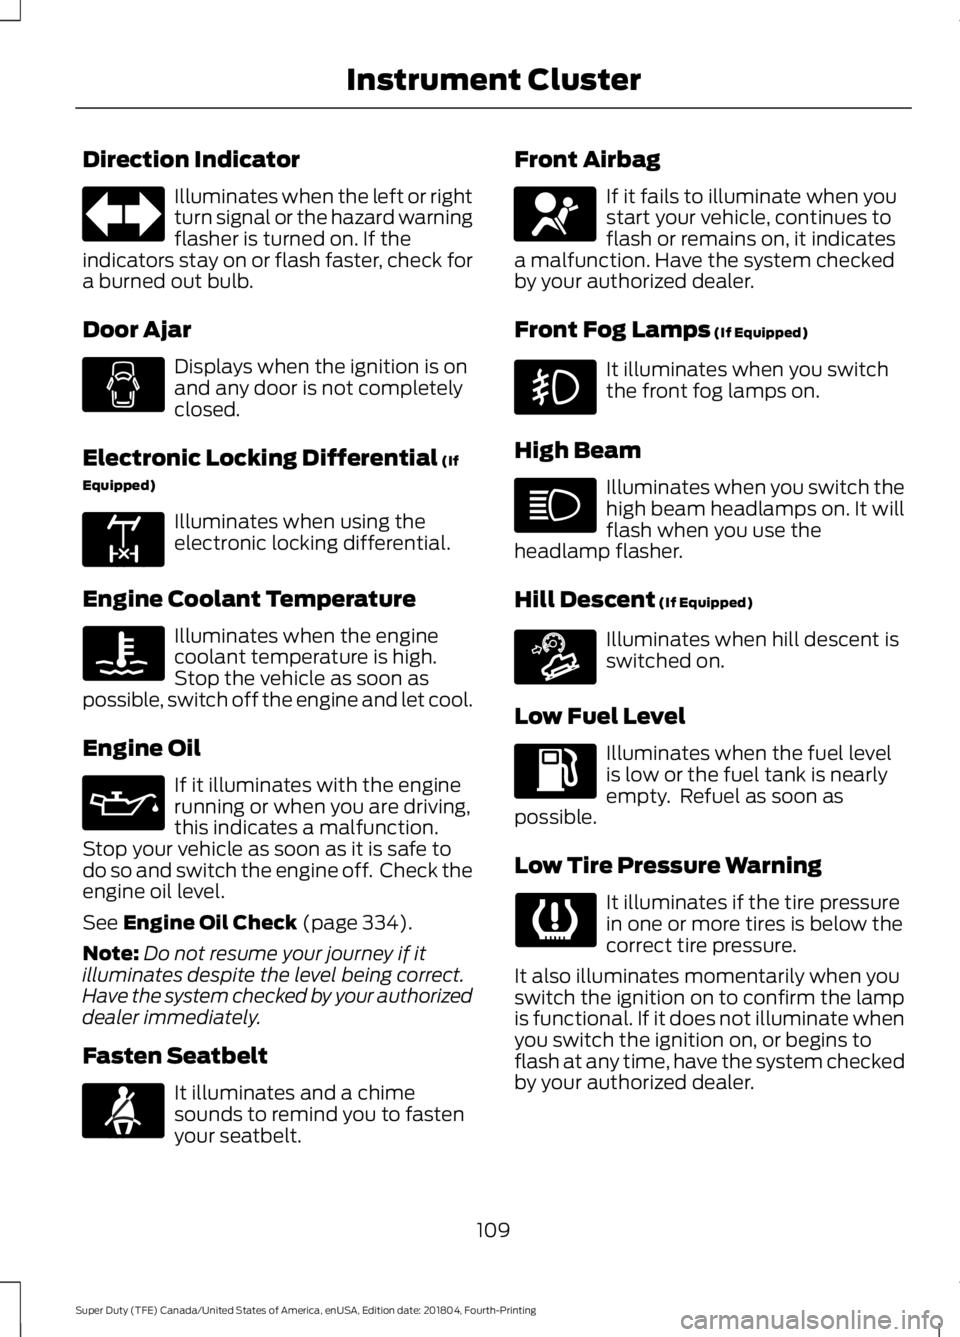
Direction Indicator
Illuminates when the left or right
turn signal or the hazard warning
flasher is turned on. If the
indicators stay on or flash faster, check for
a burned out bulb.
Door Ajar Displays when the ignition is on
and any door is not completely
closed.
Electronic Locking Differential (If
Equipped) Illuminates when using the
electronic locking differential.
Engine Coolant Temperature Illuminates when the engine
coolant temperature is high.
Stop the vehicle as soon as
possible, switch off the engine and let cool.
Engine Oil If it illuminates with the engine
running or when you are driving,
this indicates a malfunction.
Stop your vehicle as soon as it is safe to
do so and switch the engine off. Check the
engine oil level.
See
Engine Oil Check (page 334).
Note: Do not resume your journey if it
illuminates despite the level being correct.
Have the system checked by your authorized
dealer immediately.
Fasten Seatbelt It illuminates and a chime
sounds to remind you to fasten
your seatbelt. Front Airbag If it fails to illuminate when you
start your vehicle, continues to
flash or remains on, it indicates
a malfunction. Have the system checked
by your authorized dealer.
Front Fog Lamps
(If Equipped) It illuminates when you switch
the front fog lamps on.
High Beam Illuminates when you switch the
high beam headlamps on. It will
flash when you use the
headlamp flasher.
Hill Descent
(If Equipped) Illuminates when hill descent is
switched on.
Low Fuel Level Illuminates when the fuel level
is low or the fuel tank is nearly
empty. Refuel as soon as
possible.
Low Tire Pressure Warning It illuminates if the tire pressure
in one or more tires is below the
correct tire pressure.
It also illuminates momentarily when you
switch the ignition on to confirm the lamp
is functional. If it does not illuminate when
you switch the ignition on, or begins to
flash at any time, have the system checked
by your authorized dealer.
109
Super Duty (TFE) Canada/United States of America, enUSA, Edition date: 201804, Fourth-Printing Instrument Cluster E163170 E71880 E67017 E163171