key FORD F-250 2019 Owner's Manual
[x] Cancel search | Manufacturer: FORD, Model Year: 2019, Model line: F-250, Model: FORD F-250 2019Pages: 666, PDF Size: 13.6 MB
Page 75 of 666
Accessory Mode Battery Saver for
Intelligent Access Keys (If Equipped)
If you leave the ignition on after leaving
your vehicle, it turns off 30 minutes after
you close all of the doors.
KEYLESS ENTRY (IF EQUIPPED)
SECURICODE™ KEYLESS ENTRY
KEYPAD
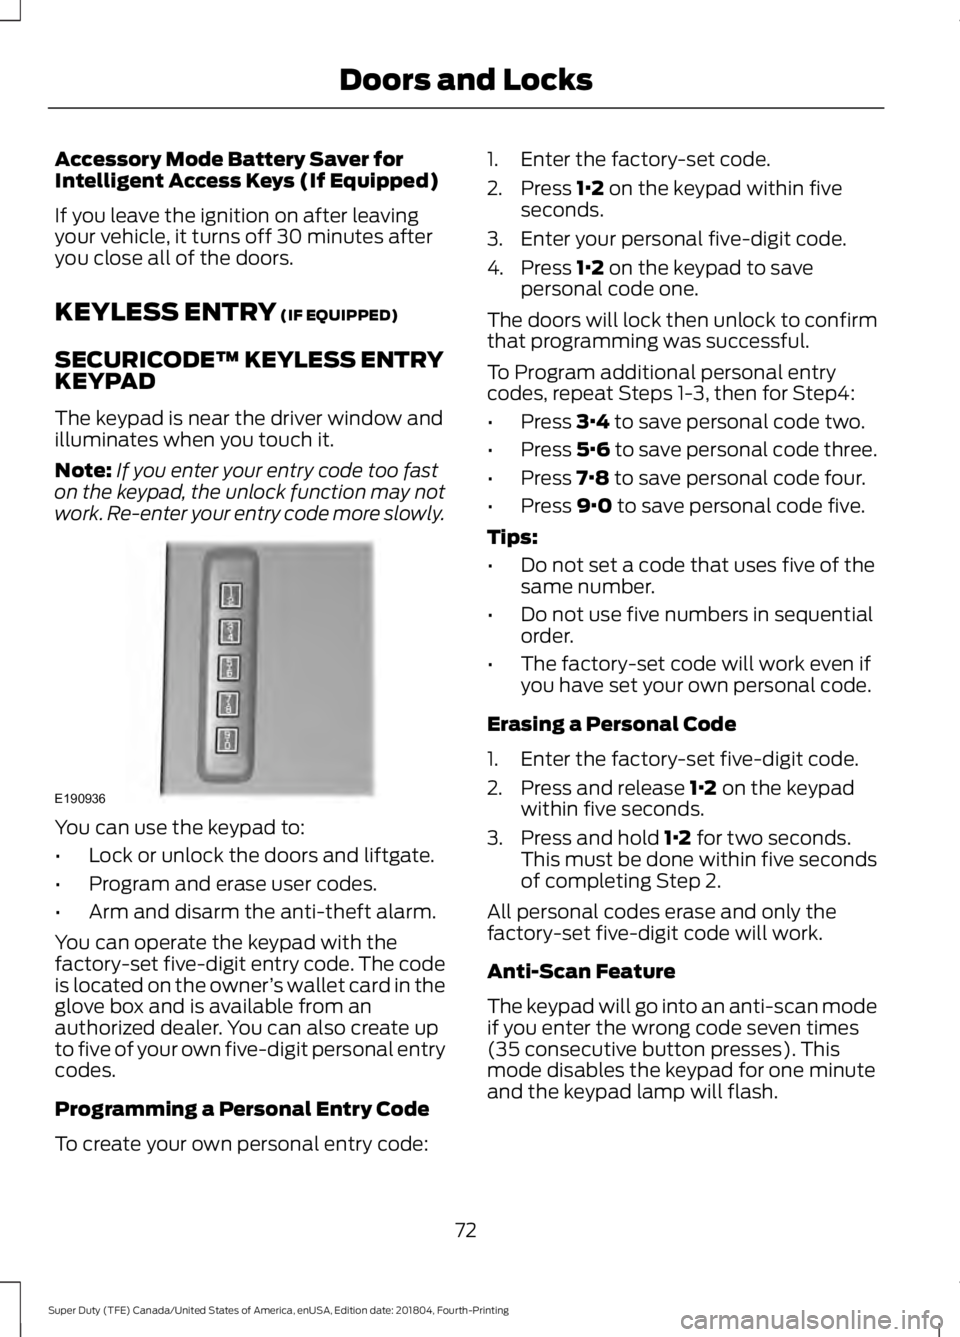
The keypad is near the driver window and
illuminates when you touch it.
Note: If you enter your entry code too fast
on the keypad, the unlock function may not
work. Re-enter your entry code more slowly. You can use the keypad to:
•
Lock or unlock the doors and liftgate.
• Program and erase user codes.
• Arm and disarm the anti-theft alarm.
You can operate the keypad with the
factory-set five-digit entry code. The code
is located on the owner ’s wallet card in the
glove box and is available from an
authorized dealer. You can also create up
to five of your own five-digit personal entry
codes.
Programming a Personal Entry Code
To create your own personal entry code: 1. Enter the factory-set code.
2. Press
1·2 on the keypad within five
seconds.
3. Enter your personal five-digit code.
4. Press
1·2 on the keypad to save
personal code one.
The doors will lock then unlock to confirm
that programming was successful.
To Program additional personal entry
codes, repeat Steps 1-3, then for Step4:
• Press
3·4 to save personal code two.
• Press
5·6 to save personal code three.
• Press
7·8 to save personal code four.
• Press
9·0 to save personal code five.
Tips:
• Do not set a code that uses five of the
same number.
• Do not use five numbers in sequential
order.
• The factory-set code will work even if
you have set your own personal code.
Erasing a Personal Code
1. Enter the factory-set five-digit code.
2. Press and release
1·2 on the keypad
within five seconds.
3. Press and hold
1·2 for two seconds.
This must be done within five seconds
of completing Step 2.
All personal codes erase and only the
factory-set five-digit code will work.
Anti-Scan Feature
The keypad will go into an anti-scan mode
if you enter the wrong code seven times
(35 consecutive button presses). This
mode disables the keypad for one minute
and the keypad lamp will flash.
72
Super Duty (TFE) Canada/United States of America, enUSA, Edition date: 201804, Fourth-Printing Doors and LocksE190936
Page 76 of 666
The anti-scan feature will turn off after:
•
One minute of keypad inactivity.
• Pressing the unlock button on the
remote control.
• Switching the ignition on.
• Unlocking the vehicle using intelligent
access.
Unlocking and Locking the Doors
To Unlock the Driver Door
Enter the factory-set five-digit code or your
personal code. You must press each
number within five seconds of each other.
The interior lamps illuminate.
Note: All doors unlock if you disable the
two-stage unlocking feature. See General
Information (page 112).
To Unlock All Doors
Enter the factory-set code or your personal
code, then press
3·4 control within five
seconds.
To Lock All Doors
Press and hold
7·8 and 9·0 at the same
time with the driver door closed. You do
not need to enter the keypad code first.
To Release the Tailgate (If Equipped)
Enter the factory-set code or your personal
code, then press
5·6 control within five
seconds.
73
Super Duty (TFE) Canada/United States of America, enUSA, Edition date: 201804, Fourth-Printing Doors and Locks
Page 77 of 666
TAILGATE LOCK (IF EQUIPPED)
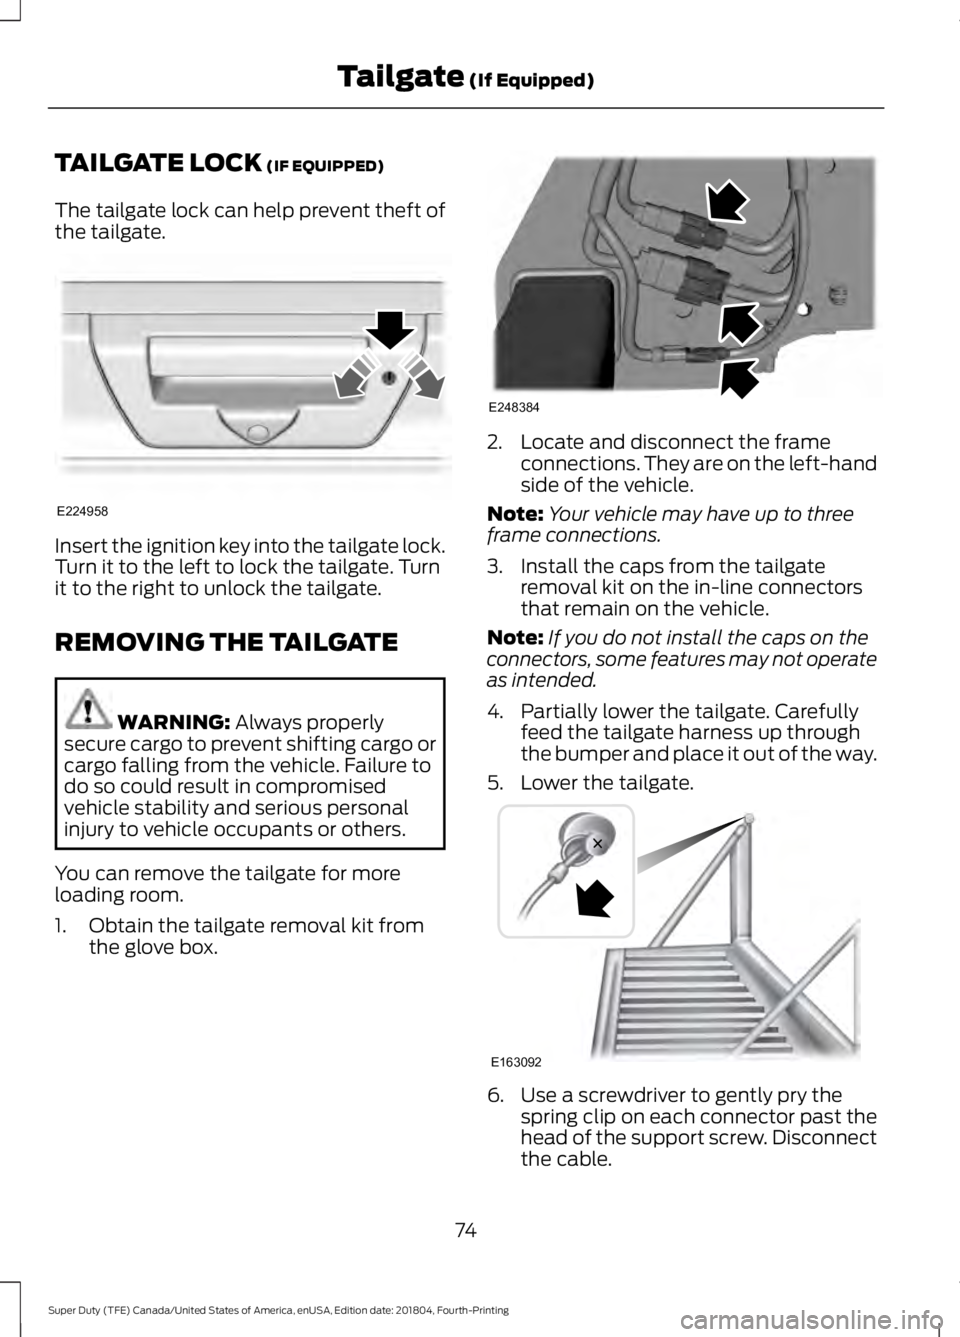
The tailgate lock can help prevent theft of
the tailgate. Insert the ignition key into the tailgate lock.
Turn it to the left to lock the tailgate. Turn
it to the right to unlock the tailgate.
REMOVING THE TAILGATE
WARNING:
Always properly
secure cargo to prevent shifting cargo or
cargo falling from the vehicle. Failure to
do so could result in compromised
vehicle stability and serious personal
injury to vehicle occupants or others.
You can remove the tailgate for more
loading room.
1. Obtain the tailgate removal kit from the glove box. 2. Locate and disconnect the frame
connections. They are on the left-hand
side of the vehicle.
Note: Your vehicle may have up to three
frame connections.
3. Install the caps from the tailgate removal kit on the in-line connectors
that remain on the vehicle.
Note: If you do not install the caps on the
connectors, some features may not operate
as intended.
4. Partially lower the tailgate. Carefully feed the tailgate harness up through
the bumper and place it out of the way.
5. Lower the tailgate. 6. Use a screwdriver to gently pry the
spring clip on each connector past the
head of the support screw. Disconnect
the cable.
74
Super Duty (TFE) Canada/United States of America, enUSA, Edition date: 201804, Fourth-Printing Tailgate
(If Equipped)E224958 E248384 E163092
Page 81 of 666
PASSIVE ANTI-THEFT
SYSTEM
Note:
The system is not compatible with
non-Ford aftermarket remote start systems.
Use of these systems may result in engine
starting problems and a loss of security
protection.
Note: Metallic objects, electronic devices
or a second coded key on the same key
chain may result in vehicle starting
problems, especially if they are too close to
the key when starting your vehicle. Prevent
these objects from touching the coded key
when starting your vehicle. Switch the
ignition off, move all objects on the key
chain away from the coded key and restart
your vehicle if a problem occurs.
Note: Do not leave a duplicate coded key
in your vehicle. Always take your keys and
lock all doors when leaving your vehicle.
SecuriLock®
The system helps prevent the engine from
starting unless you use a coded key
programmed to your vehicle. Using the
wrong key may prevent your vehicle from
starting. A message may appear in the
information display.
If you are unable to start your vehicle with
a coded key, it is not operating correctly.
A message may appear in the information
display.
Automatic Arming
The system arms when you switch the
ignition off.
Automatic Disarming
The system disarms when you switch the
ignition on with a coded key.
Replacement Keys
Note: Your vehicle comes with two keys. The integrated keyhead transmitter
functions as a programmed ignition key
that operates all the locks and starts your
vehicle, as well as a remote control.
The intelligent access key functions as a
programmed key that operates the driver
door lock and turns on the intelligent
access with push button start system, as
well as a remote control.
If your coded keys are lost or stolen and
you do not have an extra coded key, you
need to erase the key codes from your
vehicle and program new coded keys.
Contact an authorized dealer.
Store an extra programmed key away from
your vehicle in a safe place. You can
purchase replacement keys or remote
controls from an authorized dealer.
Programming a Spare Integrated
Keyhead Transmitter
Note:
You can program a maximum of four
keys to your vehicle. All six can be
integrated keyhead transmitters.
You can program your own integrated
keyhead transmitter or standard
SecuriLock coded keys to your vehicle.
This procedure programs both the vehicle
immobilizer keycode and the remote
control to your vehicle.
Only use integrated keyhead transmitters
or standard SecuriLock keys.
You must have two previously
programmed coded keys and the new
unprogrammed key readily accessible.
Contact an authorized dealer to have the
spare key programmed if two previously
programmed keys are not available.
Read and understand the entire procedure
before you begin.
1. Insert the first previously programmed
coded key into the ignition.
78
Super Duty (TFE) Canada/United States of America, enUSA, Edition date: 201804, Fourth-Printing Security
Page 82 of 666
2.
Switch the ignition from off to on. Keep
the ignition on for at least 3 seconds,
but no more than 10 seconds.
3. Switch the ignition off and remove the
first coded key from the ignition.
4. After at least 3 seconds but within 10 seconds of switching the ignition off,
insert the second previously coded key
into the ignition.
5. Switch the ignition from off to on. Keep
the ignition on for at least 3 seconds,
but no more than 10 seconds.
6. Switch the ignition off and remove the
second previously programmed coded
key from the ignition.
7. After at least 3 seconds but within 10 seconds of switching the ignition off
and removing the previously
programmed coded key, insert the new
unprogrammed key into the ignition.
8. Switch the ignition from off to on. Keep
the ignition on for at least six seconds.
9. Remove the newly programmed coded
key from the ignition.
If you have successfully programmed the
new integrated keyhead transmitter, it will
start your vehicle and operate the remote
entry system.
If programming was unsuccessful, wait 10
seconds and repeat steps 1 through 9. If
you are still unsuccessful, take your vehicle
to your authorized dealer.
Programming a Spare Intelligent
Access Key
Note: Do not place the device on the
wireless accessory charging area when
programming intelligent access keys.
Note: You can program a maximum of six
keys to your vehicle. All six must be
intelligent access keys. This procedure programs both the vehicle
immobilizer keycode and the remote
control to your vehicle.
You must have two previously
programmed intelligent access keys inside
your vehicle and the new unprogrammed
intelligent access key readily accessible.
Contact an authorized dealer to have the
spare key programmed if two previously
programmed keys are not available.
Make sure that the ignition is switched off
before beginning this procedure. Make sure
that you close all the doors before
beginning and that they remain closed
throughout the procedure. Carry out all
steps within 30 seconds of starting the
sequence. Stop and wait for at least one
minute before starting again if you carry
out any steps out of sequence.
Read and understand the entire procedure
before you begin.
79
Super Duty (TFE) Canada/United States of America, enUSA, Edition date: 201804, Fourth-Printing Security
Page 83 of 666
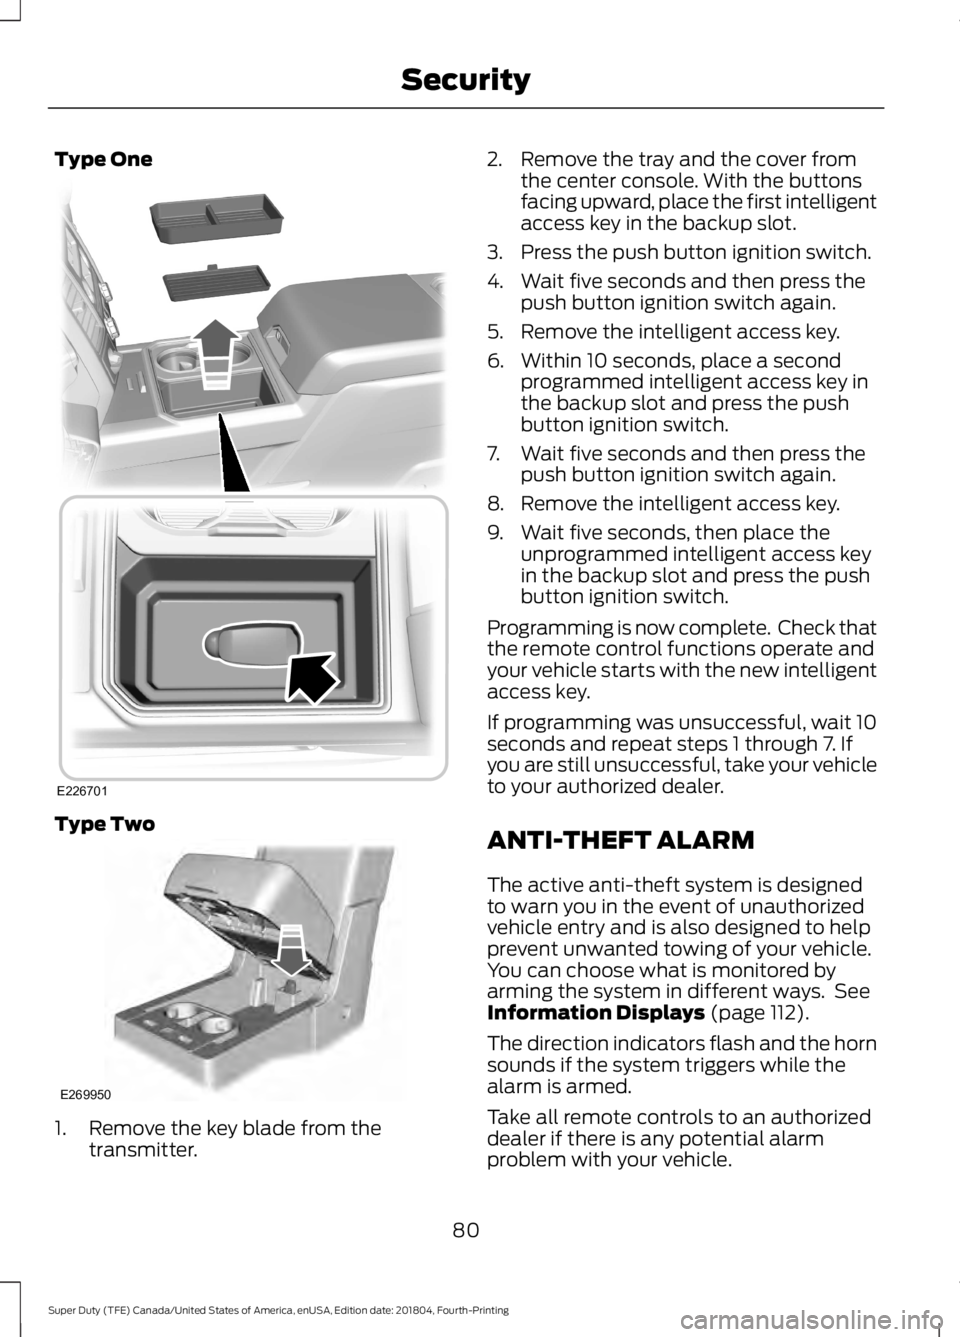
Type One
Type Two
1. Remove the key blade from the
transmitter. 2. Remove the tray and the cover from
the center console. With the buttons
facing upward, place the first intelligent
access key in the backup slot.
3. Press the push button ignition switch.
4. Wait five seconds and then press the push button ignition switch again.
5. Remove the intelligent access key.
6. Within 10 seconds, place a second programmed intelligent access key in
the backup slot and press the push
button ignition switch.
7. Wait five seconds and then press the push button ignition switch again.
8. Remove the intelligent access key.
9. Wait five seconds, then place the unprogrammed intelligent access key
in the backup slot and press the push
button ignition switch.
Programming is now complete. Check that
the remote control functions operate and
your vehicle starts with the new intelligent
access key.
If programming was unsuccessful, wait 10
seconds and repeat steps 1 through 7. If
you are still unsuccessful, take your vehicle
to your authorized dealer.
ANTI-THEFT ALARM
The active anti-theft system is designed
to warn you in the event of unauthorized
vehicle entry and is also designed to help
prevent unwanted towing of your vehicle.
You can choose what is monitored by
arming the system in different ways. See
Information Displays (page 112).
The direction indicators flash and the horn
sounds if the system triggers while the
alarm is armed.
Take all remote controls to an authorized
dealer if there is any potential alarm
problem with your vehicle.
80
Super Duty (TFE) Canada/United States of America, enUSA, Edition date: 201804, Fourth-Printing SecurityE226701 E269950
Page 84 of 666
Using the System
You can select two levels of alarm security.
You can change the level of security when
the ignition is switched off through the
information display with the two options
below:
Perimeter Only (If Equipped)
Perimeter only monitors the following:
•
Doors.
• Hood.
• Tailgate.
All Sensors (If Equipped)
All sensors monitors the following:
• Doors.
• Hood.
• Tailgate.
• Movement inside your vehicle.
• Change in vehicle inclination, for
example, unwanted towing.
Note: Do not choose all sensors monitor
mode when the vehicle is in transport or if
movement within the vehicle is likely to
occur.
Note: For correct operation of the interior
motion detection system, make sure you
close all the windows prior to arming the
system. This helps prevent accidental alarm
activation due to external influences.
Additionally, the interior motion sensing
system does not arm if any door is ajar.
Arming the Alarm
The alarm is ready to arm when there is
not a key in the ignition. Lock your vehicle
using the remote control or keyless entry
keypad. You can also lock your vehicle
using the lock sensor on the exterior door
handle if your vehicle is equipped with
intelligent access. See Locking and
Unlocking (page 69). The direction indicators flash once after
you lock your vehicle. This indicates the
alarm is in the pre-armed mode. It fully
arms after 20 seconds.
Disarming the Alarm
Disarm the alarm by any of the following
actions:
•
Press the power door unlock button
within the 20-second pre-armed mode.
• Unlock the doors with the remote
control or keyless entry keypad. If
equipped with intelligent access, you
can use the unlock sensor on the
exterior door handle. See
Locking and
Unlocking (page 69).
• Switch the ignition on or start your
vehicle.
• Use a key in the driver door lock
cylinder to unlock your vehicle, then
switch the ignition on within 12
seconds.
81
Super Duty (TFE) Canada/United States of America, enUSA, Edition date: 201804, Fourth-Printing Security
Page 109 of 666
Engine Oil Pressure Gauge
Indicates engine oil pressure. The needle
should stay in the normal operating range
(between L and H). If the needle falls
below the normal range, stop your vehicle,
turn off the engine and check the engine
oil level. Add oil if needed. If the oil level is
correct, have your vehicle checked by an
authorized dealer.
Engine Coolant Temperature
Gauge
WARNING: Do not remove the
coolant reservoir cap when the engine is
on or the cooling system is hot. Wait 10
minutes for the cooling system to cool
down. Cover the coolant reservoir cap
with a thick cloth to prevent the
possibility of scalding and slowly remove
the cap. Failure to follow this instruction
could result in personal injury.
Indicates engine coolant temperature. At
normal operating temperature, the level
indicator will be in the normal range. If the
engine coolant temperature exceeds the
normal range, stop your vehicle as soon as
safely possible, switch off the engine and
let the engine cool.
Fuel Gauge
Note: The fuel gauge may vary slightly
when your vehicle is moving or on a slope.
The fuel gauge indicates about how much
fuel is in the fuel tank.
The arrow adjacent to the fuel pump
symbol indicates on which side of your
vehicle the fuel filler door is located. Low Fuel Reminder
A low fuel level reminder displays and
sounds when the distance to empty
reaches
75 mi (120 km) to empty for
MyKey, and at 50 mi (80 km), 25 mi
(40 km), 10 mi (20 km) and 0 mi (0 km)
for all vehicle keys.
Note: The low fuel reminder can appear at
different fuel gauge positions depending on
fuel economy conditions. This variation is
normal.
Transmission Fluid Temperature
Gauge
Indicates transmission fluid temperature.
At normal operating temperature, the level
indicator will be in the normal range. If the
transmission fluid temperature exceeds
the normal range, stop the vehicle as soon
as safely possible and verify the airflow is
not restricted such as snow or debris
blocking airflow through the grill. Also,
higher than normal operating temperature
can be caused by special operation
conditions (i.e. snowplowing, towing or
off-road use). Operating the transmission
for extended periods with the gauge in the
higher than normal area may cause
internal transmission damage. You need
to alter the severity of your driving
conditions to lower the transmission
temperature into the normal range. If the
gauge continues to show high
temperatures, see an authorized dealer.
Turbo Boost Gauge
(If Equipped)
Indicates the amount of manifold air
pressure in the engine.
DEF Gauge
(If Equipped)
Indicates the current DEF level.
106
Super Duty (TFE) Canada/United States of America, enUSA, Edition date: 201804, Fourth-Printing Instrument Cluster
Page 111 of 666
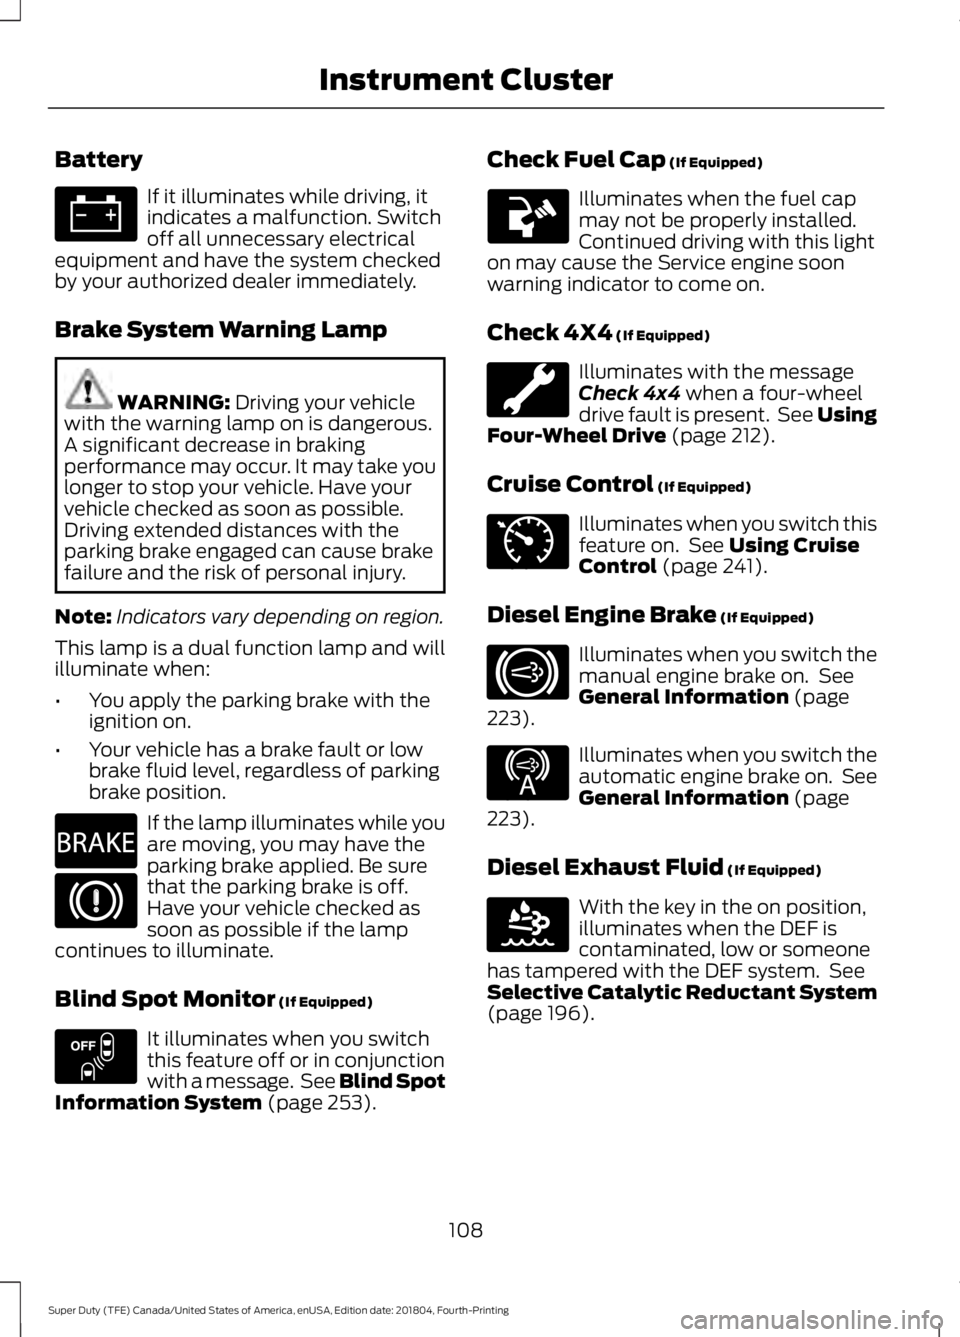
Battery
If it illuminates while driving, it
indicates a malfunction. Switch
off all unnecessary electrical
equipment and have the system checked
by your authorized dealer immediately.
Brake System Warning Lamp WARNING: Driving your vehicle
with the warning lamp on is dangerous.
A significant decrease in braking
performance may occur. It may take you
longer to stop your vehicle. Have your
vehicle checked as soon as possible.
Driving extended distances with the
parking brake engaged can cause brake
failure and the risk of personal injury.
Note: Indicators vary depending on region.
This lamp is a dual function lamp and will
illuminate when:
• You apply the parking brake with the
ignition on.
• Your vehicle has a brake fault or low
brake fluid level, regardless of parking
brake position. If the lamp illuminates while you
are moving, you may have the
parking brake applied. Be sure
that the parking brake is off.
Have your vehicle checked as
soon as possible if the lamp
continues to illuminate.
Blind Spot Monitor
(If Equipped) It illuminates when you switch
this feature off or in conjunction
with a message. See Blind Spot
Information System
(page 253). Check Fuel Cap
(If Equipped) Illuminates when the fuel cap
may not be properly installed.
Continued driving with this light
on may cause the Service engine soon
warning indicator to come on.
Check 4X4
(If Equipped) Illuminates with the message
Check 4x4
when a four-wheel
drive fault is present. See Using
Four-Wheel Drive (page 212).
Cruise Control
(If Equipped) Illuminates when you switch this
feature on. See
Using Cruise
Control (page 241).
Diesel Engine Brake
(If Equipped) Illuminates when you switch the
manual engine brake on. See
General Information
(page
223). Illuminates when you switch the
automatic engine brake on. See
General Information
(page
223).
Diesel Exhaust Fluid
(If Equipped) With the key in the on position,
illuminates when the DEF is
contaminated, low or someone
has tampered with the DEF system. See
Selective Catalytic Reductant System
(page
196).
108
Super Duty (TFE) Canada/United States of America, enUSA, Edition date: 201804, Fourth-Printing Instrument Cluster E270480 E151262 E71340 E171217 E234452 E163176
Page 114 of 666
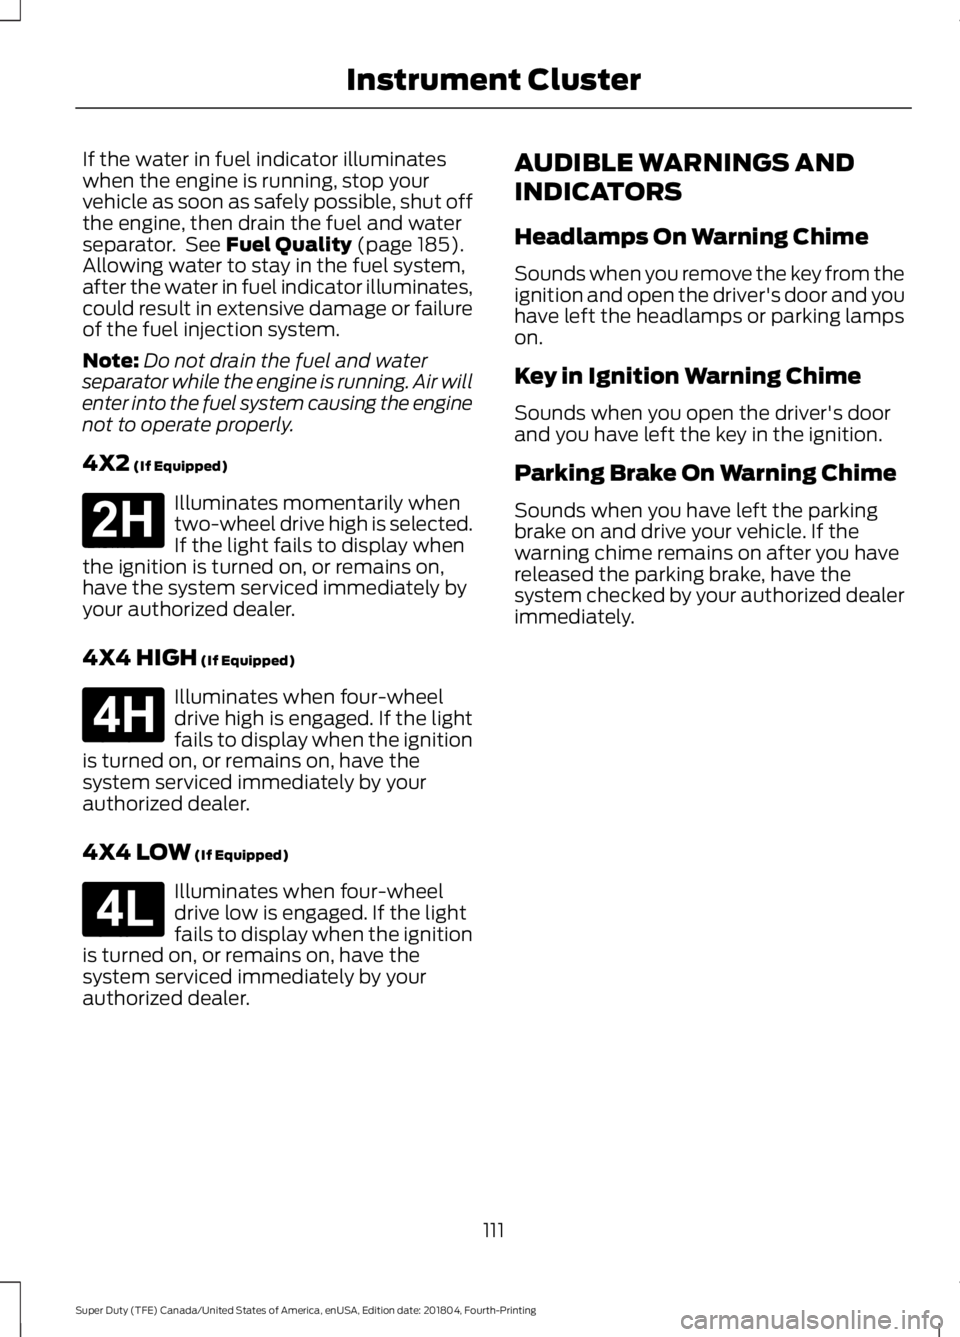
If the water in fuel indicator illuminates
when the engine is running, stop your
vehicle as soon as safely possible, shut off
the engine, then drain the fuel and water
separator. See Fuel Quality (page 185).
Allowing water to stay in the fuel system,
after the water in fuel indicator illuminates,
could result in extensive damage or failure
of the fuel injection system.
Note: Do not drain the fuel and water
separator while the engine is running. Air will
enter into the fuel system causing the engine
not to operate properly.
4X2
(If Equipped) Illuminates momentarily when
two-wheel drive high is selected.
If the light fails to display when
the ignition is turned on, or remains on,
have the system serviced immediately by
your authorized dealer.
4X4 HIGH
(If Equipped) Illuminates when four-wheel
drive high is engaged. If the light
fails to display when the ignition
is turned on, or remains on, have the
system serviced immediately by your
authorized dealer.
4X4 LOW
(If Equipped) Illuminates when four-wheel
drive low is engaged. If the light
fails to display when the ignition
is turned on, or remains on, have the
system serviced immediately by your
authorized dealer. AUDIBLE WARNINGS AND
INDICATORS
Headlamps On Warning Chime
Sounds when you remove the key from the
ignition and open the driver's door and you
have left the headlamps or parking lamps
on.
Key in Ignition Warning Chime
Sounds when you open the driver's door
and you have left the key in the ignition.
Parking Brake On Warning Chime
Sounds when you have left the parking
brake on and drive your vehicle. If the
warning chime remains on after you have
released the parking brake, have the
system checked by your authorized dealer
immediately.
111
Super Duty (TFE) Canada/United States of America, enUSA, Edition date: 201804, Fourth-Printing Instrument ClusterE181778 E181779 E181780