4WD FORD F-250 2019 Owners Manual
[x] Cancel search | Manufacturer: FORD, Model Year: 2019, Model line: F-250, Model: FORD F-250 2019Pages: 666, PDF Size: 13.6 MB
Page 113 of 666
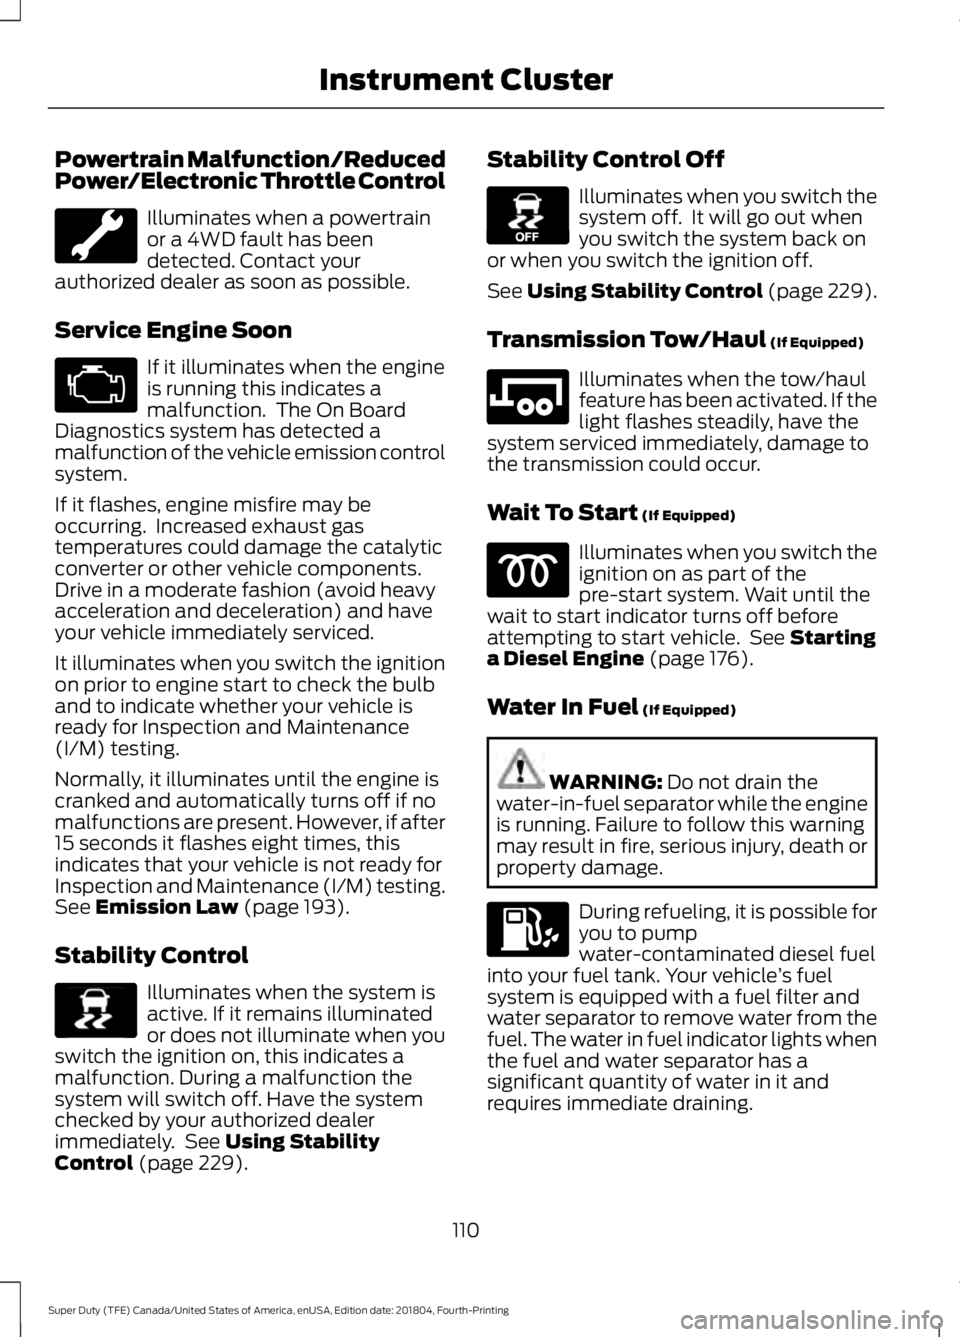
Powertrain Malfunction/Reduced
Power/Electronic Throttle Control
Illuminates when a powertrain
or a 4WD fault has been
detected. Contact your
authorized dealer as soon as possible.
Service Engine Soon If it illuminates when the engine
is running this indicates a
malfunction. The On Board
Diagnostics system has detected a
malfunction of the vehicle emission control
system.
If it flashes, engine misfire may be
occurring. Increased exhaust gas
temperatures could damage the catalytic
converter or other vehicle components.
Drive in a moderate fashion (avoid heavy
acceleration and deceleration) and have
your vehicle immediately serviced.
It illuminates when you switch the ignition
on prior to engine start to check the bulb
and to indicate whether your vehicle is
ready for Inspection and Maintenance
(I/M) testing.
Normally, it illuminates until the engine is
cranked and automatically turns off if no
malfunctions are present. However, if after
15 seconds it flashes eight times, this
indicates that your vehicle is not ready for
Inspection and Maintenance (I/M) testing.
See Emission Law (page 193).
Stability Control Illuminates when the system is
active. If it remains illuminated
or does not illuminate when you
switch the ignition on, this indicates a
malfunction. During a malfunction the
system will switch off. Have the system
checked by your authorized dealer
immediately. See
Using Stability
Control (page 229). Stability Control Off Illuminates when you switch the
system off. It will go out when
you switch the system back on
or when you switch the ignition off.
See Using Stability Control (page 229).
Transmission Tow/Haul
(If Equipped) Illuminates when the tow/haul
feature has been activated. If the
light flashes steadily, have the
system serviced immediately, damage to
the transmission could occur.
Wait To Start
(If Equipped) Illuminates when you switch the
ignition on as part of the
pre-start system. Wait until the
wait to start indicator turns off before
attempting to start vehicle. See
Starting
a Diesel Engine (page 176).
Water In Fuel
(If Equipped) WARNING:
Do not drain the
water-in-fuel separator while the engine
is running. Failure to follow this warning
may result in fire, serious injury, death or
property damage. During refueling, it is possible for
you to pump
water-contaminated diesel fuel
into your fuel tank. Your vehicle ’s fuel
system is equipped with a fuel filter and
water separator to remove water from the
fuel. The water in fuel indicator lights when
the fuel and water separator has a
significant quantity of water in it and
requires immediate draining.
110
Super Duty (TFE) Canada/United States of America, enUSA, Edition date: 201804, Fourth-Printing Instrument Cluster E138639 E130458 E246592
Page 147 of 666
Action
Message
The trailer tire pressure monitoring system is
malfunctioning. If the warning stays on or continues to come on, contact an authorized dealer.
Trailer Tire Pressure Monitor
Fault
The system cannot detect the trailer tire pressuremonitoring system.
Trailer Tire Pressure Monitor
Capability Not Detected
The trailer tire pressure monitoring system is not setup.See Tire Pressure Monitoring System (page 398).
Trailer Tire Pressure Indication
Not Setup See Manual
4WD Action
Message
A 4X4 system fault is present. Contact an authorizeddealer as soon as possible.
Check 4x4
The 4X4 system is making a shift.
4x4 Shift in Progress
When your vehicle is at a stop and you need to shiftinto Neutral before you select 4X4 LOW.
For 4x4 LOW Shift to N
When your vehicle is moving and you need to reduceyour speed to select 4X4 LOW.
For 4x4 LOW Slow to 3 MPH
You select 2WD while your vehicle is at a stop in 4X4LOW and you need to shift into Neutral.
To Exit 4x4 LOW Shift to N
You select 2WD while your vehicle is operating in 4X4LOW and you need to reduce your speed.
To Exit 4x4 LOW Slow to 3 MPH
May display when there is a Transfer case gear tooth
blockage while shifting to or from 4L or to the neutral state.
Shift Delayed Pull Forward
The system temporarily disables 4X4 and reduces theoverall powertrain output response. After the 4X4system has had the opportunity to cool down, it restores 4X4 and powertrain response.
4x4 Temporarily Disabled
The system restores 4X4 to its original setting.
4x4 Restored
The 4X4 system is temporarily locked for added drive-line protection and switches to the 4H setting.
4x4 Temporarily Locked
144
Super Duty (TFE) Canada/United States of America, enUSA, Edition date: 201804, Fourth-Printing Information Displays
Page 215 of 666
USING FOUR-WHEEL DRIVE
Note:
For important information regarding
the safe operation of this type of vehicle,
see General Information in the Wheels and
Tires chapter.
Note: Do not use 4H or 4L mode on dry,
hard surfaced roads. Doing so can produce
excessive noise, increase tire wear and may
damage drive components. 4X4 mode is
only intended for consistently slippery or
loose surfaces. Use of 4L mode on these
surfaces may produce some noise (such as
occasional clunks), but will not damage
drive components.
Note: If 4X4 low is selected while the
vehicle is moving above 3 mph (5 km/h),
the 4WD system will not perform a shift.
This is normal and should be no reason for
concern. Refer to Shifting to or from 4L (4X4
Low) for proper operation.
Note: You can switch on and switch off the
electronic locking differential by pulling the
4WD control (4WD vehicles) or turning the
electronic locking differential control (2WD
vehicles). See
Electronic Locking
Differential (page 221).
Manual Shift On Stop (MSOS)
4WD system
(If Equipped)
Note: The vehicle should not be driven in
4X4 High or 4X4 Low modes with the hub
locks set to FREE as this condition may
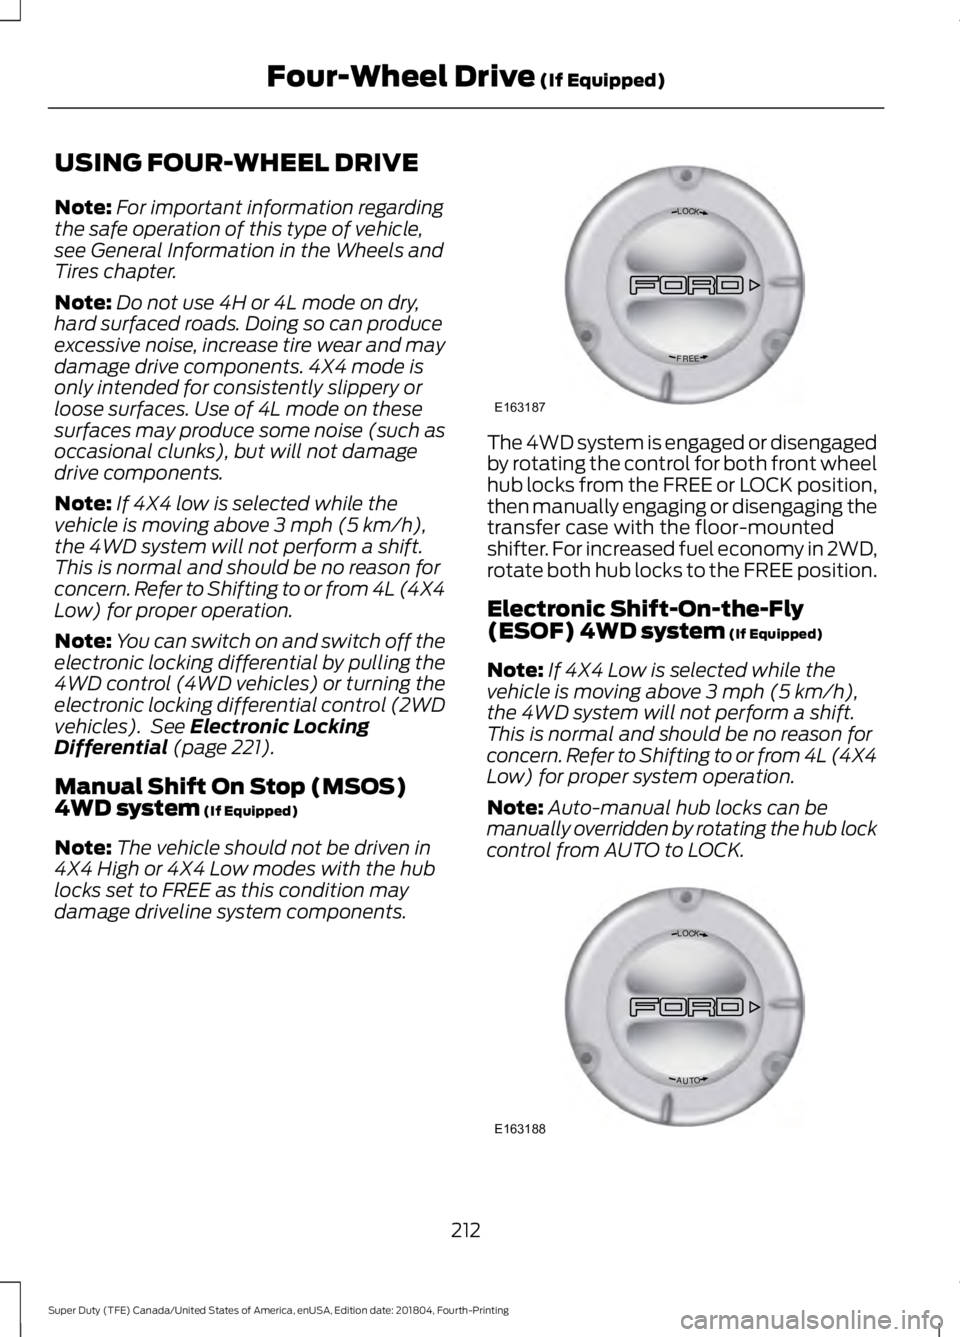
damage driveline system components. The 4WD system is engaged or disengaged
by rotating the control for both front wheel
hub locks from the FREE or LOCK position,
then manually engaging or disengaging the
transfer case with the floor-mounted
shifter. For increased fuel economy in 2WD,
rotate both hub locks to the FREE position.
Electronic Shift-On-the-Fly
(ESOF) 4WD system
(If Equipped)
Note: If 4X4 Low is selected while the
vehicle is moving above
3 mph (5 km/h),
the 4WD system will not perform a shift.
This is normal and should be no reason for
concern. Refer to Shifting to or from 4L (4X4
Low) for proper system operation.
Note: Auto-manual hub locks can be
manually overridden by rotating the hub lock
control from AUTO to LOCK. 212
Super Duty (TFE) Canada/United States of America, enUSA, Edition date: 201804, Fourth-Printing Four-Wheel Drive
(If Equipped)LOC K
EERF
E163187 LOC K
OTUA
E163188
Page 216 of 666
For proper operation, make sure that each
hub is fully engaged and that both hub
locks are set to the same position (both
set to LOCK or both set to AUTO). To
engage LOCK, turn the hub locks
completely clockwise; to engage AUTO,
turn the hub locks completely
counterclockwise.
The ESOF 4WD system:
•
provides 4x4 High engagement and
disengagement while the vehicle is
moving.
• is operated by a rotary control located
on the instrument panel that allows
you select 4x2, 4x4 High or 4x4 Low
operation.
• uses auto-manual hub locks that can
be engaged and disengaged
automatically based on the 4x4 mode
selected.
• will increase fuel economy when used
in the hub lock's recommended AUTO
mode.
4WD Indicator Lights
Note: When a 4X4 system fault is present,
the system will typically remain in whichever
4X4 mode was selected prior to the fault
condition occurring. It will not default to 4X2
in all circumstances. When this warning is
displayed, have your vehicle serviced by an
authorized dealer.
4X2 Momentarily illuminates when
2H is selected.
4X4 HIGH Continuously illuminates when
4H is selected. 4X4 LOW Continuously illuminates when
4L is selected.
CHECK 4X4 Displays when a 4X4 fault is
present.
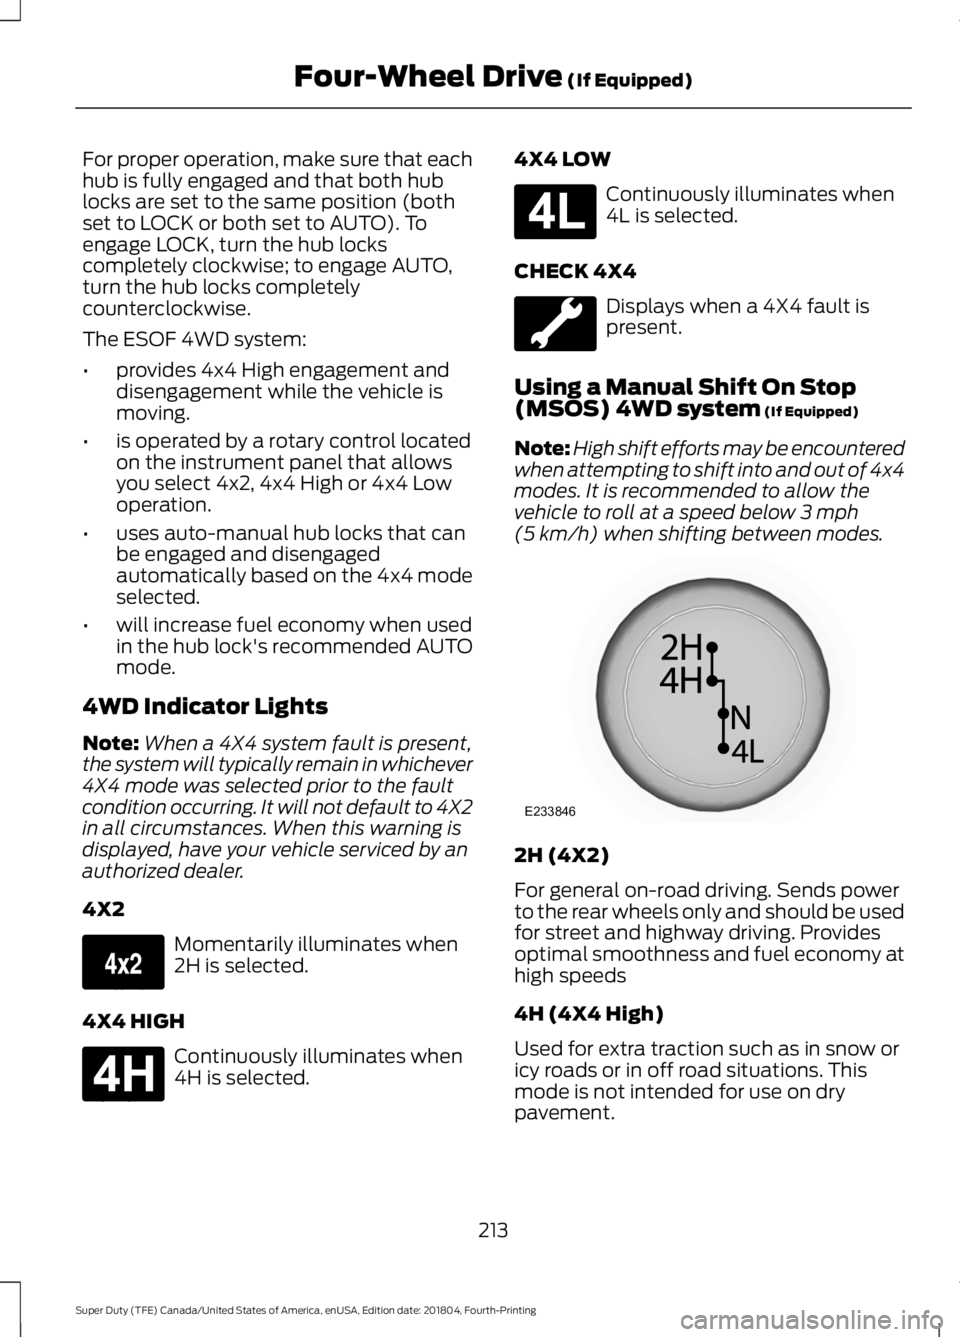
Using a Manual Shift On Stop
(MSOS) 4WD system (If Equipped)
Note: High shift efforts may be encountered
when attempting to shift into and out of 4x4
modes. It is recommended to allow the
vehicle to roll at a speed below
3 mph
(5 km/h) when shifting between modes. 2H (4X2)
For general on-road driving. Sends power
to the rear wheels only and should be used
for street and highway driving. Provides
optimal smoothness and fuel economy at
high speeds
4H (4X4 High)
Used for extra traction such as in snow or
icy roads or in off road situations. This
mode is not intended for use on dry
pavement.
213
Super Duty (TFE) Canada/United States of America, enUSA, Edition date: 201804, Fourth-Printing Four-Wheel Drive
(If Equipped)E163173 E181779 E181780 E233846
Page 218 of 666
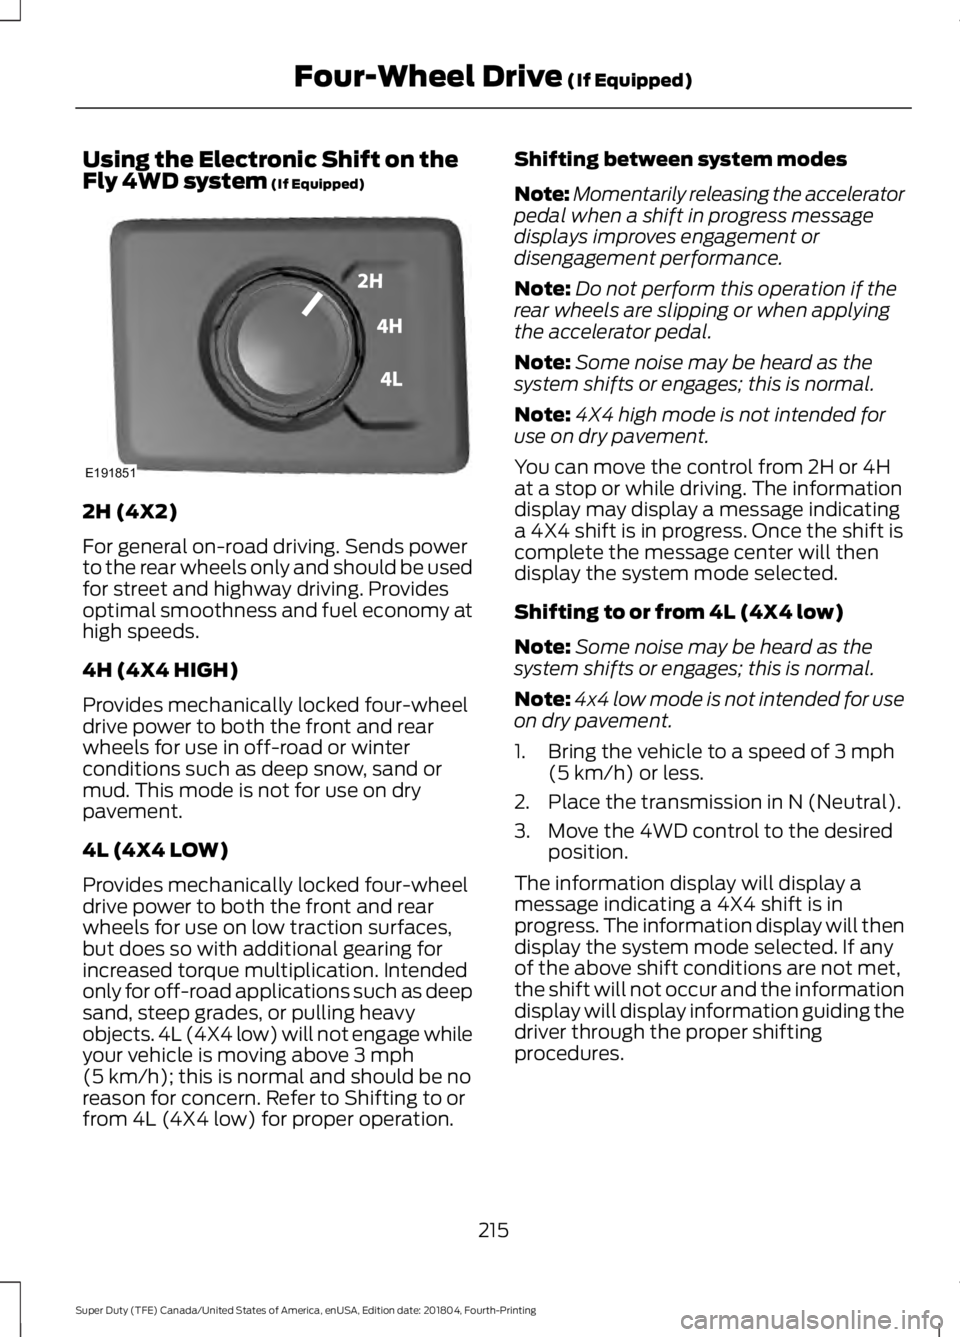
Using the Electronic Shift on the
Fly 4WD system (If Equipped)
2H (4X2)
For general on-road driving. Sends power
to the rear wheels only and should be used
for street and highway driving. Provides
optimal smoothness and fuel economy at
high speeds.
4H (4X4 HIGH)
Provides mechanically locked four-wheel
drive power to both the front and rear
wheels for use in off-road or winter
conditions such as deep snow, sand or
mud. This mode is not for use on dry
pavement.
4L (4X4 LOW)
Provides mechanically locked four-wheel
drive power to both the front and rear
wheels for use on low traction surfaces,
but does so with additional gearing for
increased torque multiplication. Intended
only for off-road applications such as deep
sand, steep grades, or pulling heavy
objects. 4L (4X4 low) will not engage while
your vehicle is moving above
3 mph
(5 km/h); this is normal and should be no
reason for concern. Refer to Shifting to or
from 4L (4X4 low) for proper operation. Shifting between system modes
Note:
Momentarily releasing the accelerator
pedal when a shift in progress message
displays improves engagement or
disengagement performance.
Note: Do not perform this operation if the
rear wheels are slipping or when applying
the accelerator pedal.
Note: Some noise may be heard as the
system shifts or engages; this is normal.
Note: 4X4 high mode is not intended for
use on dry pavement.
You can move the control from 2H or 4H
at a stop or while driving. The information
display may display a message indicating
a 4X4 shift is in progress. Once the shift is
complete the message center will then
display the system mode selected.
Shifting to or from 4L (4X4 low)
Note: Some noise may be heard as the
system shifts or engages; this is normal.
Note: 4x4 low mode is not intended for use
on dry pavement.
1. Bring the vehicle to a speed of
3 mph
(5 km/h) or less.
2. Place the transmission in N (Neutral).
3. Move the 4WD control to the desired position.
The information display will display a
message indicating a 4X4 shift is in
progress. The information display will then
display the system mode selected. If any
of the above shift conditions are not met,
the shift will not occur and the information
display will display information guiding the
driver through the proper shifting
procedures.
215
Super Duty (TFE) Canada/United States of America, enUSA, Edition date: 201804, Fourth-Printing Four-Wheel Drive
(If Equipped)E191851
Page 219 of 666
If Shift Delayed Pull Forward appears in
the information display, transfer case gear
tooth blockage is present. To alleviate this
condition, place the transmission in a
forward gear, move the vehicle forward
approximately
5 ft (1.5 m), and shift the
transmission back to neutral to allow the
transfer case to complete the range shift.
How Your Vehicle Differs From
Other Vehicles WARNING: Vehicles with a higher
center of gravity (utility and four-wheel
drive vehicles) handle differently than
vehicles with a lower center of gravity
(passenger cars). Avoid sharp turns,
excessive speed and abrupt steering in
these vehicles. Failure to drive cautiously
increases the risk of losing control of your
vehicle, vehicle rollover, personal injury
and death.
Truck and utility vehicles can differ from
some other vehicles. Your vehicle may be
higher to allow it to travel over rough
terrain without getting hung up or
damaging underbody components.
The differences that make your vehicle so
versatile also make it handle differently
than an ordinary passenger car.
Maintain steering wheel control at all
times, especially in rough terrain. Since
sudden changes in terrain can result in
abrupt steering wheel motion, make sure
you grip the steering wheel from the
outside. Do not grip the spokes.
Drive cautiously to avoid vehicle damage
from concealed objects such as rocks and
stumps. You should either know the terrain or
examine maps of the area before driving.
Map out your route before driving in the
area. To maintain steering and braking
control of your vehicle, you must have all
four wheels on the ground and they must
be rolling, not sliding or spinning.
Driving Off-Road With Truck and
Utility Vehicles
Note:
On some models, the initial shift from
two-wheel drive to four-wheel drive while
the vehicle is moving can cause some
momentary clunk and ratcheting sounds.
This is the front drivetrain coming up to
speed and the automatic locking hubs
engaging and is not cause for concern.
Note: Your vehicle may be equipped with
a front air dam that can become damaged
(due to reduced ground clearance) when
taking your vehicle off-road. This air dam
can be taken off by removing 15 bolts.
Four-wheel drive vehicles are specially
equipped for driving on sand, snow, mud
and rough terrain and have operating
characteristics that are somewhat
different from conventional vehicles, both
on and off the road.
Power is supplied to all four wheels
through a transfer case. On four-wheel
drive vehicles, the transfer case allows you
to select 4WD when necessary.
Information on transfer case operation and
shifting procedures can be found in this
chapter. Information on transfer case
maintenance can be found in the
Maintenance chapter. You should become
thoroughly familiar with this information
before you operate your vehicle.
Four-wheel drive (when you select a 4WD
mode) uses all four wheels to power the
vehicle. This increases traction, enabling
you to drive over terrain and road
conditions that a conventional two-wheel
drive vehicle cannot.
216
Super Duty (TFE) Canada/United States of America, enUSA, Edition date: 201804, Fourth-Printing Four-Wheel Drive
(If Equipped)
Page 225 of 666
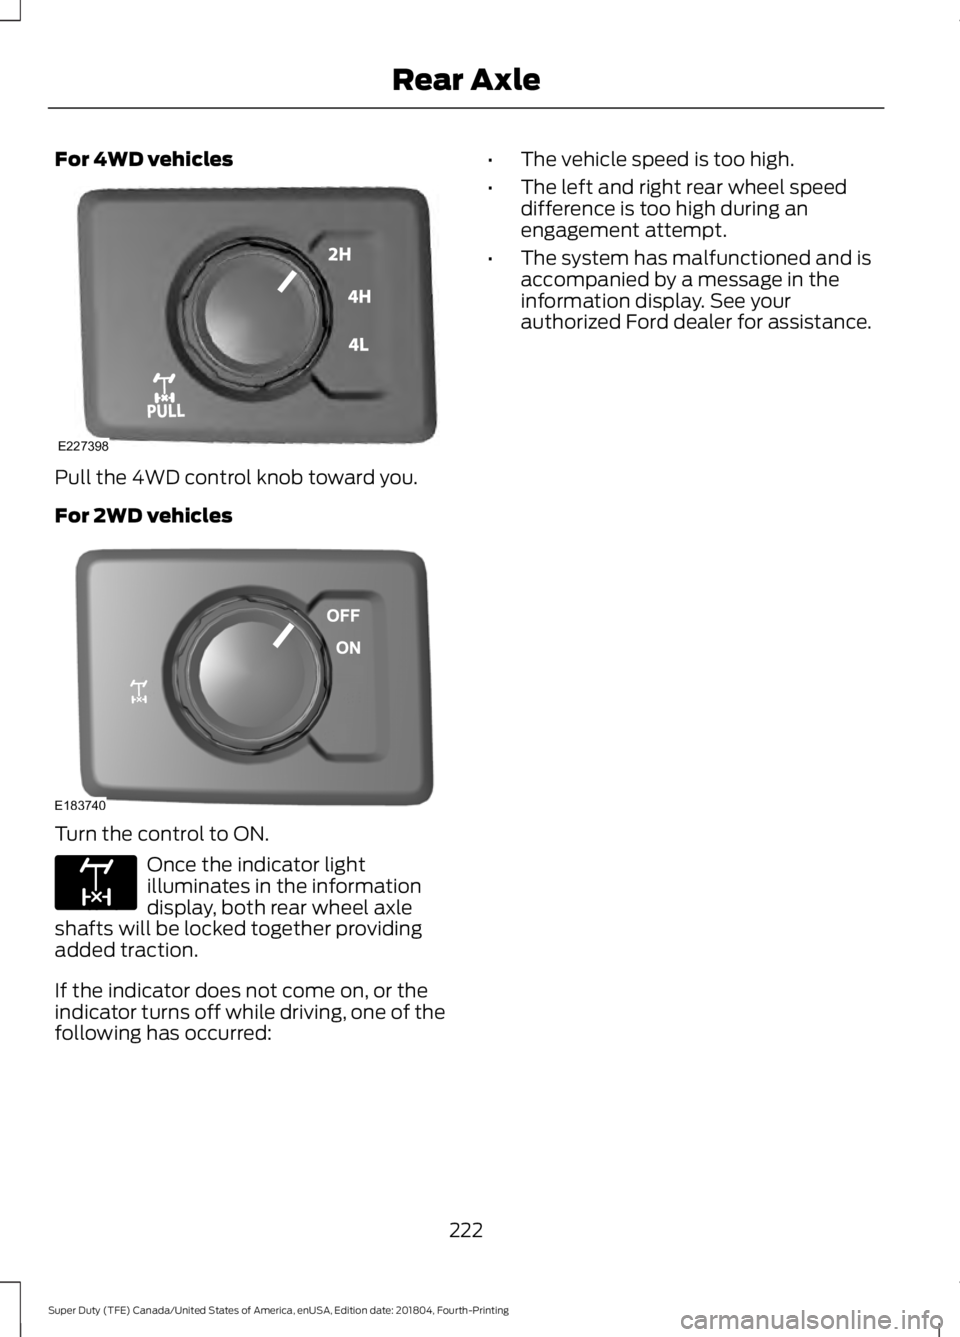
For 4WD vehicles
Pull the 4WD control knob toward you.
For 2WD vehicles
Turn the control to ON.
Once the indicator light
illuminates in the information
display, both rear wheel axle
shafts will be locked together providing
added traction.
If the indicator does not come on, or the
indicator turns off while driving, one of the
following has occurred: •
The vehicle speed is too high.
• The left and right rear wheel speed
difference is too high during an
engagement attempt.
• The system has malfunctioned and is
accompanied by a message in the
information display. See your
authorized Ford dealer for assistance.
222
Super Duty (TFE) Canada/United States of America, enUSA, Edition date: 201804, Fourth-Printing Rear AxleE227398 E183740 E163170
Page 233 of 666
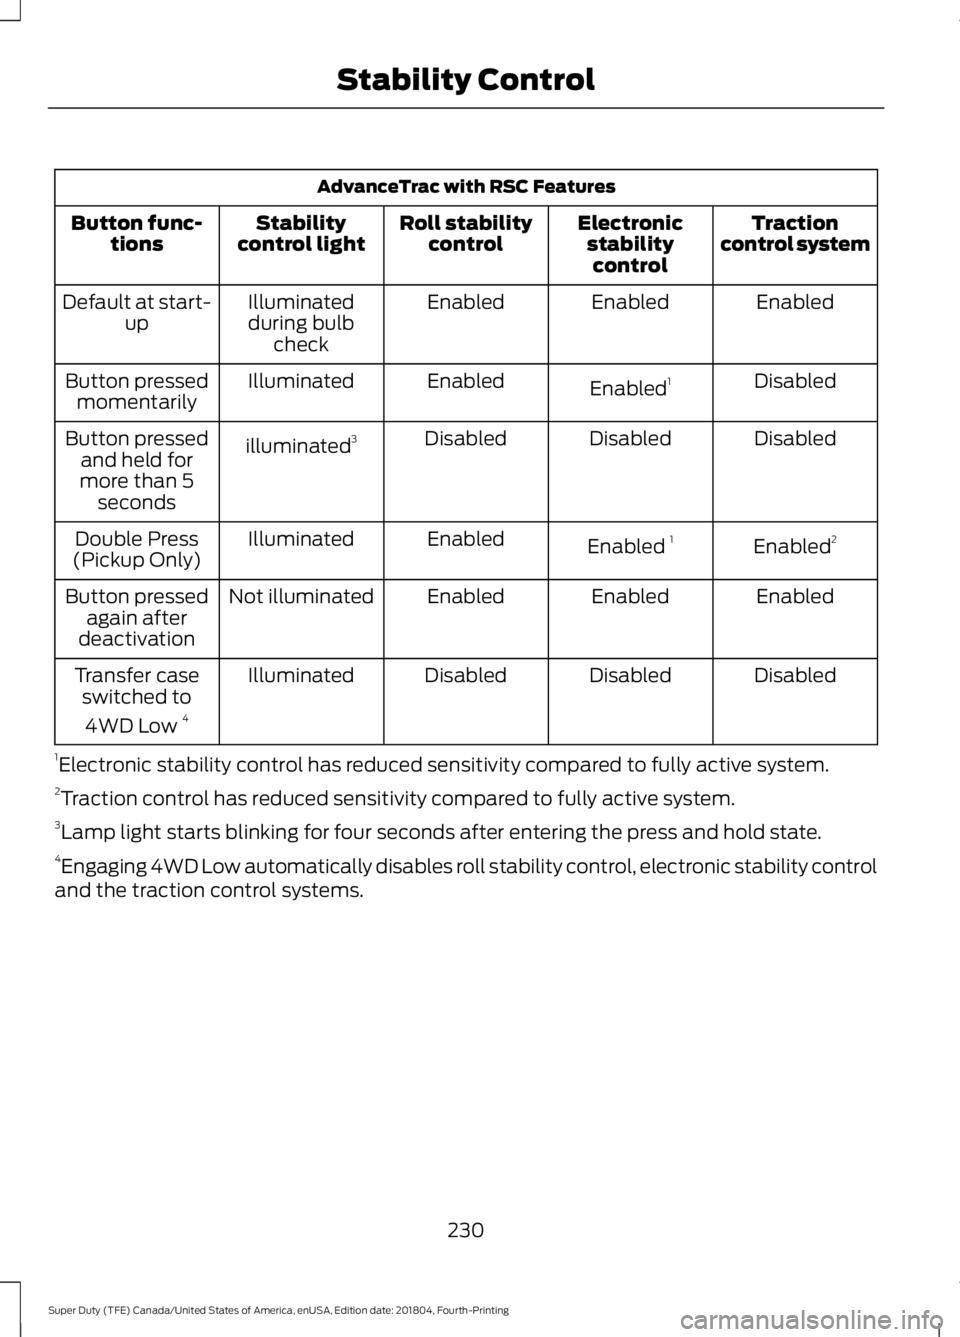
AdvanceTrac with RSC Features
Traction
control system
Electronic
stabilitycontrol
Roll stability
control
Stability
control light
Button func-
tions
Enabled
Enabled
Enabled
Illuminated
during bulb check
Default at start-
up
Disabled
Enabled 1
Enabled
Illuminated
Button pressed
momentarily
Disabled
Disabled
Disabled
illuminated 3
Button pressed
and held for
more than 5 seconds
Enabled2
Enabled 1
Enabled
Illuminated
Double Press
(Pickup Only)
Enabled
Enabled
Enabled
Not illuminated
Button pressed
again after
deactivation
Disabled
Disabled
Disabled
Illuminated
Transfer case
switched to
4WD Low 4
1 Electronic stability control has reduced sensitivity compared to fully active system.
2 Traction control has reduced sensitivity compared to fully active system.
3 Lamp light starts blinking for four seconds after entering the press and hold state.
4 Engaging 4WD Low automatically disables roll stability control, electronic stability control
and the traction control systems.
230
Super Duty (TFE) Canada/United States of America, enUSA, Edition date: 201804, Fourth-Printing Stability Control
Page 306 of 666
Engine temperature while plowing
When driving with a plow, your engine may
run at a higher temperature than normal
because the attached snowplow blade will
restrict airflow to the radiator.
•
If you are driving more than 15 mi
(24 km) at temperatures above
freezing, angle the plow blade either
full left or full right to provide
maximum airflow to the radiator.
• If you are driving less than
15 mi
(24 km) at speeds up to 45 mph
(72 km/h) in cold weather, you will not
need to worry about blade position to
provide maximum airflow.
Transmission operation while
plowing WARNING: Do not spin the wheels
at over
34 mph (55 km/h). The tires may
fail and injure a passenger or bystander.
• Shift transfer case to
4L (4WD Low)
when plowing in small areas at speeds
below
5 mph (8 km/h).
• Shift transfer case to
4H (4WD High)
when plowing larger areas or light snow
at higher speeds. Do not exceed 15 mph
(24 km/h)
.
• Do not shift the transmission from a
forward gear to
R (Reverse) until the
engine is at idle and the wheels have
stopped.
303
Super Duty (TFE) Canada/United States of America, enUSA, Edition date: 201804, Fourth-Printing Driving Hints
Page 409 of 666
The trailer tire pressure monitoring system
can be reset through the menu in the
information display. See General
Information (page 112). Performing the
trailer setup process also resets the trailer
tire pressure monitoring system.
CHANGING A ROAD WHEEL WARNING:
If the tire pressure
monitor sensor becomes damaged it
may not function.
Note: If your vehicle is equipped with the
tire pressure monitoring system, the
indicator light illuminates when the spare
tire is in use. To restore the full function of
the monitoring system, all road wheels
equipped with tire pressure monitoring
sensors must be mounted on the vehicle.
Note: You should only use tire sealants in
roadside emergencies as they may cause
damage to the tire pressure monitoring
system sensor.
If you get a flat tire when driving, do not
apply the brake heavily. Instead, gradually
decrease your speed. Hold the steering
wheel firmly and slowly move to a safe
place on the side of the road.
If your vehicle is equipped with the tire
pressure monitoring system, have a flat
serviced by an authorized dealer in order
to prevent damage to the system sensors.
See
Tire Pressure Monitoring System
(page 398). Replace the spare tire with a
road tire as soon as possible. During
repairing or replacing of the flat tire, have
the authorized dealer inspect the system
sensor for damage. Dissimilar Spare Wheel and Tire
Assembly Information WARNING:
Failure to follow these
guidelines could result in an increased
risk of loss of vehicle control, injury or
death.
If you have a dissimilar spare wheel and
tire, then it is intended for temporary use
only. This means that if you need to use it,
you should replace it as soon as possible
with a road wheel and tire assembly that
is the same size and type as the road tires
and wheels that were originally provided
by Ford. If the dissimilar spare tire or wheel
is damaged, it should be replaced rather
than repaired.
A dissimilar spare wheel and tire assembly
is defined as a spare wheel and tire
assembly that is different in brand, size or
appearance from the road tires and
wheels.
Full-size dissimilar spare
When driving with the full-size dissimilar
spare wheel and tire assembly, do not:
• Exceed
70 mph (113 km/h).
• Use more than one dissimilar spare
wheel and tire assembly at a time.
• Use snow chains on the end of the
vehicle with the dissimilar spare wheel
and tire assembly.
When driving with the full-size dissimilar
spare wheel and tire assembly, it is
recommended that you do not:
• Exceed
50 mph (80 km/h) in 4WD.
• Engage 4WD unless the vehicle is
stationary.
• Use 4WD on dry pavement.
406
Super Duty (TFE) Canada/United States of America, enUSA, Edition date: 201804, Fourth-Printing Wheels and Tires