keyless FORD F-250 2020 User Guide
[x] Cancel search | Manufacturer: FORD, Model Year: 2020, Model line: F-250, Model: FORD F-250 2020Pages: 631, PDF Size: 9.62 MB
Page 132 of 631
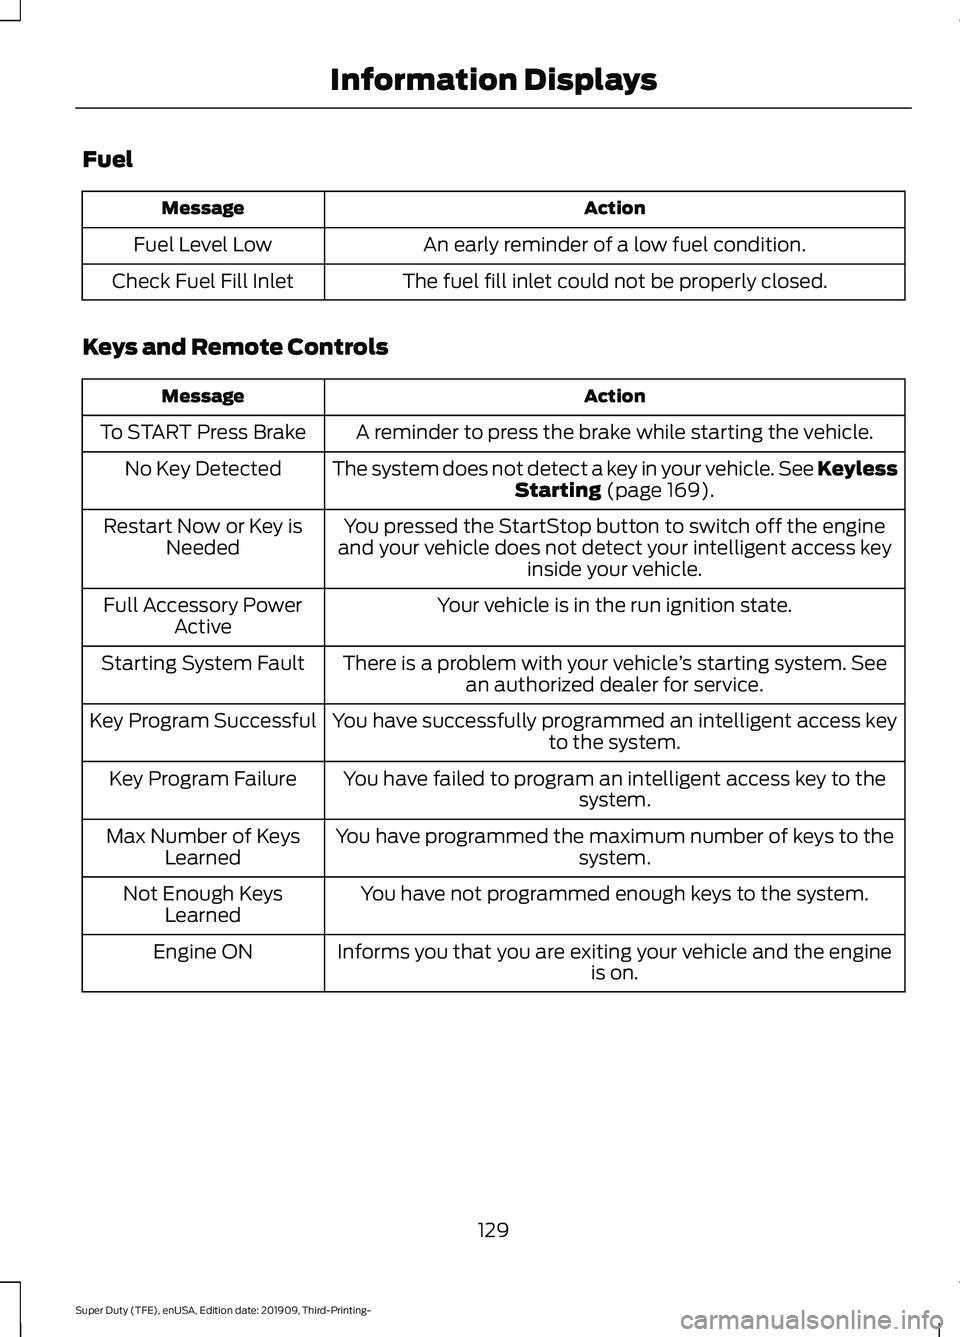
Fuel
Action
Message
An early reminder of a low fuel condition.
Fuel Level Low
The fuel fill inlet could not be properly closed.
Check Fuel Fill Inlet
Keys and Remote Controls Action
Message
A reminder to press the brake while starting the vehicle.
To START Press Brake
The system does not detect a key in your vehicle. See KeylessStarting (page 169).
No Key Detected
You pressed the StartStop button to switch off the engine
and your vehicle does not detect your intelligent access key inside your vehicle.
Restart Now or Key is
Needed
Your vehicle is in the run ignition state.
Full Accessory Power
Active
There is a problem with your vehicle ’s starting system. See
an authorized dealer for service.
Starting System Fault
You have successfully programmed an intelligent access keyto the system.
Key Program Successful
You have failed to program an intelligent access key to thesystem.
Key Program Failure
You have programmed the maximum number of keys to the system.
Max Number of Keys
Learned
You have not programmed enough keys to the system.
Not Enough Keys
Learned
Informs you that you are exiting your vehicle and the engine is on.
Engine ON
129
Super Duty (TFE), enUSA, Edition date: 201909, Third-Printing- Information Displays
Page 165 of 631
12 V DC Power Point
WARNING: Do not plug optional
electrical accessories into the cigar
lighter socket. Incorrect use of the cigar
lighter can cause damage not covered
by the vehicle warranty, and can result
in fire or serious injury.
Note: When you switch the ignition on, you
can use the socket to power
12 V appliances
with a maximum current rating of 20 A20
amps.
Note: Do not plug in any device that
supplies power to the vehicle through the
power points, this may result in damage to
vehicle systems.
Note: Do not hang any accessory from the
accessory plug.
Note: Do not use the power point over the
vehicle capacity of 12 V DC 240 W or a fuse
may blow.
Note: Always keep the power point caps
closed when not in use.
Do not insert objects other than an
accessory plug into the power point. This
damages the power point and may blow
the fuse.
Run the vehicle for full capacity use of the
power point.
To prevent the battery from running out of
charge:
• Do not use the power point longer than
necessary when the engine is off.
• Do not leave devices plugged in
overnight or when you park your vehicle
for extended periods. 110 V 400 Watt AC Power Point
(If
Equipped) WARNING:
Do not keep electrical
devices plugged in the power point
whenever the device is not in use. Do not
use any extension cord with the 110 volt
AC power point, since it will defeat the
safety protection design. Doing so may
cause the power point to overload due
to powering multiple devices that can
reach beyond the 400 watt load limit
and could result in fire or serious injury.
Note: This feature works only when you
have the ignition switched on.
Note: This feature has a maximum output
of 400 watts when the vehicle is in park (P).
Note: While in drive (D), the maximum
outlet output is 300 watts.
Note: When powering electric devices that
require more than 10 watts in vehicles
equipped with keyless start, the engine must
remain running. If the engine is turned off or
you switch the ignition to accessory mode,
plugged in devices will not be charged.
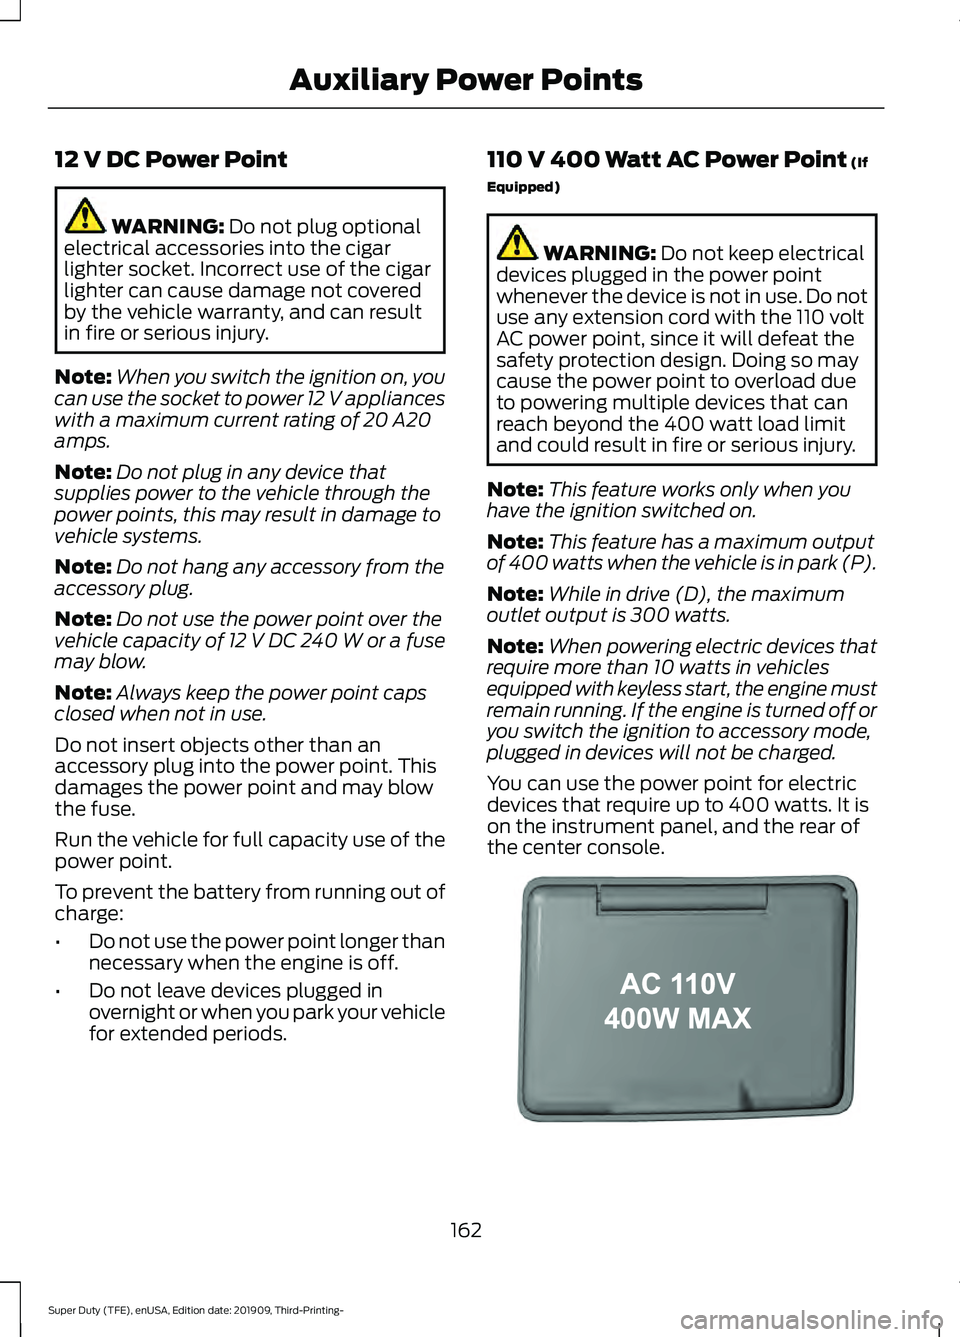
You can use the power point for electric
devices that require up to 400 watts. It is
on the instrument panel, and the rear of
the center console. 162
Super Duty (TFE), enUSA, Edition date: 201909, Third-Printing- Auxiliary Power PointsE191617
Page 172 of 631
III (start) - Cranks the engine.
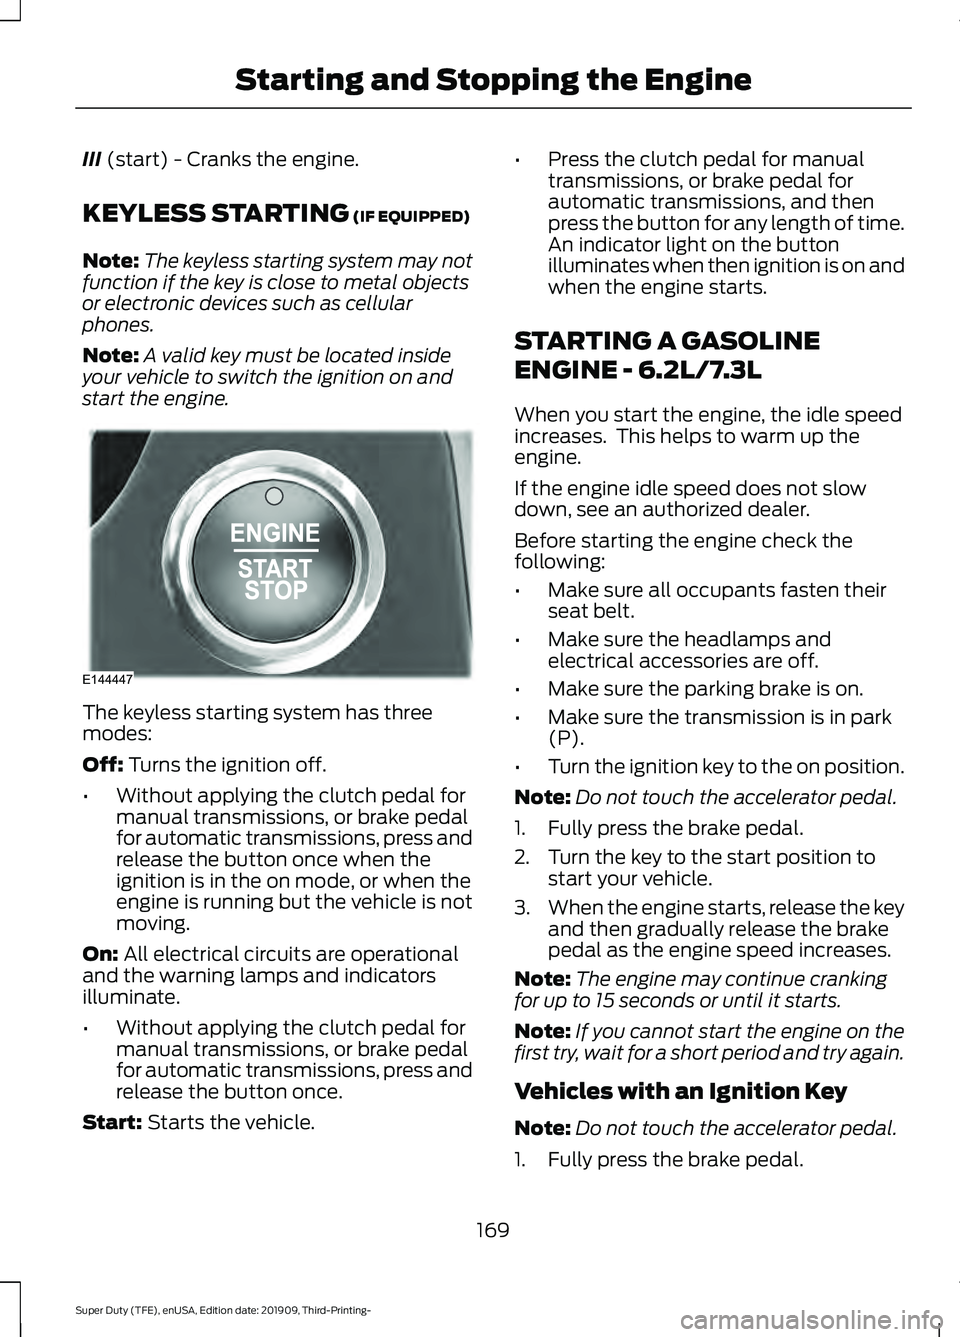
KEYLESS STARTING
(IF EQUIPPED)
Note: The keyless starting system may not
function if the key is close to metal objects
or electronic devices such as cellular
phones.
Note: A valid key must be located inside
your vehicle to switch the ignition on and
start the engine. The keyless starting system has three
modes:
Off:
Turns the ignition off.
• Without applying the clutch pedal for
manual transmissions, or brake pedal
for automatic transmissions, press and
release the button once when the
ignition is in the on mode, or when the
engine is running but the vehicle is not
moving.
On:
All electrical circuits are operational
and the warning lamps and indicators
illuminate.
• Without applying the clutch pedal for
manual transmissions, or brake pedal
for automatic transmissions, press and
release the button once.
Start:
Starts the vehicle. •
Press the clutch pedal for manual
transmissions, or brake pedal for
automatic transmissions, and then
press the button for any length of time.
An indicator light on the button
illuminates when then ignition is on and
when the engine starts.
STARTING A GASOLINE
ENGINE - 6.2L/7.3L
When you start the engine, the idle speed
increases. This helps to warm up the
engine.
If the engine idle speed does not slow
down, see an authorized dealer.
Before starting the engine check the
following:
• Make sure all occupants fasten their
seat belt.
• Make sure the headlamps and
electrical accessories are off.
• Make sure the parking brake is on.
• Make sure the transmission is in park
(P).
• Turn the ignition key to the on position.
Note: Do not touch the accelerator pedal.
1. Fully press the brake pedal.
2. Turn the key to the start position to start your vehicle.
3. When the engine starts, release the key
and then gradually release the brake
pedal as the engine speed increases.
Note: The engine may continue cranking
for up to 15 seconds or until it starts.
Note: If you cannot start the engine on the
first try, wait for a short period and try again.
Vehicles with an Ignition Key
Note: Do not touch the accelerator pedal.
1. Fully press the brake pedal.
169
Super Duty (TFE), enUSA, Edition date: 201909, Third-Printing- Starting and Stopping the EngineE144447
Page 173 of 631
2. Turn the key to position III to start the
engine.
3. When the engine starts, release the brake pedal.
Do not crank the engine for more than 10
seconds as starter damage may occur. If
the engine does not start, switch the
ignition off and wait 30 seconds before
trying again.
Vehicles with Keyless Start
Note: Do not touch the accelerator pedal.
Note: If you press the push button ignition
switch again prior to the engine starting, the
ignition switches to accessory mode and
will not start.
Note: If you release the brake pedal before
the engine starts, follow the engine start
sequence again.
1. Fully press the brake pedal.
2. Press the center of the push button ignition switch.
3. When the engine starts, release the brake pedal.
Failure to Start
If you cannot start the engine after three
attempts, wait 10 seconds and follow this
procedure:
1. Fully press the brake pedal.
2. Fully press the accelerator pedal and hold it there.
3. Start the engine.
Stopping the Engine When Your
Vehicle is Stationary
1. When your vehicle has stopped, shift into park (P) and switch the ignition
off.
2. Apply the parking brake. Stopping the Engine When Your
Vehicle is Moving WARNING:
Switching off the
engine when your vehicle is still moving
results in a significant decrease in
braking assistance. Higher effort is
required to apply the brakes and to stop
your vehicle. A significant decrease in
steering assistance could also occur. The
steering does not lock, but higher effort
could be required to steer your vehicle.
When you switch the ignition off, some
electrical circuits, for example airbags,
also turn off. If you unintentionally switch
the ignition off, shift into neutral (N) and
restart the engine.
1. Put the transmission into neutral (N) and use the brakes to bring your vehicle
to a safe stop.
2. When your vehicle has stopped, shift into park (P) and switch the ignition
off.
3. Apply the parking brake.
Automatic Engine Shutdown
If your vehicle has a keyless ignition, it has
a feature that shuts down the engine if it
has been idling for an extended period of
time. The ignition also turns off in order to
save battery power. Before the engine
shuts down, a message appears in the
information display showing a timer
counting down from 30 seconds. If you do
not intervene within 30 seconds, the engine
shuts down. Another message appears in
the information display to inform you that
the engine has shut down in order to save
fuel. Start your vehicle as you normally do.
170
Super Duty (TFE), enUSA, Edition date: 201909, Third-Printing- Starting and Stopping the Engine
Page 175 of 631
preventing engine damage due to lack of
proper lubrication. After the 30 second
warm-up period, the accelerator pedal
becomes operational again and a message
appears informing you the vehicle is ok to
drive.
When you start the engine in extremely
cold temperatures -15°F (-26°C), we
recommend that you allow the engine to
idle for several minutes before you drive
the vehicle.
Before starting the engine check the
following:
• Make sure all occupants fasten their
seatbelt.
• Make sure the headlamps and
electrical accessories are off.
• Make sure the parking brake is on.
• Make sure the transmission is in park
(P).
Note: Do not press the accelerator during
starting.
Vehicles with an Ignition Key
Note: Do not touch the accelerator pedal.
1. Fully press the brake pedal.
2. Turn the key to position
II
Note: A message appears: Engine Start
Pending, Please Wait.
3. Wait until the engine glow-plug indicator turns off.
4. Turn the key to position
III to start the
engine.
5. When the engine starts, release the brake pedal.
Do not crank the engine for more than 10
seconds as starter damage may occur. If
the engine does not start, switch the
ignition off and wait 30 seconds before
trying again. Vehicles with Keyless Start
Note:
Do not touch the accelerator pedal.
Note: If the push button ignition switch is
pressed again prior to the engine starting,
the ignition switches to accessory mode and
does not start.
Note: If you release the brake pedal before
the engine starts, follow the engine start
sequence again.
1. Fully press the brake pedal.
2. Press the center of the push button ignition switch.
Note: A message appears: Engine Start
Pending, Please Wait.
3. When the engine starts, release the brake pedal.
Diesel Engine Fast Start Glow Plug
System
The diesel engine glow system consists of:
• Eight glow plugs, one per cylinder.
• Glow Plug Control Module.
• Engine Coolant Temperature sensor.
• Barometric pressure sensor.
• Environmental temperature sensor.
The powertrain and glow plug control
modules electronically control the glow
plug system. After you switch the ignition
on, the glow plug control module
immediately energizes the glow plugs. The
glow plug control module uses the engine
coolant temperature, barometric pressure
sensor and environmental temperature
sensor to determine how long the glow
plugs stay energized. The required time for
the glow plugs to be energized decreases
as the coolant temperature, barometric
pressure and environmental temperature
increase.
172
Super Duty (TFE), enUSA, Edition date: 201909, Third-Printing- Starting and Stopping the Engine
Page 176 of 631
Automatic Engine Shutdown
If your vehicle is equipped with a keyless
ignition, it has a feature that automatically
shuts down the engine if it has been idling
for an extended period. The ignition also
turns off in order to save battery power.
Before the engine shuts down, a message
appears in the information display showing
a timer counting down from 30 seconds.
If you do not intervene within 30 seconds,
the engine shuts down. Another message
appears in the information display to
inform you that the engine has shut down
in order to save fuel. Start your vehicle as
you normally do.
Cold Weather Starting
WARNING: Do not use starting
fluid, for example ether, in the air intake
system. Such fluid could cause
immediate explosive damage to the
engine and possible personal injury. WARNING:
Do not mix diesel with
gasoline, gasohol or alcohol. This could
cause an explosion.
We recommend that the engine block
heater be used for starting when the
temperature is -9°F (-23°C) or colder. See
Engine Block Heater
(page 176).
When operating in cold weather, you may
use Motorcraft® cetane improvers or
non-alcohol-based cetane improvers from
a reputable manufacturer as needed. Switch the ignition on. Do not
start the engine until the
glow-plug indicator turns off. When the glow plug pre-heat indicator
turns off, turn the key to start. After you
start the engine, the glow plugs may
remain on for a period. If you do not start
the engine before the glow plug activation
time ends, you need to reset the glow plugs
by switching the ignition off. After the
engine starts, allow it to idle for about 15
seconds. This protects the engine. Do not
increase engine speed until the oil pressure
gauge indicates normal pressure.
Cold Weather Operation
Note:
Idling in cold weather does not heat
the engine to its normal operating
temperature. Long periods of idling,
especially in cold weather, can cause a
buildup of deposits which can cause engine
damage.
Change to a lighter grade engine oil to
make starting easier under these
conditions. Refer to engine oil
specifications. See
Engine Block Heater
(page 176).
Diesel fuel is adjusted seasonally for cold
temperatures. Diesel fuel which has not
been properly formulated for the ambient
conditions may gel which can clog the fuel
filters. One indication that the fuel filter(s)
may be clogged is if the engine starts, stalls
after a short time, and then does not
restart. If you have been using biodiesel,
you may need to use a fuel with lower
biodiesel content, try another brand, or
discontinue using biodiesel. Do not use
alcohol based additives to correct fuel
gelling. This may result in damage to the
fuel injectors and system. Use the proper
anti-gel and performance improvement
product. See
Engine Block Heater (page
176).
173
Super Duty (TFE), enUSA, Edition date: 201909, Third-Printing- Starting and Stopping the Engine
Page 186 of 631
Note:
Degraded or oxidized biodiesel can
damage fuel system seals and plastics and
corrode steel parts.
During cold weather, if you have problems
operating on biodiesel, you may need to
use a diesel fuel with lower biodiesel
content, try another brand, or discontinue
the use of biodiesel.
Diesel Fuel Additives
It should not be necessary to add any
aftermarket additives to your fuel if you
use a high quality diesel fuel that conforms
to ASTM industry specifications.
Aftermarket additives can damage the fuel
injector system or engine.
Use Motorcraft® cetane booster or an
equivalent cetane booster additive if you
suspect fuel has low cetane. Use
Motorcraft® anti-gel & performance
improver or an equivalent additive if there
is fuel gelling.
Do not use alcohol-based additives to
improve cetane quality, to prevent fuel
gelling or any other use. The use of alcohol
additives may result in damage to the fuel
injectors and system. See Engine
Specifications (page 429).
Your warranty may not cover repairs
needed to correct the effects of using an
aftermarket product that does not meet
Ford specifications in your fuel.
RUNNING OUT OF FUEL WARNING:
Flow of fuel through a
fuel pump nozzle can produce static
electricity. This can cause a fire if you are
filling an ungrounded fuel container.
Avoid running out of fuel because this
situation may have an adverse effect on
engine components. If you have run out of fuel:
•
You may need to cycle the ignition from
off to on several times after refueling
to allow the fuel system to pump the
fuel from the tank to the engine. On
restarting, cranking time will take a few
seconds longer than normal. With
keyless ignition, just start the engine.
Crank time will be longer than usual.
• Normally, adding
1 gal (4 L) of fuel is
enough to restart the engine. If the
vehicle is out of fuel and on a steep
grade, more than
1 gal (4 L) may be
required.
REFUELING - GASOLINE WARNING: When refueling always
shut the engine off and never allow
sparks or open flames near the fuel tank
filler valve. Never smoke or use a cell
phone while refueling. Fuel vapor is
extremely hazardous under certain
conditions. Avoid inhaling excess fumes. WARNING:
Fuel vapor burns
violently and a fuel fire can cause severe
injuries. WARNING: Read and follow all the
instructions on the pump island. WARNING:
Stay outside your
vehicle and do not leave the fuel pump
unattended when refueling your vehicle. WARNING:
Keep children away
from the fuel pump. Never let children
pump fuel. WARNING:
Wait at least five
seconds before removing the fuel pump
nozzle to allow any residual fuel to drain
into the fuel tank.
183
Super Duty (TFE), enUSA, Edition date: 201909, Third-Printing- Fuel and Refueling
Page 308 of 631
Follow these guidelines if you have a need
for recreational towing, such as towing
your vehicle behind a motorhome. We have
designed these guidelines to prevent
damage to your transmission.
Two-wheel Drive Vehicles
Do not tow your vehicle with any wheels
on the ground, as vehicle or transmission
damage may occur. You must tow your
vehicle with all four (4) wheels off the
ground, such as when using a car-hauling
trailer.
Four-wheel Drive Vehicles
If towing your vehicle with wheels off the
ground it must be all four wheels, such as
when using a car-hauling trailer.
To tow a four-wheel drive vehicle with all
wheels on the ground, place the transfer
case in its neutral position and engage the
four-wheel-down towing feature.
Perform the steps in the following section
after positioning your vehicle behind the
tow vehicle and properly securing them
together.
Note:
Make sure you properly secure your
vehicle to the tow vehicle.
Towing With All Four Wheels On The
Ground
1. Put the ignition in the on position, but do not start the engine.
2. Press and hold the brake pedal.
3. Rotate the four-wheel drive control to 2H.
4. Shift into neutral (N).
5. Using the instrument cluster display controls on the steering wheel, select
Settings
.
6. Select
Advanced Settings.
7. Select
Vehicle.
8. Select
Neutral Tow. 9. Press and hold the
OK button until a
confirmation message appears in the
information display.
Note: You may hear an audible noise as the
transfer case shifts into its neutral position.
10. If you do not see a message in the display, you must perform the
procedure again from the beginning.
11. Leave the transmission in neutral (N)
and turn the ignition off.
12. If your vehicle has an ignition key, you
must leave the key in the ignition
while towing.
Note: To lock and unlock your vehicle, use
the keyless entry keypad or extra set of keys.
13. If your vehicle has intelligent access, switch the vehicle into accessory
mode. See
Starting and Stopping
the Engine (page 168).
Note: You do not need to leave your keys
in the vehicle. You can lock and unlock your
vehicle as you normally do.
14. Release the brake pedal. WARNING:
Do not disconnect the
battery during recreational towing. It
prevents the transfer case from shifting
properly and may cause the vehicle to
roll, even if the transmission is in park
(P). WARNING:
Shifting the transfer
case to its neutral position for
recreational towing may cause the
vehicle to roll, even if the transmission is
in park (P). It may injure the driver and
others. Make sure you press the foot
brake and the vehicle is in a secure, safe
position when you shift to neutral (N).
Note: Failing to put the transfer case in its
neutral position while towing with all four
wheels on the ground will damage vehicle
components.
305
Super Duty (TFE), enUSA, Edition date: 201909, Third-Printing- Towing
Page 338 of 631
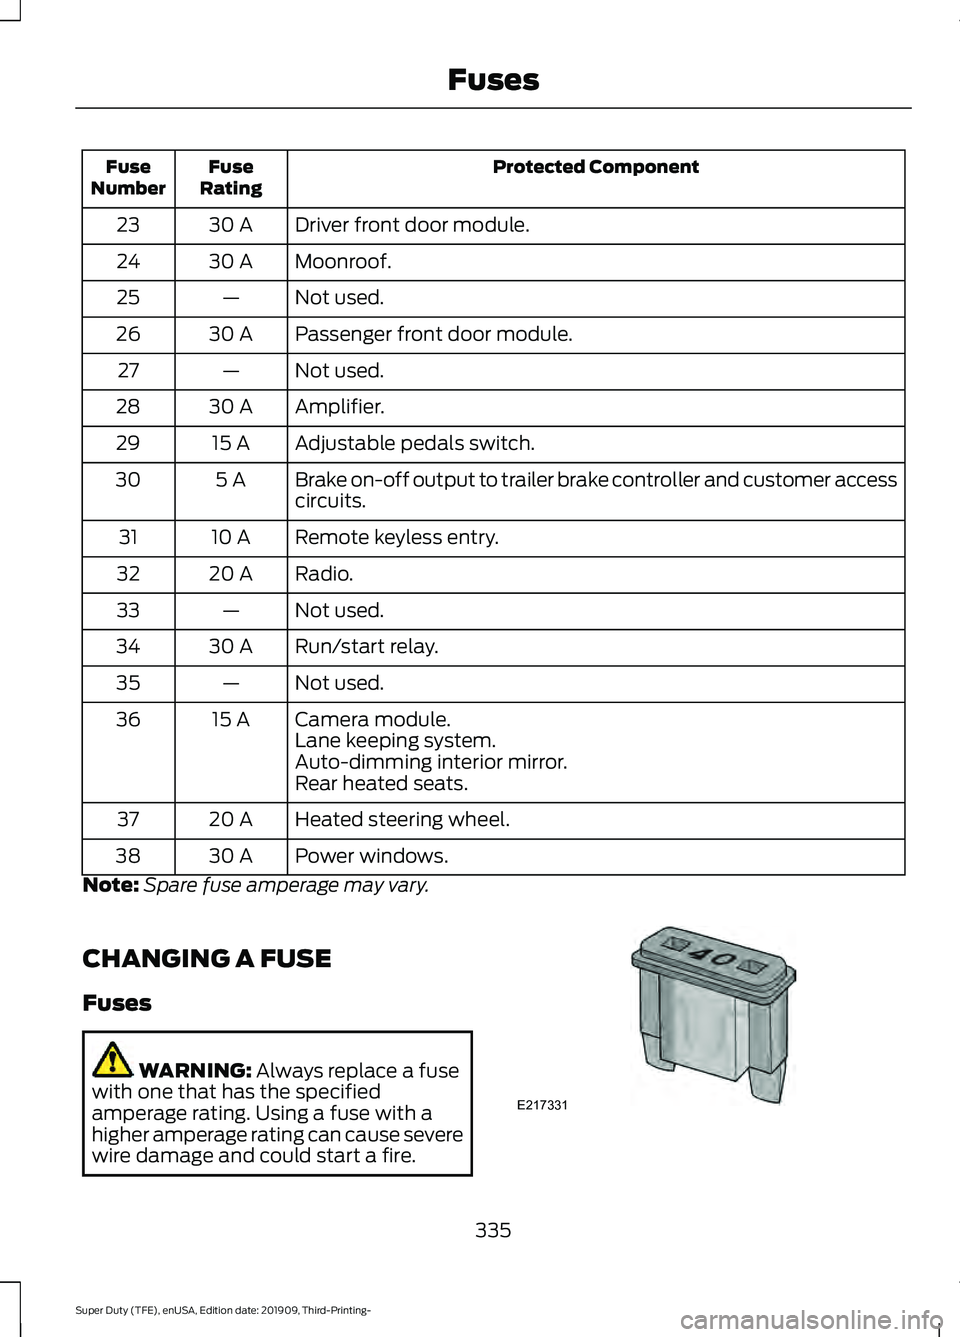
Protected Component
Fuse
Rating
Fuse
Number
Driver front door module.
30 A
23
Moonroof.
30 A
24
Not used.
—
25
Passenger front door module.
30 A
26
Not used.
—
27
Amplifier.
30 A
28
Adjustable pedals switch.
15 A
29
Brake on-off output to trailer brake controller and customer access
circuits.
5 A
30
Remote keyless entry.
10 A
31
Radio.
20 A
32
Not used.
—
33
Run/start relay.
30 A
34
Not used.
—
35
Camera module.
15 A
36
Lane keeping system.
Auto-dimming interior mirror.
Rear heated seats.
Heated steering wheel.
20 A
37
Power windows.
30 A
38
Note: Spare fuse amperage may vary.
CHANGING A FUSE
Fuses WARNING: Always replace a fuse
with one that has the specified
amperage rating. Using a fuse with a
higher amperage rating can cause severe
wire damage and could start a fire. 335
Super Duty (TFE), enUSA, Edition date: 201909, Third-Printing- FusesE217331
Page 616 of 631
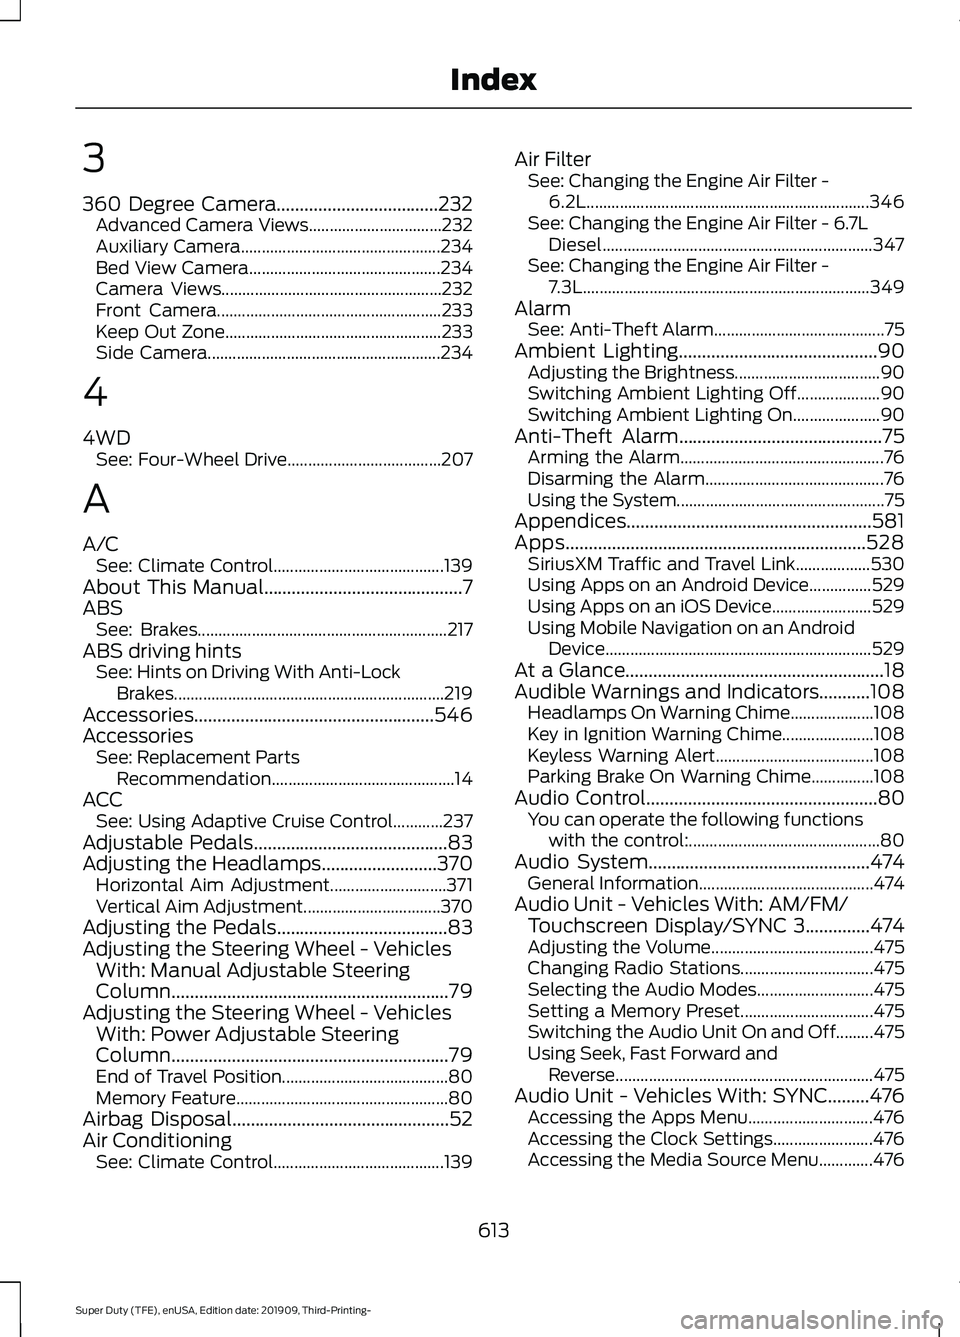
3
360 Degree Camera...................................232
Advanced Camera Views................................ 232
Auxiliary Camera................................................ 234
Bed View Camera.............................................. 234
Camera Views..................................................... 232
Front Camera...................................................... 233
Keep Out Zone.................................................... 233
Side Camera........................................................ 234
4
4WD See: Four-Wheel Drive..................................... 207
A
A/C See: Climate Control......................................... 139
About This Manual
...........................................7
ABS See: Brakes............................................................ 217
ABS driving hints See: Hints on Driving With Anti-Lock
Brakes................................................................. 219
Accessories....................................................546
Accessories See: Replacement Parts
Recommendation............................................ 14
ACC See: Using Adaptive Cruise Control............237
Adjustable Pedals
..........................................83
Adjusting the Headlamps.........................370
Horizontal Aim Adjustment............................ 371
Vertical Aim Adjustment................................. 370
Adjusting the Pedals
.....................................83
Adjusting the Steering Wheel - Vehicles With: Manual Adjustable Steering
Column
............................................................79
Adjusting the Steering Wheel - Vehicles With: Power Adjustable Steering
Column
............................................................79
End of Travel Position........................................ 80
Memory Feature................................................... 80
Airbag Disposal
...............................................52
Air Conditioning See: Climate Control......................................... 139Air Filter
See: Changing the Engine Air Filter -
6.2L.................................................................... 346
See: Changing the Engine Air Filter - 6.7L Diesel................................................................. 347
See: Changing the Engine Air Filter - 7.3L..................................................................... 349
Alarm See: Anti-Theft Alarm......................................... 75
Ambient Lighting...........................................90 Adjusting the Brightness................................... 90
Switching Ambient Lighting Off.................... 90
Switching Ambient Lighting On..................... 90
Anti-Theft Alarm............................................75 Arming the Alarm................................................. 76
Disarming the Alarm........................................... 76
Using the System.................................................. 75
Appendices.....................................................581
Apps
.................................................................528
SiriusXM Traffic and Travel Link.................. 530
Using Apps on an Android Device...............529
Using Apps on an iOS Device........................ 529
Using Mobile Navigation on an Android Device................................................................ 529
At a Glance........................................................18
Audible Warnings and Indicators...........108 Headlamps On Warning Chime.................... 108
Key in Ignition Warning Chime...................... 108
Keyless Warning Alert...................................... 108
Parking Brake On Warning Chime...............108
Audio Control
..................................................80
You can operate the following functions
with the control:.............................................. 80
Audio System
................................................474
General Information.......................................... 474
Audio Unit - Vehicles With: AM/FM/ Touchscreen Display/SYNC 3..............474
Adjusting the Volume....................................... 475
Changing Radio Stations................................ 475
Selecting the Audio Modes............................ 475
Setting a Memory Preset................................ 475
Switching the Audio Unit On and Off.........475
Using Seek, Fast Forward and Reverse.............................................................. 475
Audio Unit - Vehicles With: SYNC.........476 Accessing the Apps Menu.............................. 476
Accessing the Clock Settings........................ 476
Accessing the Media Source Menu.............476
613
Super Duty (TFE), enUSA, Edition date: 201909, Third-Printing- Index