headlamp FORD F-350 2020 User Guide
[x] Cancel search | Manufacturer: FORD, Model Year: 2020, Model line: F-350, Model: FORD F-350 2020Pages: 631, PDF Size: 9.62 MB
Page 175 of 631
preventing engine damage due to lack of
proper lubrication. After the 30 second
warm-up period, the accelerator pedal
becomes operational again and a message
appears informing you the vehicle is ok to
drive.
When you start the engine in extremely
cold temperatures -15°F (-26°C), we
recommend that you allow the engine to
idle for several minutes before you drive
the vehicle.
Before starting the engine check the
following:
• Make sure all occupants fasten their
seatbelt.
• Make sure the headlamps and
electrical accessories are off.
• Make sure the parking brake is on.
• Make sure the transmission is in park
(P).
Note: Do not press the accelerator during
starting.
Vehicles with an Ignition Key
Note: Do not touch the accelerator pedal.
1. Fully press the brake pedal.
2. Turn the key to position
II
Note: A message appears: Engine Start
Pending, Please Wait.
3. Wait until the engine glow-plug indicator turns off.
4. Turn the key to position
III to start the
engine.
5. When the engine starts, release the brake pedal.
Do not crank the engine for more than 10
seconds as starter damage may occur. If
the engine does not start, switch the
ignition off and wait 30 seconds before
trying again. Vehicles with Keyless Start
Note:
Do not touch the accelerator pedal.
Note: If the push button ignition switch is
pressed again prior to the engine starting,
the ignition switches to accessory mode and
does not start.
Note: If you release the brake pedal before
the engine starts, follow the engine start
sequence again.
1. Fully press the brake pedal.
2. Press the center of the push button ignition switch.
Note: A message appears: Engine Start
Pending, Please Wait.
3. When the engine starts, release the brake pedal.
Diesel Engine Fast Start Glow Plug
System
The diesel engine glow system consists of:
• Eight glow plugs, one per cylinder.
• Glow Plug Control Module.
• Engine Coolant Temperature sensor.
• Barometric pressure sensor.
• Environmental temperature sensor.
The powertrain and glow plug control
modules electronically control the glow
plug system. After you switch the ignition
on, the glow plug control module
immediately energizes the glow plugs. The
glow plug control module uses the engine
coolant temperature, barometric pressure
sensor and environmental temperature
sensor to determine how long the glow
plugs stay energized. The required time for
the glow plugs to be energized decreases
as the coolant temperature, barometric
pressure and environmental temperature
increase.
172
Super Duty (TFE), enUSA, Edition date: 201909, Third-Printing- Starting and Stopping the Engine
Page 250 of 631
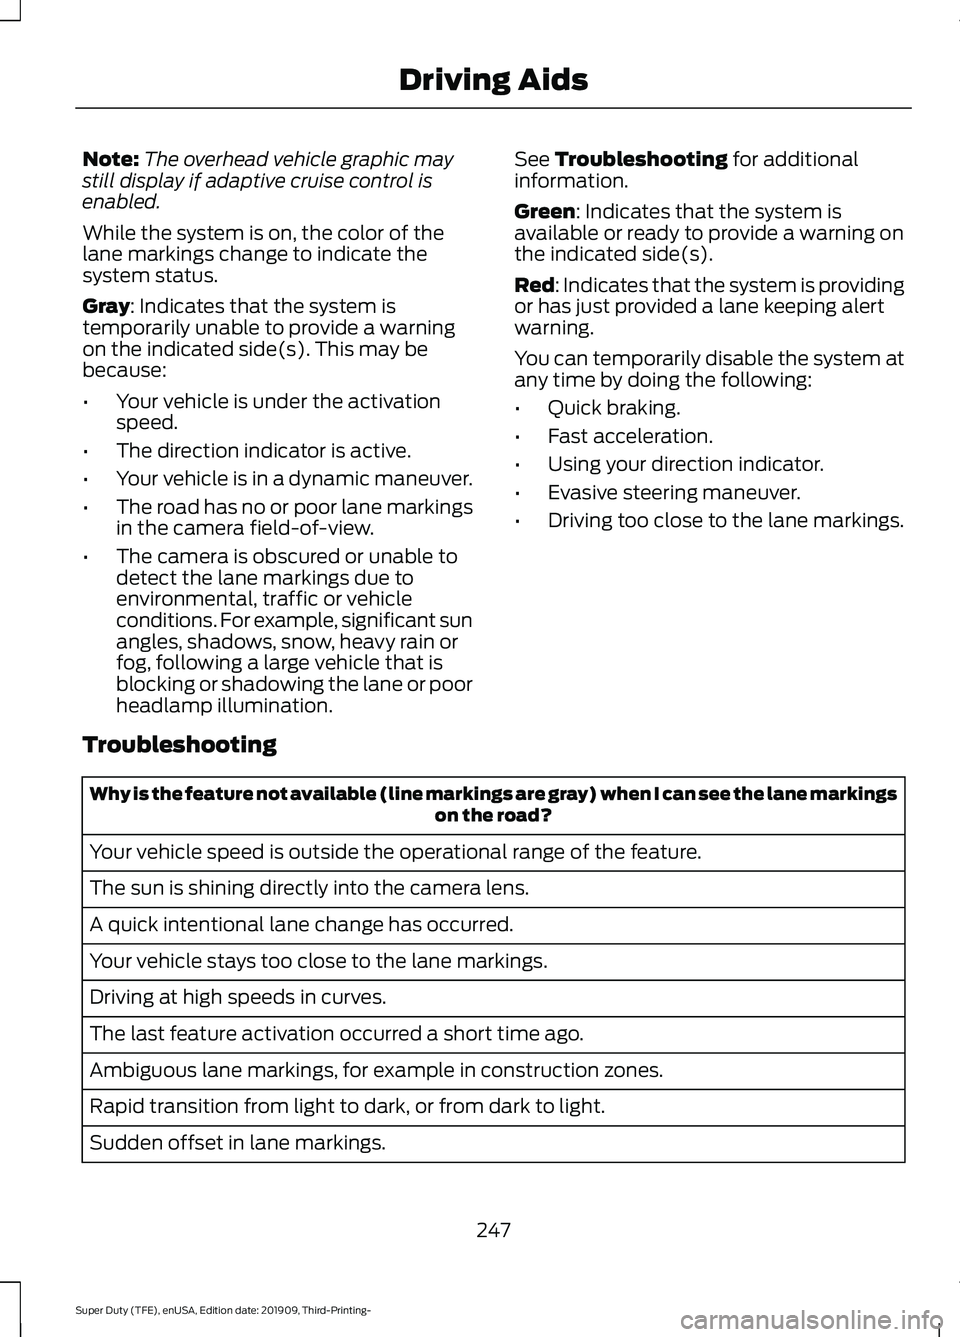
Note:
The overhead vehicle graphic may
still display if adaptive cruise control is
enabled.
While the system is on, the color of the
lane markings change to indicate the
system status.
Gray: Indicates that the system is
temporarily unable to provide a warning
on the indicated side(s). This may be
because:
• Your vehicle is under the activation
speed.
• The direction indicator is active.
• Your vehicle is in a dynamic maneuver.
• The road has no or poor lane markings
in the camera field-of-view.
• The camera is obscured or unable to
detect the lane markings due to
environmental, traffic or vehicle
conditions. For example, significant sun
angles, shadows, snow, heavy rain or
fog, following a large vehicle that is
blocking or shadowing the lane or poor
headlamp illumination. See
Troubleshooting for additional
information.
Green
: Indicates that the system is
available or ready to provide a warning on
the indicated side(s).
Red
: Indicates that the system is providing
or has just provided a lane keeping alert
warning.
You can temporarily disable the system at
any time by doing the following:
• Quick braking.
• Fast acceleration.
• Using your direction indicator.
• Evasive steering maneuver.
• Driving too close to the lane markings.
Troubleshooting Why is the feature not available (line markings are gray) when I can see the lane markings
on the road?
Your vehicle speed is outside the operational range of the feature.
The sun is shining directly into the camera lens.
A quick intentional lane change has occurred.
Your vehicle stays too close to the lane markings.
Driving at high speeds in curves.
The last feature activation occurred a short time ago.
Ambiguous lane markings, for example in construction zones.
Rapid transition from light to dark, or from dark to light.
Sudden offset in lane markings.
247
Super Duty (TFE), enUSA, Edition date: 201909, Third-Printing- Driving Aids
Page 373 of 631
ADJUSTING THE HEADLAMPS
Vertical Aim Adjustment
The headlamps on your vehicle are
properly aimed at the assembly plant. If
your vehicle has been in an accident, the
alignment of your headlamps should be
checked by your authorized dealer.
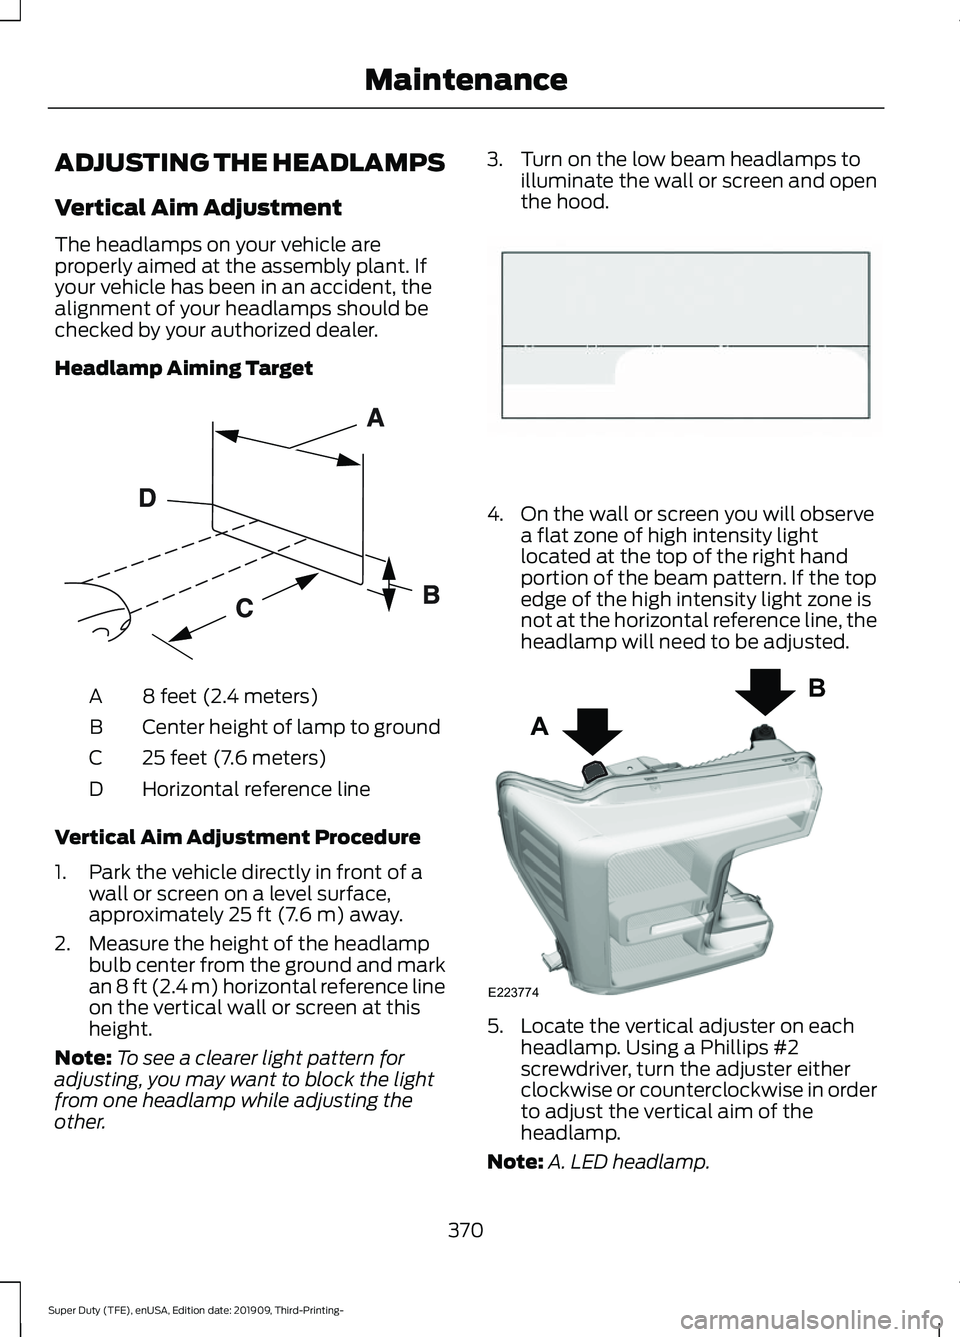
Headlamp Aiming Target
8 feet (2.4 meters)
A
Center height of lamp to ground
B
25 feet (7.6 meters)
C
Horizontal reference line
D
Vertical Aim Adjustment Procedure
1. Park the vehicle directly in front of a wall or screen on a level surface,
approximately 25 ft (7.6 m) away.
2. Measure the height of the headlamp bulb center from the ground and mark
an
8 ft (2.4 m) horizontal reference line
on the vertical wall or screen at this
height.
Note: To see a clearer light pattern for
adjusting, you may want to block the light
from one headlamp while adjusting the
other. 3. Turn on the low beam headlamps to
illuminate the wall or screen and open
the hood. 4. On the wall or screen you will observe
a flat zone of high intensity light
located at the top of the right hand
portion of the beam pattern. If the top
edge of the high intensity light zone is
not at the horizontal reference line, the
headlamp will need to be adjusted. 5. Locate the vertical adjuster on each
headlamp. Using a Phillips #2
screwdriver, turn the adjuster either
clockwise or counterclockwise in order
to adjust the vertical aim of the
headlamp.
Note: A. LED headlamp.
370
Super Duty (TFE), enUSA, Edition date: 201909, Third-Printing- MaintenanceE142592 E142465 A
B
E223774
Page 374 of 631
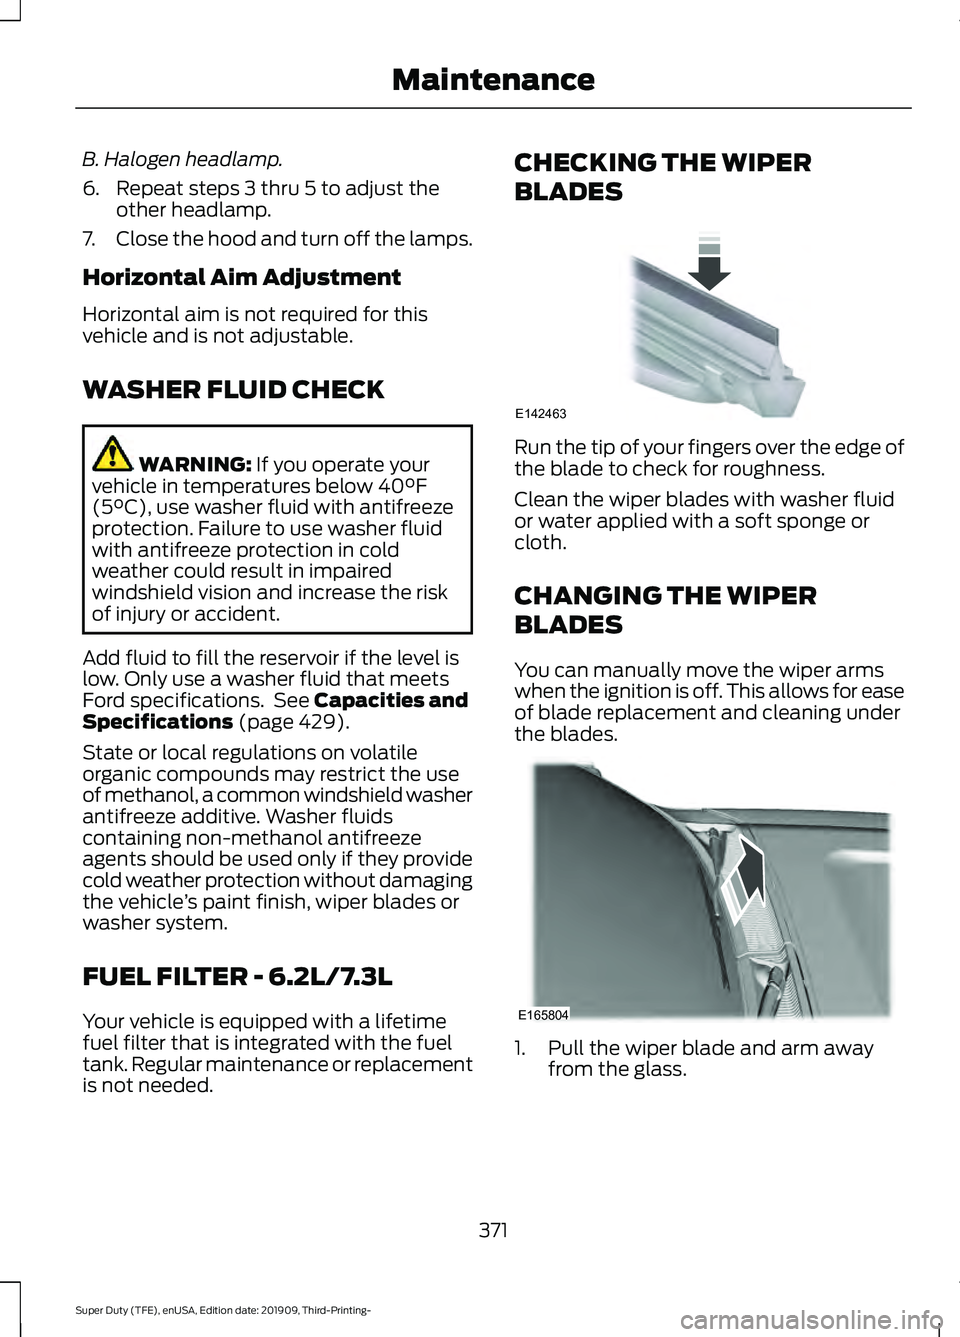
B. Halogen headlamp.
6. Repeat steps 3 thru 5 to adjust the
other headlamp.
7. Close the hood and turn off the lamps.
Horizontal Aim Adjustment
Horizontal aim is not required for this
vehicle and is not adjustable.
WASHER FLUID CHECK WARNING: If you operate your
vehicle in temperatures below 40°F
(5°C), use washer fluid with antifreeze
protection. Failure to use washer fluid
with antifreeze protection in cold
weather could result in impaired
windshield vision and increase the risk
of injury or accident.
Add fluid to fill the reservoir if the level is
low. Only use a washer fluid that meets
Ford specifications. See
Capacities and
Specifications (page 429).
State or local regulations on volatile
organic compounds may restrict the use
of methanol, a common windshield washer
antifreeze additive. Washer fluids
containing non-methanol antifreeze
agents should be used only if they provide
cold weather protection without damaging
the vehicle ’s paint finish, wiper blades or
washer system.
FUEL FILTER - 6.2L/7.3L
Your vehicle is equipped with a lifetime
fuel filter that is integrated with the fuel
tank. Regular maintenance or replacement
is not needed. CHECKING THE WIPER
BLADES
Run the tip of your fingers over the edge of
the blade to check for roughness.
Clean the wiper blades with washer fluid
or water applied with a soft sponge or
cloth.
CHANGING THE WIPER
BLADES
You can manually move the wiper arms
when the ignition is off. This allows for ease
of blade replacement and cleaning under
the blades.
1. Pull the wiper blade and arm away
from the glass.
371
Super Duty (TFE), enUSA, Edition date: 201909, Third-Printing- MaintenanceE142463 E165804
Page 375 of 631
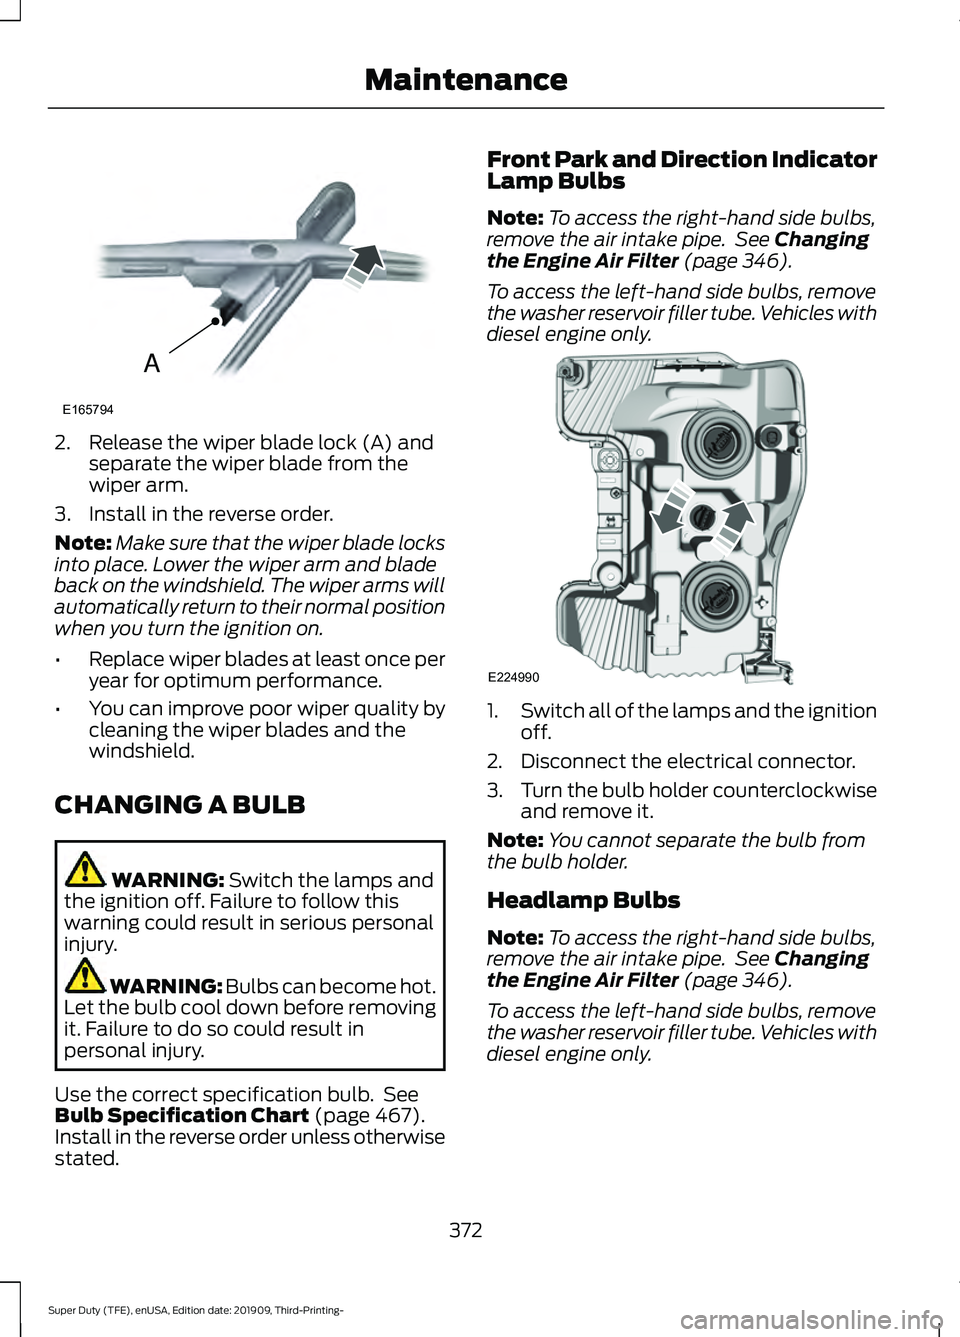
2. Release the wiper blade lock (A) and
separate the wiper blade from the
wiper arm.
3. Install in the reverse order.
Note: Make sure that the wiper blade locks
into place. Lower the wiper arm and blade
back on the windshield. The wiper arms will
automatically return to their normal position
when you turn the ignition on.
• Replace wiper blades at least once per
year for optimum performance.
• You can improve poor wiper quality by
cleaning the wiper blades and the
windshield.
CHANGING A BULB WARNING: Switch the lamps and
the ignition off. Failure to follow this
warning could result in serious personal
injury. WARNING: Bulbs can become hot.
Let the bulb cool down before removing
it. Failure to do so could result in
personal injury.
Use the correct specification bulb. See
Bulb Specification Chart
(page 467).
Install in the reverse order unless otherwise
stated. Front Park and Direction Indicator
Lamp Bulbs
Note:
To access the right-hand side bulbs,
remove the air intake pipe. See
Changing
the Engine Air Filter (page 346).
To access the left-hand side bulbs, remove
the washer reservoir filler tube. Vehicles with
diesel engine only. 1.
Switch all of the lamps and the ignition
off.
2. Disconnect the electrical connector.
3. Turn the bulb holder counterclockwise
and remove it.
Note: You cannot separate the bulb from
the bulb holder.
Headlamp Bulbs
Note: To access the right-hand side bulbs,
remove the air intake pipe. See
Changing
the Engine Air Filter (page 346).
To access the left-hand side bulbs, remove
the washer reservoir filler tube. Vehicles with
diesel engine only.
372
Super Duty (TFE), enUSA, Edition date: 201909, Third-Printing- MaintenanceA
E165794 E224990
Page 376 of 631
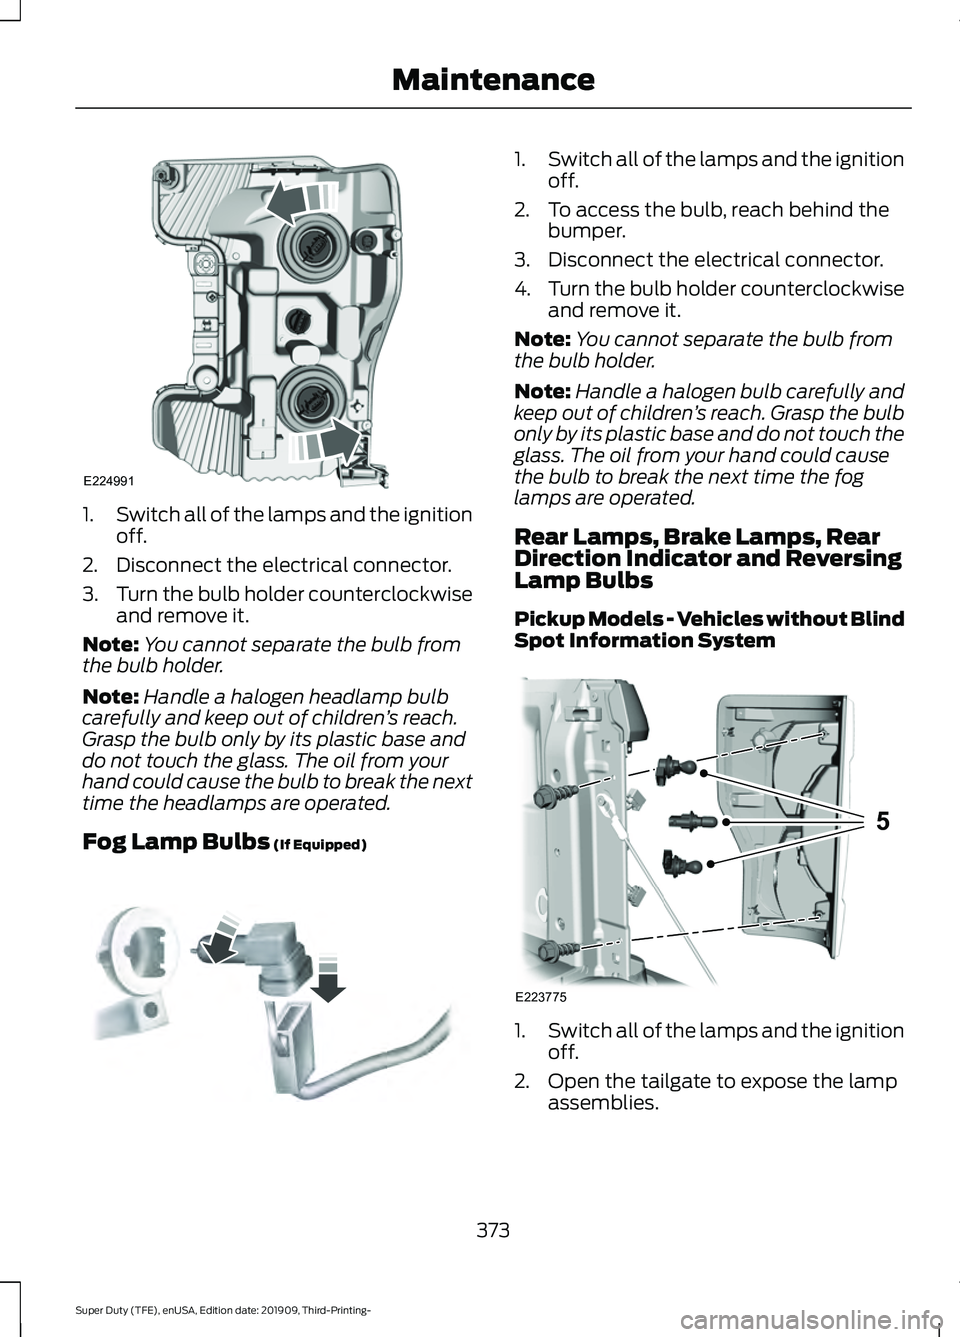
1.
Switch all of the lamps and the ignition
off.
2. Disconnect the electrical connector.
3. Turn the bulb holder counterclockwise
and remove it.
Note: You cannot separate the bulb from
the bulb holder.
Note: Handle a halogen headlamp bulb
carefully and keep out of children ’s reach.
Grasp the bulb only by its plastic base and
do not touch the glass. The oil from your
hand could cause the bulb to break the next
time the headlamps are operated.
Fog Lamp Bulbs (If Equipped) 1.
Switch all of the lamps and the ignition
off.
2. To access the bulb, reach behind the bumper.
3. Disconnect the electrical connector.
4. Turn the bulb holder counterclockwise
and remove it.
Note: You cannot separate the bulb from
the bulb holder.
Note: Handle a halogen bulb carefully and
keep out of children ’s reach. Grasp the bulb
only by its plastic base and do not touch the
glass. The oil from your hand could cause
the bulb to break the next time the fog
lamps are operated.
Rear Lamps, Brake Lamps, Rear
Direction Indicator and Reversing
Lamp Bulbs
Pickup Models - Vehicles without Blind
Spot Information System 1.
Switch all of the lamps and the ignition
off.
2. Open the tailgate to expose the lamp assemblies.
373
Super Duty (TFE), enUSA, Edition date: 201909, Third-Printing- MaintenanceE224991 E163826 E223775
5
Page 378 of 631
4. Remove the bulb by pulling it straight
out.
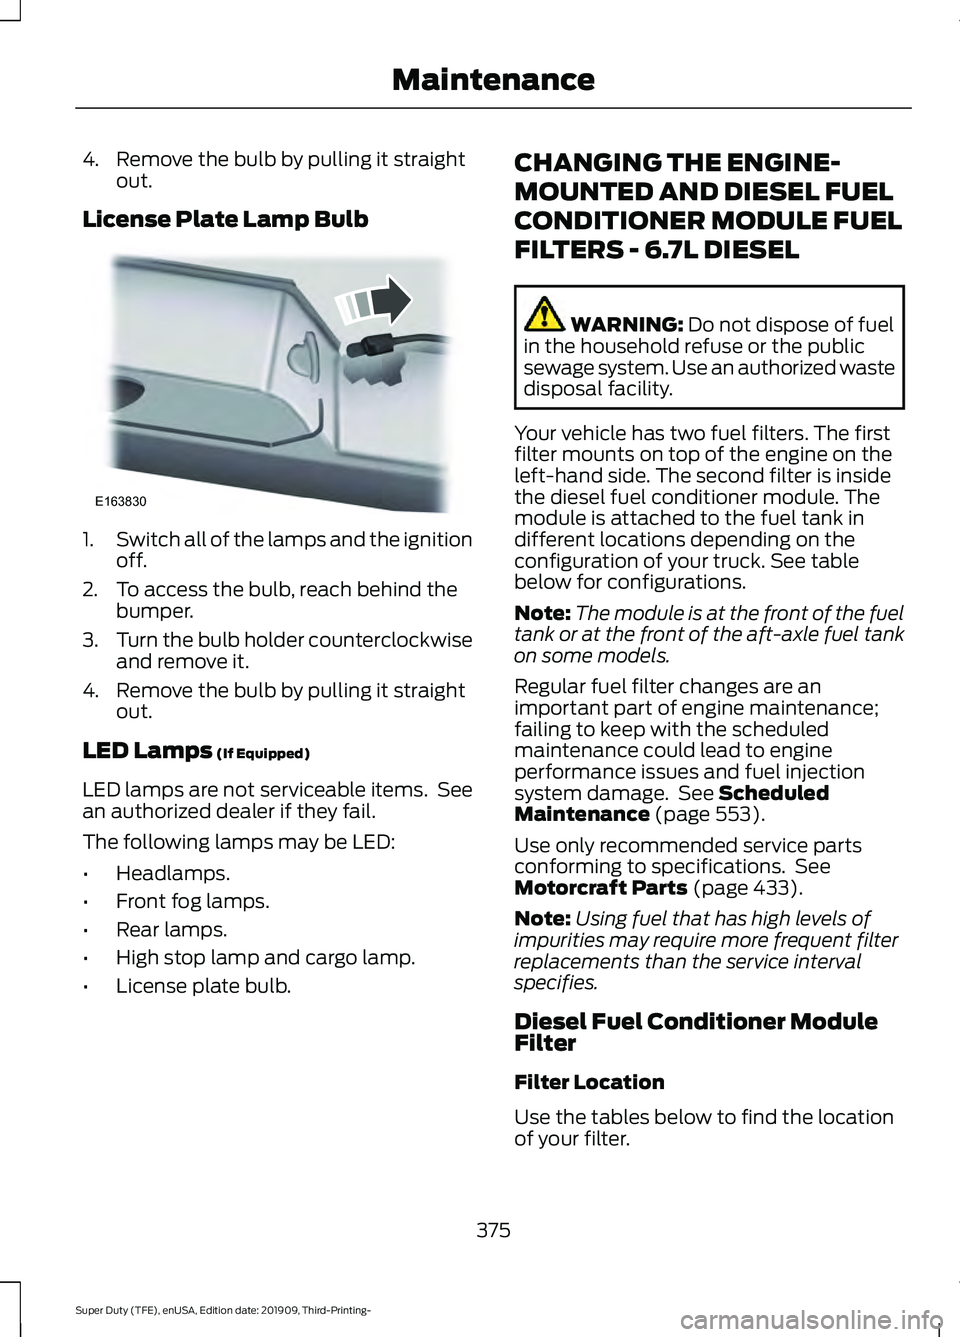
License Plate Lamp Bulb 1.
Switch all of the lamps and the ignition
off.
2. To access the bulb, reach behind the bumper.
3. Turn the bulb holder counterclockwise
and remove it.
4. Remove the bulb by pulling it straight out.
LED Lamps (If Equipped)
LED lamps are not serviceable items. See
an authorized dealer if they fail.
The following lamps may be LED:
• Headlamps.
• Front fog lamps.
• Rear lamps.
• High stop lamp and cargo lamp.
• License plate bulb. CHANGING THE ENGINE-
MOUNTED AND DIESEL FUEL
CONDITIONER MODULE FUEL
FILTERS - 6.7L DIESEL WARNING:
Do not dispose of fuel
in the household refuse or the public
sewage system. Use an authorized waste
disposal facility.
Your vehicle has two fuel filters. The first
filter mounts on top of the engine on the
left-hand side. The second filter is inside
the diesel fuel conditioner module. The
module is attached to the fuel tank in
different locations depending on the
configuration of your truck. See table
below for configurations.
Note: The module is at the front of the fuel
tank or at the front of the aft-axle fuel tank
on some models.
Regular fuel filter changes are an
important part of engine maintenance;
failing to keep with the scheduled
maintenance could lead to engine
performance issues and fuel injection
system damage. See
Scheduled
Maintenance (page 553).
Use only recommended service parts
conforming to specifications. See
Motorcraft Parts
(page 433).
Note: Using fuel that has high levels of
impurities may require more frequent filter
replacements than the service interval
specifies.
Diesel Fuel Conditioner Module
Filter
Filter Location
Use the tables below to find the location
of your filter.
375
Super Duty (TFE), enUSA, Edition date: 201909, Third-Printing- MaintenanceE163830
Page 384 of 631
CLEANING THE EXTERIOR
Wash your vehicle regularly with cool or
lukewarm water and a neutral pH
shampoo, we recommend Motorcraft
Detail Wash.
•
Never use strong household detergents
or soap, for example dish washing or
laundry liquid. These products can
discolor and spot painted surfaces.
• Never wash your vehicle when it is hot
to the touch, or during strong or direct
sunlight.
• Dry your vehicle with a chamois or soft
terry cloth towel to eliminate water
spotting.
• Immediately remove fuel spillages, bird
droppings, insect deposits and road tar.
These may cause damage to your
vehicle ’s paintwork or trim over time.
We recommend Motorcraft Bug and
Tar Remover.
• Remove any exterior accessories, for
example antennas, before entering a
car wash.
• When filling with AdBlue®, remove any
residue on painted surfaces
immediately.
Note: Suntan lotions and insect repellents
can damage painted surfaces. If these
substances come in contact with your
vehicle, wash the affected area as soon as
possible.
Cleaning the Headlamps
Note: Do not scrape the headlamp lenses
or use abrasives, alcoholic solvents or
chemical solvents to clean them.
Note: Do not wipe the headlamps when
they are dry. Exterior Chrome Parts
•
Apply a high quality-cleaning product
to bumpers and other chrome parts.
Follow the manufacturer ’s instructions.
We recommend Motorcraft Custom
Bright Metal Cleaner.
• Do not apply the cleaning product to
hot surfaces. Do not leave the cleaning
product on chrome surfaces longer
than the time recommended.
• Using non-recommended cleaners can
result in severe and permanent
cosmetic damage.
Note: Never use abrasive materials, for
example steel wool or plastic pads as they
can scratch the chrome surface.
Note: Do not use chrome cleaner, metal
cleaner or polish on wheels or wheel covers.
Exterior Plastic Parts
For routine cleaning we recommend
Motorcraft Detail Wash. If tar or grease
spots are present, we recommend
Motorcraft Bug and Tar Remover.
Stripes or Graphics (If Equipped)
Hand washing your vehicle is preferred
however, pressure washing may be used
under the following conditions:
• Do not use water pressure higher than
2,000 psi (14,000 kPa)
.
• Do not use water hotter than
179°F
(82°C).
• Use a spray with a
40° wide spray
angle pattern.
• Keep the nozzle at a
12 in (305 mm)
distance and 90° angle to your
vehicle's surface.
Note: Holding the pressure washer nozzle
at an angle to the vehicle's surface may
damage graphics and cause the edges to
peel away from the vehicle's surface.
381
Super Duty (TFE), enUSA, Edition date: 201909, Third-Printing- Vehicle Care
Page 470 of 631
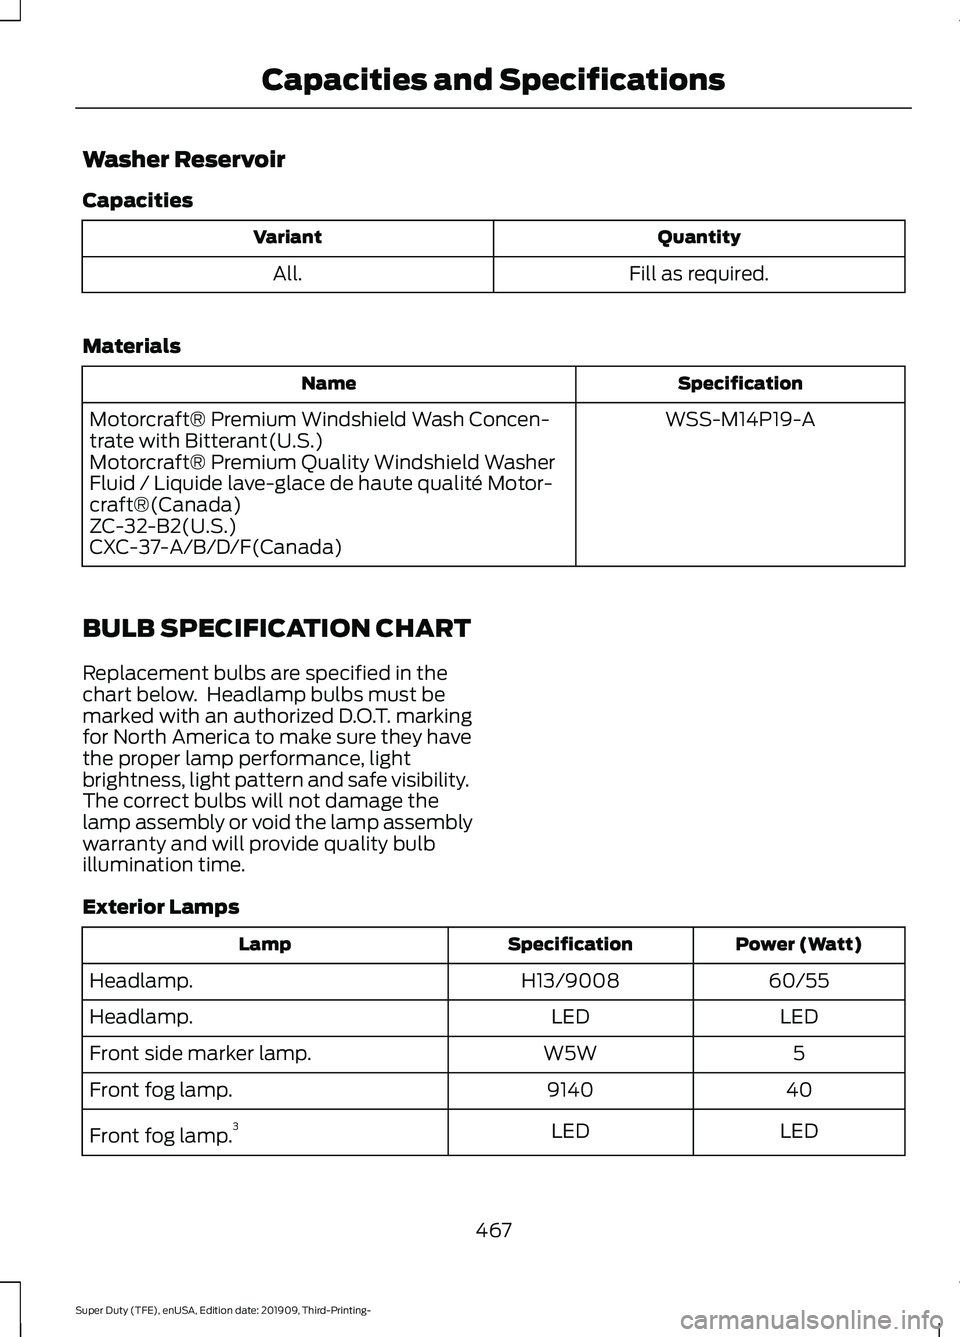
Washer Reservoir
Capacities
Quantity
Variant
Fill as required.
All.
Materials Specification
Name
WSS-M14P19-A
Motorcraft® Premium Windshield Wash Concen-
trate with Bitterant(U.S.)
Motorcraft® Premium Quality Windshield Washer
Fluid / Liquide lave-glace de haute qualité Motor-
craft®(Canada)
ZC-32-B2(U.S.)
CXC-37-A/B/D/F(Canada)
BULB SPECIFICATION CHART
Replacement bulbs are specified in the
chart below. Headlamp bulbs must be
marked with an authorized D.O.T. marking
for North America to make sure they have
the proper lamp performance, light
brightness, light pattern and safe visibility.
The correct bulbs will not damage the
lamp assembly or void the lamp assembly
warranty and will provide quality bulb
illumination time.
Exterior Lamps Power (Watt)
Specification
Lamp
60/55
H13/9008
Headlamp.
LED
LED
Headlamp.
5
W5W
Front side marker lamp.
40
9140
Front fog lamp.
LED
LED
Front fog lamp. 3
467
Super Duty (TFE), enUSA, Edition date: 201909, Third-Printing- Capacities and Specifications
Page 616 of 631
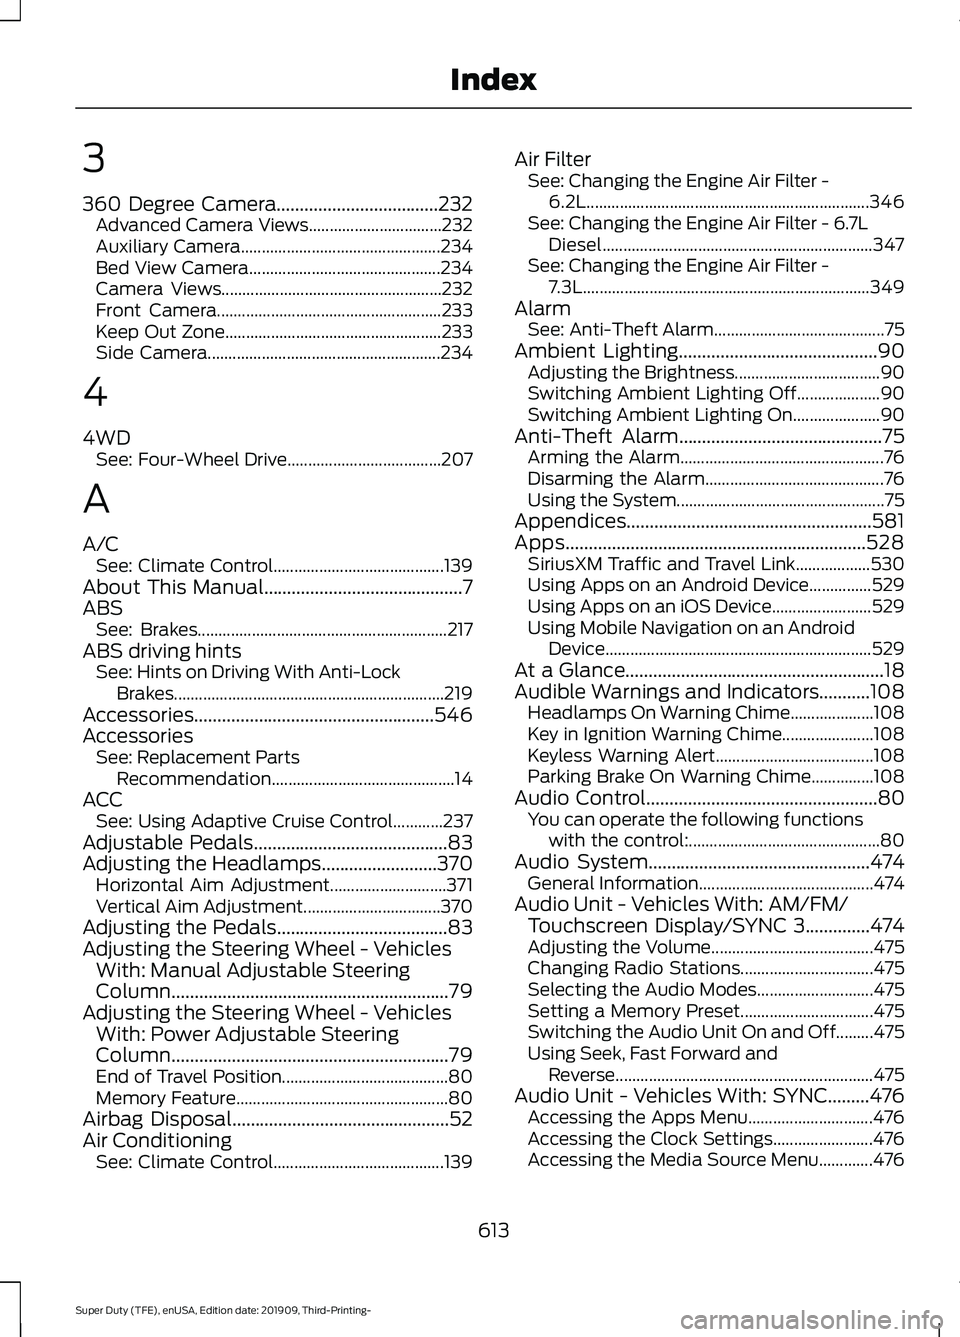
3
360 Degree Camera...................................232
Advanced Camera Views................................ 232
Auxiliary Camera................................................ 234
Bed View Camera.............................................. 234
Camera Views..................................................... 232
Front Camera...................................................... 233
Keep Out Zone.................................................... 233
Side Camera........................................................ 234
4
4WD See: Four-Wheel Drive..................................... 207
A
A/C See: Climate Control......................................... 139
About This Manual
...........................................7
ABS See: Brakes............................................................ 217
ABS driving hints See: Hints on Driving With Anti-Lock
Brakes................................................................. 219
Accessories....................................................546
Accessories See: Replacement Parts
Recommendation............................................ 14
ACC See: Using Adaptive Cruise Control............237
Adjustable Pedals
..........................................83
Adjusting the Headlamps.........................370
Horizontal Aim Adjustment............................ 371
Vertical Aim Adjustment................................. 370
Adjusting the Pedals
.....................................83
Adjusting the Steering Wheel - Vehicles With: Manual Adjustable Steering
Column
............................................................79
Adjusting the Steering Wheel - Vehicles With: Power Adjustable Steering
Column
............................................................79
End of Travel Position........................................ 80
Memory Feature................................................... 80
Airbag Disposal
...............................................52
Air Conditioning See: Climate Control......................................... 139Air Filter
See: Changing the Engine Air Filter -
6.2L.................................................................... 346
See: Changing the Engine Air Filter - 6.7L Diesel................................................................. 347
See: Changing the Engine Air Filter - 7.3L..................................................................... 349
Alarm See: Anti-Theft Alarm......................................... 75
Ambient Lighting...........................................90 Adjusting the Brightness................................... 90
Switching Ambient Lighting Off.................... 90
Switching Ambient Lighting On..................... 90
Anti-Theft Alarm............................................75 Arming the Alarm................................................. 76
Disarming the Alarm........................................... 76
Using the System.................................................. 75
Appendices.....................................................581
Apps
.................................................................528
SiriusXM Traffic and Travel Link.................. 530
Using Apps on an Android Device...............529
Using Apps on an iOS Device........................ 529
Using Mobile Navigation on an Android Device................................................................ 529
At a Glance........................................................18
Audible Warnings and Indicators...........108 Headlamps On Warning Chime.................... 108
Key in Ignition Warning Chime...................... 108
Keyless Warning Alert...................................... 108
Parking Brake On Warning Chime...............108
Audio Control
..................................................80
You can operate the following functions
with the control:.............................................. 80
Audio System
................................................474
General Information.......................................... 474
Audio Unit - Vehicles With: AM/FM/ Touchscreen Display/SYNC 3..............474
Adjusting the Volume....................................... 475
Changing Radio Stations................................ 475
Selecting the Audio Modes............................ 475
Setting a Memory Preset................................ 475
Switching the Audio Unit On and Off.........475
Using Seek, Fast Forward and Reverse.............................................................. 475
Audio Unit - Vehicles With: SYNC.........476 Accessing the Apps Menu.............................. 476
Accessing the Clock Settings........................ 476
Accessing the Media Source Menu.............476
613
Super Duty (TFE), enUSA, Edition date: 201909, Third-Printing- Index