turn signal FORD F-450 2018 Owners Manual
[x] Cancel search | Manufacturer: FORD, Model Year: 2018, Model line: F-450, Model: FORD F-450 2018Pages: 660, PDF Size: 11.64 MB
Page 113 of 660
Cruise Control (If Equipped)
Illuminates when you switch this
feature on. See
Using Cruise
Control (page 243).
Direction Indicator Illuminates when the left or right
turn signal or the hazard warning
flasher is turned on. If the
indicators stay on or flash faster, check for
a burned out bulb.
Door Ajar Displays when the ignition is on
and any door is not completely
closed.
Electronic Locking Differential
(If
Equipped) Illuminates when using the
electronic locking differential.
Engine Coolant Temperature Illuminates when the engine
coolant temperature is high.
Stop the vehicle as soon as
possible, switch off the engine and let cool.
Engine Oil If it illuminates with the engine
running or when you are driving,
this indicates a malfunction.
Stop your vehicle as soon as it is safe to
do so and switch the engine off. Check the
engine oil level.
See
Engine Oil Check (page 333).
Note: Do not resume your journey if it
illuminates despite the level being correct.
Have the system checked by your authorized
dealer immediately. Fasten Seatbelt It illuminates and a chime
sounds to remind you to fasten
your seatbelt.
Front Airbag If it fails to illuminate when you
start your vehicle, continues to
flash or remains on, it indicates
a malfunction. Have the system checked
by your authorized dealer.
Front Fog Lamps
(If Equipped) It illuminates when you switch
the front fog lamps on.
High Beam Illuminates when you switch the
high beam headlamps on. It will
flash when you use the
headlamp flasher.
Hill Descent
(If Equipped) Illuminates when hill descent is
switched on.
Low Fuel Level Illuminates when the fuel level
is low or the fuel tank is nearly
empty. Refuel as soon as
possible.
Low Tire Pressure Warning It illuminates if the tire pressure
in one or more tires is below the
correct tire pressure.
110
Super Duty (TFE) Canada/United States of America, enUSA, Edition date: 201709, Second Printing Instrument ClusterE71340 E163170 E71880 E67017 E163171
Page 251 of 660
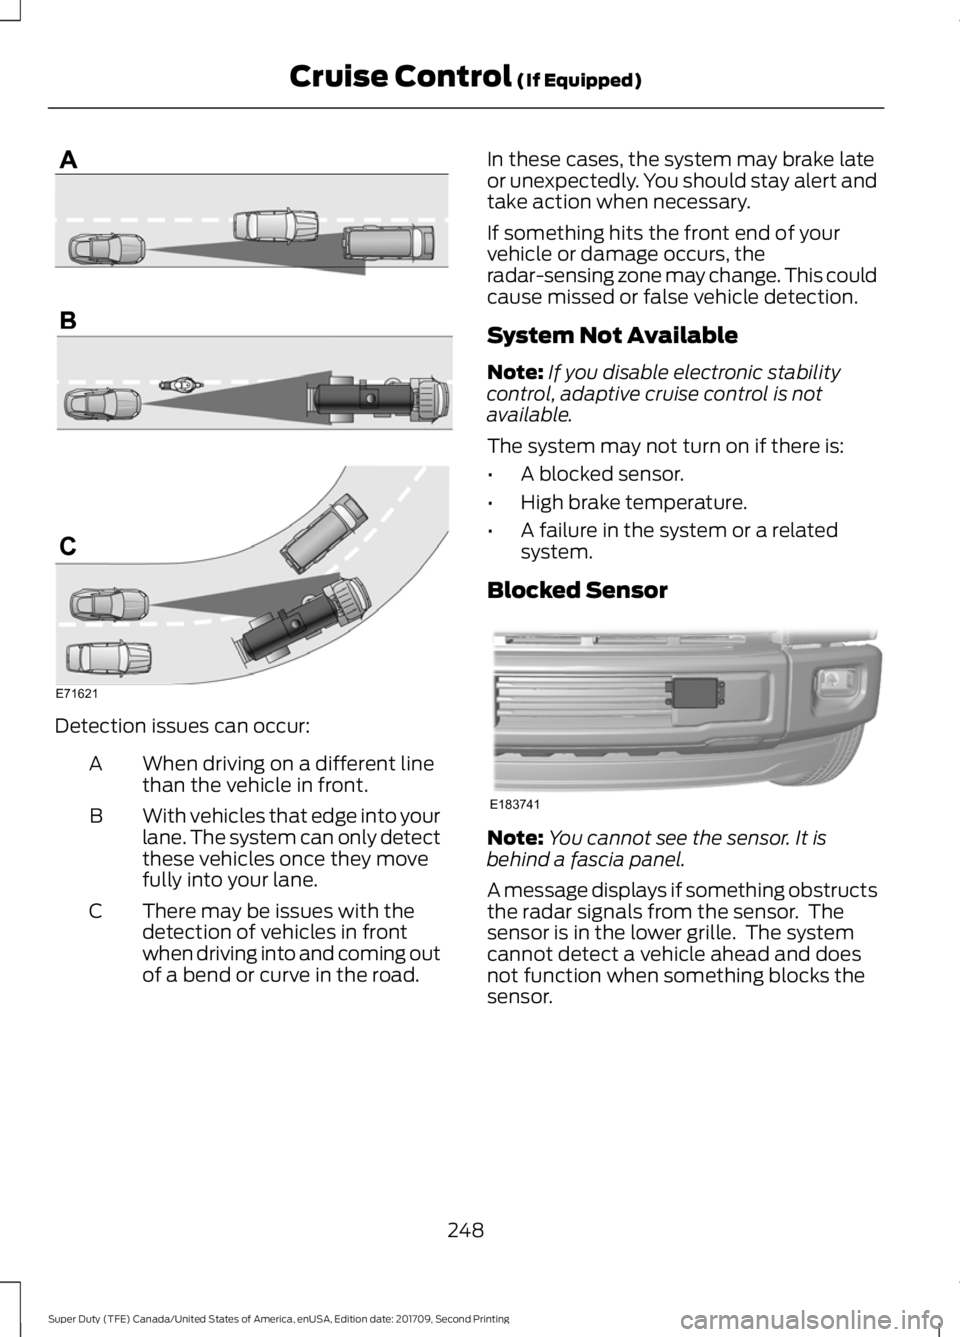
Detection issues can occur:
When driving on a different line
than the vehicle in front.
A
With vehicles that edge into your
lane. The system can only detect
these vehicles once they move
fully into your lane.
B
There may be issues with the
detection of vehicles in front
when driving into and coming out
of a bend or curve in the road.
C In these cases, the system may brake late
or unexpectedly. You should stay alert and
take action when necessary.
If something hits the front end of your
vehicle or damage occurs, the
radar-sensing zone may change. This could
cause missed or false vehicle detection.
System Not Available
Note:
If you disable electronic stability
control, adaptive cruise control is not
available.
The system may not turn on if there is:
• A blocked sensor.
• High brake temperature.
• A failure in the system or a related
system.
Blocked Sensor Note:
You cannot see the sensor. It is
behind a fascia panel.
A message displays if something obstructs
the radar signals from the sensor. The
sensor is in the lower grille. The system
cannot detect a vehicle ahead and does
not function when something blocks the
sensor.
248
Super Duty (TFE) Canada/United States of America, enUSA, Edition date: 201709, Second Printing Cruise Control (If Equipped)E71621 E183741
Page 256 of 660
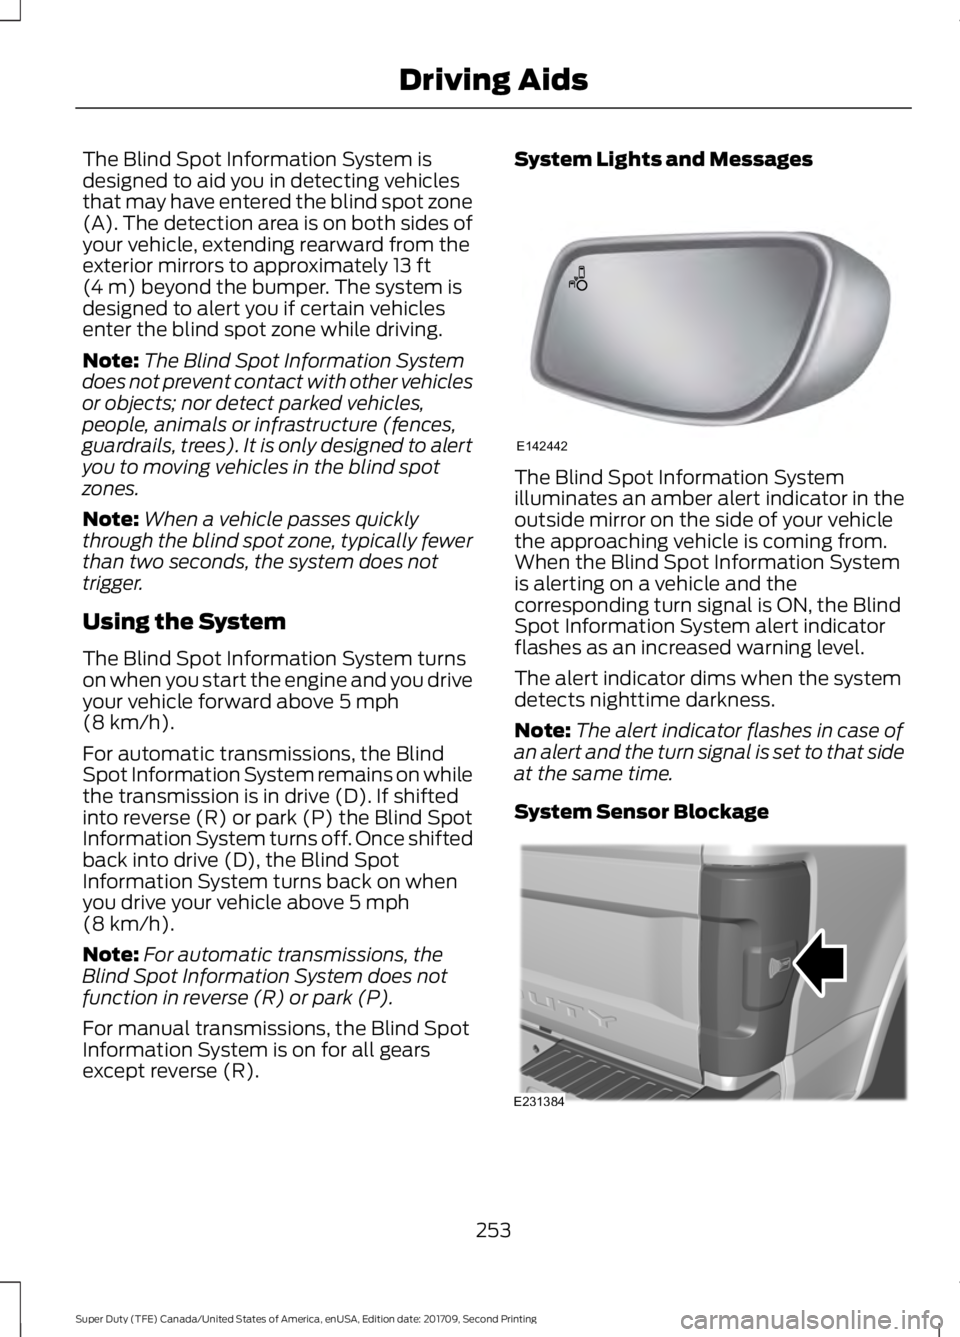
The Blind Spot Information System is
designed to aid you in detecting vehicles
that may have entered the blind spot zone
(A). The detection area is on both sides of
your vehicle, extending rearward from the
exterior mirrors to approximately 13 ft
(4 m) beyond the bumper. The system is
designed to alert you if certain vehicles
enter the blind spot zone while driving.
Note: The Blind Spot Information System
does not prevent contact with other vehicles
or objects; nor detect parked vehicles,
people, animals or infrastructure (fences,
guardrails, trees). It is only designed to alert
you to moving vehicles in the blind spot
zones.
Note: When a vehicle passes quickly
through the blind spot zone, typically fewer
than two seconds, the system does not
trigger.
Using the System
The Blind Spot Information System turns
on when you start the engine and you drive
your vehicle forward above
5 mph
(8 km/h).
For automatic transmissions, the Blind
Spot Information System remains on while
the transmission is in drive (D). If shifted
into reverse (R) or park (P) the Blind Spot
Information System turns off. Once shifted
back into drive (D), the Blind Spot
Information System turns back on when
you drive your vehicle above
5 mph
(8 km/h).
Note: For automatic transmissions, the
Blind Spot Information System does not
function in reverse (R) or park (P).
For manual transmissions, the Blind Spot
Information System is on for all gears
except reverse (R). System Lights and Messages
The Blind Spot Information System
illuminates an amber alert indicator in the
outside mirror on the side of your vehicle
the approaching vehicle is coming from.
When the Blind Spot Information System
is alerting on a vehicle and the
corresponding turn signal is ON, the Blind
Spot Information System alert indicator
flashes as an increased warning level.
The alert indicator dims when the system
detects nighttime darkness.
Note:
The alert indicator flashes in case of
an alert and the turn signal is set to that side
at the same time.
System Sensor Blockage 253
Super Duty (TFE) Canada/United States of America, enUSA, Edition date: 201709, Second Printing Driving AidsE142442 E231384
Page 265 of 660
Note:
It is recommended that you turn the
collision warning system off if a snow plow
or similar object is installed in such a way
that it may block the radar sensor. Your
vehicle will remember the selected setting
across key cycles.
Note: When possible, the manufacturer
recommends using the highest sensitivity
setting. If warnings are too frequent, you can
reduce your system's sensitivity. Reduced
sensitivity causes fewer and later system
warnings. See General Information (page
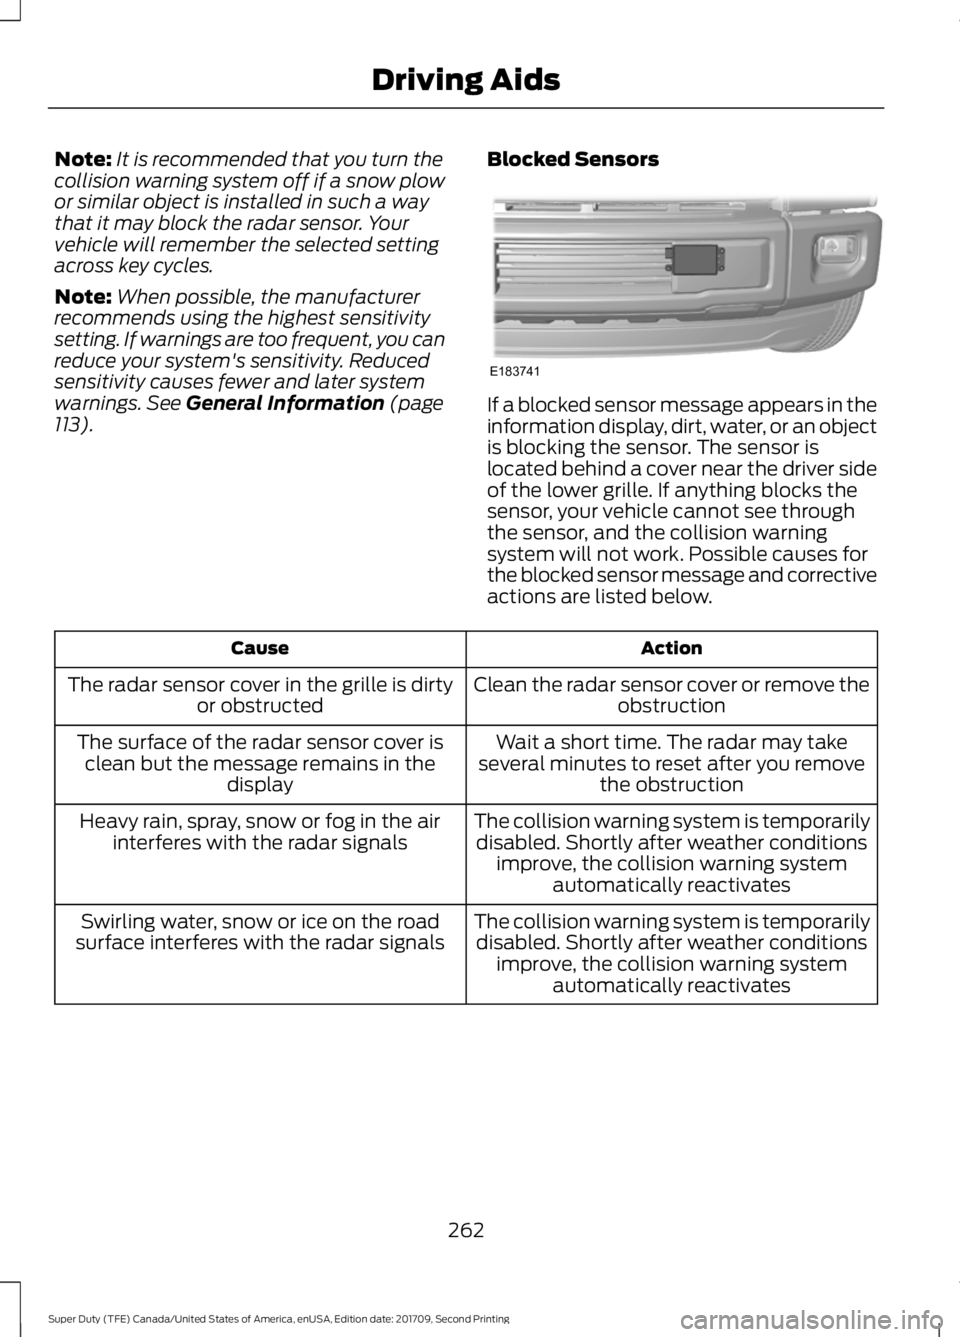
113). Blocked Sensors If a blocked sensor message appears in the
information display, dirt, water, or an object
is blocking the sensor. The sensor is
located behind a cover near the driver side
of the lower grille. If anything blocks the
sensor, your vehicle cannot see through
the sensor, and the collision warning
system will not work. Possible causes for
the blocked sensor message and corrective
actions are listed below.
Action
Cause
Clean the radar sensor cover or remove theobstruction
The radar sensor cover in the grille is dirty
or obstructed
Wait a short time. The radar may take
several minutes to reset after you remove the obstruction
The surface of the radar sensor cover is
clean but the message remains in the display
The collision warning system is temporarilydisabled. Shortly after weather conditions improve, the collision warning system automatically reactivates
Heavy rain, spray, snow or fog in the air
interferes with the radar signals
The collision warning system is temporarilydisabled. Shortly after weather conditions improve, the collision warning system automatically reactivates
Swirling water, snow or ice on the road
surface interferes with the radar signals
262
Super Duty (TFE) Canada/United States of America, enUSA, Edition date: 201709, Second Printing Driving AidsE183741
Page 289 of 660
ESSENTIAL TOWING CHECKS
WARNING
Do not exceed the maximum vertical
load on the tow ball. Failure to follow
this instruction could result in the
loss of control of your vehicle, personal
injury or death. Follow these guidelines for safe towing:
•
Do not tow a trailer until you drive your
vehicle at least 1,000 mi (1,600 km).
• Consult your local motor vehicle laws
for towing a trailer.
• See the instructions included with
towing accessories for the proper
installation and adjustment
specifications.
• Service your vehicle more frequently if
you tow a trailer. See your scheduled
maintenance information.
See
Scheduled Maintenance (page 581).
• If you use a rental trailer, follow the
instructions the rental agency gives
you.
See
Load Limits in the Load Carrying
chapter for load specification terms found
on the tire label and Safety Compliance
label and instructions on calculating your
vehicle's load.
Vehicles with a diesel engine have an
engine braking feature.
See General
Information (page 225).
Remember to account for the trailer
tongue weight as part of your vehicle load
when calculating the total vehicle weight.
Some vehicles will have the ability to
modify trailer towing features. See
General Information
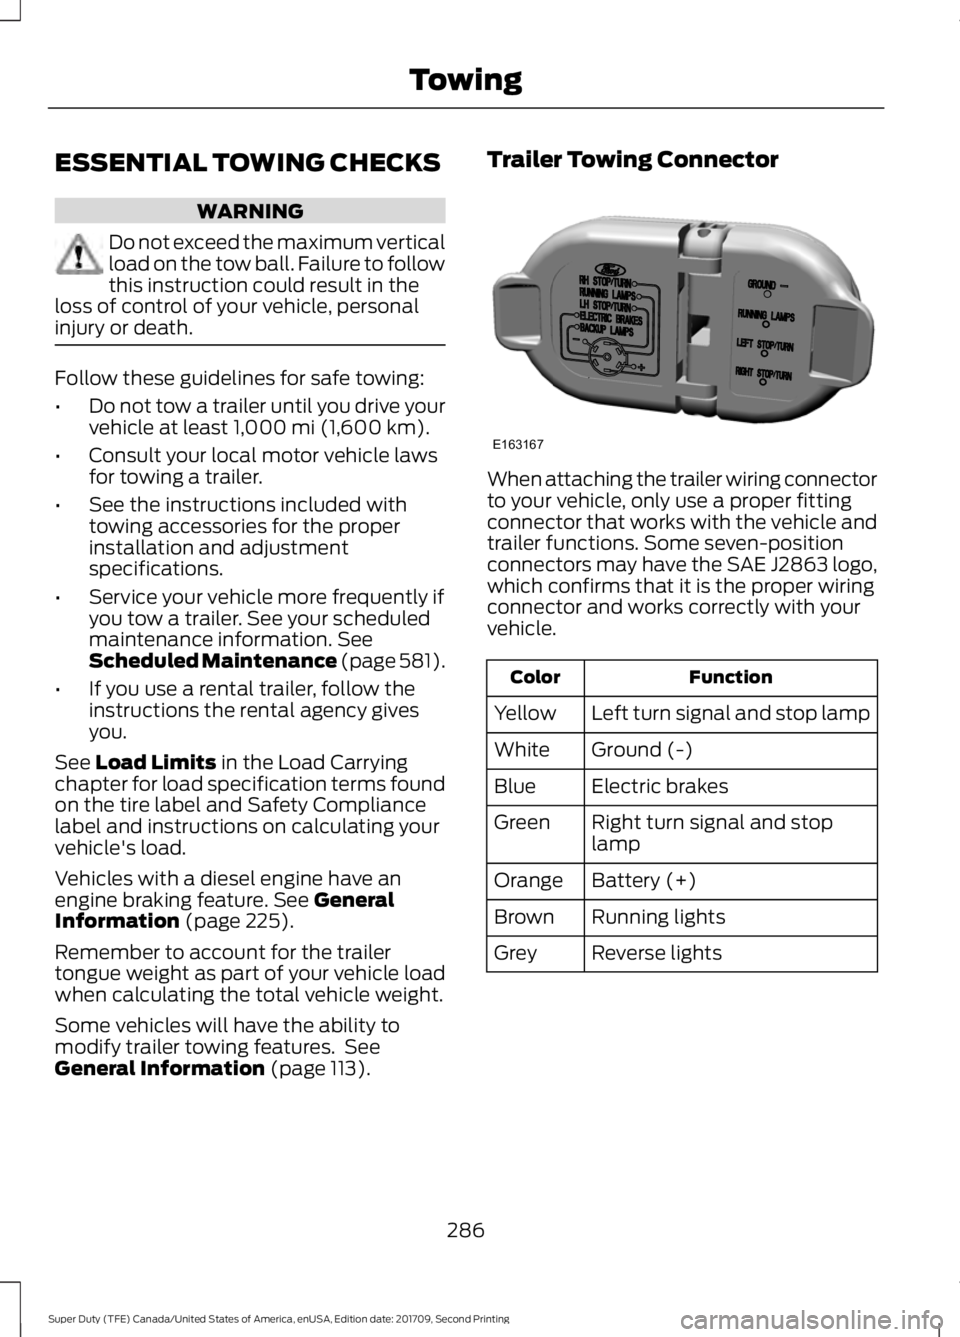
(page 113). Trailer Towing Connector
When attaching the trailer wiring connector
to your vehicle, only use a proper fitting
connector that works with the vehicle and
trailer functions. Some seven-position
connectors may have the SAE J2863 logo,
which confirms that it is the proper wiring
connector and works correctly with your
vehicle.
Function
Color
Left turn signal and stop lamp
Yellow
Ground (-)
White
Electric brakes
Blue
Right turn signal and stop
lamp
Green
Battery (+)
Orange
Running lights
Brown
Reverse lights
Grey
286
Super Duty (TFE) Canada/United States of America, enUSA, Edition date: 201709, Second Printing TowingE163167
Page 296 of 660
If the message only displays with a trailer
connected, the problem is with the trailer
wiring. Consult your trailer dealer for
assistance. This can be a short to ground
(such as a chaffed wire), short to voltage
(such as a pulled pin on trailer emergency
breakaway battery) or the trailer brakes
may be drawing too much current.
Points to Remember
Note:
Do not attempt removal of the trailer
brake controller without consulting the
Workshop Manual. Damage to the unit may
result.
• Adjust gain setting before using the
trailer brake controller.
• Adjust gain setting, using the procedure
above, whenever road, weather, trailer
or vehicle loading conditions change
from when the gain was initially set.
• Only use the manual control lever for
proper adjustment of the gain during
trailer setup. Misuse, such as
application during trailer sway, could
cause instability of trailer or tow
vehicle.
• Avoid towing in adverse weather
conditions. The trailer brake controller
does not provide anti-lock control of
the trailer wheels. Trailer wheels can
lock up on slippery surfaces, resulting
in reduced stability of trailer and tow
vehicle.
• The trailer brake controller is equipped
with a feature that reduces output at
vehicle speeds below 11 mph (18 km/h)
so trailer and vehicle braking is not jerky
or harsh. This feature is only active
when applying the brakes using your
vehicle's brake pedal, not the
controller. •
The controller interacts with the brake
control system and powertrain control
system of your vehicle to provide the
best performance on different road
conditions.
• Your vehicle's brake system and the
trailer brake system work
independently of each other. Changing
the gain setting on the controller does
not affect the operation of your
vehicle's brakes.
• When you switch the engine off, the
controller output is disabled and the
display and module shut down.
Trailer Lamps WARNING
Never connect any trailer lamp wiring
to the vehicle's tail lamp wiring; this
may damage the electrical system
resulting in fire. Contact your authorized
dealer as soon as possible for assistance
in proper trailer tow wiring installation.
Additional electrical equipment may be
required. Trailer lamps are required on most towed
vehicles. Make sure all running lights, brake
lights, turn signals and hazard lights are
working.
Before Towing a Trailer
Practice turning, stopping and backing up
to get the feel of your vehicle-trailer
combination before starting on a trip.
When turning, make wider turns so the
trailer wheels clear curbs and other
obstacles.
293
Super Duty (TFE) Canada/United States of America, enUSA, Edition date: 201709, Second Printing Towing
Page 458 of 660
When HD Radio broadcasts are active, you
can access the following functions:
•
Scan allows you to hear a brief
sampling of all available stations. This
feature still works when HD Radio
reception is on, although it does not
scan for HD2-HD7 channels. You may
see the HD logo appear if the station
has a digital broadcast. •
Memory presets
allow you to save an
active channel as a memory preset.
Touch and hold a memory preset slot
until the sound returns. There is a brief
mute while the radio saves the station.
Sound returns when finished. When
switching to an HD2 or HD3 memory
preset, the sound mutes before the
digital audio plays, because the system
has to reacquire the digital signal.
Note: As with any saved radio station, you
cannot access a station you save if your
vehicle is outside the station ’s reception
area.
HD Radio Reception and Station Troubleshooting Potential Reception Issues
If you are listening to a multicast station and you are on
the fringe of the reception area, the station may mute due
to weak signal strength.
Reception area
If you are listening to HD1, the system switches back to
the analog broadcast until the digital broadcast is available
again. However, if you are listening to any of the possible
HD2-HD7 multicast channels, the station mutes and stays
muted unless it is able to connect to the digital signal
again.
When the system first receives a station (aside from HD2-
HD7 multicast stations), it first plays the station in the
analog version. Once the receiver verifies the station is an
HD Radio station, it shifts to the digital version. Depending
on the station quality, you may hear a slight sound change
when the station changes from analog to digital. Blending
is the shift from analog to digital sound or digital back to
analog sound.
Station blending
In order to provide the best possible
experience, use the contact form to report
any station issues found while listening to
a station broadcasting with HD Radio
technology. Independent entities own and
operate each station. These stations are
responsible for ensuring all audio streams
and data fields are accurate. 455
Super Duty (TFE) Canada/United States of America, enUSA, Edition date: 201709, Second Printing Audio System
Page 461 of 660
Troubleshooting
Action
Condition
Message
No action required. This
message should disappear
shortly.
Radio requires more than
two seconds to produce
audio for the selected
channel.
Acquiring\b
If this message does not
clear shortly, or with an igni-
tion key cycle, your receiver
may have a fault. See an
authorized dealer for service.
There is an internal module
or system failure present.
Satellite antenna fault
SIRIUS system failure
Tune to another channel or
choose another preset.
The channel is no longer
available.
Invalid Channel
Contact SiriusXM at 1-888-
539-7474 to subscribe to
the channel, or tune to
another channel.
Your subscription does not
include this channel.
Unsubscribed Channel
The signal is blocked. When
you move into an open area,
the signal should return.
The signal is lost from the
SiriusXM satellite or Siri-
usXM tower to your vehicle
antenna.
No Signal
No action required. The
process may take up to
three minutes.
Update of channel
programming in progress.
Updating\b
Contact SiriusXM at 1-888-
539-7474 to resolve
subscription issues.
Your satellite service is no
longer available.
Questions? Call
1-888-539-7474
Use the channel guide to
turn off the Lock or Skip
function on that station.
All the channels in the
selected category are either
skipped or locked.
None found
Check Channel Guide
No action required.
SiriusXM has updated the
channels available for your
vehicle.
Subscription Updated
458
Super Duty (TFE) Canada/United States of America, enUSA, Edition date: 201709, Second Printing Audio System
Page 475 of 660
Sending a Text Message
Note:
You can only send a text message to
one recipient at a time.
1. Select the send option when the desired selection highlights in the audio
display.
2. Select the confirmation option when the contact appears.
3. Press the OK button again to confirm when the system asks if you want to
send the message. A pre-defined
signature appears on each text
message. Note:
You can send text messages either
by choosing a contact from the phonebook
and selecting the text option from the audio
display or by replying to a received message
in the inbox.
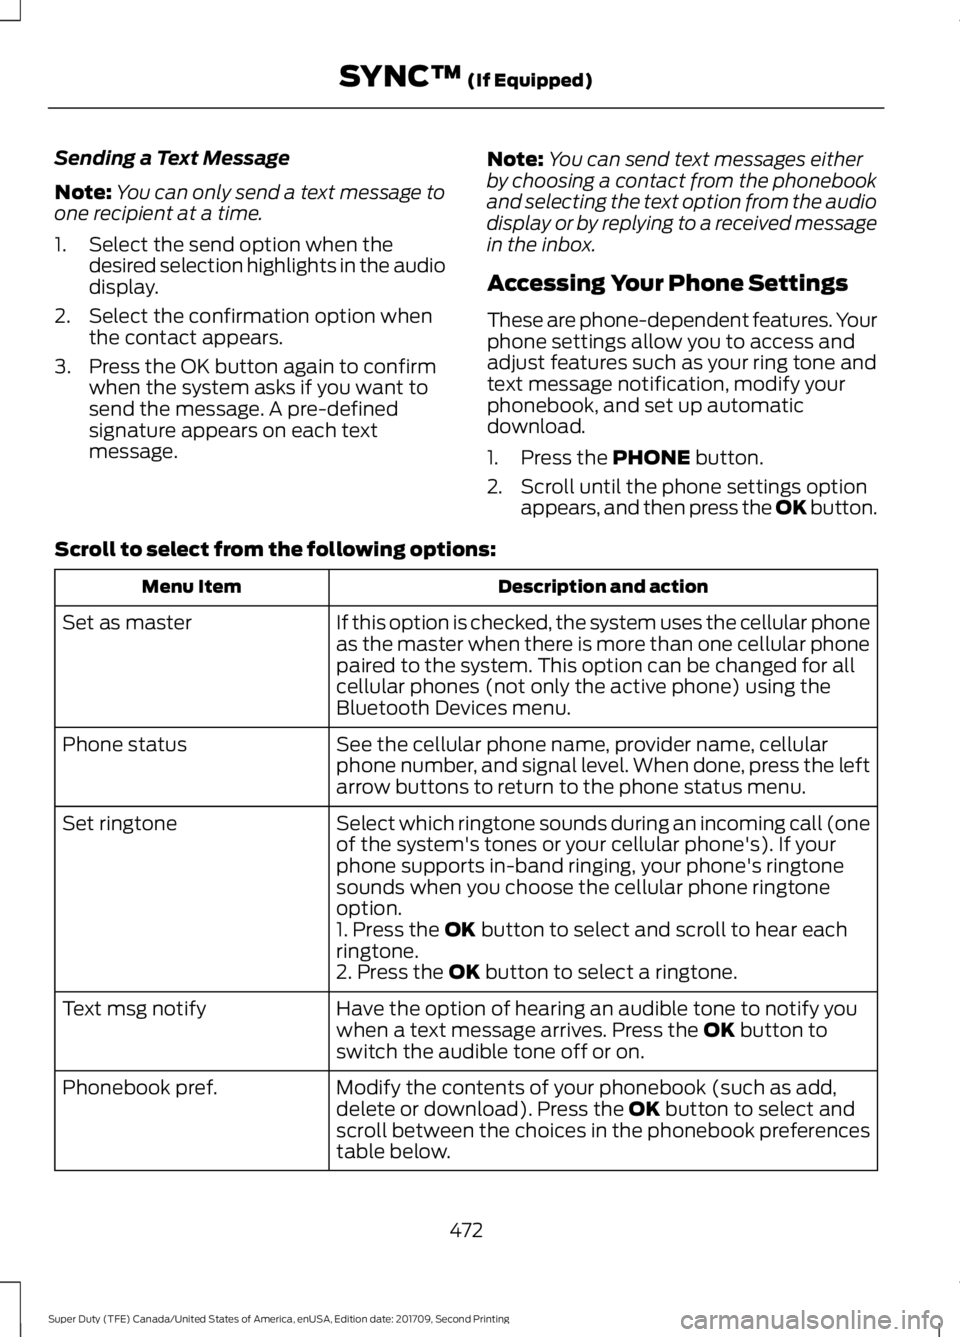
Accessing Your Phone Settings
These are phone-dependent features. Your
phone settings allow you to access and
adjust features such as your ring tone and
text message notification, modify your
phonebook, and set up automatic
download.
1. Press the PHONE button.
2. Scroll until the phone settings option appears, and then press the OK button.
Scroll to select from the following options: Description and action
Menu Item
If this option is checked, the system uses the cellular phone
as the master when there is more than one cellular phone
paired to the system. This option can be changed for all
cellular phones (not only the active phone) using the
Bluetooth Devices menu.
Set as master
See the cellular phone name, provider name, cellular
phone number, and signal level. When done, press the left
arrow buttons to return to the phone status menu.
Phone status
Select which ringtone sounds during an incoming call (one
of the system's tones or your cellular phone's). If your
phone supports in-band ringing, your phone's ringtone
sounds when you choose the cellular phone ringtone
option.
Set ringtone
1. Press the
OK button to select and scroll to hear each
ringtone.
2. Press the
OK button to select a ringtone.
Have the option of hearing an audible tone to notify you
when a text message arrives. Press the
OK button to
switch the audible tone off or on.
Text msg notify
Modify the contents of your phonebook (such as add,
delete or download). Press the
OK button to select and
scroll between the choices in the phonebook preferences
table below.
Phonebook pref.
472
Super Duty (TFE) Canada/United States of America, enUSA, Edition date: 201709, Second Printing SYNC™
(If Equipped)
Page 513 of 660
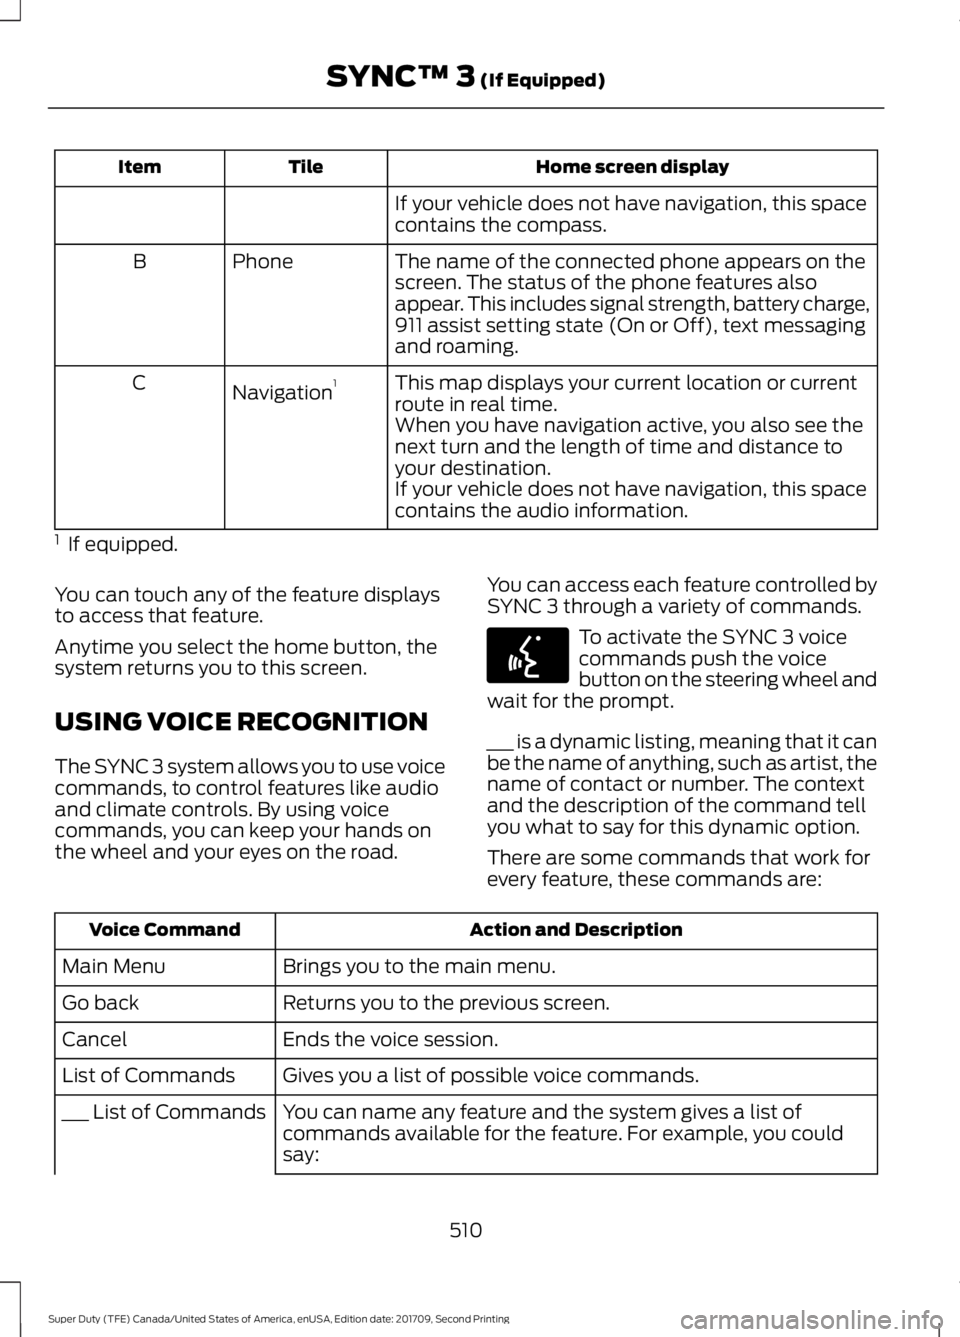
Home screen display
Tile
Item
If your vehicle does not have navigation, this space
contains the compass.
The name of the connected phone appears on the
screen. The status of the phone features also
appear. This includes signal strength, battery charge,
911 assist setting state (On or Off), text messaging
and roaming.
Phone
B
This map displays your current location or current
route in real time.
Navigation 1
C
When you have navigation active, you also see the
next turn and the length of time and distance to
your destination.
If your vehicle does not have navigation, this space
contains the audio information.
1 If equipped.
You can touch any of the feature displays
to access that feature.
Anytime you select the home button, the
system returns you to this screen.
USING VOICE RECOGNITION
The SYNC 3 system allows you to use voice
commands, to control features like audio
and climate controls. By using voice
commands, you can keep your hands on
the wheel and your eyes on the road. You can access each feature controlled by
SYNC 3 through a variety of commands. To activate the SYNC 3 voice
commands push the voice
button on the steering wheel and
wait for the prompt.
___ is a dynamic listing, meaning that it can
be the name of anything, such as artist, the
name of contact or number. The context
and the description of the command tell
you what to say for this dynamic option.
There are some commands that work for
every feature, these commands are: Action and Description
Voice Command
Brings you to the main menu.
Main Menu
Returns you to the previous screen.
Go back
Ends the voice session.
Cancel
Gives you a list of possible voice commands.
List of Commands
You can name any feature and the system gives a list of
commands available for the feature. For example, you could
say:
___ List of Commands
510
Super Duty (TFE) Canada/United States of America, enUSA, Edition date: 201709, Second Printing SYNC™ 3 (If Equipped)E142599