cooling FORD F-450 2020 User Guide
[x] Cancel search | Manufacturer: FORD, Model Year: 2020, Model line: F-450, Model: FORD F-450 2020Pages: 631, PDF Size: 9.62 MB
Page 229 of 631
PRINCIPLE OF OPERATION
WARNING: Hill descent control
cannot control descent in all surface
conditions and circumstances, such as
ice or extremely steep grades. Hill
descent control is a driver assist system
and cannot substitute for good judgment
by the driver. Failure to do so may result
in loss of vehicle control, crash or serious
injury. WARNING:
The system does not
replace the parking brake. When you
leave your vehicle, always apply the
parking brake and shift the transmission
into park (P) for automatic transmission
or first gear for manual transmission.
Hill descent control allows the driver to set
and maintain vehicle speed while
descending steep grades in various surface
conditions.
Hill descent control can maintain vehicle
speeds on downhill grades between 2 mph
(3 km/h)
and 12 mph (20 km/h). Above
20 mph (32 km/h), the system remains
armed, but descent speed cannot be set
or maintained.
Hill descent control requires a cooling
down interval after a period of sustained
use. The amount of time that the feature
can remain active before cooling varies
with conditions. The system will provide
a warning in the message center and a
chime will sound when the system is about
to disengage for cooling. At this time,
manually apply the brakes as needed to
maintain descent speed. USING HILL DESCENT
CONTROL Press and release the hill
descent button on the
instrument panel. A light in the
cluster illuminates and a tone sounds
when this feature is activated.
To increase descent speed, press the
accelerator pedal until the desired speed
is reached. To decrease descent speed,
press the brake pedal until the desired
speed is reached.
Whether accelerating or decelerating, once
the desired descent speed is reached,
remove your feet from the pedals and the
chosen vehicle speed is maintained.
Note: Noise from the ABS pump motor may
be observed during hill descent control
operation. This is a normal characteristic of
the ABS and should be no reason for
concern.
Hill Descent Modes
• At speeds below
20 mph (32 km/h):
When the hill descent control switch is
pressed and hill descent control is
active, the hill descent control telltale
flashes.
• At speeds below
20 mph (32 km/h):
When the hill descent control switch is
pressed and conditions are not correct
for hill descent activation, the hill
descent control system is enabled and
the hill descent control telltale is solid.
A message displays in the information
display.
• At speeds above
20 mph (32 km/h):
When the hill descent control switch is
pressed, the hill descent control
system is enabled, the telltale in the
cluster is not illuminated and a
message is displayed in the information
display.
226
Super Duty (TFE), enUSA, Edition date: 201909, Third-Printing- Terrain Control
(If Equipped)E163957
Page 306 of 631
•
Your vehicle's brake system and the
trailer brake system work
independently of each other. Changing
the gain setting on the controller does
not affect the operation of your
vehicle's brakes.
• When you switch the engine off, the
controller output is disabled and the
display and module shut down.
Trailer Lamps WARNING: Never connect any
trailer lamp wiring to the vehicle's tail
lamp wiring; this may damage the
electrical system resulting in fire. Contact
your authorized dealer as soon as
possible for assistance in proper trailer
tow wiring installation. Additional
electrical equipment may be required.
Trailer lamps are required on most towed
vehicles. Make sure all running lights, brake
lights, turn signals and hazard lights are
working.
Before Towing a Trailer
Practice turning, stopping and backing up
to get the feel of your vehicle-trailer
combination before starting on a trip.
When turning, make wider turns so the
trailer wheels clear curbs and other
obstacles.
When Towing a Trailer
• Check your hitch, electrical connections
and trailer wheel lug nuts thoroughly
after you have traveled 50 mi (80 km).
• Do not drive faster than
70 mph
(113 km/h) during the first 500 mi
(800 km).
• Do not make full-throttle starts. •
When stopped in congested or heavy
traffic during hot weather, place the
gearshift in park (P) to aid engine and
transmission cooling and to help A/C
performance.
• Turn off the speed control with heavy
loads or in hilly terrain. The speed
control may turn off automatically
when you are towing on long, steep
grades.
• Shift to a lower gear when driving down
a long or steep hill. Do not apply the
brakes continuously, as they may
overheat and become less effective.
• If your transmission is equipped with a
Grade Assist or Tow/Haul feature, use
this feature when towing. This provides
engine braking and helps eliminate
excessive transmission shifting for
optimum fuel economy and
transmission cooling.
• If your vehicle is equipped with
Adaptive Steering and you have
enabled Tow/Haul, the Adaptive
Steering system adjusts the steering
response to match your vehicle ’s load.
The system reduces vehicle sensitivity
to steering inputs at higher vehicle
speeds while it maintains the ease of
parking and maneuverability at low
speeds.
• If your vehicle is equipped with
AdvanceTrac with RSC, this system
may turn on during typical cornering
maneuvers with a heavily loaded trailer.
This is normal. Turning the corner at a
slower speed while towing may reduce
this tendency.
• If you are towing a trailer frequently in
hot weather, hilly conditions, at the
gross combined weight rating (or any
combination of these factors), consider
refilling your rear axle with synthetic
gear lubricant (if the axle is not already
filled with it). See
Capacities and
Specifications (page 429).
303
Super Duty (TFE), enUSA, Edition date: 201909, Third-Printing- Towing
Page 312 of 631
•
When negotiating low speed obstacles,
applying light brake pressure in
conjunction with the throttle will help
prevent the vehicle from lurching and
will allow you to negotiate the obstacle
in a more controlled manner. Using 4L
also assists with this.
• Use and equip supplemental safety
equipment.
• Please consult your local off-road
group for other helpful tips.
• Off-roading requires a high degree of
concentration. Even if your local law
does not prohibit alcohol use while
driving off-road, Ford strongly
recommends against drinking alcohol
if you plan to off-road.
Crossing Obstacles
• Review the path ahead before
attempting to cross any obstacles. It is
best if the obstacles are reviewed from
outside the vehicle so that there is a
good understanding of the terrains
condition both in front of and behind
the obstacles.
• Approach obstacles slowly and slowly
creep the vehicle over.
• If a large obstacle such as a rock
cannot be avoided, choose a path that
places the rock directly under the tire
rather than the undercarriage of the
vehicle. This helps prevent damage to
the vehicle.
• Ditches and washouts should be
crossed at a 45 degree angle, allowing
each wheel to independently cross the
obstacle. Hill Climbing WARNING: Extreme care should
be used when steering the vehicle in
reverse down a slope so as not to cause
the vehicle to swerve out of control.
• Always attempt to climb a steep hill
along the fall line of the slope and not
diagonally.
• If the vehicle is unable to make it up
the hill, DO NOT attempt to turn back
down the slope. Place the vehicle in
low range and slowly back down in
reverse.
• When descending a steep slope, select
low gear and engage trail control. Use
the throttle and brake pedals to control
your descent speed as described earlier
in this section using trail control. Note
that trail control is functional in reverse
and should be used in this situation.
After Off-Road Driving
It is important to complete a full vehicle
inspection after off-road driving. Some
items to check include:
• Make sure that tires are inflated to
proper tire pressure as indicated on the
tire placard.
• Check the wheels and undercarriage
for built up mud or debris which can
cause vehicle vibration.
• Make sure that the grille and radiator
are clear of any obstructions that may
affect cooling.
• Make sure that the brakes are in proper
working order and free of any mud,
stones and debris, which can become
trapped around the brake rotor,
backing plate and caliper.
• Check that the air filter is clean and dry.
• Inspect for torn or punctured boots on
ball joints, half shafts, steering gears.
309
Super Duty (TFE), enUSA, Edition date: 201909, Third-Printing- Driving Hints
Page 315 of 631
•
The tire air pressures recommended
for general driving are on the vehicle ’s
Safety Certification Label. The
maximum cold inflation pressure for
the tire and associated load rating is
on the tire sidewall. Tire air pressure
may require re-adjustment within these
pressure limits to accommodate the
additional weight of the snowplow
installation.
• Federal and some local regulations
require additional exterior lamps for
snowplow-equipped vehicles. Consult
your authorized dealer for additional
information.
Operating the Vehicle with the
Snowplow Attached
Note: Do not use your vehicle for snow
removal until you have driven at least
500 mi (800 km).
Ford recommends vehicle speed does not
exceed
45 mph (72 km/h) when
snowplowing.
If transporting a snowplow in summertime,
cooling system airflow may be blocked by
the snowplow. Change the snowplow
height or position to improve airflow to the
radiator or limit your vehicle speed to a
maximum of
45 mph (72 km/h).
The attached snowplow blade restricts
airflow to the radiator, and may cause the
engine to run at a higher temperature:
Attention to engine temperature is
especially important when outside
temperatures are above freezing. Angle
the blade to maximize airflow to the
radiator and monitor engine temperature
to determine whether a left or right angle
provides the best performance.
Follow the severe duty schedule in your
Scheduled Maintenance information for
engine oil and transmission fluid change
intervals. Snowplowing with your Airbag
Equipped Vehicle WARNING:
Do not attempt to
service, repair, or modify the
supplementary restraint system or
associated components. Failure to
follow this instruction could result in
personal injury or death. WARNING:
All occupants of your
vehicle, including the driver, should
always properly wear their seatbelts,
even when an airbag supplemental
restraint system is provided. Failure to
properly wear your seatbelt could
seriously increase the risk of injury or
death. WARNING:
Modifying or adding
equipment to the front end of your
vehicle (including hood, bumper system,
frame, front end body structure, tow
hooks and hood pins) may affect the
performance of the airbag system,
increasing the risk of injury. Do not
modify or add equipment to the front
end of your vehicle.
Note: Please refer to the Body Builders
Layout Book for instructions about the
appropriate installation of additional
equipment.
Your vehicle is equipped with a driver and
passenger airbag supplemental restraint
system. The supplemental restraint system
will activate in certain frontal and offset
frontal collisions when the vehicle sustains
sufficient frontal deceleration.
Careless or high speed driving while
plowing snow that results in sufficient
vehicle decelerations can deploy the
airbags. Such driving also increases the risk
of accidents.
312
Super Duty (TFE), enUSA, Edition date: 201909, Third-Printing- Driving Hints
Page 334 of 631
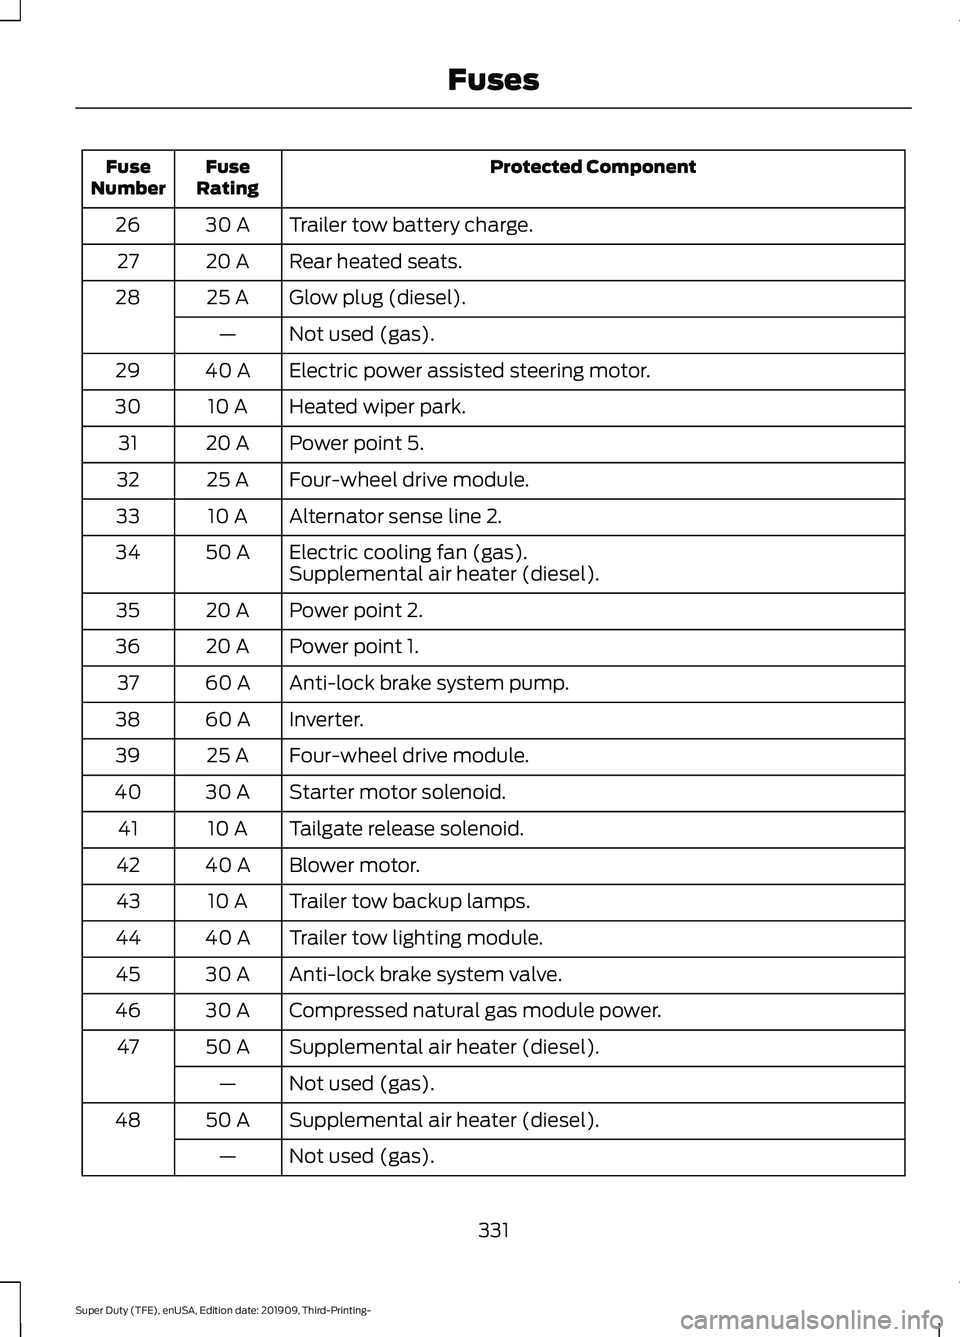
Protected Component
Fuse
Rating
Fuse
Number
Trailer tow battery charge.
30 A
26
Rear heated seats.
20 A
27
Glow plug (diesel).
25 A
28
Not used (gas).
—
Electric power assisted steering motor.
40 A
29
Heated wiper park.
10 A
30
Power point 5.
20 A
31
Four-wheel drive module.
25 A
32
Alternator sense line 2.
10 A
33
Electric cooling fan (gas).
50 A
34
Supplemental air heater (diesel).
Power point 2.
20 A
35
Power point 1.
20 A
36
Anti-lock brake system pump.
60 A
37
Inverter.
60 A
38
Four-wheel drive module.
25 A
39
Starter motor solenoid.
30 A
40
Tailgate release solenoid.
10 A
41
Blower motor.
40 A
42
Trailer tow backup lamps.
10 A
43
Trailer tow lighting module.
40 A
44
Anti-lock brake system valve.
30 A
45
Compressed natural gas module power.
30 A
46
Supplemental air heater (diesel).
50 A
47
Not used (gas).
—
Supplemental air heater (diesel).
50 A
48
Not used (gas).
—
331
Super Duty (TFE), enUSA, Edition date: 201909, Third-Printing- Fuses
Page 343 of 631
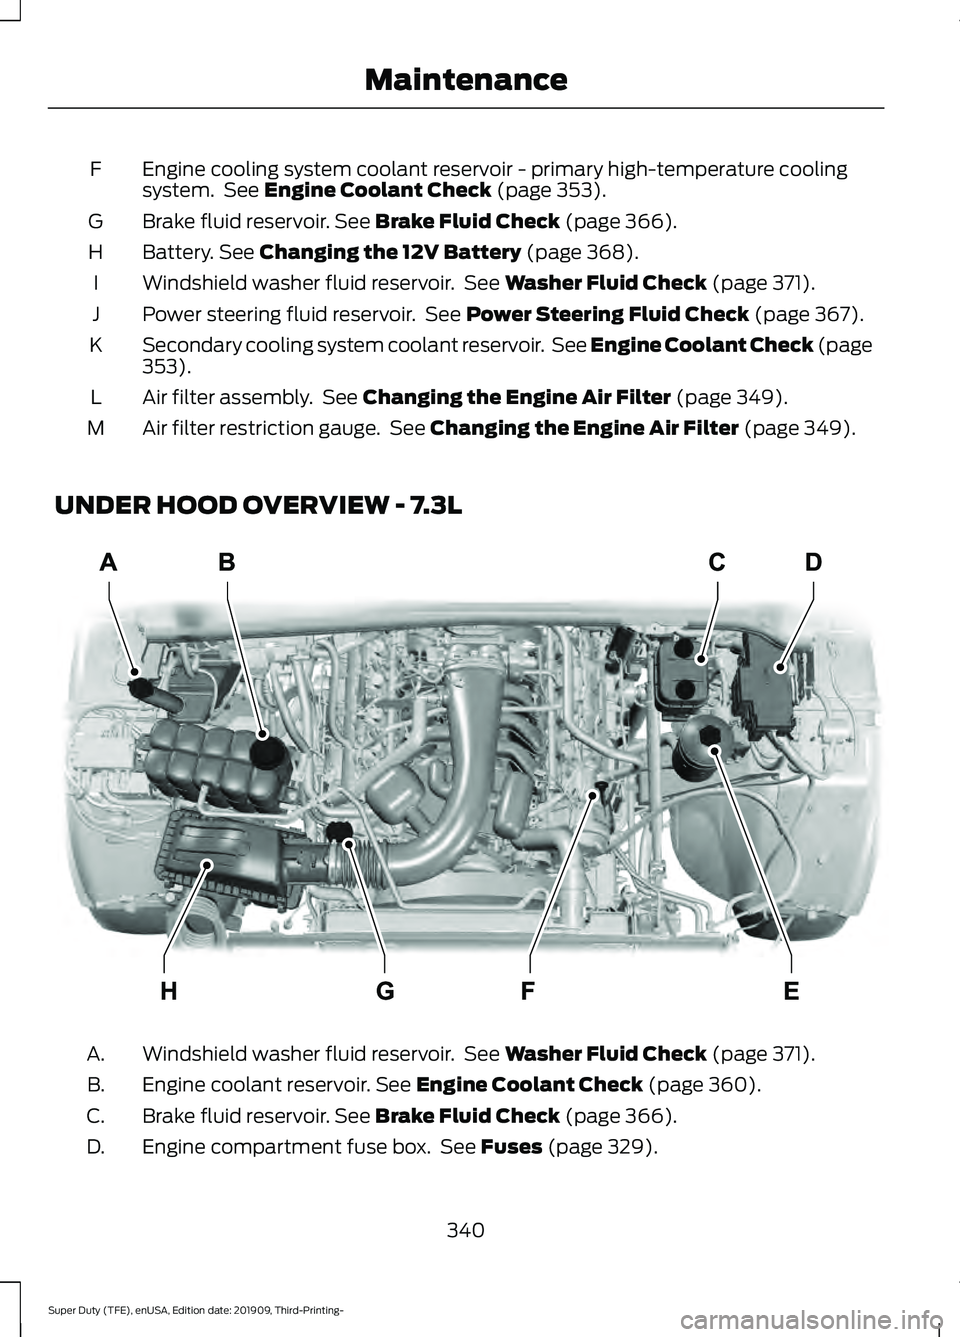
Engine cooling system coolant reservoir - primary high-temperature cooling
system. See Engine Coolant Check (page 353).
F
Brake fluid reservoir.
See Brake Fluid Check (page 366).
G
Battery.
See Changing the 12V Battery (page 368).
H
Windshield washer fluid reservoir. See
Washer Fluid Check (page 371).
I
Power steering fluid reservoir. See
Power Steering Fluid Check (page 367).
J
Secondary cooling system coolant reservoir. See Engine Coolant Check
(page
353).
K
Air filter assembly. See
Changing the Engine Air Filter (page 349).
L
Air filter restriction gauge. See
Changing the Engine Air Filter (page 349).
M
UNDER HOOD OVERVIEW - 7.3L Windshield washer fluid reservoir. See
Washer Fluid Check (page 371).
A.
Engine coolant reservoir.
See Engine Coolant Check (page 360).
B.
Brake fluid reservoir.
See Brake Fluid Check (page 366).
C.
Engine compartment fuse box. See
Fuses (page 329).
D.
340
Super Duty (TFE), enUSA, Edition date: 201909, Third-Printing- MaintenanceE314803
Page 356 of 631
ENGINE COOLANT CHECK -
6.2L
WARNING: Do not remove the
coolant reservoir cap when the engine is
on or the cooling system is hot. Wait 10
minutes for the cooling system to cool
down. Cover the coolant reservoir cap
with a thick cloth to prevent the
possibility of scalding and slowly remove
the cap. Failure to follow this instruction
could result in personal injury. WARNING:
Do not put coolant in
the windshield washer reservoir. If
sprayed on the windshield, coolant could
make it difficult to see through the
windshield. WARNING:
To reduce the risk of
personal injury, make sure the engine is
cool before unscrewing the coolant
pressure relief cap. The cooling system
is under pressure. Steam and hot liquid
can come out forcefully when you loosen
the cap slightly. WARNING:
Do not add coolant
further than the MAX mark.
When the engine is cold, check the
concentration and level of the coolant at
the intervals listed in the scheduled
maintenance information. See Scheduled
Maintenance
(page 553).
Note: Make sure that the coolant level is
between the
MIN and the MAX marks on
the coolant reservoir.
Note: Coolant expands when it is hot. The
level may extend beyond the
MAX mark. Maintain coolant concentration within
48% to 50%, which equates to a freeze
point between -30°F (-34°C) and -34°F
(-37°C). Coolant concentration should be
checked using a refractometer. We
recommend Robinair® Coolant and
Battery Refractometer 75240 (Rotunda
tool part number: ROB75240). We do not
recommend the use of hydrometers or
coolant test strips for measuring coolant
concentration.
Note:
Automotive fluids are not
interchangeable. Do not use coolant or
windshield washer fluid outside of its
specified function and vehicle location.
Note: Do not use stop leak pellets, cooling
system sealants, or additives as they can
cause damage to the engine cooling or
heating systems. Resulting component
damage may not be covered by the vehicle
Warranty.
Adding Coolant WARNING:
Do not remove the
coolant reservoir cap when the engine is
on or the cooling system is hot. Wait 10
minutes for the cooling system to cool
down. Cover the coolant reservoir cap
with a thick cloth to prevent the
possibility of scalding and slowly remove
the cap. Failure to follow this instruction
could result in personal injury.
It is very important to use prediluted
coolant meeting the correct specification
in order to avoid plugging the small
passageways in the engine cooling system.
See
Capacities and Specifications
(page 437). Incorrect prediluted coolant
use can cause damage not covered by the
vehicle Warranty.
If the coolant level is at or below the
minimum mark, add prediluted coolant
immediately.
353
Super Duty (TFE), enUSA, Edition date: 201909, Third-Printing- Maintenance
Page 357 of 631
To top up the coolant level do the
following:
1. Unscrew the cap slowly. Any pressure
escapes as you unscrew the cap.
2. Add prediluted coolant meeting the correct specification. See Scheduled
Maintenance (page 553).
3. Add enough prediluted coolant to reach the correct level.
4. Replace the coolant reservoir cap. Turn
the cap clockwise until it contacts the
hard stop.
5. Check the coolant level in the coolant reservoir the next few times you drive
your vehicle.
Do not mix different colors or types of
prediluted coolant in your vehicle. Mixing
of prediluted coolant or using an incorrect
prediluted coolant may harm the engine
or cooling system components and may
not be covered by the vehicle Warranty.
If you have to add more than
1.1 qt (1 L) of
engine coolant per month, have your
vehicle checked as soon as possible.
Operating an engine with a low level of
coolant can result in engine overheating
and possible engine damage.
In case of emergency, you can add a large
amount of water without prediluted
coolant in order to reach a vehicle service
location. On arrival do the following:
1. Drain the cooling system.
2. Chemically clean the cooling system. We recommend Motorcraft Premium
Cooling System Flush.
3. Refill with prediluted coolant as soon as possible.
Water alone, without prediluted coolant,
can cause engine damage from corrosion,
overheating or freezing. Do not use the following as a coolant
substitute:
•
Alcohol.
• Methanol.
• Brine.
• Any coolant mixed with alcohol or
methanol antifreeze.
Alcohol and other liquids can cause engine
damage from overheating or freezing.
Do not add extra inhibitors or additives to
the coolant. These can be harmful and
compromise the corrosion protection of
the coolant.
Recycled Coolant
We do not recommend the use of recycled
coolant as an approved recycling process
is not yet available.
Dispose of used engine coolant in an
appropriate manner. Follow your
community ’s regulations and standards
for recycling and disposing of automotive
fluids.
Severe Climates
If you drive in extremely cold climates:
• It may be necessary to increase the
coolant concentration above 50%.
• A coolant concentration of 60%
provides improved freeze point
protection. Coolant concentrations
above 60% decrease the overheat
protection characteristics of the
coolant and may cause engine
damage.
354
Super Duty (TFE), enUSA, Edition date: 201909, Third-Printing- Maintenance
Page 358 of 631
If you drive in extremely hot climates:
•
It may be necessary to decrease the
coolant concentration to 40%.
• A coolant concentration of 40%
provides improved overheat
protection. Coolant concentrations
below 40% decrease the freeze and
corrosion protection characteristics of
the coolant and may cause engine
damage.
Vehicles driven year-round in non-extreme
climates should use prediluted coolant for
optimum cooling system and engine
protection.
Fail-Safe Cooling
Fail-safe cooling allows you to temporarily
drive your vehicle before any incremental
component damage occurs. The fail-safe
distance depends on ambient
temperature, vehicle load and terrain.
How Fail-Safe Cooling Works
If the engine begins to overheat, the
coolant temperature gauge moves toward
the red zone: A warning lamp illuminates and
a message may appear in the
information display.
If the engine reaches a preset
over-temperature condition, the engine
automatically switches to alternating
cylinder operation. Each disabled cylinder
acts as an air pump and cools the engine.
When this occurs, your vehicle still
operates, however:
• Engine power is limited.
• The air conditioning system turns off. Continued operation increases the engine
temperature, causing the engine to
completely shut down. Your steering and
braking effort increases in this situation.
When the engine temperature cools, you
can re-start the engine. Have your vehicle
checked as soon as possible to minimize
engine damage.
When Fail-Safe Mode Is Activated
WARNING: Fail-safe mode is for
use during emergencies only. Operate
your vehicle in fail-safe mode only as
long as necessary to bring your vehicle
to rest in a safe location and seek
immediate repairs. When in fail-safe
mode, your vehicle will have limited
power, will not be able to maintain
high-speed operation, and may
completely shut down without warning,
potentially losing engine power, power
steering assist, and power brake assist,
which may increase the possibility of a
crash resulting in serious injury. WARNING:
Do not remove the
coolant reservoir cap when the engine is
on or the cooling system is hot. Wait 10
minutes for the cooling system to cool
down. Cover the coolant reservoir cap
with a thick cloth to prevent the
possibility of scalding and slowly remove
the cap. Failure to follow this instruction
could result in personal injury.
Your vehicle has limited engine power
when in the fail-safe mode, drive your
vehicle with caution. Your vehicle does not
maintain high-speed operation and the
engine may operate poorly.
Remember that the engine is capable of
automatically shutting down to prevent
engine damage. In this situation:
1. Pull off the road as soon as safely possible and switch the engine off.
355
Super Duty (TFE), enUSA, Edition date: 201909, Third-Printing- Maintenance
Page 360 of 631
ENGINE COOLANT CHECK -
6.7L DIESEL
WARNING: Do not remove the
coolant reservoir cap when the engine is
on or the cooling system is hot. Wait 10
minutes for the cooling system to cool
down. Cover the coolant reservoir cap
with a thick cloth to prevent the
possibility of scalding and slowly remove
the cap. Failure to follow this instruction
could result in personal injury. WARNING:
Do not put coolant in
the windshield washer reservoir. If
sprayed on the windshield, coolant could
make it difficult to see through the
windshield. WARNING:
To reduce the risk of
personal injury, make sure the engine is
cool before unscrewing the coolant
pressure relief cap. The cooling system
is under pressure. Steam and hot liquid
can come out forcefully when you loosen
the cap slightly. WARNING:
Do not add coolant
further than the MAX mark.
When the engine is cold, check the
concentration and level of the coolant at
the intervals listed in the scheduled
maintenance information. See Scheduled
Maintenance
(page 553).
Note: Make sure that the coolant level is
between the
MIN and MAX marks on the
coolant reservoir.
Note: Coolant expands when it is hot. The
level may extend beyond the
MAX mark. Maintain coolant concentration within
48% to 50%, which equates to a freeze
point between -30°F (-34°C) and -34°F
(-37°C). Check the coolant concentration
using a refractometer. We do not
recommend the use of hydrometers or
coolant test strips for measuring coolant
concentration.
Adding Coolant
WARNING:
Do not add engine
coolant when the engine is on or the
cooling system is hot. Failure to follow
this instruction could result in personal
injury. WARNING:
Do not remove the
coolant reservoir cap when the engine is
on or the cooling system is hot. Wait 10
minutes for the cooling system to cool
down. Cover the coolant reservoir cap
with a thick cloth to prevent the
possibility of scalding and slowly remove
the cap. Failure to follow this instruction
could result in personal injury.
Note: Automotive fluids are not
interchangeable. Do not use coolant or
windshield washer fluid outside of its
specified function and vehicle location.
Note: Do not use stop leak pellets, cooling
system sealants, or additives as they can
cause damage to the engine cooling or
heating systems. Resulting component
damage may not be covered by the vehicle
Warranty.
357
Super Duty (TFE), enUSA, Edition date: 201909, Third-Printing- Maintenance