warning light FORD F-450 2020 User Guide
[x] Cancel search | Manufacturer: FORD, Model Year: 2020, Model line: F-450, Model: FORD F-450 2020Pages: 631, PDF Size: 9.62 MB
Page 51 of 631
Transport Canada Deactivation Criteria
(Canada Only)
WARNING: This vehicle has special
energy management seatbelts for the
driver and right front passenger. These
particular seatbelts are specifically
designed to work with airbags to help
reduce the risk of injury in a crash. The
energy management seatbelt gives or
releases additional seatbelt webbing in
some accidents to reduce the
concentration of force on an occupant's
chest and to reduce the risk of certain
bone fractures and injuries to underlying
organs. In a crash, if the airbag is off, this
energy management seatbelt might
permit the passenger wearing the
seatbelt to move forward enough to
have a serious or fatal injury. The more
severe the crash, and the heavier the
occupant, the greater the risk. Make sure
the airbag is on for any passenger who
does not qualify under the Transport
Canada deactivation criteria.
1. Infant: An infant (less than 1 year old)
must ride in the front seat because:
• My vehicle has no rear seat;
• The rear seat in my vehicle cannot
accommodate a rear-facing infant
seat;
• The infant has a medical condition
which, according to the infant's
physician, makes it necessary for the
infant to ride in the front seat so that
the driver can monitor the infant's
condition.
2. Child age 12 or under: A child age 12 or
under must ride in the front seat because: •
My vehicle has no rear seat;
• Although children age 12 and under ride
in the rear seat whenever possible,
children age 12 and under have no
option but to sometimes ride in the
front seat because rear seat space is
insufficient;
• The child has a medical condition that,
according to the child's physician,
makes it necessary for the child to ride
in the front seat so that the driver can
monitor the child's condition.
3. Medical condition:
A passenger has a
medical condition that, according to his or
her physician:
• Poses a special risk for the passenger
if the airbag deploys; and
• Makes the potential harm from the
passenger airbag deployment greater
than the potential harm from turning
off the airbag and experiencing a crash
without the protection offered by the
airbag
Proper Driver and Front Passenger
Seating Adjustment WARNING:
National Highway
Traffic Safety Administration (NHTSA)
recommends a minimum distance of at
least
10 in (25 cm) between an
occupant's chest and the driver airbag
module.
To properly position yourself away from
the airbag:
• Move your seat to the rear as far as you
can while still reaching the pedals
comfortably.
• Recline the seat slightly (one or two
degrees) from the upright position.
48
Super Duty (TFE), enUSA, Edition date: 201909, Third-Printing- Supplementary Restraints System
Page 55 of 631
The restraints control module also
monitors the readiness of the above safety
devices plus the crash and occupant
sensors. The readiness of the safety
system is indicated by a warning indicator
light in the instrument cluster or by a
backup tone if the warning light is not
working. Routine maintenance of the
airbag is not required.
A difficulty with the system is indicated by
one or more of the following:
The readiness light will not
illuminate immediately after you
switch the ignition on.
• The readiness light either flashes or
stays lit.
• You hear a series of five beeps. The
tone pattern repeats periodically until
the problem, the light or both are
repaired.
If any of these things happen, even
intermittently, have the supplemental
restraint system serviced at an authorized
dealer immediately. Unless serviced, the
system may not function properly in the
event of a crash.
The fact that the seatbelt pretensioners
or front airbags did not activate for both
front seat occupants in a crash does not
mean that something is wrong with the
system. Rather, it means the restraints
control module determined the accident
conditions (crash severity, belt usage)
were not appropriate to activate these
safety devices.
• The design of the front airbags is to
activate only in frontal and near-frontal
crashes (not rollovers, side impacts or
rear impacts unless the crash causes
sufficient frontal deceleration).
• The design of the seatbelt
pretensioners is to activate in frontal,
near-frontal and side crashes, and in
rollovers. •
The design of the side airbags is to
inflate in certain side impact crashes.
Side airbags may activate in other
types of crashes if the vehicle
experiences sufficient sideways motion
or deformation.
• The design of the Safety Canopy is to
inflate in certain side impact crashes
or rollover events. The Safety Canopy
may activate in other types of crashes
if the vehicle experiences sufficient
sideways motion or deformation, or a
certain likelihood of rollover.
AIRBAG DISPOSAL
Contact your authorized dealer as soon as
possible. Airbags must be disposed of by
qualified personnel.
52
Super Duty (TFE), enUSA, Edition date: 201909, Third-Printing- Supplementary Restraints SystemE67017
Page 74 of 631
REMOVING THE TAILGATE
WARNING: Always properly secure
cargo to prevent shifting cargo or cargo
falling from the vehicle. Failure to do so
could result in compromised vehicle
stability and serious personal injury to
vehicle occupants or others.
You can remove the tailgate for more
loading room.
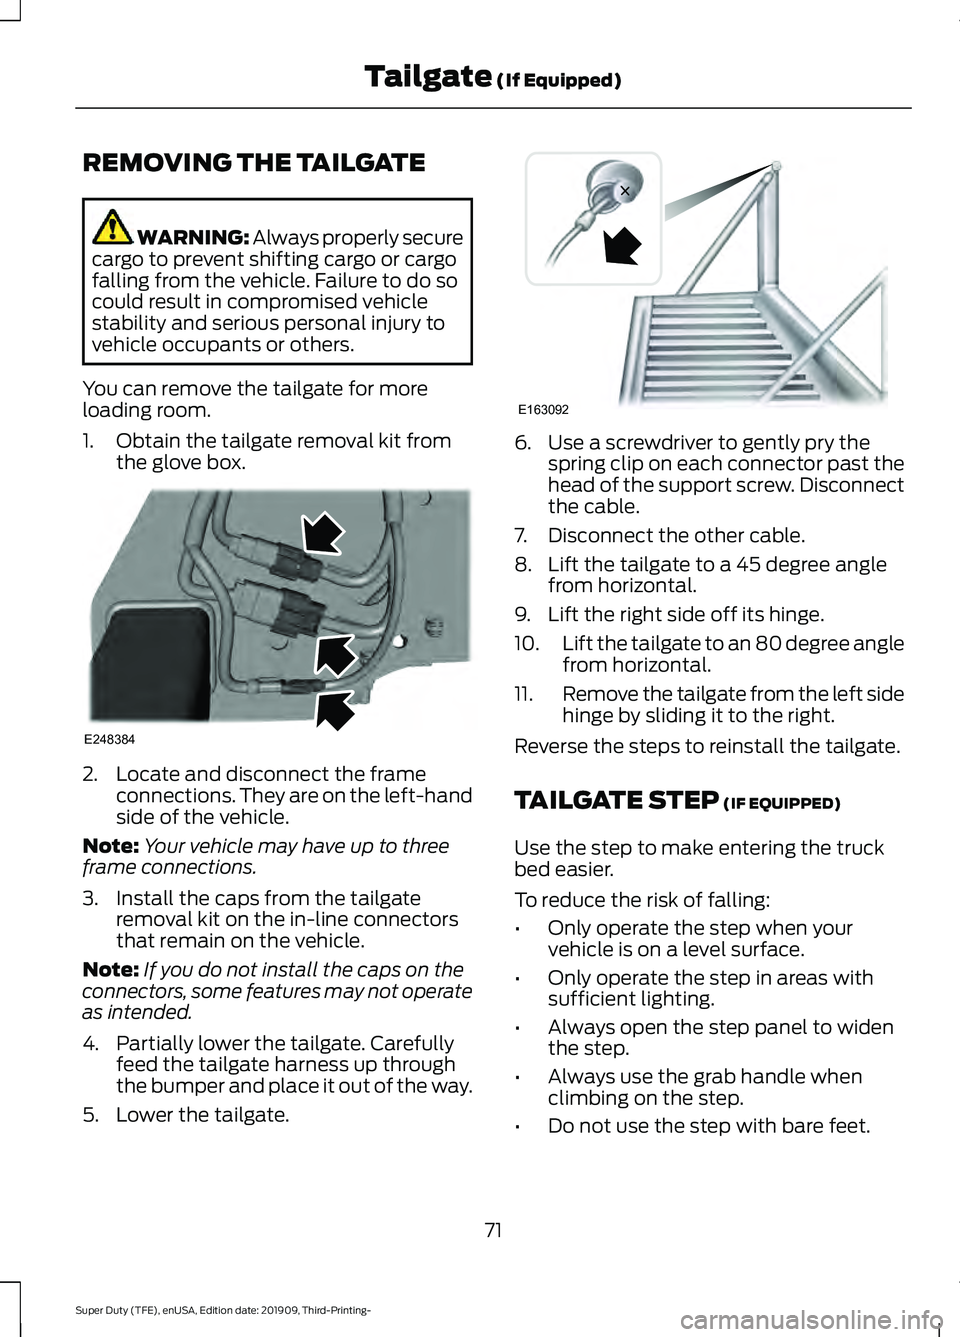
1. Obtain the tailgate removal kit from the glove box. 2. Locate and disconnect the frame
connections. They are on the left-hand
side of the vehicle.
Note: Your vehicle may have up to three
frame connections.
3. Install the caps from the tailgate removal kit on the in-line connectors
that remain on the vehicle.
Note: If you do not install the caps on the
connectors, some features may not operate
as intended.
4. Partially lower the tailgate. Carefully feed the tailgate harness up through
the bumper and place it out of the way.
5. Lower the tailgate. 6. Use a screwdriver to gently pry the
spring clip on each connector past the
head of the support screw. Disconnect
the cable.
7. Disconnect the other cable.
8. Lift the tailgate to a 45 degree angle from horizontal.
9. Lift the right side off its hinge.
10. Lift the tailgate to an 80 degree angle
from horizontal.
11. Remove the tailgate from the left side
hinge by sliding it to the right.
Reverse the steps to reinstall the tailgate.
TAILGATE STEP (IF EQUIPPED)
Use the step to make entering the truck
bed easier.
To reduce the risk of falling:
• Only operate the step when your
vehicle is on a level surface.
• Only operate the step in areas with
sufficient lighting.
• Always open the step panel to widen
the step.
• Always use the grab handle when
climbing on the step.
• Do not use the step with bare feet.
71
Super Duty (TFE), enUSA, Edition date: 201909, Third-Printing- Tailgate
(If Equipped)E248384 E163092
Page 90 of 631
Flashing the Headlamp High Beam
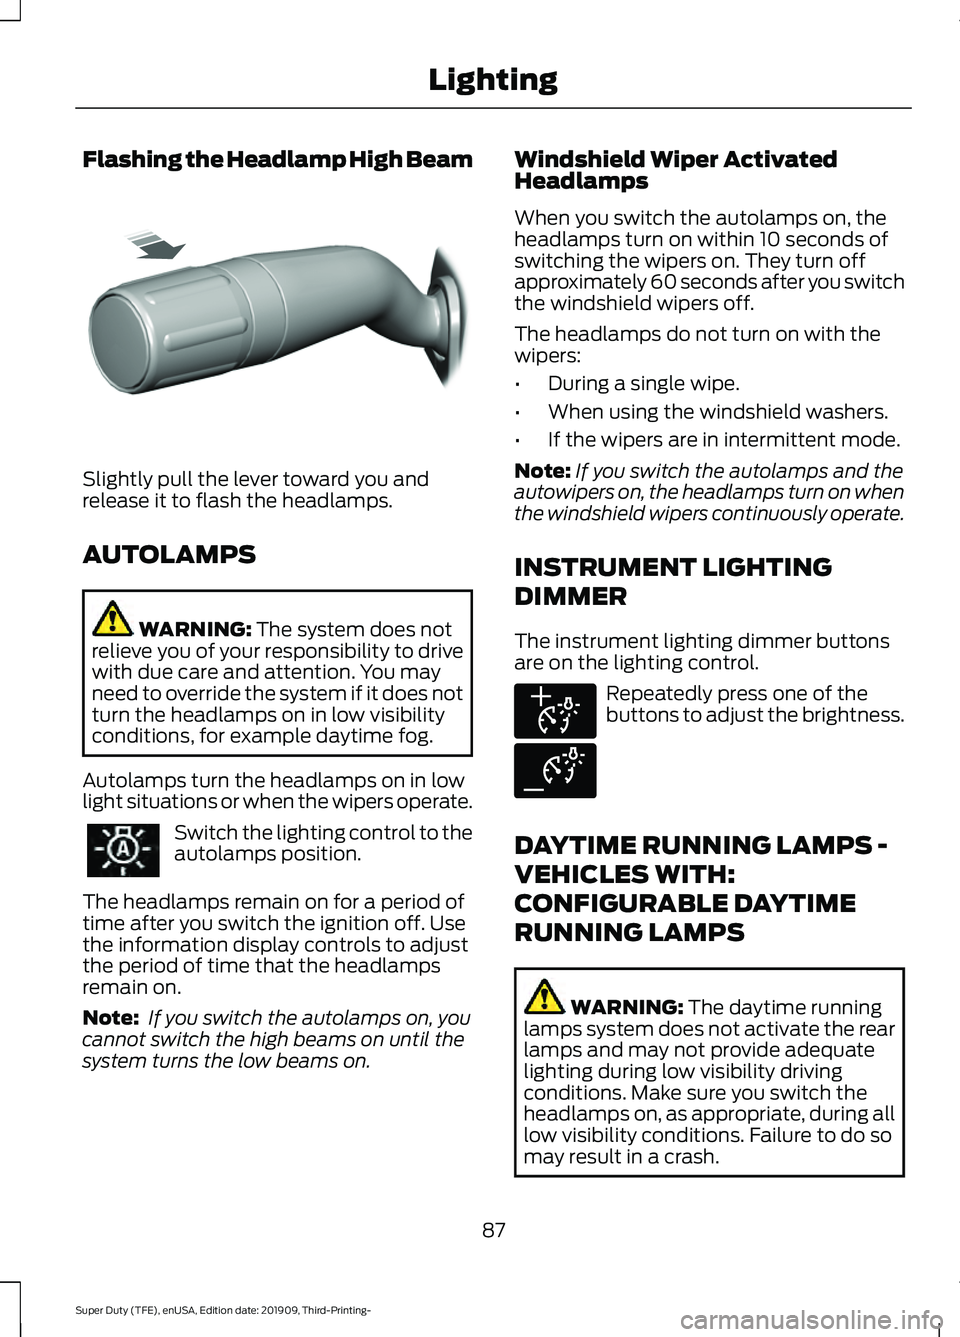
Slightly pull the lever toward you and
release it to flash the headlamps.
AUTOLAMPS
WARNING: The system does not
relieve you of your responsibility to drive
with due care and attention. You may
need to override the system if it does not
turn the headlamps on in low visibility
conditions, for example daytime fog.
Autolamps turn the headlamps on in low
light situations or when the wipers operate. Switch the lighting control to the
autolamps position.
The headlamps remain on for a period of
time after you switch the ignition off. Use
the information display controls to adjust
the period of time that the headlamps
remain on.
Note: If you switch the autolamps on, you
cannot switch the high beams on until the
system turns the low beams on. Windshield Wiper Activated
Headlamps
When you switch the autolamps on, the
headlamps turn on within 10 seconds of
switching the wipers on. They turn off
approximately 60 seconds after you switch
the windshield wipers off.
The headlamps do not turn on with the
wipers:
•
During a single wipe.
• When using the windshield washers.
• If the wipers are in intermittent mode.
Note: If you switch the autolamps and the
autowipers on, the headlamps turn on when
the windshield wipers continuously operate.
INSTRUMENT LIGHTING
DIMMER
The instrument lighting dimmer buttons
are on the lighting control. Repeatedly press one of the
buttons to adjust the brightness.
DAYTIME RUNNING LAMPS -
VEHICLES WITH:
CONFIGURABLE DAYTIME
RUNNING LAMPS WARNING:
The daytime running
lamps system does not activate the rear
lamps and may not provide adequate
lighting during low visibility driving
conditions. Make sure you switch the
headlamps on, as appropriate, during all
low visibility conditions. Failure to do so
may result in a crash.
87
Super Duty (TFE), enUSA, Edition date: 201909, Third-Printing- LightingE311233 E291299 E291298
Page 91 of 631
Switch the daytime running lamps on or
off using the information display. See
General Information (page 109).
The daytime running lamps turn on when:
1. The lamps are on in the information display.
2. You switch the ignition on.
3. The transmission is not in park (P) for vehicles with automatic transmissions
or you release the parking brake for
vehicles with manual transmissions.
4. The lighting control is in the autolamps
position.
5. The headlamps are off.
The other lighting control switch positions
do not turn on the daytime running lamps.
If the daytime running lamps are off in the
information display, the lamps stay off in
all switch positions.
DAYTIME RUNNING LAMPS -
VEHICLES WITH: DAYTIME
RUNNING LAMPS (DRL) WARNING:
The daytime running
lamps system does not activate the rear
lamps and may not provide adequate
lighting during low visibility driving
conditions. Make sure you switch the
headlamps on, as appropriate, during all
low visibility conditions. Failure to do so
may result in a crash.
The system turns the lamps on in daylight
conditions.
To switch the system on, switch the
lighting control to any position except
headlamps. FRONT FOG LAMPS
(IF EQUIPPED)
Switching the Front Fog Lamps On
or Off
Only switch the front fog lamps on during
reduced visibility.
You can switch the front fog lamps on if
any of the following occur:
• You set the lighting control to the
parking lamps position.
• You set the lighting control to the
headlamps position.
• You set the lighting control to the
autolamps position and the headlamps
are on.
The front fog lamp button is on the lighting
control. Press the button to switch the
front fog lamps on or off.
Note: The brightness of the daytime running
lamps may decrease when the front fog
lamps are switched on.
Front Fog Lamp Indicator It illuminates when you switch
the front fog lamps on.
88
Super Duty (TFE), enUSA, Edition date: 201909, Third-Printing- Lighting
Page 95 of 631
WHAT IS AUTOMATIC HIGH
BEAM CONTROL
The system turns on high beams if it is dark
enough and no other traffic is present. If it
detects an approaching vehicle
’s
headlamps or tail lamps, or street lighting
ahead, the system turns the high beams
off. Low beams remain on.
A camera sensor, centrally mounted
behind the windshield of your vehicle,
continuously monitors conditions to turn
the high beams on and off.
SWITCHING AUTOMATIC HIGH
BEAM CONTROL ON AND OFF
Switch the system on or off using the
information display. See General
Information (page 109).
Activating the Automatic High
Beam Control Switch the lighting control to the
autolamps position to activate.
See
Autolamps (page 87).
Note: Automatic high beams are not
available when autolamps are not turned
on.
When active, the high beams turn on if:
• The ambient light level is low enough.
• There is no traffic in front of your
vehicle.
• The vehicle speed is greater than
approximately
32 mph (52 km/h).
When active, the high beams turn off if:
• The ambient light level is high enough
that high beams are not required.
• The system detects an approaching
vehicle's headlamps or tail lamps.
• The system detects severe rain, snow
or fog. •
The camera is blocked.
• The vehicle speed falls below
approximately
27 mph (44 km/h).
Note: The deactivation speed is lower on
curves.
Note: High beam reactivation may be
delayed in certain curvy road situations.
Note: The system may not operate properly
if the sensor is blocked. Keep the windshield
free from obstruction or damage.
Note: The system may not operate properly
in cold or inclement conditions. You can
switch on the high beams by overriding the
system.
Note: If the system detects a blockage, for
example bird droppings, bug splatter, snow
or ice, the system goes into low beam mode
until you clear the blockage. A message may
appear in the information display if the
camera is blocked.
Note: Using much larger tires or equipping
vehicle accessories such as snowplows can
modify your vehicle's ride height and
degrade automatic high beam control
performance.
AUTOMATIC HIGH BEAM
CONTROL INDICATORS The indicator illuminates to
confirm when the system is
ready to assist.
OVERRIDING AUTOMATIC
HIGH BEAM CONTROL WARNING:
The system does not
relieve you of your responsibility to drive
with due care and attention. You may
need to override the system if it does not
turn the high beams on or off.
92
Super Duty (TFE), enUSA, Edition date: 201909, Third-Printing- Automatic High Beam Control
(If Equipped)
Page 97 of 631
POWER WINDOWS (IF EQUIPPED)
WARNING:
Do not leave children
unattended in your vehicle and do not
let them play with the power windows.
They may seriously injure themselves. WARNING:
When closing the
power windows, you should verify they
are free of obstructions and make sure
that children and pets are not in the
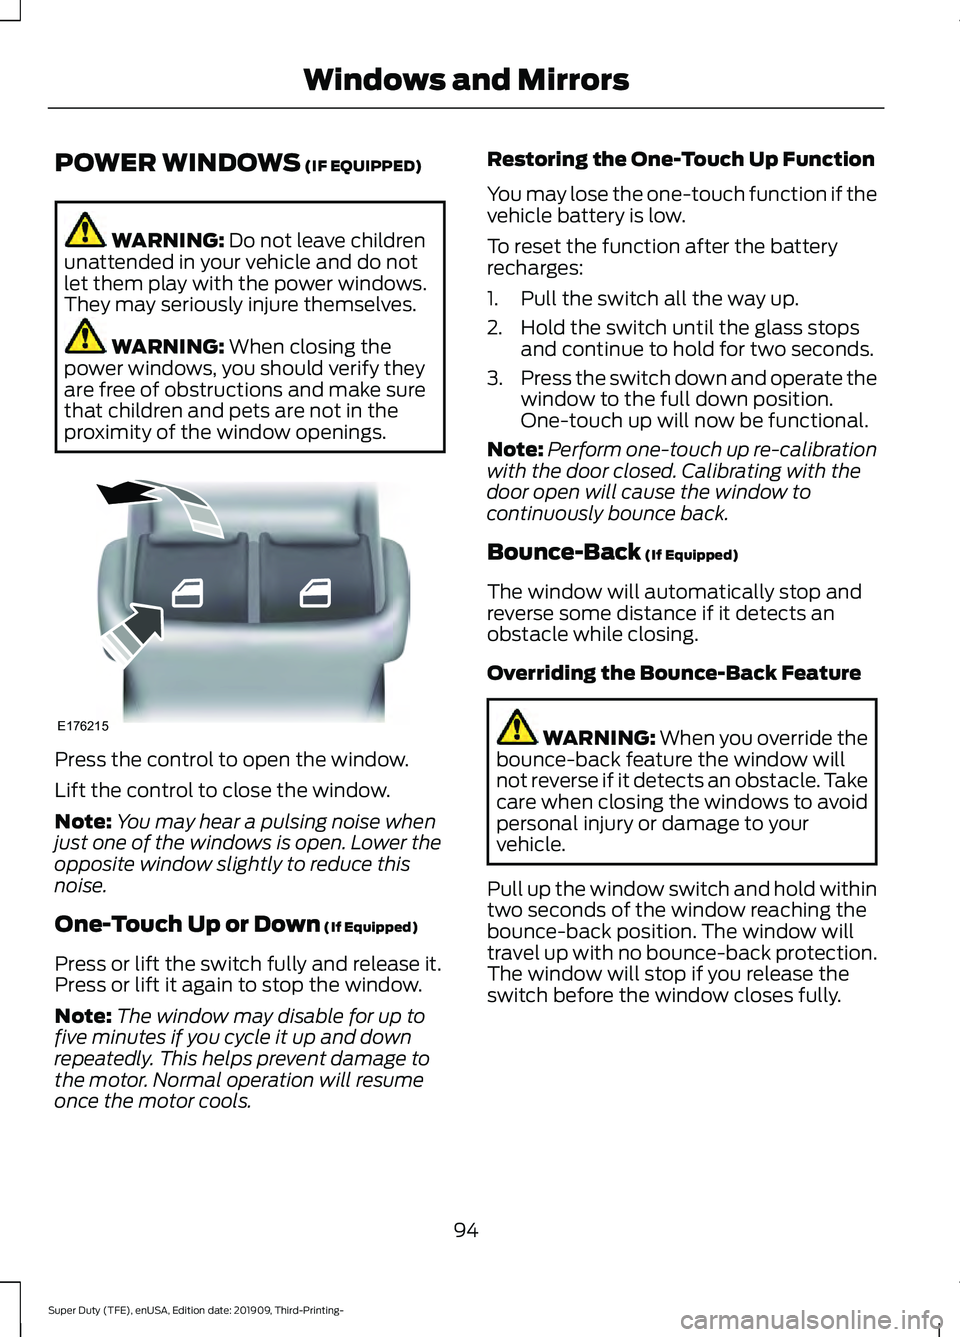
proximity of the window openings. Press the control to open the window.
Lift the control to close the window.
Note:
You may hear a pulsing noise when
just one of the windows is open. Lower the
opposite window slightly to reduce this
noise.
One-Touch Up or Down
(If Equipped)
Press or lift the switch fully and release it.
Press or lift it again to stop the window.
Note: The window may disable for up to
five minutes if you cycle it up and down
repeatedly. This helps prevent damage to
the motor. Normal operation will resume
once the motor cools. Restoring the One-Touch Up Function
You may lose the one-touch function if the
vehicle battery is low.
To reset the function after the battery
recharges:
1. Pull the switch all the way up.
2. Hold the switch until the glass stops
and continue to hold for two seconds.
3. Press the switch down and operate the
window to the full down position.
One-touch up will now be functional.
Note: Perform one-touch up re-calibration
with the door closed. Calibrating with the
door open will cause the window to
continuously bounce back.
Bounce-Back
(If Equipped)
The window will automatically stop and
reverse some distance if it detects an
obstacle while closing.
Overriding the Bounce-Back Feature WARNING:
When you override the
bounce-back feature the window will
not reverse if it detects an obstacle. Take
care when closing the windows to avoid
personal injury or damage to your
vehicle.
Pull up the window switch and hold within
two seconds of the window reaching the
bounce-back position. The window will
travel up with no bounce-back protection.
The window will stop if you release the
switch before the window closes fully.
94
Super Duty (TFE), enUSA, Edition date: 201909, Third-Printing- Windows and MirrorsE176215
Page 98 of 631
Window Lock (If Equipped)
Press the control to lock or unlock the rear
window controls.
Accessory Delay
(If Equipped)
The window switches remain operational
for several minutes when you switch the
ignition off or until you open either front
door.
GLOBAL OPENING
(IF EQUIPPED)
You can use the remote control to open
the windows with the ignition off.
Note: To operate this feature, accessory
delay must not be active.
Opening the Windows
You can only open the windows for a short
time after you unlock your vehicle with the
remote control. After you unlock your
vehicle, press and hold the remote control
unlock button to open the windows.
Release the button once movement starts.
Press the lock or unlock button to stop
movement. EXTERIOR MIRRORS
Power Exterior Mirrors
(If Equipped) WARNING:
Do not adjust the
mirrors when your vehicle is moving. This
could result in the loss of control of your
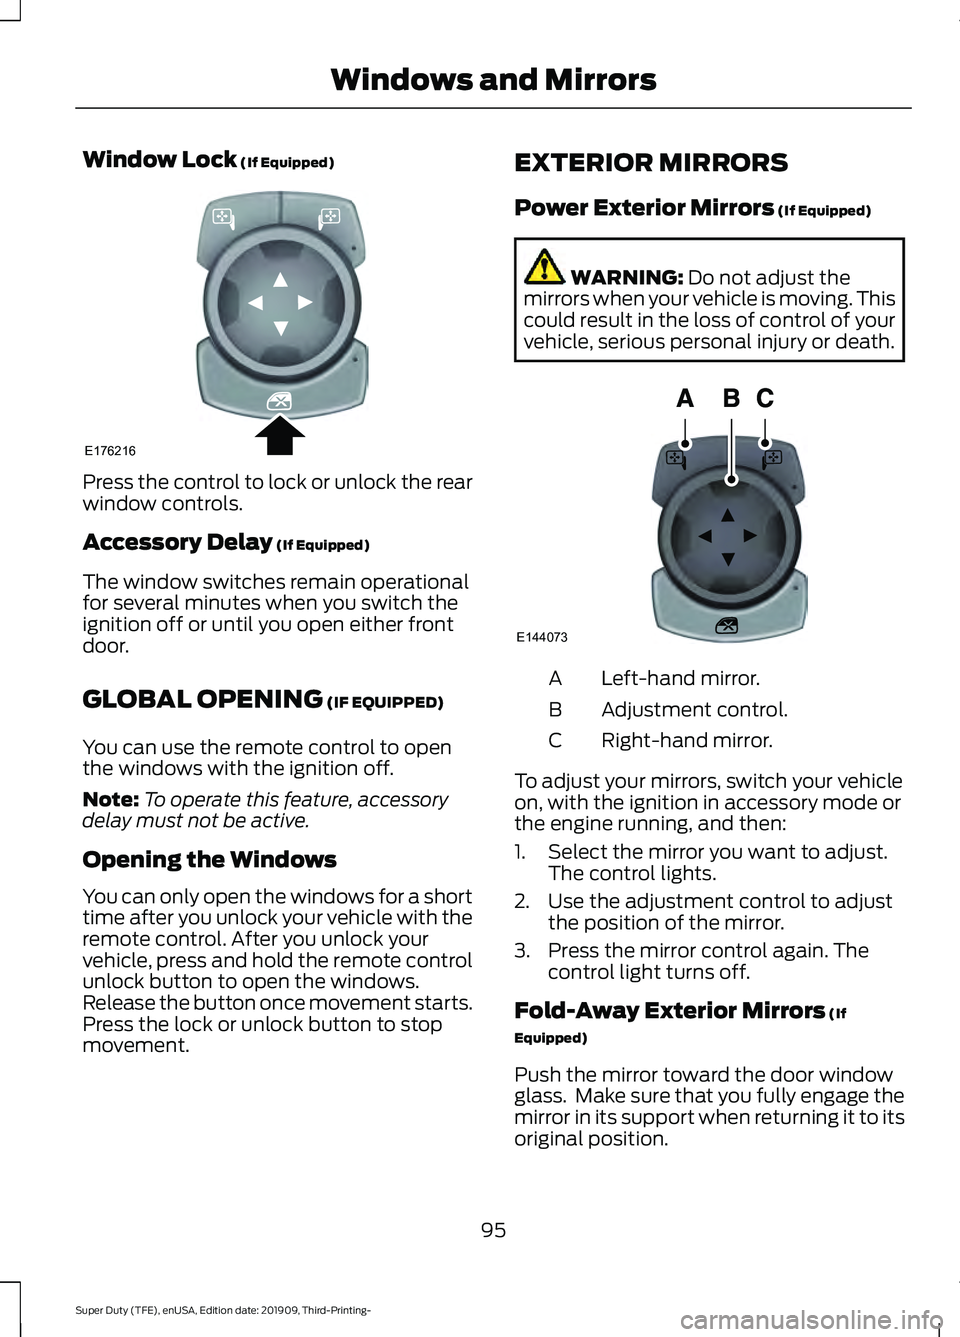
vehicle, serious personal injury or death. Left-hand mirror.
A
Adjustment control.
B
Right-hand mirror.
C
To adjust your mirrors, switch your vehicle
on, with the ignition in accessory mode or
the engine running, and then:
1. Select the mirror you want to adjust. The control lights.
2. Use the adjustment control to adjust the position of the mirror.
3. Press the mirror control again. The control light turns off.
Fold-Away Exterior Mirrors
(If
Equipped)
Push the mirror toward the door window
glass. Make sure that you fully engage the
mirror in its support when returning it to its
original position.
95
Super Duty (TFE), enUSA, Edition date: 201909, Third-Printing- Windows and MirrorsE176216 E144073
Page 101 of 631

Blind Spot Information System (If
Equipped)
See
Blind Spot Information System
(page 248).
INTERIOR MIRROR WARNING:
Do not adjust the
mirrors when your vehicle is moving. This
could result in the loss of control of your
vehicle, serious personal injury or death.
Note: Do not clean the mirror housing or
glass with harsh abrasives, fuel or other
petroleum-based cleaning products.
You can adjust the interior mirror to your
preference. Some mirrors also have a
second pivot point. This lets you move the
mirror hear up or down and from side to
side.
Manual Dimming Mirror
Pull the tab below the mirror toward you
to reduce the effect of bright light from
behind.
Auto-Dimming Mirror
(If Equipped)
Note: Do not block the sensors on the front
and back of the mirror. A rear center
passenger or raised rear center head
restraint may also block light from reaching
the sensor.
The mirror dims to reduce glare when
bright lights are detected from behind your
vehicle. It automatically returns to normal
reflection when you shift the transmission
into reverse (R) to make sure you have a
clear view when backing up. SLIDING WINDOWS
(IF EQUIPPED)
Power Sliding Back Window
(If
Equipped) WARNING:
When operating the
power sliding back window, you must
make sure all rear seat occupants and
cargo are not in the proximity of the back
window. WARNING:
Do not leave children
unattended in your vehicle and do not
let them play with the power sliding back
window. They may seriously injure
themselves. The control is on the overhead console.
Press and hold the control to open the
window. Pull and hold the control to close
the window.
98
Super Duty (TFE), enUSA, Edition date: 201909, Third-Printing- Windows and MirrorsE176217
Page 106 of 631
Engine Oil Pressure Gauge
Indicates engine oil pressure. The needle
should stay in the normal operating range
(between L and H). If the needle falls
below the normal range, stop your vehicle,
turn off the engine and check the engine
oil level. Add oil if needed. If the oil level is
correct, have your vehicle checked by an
authorized dealer.
Engine Coolant Temperature
Gauge
WARNING: Do not remove the
coolant reservoir cap when the engine is
on or the cooling system is hot. Wait 10
minutes for the cooling system to cool
down. Cover the coolant reservoir cap
with a thick cloth to prevent the
possibility of scalding and slowly remove
the cap. Failure to follow this instruction
could result in personal injury.
Indicates engine coolant temperature. At
normal operating temperature, the level
indicator will be in the normal range. If the
engine coolant temperature exceeds the
normal range, stop your vehicle as soon as
safely possible, switch off the engine and
let the engine cool.
Fuel Gauge
Note: The fuel gauge may vary slightly
when your vehicle is moving or on a slope.
The fuel gauge indicates about how much
fuel is in the fuel tank.
The arrow adjacent to the fuel pump
symbol indicates on which side of your
vehicle the fuel filler door is located. Low Fuel Reminder
A low fuel level reminder displays and
sounds when the distance to empty
reaches
75 mi (120 km) to empty for
MyKey, and at 50 mi (80 km), 25 mi
(40 km), 10 mi (20 km) and 0 mi (0 km)
for all vehicle keys.
Note: The low fuel reminder can appear at
different fuel gauge positions depending on
fuel economy conditions. This variation is
normal.
Transmission Fluid Temperature
Gauge
Indicates transmission fluid temperature.
At normal operating temperature, the level
indicator will be in the normal range. If the
transmission fluid temperature exceeds
the normal range, stop the vehicle as soon
as safely possible and verify the airflow is
not restricted such as snow or debris
blocking airflow through the grill. Also,
higher than normal operating temperature
can be caused by special operation
conditions (i.e. snowplowing, towing or
off-road use). Operating the transmission
for extended periods with the gauge in the
higher than normal area may cause
internal transmission damage. You need
to alter the severity of your driving
conditions to lower the transmission
temperature into the normal range. If the
gauge continues to show high
temperatures, see an authorized dealer.
Turbo Boost Gauge
(If Equipped)
Indicates the amount of manifold air
pressure in the engine.
DEF Gauge
(If Equipped)
Indicates the current DEF level.
103
Super Duty (TFE), enUSA, Edition date: 201909, Third-Printing- Instrument Cluster