climate settings FORD F-450 2020 Owners Manual
[x] Cancel search | Manufacturer: FORD, Model Year: 2020, Model line: F-450, Model: FORD F-450 2020Pages: 631, PDF Size: 9.62 MB
Page 9 of 631
Capacities and Specifications
Engine Specifications - 6.2L
...................429
Engine Specifications - 6.7L Diesel ......
429
Engine Specifications - 7.3L ...................
430
Motorcraft Parts - 6.2L ..............................
431
Motorcraft Parts - 6.7L Diesel ................
433
Motorcraft Parts - 7.3L ..............................
434
Vehicle Identification Number ...............
435
Vehicle Certification Label ......................
436
Transmission Code Designation ...........
436
Capacities and Specifications - 6.2L ........................................................................\
437
Capacities and Specifications - 6.7L Diesel ..........................................................
446
Capacities and Specifications - 7.3L ........................................................................\
457
Bulb Specification Chart ..........................
467
Network Connectivity
Connecting the Vehicle to a Mobile Network .....................................................
470
Network Connectivity – Troubleshooting ........................................................................\
.
471
Vehicle Wi-Fi Hotspot
Creating a Vehicle Wi-Fi Hotspot .........
473
Changing the Vehicle Wi-Fi Hotspot Name or Password .................................
473
Audio System
General Information ..................................
474
Audio Unit - Vehicles With: AM/FM/ Touchscreen Display/SYNC 3 ............
474
Audio Unit - Vehicles With: SYNC ........
476
Digital Radio .................................................
478
Satellite Radio ............................................
480
USB Port ........................................................
483
SYNC™
General Information ..................................
484Using Voice Recognition
..........................
485
Using SYNC™ With Your Phone ...........
487
SYNC™ Applications and Services .....
488
Using SYNC™ With Your Media Player ........................................................................\
.
491
SYNC™ Troubleshooting ........................
492
SYNC™ 3
General Information ...................................
501
Using Voice Recognition ..........................
503
Entertainment .............................................
509
Climate ............................................................
519
Phone ...............................................................
521
Navigation .....................................................
523
Apps ................................................................
528
Settings ...........................................................
531
SYNC™ 3 Troubleshooting .....................
533
Accessories
Accessories ...................................................
546
Auxiliary Switches ......................................
547
Ford Protect
Ford Protect ...................................................
551
Scheduled Maintenance
General Maintenance Information .......
553
Normal Scheduled Maintenance .........
556
Special Operating Conditions Scheduled Maintenance ............................................
562
Scheduled Maintenance Record ............
571
Appendices
Electromagnetic Compatibility ..............
581
End User License Agreement ................
584
Declaration of Conformity ......................
609
Declaration of Conformity - Vehicles With: SYNC 3 ...........................................
609
Type Approvals ............................................
610
6
Super Duty (TFE), enUSA, Edition date: 201909, Third-Printing- Table of Contents
Page 15 of 631
Note:
Event data recorder data is recorded
by your vehicle only if a non-trivial crash
situation occurs; no data is recorded by the
event data recorder under normal driving
conditions and no personal data or
information (e.g., name, gender, age, and
crash location) is recorded. However, other
parties, such as law enforcement, could
combine the event data recorder data with
the type of personally identifying data
routinely acquired during a crash
investigation.
To read data recorded by an event data
recorder, special equipment is required,
and access to the vehicle or the event data
recorder is needed. In addition to the
vehicle manufacturer, other parties, such
as law enforcement, that have such special
equipment, can read the information if they
have access to the vehicle or the event
data recorder.
Comfort, Convenience and
Entertainment Data
Your vehicle has electronic control units
that have the ability to store data based
on your personalized settings. The data is
stored locally in the vehicle or on devices
that you connect to it, for example, a USB
drive or digital music player. You can delete
some of this data and also choose whether
to share it through the services to which
you subscribe. See Settings (page 531).
Comfort and Convenience Data
Data recorded includes, for example:
• Seat and steering wheel position.
• Climate control settings.
• Radio presets. Entertainment Data
Data recorded includes, for example:
•
Music, videos or album art.
• Contacts and corresponding address
book entries.
• Navigation destinations.
Services That We Provide
If you use our services, we collect and use
data, for example, account information,
vehicle location and driving characteristics,
that could identify you. We transmit this
data through a dedicated, protected
connection. We only collect and use data
to enable your use of our services to which
you have subscribed, with your consent or
where permitted by law. For additional
information, see the terms and conditions
of the services to which you have
subscribed.
Services That Third Parties
Provide
We recommend that you review the terms
and conditions and data privacy
information for any services to which you
subscribe. We take no responsibility for
services that third parties provide.
Vehicles With a Modem
(If Equipped) The modem has a SIM. The
modem was enabled when your
vehicle was built and periodically
sends messages to stay connected to the
cell phone network, receive automatic
software updates and send vehicle-related
information to us, for example, diagnostic
information. These messages could
include information that identifies your
vehicle, the SIM and the electronic serial
number of the modem. Cell phone network
12
Super Duty (TFE), enUSA, Edition date: 201909, Third-Printing- Introduction
Page 80 of 631
USING POWER RUNNING
BOARDS
WARNING: In extreme climates,
excessive ice buildup may occur, causing
the running boards not to deploy. Make
sure that the running boards have
deployed, and have finished moving
before attempting to step on them. The
running boards will resume normal
function once the blockage is cleared. WARNING:
Switch off the running
boards before jacking or placing any
object under your vehicle. Never place
your hand between the extended running
board and your vehicle. A moving running
board may cause injury.
Note: Do not use the running boards, front
and rear hinge assemblies, running board
motors, or the running board underbody
mounts to lift your vehicle when jacking.
Always use proper jacking points.
Note: The running boards may operate
more slowly in cool temperatures.
Note: The running board mechanism may
trap debris such as mud, dirt, snow, ice and
salt. This may cause unwanted noise. If this
happens, manually set the running boards
to the deployed position. Then, wash the
system, in particular the front and rear hinge
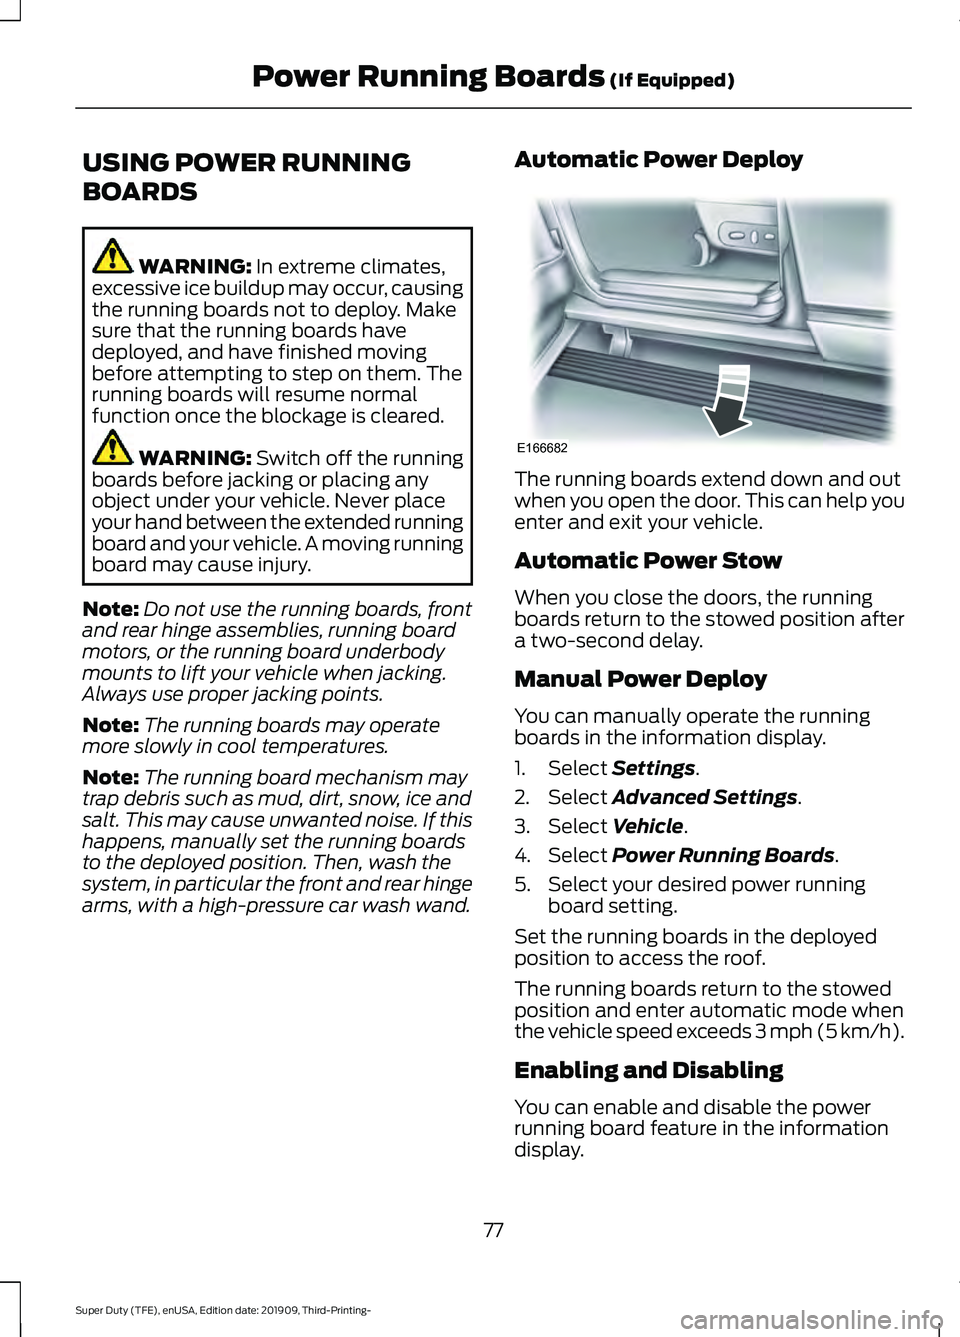
arms, with a high-pressure car wash wand. Automatic Power Deploy The running boards extend down and out
when you open the door. This can help you
enter and exit your vehicle.
Automatic Power Stow
When you close the doors, the running
boards return to the stowed position after
a two-second delay.
Manual Power Deploy
You can manually operate the running
boards in the information display.
1. Select
Settings.
2. Select
Advanced Settings.
3. Select
Vehicle.
4. Select
Power Running Boards.
5. Select your desired power running board setting.
Set the running boards in the deployed
position to access the roof.
The running boards return to the stowed
position and enter automatic mode when
the vehicle speed exceeds 3 mph (5 km/h).
Enabling and Disabling
You can enable and disable the power
running board feature in the information
display.
77
Super Duty (TFE), enUSA, Edition date: 201909, Third-Printing- Power Running Boards
(If Equipped)E166682
Page 144 of 631
Setting the Blower Motor Speed
Press and release + or - to adjust
the volume of air circulated in
the vehicle.
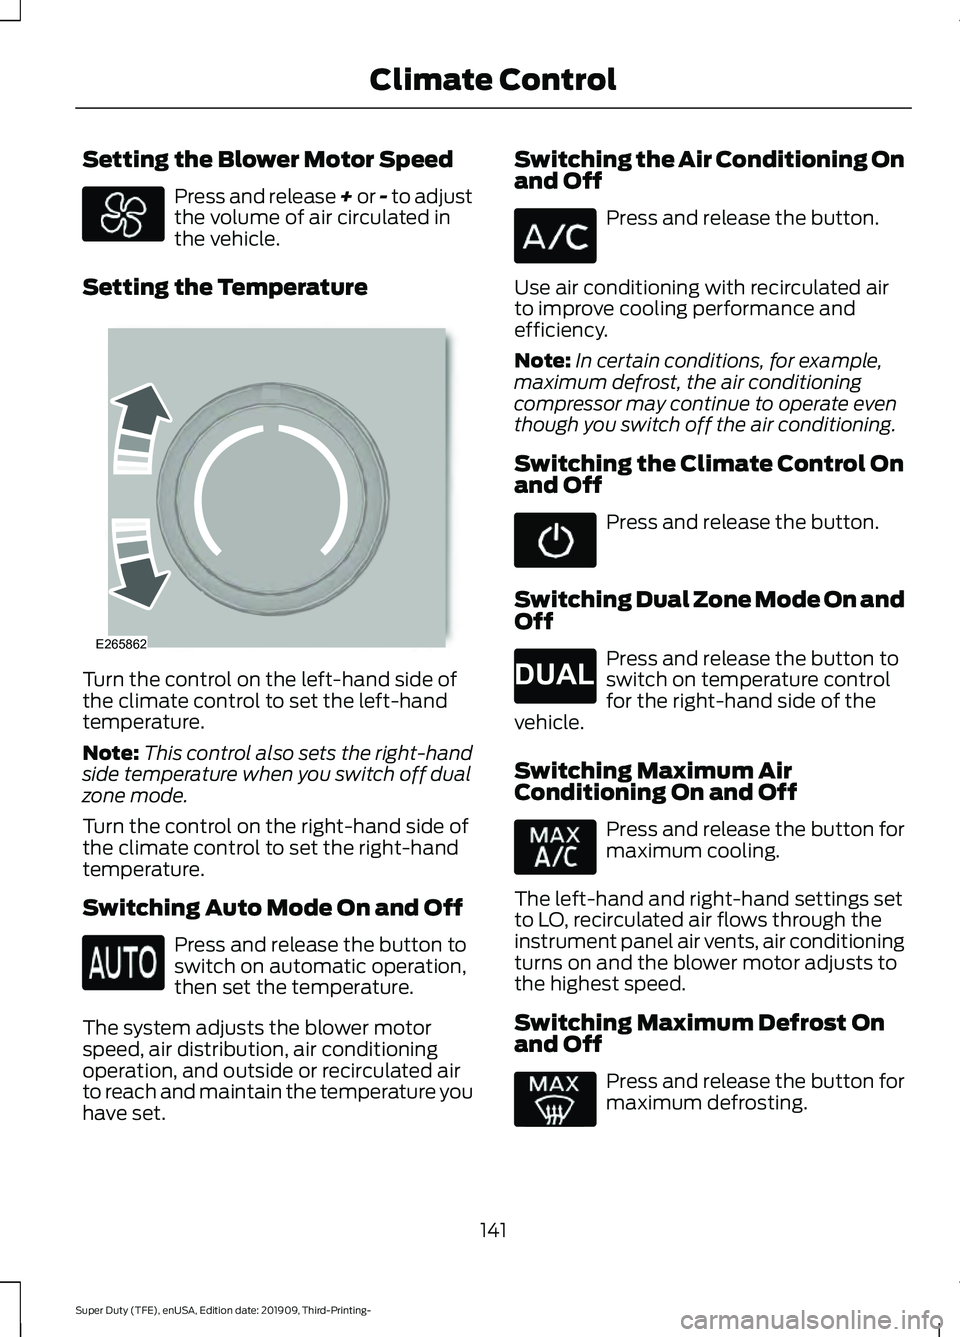
Setting the Temperature Turn the control on the left-hand side of
the climate control to set the left-hand
temperature.
Note:
This control also sets the right-hand
side temperature when you switch off dual
zone mode.
Turn the control on the right-hand side of
the climate control to set the right-hand
temperature.
Switching Auto Mode On and Off Press and release the button to
switch on automatic operation,
then set the temperature.
The system adjusts the blower motor
speed, air distribution, air conditioning
operation, and outside or recirculated air
to reach and maintain the temperature you
have set. Switching the Air Conditioning On
and Off Press and release the button.
Use air conditioning with recirculated air
to improve cooling performance and
efficiency.
Note: In certain conditions, for example,
maximum defrost, the air conditioning
compressor may continue to operate even
though you switch off the air conditioning.
Switching the Climate Control On
and Off Press and release the button.
Switching Dual Zone Mode On and
Off Press and release the button to
switch on temperature control
for the right-hand side of the
vehicle.
Switching Maximum Air
Conditioning On and Off Press and release the button for
maximum cooling.
The left-hand and right-hand settings set
to LO, recirculated air flows through the
instrument panel air vents, air conditioning
turns on and the blower motor adjusts to
the highest speed.
Switching Maximum Defrost On
and Off Press and release the button for
maximum defrosting.
141
Super Duty (TFE), enUSA, Edition date: 201909, Third-Printing- Climate Control E265862 E265280
Page 145 of 631
The left-hand and right-hand settings set
to HI, air flows through the windshield air
vents, and the blower motor adjusts to the
highest speed.
You can also use this setting to defog and
clear the windshield of a thin covering of
ice.
Note:
To prevent window fogging, you
cannot select recirculated air when
maximum defrost is on.
Note: The heated rear window also turns
on when you select maximum defrost.
Switching Recirculated Air On and
Off Press and release the button to
switch between outside air and
recirculated air.
The air currently in the passenger
compartment recirculates. This may
reduce the time needed to cool the interior,
when used with A/C, and reduce unwanted
odors from entering your vehicle.
Note: Recirculated air may turn off, or
prevent you from switching it on, in all air
flow modes except MAX A/C to reduce the
risk of fogging. Recirculation may also turn
on and off in various air distribution control
combinations during hot weather in order
to improve cooling efficiency.
HINTS ON CONTROLLING THE
INTERIOR CLIMATE -
VEHICLES WITH: AUTOMATIC
TEMPERATURE CONTROL
General Hints
Note: Prolonged use of recirculated air may
cause the windows to fog up.
Note: You may feel a small amount of air
from the footwell air vents regardless of the
air distribution setting. Note:
To reduce humidity build-up inside
your vehicle, do not drive with the system
switched off or with recirculated air always
switched on.
Note: Do not place objects under the front
seats as this may interfere with the airflow
to the rear seats.
Note: Remove any snow, ice or leaves from
the air intake area at the base of the
windshield.
Note: To improve the time to reach a
comfortable temperature in hot weather,
drive with the windows open until you feel
cold air through the air vents.
Automatic Climate Control
Note: Adjusting the settings when your
vehicle interior is extremely hot or cold is
not necessary. Automatic mode is best
recommended to maintain set temperature.
Note: The system adjusts to heat or cool
the interior to the temperature you select
as quickly as possible.
Note: For the system to function efficiently,
the instrument panel and side air vents
should be fully open.
Note: If you select AUTO during cold
outside temperatures, the system directs
air flow to the windshield and side window
air vents. In addition, the blower motor may
run at a slower speed until the engine warms
up.
Note: If you select
AUTO during hot
temperatures and the inside of the vehicle
is hot, the system uses recirculated air to
maximize interior cooling. Blower motor
speed may also reduce until the air cools.
Quickly Heating the Interior
1. Press and release
AUTO.
2. Adjust the temperature function to the
setting you prefer.
142
Super Duty (TFE), enUSA, Edition date: 201909, Third-Printing- Climate Control
Page 146 of 631

Recommended Settings for
Heating
1. Press and release AUTO.
2. Adjust the temperature function to the
setting you prefer. Use
72°F (22°C) as
a starting point, then adjust the setting
as necessary.
Quickly Cooling the Interior
1. Press and release
MAX A/C.
Recommended Settings for
Cooling
1. Press and release
AUTO.
2. Adjust the temperature function to the
setting you prefer. Use
72°F (22°C) as
a starting point, then adjust the setting
as necessary.
Defogging the Side Windows in
Cold Weather
1. Press and release defrost or maximum
defrost.
2. Adjust the temperature control to the setting you prefer. Use
72°F (22°C) as
a starting point, then adjust the setting
as necessary.
HINTS ON CONTROLLING THE
INTERIOR CLIMATE -
VEHICLES WITH: MANUAL
TEMPERATURE CONTROL
General Hints
Note: Prolonged use of recirculated air may
cause the windows to fog up.
Note: You may feel a small amount of air
from the footwell air vents regardless of the
air distribution setting. Note:
To reduce humidity build-up inside
your vehicle, do not drive with the system
switched off or with recirculated air always
switched on.
Note: Do not place objects under the front
seats as this may interfere with the airflow
to the rear seats.
Note: Remove any snow, ice or leaves from
the air intake area at the base of the
windshield.
Note: To improve the time to reach a
comfortable temperature in hot weather,
drive with the windows open until you feel
cold air through the air vents.
Quickly Heating the Interior
1. Adjust the blower motor speed to the highest speed setting.
2. Adjust the temperature control to the highest setting.
3. Direct air to the footwell air vents.
Recommended Settings for
Heating
1. Adjust the blower motor speed to the center setting.
2. Adjust the temperature control to the midway point of the hot settings.
3. Direct air to the footwell air vents.
Quickly Cooling the Interior
1. Select
MAX A/C.
2. Drive with the windows open for a short
period of time.
Recommended Settings for
Cooling
1. Adjust the blower motor speed to the center setting.
2. Adjust the temperature control to the midway point of the cold settings.
143
Super Duty (TFE), enUSA, Edition date: 201909, Third-Printing- Climate Control
Page 147 of 631
3. Direct air to the instrument panel air
vents.
Vehicle Stationary for Extended
Periods During Extreme High
Ambient Temperatures
1. Apply the parking brake.
2. Place your vehicle in park (P) or neutral.
3. Select MAX A/C.
4. Adjust the blower motor speed to the lowest speed setting.
Defogging the Side Windows in
Cold Weather
1. Direct air to the instrument panel and windshield air vents.
2. Press and release
A/C.
3. Adjust the temperature control to the setting you prefer.
4. Adjust the blower motor speed to the highest setting.
5. Direct air toward the side windows.
6. Close the instrument panel air vents.
HEATED WINDSHIELD
(IF
EQUIPPED)
Windshield Wiper De-Icer When you switch the heated rear
window on, the windshield wiper
de-icer turns on.
HEATED REAR WINDOW
(IF
EQUIPPED) Press the button to clear the rear
window of thin ice and fog. The
heated rear window turns off
after a short period of time. Note:
Do not use harsh chemicals, razor
blades or other sharp objects to clean or
remove decals from the inside of the heated
rear window. The vehicle warranty may not
cover damage to the heated rear window
grid lines.
HEATED EXTERIOR MIRRORS
(IF EQUIPPED) Press the button to clear the
exterior mirrors of thin ice and
fog. Press the button again to
switch them off. They switch off after a
short period of time.
Note: Do not remove ice from the mirrors
with a scraper or adjust the mirror glass
when it is frozen in place. These actions
could cause damage to the glass and
mirrors.
Note: Do not clean the mirror housing or
glass with harsh abrasives, fuel or other
petroleum-based cleaning products.
REMOTE START
(IF EQUIPPED)
You can switch this feature on or off and
adjust the settings in the information
display.
The system adjusts the interior
temperature depending on your chosen
settings during remote start.
You cannot adjust the climate control
setting during remote start operation. The
information display and the indicators do
not turn on during remote start. When you
switch the ignition on, the climate control
system returns to the previous settings.
You can now make adjustments.
You need to switch on certain
vehicle-dependent features, such as:
• Heated seats.
• Cooled seats.
144
Super Duty (TFE), enUSA, Edition date: 201909, Third-Printing- Climate ControlE184884 E184884
Page 148 of 631
•
Heated steering wheel.
• Heated mirrors.
• Heated rear window.
Automatic Settings
In hot weather, the system sets to 72°F
(22°C). The cooled seats are set to high,
if available, and AUTO is on in the
information display.
In moderate weather, the system either
heats or cools, based on pre-selected
settings. The rear defroster, heated mirrors
and heated or cooled seats do not turn on.
In cold weather, the system sets to
72°F
(22°C). The heated seats are set to high,
if available, and AUTO is on in the
information display. The heated rear
window and heated mirrors turn on.
145
Super Duty (TFE), enUSA, Edition date: 201909, Third-Printing- Climate Control
Page 505 of 631
Automatic crash notification
system off.
Cell phone network signal
strength.
Vehicle data sharing on.
Vehicle location sharing on.
Vehicle data and vehicle location
sharing on.
Wireless charger active.
Feature Bar Select to use the radio, a USB, a
media player or a Bluetooth
device. See Entertainment
(page 509). Select to adjust climate settings
See
Climate (page 519).
Select to make calls and access
the phonebook on your cell
phone. See
Phone (page 521).
Select to use the navigation
system.
See Navigation (page
523). Select to search for and use
compatible apps on your iOS or
Android device. See Apps (page
528
). Select to adjust system settings.
See
Settings (page 531).
Cleaning the Touchscreen
See
Cleaning the Interior (page 383). Updating the System
Updating the System Using a USB Drive
Downloading an Update
1. Go to the SYNC update page on the
local Ford website.
2. Download the update.
Note: The website notifies you if an update
is available.
3. Insert a USB drive into your computer.
Note: The USB drive needs to be empty and
meet the minimum requirements detailed
on the website.
4. Follow the instructions provided to download the update to the USB drive.
Installing an Update
Note: You can use the system when an
installation is in progress.
1. Disconnect all other USB devices from
the USB ports.
2. Connect the USB drive with the update
to a USB port.
Note: Installation starts automatically
within 10 minutes.
Updating the System Using a Wi-Fi
Network Connection
Connecting to a Wi-Fi Network Select the settings option on the
feature bar.
1. Select
Automatic Updates.
2. Select
System Wi-Fi.
3. Switch
System Wi-Fi on.
4. Select
Available Wi-Fi Networks.
5. Select an available Wi-Fi network.
Note: Enter the network password to
connect to a secure network.
502
Super Duty (TFE), enUSA, Edition date: 201909, Third-Printing- SYNC™ 3
(If Equipped) E100027 E283811 E280315 E280315
Page 522 of 631
Supported USB file systems include: FAT,
exFAT, and NTFS.
SYNC 3 is also able to organize the media
from your USB device by metadata tags.
Metadata tags, which are descriptive
software identifiers embedded in the
media files, provide information about the
file.
If your indexed media files contain no
information embedded in these metadata
tags, SYNC 3 may classify the empty
metadata tags as unknown.
SYNC 3 is capable of indexing up to
50,000 songs per USB device, for up to 10
devices.
CLIMATE
Touch the climate button on the
touchscreen to access your climate control
features.
Note:
You can switch temperature units
between Fahrenheit and Celsius. See
Settings (page 531).
Accessing the Climate Control
Menu Touch the button to access
additional controls for the front
climate system.
Directing the Airflow Touch the button to direct
airflow to the windshield air
vents and de-mister.
Touch the button to direct
airflow to the instrument panel
air vents.
Touch the button to direct
airflow to the footwell air vents. You can direct air through any combination
of these air vents.
Setting the Blower Motor Speed Touch up or down to increase or
decrease the volume of air that
circulates in your vehicle.
Setting the Temperature
Touch up or down on the left-hand
temperature control to set the left-hand
temperature.
Note: This control also adjusts the
right-hand side temperature when you
switch off dual zone mode.
Touch up or down on the right-hand
temperature control to set the right-hand
temperature.
Switching Auto Mode On and Off Touch the button to switch on
automatic operation, then set
the temperature.
The system adjusts the blower motor
speed, air distribution, air conditioning
operation, and outside or recirculated air
to reach and maintain the temperature you
have set.
Switching the Air Conditioning On
and Off A pop-up appears on the screen
to display the air conditioning
options.
MAX A/C:
Touch the button to activate
and maximize cooling. The driver and
passenger temperatures are set to LO,
recirculated air flows through the
instrument panel vents, air conditioning
automatically turns on and the fan
automatically adjusts to the highest speed.
519
Super Duty (TFE), enUSA, Edition date: 201909, Third-Printing- SYNC™ 3
(If Equipped)E265038 E244097