boot FORD F-450 2022 Owners Manual
[x] Cancel search | Manufacturer: FORD, Model Year: 2022, Model line: F-450, Model: FORD F-450 2022Pages: 740, PDF Size: 12.6 MB
Page 229 of 740

WARNING: If the parking brake is
fully released, but the brake warning
lamp remains illuminated, the brakes
may not be working properly. Have your
vehicle checked as soon as possible.
In the event of an electrical malfunction,
it is possible that a fuse has blown or the
stoplamps are not working. See
Fuse
Precautions (page 387).
If the vehicle battery has no charge, jump
start your vehicle.
USING BRAKE SHIFT INTERLOCK
Brake-Shift Interlock
The following procedure allows you to
move the gearshift lever from park (P):
1. Apply the parking brake. Switch the ignition key to 1 - 0, then remove the
key.
2. Move the steering column to the full down and full rearward position,
toward the driver seat.
3. Remove the gearshift lever boot.
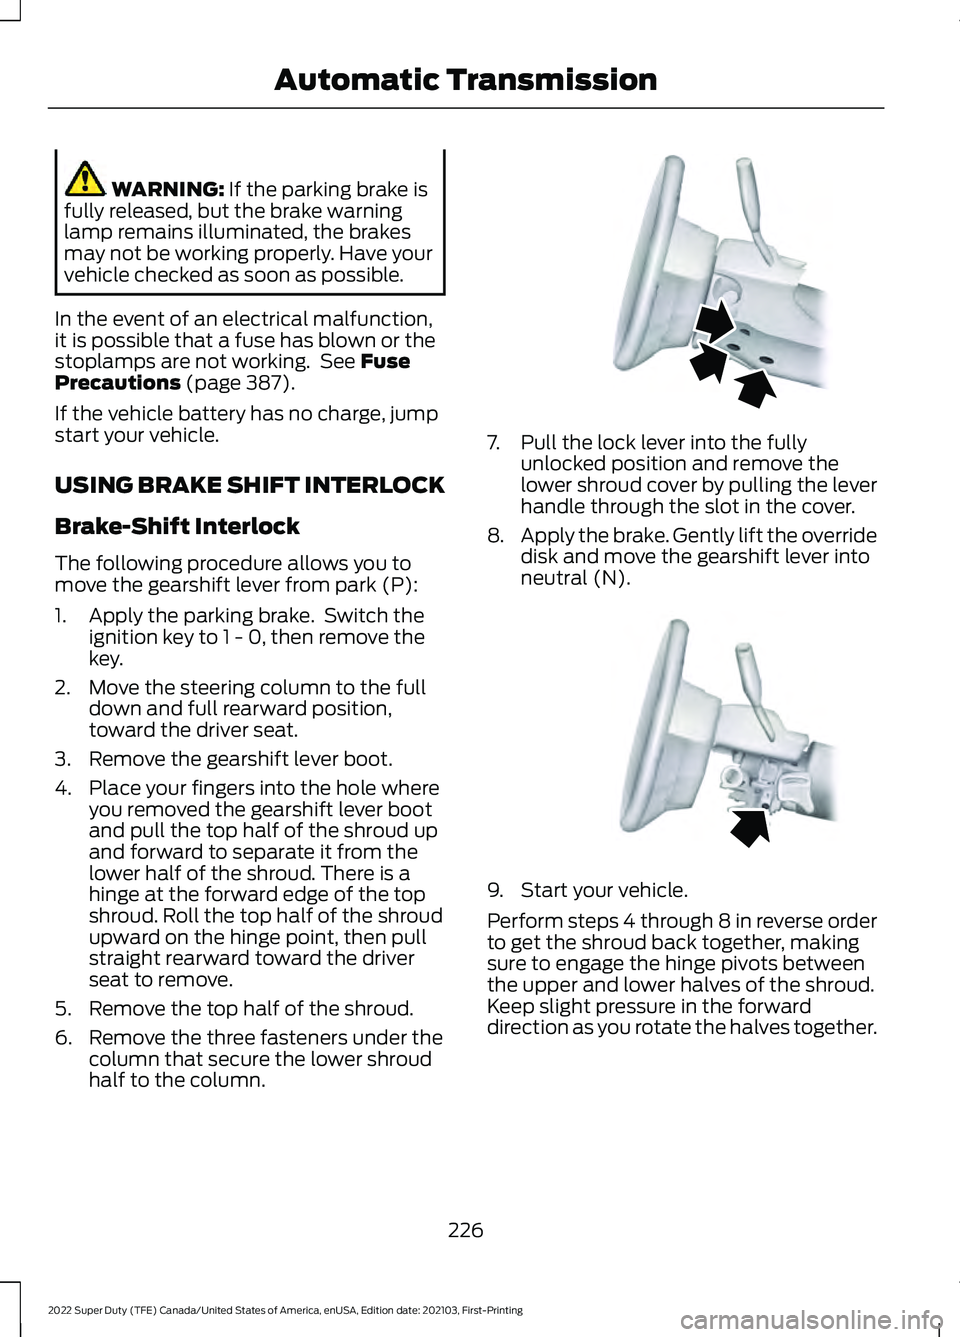
4. Place your fingers into the hole where you removed the gearshift lever boot
and pull the top half of the shroud up
and forward to separate it from the
lower half of the shroud. There is a
hinge at the forward edge of the top
shroud. Roll the top half of the shroud
upward on the hinge point, then pull
straight rearward toward the driver
seat to remove.
5. Remove the top half of the shroud.
6. Remove the three fasteners under the column that secure the lower shroud
half to the column. 7. Pull the lock lever into the fully
unlocked position and remove the
lower shroud cover by pulling the lever
handle through the slot in the cover.
8. Apply the brake. Gently lift the override
disk and move the gearshift lever into
neutral (N). 9. Start your vehicle.
Perform steps 4 through 8 in reverse order
to get the shroud back together, making
sure to engage the hinge pivots between
the upper and lower halves of the shroud.
Keep slight pressure in the forward
direction as you rotate the halves together.
226
2022 Super Duty (TFE) Canada/United States of America, enUSA, Edition date: 202103, First-Printing Automatic TransmissionE163185 E163186
Page 383 of 740

Do not disconnect the battery of the
disabled vehicle. This could damage your
vehicle's electrical system.
PREPARING THE VEHICLE
Use only a 12 volt supply to start your
vehicle.
Park the booster vehicle close to the hood
of the disabled vehicle, making sure the
two vehicles do not touch.
JUMP STARTING THE VEHICLE
Connecting the Jumper Cables
WARNING: Do not connect the
negative jumper cable to any other part
of your vehicle. Use the ground point.
Note: If you are using a jump pack or
booster box, follow the manufacturer's
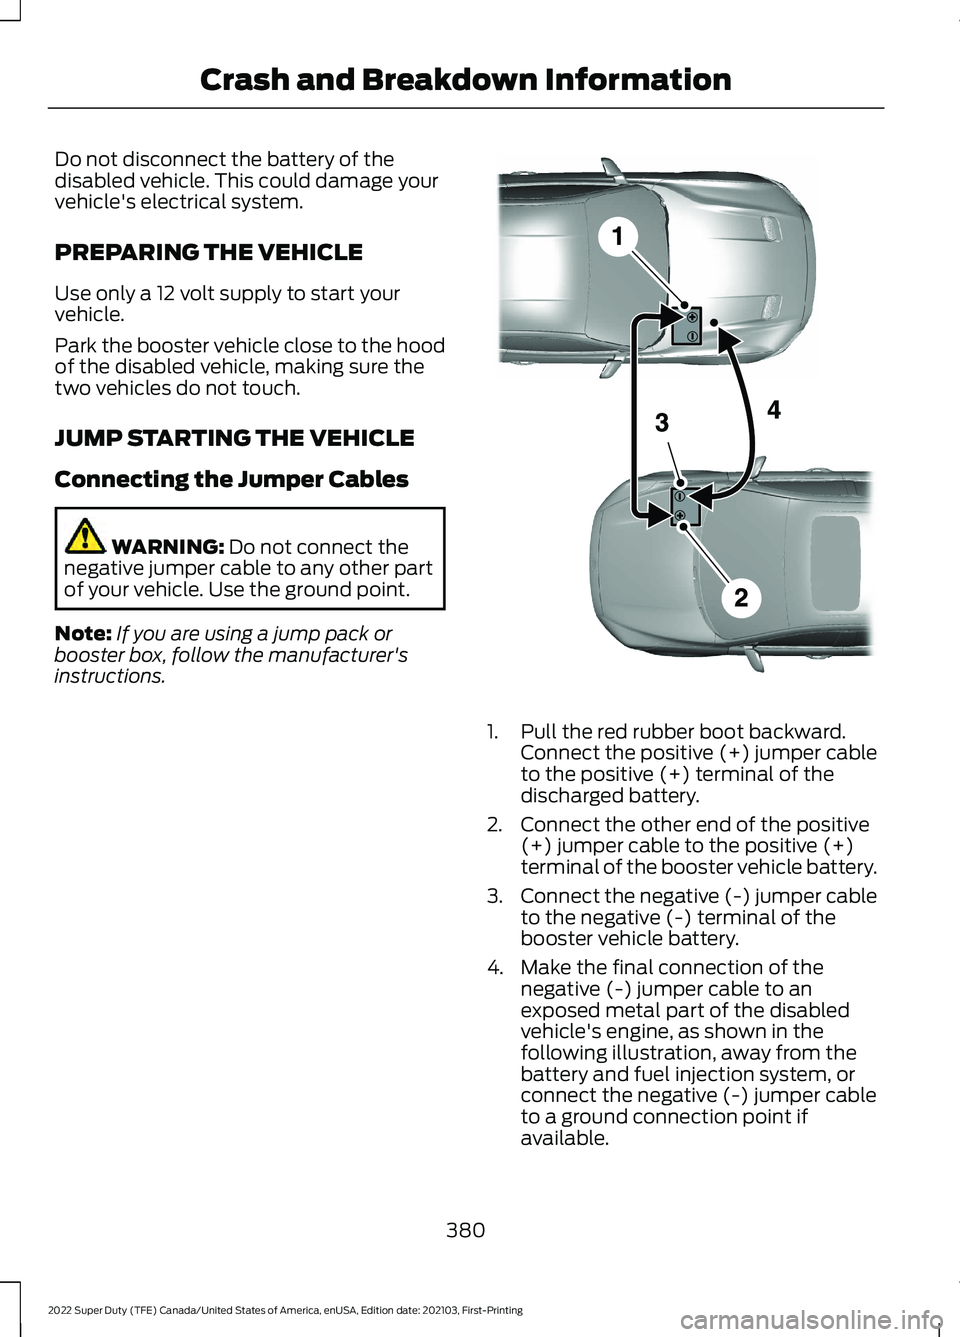
instructions. 1. Pull the red rubber boot backward.
Connect the positive (+) jumper cable
to the positive (+) terminal of the
discharged battery.
2. Connect the other end of the positive (+) jumper cable to the positive (+)
terminal of the booster vehicle battery.
3. Connect the negative (-) jumper cable
to the negative (-) terminal of the
booster vehicle battery.
4. Make the final connection of the negative (-) jumper cable to an
exposed metal part of the disabled
vehicle's engine, as shown in the
following illustration, away from the
battery and fuel injection system, or
connect the negative (-) jumper cable
to a ground connection point if
available.
380
2022 Super Duty (TFE) Canada/United States of America, enUSA, Edition date: 202103, First-Printing Crash and Breakdown InformationE281345
Page 628 of 740

Multi-Point Inspection
Windshield for cracks, chips or pits
For oil and fluid leaks
Washer spray and wiper operation
Half-shaft dust boots
1 Brake, coolant recovery reservoir, automatic transmission and window washer.
2 If your vehicle has a temporary mobility kit, check the tire sealant expiration Use By date
on the canister. Replace as needed.
Be sure to ask your dealership service
advisor or technician about the multi-point
vehicle inspection. It is a comprehensive
way to perform a thorough inspection of
your vehicle. Your checklist gives you
immediate feedback on the overall
condition of your vehicle.
NORMAL SCHEDULED
MAINTENANCE - DIESEL
Oil Change Reminder
Your vehicle comes with an oil change
reminder that determines when you should
change the engine oil based on how you
use your vehicle. Your vehicle lets you know when an oil
change is due by displaying a message in
the information display.
The following table provides examples of
vehicle use and its impact on oil change
intervals. It is a guideline only. Actual oil
change intervals depend on several factors
and generally decrease with severity of
use.When to Expect the Message Prompting You to Change Your Oil
Vehicle Use and Example
mi (km)
Normal
7,500– 10,000 mi
(12,000– 16,000 km) Normal commuting with highway driving.
No, or moderate, load or towing.
Flat to moderately hilly roads.
No extended idling.
Severe
5,000– 7,500 mi
(8,000– 12,000 km) Moderate to heavy load or towing.
Mountainous or off-road conditions.
Extended idling, 200-300 hours.
Extended hot or cold operation.
625
2022 Super Duty (TFE) Canada/United States of America, enUSA, Edition date: 202103, First-Printing Scheduled Maintenance