FORD F-53 2018 Service Manual
Manufacturer: FORD, Model Year: 2018, Model line: F-53, Model: FORD F-53 2018Pages: 168, PDF Size: 3.02 MB
Page 41 of 168
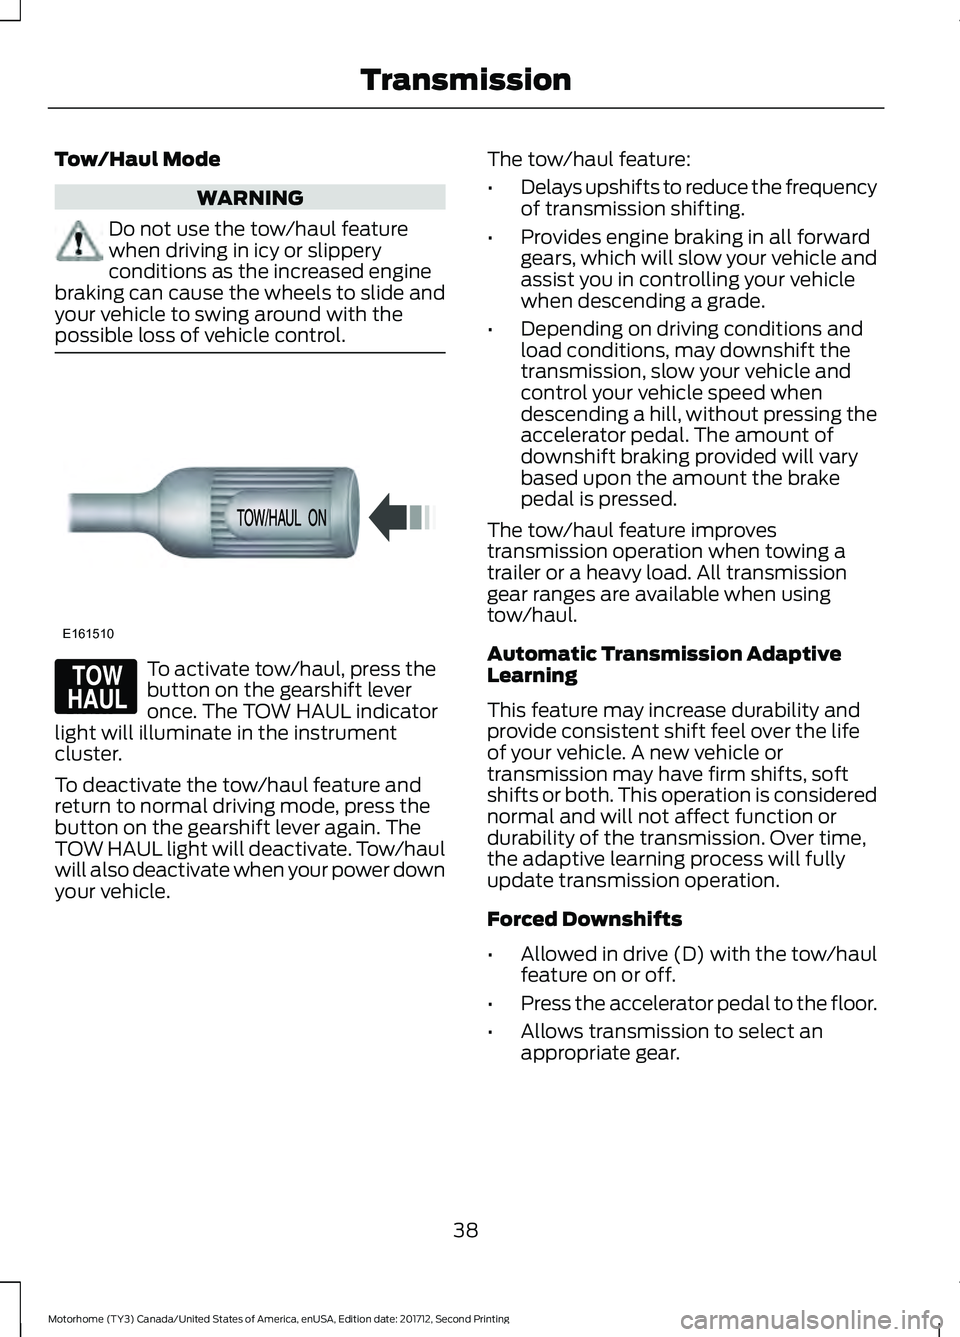
Tow/Haul Mode
WARNING
Do not use the tow/haul feature
when driving in icy or slippery
conditions as the increased engine
braking can cause the wheels to slide and
your vehicle to swing around with the
possible loss of vehicle control. To activate tow/haul, press the
button on the gearshift lever
once. The TOW HAUL indicator
light will illuminate in the instrument
cluster.
To deactivate the tow/haul feature and
return to normal driving mode, press the
button on the gearshift lever again. The
TOW HAUL light will deactivate. Tow/haul
will also deactivate when your power down
your vehicle. The tow/haul feature:
•
Delays upshifts to reduce the frequency
of transmission shifting.
• Provides engine braking in all forward
gears, which will slow your vehicle and
assist you in controlling your vehicle
when descending a grade.
• Depending on driving conditions and
load conditions, may downshift the
transmission, slow your vehicle and
control your vehicle speed when
descending a hill, without pressing the
accelerator pedal. The amount of
downshift braking provided will vary
based upon the amount the brake
pedal is pressed.
The tow/haul feature improves
transmission operation when towing a
trailer or a heavy load. All transmission
gear ranges are available when using
tow/haul.
Automatic Transmission Adaptive
Learning
This feature may increase durability and
provide consistent shift feel over the life
of your vehicle. A new vehicle or
transmission may have firm shifts, soft
shifts or both. This operation is considered
normal and will not affect function or
durability of the transmission. Over time,
the adaptive learning process will fully
update transmission operation.
Forced Downshifts
• Allowed in drive (D) with the tow/haul
feature on or off.
• Press the accelerator pedal to the floor.
• Allows transmission to select an
appropriate gear.
38
Motorhome (TY3) Canada/United States of America, enUSA, Edition date: 201712, Second Printing TransmissionE161510 E161509
Page 42 of 168
Brake-Shift Interlock
WARNINGS
Do not drive your vehicle until you
verify that the brake lamps are
working.
If your brake lamps are not working
properly or if you have disconnected
the vehicle battery cables, the
vehicle brake lamps and hazard flashers
may not properly warn traffic of a vehicle
breakdown or approaching danger, which
can increase the risk of serious injury or
death. To minimize the risk of serious injury
or death, be aware of your surroundings,
use other hazard signaling devices if
available, and move the vehicle to a safe
location away from traffic as soon as
possible. When doing this procedure, you will
be taking the vehicle out of park
which means the vehicle can roll
freely. To avoid unwanted vehicle
movement, always fully set the parking
brake prior to doing this procedure. Use
wheel chocks if appropriate. If the parking brake is fully released,
but the brake warning lamp remains
illuminated, the brakes may not be
working properly. See your authorized
dealer. Your vehicle is equipped with a brake-shift
interlock feature that prevents moving the
gearshift lever from park (P) when the
ignition is in the on position and the brake
pedal is not pressed.
If you cannot move the gearshift lever out
of park (P) position with the ignition in the
on position and the brake pedal pressed,
a malfunction may have occurred. It is
possible that a fuse has blown or your
vehicle
’s brake lamps are not operating
properly. See Fuse Specification Chart
(page 68). If the fuse is not blown and the brake
lamps are working properly, the following
procedure will allow you to move the
gearshift lever from park (P):
1. Apply the parking brake. Turn key to
the lock position, and then remove the
key.
2. Disconnect the negative (black) battery cable from the battery.
3. Insert the key and turn to the off position. Shift the transmission to
neutral (N).
4. Reconnect the negative (black) battery
cable to the battery.
5. Start the vehicle.
Note: See your authorized dealer as soon
as possible if this procedure is used.
If Your Vehicle Gets Stuck In Mud
or Snow
Note: Do not rock your vehicle if the engine
is not at normal operating temperature or
damage to the transmission may occur.
Note: Do not rock your vehicle for more
than a minute or damage to the
transmission and tires may occur, or the
engine may overheat.
If your vehicle gets stuck in mud or snow,
you may rock it out by shifting between
forward and reverse gears, stopping
between shifts in a steady pattern. Press
lightly on the accelerator in each gear.
39
Motorhome (TY3) Canada/United States of America, enUSA, Edition date: 201712, Second Printing Transmission
Page 43 of 168
GENERAL INFORMATION
Note:
Occasional brake noise is normal. If
a metal-to-metal, continuous grinding or
continuous squeal sound is present, the
brake linings may be worn-out and should
be inspected by an authorized dealer. If the
vehicle has continuous vibration or shudder
in the steering wheel while braking, the
vehicle should be inspected by an
authorized dealer.
Note: Brake dust may accumulate on the
wheels, even under normal driving
conditions. Some dust is inevitable as the
brakes wear and does not contribute to
brake noise. See Cleaning the Wheels
(page 106). See the Instrument Cluster
chapter for information on the
brake system warning light.
Wet brakes result in reduced braking
efficiency. Gently press the brake pedal a
few times when driving from a car wash or
standing water to dry the brakes.
Brake Over Accelerator
In the event the accelerator pedal
becomes stuck or entrapped, apply steady
and firm pressure to the brake pedal to
slow the vehicle and reduce engine power.
If you experience this condition, apply the
brakes and bring your vehicle to a safe
stop. Turn the engine off, shift the
transmission into park (P), apply the
parking brake, and then inspect the
accelerator pedal for any interferences. If
none are found and the condition persists,
have your vehicle towed to the nearest
authorized dealer. Hydraulic brake booster system
(Hydroboost or Hydromax)
The Hydroboost and Hydromax systems
receive fluid pressure from the power
steering pump to provide power assist
during braking.
The Hydromax booster receives backup
pressure from the reserve system electric
pump whenever the fluid in the power
steering system is not flowing. When the
engine is off, the pump will turn on if the
brake pedal is applied, or if the ignition is
turned to the on position.
The sound of the pump operating may be
heard by the driver, but this is a normal
characteristic of the system.
The reserve system provides reduced
braking power, so the vehicle should be
operated under these conditions with
caution, and only to seek service repair and
remove the vehicle from the roadway.
Note:
For Hydromax-equipped vehicles
operating under normal conditions, the noise
of the fluid flowing through the booster may
be heard whenever the brake is applied. This
condition is normal. Vehicle service is not
required.
If braking performance or pedal response
becomes very poor, even when the pedal
is strongly pressed, it may indicate the
presence of air in the hydraulic system or
leakage of fluid. Stop the vehicle safely as
soon as possible and seek service
immediately.
HINTS ON DRIVING WITH
ANTI-LOCK BRAKES
The anti-lock braking system does not
eliminate the risks when:
• You drive too closely to the vehicle in
front of you.
• Your vehicle is hydroplaning.
40
Motorhome (TY3) Canada/United States of America, enUSA, Edition date: 201712, Second Printing BrakesE144522
Page 44 of 168
•
You take corners too fast.
• The road surface is poor.
Note: If the system activates, the brake
pedal may pulse and may travel further.
Maintain pressure on the brake pedal. You
may also hear a noise from the system. This
is normal.
PARKING BRAKE WARNING
Always set the parking brake fully
and make sure the transmission
selector lever is placed in park (P).
Failure to set the parking brake and engage
park could result in vehicle roll-away,
property damage or bodily injury. Turn the
ignition to the lock position and remove
the key whenever you leave your vehicle. Apply the parking brake whenever your
vehicle is parked.
•
For vehicles equipped with a foot
operated parking brake, press the pedal
downward to set the parking brake.
• For vehicle equipped with a hand
operated parking brake, pull the
parking brake lever up to set the
parking brake. The brake warning lamp in the
instrument cluster illuminates
when the ignition is turned on
and the parking brake is applied.
The parking brake is not recommended to
stop a moving vehicle. However, if the
normal brakes fail, the parking brake can
be used to stop your vehicle in an
emergency. Your vehicle's stopping
distance will increase greatly and the
handling of your vehicle will be adversely
affected. To release the parking brake:
•
For vehicles equipped with a foot
operated parking brake, pull the
parking brake release lever.
• For vehicles equipped with a hand
operated parking brake, push the
parking brake lever down.
41
Motorhome (TY3) Canada/United States of America, enUSA, Edition date: 201712, Second Printing BrakesE144522
Page 45 of 168
PRINCIPLE OF OPERATION
Cruise control lets you maintain a set
speed without keeping your foot on the
accelerator pedal. You can use cruise
control when your vehicle speed is greater
than 20 mph (30 km/h).
USING CRUISE CONTROL WARNINGS
Do not use cruise control on winding
roads, in heavy traffic or when the
road surface is slippery. This could
result in loss of vehicle control, serious
injury or death. When you are going downhill, your
vehicle speed could increase above
the set speed. The system does not
apply the brakes. To help the system to maintain the set
speed when going downhill, downshift to
a lower gear.
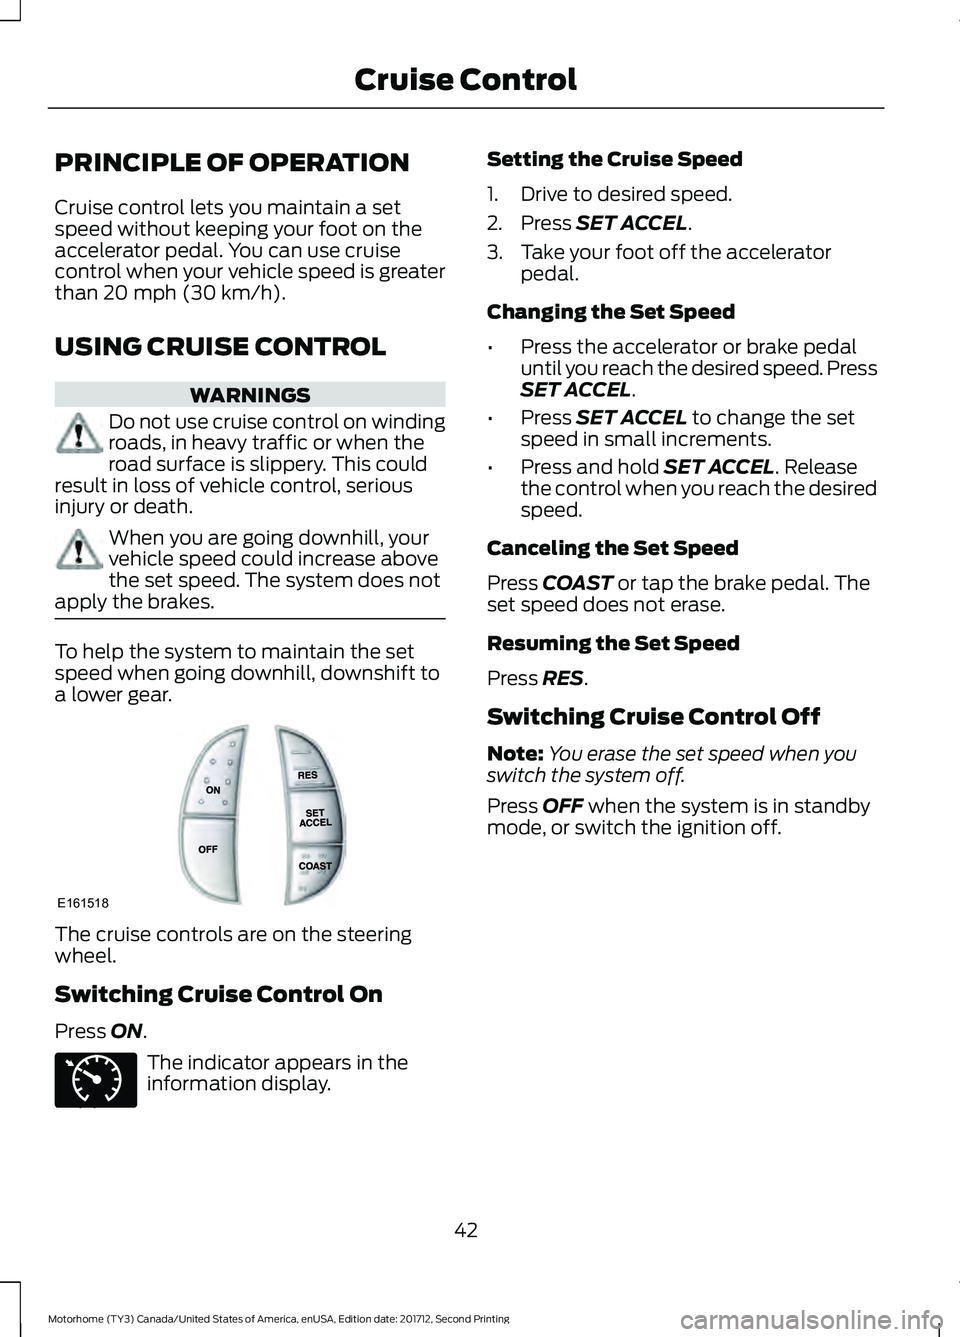
The cruise controls are on the steering
wheel.
Switching Cruise Control On
Press
ON.
The indicator appears in the
information display. Setting the Cruise Speed
1. Drive to desired speed.
2. Press
SET ACCEL.
3. Take your foot off the accelerator pedal.
Changing the Set Speed
• Press the accelerator or brake pedal
until you reach the desired speed. Press
SET ACCEL
.
• Press
SET ACCEL to change the set
speed in small increments.
• Press and hold
SET ACCEL. Release
the control when you reach the desired
speed.
Canceling the Set Speed
Press
COAST or tap the brake pedal. The
set speed does not erase.
Resuming the Set Speed
Press
RES.
Switching Cruise Control Off
Note: You erase the set speed when you
switch the system off.
Press
OFF when the system is in standby
mode, or switch the ignition off.
42
Motorhome (TY3) Canada/United States of America, enUSA, Edition date: 201712, Second Printing Cruise ControlE161518 E71340
Page 46 of 168
LOAD LIMIT
Vehicle Loading - with and
without a Trailer
This section guides you in the
proper loading of your vehicle,
trailer, or both. Keep your loaded
vehicle weight within its design
rating capability, with or without
a trailer. Properly loading your
vehicle provides maximum return
of vehicle design performance.
Before you load your vehicle,
become familiar with the
following terms for determining
your vehicle
’s weight rating, with
or without a trailer, from the
vehicle ’s Tire and Loading
Information label or Safety
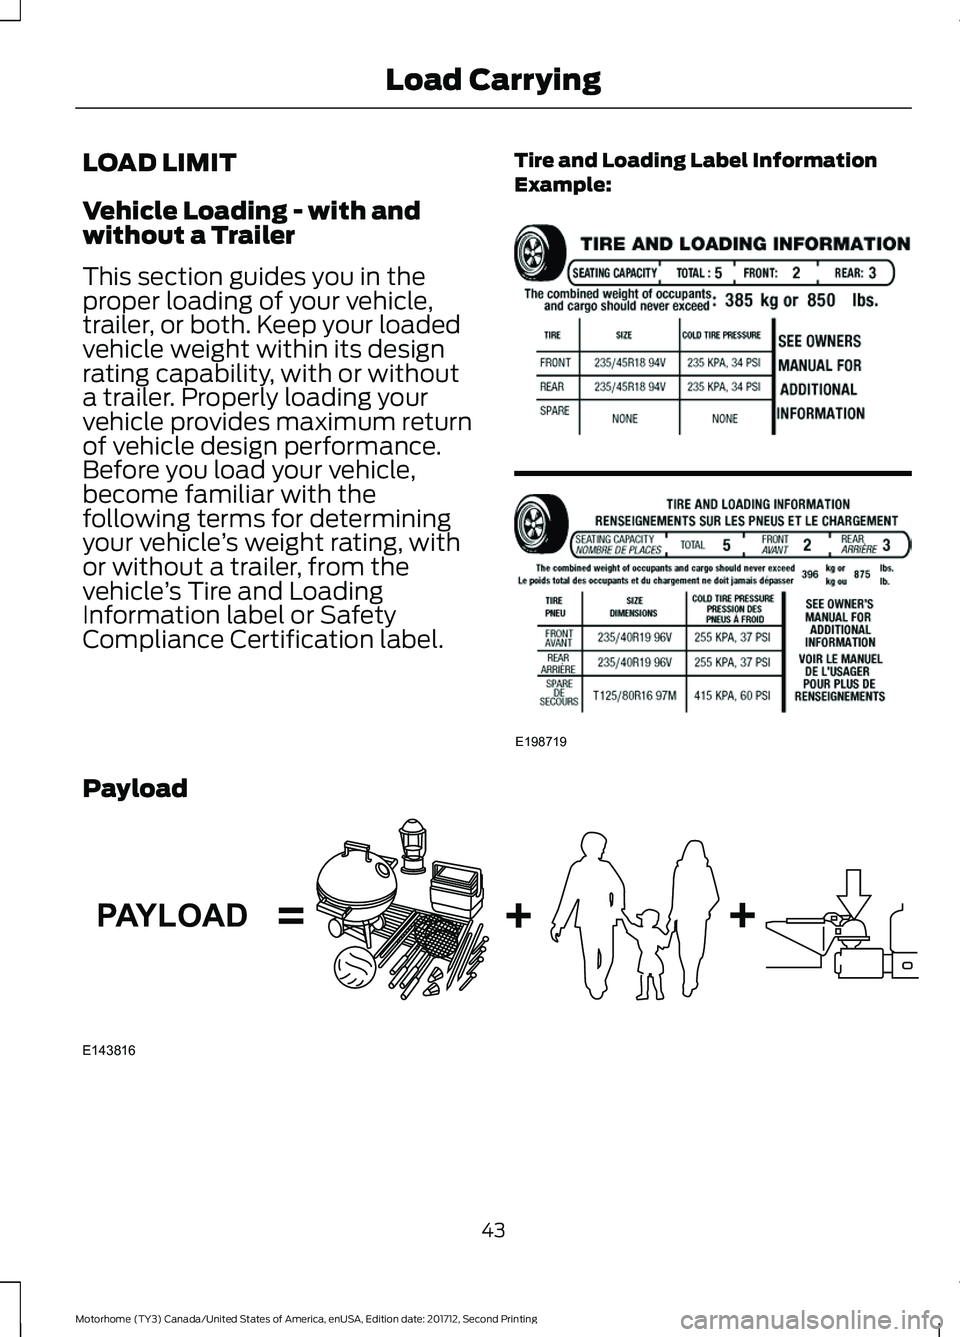
Compliance Certification label. Tire and Loading Label Information
Example:Payload
43
Motorhome (TY3) Canada/United States of America, enUSA, Edition date: 201712, Second Printing Load CarryingE198719 E143816PAYLOAD
Page 47 of 168
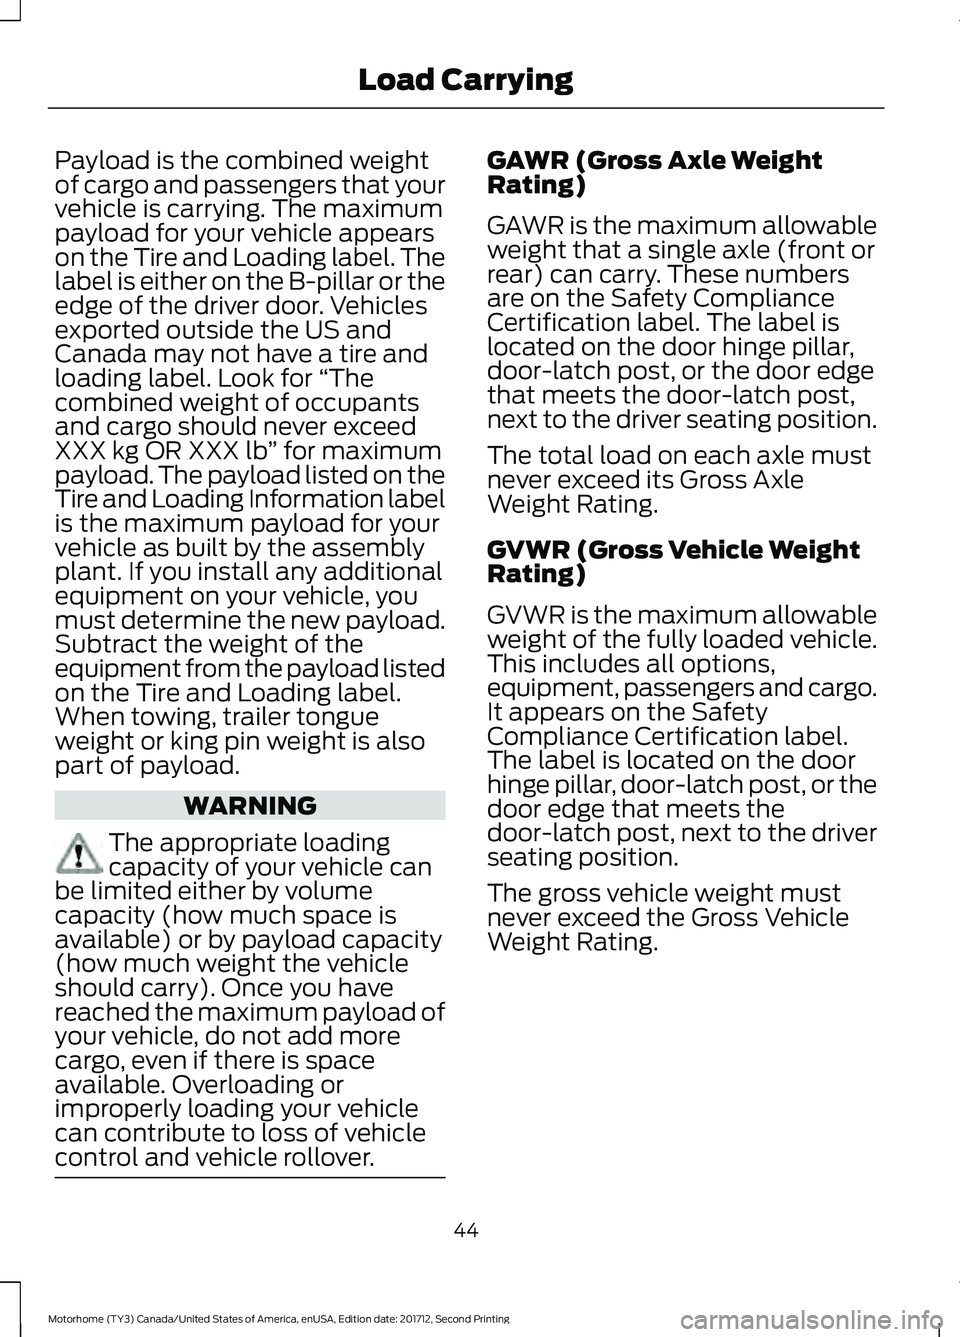
Payload is the combined weight
of cargo and passengers that your
vehicle is carrying. The maximum
payload for your vehicle appears
on the Tire and Loading label. The
label is either on the B-pillar or the
edge of the driver door. Vehicles
exported outside the US and
Canada may not have a tire and
loading label. Look for
“The
combined weight of occupants
and cargo should never exceed
XXX kg OR XXX lb ” for maximum
payload. The payload listed on the
Tire and Loading Information label
is the maximum payload for your
vehicle as built by the assembly
plant. If you install any additional
equipment on your vehicle, you
must determine the new payload.
Subtract the weight of the
equipment from the payload listed
on the Tire and Loading label.
When towing, trailer tongue
weight or king pin weight is also
part of payload. WARNING
The appropriate loading
capacity of your vehicle can
be limited either by volume
capacity (how much space is
available) or by payload capacity
(how much weight the vehicle
should carry). Once you have
reached the maximum payload of
your vehicle, do not add more
cargo, even if there is space
available. Overloading or
improperly loading your vehicle
can contribute to loss of vehicle
control and vehicle rollover. GAWR (Gross Axle Weight
Rating)
GAWR is the maximum allowable
weight that a single axle (front or
rear) can carry. These numbers
are on the Safety Compliance
Certification label. The label is
located on the door hinge pillar,
door-latch post, or the door edge
that meets the door-latch post,
next to the driver seating position.
The total load on each axle must
never exceed its Gross Axle
Weight Rating.
GVWR (Gross Vehicle Weight
Rating)
GVWR is the maximum allowable
weight of the fully loaded vehicle.
This includes all options,
equipment, passengers and cargo.
It appears on the Safety
Compliance Certification label.
The label is located on the door
hinge pillar, door-latch post, or the
door edge that meets the
door-latch post, next to the driver
seating position.
The gross vehicle weight must
never exceed the Gross Vehicle
Weight Rating.
44
Motorhome (TY3) Canada/United States of America, enUSA, Edition date: 201712, Second Printing Load Carrying
Page 48 of 168
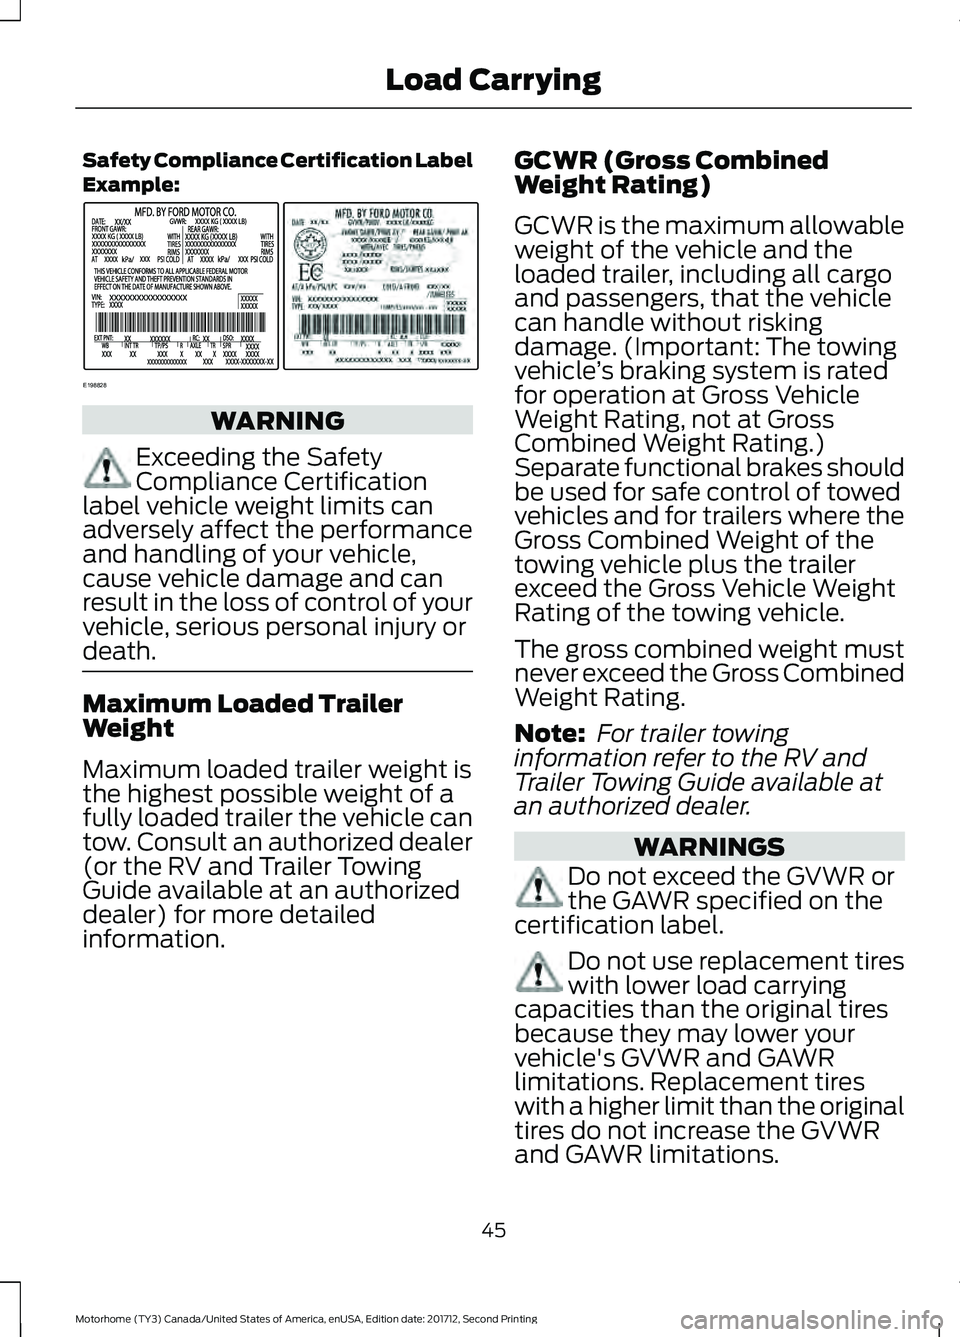
Safety Compliance Certification Label
Example:
WARNING
Exceeding the Safety
Compliance Certification
label vehicle weight limits can
adversely affect the performance
and handling of your vehicle,
cause vehicle damage and can
result in the loss of control of your
vehicle, serious personal injury or
death. Maximum Loaded Trailer
Weight
Maximum loaded trailer weight is
the highest possible weight of a
fully loaded trailer the vehicle can
tow. Consult an authorized dealer
(or the RV and Trailer Towing
Guide available at an authorized
dealer) for more detailed
information. GCWR (Gross Combined
Weight Rating)
GCWR is the maximum allowable
weight of the vehicle and the
loaded trailer, including all cargo
and passengers, that the vehicle
can handle without risking
damage. (Important: The towing
vehicle
’s braking system is rated
for operation at Gross Vehicle
Weight Rating, not at Gross
Combined Weight Rating.)
Separate functional brakes should
be used for safe control of towed
vehicles and for trailers where the
Gross Combined Weight of the
towing vehicle plus the trailer
exceed the Gross Vehicle Weight
Rating of the towing vehicle.
The gross combined weight must
never exceed the Gross Combined
Weight Rating.
Note: For trailer towing
information refer to the RV and
Trailer Towing Guide available at
an authorized dealer. WARNINGS
Do not exceed the GVWR or
the GAWR specified on the
certification label. Do not use replacement tires
with lower load carrying
capacities than the original tires
because they may lower your
vehicle's GVWR and GAWR
limitations. Replacement tires
with a higher limit than the original
tires do not increase the GVWR
and GAWR limitations.
45
Motorhome (TY3) Canada/United States of America, enUSA, Edition date: 201712, Second Printing Load CarryingE198828
Page 49 of 168
WARNINGS
Exceeding any vehicle weight
rating can adversely affect
the performance and handling of
your vehicle, cause vehicle
damage and can result in the loss
of control of your vehicle, serious
personal injury or death. Steps for determining the
correct load limit:
1. Locate the statement "The
combined weight of occupants
and cargo should never exceed
XXX kg or XXX lb." on your
vehicle ’s placard.
2. Determine the combined
weight of the driver and
passengers that will be riding
in your vehicle.
3. Subtract the combined weight
of the driver and passengers
from XXX kg or XXX lb.
4. The resulting figure equals the
available amount of cargo and
luggage load capacity. For
example, if the “XXX” amount
equals 1,400 lb. and there will
be five 150 lb. passengers in
your vehicle, the amount of
available cargo and luggage
load capacity is 650 lb.
(1400-750 (5 x 150) = 650 lb.) 5.
Determine the combined
weight of luggage and cargo
being loaded on the vehicle.
That weight may not safely
exceed the available cargo and
luggage load capacity
calculated in Step 4.
6. If your vehicle will be towing a
trailer, load from your trailer
will be transferred to your
vehicle. Consult this manual to
determine how this reduces the
available cargo and luggage
load capacity of your vehicle.
Helpful examples for calculating
the available amount of cargo
and luggage load capacity
Suppose your vehicle has a
1400-pound (635-kilogram) cargo
and luggage capacity. You decide
to go golfing. Is there enough load
capacity to carry you, four of your
friends and all the golf bags? You
and four friends average 220
pounds (99 kilograms) each and
the golf bags weigh approximately
30 pounds (13.5 kilograms) each.
The calculation would be: 1400 -
(5 x 220) - (5 x 30) = 1400 - 1100
- 150 = 150 pounds. Yes, you have
enough load capacity in your
vehicle to transport four friends
and your golf bags. In metric units,
the calculation would be: 635
kilograms - (5 x 99 kilograms) -
(5 x 13.5 kilograms) = 635 - 495 -
67.5 = 72.5 kilograms.
46
Motorhome (TY3) Canada/United States of America, enUSA, Edition date: 201712, Second Printing Load Carrying
Page 50 of 168
Suppose your vehicle has a
1400-pound (635-kilogram) cargo
and luggage capacity. You and
one of your friends decide to pick
up cement from the local home
improvement store to finish that
patio you have been planning for
the past two years. Measuring the
inside of the vehicle with the rear
seat folded down, you have room
for twelve 100-pound
(45-kilogram) bags of cement. Do
you have enough load capacity to
transport the cement to your
home? If you and your friend each
weigh 220 pounds (99 kilograms),
the calculation would be: 1400 -
(2 x 220) - (12 x 100) = 1400 - 440
- 1200 = - 240 pounds. No, you do
not have enough cargo capacity
to carry that much weight. In
metric units, the calculation would
be: 635 kilograms - (2 x 99
kilograms) - (12 x 45 kilograms) =
635 - 198 - 540 = -103 kilograms.
You will need to reduce the load
weight by at least 240 pounds
(104 kilograms). If you remove
three 100-pound (45-kilogram)
cement bags, then the load
calculation would be:1400 - (2 x
220) - (9 x 100) = 1400 - 440 -
900 = 60 pounds. Now you have
the load capacity to transport the
cement and your friend home. In
metric units, the calculation would
be: 635 kilograms - (2 x 99
kilograms) - (9 x 45 kilograms) =
635 - 198 - 405 = 32 kilograms.
The above calculations also
assume that the loads are
positioned in your vehicle in a
manner that does not overload
the front or the rear gross axle
weight rating specified for your
vehicle on the Safety Compliance
Certification label.
Special Loading Instructions
for Owners of Pick-up Trucks
and Utility-type Vehicles
WARNING
When loading the roof racks,
we recommend you evenly
distribute the load, as well as
maintain a low center of gravity.
Loaded vehicles, with higher
centers of gravity, may handle
differently than unloaded vehicles.
Take extra precautions, such as
slower speeds and increased
stopping distance, when driving a
heavily loaded vehicle. 47
Motorhome (TY3) Canada/United States of America, enUSA, Edition date: 201712, Second Printing Load Carrying