brakes FORD F-53 2018 Owners Manual
[x] Cancel search | Manufacturer: FORD, Model Year: 2018, Model line: F-53, Model: FORD F-53 2018Pages: 168, PDF Size: 3.02 MB
Page 4 of 168
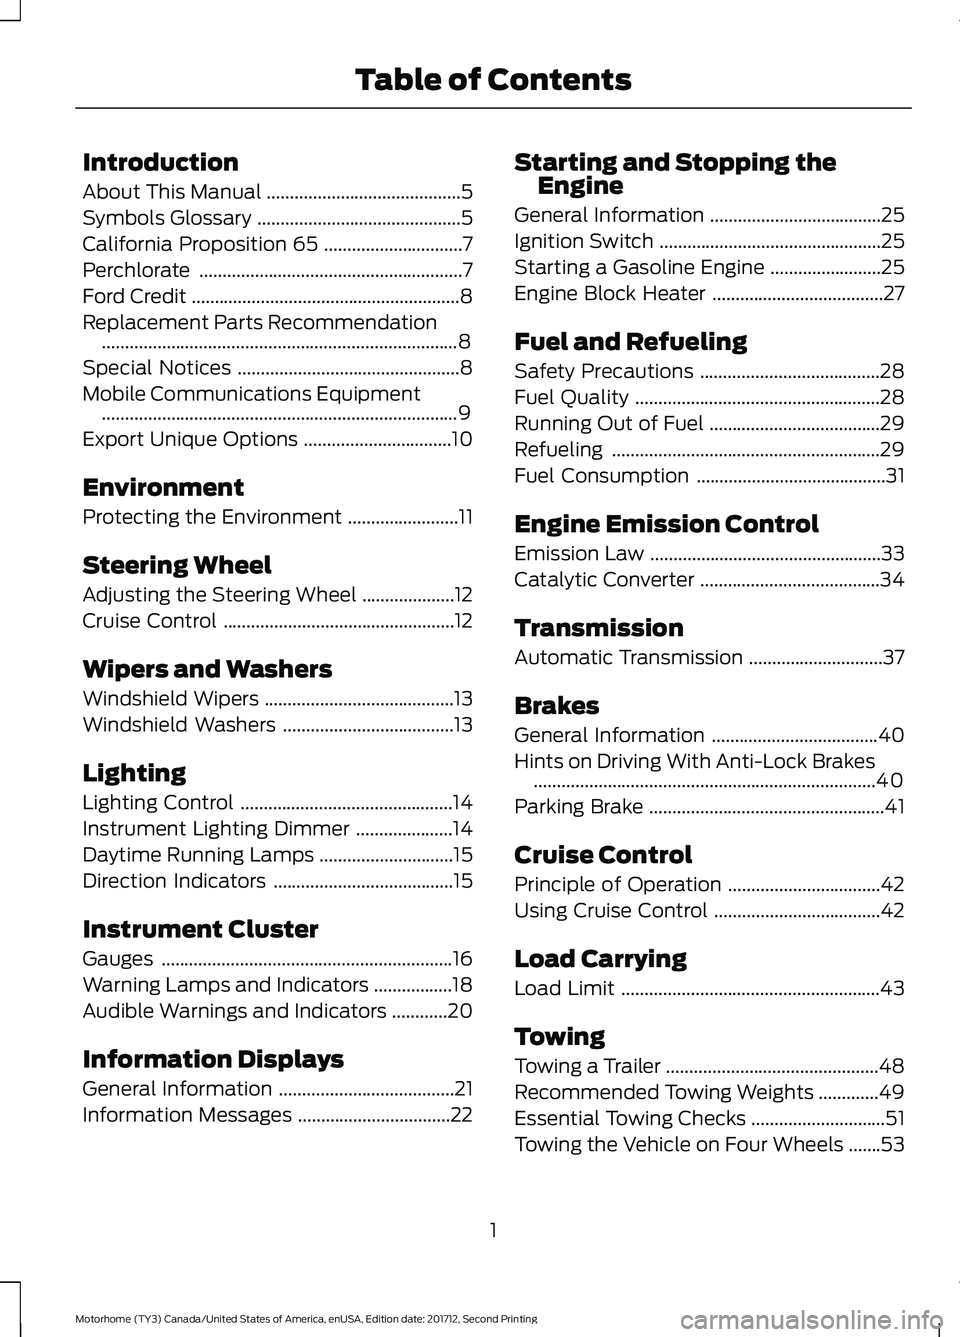
Introduction
About This Manual
..........................................5
Symbols Glossary ............................................
5
California Proposition 65 ..............................
7
Perchlorate .........................................................
7
Ford Credit ..........................................................
8
Replacement Parts Recommendation ........................................................................\
.....
8
Special Notices ................................................
8
Mobile Communications Equipment ........................................................................\
.....
9
Export Unique Options ................................
10
Environment
Protecting the Environment ........................
11
Steering Wheel
Adjusting the Steering Wheel ....................
12
Cruise Control ..................................................
12
Wipers and Washers
Windshield Wipers .........................................
13
Windshield Washers .....................................
13
Lighting
Lighting Control ..............................................
14
Instrument Lighting Dimmer .....................
14
Daytime Running Lamps .............................
15
Direction Indicators .......................................
15
Instrument Cluster
Gauges ...............................................................
16
Warning Lamps and Indicators .................
18
Audible Warnings and Indicators ............
20
Information Displays
General Information ......................................
21
Information Messages .................................
22Starting and Stopping the
Engine
General Information .....................................
25
Ignition Switch ................................................
25
Starting a Gasoline Engine ........................
25
Engine Block Heater .....................................
27
Fuel and Refueling
Safety Precautions .......................................
28
Fuel Quality .....................................................
28
Running Out of Fuel .....................................
29
Refueling ..........................................................
29
Fuel Consumption .........................................
31
Engine Emission Control
Emission Law ..................................................
33
Catalytic Converter .......................................
34
Transmission
Automatic Transmission .............................
37
Brakes
General Information ....................................
40
Hints on Driving With Anti-Lock Brakes ........................................................................\
..
40
Parking Brake ...................................................
41
Cruise Control
Principle of Operation .................................
42
Using Cruise Control ....................................
42
Load Carrying
Load Limit ........................................................
43
Towing
Towing a Trailer ..............................................
48
Recommended Towing Weights .............
49
Essential Towing Checks .............................
51
Towing the Vehicle on Four Wheels .......
53
1
Motorhome (TY3) Canada/United States of America, enUSA, Edition date: 201712, Second Printing Table of Contents
Page 27 of 168
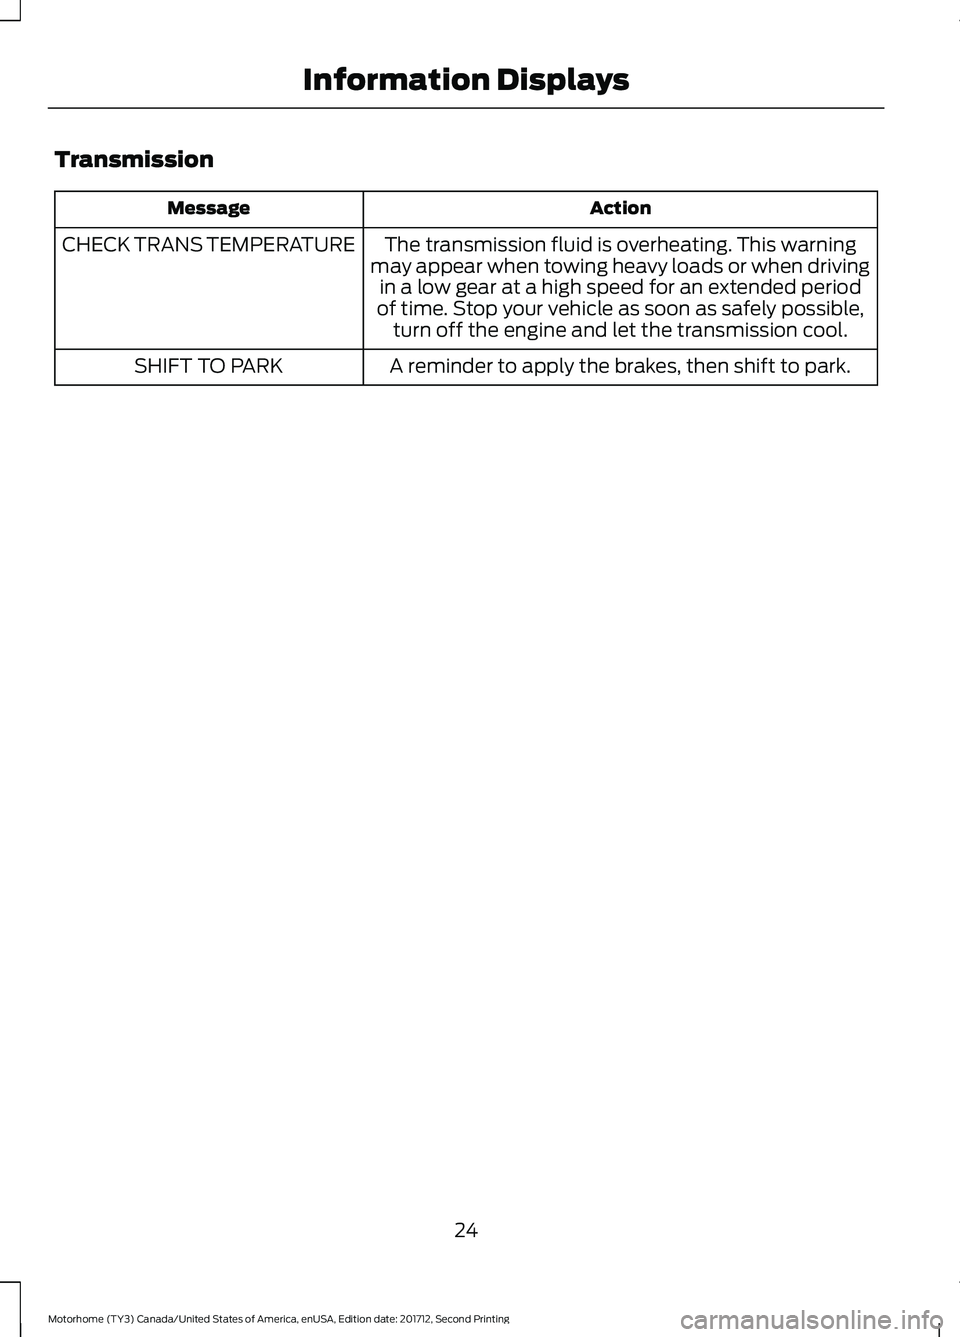
Transmission
Action
Message
The transmission fluid is overheating. This warning
may appear when towing heavy loads or when driving in a low gear at a high speed for an extended period
of time. Stop your vehicle as soon as safely possible, turn off the engine and let the transmission cool.
CHECK TRANS TEMPERATURE
A reminder to apply the brakes, then shift to park.
SHIFT TO PARK
24
Motorhome (TY3) Canada/United States of America, enUSA, Edition date: 201712, Second Printing Information Displays
Page 29 of 168
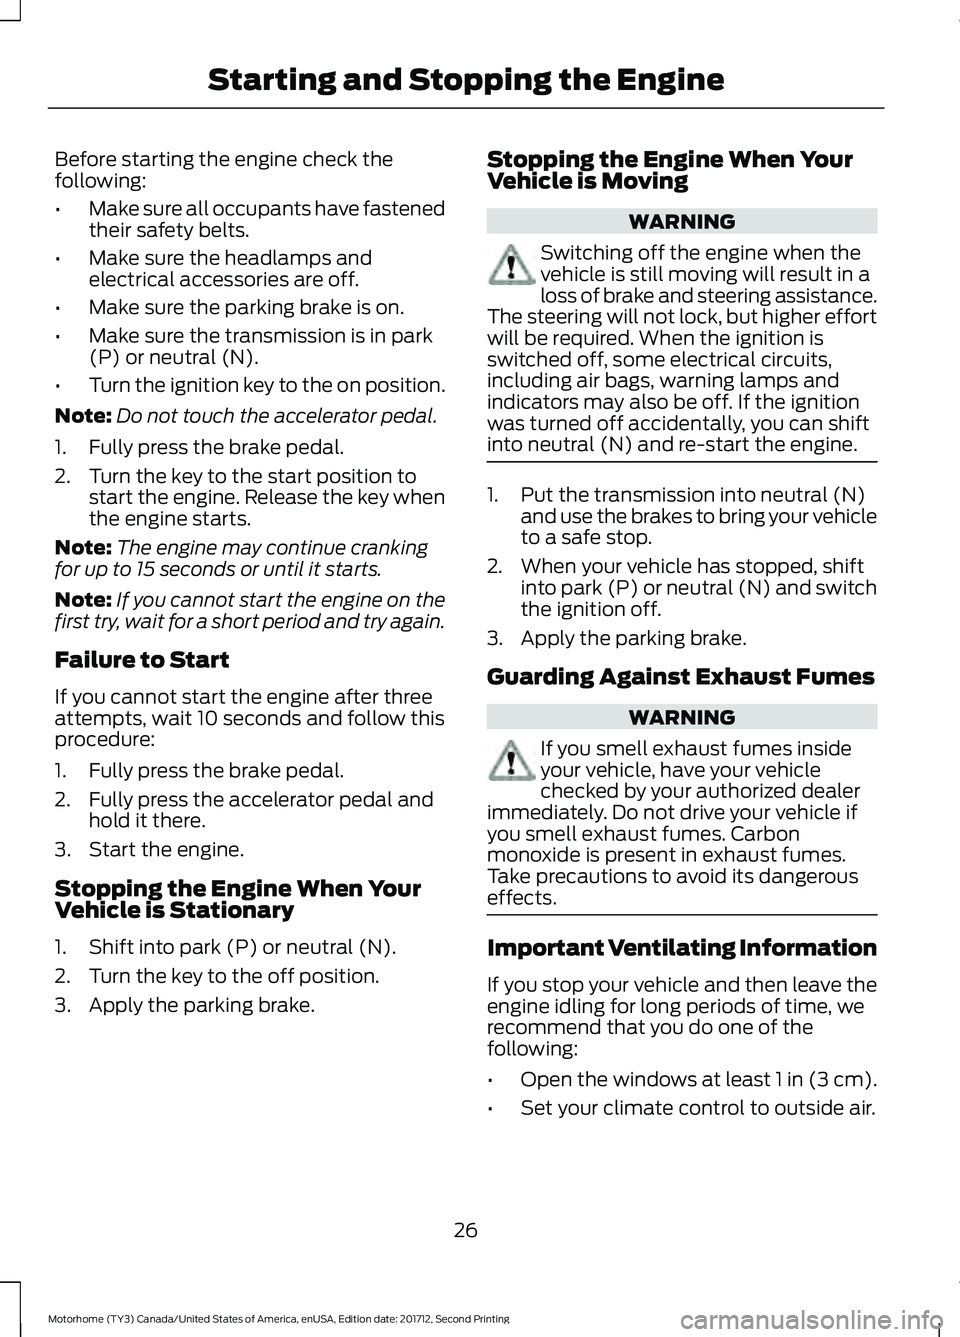
Before starting the engine check the
following:
•
Make sure all occupants have fastened
their safety belts.
• Make sure the headlamps and
electrical accessories are off.
• Make sure the parking brake is on.
• Make sure the transmission is in park
(P) or neutral (N).
• Turn the ignition key to the on position.
Note: Do not touch the accelerator pedal.
1. Fully press the brake pedal.
2. Turn the key to the start position to start the engine. Release the key when
the engine starts.
Note: The engine may continue cranking
for up to 15 seconds or until it starts.
Note: If you cannot start the engine on the
first try, wait for a short period and try again.
Failure to Start
If you cannot start the engine after three
attempts, wait 10 seconds and follow this
procedure:
1. Fully press the brake pedal.
2. Fully press the accelerator pedal and hold it there.
3. Start the engine.
Stopping the Engine When Your
Vehicle is Stationary
1. Shift into park (P) or neutral (N).
2. Turn the key to the off position.
3. Apply the parking brake. Stopping the Engine When Your
Vehicle is Moving WARNING
Switching off the engine when the
vehicle is still moving will result in a
loss of brake and steering assistance.
The steering will not lock, but higher effort
will be required. When the ignition is
switched off, some electrical circuits,
including air bags, warning lamps and
indicators may also be off. If the ignition
was turned off accidentally, you can shift
into neutral (N) and re-start the engine. 1. Put the transmission into neutral (N)
and use the brakes to bring your vehicle
to a safe stop.
2. When your vehicle has stopped, shift into park (P) or neutral (N) and switch
the ignition off.
3. Apply the parking brake.
Guarding Against Exhaust Fumes WARNING
If you smell exhaust fumes inside
your vehicle, have your vehicle
checked by your authorized dealer
immediately. Do not drive your vehicle if
you smell exhaust fumes. Carbon
monoxide is present in exhaust fumes.
Take precautions to avoid its dangerous
effects. Important Ventilating Information
If you stop your vehicle and then leave the
engine idling for long periods of time, we
recommend that you do one of the
following:
•
Open the windows at least 1 in (3 cm).
• Set your climate control to outside air.
26
Motorhome (TY3) Canada/United States of America, enUSA, Edition date: 201712, Second Printing Starting and Stopping the Engine
Page 42 of 168
Brake-Shift Interlock
WARNINGS
Do not drive your vehicle until you
verify that the brake lamps are
working.
If your brake lamps are not working
properly or if you have disconnected
the vehicle battery cables, the
vehicle brake lamps and hazard flashers
may not properly warn traffic of a vehicle
breakdown or approaching danger, which
can increase the risk of serious injury or
death. To minimize the risk of serious injury
or death, be aware of your surroundings,
use other hazard signaling devices if
available, and move the vehicle to a safe
location away from traffic as soon as
possible. When doing this procedure, you will
be taking the vehicle out of park
which means the vehicle can roll
freely. To avoid unwanted vehicle
movement, always fully set the parking
brake prior to doing this procedure. Use
wheel chocks if appropriate. If the parking brake is fully released,
but the brake warning lamp remains
illuminated, the brakes may not be
working properly. See your authorized
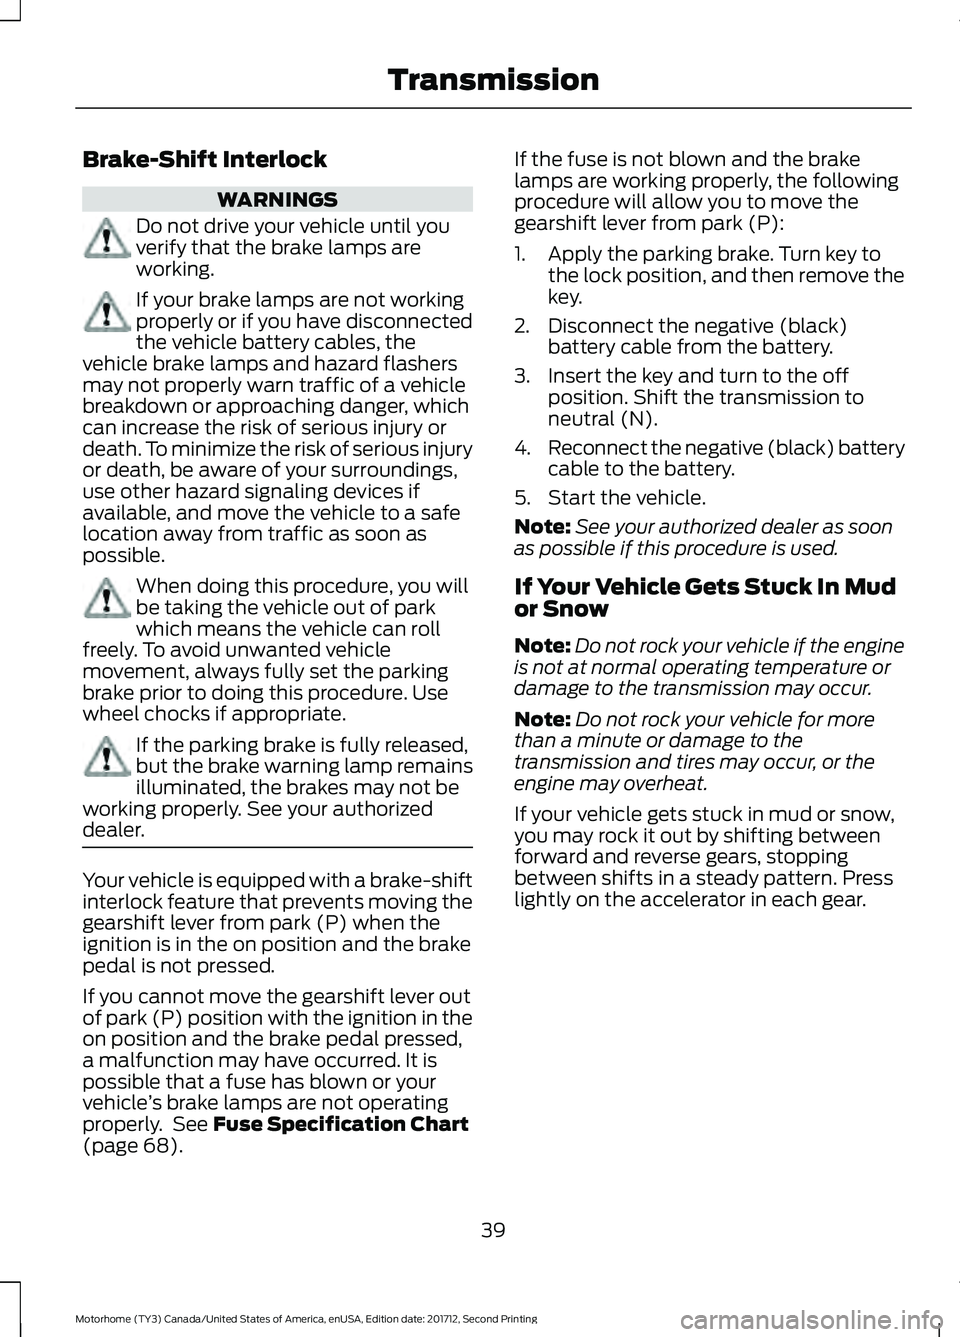
dealer. Your vehicle is equipped with a brake-shift
interlock feature that prevents moving the
gearshift lever from park (P) when the
ignition is in the on position and the brake
pedal is not pressed.
If you cannot move the gearshift lever out
of park (P) position with the ignition in the
on position and the brake pedal pressed,
a malfunction may have occurred. It is
possible that a fuse has blown or your
vehicle
’s brake lamps are not operating
properly. See Fuse Specification Chart
(page 68). If the fuse is not blown and the brake
lamps are working properly, the following
procedure will allow you to move the
gearshift lever from park (P):
1. Apply the parking brake. Turn key to
the lock position, and then remove the
key.
2. Disconnect the negative (black) battery cable from the battery.
3. Insert the key and turn to the off position. Shift the transmission to
neutral (N).
4. Reconnect the negative (black) battery
cable to the battery.
5. Start the vehicle.
Note: See your authorized dealer as soon
as possible if this procedure is used.
If Your Vehicle Gets Stuck In Mud
or Snow
Note: Do not rock your vehicle if the engine
is not at normal operating temperature or
damage to the transmission may occur.
Note: Do not rock your vehicle for more
than a minute or damage to the
transmission and tires may occur, or the
engine may overheat.
If your vehicle gets stuck in mud or snow,
you may rock it out by shifting between
forward and reverse gears, stopping
between shifts in a steady pattern. Press
lightly on the accelerator in each gear.
39
Motorhome (TY3) Canada/United States of America, enUSA, Edition date: 201712, Second Printing Transmission
Page 43 of 168
GENERAL INFORMATION
Note:
Occasional brake noise is normal. If
a metal-to-metal, continuous grinding or
continuous squeal sound is present, the
brake linings may be worn-out and should
be inspected by an authorized dealer. If the
vehicle has continuous vibration or shudder
in the steering wheel while braking, the
vehicle should be inspected by an
authorized dealer.
Note: Brake dust may accumulate on the
wheels, even under normal driving
conditions. Some dust is inevitable as the
brakes wear and does not contribute to
brake noise. See Cleaning the Wheels
(page 106). See the Instrument Cluster
chapter for information on the
brake system warning light.
Wet brakes result in reduced braking
efficiency. Gently press the brake pedal a
few times when driving from a car wash or
standing water to dry the brakes.
Brake Over Accelerator
In the event the accelerator pedal
becomes stuck or entrapped, apply steady
and firm pressure to the brake pedal to
slow the vehicle and reduce engine power.
If you experience this condition, apply the
brakes and bring your vehicle to a safe
stop. Turn the engine off, shift the
transmission into park (P), apply the
parking brake, and then inspect the
accelerator pedal for any interferences. If
none are found and the condition persists,
have your vehicle towed to the nearest
authorized dealer. Hydraulic brake booster system
(Hydroboost or Hydromax)
The Hydroboost and Hydromax systems
receive fluid pressure from the power
steering pump to provide power assist
during braking.
The Hydromax booster receives backup
pressure from the reserve system electric
pump whenever the fluid in the power
steering system is not flowing. When the
engine is off, the pump will turn on if the
brake pedal is applied, or if the ignition is
turned to the on position.
The sound of the pump operating may be
heard by the driver, but this is a normal
characteristic of the system.
The reserve system provides reduced
braking power, so the vehicle should be
operated under these conditions with
caution, and only to seek service repair and
remove the vehicle from the roadway.
Note:
For Hydromax-equipped vehicles
operating under normal conditions, the noise
of the fluid flowing through the booster may
be heard whenever the brake is applied. This
condition is normal. Vehicle service is not
required.
If braking performance or pedal response
becomes very poor, even when the pedal
is strongly pressed, it may indicate the
presence of air in the hydraulic system or
leakage of fluid. Stop the vehicle safely as
soon as possible and seek service
immediately.
HINTS ON DRIVING WITH
ANTI-LOCK BRAKES
The anti-lock braking system does not
eliminate the risks when:
• You drive too closely to the vehicle in
front of you.
• Your vehicle is hydroplaning.
40
Motorhome (TY3) Canada/United States of America, enUSA, Edition date: 201712, Second Printing BrakesE144522
Page 44 of 168
•
You take corners too fast.
• The road surface is poor.
Note: If the system activates, the brake
pedal may pulse and may travel further.
Maintain pressure on the brake pedal. You
may also hear a noise from the system. This
is normal.
PARKING BRAKE WARNING
Always set the parking brake fully
and make sure the transmission
selector lever is placed in park (P).
Failure to set the parking brake and engage
park could result in vehicle roll-away,
property damage or bodily injury. Turn the
ignition to the lock position and remove
the key whenever you leave your vehicle. Apply the parking brake whenever your
vehicle is parked.
•
For vehicles equipped with a foot
operated parking brake, press the pedal
downward to set the parking brake.
• For vehicle equipped with a hand
operated parking brake, pull the
parking brake lever up to set the
parking brake. The brake warning lamp in the
instrument cluster illuminates
when the ignition is turned on
and the parking brake is applied.
The parking brake is not recommended to
stop a moving vehicle. However, if the
normal brakes fail, the parking brake can
be used to stop your vehicle in an
emergency. Your vehicle's stopping
distance will increase greatly and the
handling of your vehicle will be adversely
affected. To release the parking brake:
•
For vehicles equipped with a foot
operated parking brake, pull the
parking brake release lever.
• For vehicles equipped with a hand
operated parking brake, push the
parking brake lever down.
41
Motorhome (TY3) Canada/United States of America, enUSA, Edition date: 201712, Second Printing BrakesE144522
Page 45 of 168
PRINCIPLE OF OPERATION
Cruise control lets you maintain a set
speed without keeping your foot on the
accelerator pedal. You can use cruise
control when your vehicle speed is greater
than 20 mph (30 km/h).
USING CRUISE CONTROL WARNINGS
Do not use cruise control on winding
roads, in heavy traffic or when the
road surface is slippery. This could
result in loss of vehicle control, serious
injury or death. When you are going downhill, your
vehicle speed could increase above
the set speed. The system does not
apply the brakes. To help the system to maintain the set
speed when going downhill, downshift to
a lower gear.
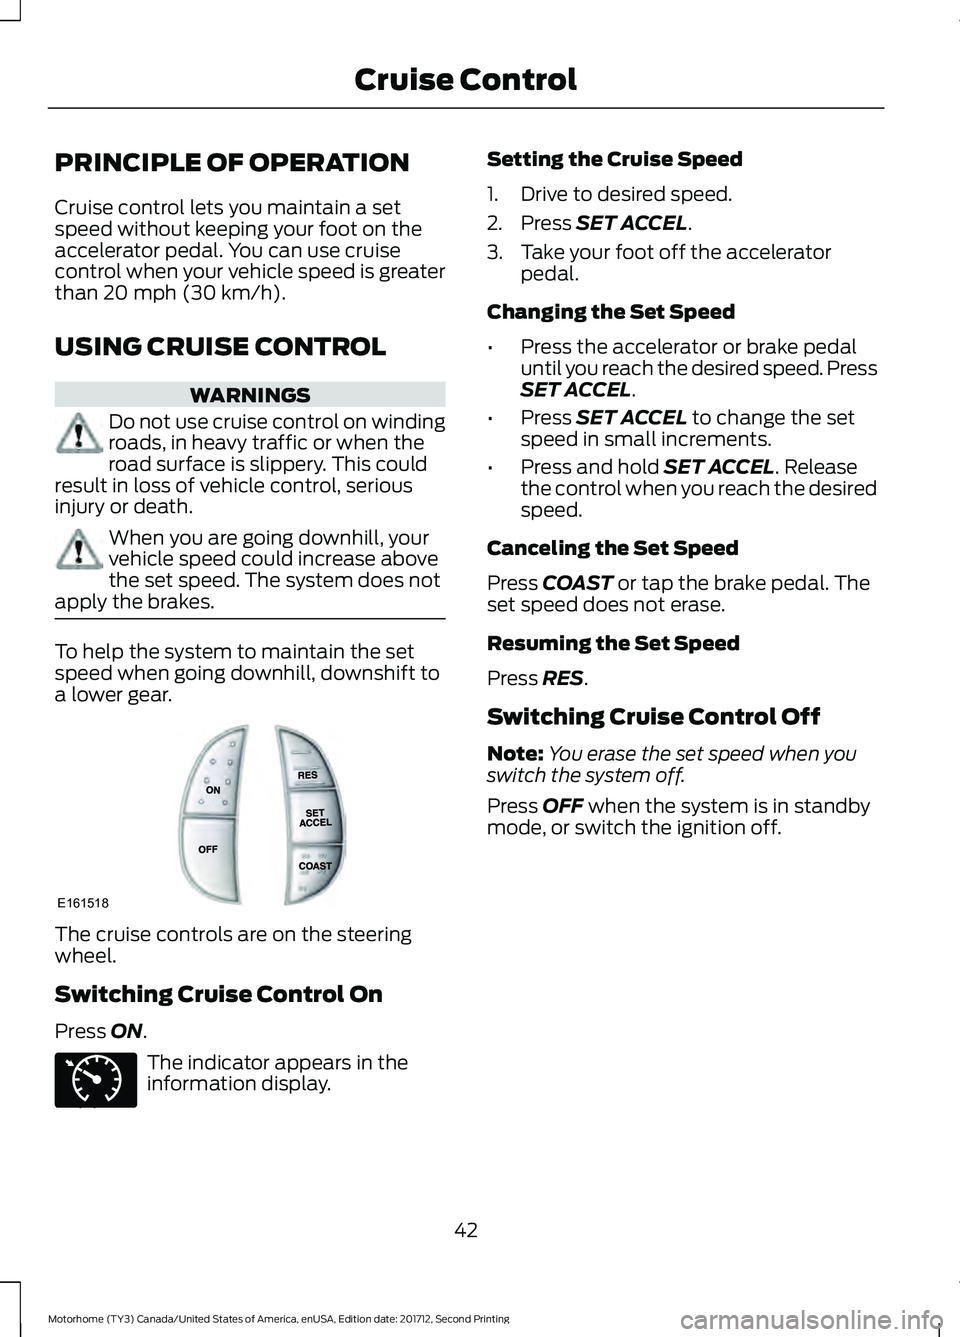
The cruise controls are on the steering
wheel.
Switching Cruise Control On
Press
ON.
The indicator appears in the
information display. Setting the Cruise Speed
1. Drive to desired speed.
2. Press
SET ACCEL.
3. Take your foot off the accelerator pedal.
Changing the Set Speed
• Press the accelerator or brake pedal
until you reach the desired speed. Press
SET ACCEL
.
• Press
SET ACCEL to change the set
speed in small increments.
• Press and hold
SET ACCEL. Release
the control when you reach the desired
speed.
Canceling the Set Speed
Press
COAST or tap the brake pedal. The
set speed does not erase.
Resuming the Set Speed
Press
RES.
Switching Cruise Control Off
Note: You erase the set speed when you
switch the system off.
Press
OFF when the system is in standby
mode, or switch the ignition off.
42
Motorhome (TY3) Canada/United States of America, enUSA, Edition date: 201712, Second Printing Cruise ControlE161518 E71340
Page 48 of 168
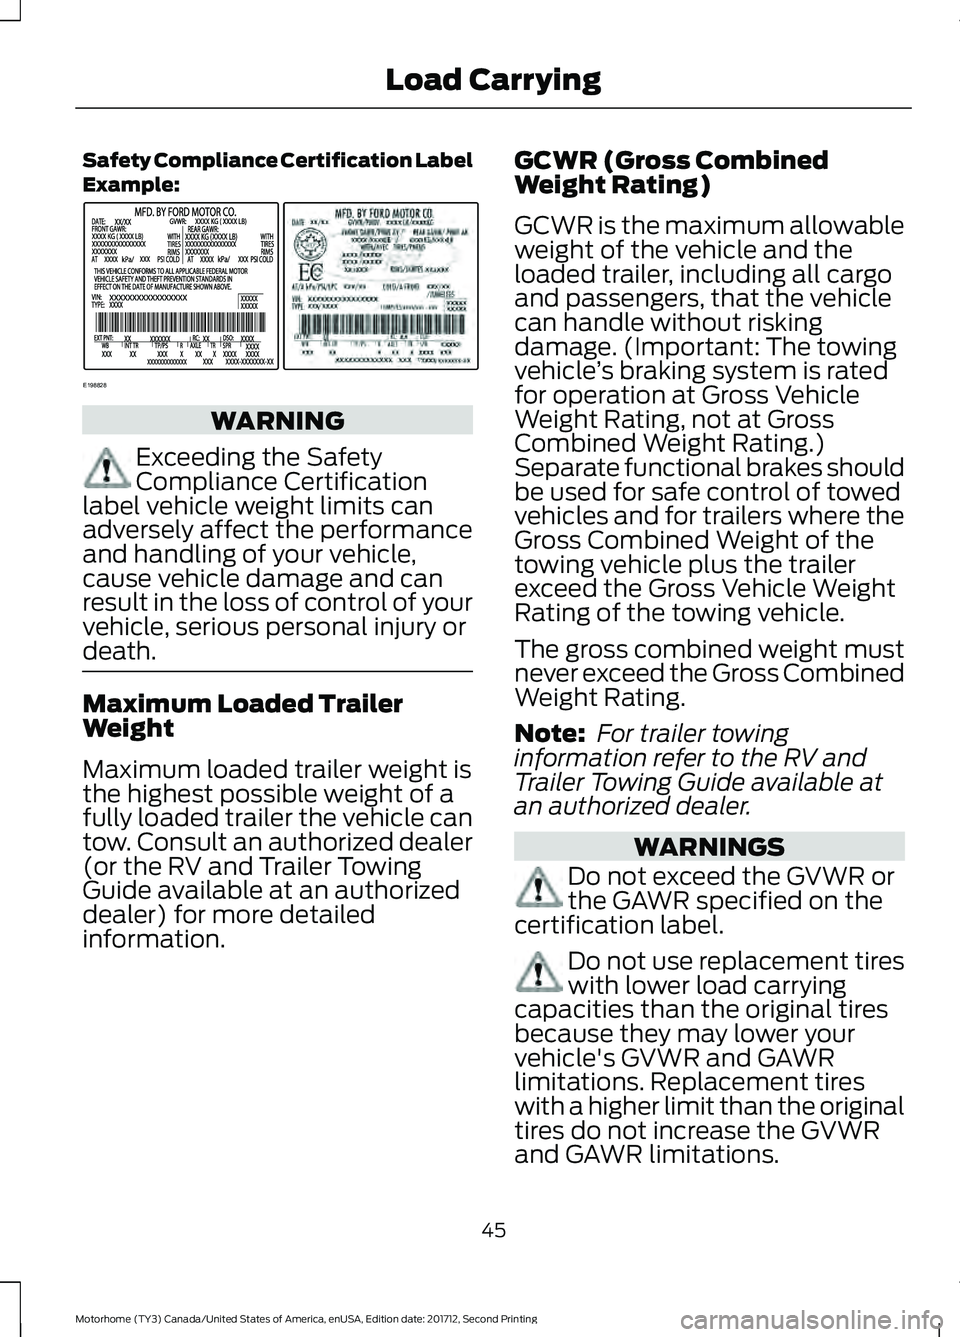
Safety Compliance Certification Label
Example:
WARNING
Exceeding the Safety
Compliance Certification
label vehicle weight limits can
adversely affect the performance
and handling of your vehicle,
cause vehicle damage and can
result in the loss of control of your
vehicle, serious personal injury or
death. Maximum Loaded Trailer
Weight
Maximum loaded trailer weight is
the highest possible weight of a
fully loaded trailer the vehicle can
tow. Consult an authorized dealer
(or the RV and Trailer Towing
Guide available at an authorized
dealer) for more detailed
information. GCWR (Gross Combined
Weight Rating)
GCWR is the maximum allowable
weight of the vehicle and the
loaded trailer, including all cargo
and passengers, that the vehicle
can handle without risking
damage. (Important: The towing
vehicle
’s braking system is rated
for operation at Gross Vehicle
Weight Rating, not at Gross
Combined Weight Rating.)
Separate functional brakes should
be used for safe control of towed
vehicles and for trailers where the
Gross Combined Weight of the
towing vehicle plus the trailer
exceed the Gross Vehicle Weight
Rating of the towing vehicle.
The gross combined weight must
never exceed the Gross Combined
Weight Rating.
Note: For trailer towing
information refer to the RV and
Trailer Towing Guide available at
an authorized dealer. WARNINGS
Do not exceed the GVWR or
the GAWR specified on the
certification label. Do not use replacement tires
with lower load carrying
capacities than the original tires
because they may lower your
vehicle's GVWR and GAWR
limitations. Replacement tires
with a higher limit than the original
tires do not increase the GVWR
and GAWR limitations.
45
Motorhome (TY3) Canada/United States of America, enUSA, Edition date: 201712, Second Printing Load CarryingE198828
Page 51 of 168
TOWING A TRAILER
WARNINGS
Towing trailers beyond the
maximum recommended
gross trailer weight exceeds the
limit of your vehicle and could
result in engine damage,
transmission damage, structural
damage, loss of vehicle control,
vehicle rollover and personal
injury. Do not exceed the GVWR or
the GAWR specified on the
certification label. Note:
See Recommended
Towing Weights (page 49).
Your vehicle may have electrical
items, such as fuses or relays,
related to towing. See
Fuses
(page 68).
Your vehicle's load capacity
designation is by weight, not by
volume, so you cannot necessarily
use all available space when
loading a vehicle or trailer.
Towing a trailer places an extra
load on your vehicle's engine,
transmission, axle, brakes, tires
and suspension. Inspect these
components periodically during,
and after, any towing operation. Load Placement
To help minimize how trailer
movement affects your vehicle
when driving:
•
Load the heaviest items closest
to the trailer floor.
• Load the heaviest items
centered between the left and
right side trailer tires.
• Load the heaviest items above
the trailer axles or just slightly
forward toward the trailer
tongue. Do not allow the final
trailer tongue weight to go
above or below 10-15% of the
loaded trailer weight.
• Select a ball mount with the
correct rise or drop and load
capacity. When both the
loaded vehicle and trailer are
connected, the trailer frame
should be level, or slightly
angled down toward your
vehicle, when viewed from the
side.
When driving with a trailer or
payload, a slight takeoff vibration
or shudder may be present due to
the increased payload weight.
Additional information regarding
proper trailer loading and setting
your vehicle up for towing is
located in another chapter of this
manual. See
Load Limit (page
43).
You can also find information in
the
RV & Trailer Towing Guide
available at your authorized
dealer, or online.
48
Motorhome (TY3) Canada/United States of America, enUSA, Edition date: 201712, Second Printing Towing
Page 52 of 168
RV & Trailer Towing Guide Online
http://www.fleet.ford.com/towing-guides/
Website
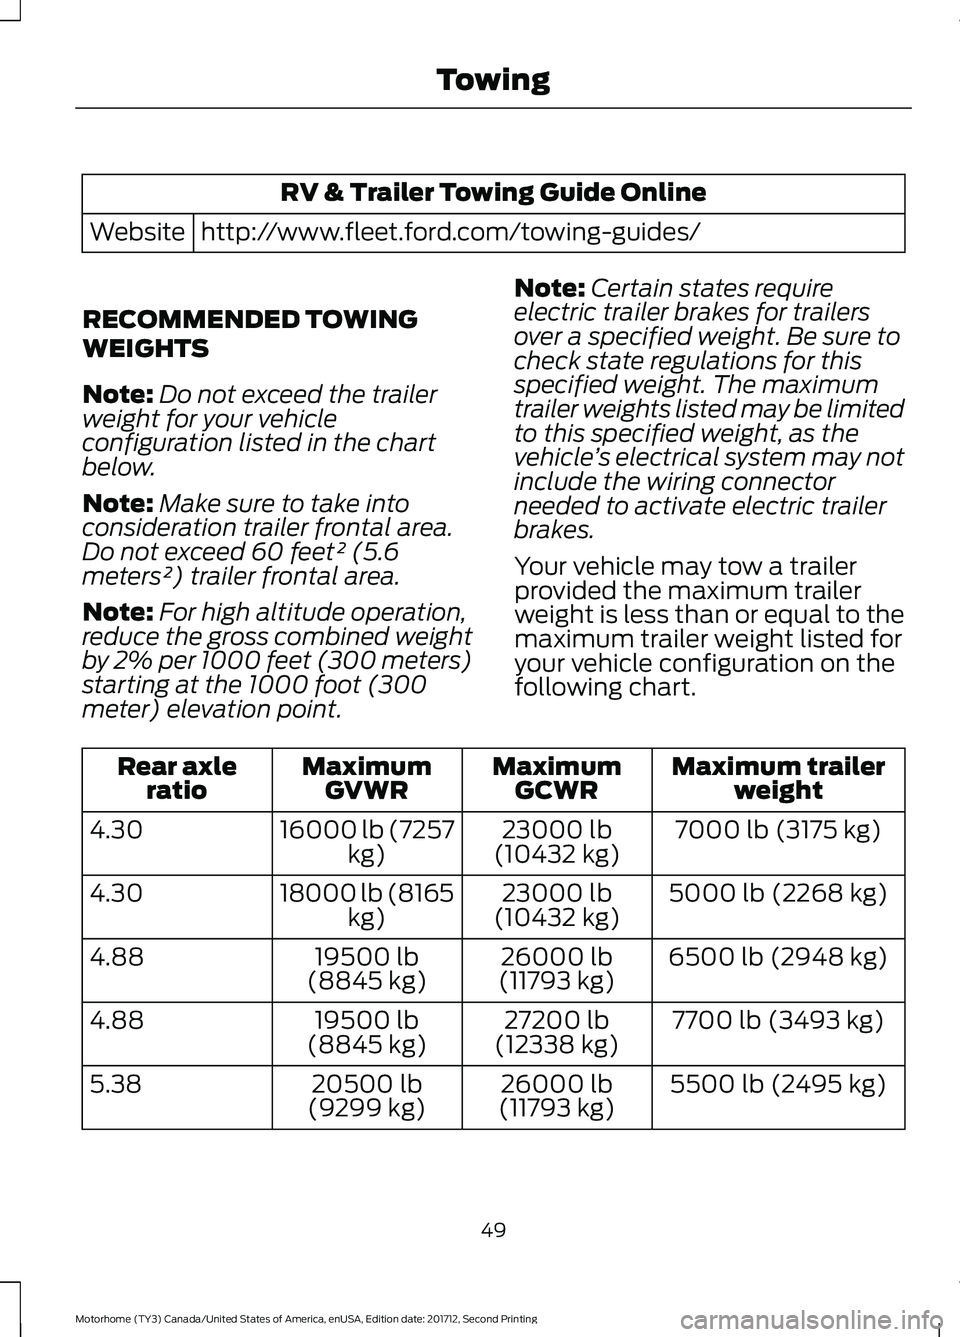
RECOMMENDED TOWING
WEIGHTS
Note: Do not exceed the trailer
weight for your vehicle
configuration listed in the chart
below.
Note: Make sure to take into
consideration trailer frontal area.
Do not exceed 60 feet² (5.6
meters²) trailer frontal area.
Note: For high altitude operation,
reduce the gross combined weight
by 2% per 1000 feet (300 meters)
starting at the 1000 foot (300
meter) elevation point. Note:
Certain states require
electric trailer brakes for trailers
over a specified weight. Be sure to
check state regulations for this
specified weight. The maximum
trailer weights listed may be limited
to this specified weight, as the
vehicle ’s electrical system may not
include the wiring connector
needed to activate electric trailer
brakes.
Your vehicle may tow a trailer
provided the maximum trailer
weight is less than or equal to the
maximum trailer weight listed for
your vehicle configuration on the
following chart. Maximum trailer
weight
Maximum
GCWR
Maximum
GVWR
Rear axle
ratio
7000 lb (3175 kg)
23000 lb
(10432 kg)
16000 lb (7257
kg)
4.30
5000 lb (2268 kg)
23000 lb
(10432 kg)
18000 lb (8165
kg)
4.30
6500 lb (2948 kg)
26000 lb
(11793 kg)
19500 lb
(8845 kg)
4.88
7700 lb (3493 kg)
27200 lb
(12338 kg)
19500 lb
(8845 kg)
4.88
5500 lb (2495 kg)
26000 lb
(11793 kg)
20500 lb
(9299 kg)
5.38
49
Motorhome (TY3) Canada/United States of America, enUSA, Edition date: 201712, Second Printing Towing