check transmission fluid FORD F-53 2021 Owners Manual
[x] Cancel search | Manufacturer: FORD, Model Year: 2021, Model line: F-53, Model: FORD F-53 2021Pages: 191, PDF Size: 2.84 MB
Page 6 of 191
Automatic Transmission Fluid Check
........................................................................\
.122
Brake Fluid Check ........................................
124
Power Steering Fluid Check .....................
126
Changing the 12V Battery ..........................
127
Fuel Filter ........................................................
129
Vehicle Care
General Information ...................................
130
Cleaning the Exterior ..................................
130
Cleaning the Engine .....................................
131
Cleaning the Wheels ...................................
131
Vehicle Storage .............................................
132
Wheels and Tires
Tire Care ..........................................................
134
Using Snow Chains .....................................
150
Technical Specifications ............................
151
Capacities and Specifications
Engine Specifications .................................
152
Motorcraft Parts ...........................................
152
Vehicle Identification Number ................
154
Transmission Code Designation ............
155
Capacities and Specifications ................
156
Connected Vehicle
Connected Vehicle Requirements ........
163
Connected Vehicle Limitations ..............
163
Connecting the Vehicle to a Mobile Network ......................................................
163
Connecting the Vehicle to a Wi-Fi Network ......................................................
163
Connected Vehicle – Troubleshooting ........................................................................\
.
164
Ford Protect
Ford Protect ..................................................
166Scheduled Maintenance
General Maintenance Information
.......
168
Normal Scheduled Maintenance ............
171
Special Operating Conditions Scheduled Maintenance ..............................................
173
Customer Information
Radio Frequency Certification Labels ........................................................................\
.
176
Appendices
Electromagnetic Compatibility ..............
180
Declaration of Conformity .......................
183
3
2021 Motorhome (TY3) Canada/United States of America, enUSA, Edition date: 202010, Second-Printing Table of Contents
Page 29 of 191
Engine Oil Pressure Gauge
Indicates engine oil pressure. The needle
should stay in the normal operating range,
between the L and H marks. If the needle
falls below the normal range, stop your
vehicle, turn off the engine and check the
engine oil level. Add oil if needed. If the oil
level is correct and the gauge displays
incorrectly, have your vehicle checked by
an authorized dealer.
Engine Coolant Temperature
Gauge WARNING:
Do not remove the
coolant reservoir cap when the engine is
on or the cooling system is hot. Wait 10
minutes for the cooling system to cool
down. Cover the coolant reservoir cap
with a thick cloth to prevent the
possibility of scalding and slowly remove
the cap. Failure to follow this instruction
could result in personal injury.
Indicates engine coolant temperature. At
normal operating temperature, the level
indicator is in the normal range. If the
engine coolant temperature exceeds the
normal range, stop your vehicle as soon as
possible, switch off the engine and let the
engine cool.
Fuel Gauge
The fuel gauge indicates about how much
fuel is in the fuel tank.
The arrow adjacent to the fuel pump
symbol indicates on which side of your
vehicle the fuel filler door is located.
Note: The fuel gauge may vary slightly
when your vehicle is moving or on a slope. Low Fuel Reminder
A low fuel level reminder displays and
sounds when the distance to empty
reaches
50 mi (80 km), 25 mi (40 km),
10 mi (20 km) and 0 mi (0 km).
Note: The low fuel reminder can appear at
different fuel gauge positions depending on
fuel economy conditions. This variation is
normal.
Distance to Empty
Indicates the approximate distance your
vehicle can travel on the fuel remaining in
the tank. Changes in driving pattern can
cause the value to not only decrease but
also increase or stay constant for periods
of time.
Configurable Gauge
Transmission Fluid Temperature Gauge
Indicates transmission fluid temperature.
At normal operating temperature, the level
indicator is in the normal range. If the
transmission fluid temperature exceeds
the normal range, stop your vehicle as soon
as possible and verify the airflow is not
restricted by snow or debris blocking
airflow through the grille.
To lower the transmission temperature
into the normal range, alter the severity of
your driving conditions. Operating the
transmission for extended periods with the
gauge in the higher than normal area may
cause internal transmission damage. If the
gauge continues to show high
temperatures, see an authorized dealer.
Voltmeter
Displays electrical system voltage.
26
2021 Motorhome (TY3) Canada/United States of America, enUSA, Edition date: 202010, Second-Printing Instrument Cluster
Page 57 of 191
GENERAL INFORMATION
Note:
Occasional brake noise is normal. If
a metal-to-metal, continuous grinding or
continuous squeal sound is present, the
brake linings may be worn-out, have the
system checked. If the vehicle has
continuous vibration or shudder in the
steering wheel while braking, have the
system checked as soon as possible.
Note: Brake dust may accumulate on the
wheels, even under normal driving
conditions. Some dust is inevitable as the
brakes wear and does not contribute to
brake noise. See Cleaning the Wheels
(page 131). See
Warning Lamps and
Indicators (page 27). Wet brakes result in reduced braking
efficiency. Gently press the brake pedal a
few times when driving from a car wash or
standing water to dry the brakes.
Brake Over Accelerator
In the event the accelerator pedal
becomes stuck or entrapped, apply steady
and firm pressure to the brake pedal to
slow the vehicle and reduce engine power.
If you experience this condition, apply the
brakes and bring your vehicle to a safe
stop. Move the transmission to park (P),
switch the engine off and apply the parking
brake. Inspect the accelerator pedal for
any interference. If none are found and the
condition persists, have the system
checked.
Anti-lock Brake System
This system helps you maintain steering
control during emergency stops by keeping
the brakes from locking. If it illuminates when you are
driving, your vehicle requires
service. Your vehicle continues
to have normal braking without the
anti-lock brake system function. Have your
vehicle checked as soon as possible.
It also momentarily illuminates when you
switch the ignition on to confirm the lamp
is functional. If it does not illuminate when
you switch the ignition on, or begins to
flash at any time, have the system
checked. It illuminates when you engage
the parking brake and the
ignition is on.
If it illuminates when your vehicle
is moving, make sure the parking
brake is disengaged. If the
parking brake is disengaged, this indicates
low brake fluid level or a brake system
fault. Have your vehicle checked as soon
as possible.
It also momentarily illuminates when you
switch the ignition on to confirm the lamp
is functional. If it does not illuminate when
you switch the ignition on, or begins to
flash at any time, have the system
checked.
Hydraulic brake booster system
(Hydroboost or Hydromax)
The Hydroboost and Hydromax systems
receive fluid pressure from the power
steering pump to provide power assist
during braking.
The Hydromax booster receives backup
pressure from the reserve system electric
pump whenever the fluid in the power
steering system is not flowing. When the
engine is off, the pump turns on if you apply
the brake pedal, or if you switch the ignition
to the on position.
54
2021 Motorhome (TY3) Canada/United States of America, enUSA, Edition date: 202010, Second-Printing BrakesE270480 E270480
Page 116 of 191
GENERAL INFORMATION
Have your vehicle serviced regularly to help
maintain its roadworthiness and resale
value. There is a large network of
authorized dealers that are there to help
you with their professional servicing
expertise. We believe that their specially
trained technicians are best qualified to
service your vehicle properly and expertly.
They are supported by a wide range of
highly specialized tools developed
specifically for servicing your vehicle.
If your vehicle requires professional service,
an authorized dealer can provide the
necessary parts and service. Check your
warranty information to find out which
parts and services are covered.
Use only recommended fuels, lubricants,
fluids and service parts conforming to
specifications. Motorcraft® parts are
designed and built to provide the best
performance in your vehicle.
Precautions
•
Do not work on a hot engine.
• Make sure that nothing gets caught in
moving parts. •
Do not work on a vehicle with the
engine running in an enclosed space,
unless you are sure you have enough
ventilation.
• Keep all open flames and other burning
material (such as cigarettes) away
from the battery and all fuel related
parts.
Working with the Engine Off
1. Set the parking brake and shift the transmission to park (P).
2. Switch off the engine.
3. Block the wheels.
Working with the Engine On WARNING: To reduce the risk of
vehicle damage and personal burn
injuries, do not start your engine with the
air cleaner removed and do not remove
it while the engine is running.
1. Set the parking brake and shift the transmission to park (P).
2. Block the wheels.
113
2021 Motorhome (TY3) Canada/United States of America, enUSA, Edition date: 202010, Second-Printing Maintenance
Page 117 of 191
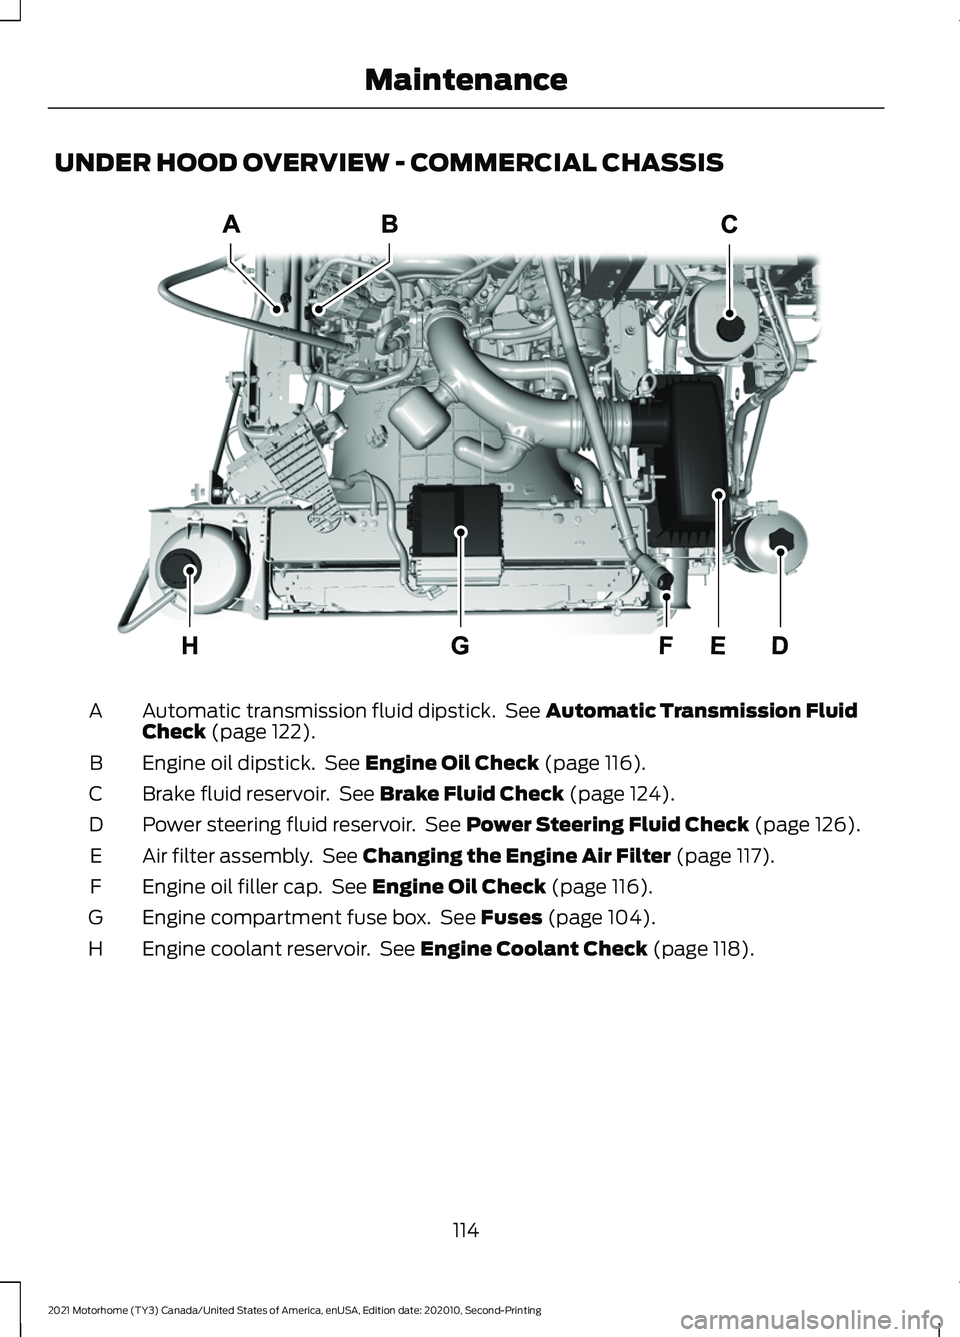
UNDER HOOD OVERVIEW - COMMERCIAL CHASSIS
Automatic transmission fluid dipstick. See Automatic Transmission Fluid
Check (page 122).
A
Engine oil dipstick. See
Engine Oil Check (page 116).
B
Brake fluid reservoir. See
Brake Fluid Check (page 124).
C
Power steering fluid reservoir. See
Power Steering Fluid Check (page 126).
D
Air filter assembly. See
Changing the Engine Air Filter (page 117).
E
Engine oil filler cap. See
Engine Oil Check (page 116).
F
Engine compartment fuse box. See
Fuses (page 104).
G
Engine coolant reservoir. See
Engine Coolant Check (page 118).
H
114
2021 Motorhome (TY3) Canada/United States of America, enUSA, Edition date: 202010, Second-Printing MaintenanceE324269
Page 118 of 191
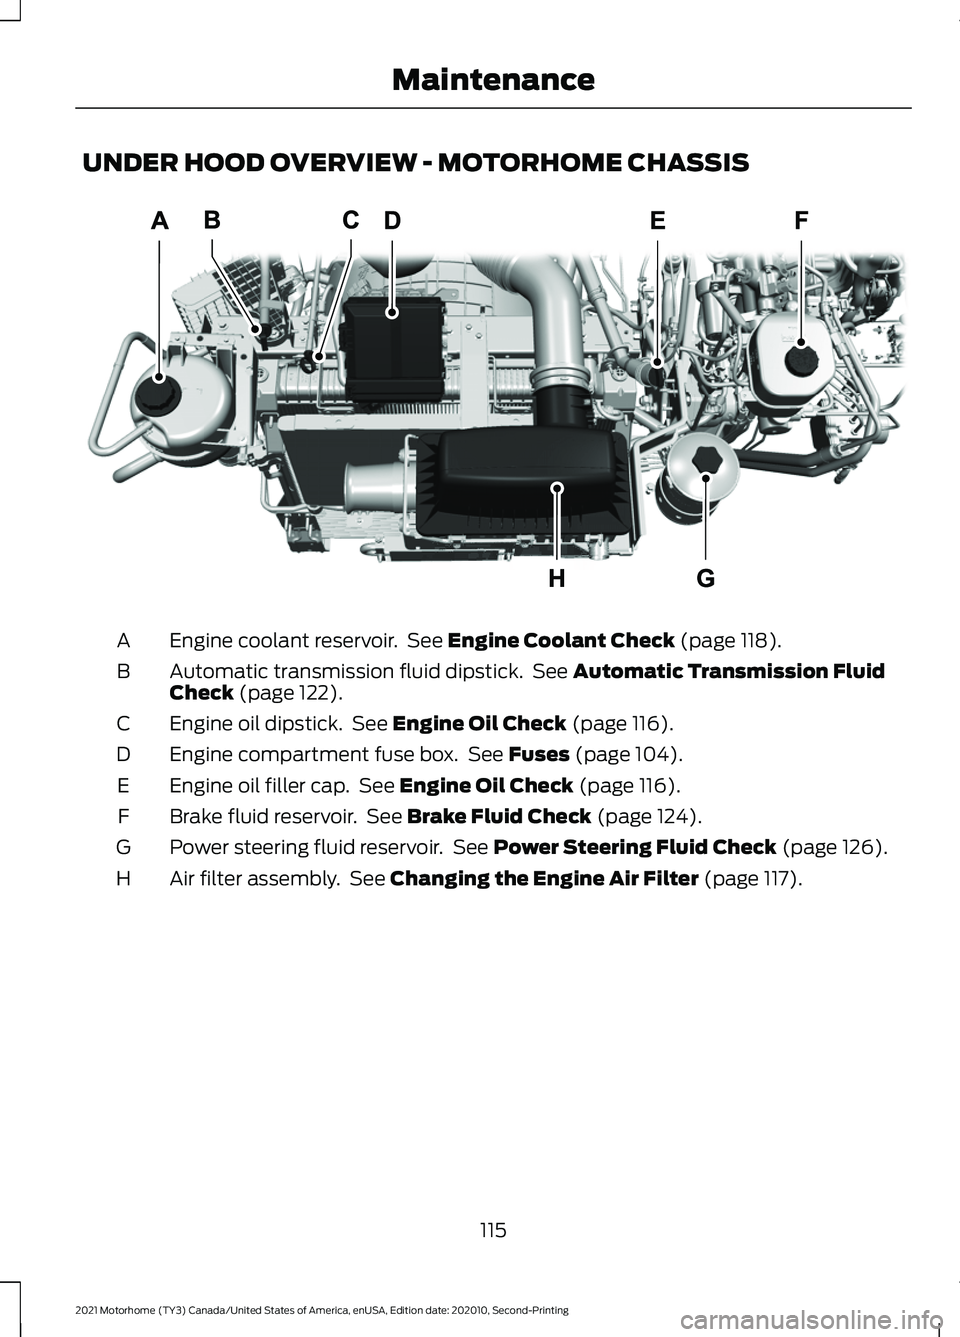
UNDER HOOD OVERVIEW - MOTORHOME CHASSIS
Engine coolant reservoir. See Engine Coolant Check (page 118).
A
Automatic transmission fluid dipstick. See
Automatic Transmission Fluid
Check (page 122).
B
Engine oil dipstick. See
Engine Oil Check (page 116).
C
Engine compartment fuse box. See
Fuses (page 104).
D
Engine oil filler cap. See
Engine Oil Check (page 116).
E
Brake fluid reservoir. See
Brake Fluid Check (page 124).
F
Power steering fluid reservoir. See
Power Steering Fluid Check (page 126).
G
Air filter assembly. See
Changing the Engine Air Filter (page 117).
H
115
2021 Motorhome (TY3) Canada/United States of America, enUSA, Edition date: 202010, Second-Printing MaintenanceE324268
Page 125 of 191
Engine Coolant Temperature
Management (If Equipped)
WARNING:
To reduce the risk of
crash and injury, be prepared that the
vehicle speed may reduce and the
vehicle may not be able to accelerate
with full power until the coolant
temperature reduces.
If you tow a trailer with your vehicle, the
engine could temporarily reach a higher
temperature during severe operating
conditions, for example ascending a long
or steep slope in high ambient
temperatures.
At this time, you may notice the coolant
temperature gauge moves toward the red
zone and a message could appear in the
information display.
You may notice a reduction in vehicle
speed caused by reduced engine power in
order to manage the engine coolant
temperature. Your vehicle may enter this
mode if certain high-temperature and
high-load conditions take place. The
amount of speed reduction depends on
vehicle loading, slope and ambient
temperature. If this occurs, there is no need
to pull off the road, you can continue to
drive your vehicle.
The air conditioning could turn on and off
during severe operating conditions to
protect the engine from overheating. When
the coolant temperature decreases to the
normal operating temperature, the air
conditioning turns on.
If the coolant temperature gauge moves
fully into the red zone, or if the coolant
temperature warning or service engine
soon messages appear in your information
display, do the following: 1. Pull off the road as soon as safely
possible and shift the transmission into
park (P).
2. Leave the engine running until the coolant temperature gauge needle
returns to the normal position. If the
temperature does not drop after
several minutes, follow the remaining
steps.
3. Switch the engine off and wait for it to
cool. Check the coolant level.
4. If the coolant level is at or below the minimum mark, add prediluted coolant
immediately.
5. If the coolant level is normal, restart the engine and continue.
AUTOMATIC TRANSMISSION
FLUID CHECK WARNING:
The dipstick and
surrounding components are hot. Use
gloves when moving components and
checking the transmission fluid level.
Failure to follow this warning could result
in serious personal injury.
Note: Automatic transmission fluid
expands when warmed. To obtain an
accurate fluid check, drive the vehicle until
it is at normal operating temperature
(approximately
20 mi (30 km)). If your
vehicle has been operated for an extended
period at high speeds, in city traffic during
hot weather or pulling a trailer, the vehicle
should be turned off for about 30 minutes
to allow fluid to cool to normal operating
temperature 196°F - 215°F (91°C - 102°C)
before checking.
Refer to your scheduled maintenance
information for scheduled intervals for fluid
checks and changes.
122
2021 Motorhome (TY3) Canada/United States of America, enUSA, Edition date: 202010, Second-Printing Maintenance
Page 126 of 191
Your transmission does not consume fluid.
However, the fluid level should be checked
if the transmission is not working properly,
(i.e., if the transmission slips or shifts
slowly) or if you notice some sign of fluid
leakage. To check the fluid level:
1.
Drive the vehicle 20 mi (30 km) or until
it reaches normal operating
temperature
2. Park the vehicle on a level surface and
engage the parking brake
3. With the engine running, parking brake
engaged and your foot on the brake
pedal, move the gearshift lever through
all of the gear ranges. Allow sufficient
time for each gear to engage
4. Latch the gearshift lever in P (Park) and leave the engine running.
5. Remove the dipstick, wiping it clean with a clean, dry lint free rag. If
necessary, refer to Under Hood
Overview in this chapter for the
location of the dipstick.
6. Install the dipstick making sure it is fully
seated in the filler tube.
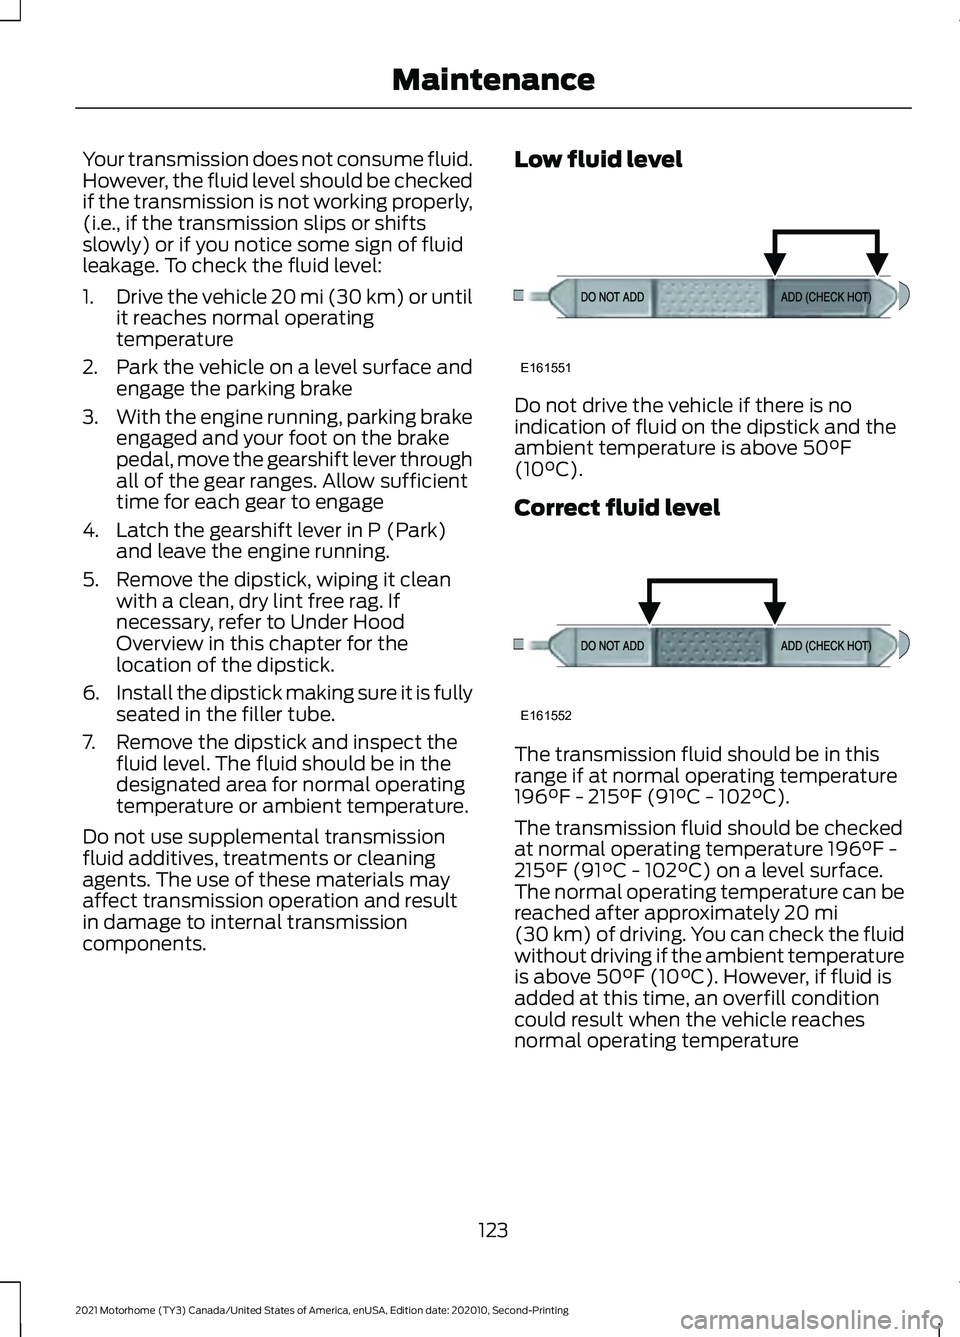
7. Remove the dipstick and inspect the fluid level. The fluid should be in the
designated area for normal operating
temperature or ambient temperature.
Do not use supplemental transmission
fluid additives, treatments or cleaning
agents. The use of these materials may
affect transmission operation and result
in damage to internal transmission
components. Low fluid level Do not drive the vehicle if there is no
indication of fluid on the dipstick and the
ambient temperature is above 50°F
(10°C).
Correct fluid level
The transmission fluid should be in this
range if at normal operating temperature
196°F - 215°F (91°C - 102°C).
The transmission fluid should be checked
at normal operating temperature 196°F -
215°F (91°C - 102°C) on a level surface.
The normal operating temperature can be
reached after approximately 20 mi
(30 km) of driving. You can check the fluid
without driving if the ambient temperature
is above 50°F (10°C). However, if fluid is
added at this time, an overfill condition
could result when the vehicle reaches
normal operating temperature
123
2021 Motorhome (TY3) Canada/United States of America, enUSA, Edition date: 202010, Second-Printing MaintenanceE161551 E161552
Page 127 of 191
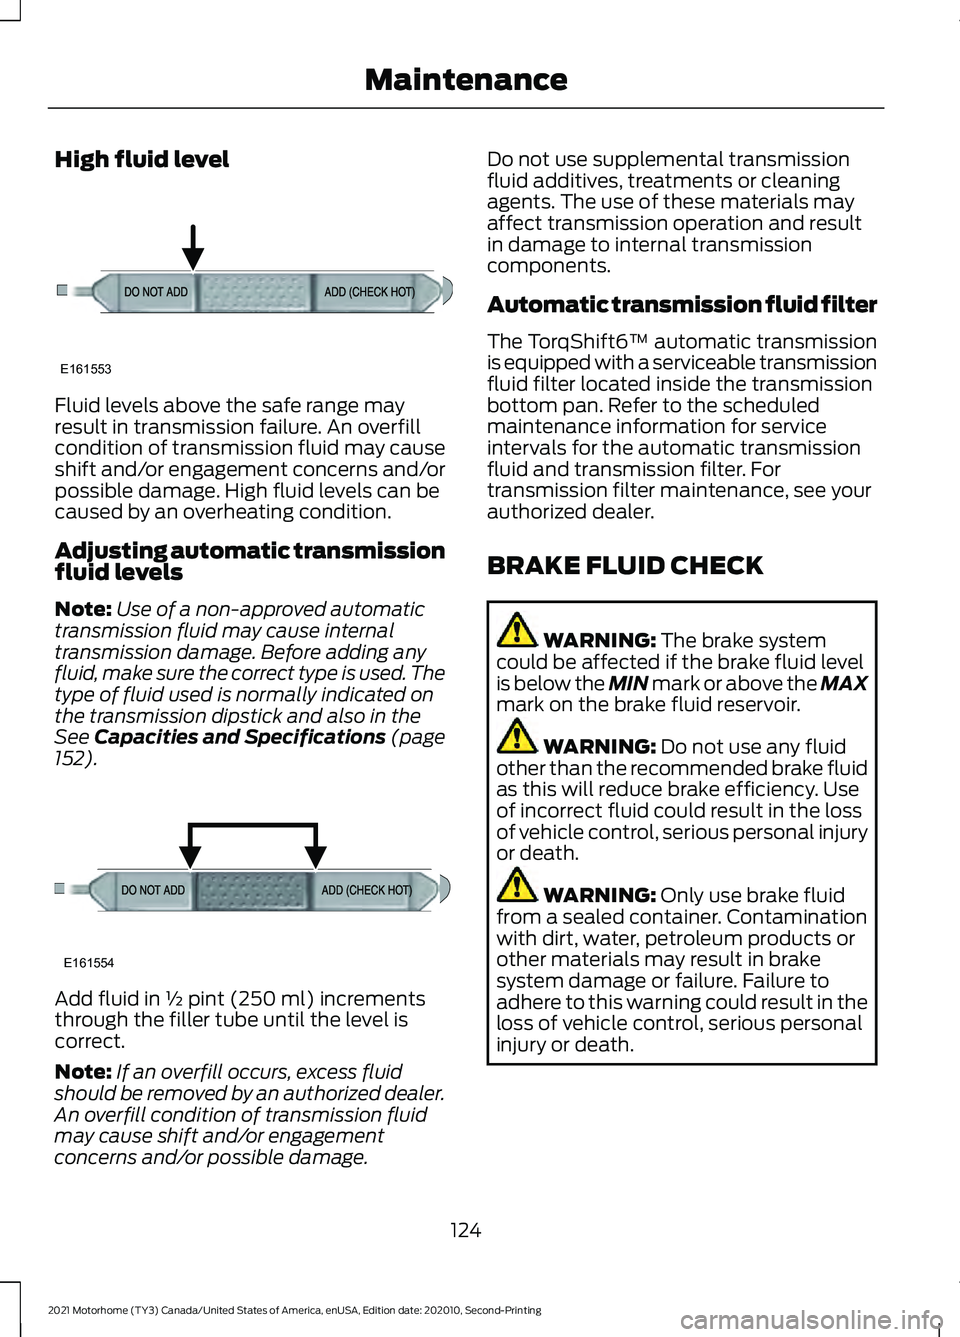
High fluid level
Fluid levels above the safe range may
result in transmission failure. An overfill
condition of transmission fluid may cause
shift and/or engagement concerns and/or
possible damage. High fluid levels can be
caused by an overheating condition.
Adjusting automatic transmission
fluid levels
Note:
Use of a non-approved automatic
transmission fluid may cause internal
transmission damage. Before adding any
fluid, make sure the correct type is used. The
type of fluid used is normally indicated on
the transmission dipstick and also in the
See Capacities and Specifications (page
152). Add fluid in ½ pint (250 ml) increments
through the filler tube until the level is
correct.
Note:
If an overfill occurs, excess fluid
should be removed by an authorized dealer.
An overfill condition of transmission fluid
may cause shift and/or engagement
concerns and/or possible damage. Do not use supplemental transmission
fluid additives, treatments or cleaning
agents. The use of these materials may
affect transmission operation and result
in damage to internal transmission
components.
Automatic transmission fluid filter
The TorqShift6™ automatic transmission
is equipped with a serviceable transmission
fluid filter located inside the transmission
bottom pan. Refer to the scheduled
maintenance information for service
intervals for the automatic transmission
fluid and transmission filter. For
transmission filter maintenance, see your
authorized dealer.
BRAKE FLUID CHECK
WARNING:
The brake system
could be affected if the brake fluid level
is below the MIN mark or above the MAX
mark on the brake fluid reservoir. WARNING:
Do not use any fluid
other than the recommended brake fluid
as this will reduce brake efficiency. Use
of incorrect fluid could result in the loss
of vehicle control, serious personal injury
or death. WARNING:
Only use brake fluid
from a sealed container. Contamination
with dirt, water, petroleum products or
other materials may result in brake
system damage or failure. Failure to
adhere to this warning could result in the
loss of vehicle control, serious personal
injury or death.
124
2021 Motorhome (TY3) Canada/United States of America, enUSA, Edition date: 202010, Second-Printing MaintenanceE161553 E161554
Page 173 of 191
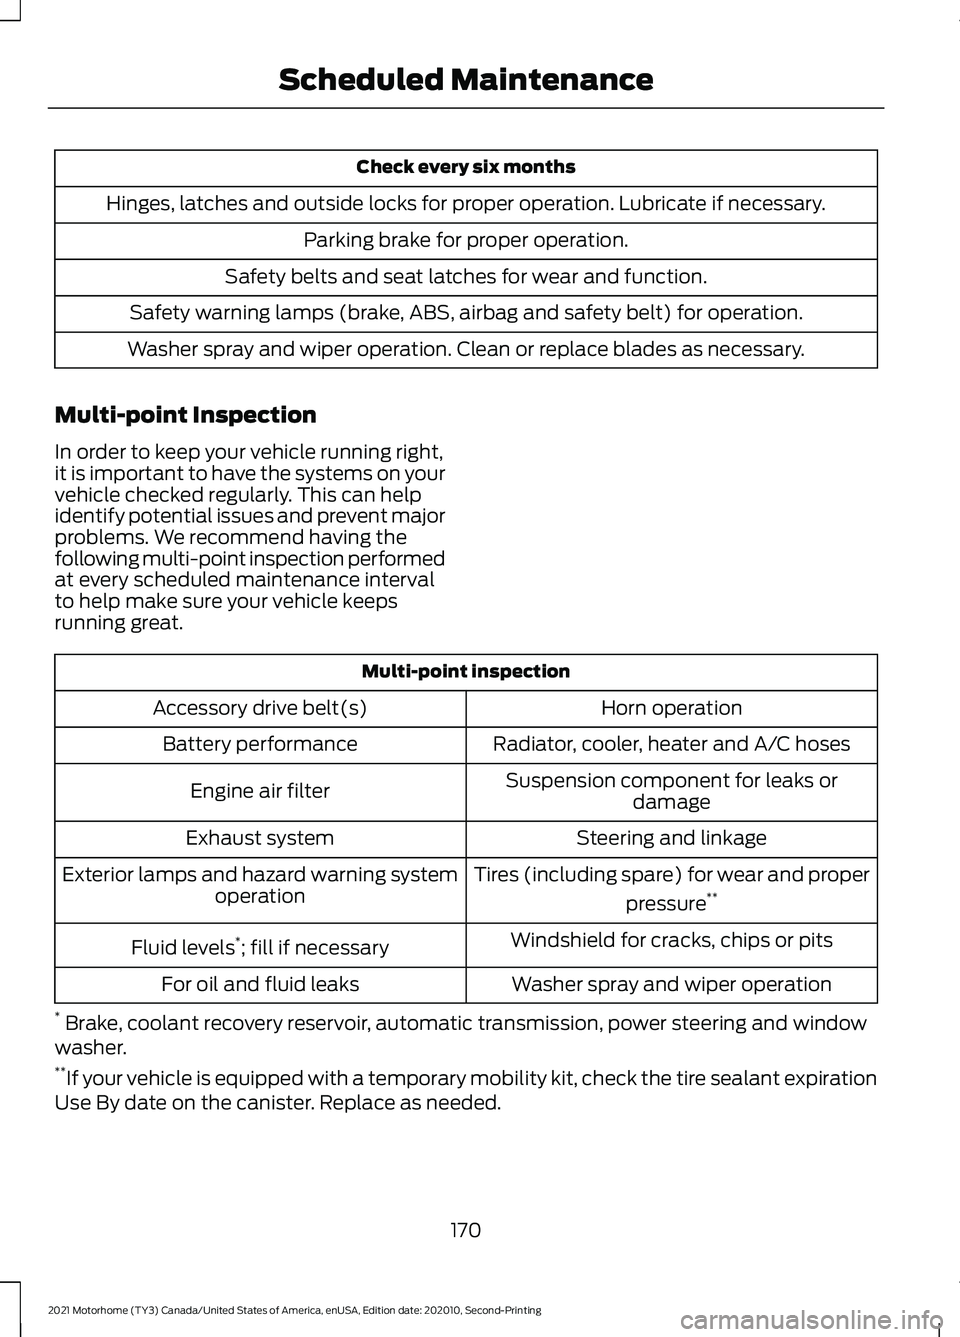
Check every six months
Hinges, latches and outside locks for proper operation. Lubricate if necessary. Parking brake for proper operation.
Safety belts and seat latches for wear and function.
Safety warning lamps (brake, ABS, airbag and safety belt) for operation.
Washer spray and wiper operation. Clean or replace blades as necessary.
Multi-point Inspection
In order to keep your vehicle running right,
it is important to have the systems on your
vehicle checked regularly. This can help
identify potential issues and prevent major
problems. We recommend having the
following multi-point inspection performed
at every scheduled maintenance interval
to help make sure your vehicle keeps
running great. Multi-point inspection
Horn operation
Accessory drive belt(s)
Radiator, cooler, heater and A/C hoses
Battery performance
Suspension component for leaks ordamage
Engine air filter
Steering and linkage
Exhaust system
Tires (including spare) for wear and properpressure**
Exterior lamps and hazard warning system
operation
Windshield for cracks, chips or pits
Fluid levels *
; fill if necessary
Washer spray and wiper operation
For oil and fluid leaks
* Brake, coolant recovery reservoir, automatic transmission, power steering and window
washer.
** If your vehicle is equipped with a temporary mobility kit, check the tire sealant expiration
Use By date on the canister. Replace as needed.
170
2021 Motorhome (TY3) Canada/United States of America, enUSA, Edition date: 202010, Second-Printing Scheduled Maintenance