oil FORD F-59 2018 Owner's Manual
[x] Cancel search | Manufacturer: FORD, Model Year: 2018, Model line: F-59, Model: FORD F-59 2018Pages: 168, PDF Size: 3.02 MB
Page 95 of 168
1.
Make sure the parking brake is on. Make
sure the transmission is in park (P) or
neutral (N).
2. Run the engine until it reaches normal operating temperature.
3. Make sure that your vehicle is on level ground.
4. Switch the engine off and wait 15 minutes for the oil to drain into the oil
pan. Checking the engine oil level too
soon after you switch the engine off
may result in an inaccurate reading.
5. Open the hood.
6. Remove the dipstick and wipe it with a clean, lint-free cloth. See Under
Hood Overview (page 89).
7. Replace the dipstick and remove it again to check the oil level. See Under
Hood Overview
(page 89).
8. Make sure that the oil level is between
the maximum and minimum marks. If
the oil level is at the minimum mark,
add oil immediately. See
Capacities
and Specifications (page 133).
9. If the oil level is correct, replace the dipstick and make sure it is fully seated.
Note: Do not remove the dipstick when the
engine is running.
Note: If the oil level is between the
maximum and minimum marks, the oil level
is acceptable. Do not add oil.
Note: The oil consumption of new engines
reaches its normal level after approximately
3,000 mi (5,000 km)
.
Adding Engine Oil WARNING
Do not remove the filler cap when
the engine is running. Do not use supplemental engine oil
additives because they are unnecessary
and could lead to engine damage that may
not be covered by the vehicle Warranty.
Only use oils certified for gasoline engines
by the American Petroleum Institute (API).
An oil with this trademark symbol
conforms to the current engine and
emission system protection standards and
fuel economy requirements of the
International Lubricants Specification
Advisory Committee (ILSAC).
To top up the engine oil level do the
following:
1. Clean the area surrounding the engine
oil filler cap before you remove it.
2. Remove the engine oil filler cap. See Under Hood Overview
(page 89).
Turn it counterclockwise and remove
it.
3. Add engine oil that meets Ford specifications. See
Capacities and
Specifications (page 133). You may
have to use a funnel to pour the engine
oil into the opening.
4. Recheck the oil level.
5. If the oil level is correct, replace the dipstick and make sure it is fully seated.
6. Replace the engine oil filler cap. Turn it clockwise until you feel a strong
resistance.
92
Motorhome (TY3) Canada/United States of America, enUSA, Edition date: 201712, Second Printing MaintenanceE142732
Page 96 of 168
Note:
Do not add oil further than the
maximum mark. Oil levels above the
maximum mark may cause engine damage.
Note: Make sure you install the oil filler cap
correctly.
Note: Soak up any spillage with an
absorbent cloth immediately.
OIL CHANGE INDICATOR
RESET
Resetting the Oil Life Monitoring
System
Only reset the oil life monitoring system
after changing the engine oil and oil filter.
To reset the oil life monitoring system do
the following:
1. Switch the ignition on. Do not start the
engine.
2. Fully press the accelerator and brake pedals at the same time.
3. Keep the accelerator and brake pedals
fully pressed.
4. After three seconds, a message displays confirming the reset procedure
is in progress.
5. After 25 seconds, a message displays confirming the reset procedure is
complete.
6. Release the accelerator and brake pedals.
7. Switch the ignition off. ENGINE COOLANT CHECK WARNINGS
Do not remove the coolant reservoir
cap when the cooling system is hot.
Wait 10 minutes for the cooling
system to cool down. Cover the coolant
reservoir cap with a thick cloth to prevent
the possibility of scalding and slowly
remove the cap. Failure to follow this
instruction could result in personal injury. Do not put coolant in the windshield
washer fluid reservoir. If sprayed on
the windshield, coolant could make
it difficult to see through the windshield. To reduce the risk of personal injury,
make sure the engine is cool before
unscrewing the coolant pressure
relief cap. The cooling system is under
pressure. Steam and hot liquid can come
out forcefully when you loosen the cap
slightly. Do not add coolant further than the
MAX mark.
When the engine is cold, check the
concentration and level of the coolant at
the intervals listed in the scheduled
maintenance information. See Scheduled
Maintenance
(page 140).
Note: Make sure that the coolant level is
between the
MIN and MAX marks on the
coolant reservoir.
Note: Coolant expands when it is hot. The
level may extend beyond the
MAX mark.
Maintain coolant concentration within
48% to 50%, which equates to a freeze
point between -30°F (-34°C) and -34°F
(-37°C). Coolant concentration should be
checked using a refractometer. We do not
recommend the use of hydrometers or
coolant test strips for measuring coolant
concentration.
93
Motorhome (TY3) Canada/United States of America, enUSA, Edition date: 201712, Second Printing Maintenance
Page 109 of 168
Underbody
Regularly clean the underside of your
vehicle using water. Keep body and door
drain holes free of debris or foreign
material.
Under Hood
For removing black rubber marks from
under the hood we recommend Motorcraft
Wheel and Tire Cleaner or Motorcraft Bug
and Tar Remover.
CLEANING THE ENGINE
Engines are more efficient when they are
clean because grease and dirt buildup keep
the engine warmer than normal.
When washing:
•
Take care when using a power washer
to clean the engine. The high-pressure
fluid could penetrate the sealed parts
and cause damage.
• Do not spray a hot engine with cold
water to avoid cracking the engine
block or other engine components.
• Spray Motorcraft Engine Shampoo and
Degreaser on all parts that require
cleaning and pressure rinse clean. In
Canada, use Motorcraft Engine
Shampoo.
• Never wash or rinse the engine while it
is hot or running; water in the running
engine may cause internal damage.
• Never wash or rinse any ignition coil,
spark plug wire or spark plug well, or
the area in and around these locations.
• Cover the battery, power distribution
box, and air filter assembly to prevent
water damage when cleaning the
engine. CLEANING THE WHEELS (If
Equipped)
1. Regularly clean them with a wheel cleaner. We recommend that you use
Ford approved wheel cleaner if
available.
2. Remove dirt and brake dust with a sponge.
3. Remove tar and grease with a bug and
tar remover. We recommend that you
use Ford approved bug and tar remover
if available.
4. Thoroughly rinse the wheels with water
after cleaning.
If you intend on parking your vehicle for an
extended period after cleaning the wheels
with a wheel cleaner, drive your vehicle for
a few minutes before doing so. This
reduces the risk of corrosion of the brake
discs, brake pads and linings.
Do not clean the wheels when they are hot.
Note: Some car washes could damage
wheel rims and covers.
Note: Using non-recommended cleaners,
harsh cleaning products, chrome wheel
cleaners or abrasive materials could
damage wheel rims and covers.
VEHICLE STORAGE
If you plan on storing your vehicle for 30
days or more, read the following
maintenance recommendations to make
sure your vehicle stays in good operating
condition.
We engineer and test all motor vehicles
and their components for reliable, regular
driving. Under various conditions,
long-term storage may lead to degraded
engine performance or failure unless you
use specific precautions to preserve engine
components.
106
Motorhome (TY3) Canada/United States of America, enUSA, Edition date: 201712, Second Printing Vehicle Care
Page 110 of 168
General
•
Store all vehicles in a dry, ventilated
place.
• Protect from sunlight, if possible.
• If vehicles are stored outside, they
require regular maintenance to protect
against rust and damage.
Body
• Wash your vehicle thoroughly to
remove dirt, grease, oil, tar or mud from
exterior surfaces, rear-wheel housing
and the underside of front fenders.
• Periodically wash your vehicle if it is
stored in exposed locations.
• Touch-up exposed or primed metal to
prevent rust.
• Cover chrome and stainless steel parts
with a thick coat of auto wax to prevent
discoloration. Re-wax as necessary
when you wash your vehicle.
• Lubricate all hood, door and luggage
compartment hinges and latches with
a light grade oil.
• Cover interior trim to prevent fading.
• Keep all rubber parts free from oil and
solvents.
Engine
• Change the engine oil and filter prior to
storage because used engine oil
contains contaminates which may
cause engine damage.
• Start the engine every 15 days for a
minimum of 15 minutes. Run at fast idle
with the climate controls set to defrost
until the engine reaches normal
operating temperature. •
With your foot on the brake, shift
through all the gears while the engine
is running.
• We recommend that you change the
engine oil before you use your vehicle
again.
Fuel system
• Fill the fuel tank with high-quality fuel
until the first automatic shutoff of the
fuel pump nozzle.
Cooling system
• Protect against freezing temperatures.
• When removing your vehicle from
storage, check coolant fluid level.
Confirm that there are no cooling
system leaks and that fluid is at the
recommended level.
Battery
• Check and recharge as necessary. Keep
connections clean.
• If storing your vehicle for more than 30
days without recharging the battery,
we recommend that you disconnect
the battery cables to maintain battery
charge for quick starting.
Note: It is necessary to reset memory
features if battery cables are disconnected.
Brakes
• Make sure the brakes and parking brake
release fully.
Tires
• Maintain recommended air pressure.
107
Motorhome (TY3) Canada/United States of America, enUSA, Edition date: 201712, Second Printing Vehicle Care
Page 111 of 168
Miscellaneous
•
Make sure all linkages, cables, levers
and pins under your vehicle are covered
with grease to prevent rust.
• Move vehicles at least 25 ft (7.5 m)
every 15 days to lubricate working parts
and prevent corrosion.
Removing Vehicle From Storage
When your vehicle is ready to come out of
storage, do the following:
• Wash your vehicle to remove any dirt
or grease film build-up on window
surfaces.
• Check windshield wipers for any
deterioration.
• Check under the hood for any foreign
material that may have collected
during storage such as mice or squirrel
nests.
• Check the exhaust for any foreign
material that may have collected
during storage.
• Check tire pressures and set tire
inflation per the Tire Label.
• Check brake pedal operation. Drive
your vehicle
15 ft (4.5 m) back and
forth to remove rust build-up.
• Check fluid levels (including coolant,
oil and gas) to make sure there are no
leaks, and fluids are at recommended
levels.
• If you remove the battery, clean the
battery cable ends and check for
damage.
Contact an authorized dealer if you have
any concerns or issues.
108
Motorhome (TY3) Canada/United States of America, enUSA, Edition date: 201712, Second Printing Vehicle Care
Page 131 of 168

14. Stow the jack, handle and lug wrench.
15. Unblock the wheels.
TECHNICAL SPECIFICATIONS
Wheel Lug Nut Torque Specifications WARNING
When you install a wheel, always remove any corrosion, dirt or foreign materials
present on the mounting surfaces of the wheel or the surface of the wheel hub,
brake drum or brake disc that contacts the wheel. Make sure to secure any fasteners
that attach the rotor to the hub so they do not interfere with the mounting surfaces of
the wheel. Installing wheels without correct metal-to-metal contact at the wheel mounting
surfaces can cause the wheel nuts to loosen and the wheel to come off while your vehicle
is in motion, resulting in loss of vehicle control, personal injury or death. Ib-ft (Nm)*
Bolt size
150 (200)
M14 x 1.5
(19.5 inch wheels)
450 (610)
M22 x 1.5
(22.5 inch wheels)
*Torque specifications are for nut and bolt threads free of dirt and rust. Use only Ford
recommended replacement fasteners.
On vehicles equipped with dual rear wheels, retighten the wheel lug nuts to the specified
torque at 100 miles (160 kilometers), and again at 500 miles (800 kilometers) of new
vehicle operation and after any wheel disturbance (such as tire rotation, changing a flat
tire, wheel removal).
On all two-piece flat wheel nuts, apply one drop of motor oil between the flat washer
and the nut. Do not apply motor oil to the wheel nut threads or the wheel stud threads. 128
Motorhome (TY3) Canada/United States of America, enUSA, Edition date: 201712, Second Printing Wheels and TiresE161443
Page 132 of 168
ENGINE SPECIFICATIONS
6.8L Engine
Engine
415 in³ (6,800 cm³)
Displacement
1-6-5-10-2-7-3-8-4-9
Firing order
Coil on plug
Ignition system
0.039 in (1 mm) - 0.043 in (1.1 mm)
Spark plug gap
9.2:1
Compression ratio
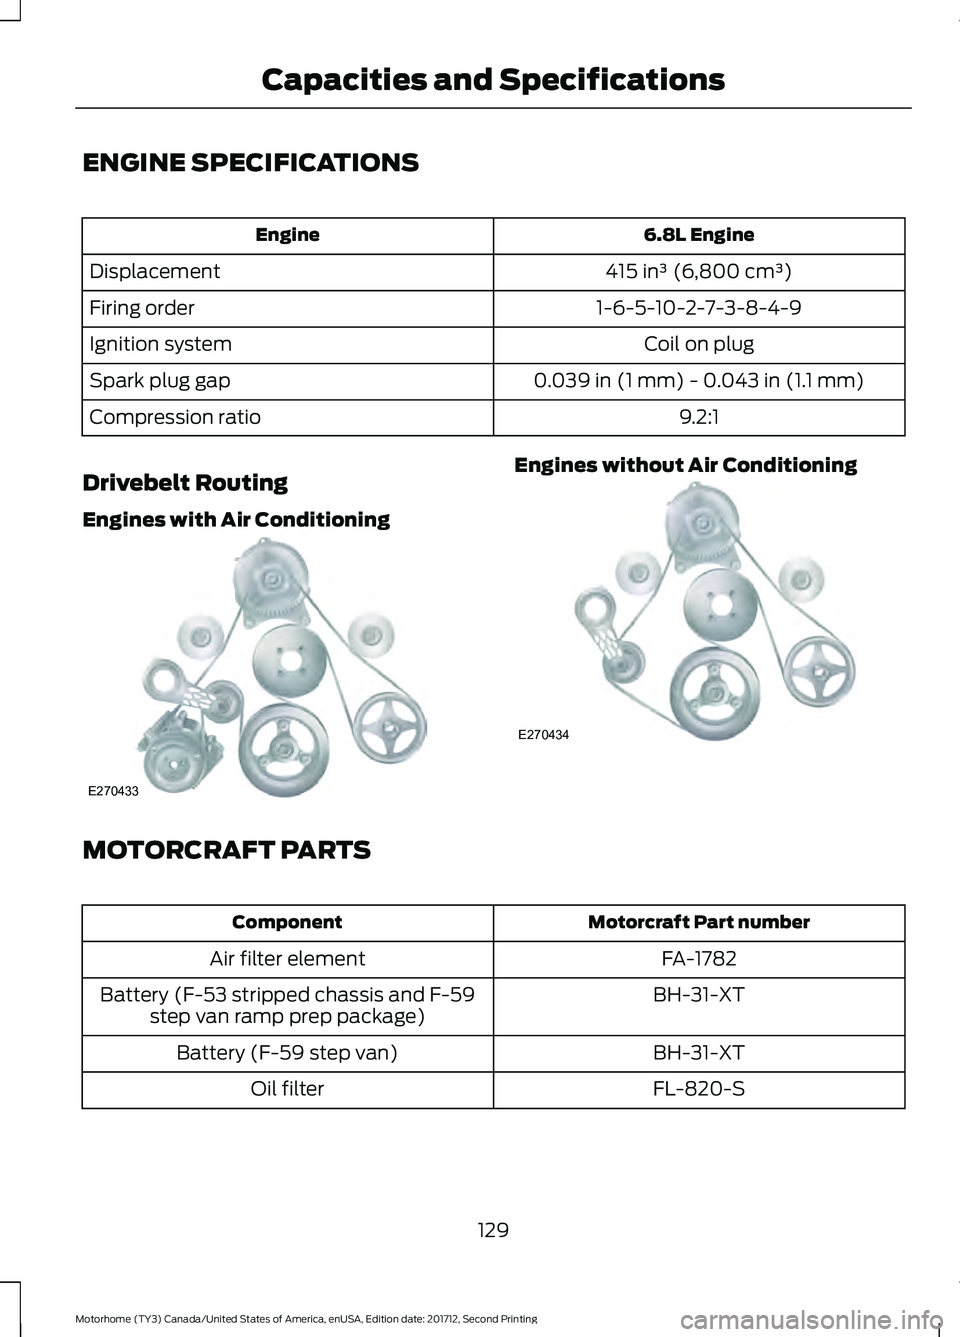
Drivebelt Routing
Engines with Air Conditioning Engines without Air Conditioning
MOTORCRAFT PARTS
Motorcraft Part number
Component
FA-1782
Air filter element
BH-31-XT
Battery (F-53 stripped chassis and F-59
step van ramp prep package)
BH-31-XT
Battery (F-59 step van)
FL-820-S
Oil filter
129
Motorhome (TY3) Canada/United States of America, enUSA, Edition date: 201712, Second Printing Capacities and SpecificationsE270433 E270434
Page 133 of 168

Motorcraft Part number
Component
SP-509
Spark plugs
FT-187
Transmission fluid filter
We recommend Motorcraft replacement parts available at your Ford dealer or at
fordparts.com for scheduled maintenance. These parts meet or exceed Ford Motor
Company ’s specifications and are engineered for your vehicle. Use of other parts may
impact vehicle performance, emissions and durability. Your warranty may be void for any
damage related to use of other parts.
If a Motorcraft oil filter is not available, use an oil filter that meets industry performance
specification SAE/USCAR-36.
For spark plug replacement, contact an authorized dealer. Replace spark plugs at the
appropriate intervals. See Scheduled Maintenance (page 140).
130
Motorhome (TY3) Canada/United States of America, enUSA, Edition date: 201712, Second Printing Capacities and Specifications
Page 136 of 168

CAPACITIES AND SPECIFICATIONS
Capacities
WARNING
The air conditioning refrigerant system contains refrigerant under high pressure.
Only qualified personnel should service the air conditioning refrigerant system.
Opening the air conditioning refrigerant system can cause personal injury.
Capacity
Item
7.0 qt (6.6 L)
Engine oil (with oil filter)
30.6 qt (29 L)
Engine coolant
Between MIN/MAX on brake fluid reservoir
Brake fluid
4.1 qt (3.9 L)
Rear axle lubricant
(Dana M80 axle)
8.0 qt (7.6 L)
Rear axle lubricant
(Dana S110 axle)
7.0 qt (6.6 L)
Rear axle lubricant
(Dana S130 axle)
16.0 qt (15.1 L)
Rear axle lubricant
(Dana Spicer 107060S axle)
17.2 qt (16.3 L)1
Automatic transmission fluid
Keep in FULL range on dipstick
Power steering fluid
Fill as required
Windshield washer fluid
80 gal (303 L)
Fuel tank (Motorhome)
40 gal (151 L)
Fuel tank (Commercial chassis)
44 oz (1.25 kg)
A/C refrigerant
8.8 fl oz (260.2 ml)
A/C refrigerant compressor oil
1 Approximate dry fill capacity. Actual amount may vary during fluid changes.
133
Motorhome (TY3) Canada/United States of America, enUSA, Edition date: 201712, Second Printing Capacities and Specifications
Page 137 of 168

Specifications
Materials
Specification
Name
WSS-M2C946-A
Motor oil (U.S.):
Motorcraft® SAE 5W-30 Premium Synthetic Blend Motor
Oil
XO-5W30-QSP
WSS-M2C946-A
Motor oil (Canada):
Motorcraft® SAE 5W-30 Super Premium Motor Oil
CXO-5W30-LSP12
WSS-M97B44-D2
Engine coolant (U.S.):
Motorcraft® Orange Prediluted Antifreeze/Coolant
VC-3DIL-B
WSS-M97B44-D2
Engine coolant (Canada):
Motorcraft® Orange Prediluted Antifreeze/Coolant
CVC-3DIL-B
WSS-M6C65-A11
Brake fluid (U.S.):
Motorcraft® High Performance DOT 3 Motor Vehicle
Brake Fluid
PM-1-C
WSS-M6C65-A11
Brake fluid (Canada):
Motorcraft® High Performance DOT 3 Motor Vehicle
Brake Fluid
CPM-1-C
WSS-M6C65-A32
Brake fluid:
Motorcraft® DOT 5.1 Motor Vehicle Brake Fluid
PM-21
WSL-M2C192-A
Rear axle lubricant (U.S.):
Motorcraft® SAE 75W-140 Synthetic Rear Axle Lubricant
XY-75W140-QL
WSL-M2C192-A
Rear axle lubricant (Canada):
Motorcraft® SAE 75W-140 Synthetic Rear Axle Lubricant
CXY-75W140-1L
WSS-M2C938-A
Automatic transmission fluid and power steering fluid
(U.S.): MERCON® LV
Motorcraft® MERCON® LV Automatic Transmission Fluid
XT-10-QLVC
134
Motorhome (TY3) Canada/United States of America, enUSA, Edition date: 201712, Second Printing Capacities and Specifications