tires FORD F-59 2018 Owner's Manual
[x] Cancel search | Manufacturer: FORD, Model Year: 2018, Model line: F-59, Model: FORD F-59 2018Pages: 168, PDF Size: 3.02 MB
Page 125 of 168

WARNINGS
When inflating the tire for
mounting pressures up to
20 psi (1.38 bar) greater than the
maximum pressure on the tire
sidewall, the following
precautions must be taken to
protect the person mounting the
tire: 1. Make sure that you have the
correct tire and wheel size.
2. Lubricate the tire bead and
wheel bead seat area again.
3. Stand at a minimum of 12 ft
(3.66 m)
away from the
wheel and tire assembly. 4. Use both eye and ear
protection.
For a mounting pressure
more than
20 psi (1.38 bar)
greater than the maximum
pressure, a Ford dealer or other
tire service professional should do
the mounting. Always inflate steel carcass
tires with a remote air fill with
the person inflating standing at a
minimum of
12 ft (3.66 m) away
from the wheel and tire assembly. Important: Remember to replace
the wheel valve stems when the
road tires are replaced on your
vehicle
It is recommended that the two
front tires or two rear tires
generally be replaced as a pair. Replacing a Tire That is
Greenhouse Gas Certified
The tires installed on this vehicle
at the factory as original
equipment are certified for
Greenhouse Gas and Fuel
Efficiency regulations.
Replacement tires must be of
equal or lower rolling resistance
level (TRRL or Crr). Consult with
your tire supplier(s) for
appropriate replacement tires.
Safety Practices
WARNINGS
If your vehicle is stuck in
snow, mud or sand, do not
rapidly spin the tires; spinning the
tires can tear the tire and cause
an explosion. A tire can explode in
as little as three to five seconds. Do not spin the wheels at
over
34 mph (55 km/h). The
tires may fail and injure a
passenger or bystander. Driving habits have a great deal
to do with your tire mileage and
safety.
*Observe posted speed limits
*Avoid fast starts, stops and turns
*Avoid potholes and objects on
the road
*Do not run over curbs or hit the
tire against a curb when parking
122
Motorhome (TY3) Canada/United States of America, enUSA, Edition date: 201712, Second Printing Wheels and Tires
Page 126 of 168

Highway Hazards
No matter how carefully you drive
there
’s always the possibility that
you may eventually have a flat tire
on the highway. Drive slowly to the
closest safe area out of traffic.
This may further damage the flat
tire, but your safety is more
important.
If you feel a sudden vibration or
ride disturbance while driving, or
you suspect your tire or vehicle
has been damaged, immediately
reduce your speed. Drive with
caution until you can safely pull
off the road. Stop and inspect the
tires for damage. If a tire is
under-inflated or damaged,
deflate it, remove wheel and
replace it with your spare tire and
wheel. If you cannot detect a
cause, have the vehicle towed to
the nearest repair facility or tire
dealer to have the vehicle
inspected.
Tire and Wheel Alignment
A bad jolt from hitting a curb or
pothole can cause the front end
of your vehicle to become
misaligned or cause damage to
your tires. If your vehicle seems to
pull to one side when you’re
driving, the wheels may be out of
alignment. Have an authorized
dealer check the wheel alignment
periodically. Wheel misalignment in the front
or the rear can cause uneven and
rapid treadwear of your tires and
should be corrected by an
authorized dealer. Front-wheel
drive vehicles and those with an
independent rear suspension may
require alignment of all four
wheels.
The tires should also be balanced
periodically. An unbalanced tire
and wheel assembly may result in
irregular tire wear.
Tire Rotation
Note:
If your tires show uneven
wear ask an authorized dealer to
check for and correct any wheel
misalignment, tire imbalance or
mechanical problem involved
before tire rotation.
Note: Your vehicle may be
equipped with a dissimilar spare
wheel and tire assembly. A
dissimilar spare wheel and tire
assembly is defined as a spare
wheel and tire assembly that is
different in brand, size or
appearance from the road tires and
wheels. If you have a dissimilar
spare wheel and tire assembly it is
intended for temporary use only
and should not be used in a tire
rotation.
Note: After having your tires
rotated, inflation pressure must be
checked and adjusted to the
vehicle requirements.
123
Motorhome (TY3) Canada/United States of America, enUSA, Edition date: 201712, Second Printing Wheels and Tires
Page 127 of 168

Rotating your tires at the
recommended interval (as
indicated in the Scheduled
Maintenance chapter) will help
your tires wear more evenly,
providing better tire performance
and longer tire life.
Dual rear wheel drive vehicle - six
tire rotation
If your vehicle is equipped with
dual rear wheels it is
recommended that the front and
rear tires (in pairs) be rotated only
side to side. We do not
recommend splitting up the dual rear wheels. Rotate them side to
side as a set. After tire rotation,
inflation pressures must be
adjusted for the tires new
positions in accordance with
vehicle requirements.
Sometimes irregular tire wear can
be corrected by rotating the tires.
USING SNOW CHAINS
WARNING
Snow tires must be the same size,
load index, and speed rating as those
originally provided by Ford. Use of
any tire or wheel not recommended by
Ford can affect the safety and
performance of your vehicle, which could
result in an increased risk of loss of vehicle
control, vehicle rollover, personal injury,
and death. Additionally, the use of
non-recommended tires and wheels could
cause steering, suspension, axle, transfer
case, or power transfer unit failure. It is also
strongly advised to follow the Ford
recommended tire inflation pressure found
on the Safety Compliance Certification
Label (affixed to either the door hinge
pillar, door-latch post, or the door edge
that meets the door-latch post, next to the
driver ’s seating position), or Tire Label
which is located on the B-Pillar or the edge
of the driver door. Failure to follow the tire
pressure recommendations can cause
uneven treadwear patterns and adversely
affect the way your vehicle handles. The tires on your vehicle have all-weather
treads to provide traction in rain and snow.
However, in some climates, you may need
to use snow tires and cables. If you need
to use cables, it is recommended that steel
wheels (of the same size and
specifications) be used, as cables may chip
aluminum wheels.
124
Motorhome (TY3) Canada/United States of America, enUSA, Edition date: 201712, Second Printing Wheels and TiresE161439
Page 128 of 168

Note:
The suspension insulation and
bumpers help prevent vehicle damage. Do
not remove these components from your
vehicle when using snow tires and chains.
Follow these guidelines when using snow
tires and chains:
• If possible, avoid fully loading your
vehicle.
• Use only SAE Class S chains.
• Install chains securely, verifying that
the chains do not touch any wiring,
brake lines or fuel lines.
• Drive cautiously. If you hear the chains
rub or bang against your vehicle, stop
and retighten the chains. If this does
not work, remove the chains to prevent
damage to your vehicle.
• Remove the tire chains when they are
no longer needed. Do not use tire
chains on dry roads.
If you have any questions regarding snow
chains or cables, please contact your
authorized dealer.
CHANGING A ROAD WHEEL
If you get a flat tire while driving, do not
apply the brake heavily. Instead, gradually
decrease your speed. Hold the steering
wheel firmly and slowly move to a safe
place on the side of the road.
Dissimilar Spare Wheel and Tire
Assembly Information WARNING
Failure to follow these guidelines
could result in an increased risk of
loss of vehicle control, injury or death. If you have a dissimilar spare wheel and
tire, then it is intended for temporary use
only. This means that if you need to use it,
you should replace it as soon as possible
with a road wheel and tire assembly that
is the same size and type as the road tires
and wheels that were originally provided
by Ford. If the dissimilar spare tire or wheel
is damaged, it should be replaced rather
than repaired.
A dissimilar spare wheel and tire assembly
is defined as a spare wheel and tire
assembly that is different in brand, size or
appearance from the road tires and wheels
and can be one of three types:
1.
T-type mini-spare: This spare tire
begins with the letter T for tire size and
may have Temporary Use Only molded in
the sidewall.
2. Full-size dissimilar spare with label
on wheel:
This spare tire has a label on
the wheel that states: THIS WHEEL AND
TIRE ASSEMBLY FOR TEMPORARY USE
ONLY.
When driving with one of the dissimilar
spare tires listed above, do not:
• Exceed
50 mph (80 km/h).
• Load the vehicle beyond maximum
vehicle load rating listed on the Safety
Compliance Label.
• Tow a trailer.
• Use snow chains on the end of the
vehicle with the dissimilar spare tire.
• Use more than one dissimilar spare tire
at a time.
• Use commercial car washing
equipment.
• Try to repair the dissimilar spare tire.
125
Motorhome (TY3) Canada/United States of America, enUSA, Edition date: 201712, Second Printing Wheels and Tires
Page 129 of 168

Use of one of the dissimilar spare tires
listed above at any one wheel location can
lead to impairment of the following:
•
Handling, stability and braking
performance.
• Comfort and noise.
• Ground clearance and parking at curbs.
• Winter weather driving capability.
• Wet weather driving capability.
• All-wheel driving capability.
3. Full-size dissimilar spare without
label on wheel
When driving with the full-size dissimilar
spare wheel and tire assembly, do not:
• Exceed 70 mph (113 km/h).
• Use more than one dissimilar spare
wheel and tire assembly at a time.
• Use commercial car washing
equipment.
• Use snow chains on the end of the
vehicle with the dissimilar spare wheel
and tire assembly.
The usage of a full-size dissimilar spare
wheel and tire assembly can lead to
impairment of the following:
• Handling, stability and braking
performance.
• Comfort and noise.
• Ground clearance and parking at curbs.
• Winter weather driving capability.
• Wet weather driving capability.
• All-wheel driving capability.
When driving with the full-size dissimilar
spare wheel and tire assembly additional
caution should be given to:
• Towing a trailer.
• Driving vehicles equipped with a
camper body.
• Driving vehicles with a load on the
cargo rack. Drive cautiously when using a full-size
dissimilar spare wheel and tire assembly
and seek service as soon as possible.
Tire Change Procedure
WARNINGS
When one of the front wheels is off
the ground, the transmission alone
will not prevent the vehicle from
moving or slipping off the jack, even if the
transmission is in park (P). To help prevent the vehicle from
moving when you change a tire, be
sure to place the transmission in park
(P), set the parking brake and block (in
both directions) the wheel that is
diagonally opposite (other side and end of
the vehicle) to the tire being changed. Never get underneath a vehicle that
is supported only by a jack. If the
vehicle slips off the jack, you or
someone else could be seriously injured. Do not attempt to change a tire on
the side of the vehicle close to
moving traffic. Pull far enough off the
road to avoid the danger of being hit when
operating the jack or changing the wheel. Always use the jack provided as
original equipment with your vehicle.
If using a jack other than the one
provided as original equipment with your
vehicle, make sure the jack capacity is
adequate for the vehicle weight, including
any vehicle cargo or modifications. 1.
Park on a level surface, set the parking
brake and activate the hazard flashers.
2. Place the transmission in park (P) and
turn the engine off.
126
Motorhome (TY3) Canada/United States of America, enUSA, Edition date: 201712, Second Printing Wheels and Tires
Page 130 of 168

3. Block the diagonally opposite wheel.
The parking brake is on the
transmission. Therefore, the vehicle will
not be prevented from moving when a
rear wheel is lifted, even if the parking
brake is applied. Be sure to block both
directions of the wheel that is
diagonally opposite to the wheel that
is being lifted.
4. Remove the spare tire and jack from the storage location.
5. Loosen the wheel nut by pulling up on the handle of the lug nut wrench about
one-half turn (counterclockwise). Do
not remove the wheel lug nuts until you
raise the tire off the ground.
6. Position the jack to raise the front or rear wheel. Raise the vehicle with the
jack applied to the axle(s).
Note: Never use the rear differential as a
jacking point.
7. Raise the vehicle until the wheel is completely off the ground.
8. Remove the lug nuts with the lug nut wrench.
9. Replace the flat tire with the spare tire. 10. Use the lug nut wrench to screw the
lug nut snugly against the wheel.
11. Lower the vehicle.
12. Remove the jack and fully tighten the
lug nuts in the order shown. See
Technical Specifications (page
128). 8-lug nut wheel
10-lug nut wheel
13. Replace any wheel trim.
127
Motorhome (TY3) Canada/United States of America, enUSA, Edition date: 201712, Second Printing Wheels and TiresE175447 E161440 E161441
13
4
27
6
5
8 1
2
3
4
5
6
7 8
9
10
E169375
Page 131 of 168

14. Stow the jack, handle and lug wrench.
15. Unblock the wheels.
TECHNICAL SPECIFICATIONS
Wheel Lug Nut Torque Specifications WARNING
When you install a wheel, always remove any corrosion, dirt or foreign materials
present on the mounting surfaces of the wheel or the surface of the wheel hub,
brake drum or brake disc that contacts the wheel. Make sure to secure any fasteners
that attach the rotor to the hub so they do not interfere with the mounting surfaces of
the wheel. Installing wheels without correct metal-to-metal contact at the wheel mounting
surfaces can cause the wheel nuts to loosen and the wheel to come off while your vehicle
is in motion, resulting in loss of vehicle control, personal injury or death. Ib-ft (Nm)*
Bolt size
150 (200)
M14 x 1.5
(19.5 inch wheels)
450 (610)
M22 x 1.5
(22.5 inch wheels)
*Torque specifications are for nut and bolt threads free of dirt and rust. Use only Ford
recommended replacement fasteners.
On vehicles equipped with dual rear wheels, retighten the wheel lug nuts to the specified
torque at 100 miles (160 kilometers), and again at 500 miles (800 kilometers) of new
vehicle operation and after any wheel disturbance (such as tire rotation, changing a flat
tire, wheel removal).
On all two-piece flat wheel nuts, apply one drop of motor oil between the flat washer
and the nut. Do not apply motor oil to the wheel nut threads or the wheel stud threads. 128
Motorhome (TY3) Canada/United States of America, enUSA, Edition date: 201712, Second Printing Wheels and TiresE161443
Page 144 of 168
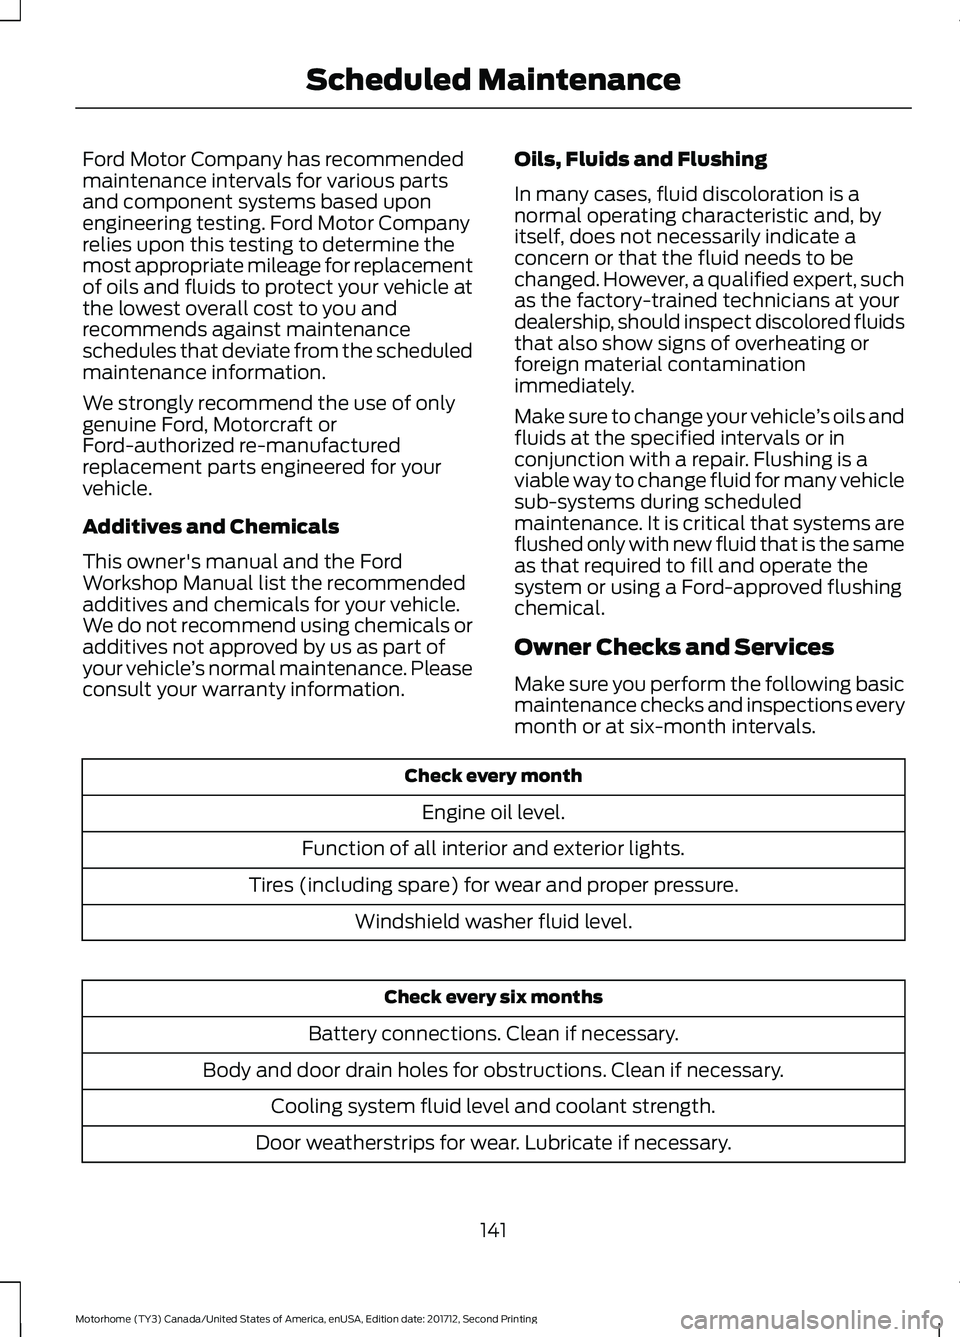
Ford Motor Company has recommended
maintenance intervals for various parts
and component systems based upon
engineering testing. Ford Motor Company
relies upon this testing to determine the
most appropriate mileage for replacement
of oils and fluids to protect your vehicle at
the lowest overall cost to you and
recommends against maintenance
schedules that deviate from the scheduled
maintenance information.
We strongly recommend the use of only
genuine Ford, Motorcraft or
Ford-authorized re-manufactured
replacement parts engineered for your
vehicle.
Additives and Chemicals
This owner's manual and the Ford
Workshop Manual list the recommended
additives and chemicals for your vehicle.
We do not recommend using chemicals or
additives not approved by us as part of
your vehicle
’s normal maintenance. Please
consult your warranty information. Oils, Fluids and Flushing
In many cases, fluid discoloration is a
normal operating characteristic and, by
itself, does not necessarily indicate a
concern or that the fluid needs to be
changed. However, a qualified expert, such
as the factory-trained technicians at your
dealership, should inspect discolored fluids
that also show signs of overheating or
foreign material contamination
immediately.
Make sure to change your vehicle
’s oils and
fluids at the specified intervals or in
conjunction with a repair. Flushing is a
viable way to change fluid for many vehicle
sub-systems during scheduled
maintenance. It is critical that systems are
flushed only with new fluid that is the same
as that required to fill and operate the
system or using a Ford-approved flushing
chemical.
Owner Checks and Services
Make sure you perform the following basic
maintenance checks and inspections every
month or at six-month intervals. Check every month
Engine oil level.
Function of all interior and exterior lights.
Tires (including spare) for wear and proper pressure. Windshield washer fluid level. Check every six months
Battery connections. Clean if necessary.
Body and door drain holes for obstructions. Clean if necessary. Cooling system fluid level and coolant strength.
Door weatherstrips for wear. Lubricate if necessary.
141
Motorhome (TY3) Canada/United States of America, enUSA, Edition date: 201712, Second Printing Scheduled Maintenance
Page 145 of 168
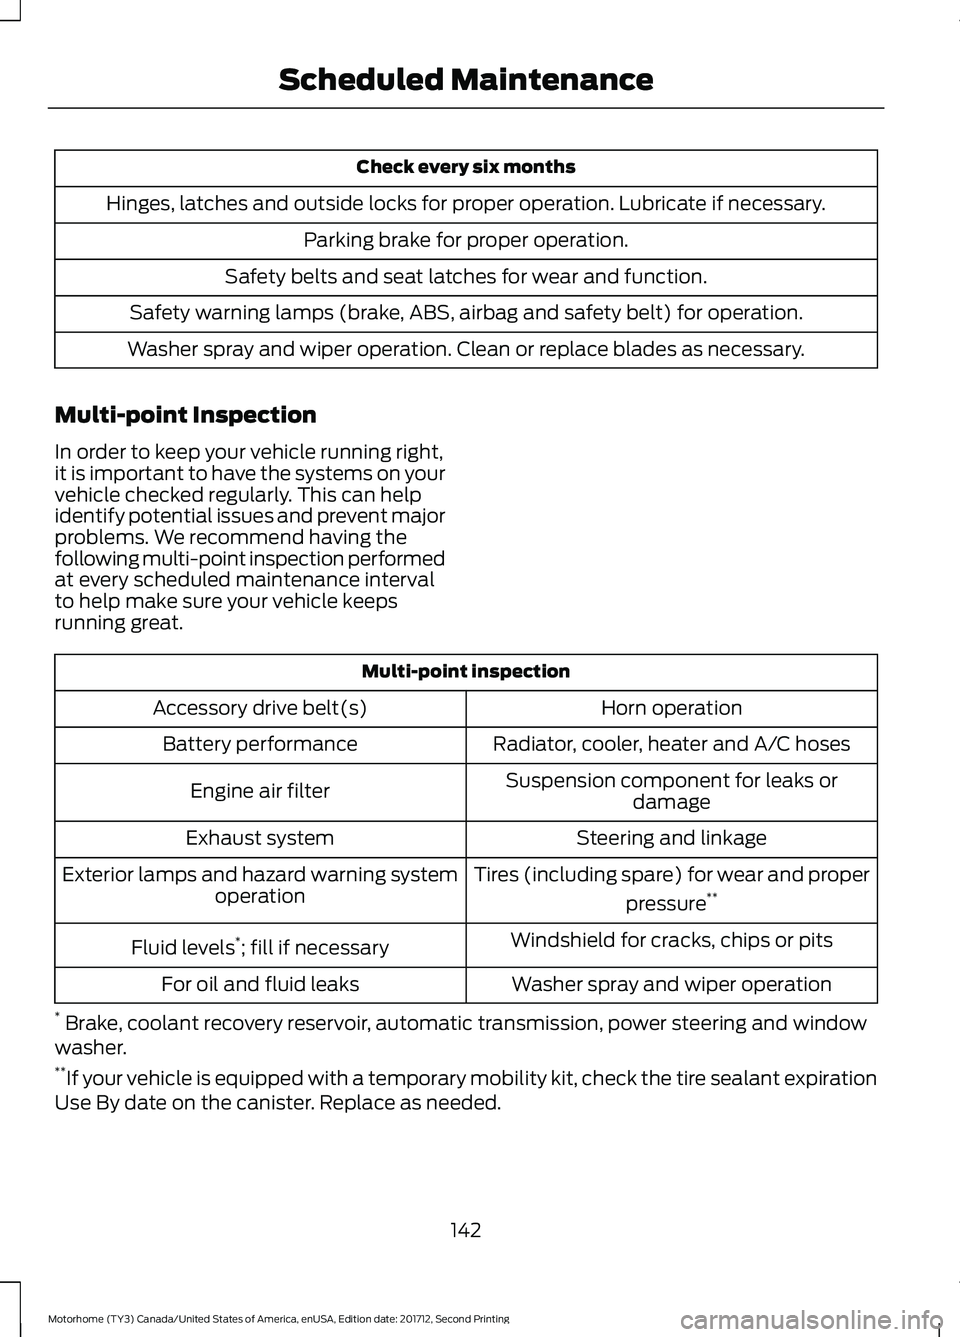
Check every six months
Hinges, latches and outside locks for proper operation. Lubricate if necessary. Parking brake for proper operation.
Safety belts and seat latches for wear and function.
Safety warning lamps (brake, ABS, airbag and safety belt) for operation.
Washer spray and wiper operation. Clean or replace blades as necessary.
Multi-point Inspection
In order to keep your vehicle running right,
it is important to have the systems on your
vehicle checked regularly. This can help
identify potential issues and prevent major
problems. We recommend having the
following multi-point inspection performed
at every scheduled maintenance interval
to help make sure your vehicle keeps
running great. Multi-point inspection
Horn operation
Accessory drive belt(s)
Radiator, cooler, heater and A/C hoses
Battery performance
Suspension component for leaks ordamage
Engine air filter
Steering and linkage
Exhaust system
Tires (including spare) for wear and properpressure**
Exterior lamps and hazard warning system
operation
Windshield for cracks, chips or pits
Fluid levels *
; fill if necessary
Washer spray and wiper operation
For oil and fluid leaks
* Brake, coolant recovery reservoir, automatic transmission, power steering and window
washer.
** If your vehicle is equipped with a temporary mobility kit, check the tire sealant expiration
Use By date on the canister. Replace as needed.
142
Motorhome (TY3) Canada/United States of America, enUSA, Edition date: 201712, Second Printing Scheduled Maintenance
Page 146 of 168
Be sure to ask your dealership service
advisor or technician about the multi-point
vehicle inspection. It is a comprehensive
way to perform a thorough inspection of
your vehicle. Your checklist gives you
immediate feedback on the overall
condition of your vehicle.
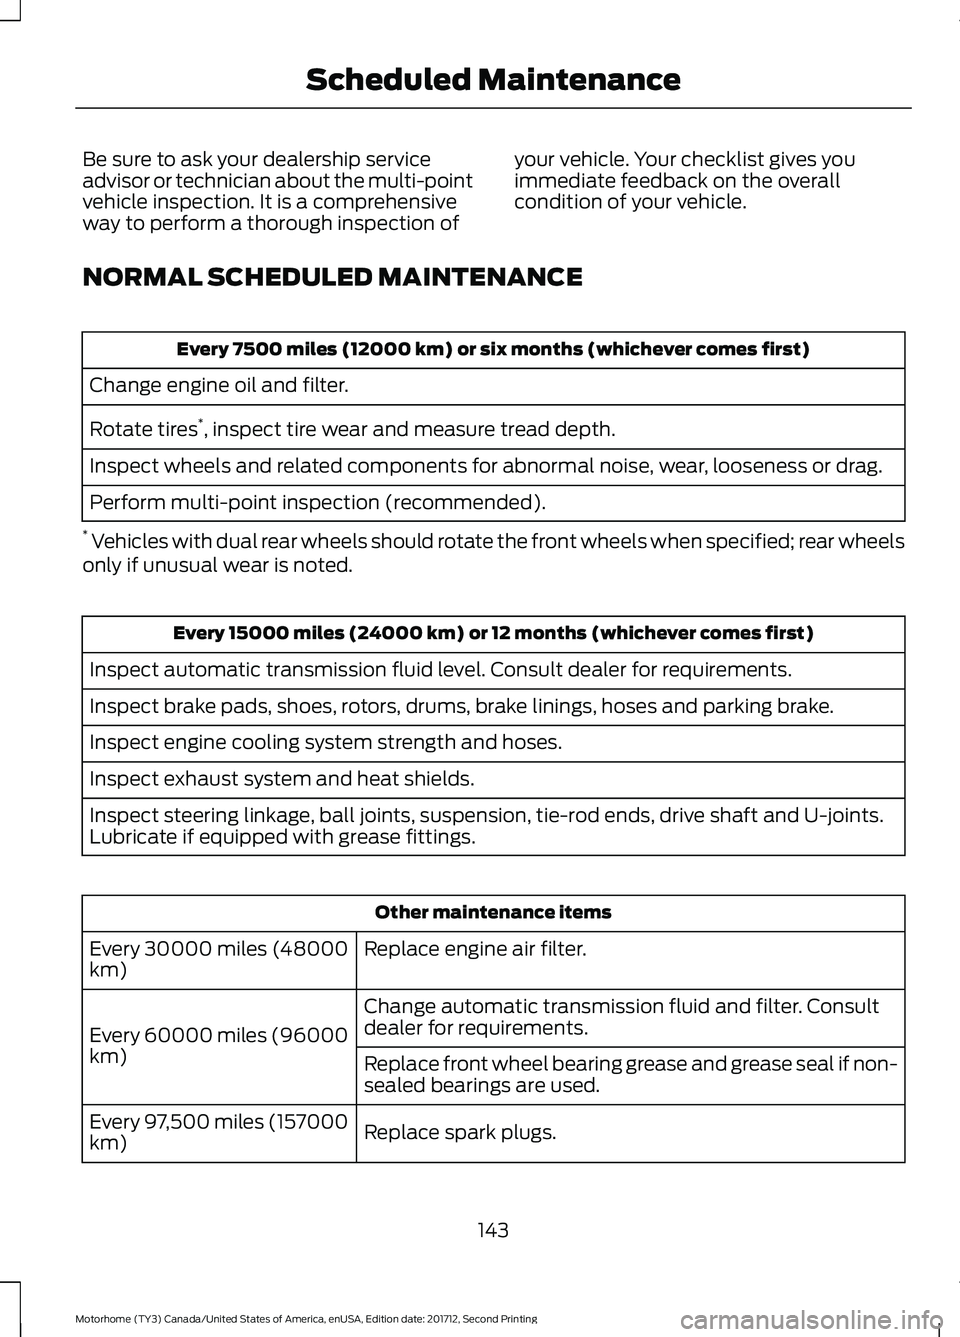
NORMAL SCHEDULED MAINTENANCE Every 7500 miles (12000 km) or six months (whichever comes first)
Change engine oil and filter.
Rotate tires *
, inspect tire wear and measure tread depth.
Inspect wheels and related components for abnormal noise, wear, looseness or drag.
Perform multi-point inspection (recommended).
* Vehicles with dual rear wheels should rotate the front wheels when specified; rear wheels
only if unusual wear is noted. Every 15000 miles (24000 km) or 12 months (whichever comes first)
Inspect automatic transmission fluid level. Consult dealer for requirements.
Inspect brake pads, shoes, rotors, drums, brake linings, hoses and parking brake.
Inspect engine cooling system strength and hoses.
Inspect exhaust system and heat shields.
Inspect steering linkage, ball joints, suspension, tie-rod ends, drive shaft and U-joints.
Lubricate if equipped with grease fittings. Other maintenance items
Replace engine air filter.
Every 30000 miles (48000
km)
Change automatic transmission fluid and filter. Consult
dealer for requirements.
Every 60000 miles (96000
km) Replace front wheel bearing grease and grease seal if non-
sealed bearings are used.
Replace spark plugs.
Every 97,500 miles (157000
km)
143
Motorhome (TY3) Canada/United States of America, enUSA, Edition date: 201712, Second Printing Scheduled Maintenance