fuel cap FORD F-59 2018 Owners Manual
[x] Cancel search | Manufacturer: FORD, Model Year: 2018, Model line: F-59, Model: FORD F-59 2018Pages: 168, PDF Size: 3.02 MB
Page 5 of 168
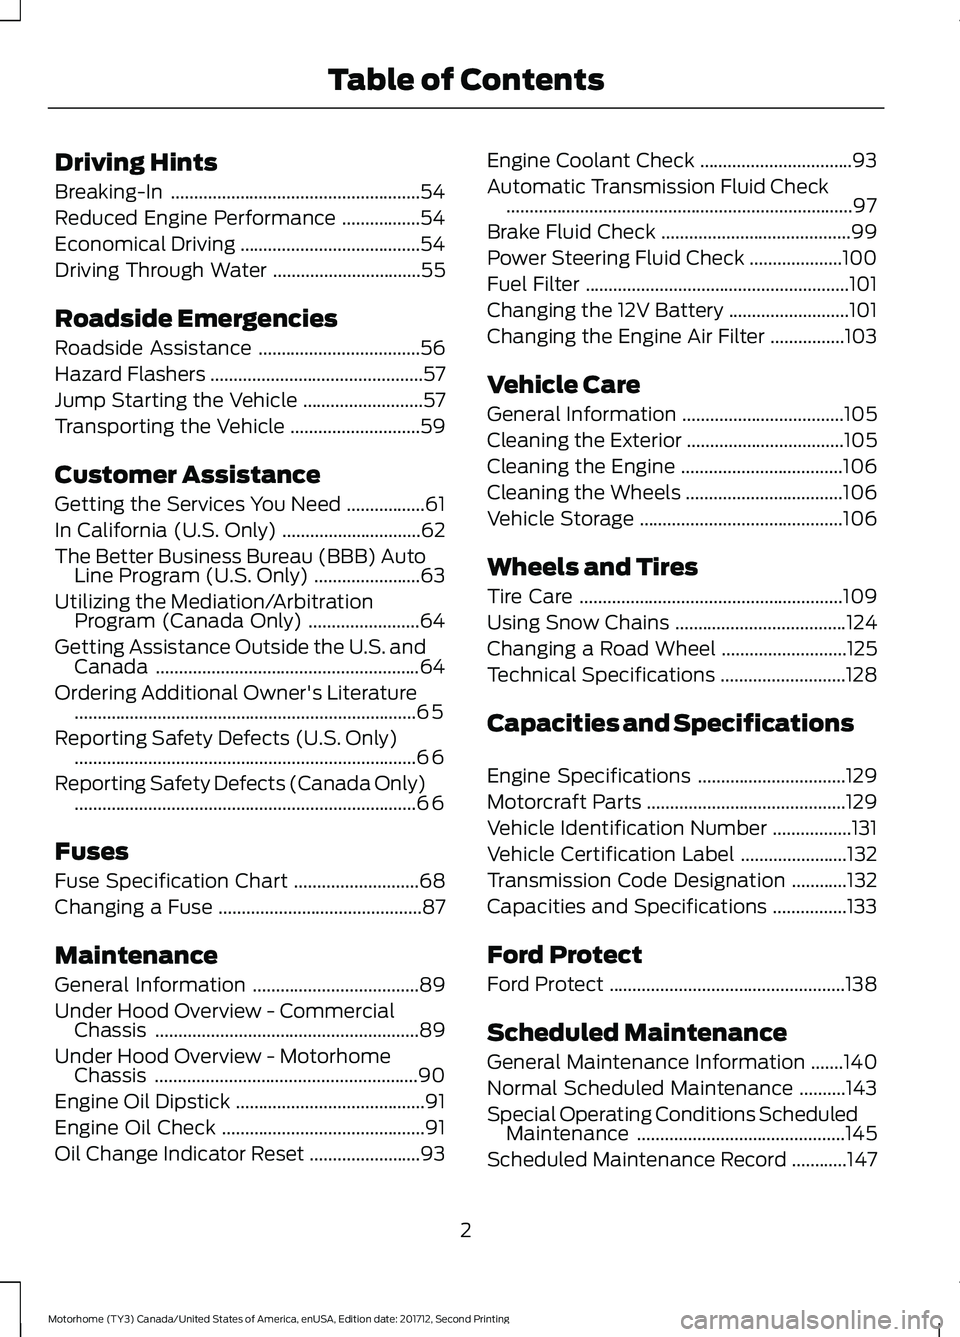
Driving Hints
Breaking-In
......................................................54
Reduced Engine Performance .................
54
Economical Driving .......................................
54
Driving Through Water ................................
55
Roadside Emergencies
Roadside Assistance ...................................
56
Hazard Flashers ..............................................
57
Jump Starting the Vehicle ..........................
57
Transporting the Vehicle ............................
59
Customer Assistance
Getting the Services You Need .................
61
In California (U.S. Only) ..............................
62
The Better Business Bureau (BBB) Auto Line Program (U.S. Only) .......................
63
Utilizing the Mediation/Arbitration Program (Canada Only) ........................
64
Getting Assistance Outside the U.S. and Canada .........................................................
64
Ordering Additional Owner's Literature ........................................................................\
..
65
Reporting Safety Defects (U.S. Only) ........................................................................\
..
66
Reporting Safety Defects (Canada Only) ........................................................................\
..
66
Fuses
Fuse Specification Chart ...........................
68
Changing a Fuse ............................................
87
Maintenance
General Information ....................................
89
Under Hood Overview - Commercial Chassis .........................................................
89
Under Hood Overview - Motorhome Chassis .........................................................
90
Engine Oil Dipstick .........................................
91
Engine Oil Check ............................................
91
Oil Change Indicator Reset ........................
93Engine Coolant Check
.................................
93
Automatic Transmission Fluid Check ........................................................................\
...
97
Brake Fluid Check .........................................
99
Power Steering Fluid Check ....................
100
Fuel Filter .........................................................
101
Changing the 12V Battery ..........................
101
Changing the Engine Air Filter ................
103
Vehicle Care
General Information ...................................
105
Cleaning the Exterior ..................................
105
Cleaning the Engine ...................................
106
Cleaning the Wheels ..................................
106
Vehicle Storage ............................................
106
Wheels and Tires
Tire Care .........................................................
109
Using Snow Chains .....................................
124
Changing a Road Wheel ...........................
125
Technical Specifications ...........................
128
Capacities and Specifications
Engine Specifications ................................
129
Motorcraft Parts ...........................................
129
Vehicle Identification Number .................
131
Vehicle Certification Label .......................
132
Transmission Code Designation ............
132
Capacities and Specifications ................
133
Ford Protect
Ford Protect ...................................................
138
Scheduled Maintenance
General Maintenance Information .......
140
Normal Scheduled Maintenance ..........
143
Special Operating Conditions Scheduled Maintenance .............................................
145
Scheduled Maintenance Record ............
147
2
Motorhome (TY3) Canada/United States of America, enUSA, Edition date: 201712, Second Printing Table of Contents
Page 9 of 168
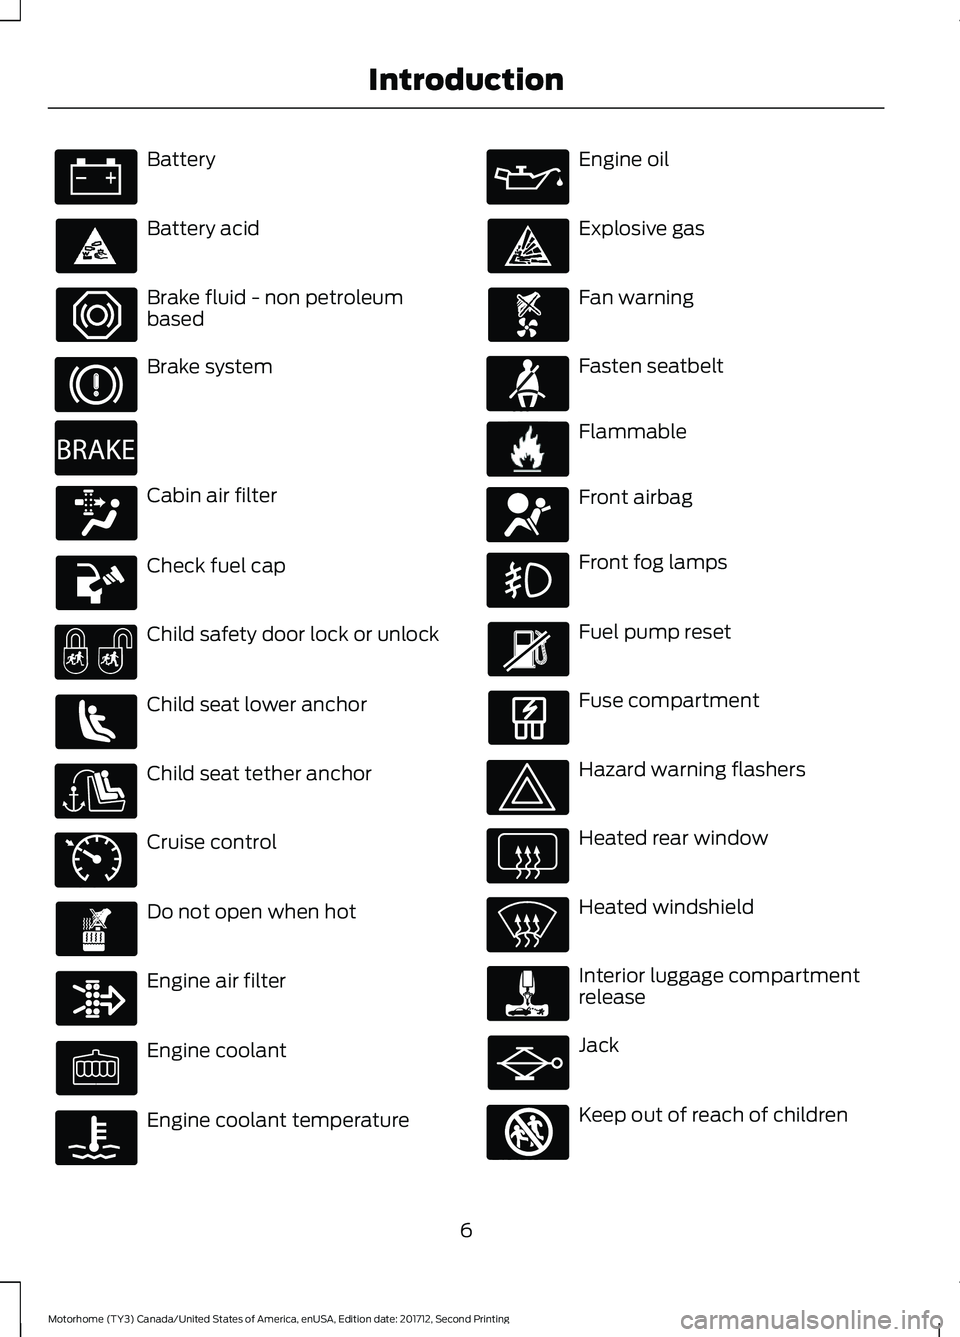
Battery
Battery acid
Brake fluid - non petroleum
based
Brake system
Cabin air filter
Check fuel cap
Child safety door lock or unlock
Child seat lower anchor
Child seat tether anchor
Cruise control
Do not open when hot
Engine air filter
Engine coolant
Engine coolant temperature Engine oil
Explosive gas
Fan warning
Fasten seatbelt
Flammable
Front airbag
Front fog lamps
Fuel pump reset
Fuse compartment
Hazard warning flashers
Heated rear window
Heated windshield
Interior luggage compartment
release
Jack
Keep out of reach of children
6
Motorhome (TY3) Canada/United States of America, enUSA, Edition date: 201712, Second Printing Introduction E270480 E71340 E71880 E231160 E67017 E161353
Page 20 of 168
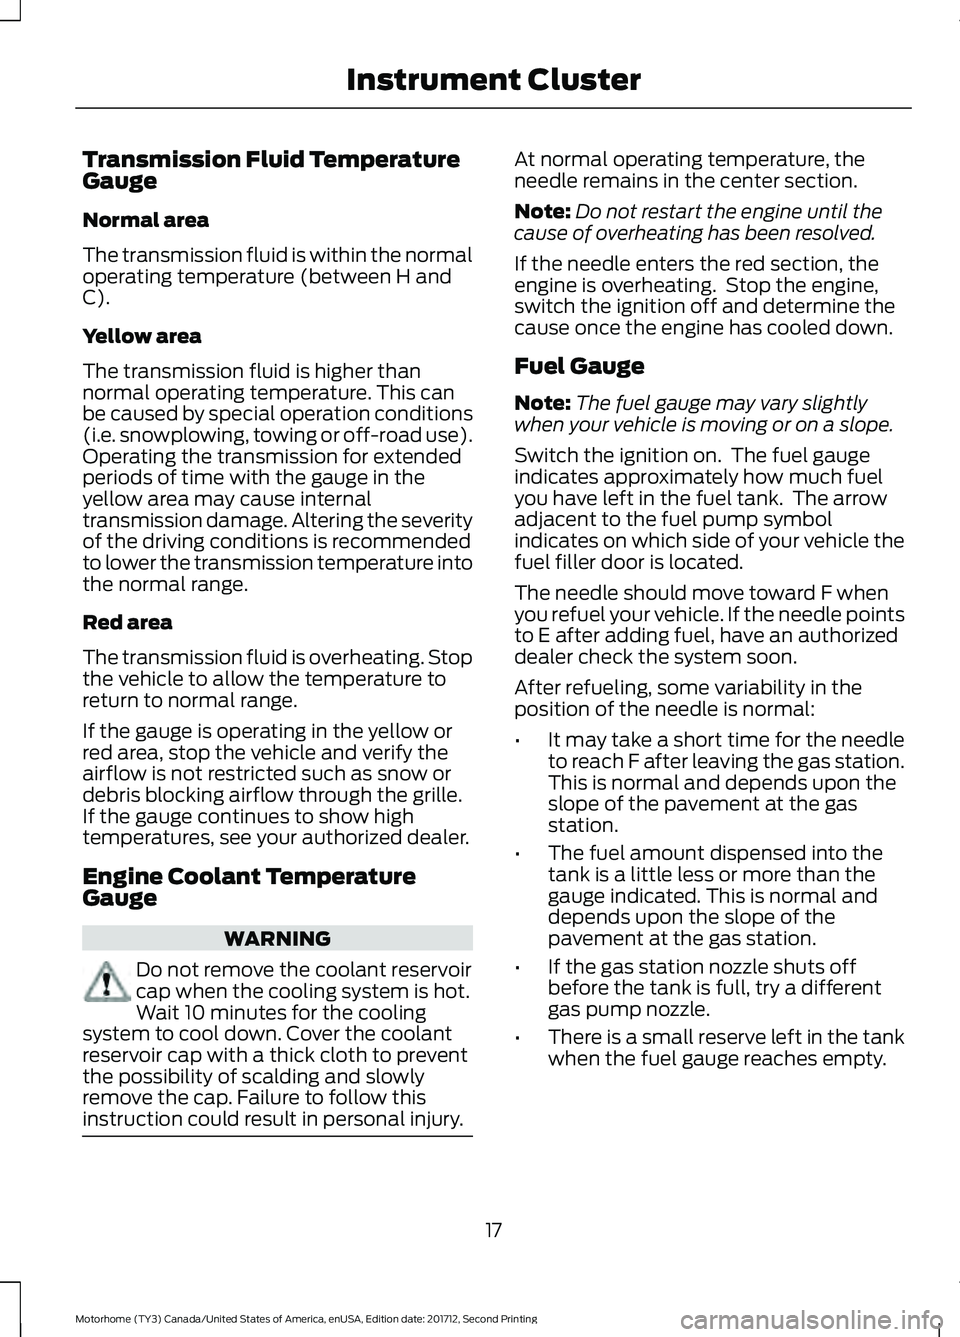
Transmission Fluid Temperature
Gauge
Normal area
The transmission fluid is within the normal
operating temperature (between H and
C).
Yellow area
The transmission fluid is higher than
normal operating temperature. This can
be caused by special operation conditions
(i.e. snowplowing, towing or off-road use).
Operating the transmission for extended
periods of time with the gauge in the
yellow area may cause internal
transmission damage. Altering the severity
of the driving conditions is recommended
to lower the transmission temperature into
the normal range.
Red area
The transmission fluid is overheating. Stop
the vehicle to allow the temperature to
return to normal range.
If the gauge is operating in the yellow or
red area, stop the vehicle and verify the
airflow is not restricted such as snow or
debris blocking airflow through the grille.
If the gauge continues to show high
temperatures, see your authorized dealer.
Engine Coolant Temperature
Gauge
WARNING
Do not remove the coolant reservoir
cap when the cooling system is hot.
Wait 10 minutes for the cooling
system to cool down. Cover the coolant
reservoir cap with a thick cloth to prevent
the possibility of scalding and slowly
remove the cap. Failure to follow this
instruction could result in personal injury. At normal operating temperature, the
needle remains in the center section.
Note:
Do not restart the engine until the
cause of overheating has been resolved.
If the needle enters the red section, the
engine is overheating. Stop the engine,
switch the ignition off and determine the
cause once the engine has cooled down.
Fuel Gauge
Note: The fuel gauge may vary slightly
when your vehicle is moving or on a slope.
Switch the ignition on. The fuel gauge
indicates approximately how much fuel
you have left in the fuel tank. The arrow
adjacent to the fuel pump symbol
indicates on which side of your vehicle the
fuel filler door is located.
The needle should move toward F when
you refuel your vehicle. If the needle points
to E after adding fuel, have an authorized
dealer check the system soon.
After refueling, some variability in the
position of the needle is normal:
• It may take a short time for the needle
to reach F after leaving the gas station.
This is normal and depends upon the
slope of the pavement at the gas
station.
• The fuel amount dispensed into the
tank is a little less or more than the
gauge indicated. This is normal and
depends upon the slope of the
pavement at the gas station.
• If the gas station nozzle shuts off
before the tank is full, try a different
gas pump nozzle.
• There is a small reserve left in the tank
when the fuel gauge reaches empty.
17
Motorhome (TY3) Canada/United States of America, enUSA, Edition date: 201712, Second Printing Instrument Cluster
Page 26 of 168
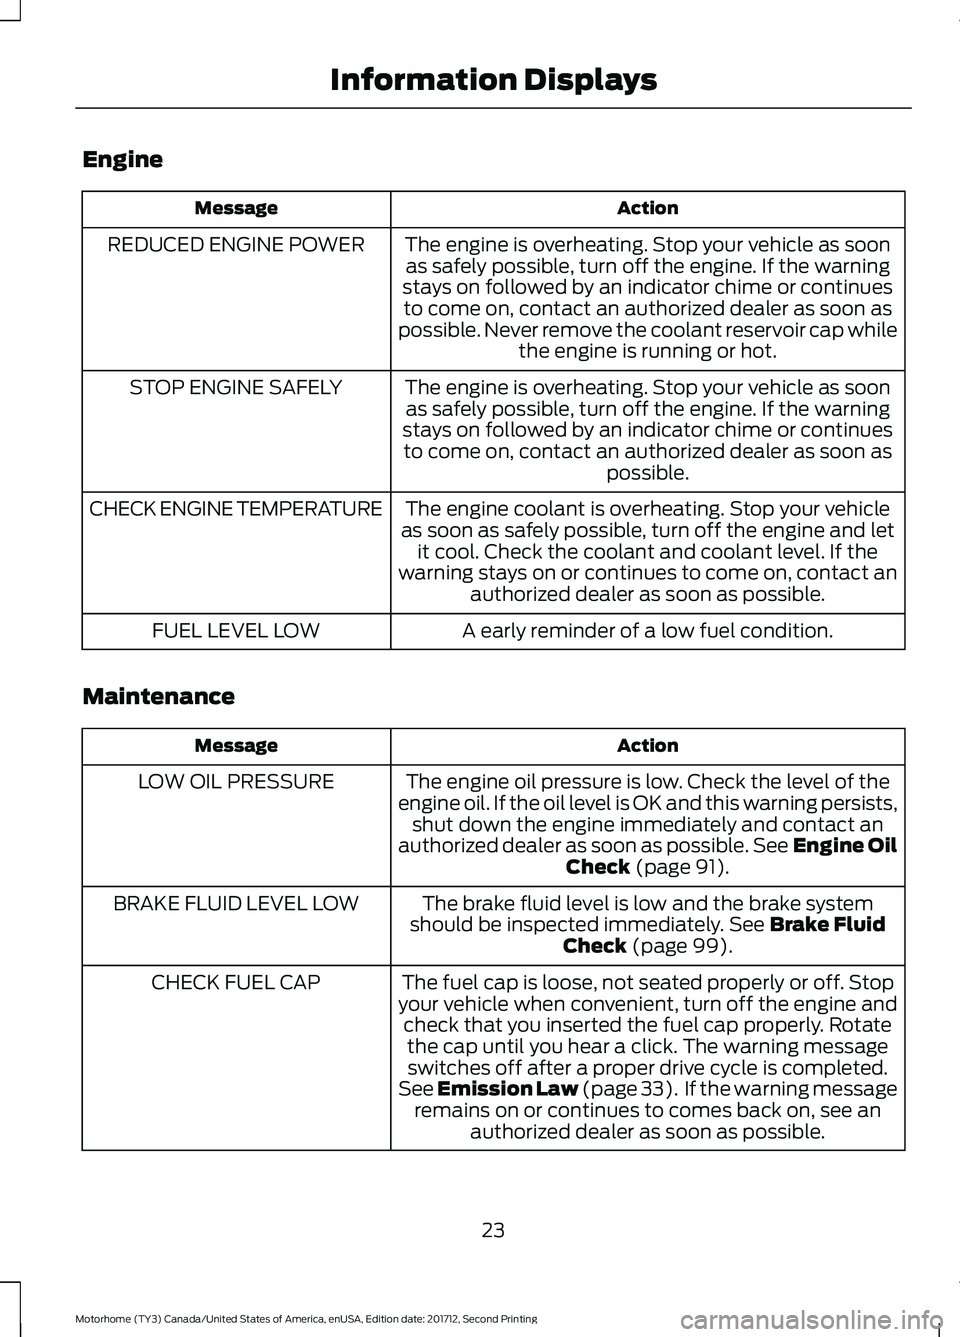
Engine
Action
Message
The engine is overheating. Stop your vehicle as soonas safely possible, turn off the engine. If the warning
stays on followed by an indicator chime or continues to come on, contact an authorized dealer as soon as
possible. Never remove the coolant reservoir cap while the engine is running or hot.
REDUCED ENGINE POWER
The engine is overheating. Stop your vehicle as soonas safely possible, turn off the engine. If the warning
stays on followed by an indicator chime or continues to come on, contact an authorized dealer as soon as possible.
STOP ENGINE SAFELY
The engine coolant is overheating. Stop your vehicle
as soon as safely possible, turn off the engine and let it cool. Check the coolant and coolant level. If the
warning stays on or continues to come on, contact an authorized dealer as soon as possible.
CHECK ENGINE TEMPERATURE
A early reminder of a low fuel condition.
FUEL LEVEL LOW
Maintenance Action
Message
The engine oil pressure is low. Check the level of the
engine oil. If the oil level is OK and this warning persists, shut down the engine immediately and contact an
authorized dealer as soon as possible. See Engine Oil
Check (page 91).
LOW OIL PRESSURE
The brake fluid level is low and the brake system
should be inspected immediately.
See Brake Fluid
Check (page 99).
BRAKE FLUID LEVEL LOW
The fuel cap is loose, not seated properly or off. Stop
your vehicle when convenient, turn off the engine and check that you inserted the fuel cap properly. Rotatethe cap until you hear a click. The warning messageswitches off after a proper drive cycle is completed.
See
Emission Law (page 33). If the warning message
remains on or continues to comes back on, see an authorized dealer as soon as possible.
CHECK FUEL CAP
23
Motorhome (TY3) Canada/United States of America, enUSA, Edition date: 201712, Second Printing Information Displays
Page 33 of 168
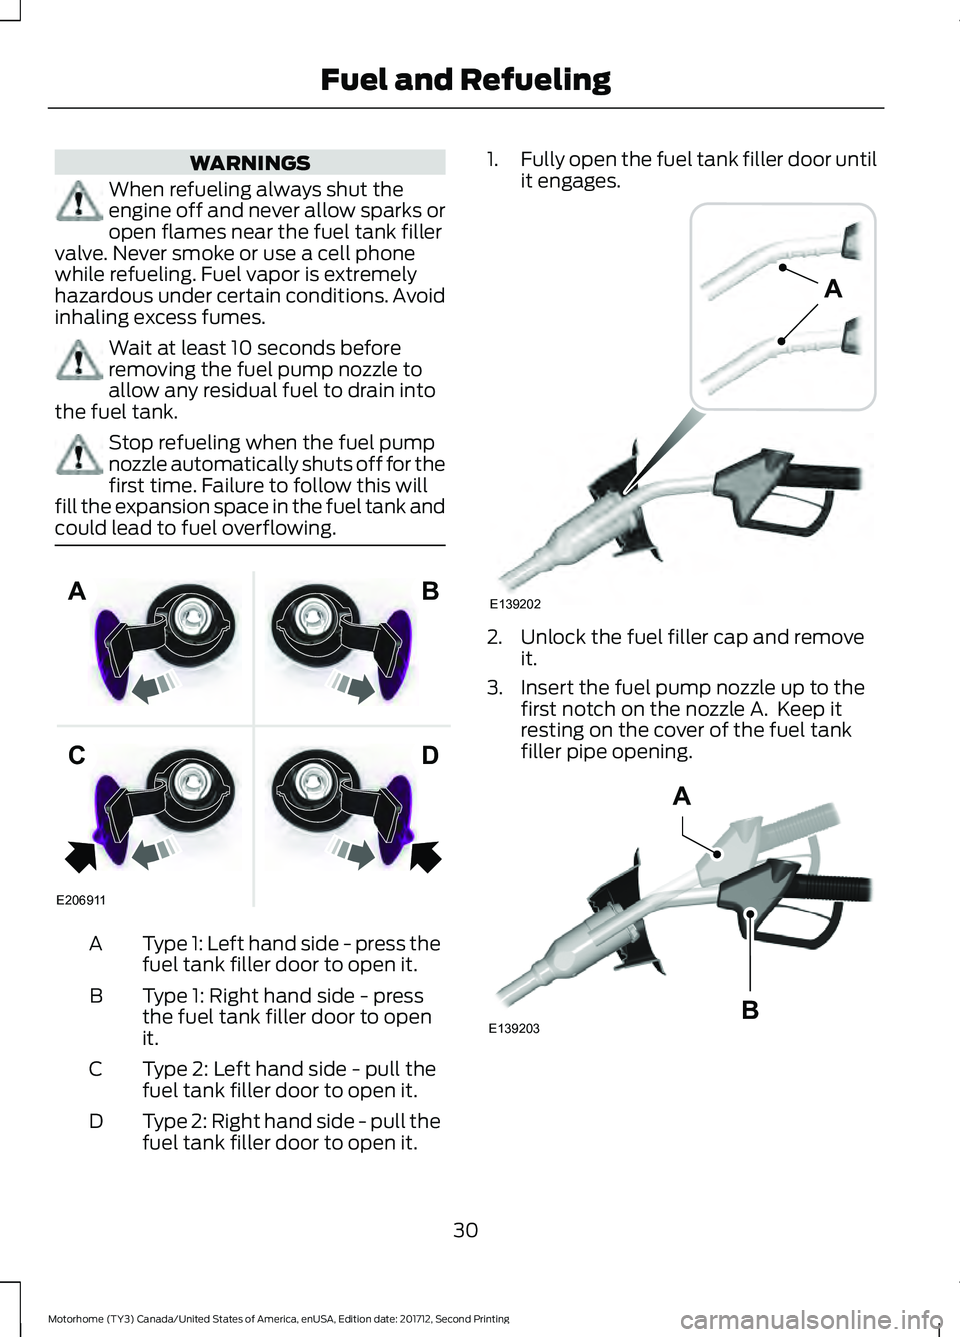
WARNINGS
When refueling always shut the
engine off and never allow sparks or
open flames near the fuel tank filler
valve. Never smoke or use a cell phone
while refueling. Fuel vapor is extremely
hazardous under certain conditions. Avoid
inhaling excess fumes. Wait at least 10 seconds before
removing the fuel pump nozzle to
allow any residual fuel to drain into
the fuel tank. Stop refueling when the fuel pump
nozzle automatically shuts off for the
first time. Failure to follow this will
fill the expansion space in the fuel tank and
could lead to fuel overflowing. Type 1: Left hand side - press the
fuel tank filler door to open it.
A
Type 1: Right hand side - press
the fuel tank filler door to open
it.
B
Type 2: Left hand side - pull the
fuel tank filler door to open it.
C
Type 2: Right hand side - pull the
fuel tank filler door to open it.
D 1.
Fully open the fuel tank filler door until
it engages. 2. Unlock the fuel filler cap and remove
it.
3. Insert the fuel pump nozzle up to the first notch on the nozzle A. Keep it
resting on the cover of the fuel tank
filler pipe opening. 30
Motorhome (TY3) Canada/United States of America, enUSA, Edition date: 201712, Second Printing Fuel and RefuelingE206911
AB
CD E139202
A E139203
A
B
Page 34 of 168
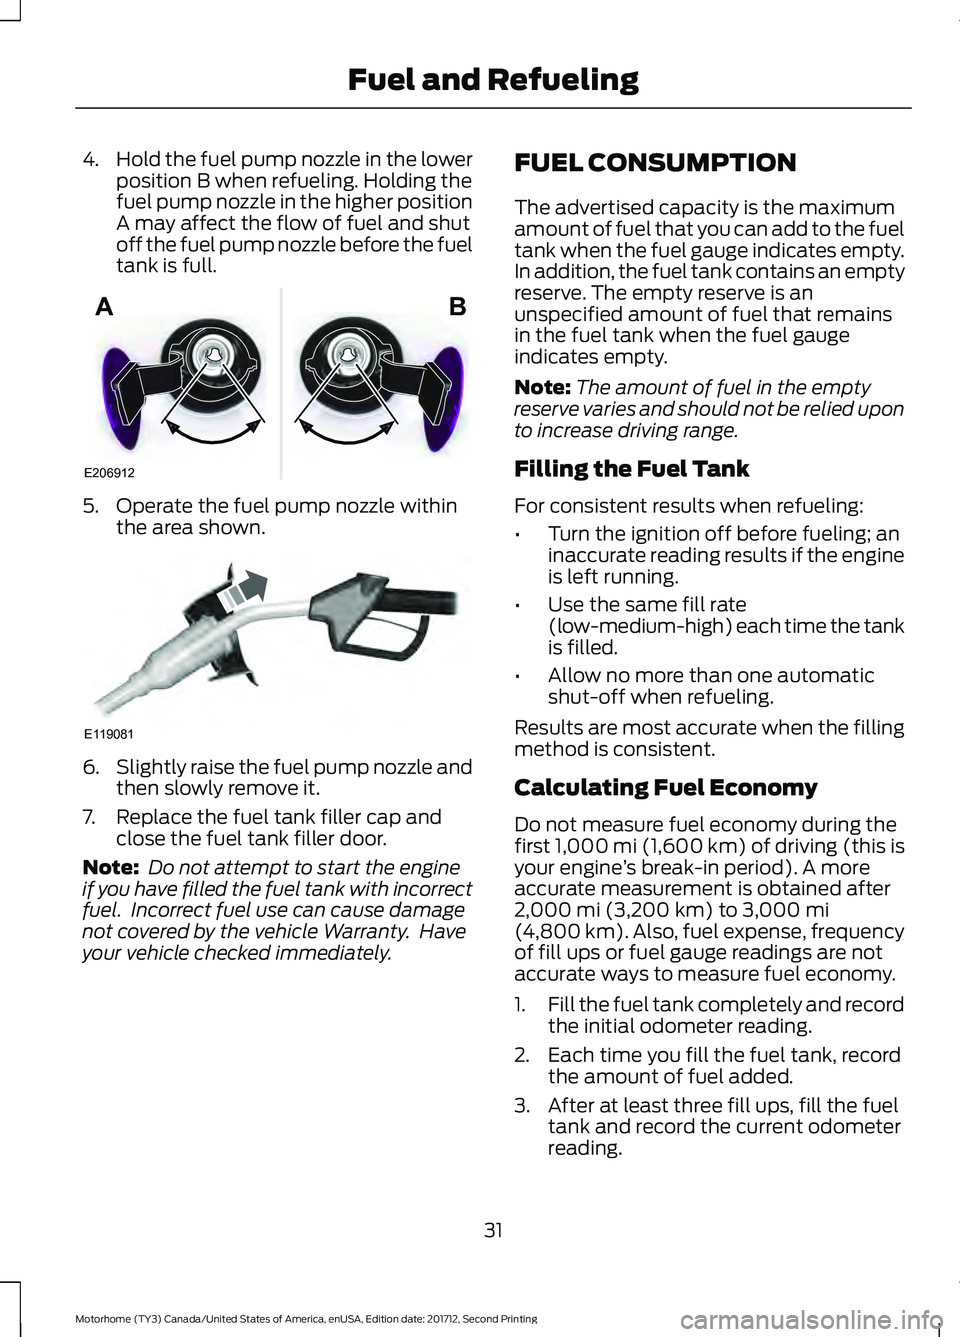
4.
Hold the fuel pump nozzle in the lower
position B when refueling. Holding the
fuel pump nozzle in the higher position
A may affect the flow of fuel and shut
off the fuel pump nozzle before the fuel
tank is full. 5. Operate the fuel pump nozzle within
the area shown. 6.
Slightly raise the fuel pump nozzle and
then slowly remove it.
7. Replace the fuel tank filler cap and close the fuel tank filler door.
Note: Do not attempt to start the engine
if you have filled the fuel tank with incorrect
fuel. Incorrect fuel use can cause damage
not covered by the vehicle Warranty. Have
your vehicle checked immediately. FUEL CONSUMPTION
The advertised capacity is the maximum
amount of fuel that you can add to the fuel
tank when the fuel gauge indicates empty.
In addition, the fuel tank contains an empty
reserve. The empty reserve is an
unspecified amount of fuel that remains
in the fuel tank when the fuel gauge
indicates empty.
Note:
The amount of fuel in the empty
reserve varies and should not be relied upon
to increase driving range.
Filling the Fuel Tank
For consistent results when refueling:
• Turn the ignition off before fueling; an
inaccurate reading results if the engine
is left running.
• Use the same fill rate
(low-medium-high) each time the tank
is filled.
• Allow no more than one automatic
shut-off when refueling.
Results are most accurate when the filling
method is consistent.
Calculating Fuel Economy
Do not measure fuel economy during the
first 1,000 mi (1,600 km) of driving (this is
your engine ’s break-in period). A more
accurate measurement is obtained after
2,000 mi (3,200 km)
to 3,000 mi
(4,800 km). Also, fuel expense, frequency
of fill ups or fuel gauge readings are not
accurate ways to measure fuel economy.
1. Fill the fuel tank completely and record
the initial odometer reading.
2. Each time you fill the fuel tank, record the amount of fuel added.
3. After at least three fill ups, fill the fuel tank and record the current odometer
reading.
31
Motorhome (TY3) Canada/United States of America, enUSA, Edition date: 201712, Second Printing Fuel and RefuelingE206912
AB E119081
Page 72 of 168
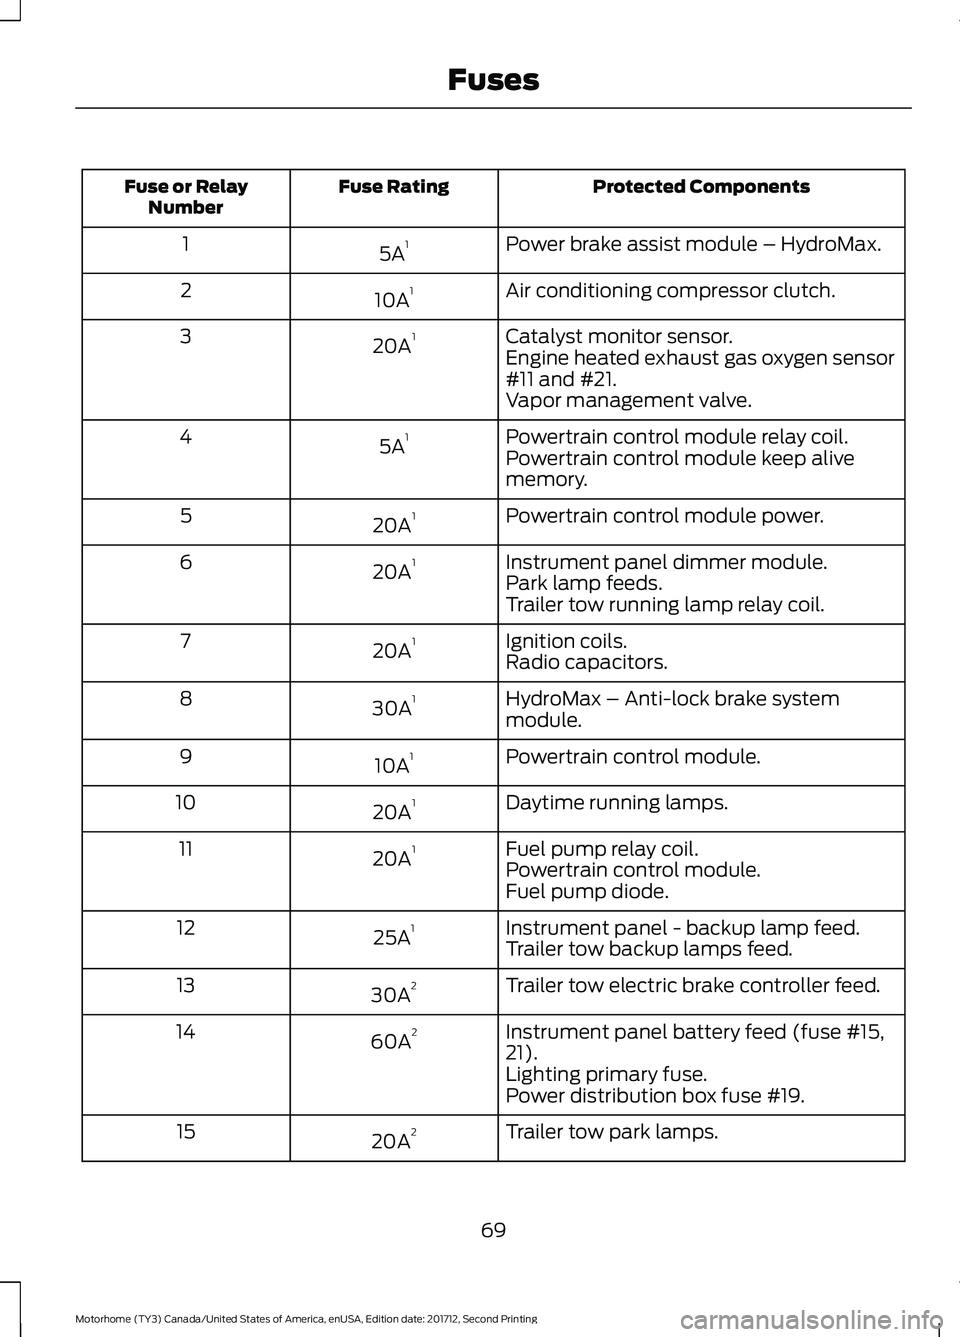
Protected Components
Fuse Rating
Fuse or Relay
Number
Power brake assist module – HydroMax.
5A 1
1
Air conditioning compressor clutch.
10A 1
2
Catalyst monitor sensor.
20A 1
3
Engine heated exhaust gas oxygen sensor
#11 and #21.
Vapor management valve.
Powertrain control module relay coil.
5A 1
4
Powertrain control module keep alive
memory.
Powertrain control module power.
20A 1
5
Instrument panel dimmer module.
20A 1
6
Park lamp feeds.
Trailer tow running lamp relay coil.
Ignition coils.
20A 1
7
Radio capacitors.
HydroMax – Anti-lock brake system
module.
30A 1
8
Powertrain control module.
10A 1
9
Daytime running lamps.
20A 1
10
Fuel pump relay coil.
20A 1
11
Powertrain control module.
Fuel pump diode.
Instrument panel - backup lamp feed.
25A 1
12
Trailer tow backup lamps feed.
Trailer tow electric brake controller feed.
30A 2
13
Instrument panel battery feed (fuse #15,
21).
60A 2
14
Lighting primary fuse.
Power distribution box fuse #19.
Trailer tow park lamps.
20A 2
15
69
Motorhome (TY3) Canada/United States of America, enUSA, Edition date: 201712, Second Printing Fuses
Page 76 of 168
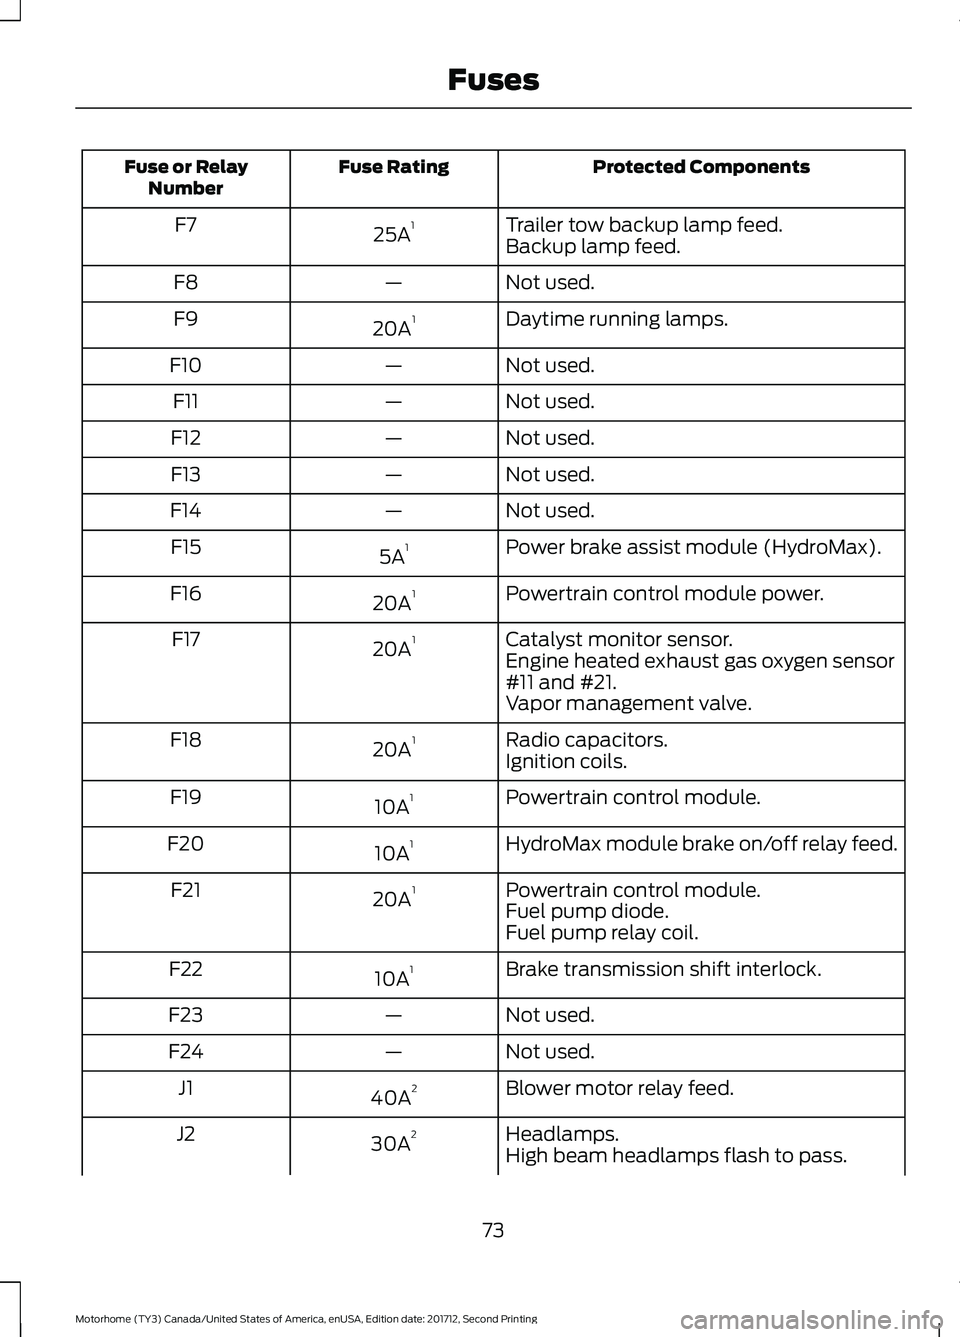
Protected Components
Fuse Rating
Fuse or Relay
Number
Trailer tow backup lamp feed.
25A 1
F7
Backup lamp feed.
Not used.
—
F8
Daytime running lamps.
20A 1
F9
Not used.
—
F10
Not used.
—
F11
Not used.
—
F12
Not used.
—
F13
Not used.
—
F14
Power brake assist module (HydroMax).
5A 1
F15
Powertrain control module power.
20A 1
F16
Catalyst monitor sensor.
20A 1
F17
Engine heated exhaust gas oxygen sensor
#11 and #21.
Vapor management valve.
Radio capacitors.
20A 1
F18
Ignition coils.
Powertrain control module.
10A 1
F19
HydroMax module brake on/off relay feed.
10A 1
F20
Powertrain control module.
20A 1
F21
Fuel pump diode.
Fuel pump relay coil.
Brake transmission shift interlock.
10A 1
F22
Not used.
—
F23
Not used.
—
F24
Blower motor relay feed.
40A 2
J1
Headlamps.
30A 2
J2
High beam headlamps flash to pass.
73
Motorhome (TY3) Canada/United States of America, enUSA, Edition date: 201712, Second Printing Fuses
Page 81 of 168
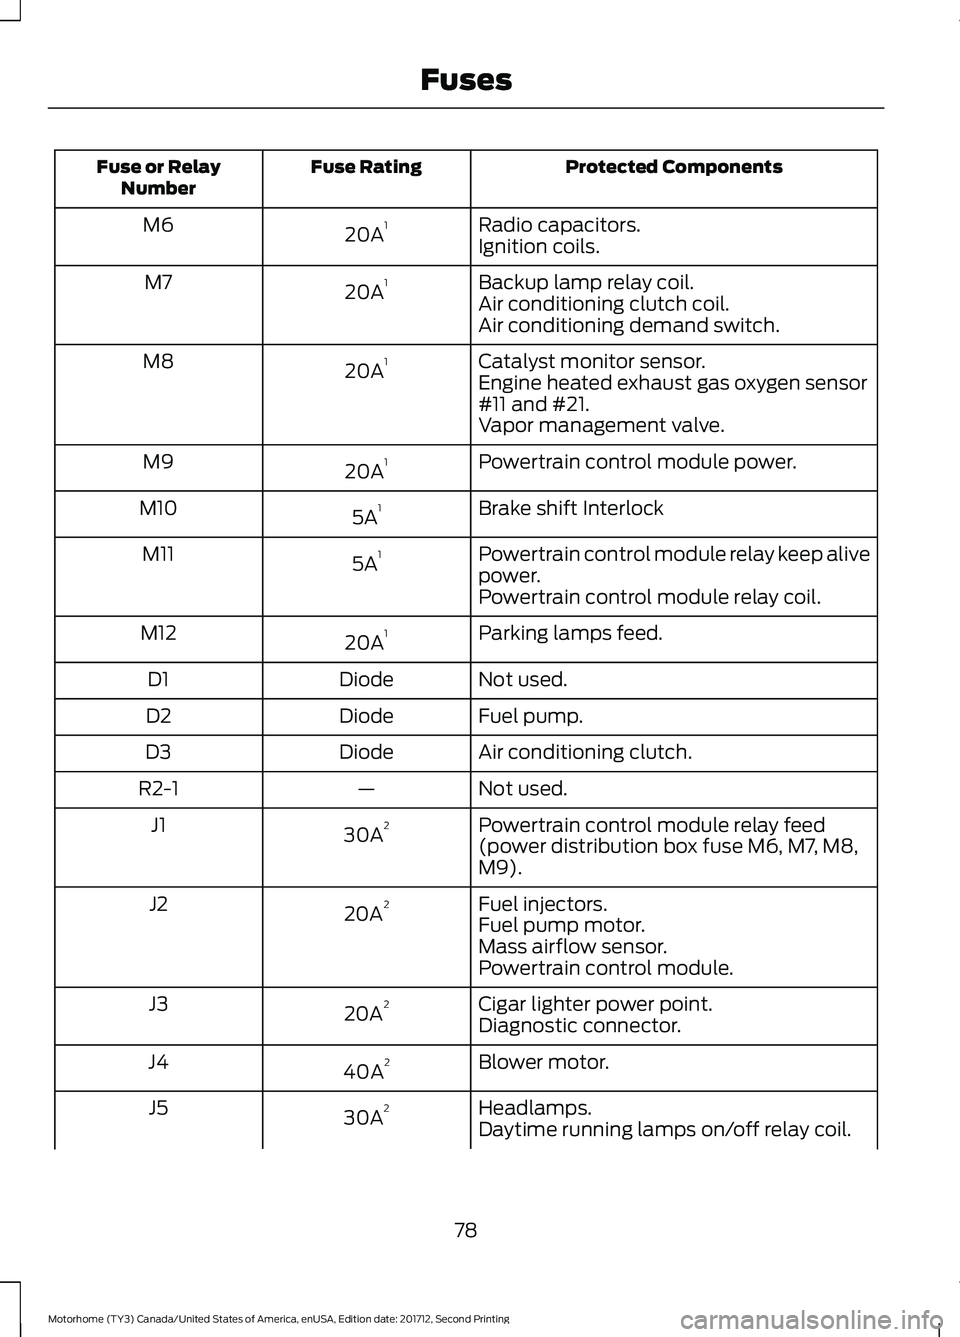
Protected Components
Fuse Rating
Fuse or Relay
Number
Radio capacitors.
20A 1
M6
Ignition coils.
Backup lamp relay coil.
20A 1
M7
Air conditioning clutch coil.
Air conditioning demand switch.
Catalyst monitor sensor.
20A 1
M8
Engine heated exhaust gas oxygen sensor
#11 and #21.
Vapor management valve.
Powertrain control module power.
20A 1
M9
Brake shift Interlock
5A 1
M10
Powertrain control module relay keep alive
power.
5A 1
M11
Powertrain control module relay coil.
Parking lamps feed.
20A 1
M12
Not used.
Diode
D1
Fuel pump.
Diode
D2
Air conditioning clutch.
Diode
D3
Not used.
—
R2-1
Powertrain control module relay feed
(power distribution box fuse M6, M7, M8,
M9).
30A
2
J1
Fuel injectors.
20A 2
J2
Fuel pump motor.
Mass airflow sensor.
Powertrain control module.
Cigar lighter power point.
20A 2
J3
Diagnostic connector.
Blower motor.
40A 2
J4
Headlamps.
30A 2
J5
Daytime running lamps on/off relay coil.
78
Motorhome (TY3) Canada/United States of America, enUSA, Edition date: 201712, Second Printing Fuses
Page 95 of 168
1.
Make sure the parking brake is on. Make
sure the transmission is in park (P) or
neutral (N).
2. Run the engine until it reaches normal operating temperature.
3. Make sure that your vehicle is on level ground.
4. Switch the engine off and wait 15 minutes for the oil to drain into the oil
pan. Checking the engine oil level too
soon after you switch the engine off
may result in an inaccurate reading.
5. Open the hood.
6. Remove the dipstick and wipe it with a clean, lint-free cloth. See Under
Hood Overview (page 89).
7. Replace the dipstick and remove it again to check the oil level. See Under
Hood Overview
(page 89).
8. Make sure that the oil level is between
the maximum and minimum marks. If
the oil level is at the minimum mark,
add oil immediately. See
Capacities
and Specifications (page 133).
9. If the oil level is correct, replace the dipstick and make sure it is fully seated.
Note: Do not remove the dipstick when the
engine is running.
Note: If the oil level is between the
maximum and minimum marks, the oil level
is acceptable. Do not add oil.
Note: The oil consumption of new engines
reaches its normal level after approximately
3,000 mi (5,000 km)
.
Adding Engine Oil WARNING
Do not remove the filler cap when
the engine is running. Do not use supplemental engine oil
additives because they are unnecessary
and could lead to engine damage that may
not be covered by the vehicle Warranty.
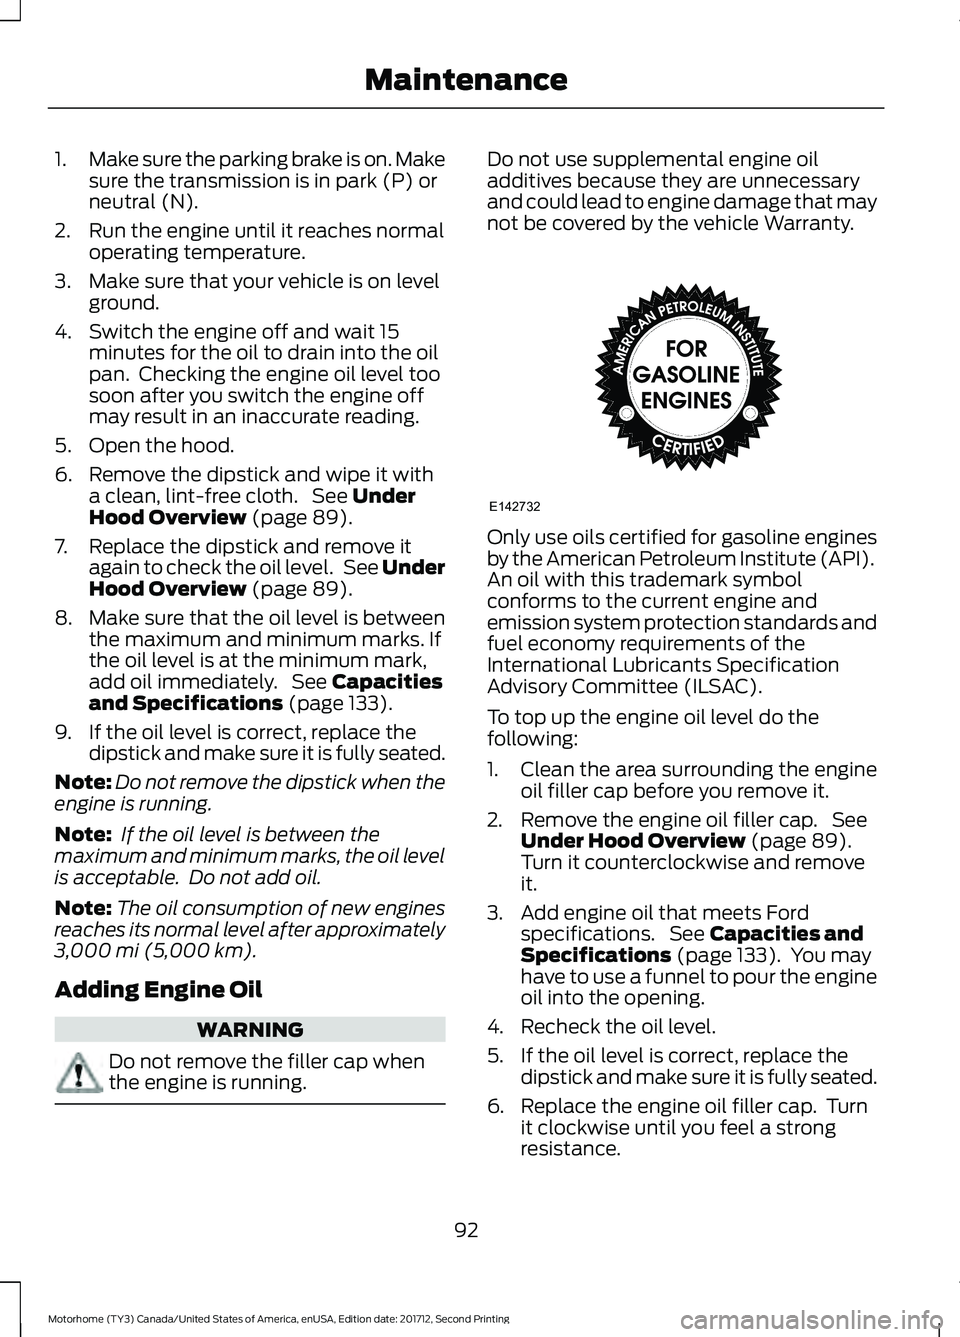
Only use oils certified for gasoline engines
by the American Petroleum Institute (API).
An oil with this trademark symbol
conforms to the current engine and
emission system protection standards and
fuel economy requirements of the
International Lubricants Specification
Advisory Committee (ILSAC).
To top up the engine oil level do the
following:
1. Clean the area surrounding the engine
oil filler cap before you remove it.
2. Remove the engine oil filler cap. See Under Hood Overview
(page 89).
Turn it counterclockwise and remove
it.
3. Add engine oil that meets Ford specifications. See
Capacities and
Specifications (page 133). You may
have to use a funnel to pour the engine
oil into the opening.
4. Recheck the oil level.
5. If the oil level is correct, replace the dipstick and make sure it is fully seated.
6. Replace the engine oil filler cap. Turn it clockwise until you feel a strong
resistance.
92
Motorhome (TY3) Canada/United States of America, enUSA, Edition date: 201712, Second Printing MaintenanceE142732