fuse FORD F-59 2019 Owners Manual
[x] Cancel search | Manufacturer: FORD, Model Year: 2019, Model line: F-59, Model: FORD F-59 2019Pages: 176, PDF Size: 9.98 MB
Page 5 of 176
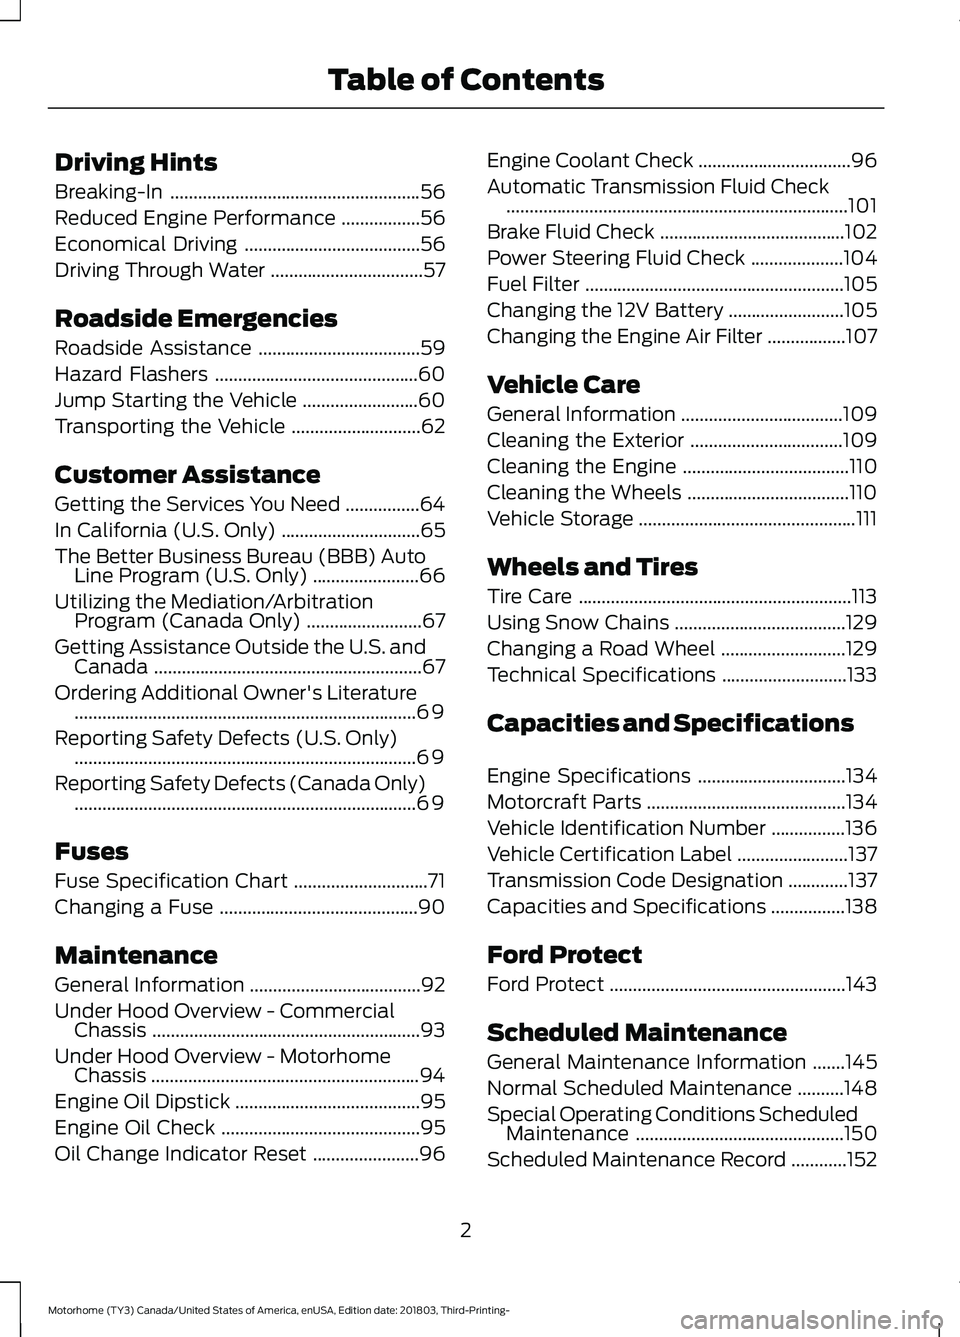
Driving Hints
Breaking-In......................................................56
Reduced Engine Performance.................56
Economical Driving......................................56
Driving Through Water.................................57
Roadside Emergencies
Roadside Assistance...................................59
Hazard Flashers............................................60
Jump Starting the Vehicle.........................60
Transporting the Vehicle............................62
Customer Assistance
Getting the Services You Need................64
In California (U.S. Only)..............................65
The Better Business Bureau (BBB) AutoLine Program (U.S. Only).......................66
Utilizing the Mediation/ArbitrationProgram (Canada Only).........................67
Getting Assistance Outside the U.S. andCanada..........................................................67
Ordering Additional Owner's Literature..........................................................................69
Reporting Safety Defects (U.S. Only)..........................................................................69
Reporting Safety Defects (Canada Only)..........................................................................69
Fuses
Fuse Specification Chart.............................71
Changing a Fuse...........................................90
Maintenance
General Information.....................................92
Under Hood Overview - CommercialChassis..........................................................93
Under Hood Overview - MotorhomeChassis..........................................................94
Engine Oil Dipstick........................................95
Engine Oil Check...........................................95
Oil Change Indicator Reset.......................96
Engine Coolant Check.................................96
Automatic Transmission Fluid Check..........................................................................101
Brake Fluid Check........................................102
Power Steering Fluid Check....................104
Fuel Filter........................................................105
Changing the 12V Battery.........................105
Changing the Engine Air Filter.................107
Vehicle Care
General Information...................................109
Cleaning the Exterior.................................109
Cleaning the Engine....................................110
Cleaning the Wheels...................................110
Vehicle Storage...............................................111
Wheels and Tires
Tire Care...........................................................113
Using Snow Chains.....................................129
Changing a Road Wheel...........................129
Technical Specifications...........................133
Capacities and Specifications
Engine Specifications................................134
Motorcraft Parts...........................................134
Vehicle Identification Number................136
Vehicle Certification Label........................137
Transmission Code Designation.............137
Capacities and Specifications................138
Ford Protect
Ford Protect...................................................143
Scheduled Maintenance
General Maintenance Information.......145
Normal Scheduled Maintenance..........148
Special Operating Conditions ScheduledMaintenance.............................................150
Scheduled Maintenance Record............152
2
Motorhome (TY3) Canada/United States of America, enUSA, Edition date: 201803, Third-Printing-Table of Contents
Page 9 of 176
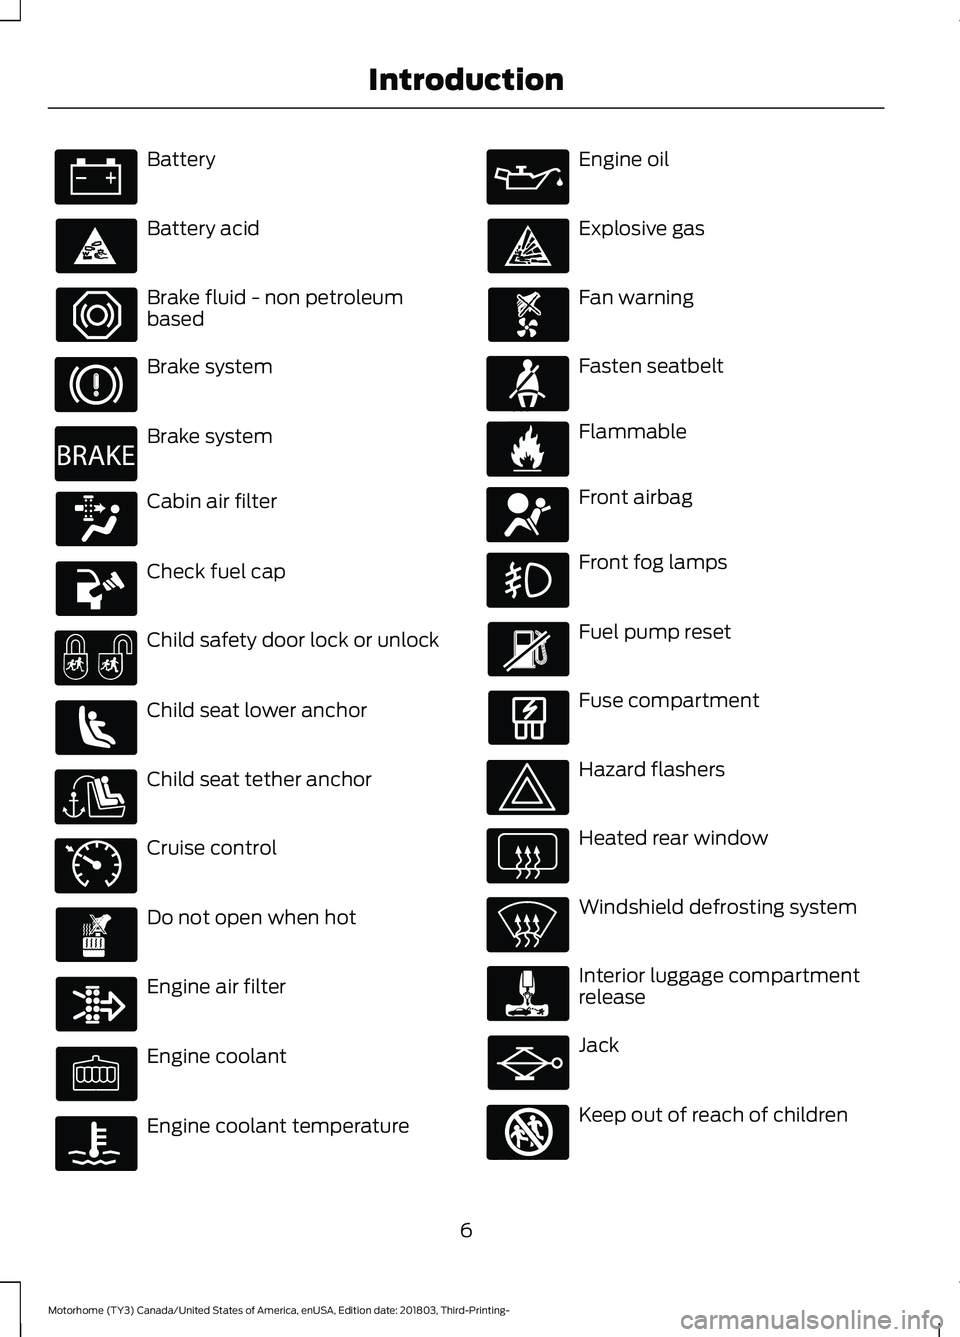
Battery
Battery acid
Brake fluid - non petroleumbased
Brake system
Brake system
Cabin air filter
Check fuel cap
Child safety door lock or unlock
Child seat lower anchor
Child seat tether anchor
Cruise control
Do not open when hot
Engine air filter
Engine coolant
Engine coolant temperature
Engine oil
Explosive gas
Fan warning
Fasten seatbelt
Flammable
Front airbag
Front fog lamps
Fuel pump reset
Fuse compartment
Hazard flashers
Heated rear window
Windshield defrosting system
Interior luggage compartmentrelease
Jack
Keep out of reach of children
6
Motorhome (TY3) Canada/United States of America, enUSA, Edition date: 201803, Third-Printing-Introduction E270480 E71340 E71880 E231160 E67017 E161353
Page 43 of 176
Brake-Shift Interlock
WARNING: Do not drive yourvehicle until you verify that thestoplamps are working.
WARNING: When doing thisprocedure, you need to take thetransmission out of park (P) whichmeans your vehicle can roll freely. Toavoid unwanted vehicle movement,always fully apply the parking brake priorto doing this procedure. Use wheelschocks if appropriate.
WARNING: If the parking brake isfully released, but the brake warninglamp remains illuminated, the brakesmay not be working properly. Have yourvehicle checked as soon as possible.
Your vehicle is equipped with a brake-shiftinterlock feature that prevents moving thegearshift lever from park (P) when theignition is in the on position and the brakepedal is not pressed.
If you cannot move the gearshift lever outof park (P) position with the ignition in theon position and the brake pedal pressed,a malfunction may have occurred. It ispossible that a fuse has blown or yourvehicle’s brake lamps are not operatingproperly. See Fuse Specification Chart(page 71).
If the fuse is not blown and the brakelamps are working properly, the followingprocedure can allow you to move thegearshift lever from park (P):
1.Apply the parking brake. Turn key tothe lock position, and then remove thekey.
2.Disconnect the negative black batterycable from the battery.
3.Insert the key and turn to the offposition. Shift the transmission toneutral (N).
4.Reconnect the negative black batterycable to the battery.
5.Start the vehicle.
Note:See your authorized dealer as soonas possible if this procedure is used.
If Your Vehicle Gets Stuck In Mudor Snow
Note:Do not rock your vehicle if the engineis not at normal operating temperature ordamage to the transmission may occur.
Note:Do not rock your vehicle for morethan a minute or damage to thetransmission and tires may occur, or theengine may overheat.
If your vehicle gets stuck in mud or snow,you may rock it out by shifting betweenforward and reverse gears, stoppingbetween shifts in a steady pattern. Presslightly on the accelerator in each gear.
40
Motorhome (TY3) Canada/United States of America, enUSA, Edition date: 201803, Third-Printing-Transmission
Page 53 of 176
TOWING A TRAILER
WARNING: Towing trailersbeyond the maximumrecommended gross trailerweight exceeds the limit of yourvehicle and could result in enginedamage, transmission damage,structural damage, loss ofvehicle control, vehicle rolloverand personal injury.
WARNING: Do not exceedthe GVWR or the GAWRspecified on the certificationlabel.
Note: See RecommendedTowing Weights (page 51).
Your vehicle may have electricalitems, such as fuses or relays,related to towing. See Fuses(page 71).
Your vehicle's load capacitydesignation is by weight, not byvolume, so you cannot necessarilyuse all available space whenloading a vehicle or trailer.
Towing a trailer places an extraload on your vehicle's engine,transmission, axle, brakes, tiresand suspension. Inspect thesecomponents periodically during,and after, any towing operation.
Load Placement
To help minimize how trailermovement affects your vehiclewhen driving:
•Load the heaviest items closestto the trailer floor.
•Load the heaviest itemscentered between the left andright side trailer tires.
•Load the heaviest items abovethe trailer axles or just slightlyforward toward the trailertongue. Do not allow the finaltrailer tongue weight to goabove or below 10-15% of theloaded trailer weight.
•Select a ball mount with thecorrect rise or drop and loadcapacity. When both theloaded vehicle and trailer areconnected, the trailer frameshould be level, or slightlyangled down toward yourvehicle, when viewed from theside.
When driving with a trailer orpayload, a slight takeoff vibrationor shudder may be present due tothe increased payload weight.Additional information regardingproper trailer loading and settingyour vehicle up for towing islocated in another chapter of thismanual. See Load Limit (page45).
You can also find information inthe RV & Trailer Towing Guideavailable at your authorizeddealer, or online.
50
Motorhome (TY3) Canada/United States of America, enUSA, Edition date: 201803, Third-Printing-Towing
Page 64 of 176
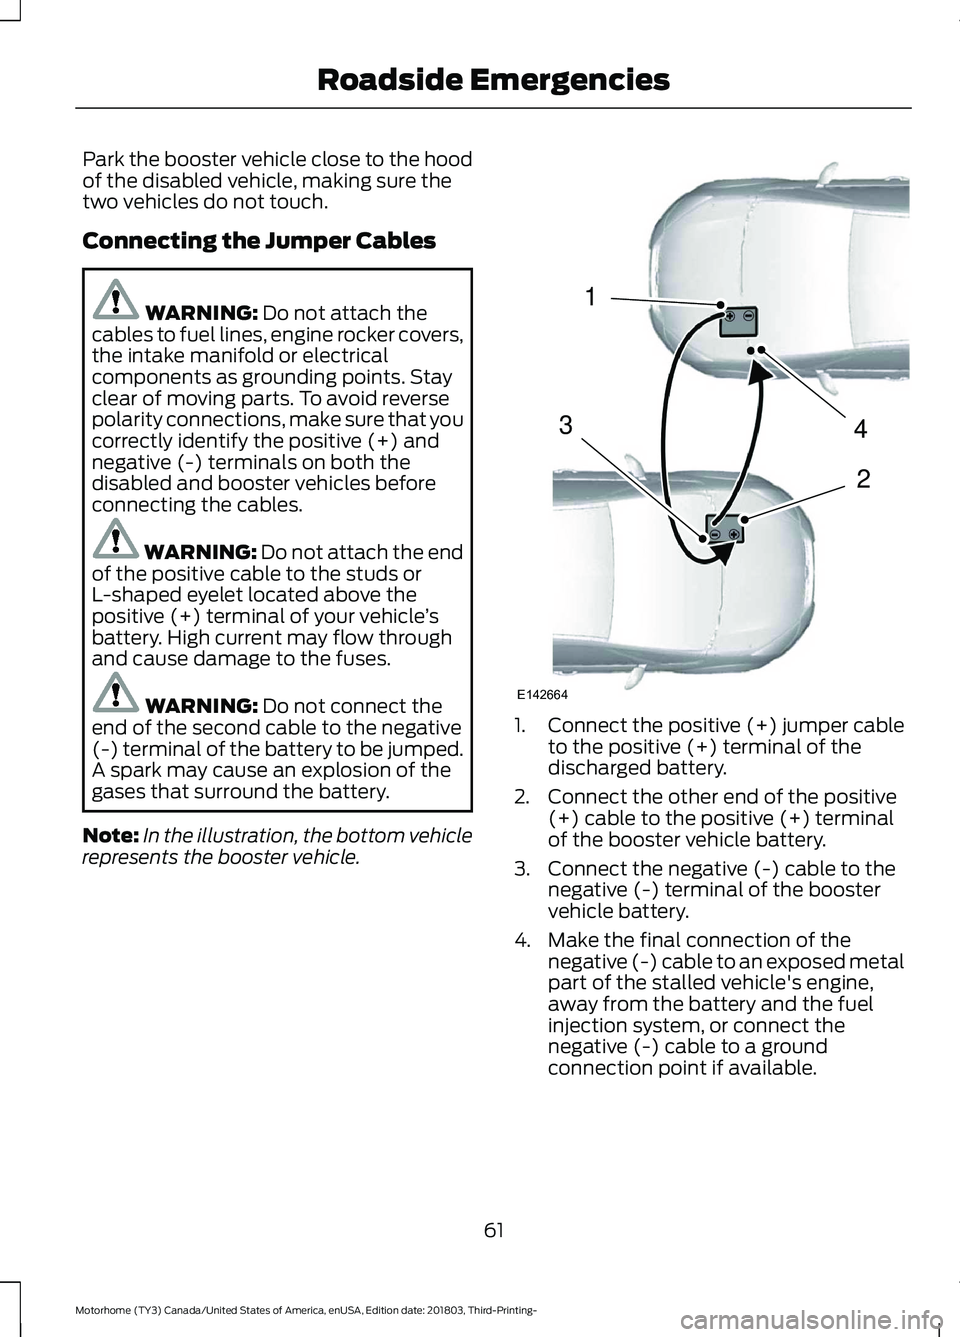
Park the booster vehicle close to the hoodof the disabled vehicle, making sure thetwo vehicles do not touch.
Connecting the Jumper Cables
WARNING: Do not attach thecables to fuel lines, engine rocker covers,the intake manifold or electricalcomponents as grounding points. Stayclear of moving parts. To avoid reversepolarity connections, make sure that youcorrectly identify the positive (+) andnegative (-) terminals on both thedisabled and booster vehicles beforeconnecting the cables.
WARNING: Do not attach the endof the positive cable to the studs orL-shaped eyelet located above thepositive (+) terminal of your vehicle’sbattery. High current may flow throughand cause damage to the fuses.
WARNING: Do not connect theend of the second cable to the negative(-) terminal of the battery to be jumped.A spark may cause an explosion of thegases that surround the battery.
Note:In the illustration, the bottom vehiclerepresents the booster vehicle.
1.Connect the positive (+) jumper cableto the positive (+) terminal of thedischarged battery.
2.Connect the other end of the positive(+) cable to the positive (+) terminalof the booster vehicle battery.
3.Connect the negative (-) cable to thenegative (-) terminal of the boostervehicle battery.
4.Make the final connection of thenegative (-) cable to an exposed metalpart of the stalled vehicle's engine,away from the battery and the fuelinjection system, or connect thenegative (-) cable to a groundconnection point if available.
61
Motorhome (TY3) Canada/United States of America, enUSA, Edition date: 201803, Third-Printing-Roadside Emergencies4213E142664
Page 74 of 176
FUSE SPECIFICATION CHART
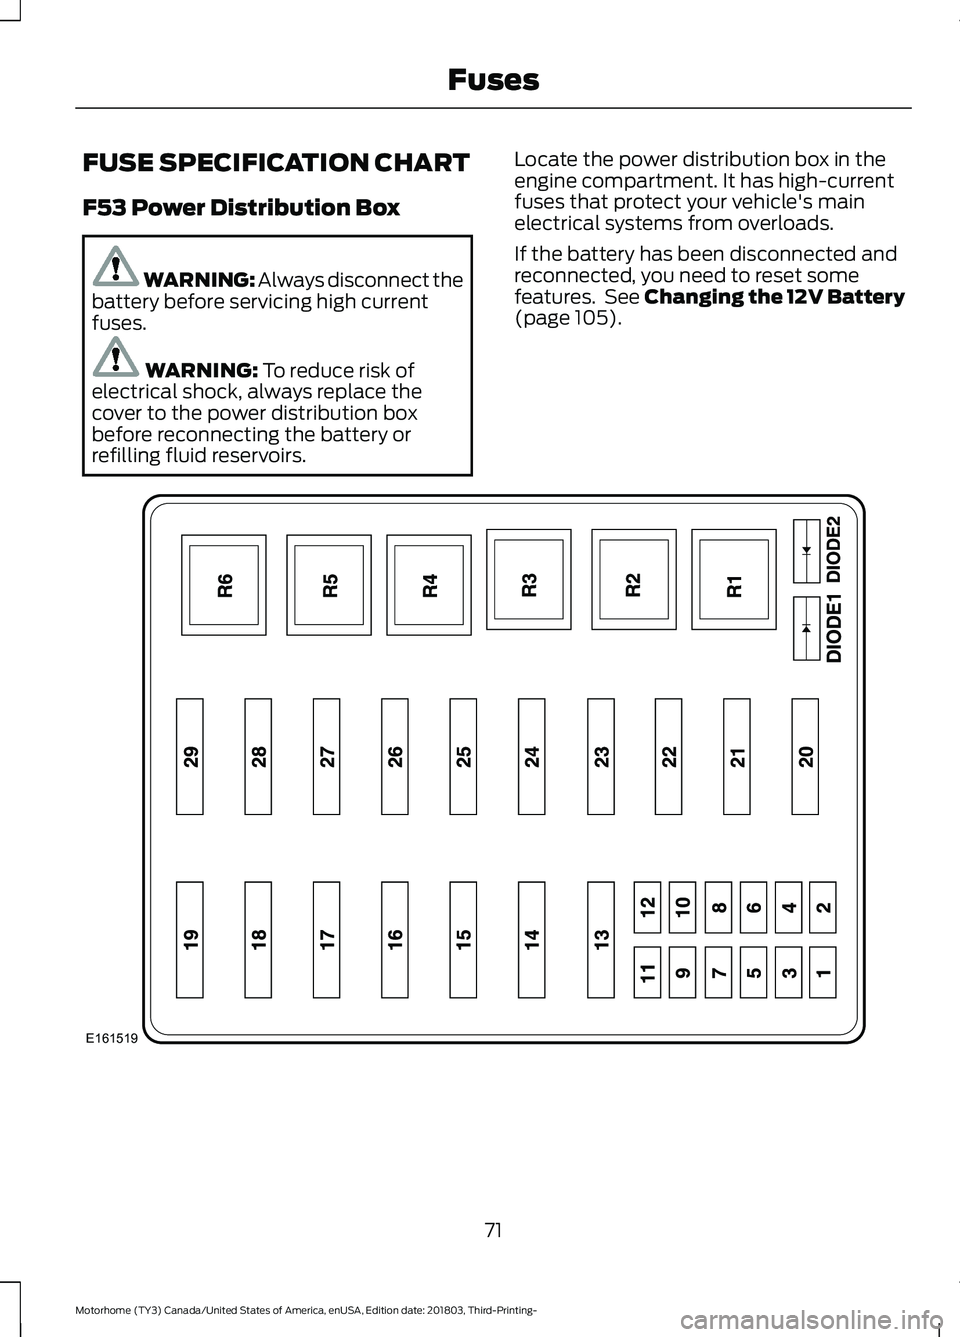
F53 Power Distribution Box
WARNING: Always disconnect thebattery before servicing high currentfuses.
WARNING: To reduce risk ofelectrical shock, always replace thecover to the power distribution boxbefore reconnecting the battery orrefilling fluid reservoirs.
Locate the power distribution box in theengine compartment. It has high-currentfuses that protect your vehicle's mainelectrical systems from overloads.
If the battery has been disconnected andreconnected, you need to reset somefeatures. See Changing the 12V Battery(page 105).
71
Motorhome (TY3) Canada/United States of America, enUSA, Edition date: 201803, Third-Printing-FusesE161519
Page 75 of 176
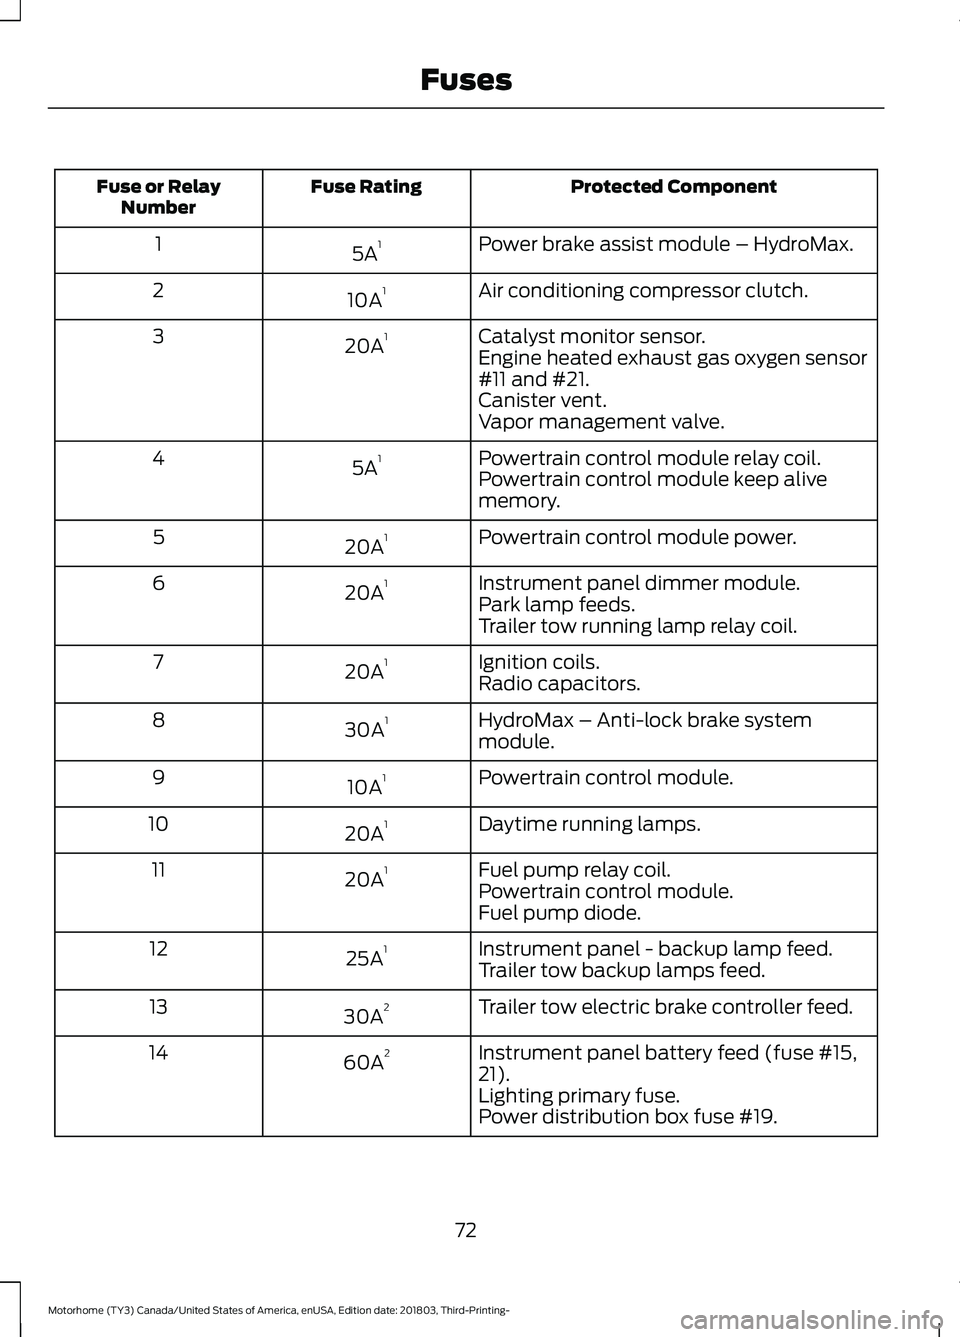
Protected ComponentFuse RatingFuse or RelayNumber
Power brake assist module – HydroMax.5A11
Air conditioning compressor clutch.10A12
Catalyst monitor sensor.20A13Engine heated exhaust gas oxygen sensor#11 and #21.Canister vent.Vapor management valve.
Powertrain control module relay coil.5A14Powertrain control module keep alivememory.
Powertrain control module power.20A15
Instrument panel dimmer module.20A16Park lamp feeds.Trailer tow running lamp relay coil.
Ignition coils.20A17Radio capacitors.
HydroMax – Anti-lock brake systemmodule.30A18
Powertrain control module.10A19
Daytime running lamps.20A110
Fuel pump relay coil.20A111Powertrain control module.Fuel pump diode.
Instrument panel - backup lamp feed.25A112Trailer tow backup lamps feed.
Trailer tow electric brake controller feed.30A213
Instrument panel battery feed (fuse #15,21).60A214
Lighting primary fuse.Power distribution box fuse #19.
72
Motorhome (TY3) Canada/United States of America, enUSA, Edition date: 201803, Third-Printing-Fuses
Page 76 of 176
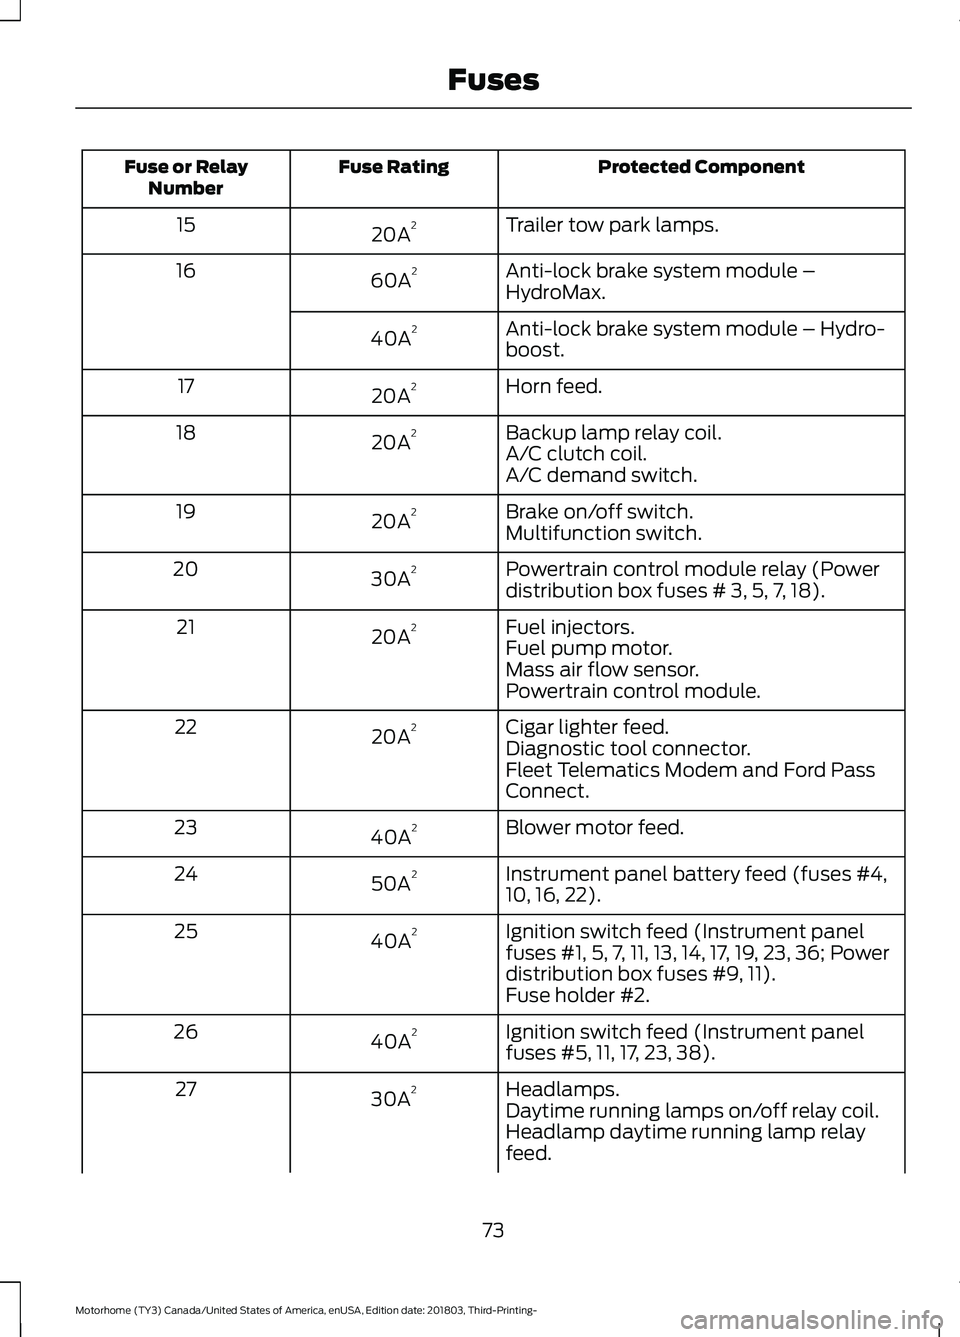
Protected ComponentFuse RatingFuse or RelayNumber
Trailer tow park lamps.20A215
Anti-lock brake system module –HydroMax.60A216
Anti-lock brake system module – Hydro-boost.40A2
Horn feed.20A217
Backup lamp relay coil.20A218A/C clutch coil.A/C demand switch.
Brake on/off switch.20A219Multifunction switch.
Powertrain control module relay (Powerdistribution box fuses # 3, 5, 7, 18).30A220
Fuel injectors.20A221Fuel pump motor.Mass air flow sensor.Powertrain control module.
Cigar lighter feed.20A222Diagnostic tool connector.Fleet Telematics Modem and Ford PassConnect.
Blower motor feed.40A223
Instrument panel battery feed (fuses #4,10, 16, 22).50A224
Ignition switch feed (Instrument panelfuses #1, 5, 7, 11, 13, 14, 17, 19, 23, 36; Powerdistribution box fuses #9, 11).
40A225
Fuse holder #2.
Ignition switch feed (Instrument panelfuses #5, 11, 17, 23, 38).40A226
Headlamps.30A227Daytime running lamps on/off relay coil.Headlamp daytime running lamp relayfeed.
73
Motorhome (TY3) Canada/United States of America, enUSA, Edition date: 201803, Third-Printing-Fuses
Page 77 of 176
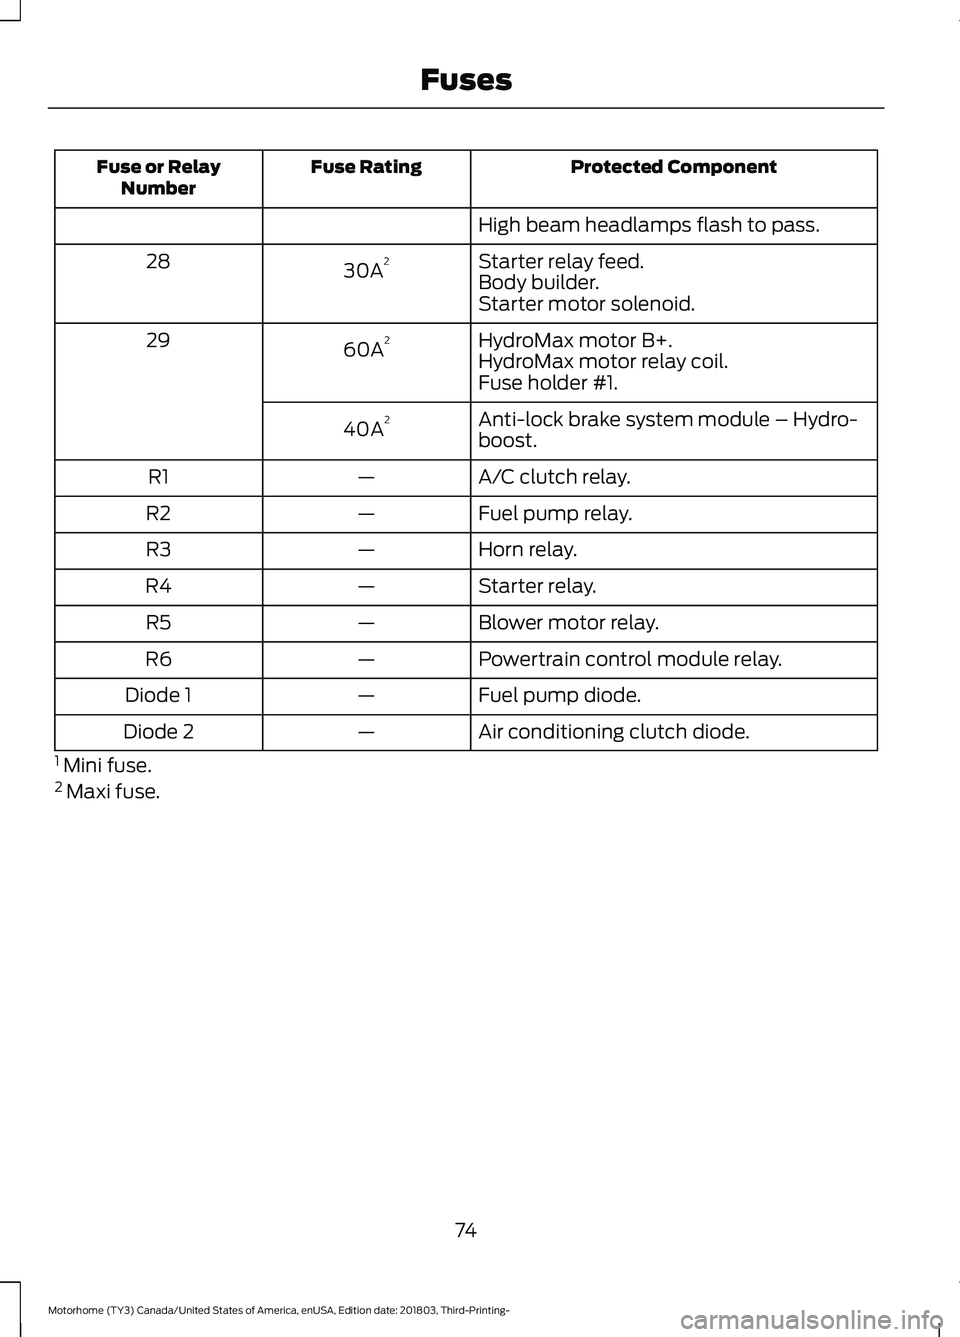
Protected ComponentFuse RatingFuse or RelayNumber
High beam headlamps flash to pass.
Starter relay feed.30A228Body builder.Starter motor solenoid.
HydroMax motor B+.60A229HydroMax motor relay coil.Fuse holder #1.
Anti-lock brake system module – Hydro-boost.40A2
A/C clutch relay.—R1
Fuel pump relay.—R2
Horn relay.—R3
Starter relay.—R4
Blower motor relay.—R5
Powertrain control module relay.—R6
Fuel pump diode.—Diode 1
Air conditioning clutch diode.—Diode 2
1 Mini fuse.2 Maxi fuse.
74
Motorhome (TY3) Canada/United States of America, enUSA, Edition date: 201803, Third-Printing-Fuses
Page 78 of 176
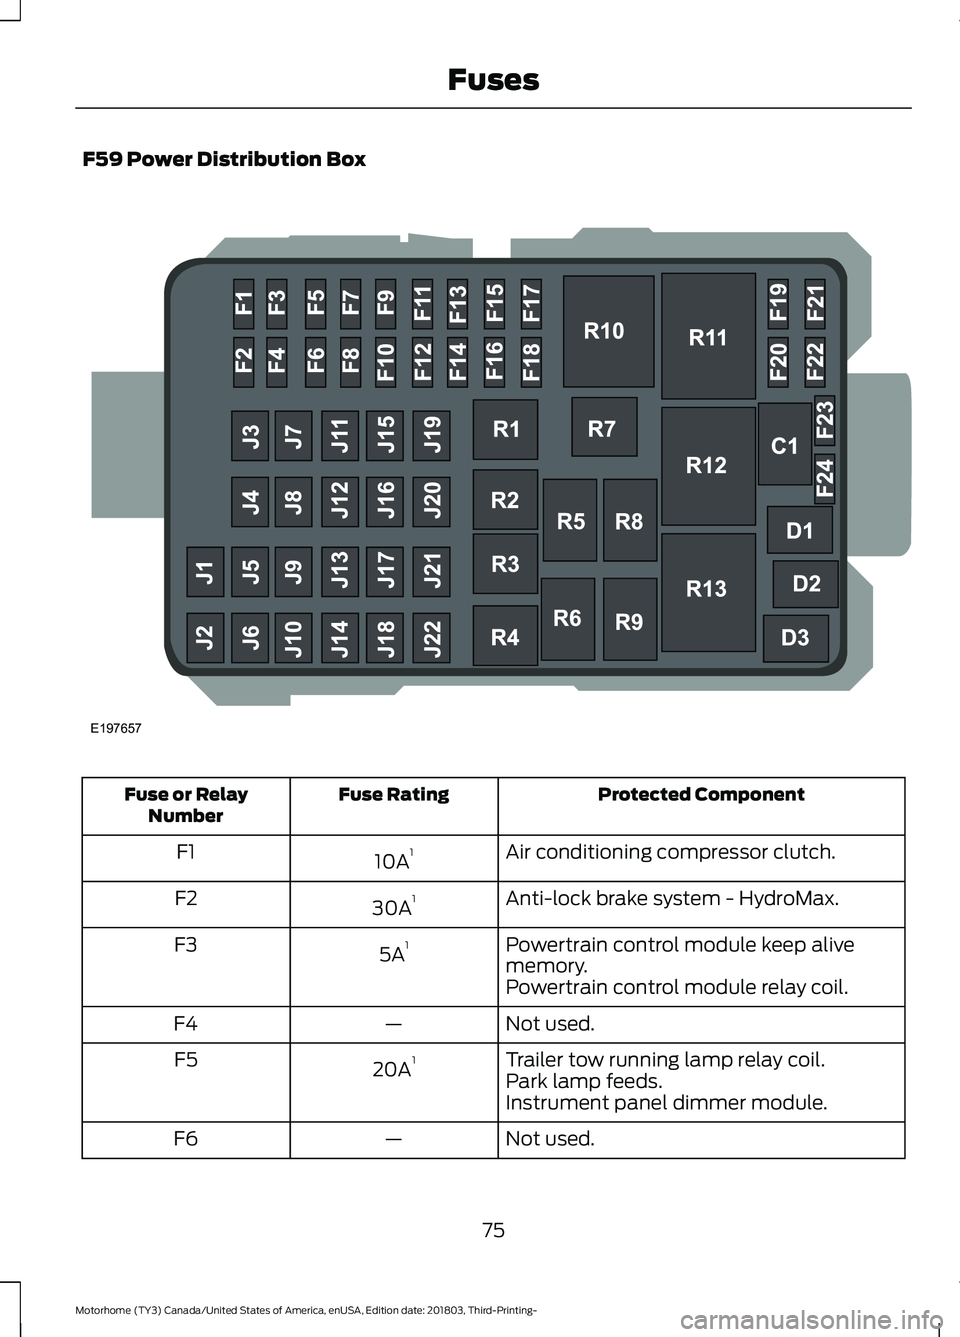
F59 Power Distribution Box
Protected ComponentFuse RatingFuse or RelayNumber
Air conditioning compressor clutch.10A1F1
Anti-lock brake system - HydroMax.30A1F2
Powertrain control module keep alivememory.5A1F3
Powertrain control module relay coil.
Not used.—F4
Trailer tow running lamp relay coil.20A1F5Park lamp feeds.Instrument panel dimmer module.
Not used.—F6
75
Motorhome (TY3) Canada/United States of America, enUSA, Edition date: 201803, Third-Printing-FusesE197657