warning FORD F-59 2021 Repair Manual
[x] Cancel search | Manufacturer: FORD, Model Year: 2021, Model line: F-59, Model: FORD F-59 2021Pages: 191, PDF Size: 2.84 MB
Page 98 of 191
Park the booster vehicle close to the hood
of the disabled vehicle, making sure the
two vehicles do not touch.
Connecting the Jumper Cables
WARNING: Do not attach the
cables to fuel lines, engine rocker covers,
the intake manifold or electrical
components as grounding points. Stay
clear of moving parts. To avoid reverse
polarity connections, make sure that you
correctly identify the positive (+) and
negative (-) terminals on both the
disabled and booster vehicles before
connecting the cables. WARNING:
Do not attach the end
of the positive cable to the studs or
L-shaped eyelet located above the
positive (+) terminal of your vehicle ’s
battery. High current may flow through
and cause damage to the fuses. WARNING: Do not connect the end
of the second cable to the negative (-)
terminal of the battery to be jumped. A
spark may cause an explosion of the
gases that surround the battery.
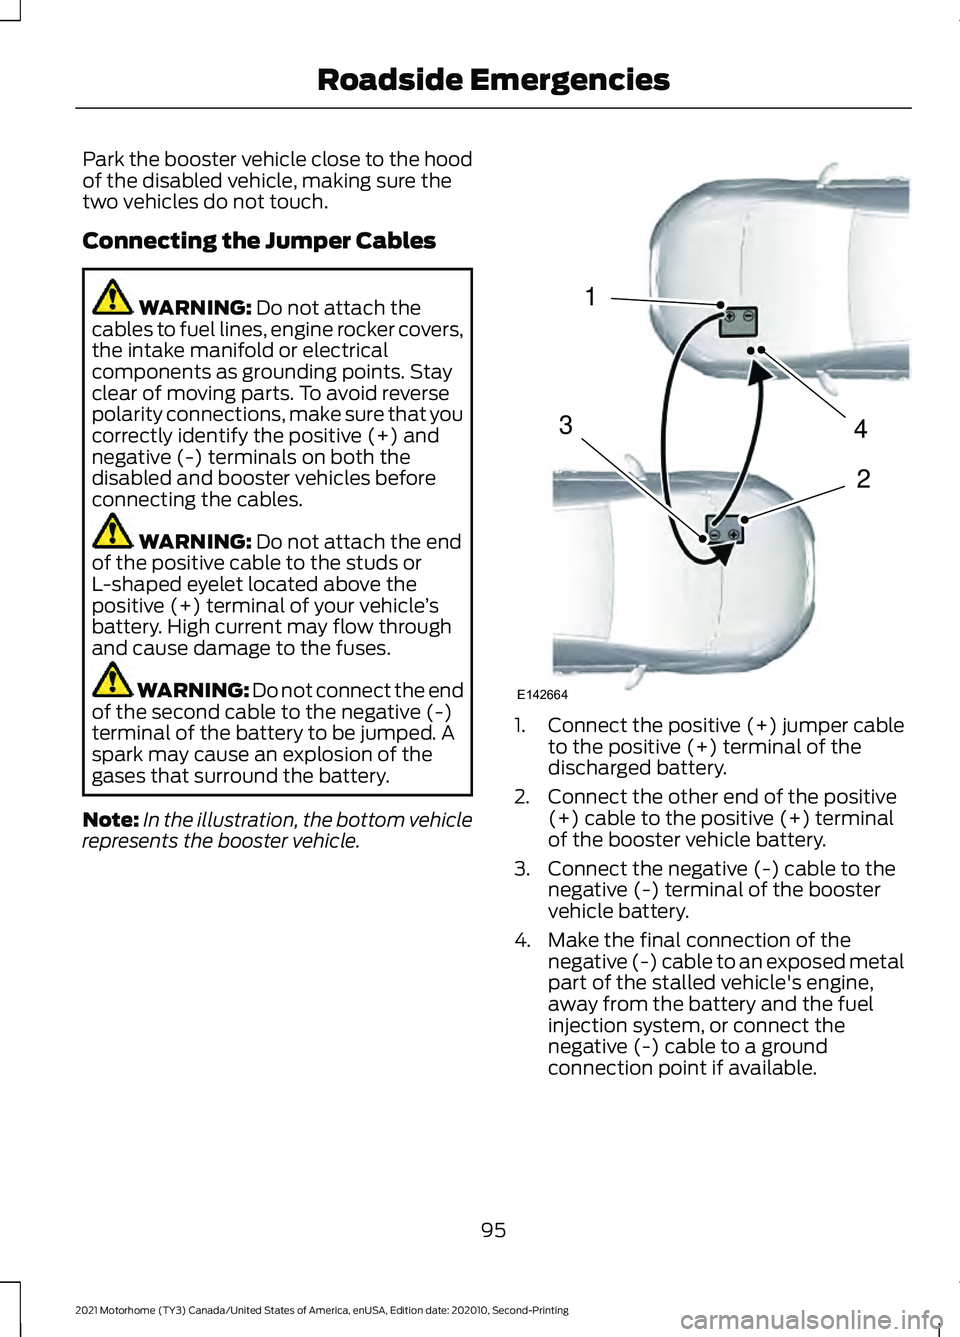
Note: In the illustration, the bottom vehicle
represents the booster vehicle. 1.
Connect the positive (+) jumper cable
to the positive (+) terminal of the
discharged battery.
2. Connect the other end of the positive (+) cable to the positive (+) terminal
of the booster vehicle battery.
3. Connect the negative (-) cable to the negative (-) terminal of the booster
vehicle battery.
4. Make the final connection of the negative (-) cable to an exposed metal
part of the stalled vehicle's engine,
away from the battery and the fuel
injection system, or connect the
negative (-) cable to a ground
connection point if available.
95
2021 Motorhome (TY3) Canada/United States of America, enUSA, Edition date: 202010, Second-Printing Roadside Emergencies4
2
1
3
E142664
Page 99 of 191
Jump Starting
1.
Start the engine of the booster vehicle
and rev the engine moderately, or press
the accelerator gently to keep your
engine speed between 2000 and 3000
RPM, as shown in your tachometer.
2. Start the engine of the disabled vehicle.
3. Once the disabled vehicle has been started, run both vehicle engines for an
additional three minutes before
disconnecting the jumper cables.
Removing the Jumper Cables
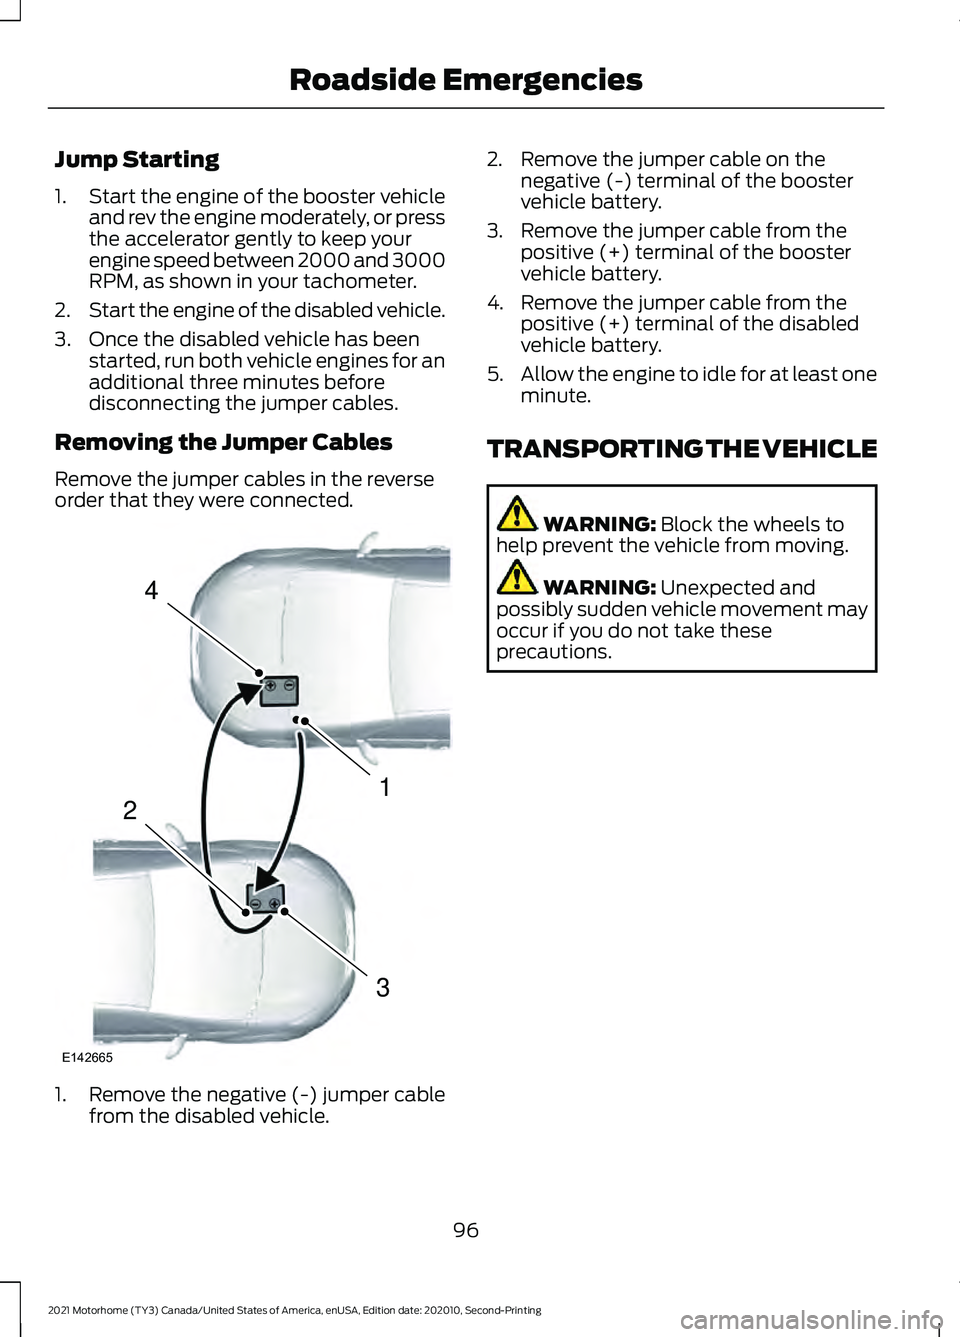
Remove the jumper cables in the reverse
order that they were connected. 1. Remove the negative (-) jumper cable
from the disabled vehicle. 2. Remove the jumper cable on the
negative (-) terminal of the booster
vehicle battery.
3. Remove the jumper cable from the positive (+) terminal of the booster
vehicle battery.
4. Remove the jumper cable from the positive (+) terminal of the disabled
vehicle battery.
5. Allow the engine to idle for at least one
minute.
TRANSPORTING THE VEHICLE WARNING: Block the wheels to
help prevent the vehicle from moving. WARNING:
Unexpected and
possibly sudden vehicle movement may
occur if you do not take these
precautions.
96
2021 Motorhome (TY3) Canada/United States of America, enUSA, Edition date: 202010, Second-Printing Roadside Emergencies4
1
3
2
E142665
Page 107 of 191
FUSE SPECIFICATION CHART
Engine Compartment Fuse Box
WARNING: Always disconnect the
battery before servicing high current
fuses. WARNING:
To reduce risk of
electrical shock, always replace the
cover to the power distribution box
before reconnecting the battery or
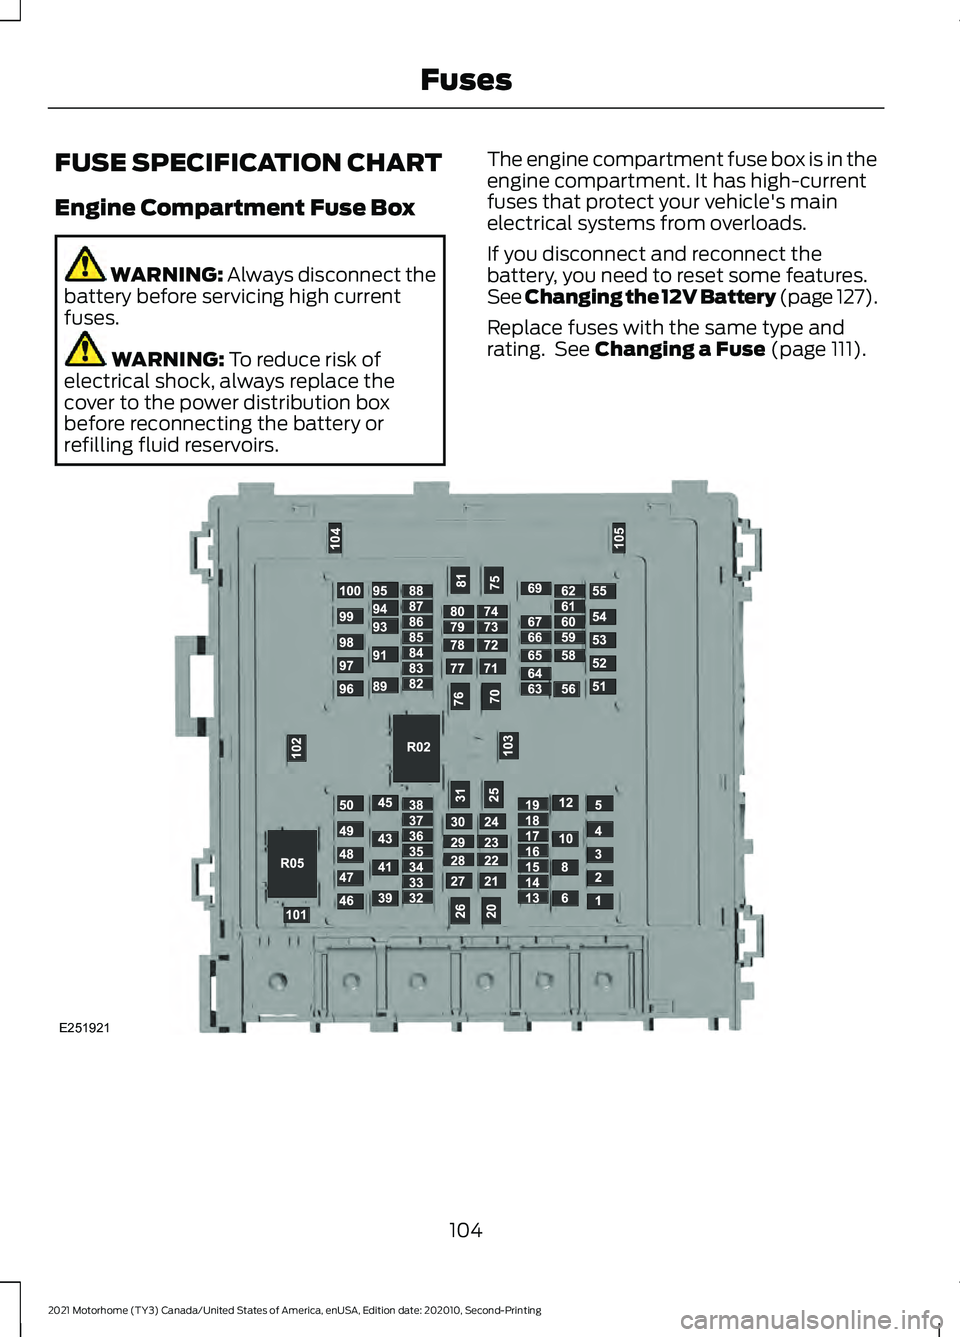
refilling fluid reservoirs. The engine compartment fuse box is in the
engine compartment. It has high-current
fuses that protect your vehicle's main
electrical systems from overloads.
If you disconnect and reconnect the
battery, you need to reset some features.
See Changing the 12V Battery (page
127).
Replace fuses with the same type and
rating. See
Changing a Fuse (page 111). 104
2021 Motorhome (TY3) Canada/United States of America, enUSA, Edition date: 202010, Second-Printing FusesE251921
Page 112 of 191
Passenger Compartment Fuse Box
WARNING: Always disconnect the
battery before servicing high current
fuses.
Note: If your vehicle has dual batteries,
disconnecting the primary under-hood
battery does not remove power from all
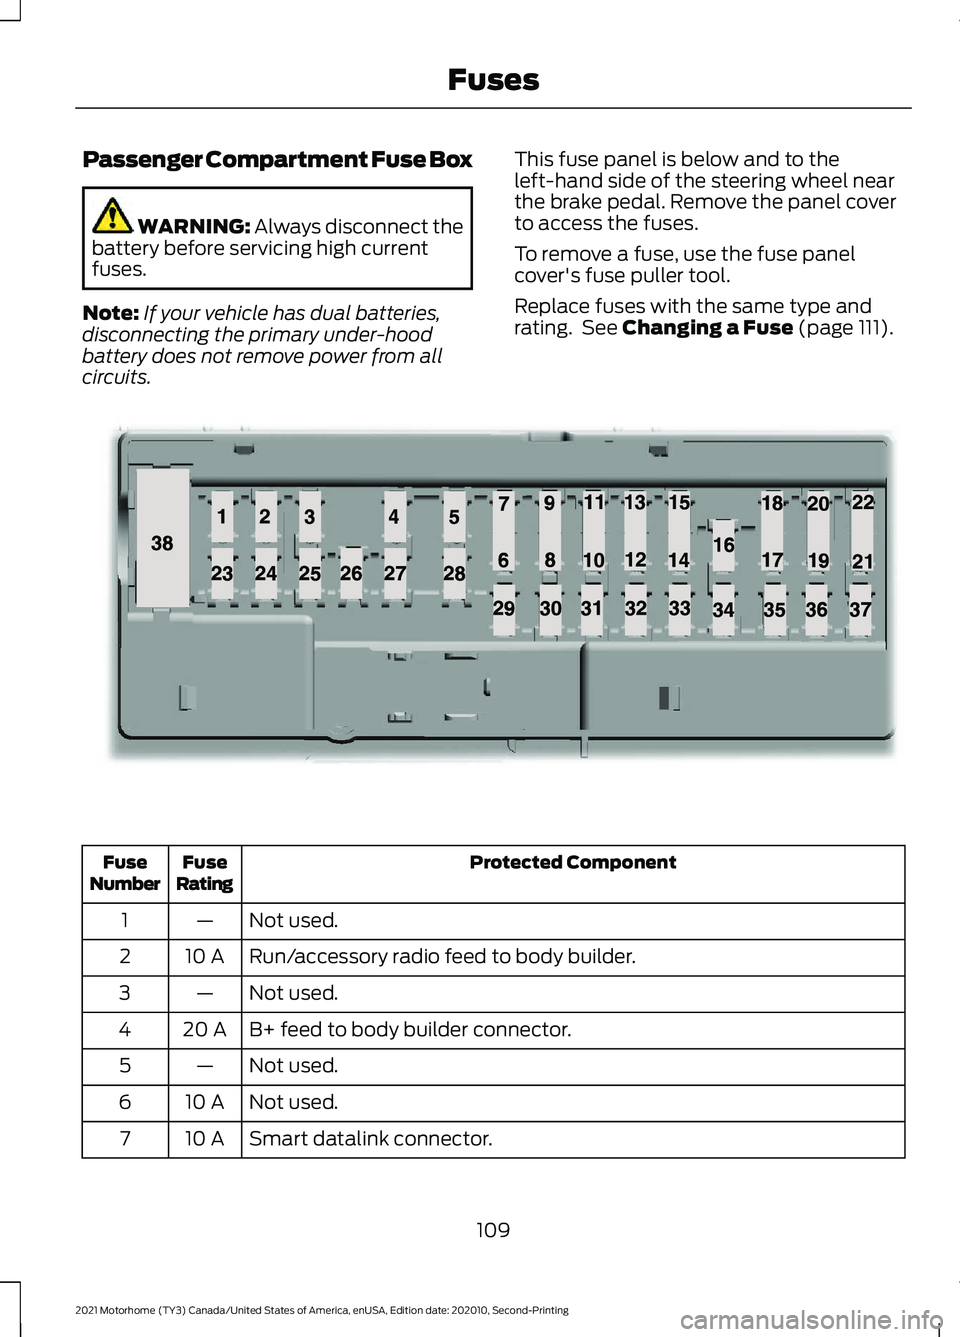
circuits. This fuse panel is below and to the
left-hand side of the steering wheel near
the brake pedal. Remove the panel cover
to access the fuses.
To remove a fuse, use the fuse panel
cover's fuse puller tool.
Replace fuses with the same type and
rating. See
Changing a Fuse (page 111). Protected Component
Fuse
Rating
Fuse
Number
Not used.
—
1
Run/accessory radio feed to body builder.
10 A
2
Not used.
—
3
B+ feed to body builder connector.
20 A
4
Not used.
—
5
Not used.
10 A
6
Smart datalink connector.
10 A
7
109
2021 Motorhome (TY3) Canada/United States of America, enUSA, Edition date: 202010, Second-Printing FusesE145984
Page 114 of 191
Protected Component
Fuse
Rating
Fuse
Number
Not used (spare).
30 A
34
Tow haul switch.
5 A
35
Camera lane departure warning (commercial stripped chassis).
15 A
36
Not used (spare) (Motorhome stripped chassis).
B+ to body builder connector.
20 A
37
Not used (spare).
30 A
38
Note: Spare fuse amperage may vary.
CHANGING A FUSE
Fuses WARNING: Always replace a fuse
with one that has the specified
amperage rating. Using a fuse with a
higher amperage rating can cause severe
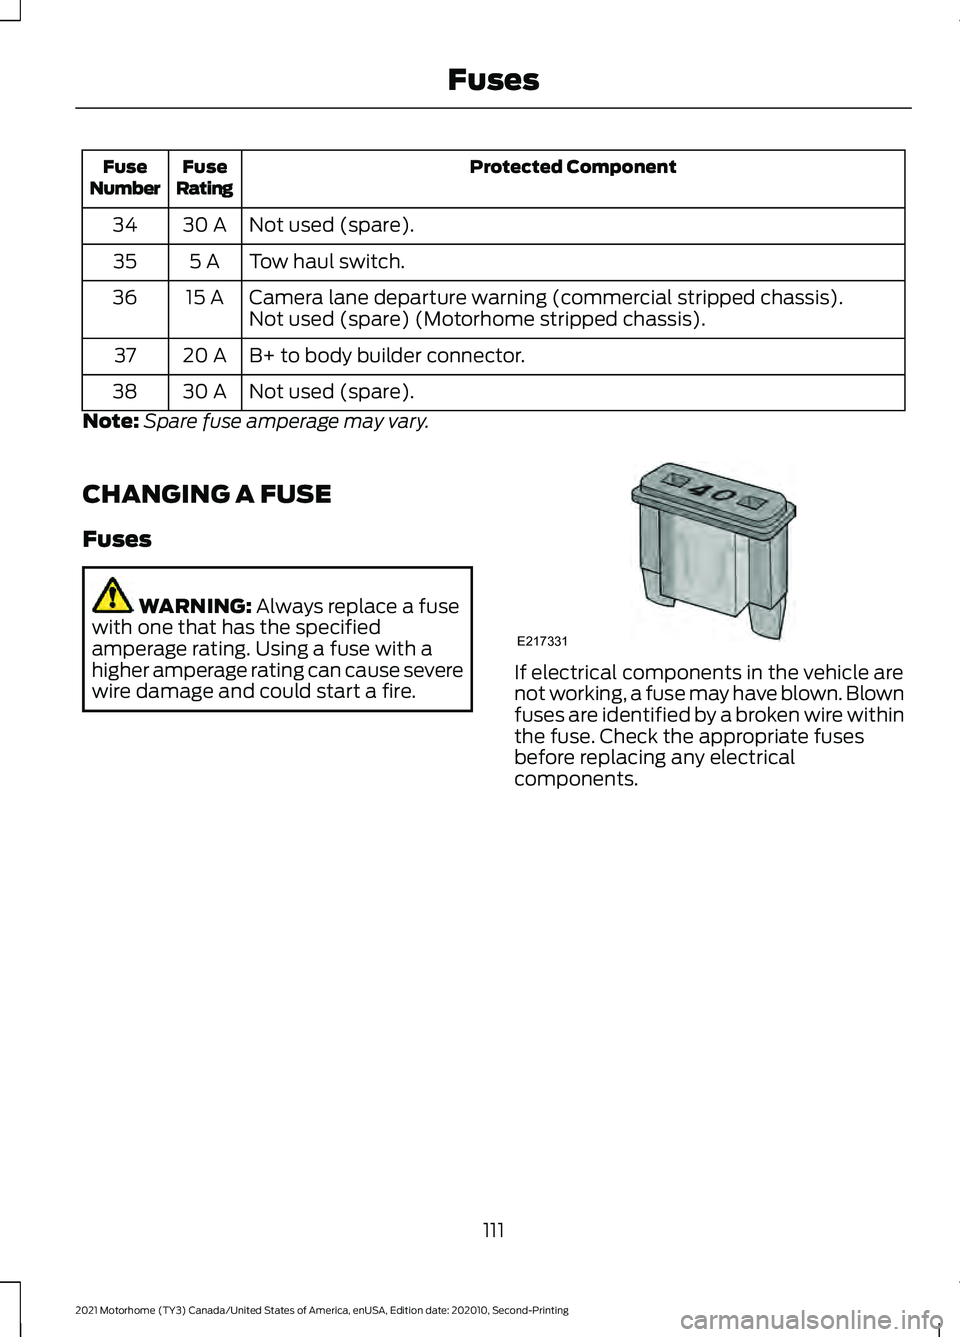
wire damage and could start a fire. If electrical components in the vehicle are
not working, a fuse may have blown. Blown
fuses are identified by a broken wire within
the fuse. Check the appropriate fuses
before replacing any electrical
components.
111
2021 Motorhome (TY3) Canada/United States of America, enUSA, Edition date: 202010, Second-Printing FusesE217331
Page 116 of 191
GENERAL INFORMATION
Have your vehicle serviced regularly to help
maintain its roadworthiness and resale
value. There is a large network of
authorized dealers that are there to help
you with their professional servicing
expertise. We believe that their specially
trained technicians are best qualified to
service your vehicle properly and expertly.
They are supported by a wide range of
highly specialized tools developed
specifically for servicing your vehicle.
If your vehicle requires professional service,
an authorized dealer can provide the
necessary parts and service. Check your
warranty information to find out which
parts and services are covered.
Use only recommended fuels, lubricants,
fluids and service parts conforming to
specifications. Motorcraft® parts are
designed and built to provide the best
performance in your vehicle.
Precautions
•
Do not work on a hot engine.
• Make sure that nothing gets caught in
moving parts. •
Do not work on a vehicle with the
engine running in an enclosed space,
unless you are sure you have enough
ventilation.
• Keep all open flames and other burning
material (such as cigarettes) away
from the battery and all fuel related
parts.
Working with the Engine Off
1. Set the parking brake and shift the transmission to park (P).
2. Switch off the engine.
3. Block the wheels.
Working with the Engine On WARNING: To reduce the risk of
vehicle damage and personal burn
injuries, do not start your engine with the
air cleaner removed and do not remove
it while the engine is running.
1. Set the parking brake and shift the transmission to park (P).
2. Block the wheels.
113
2021 Motorhome (TY3) Canada/United States of America, enUSA, Edition date: 202010, Second-Printing Maintenance
Page 119 of 191
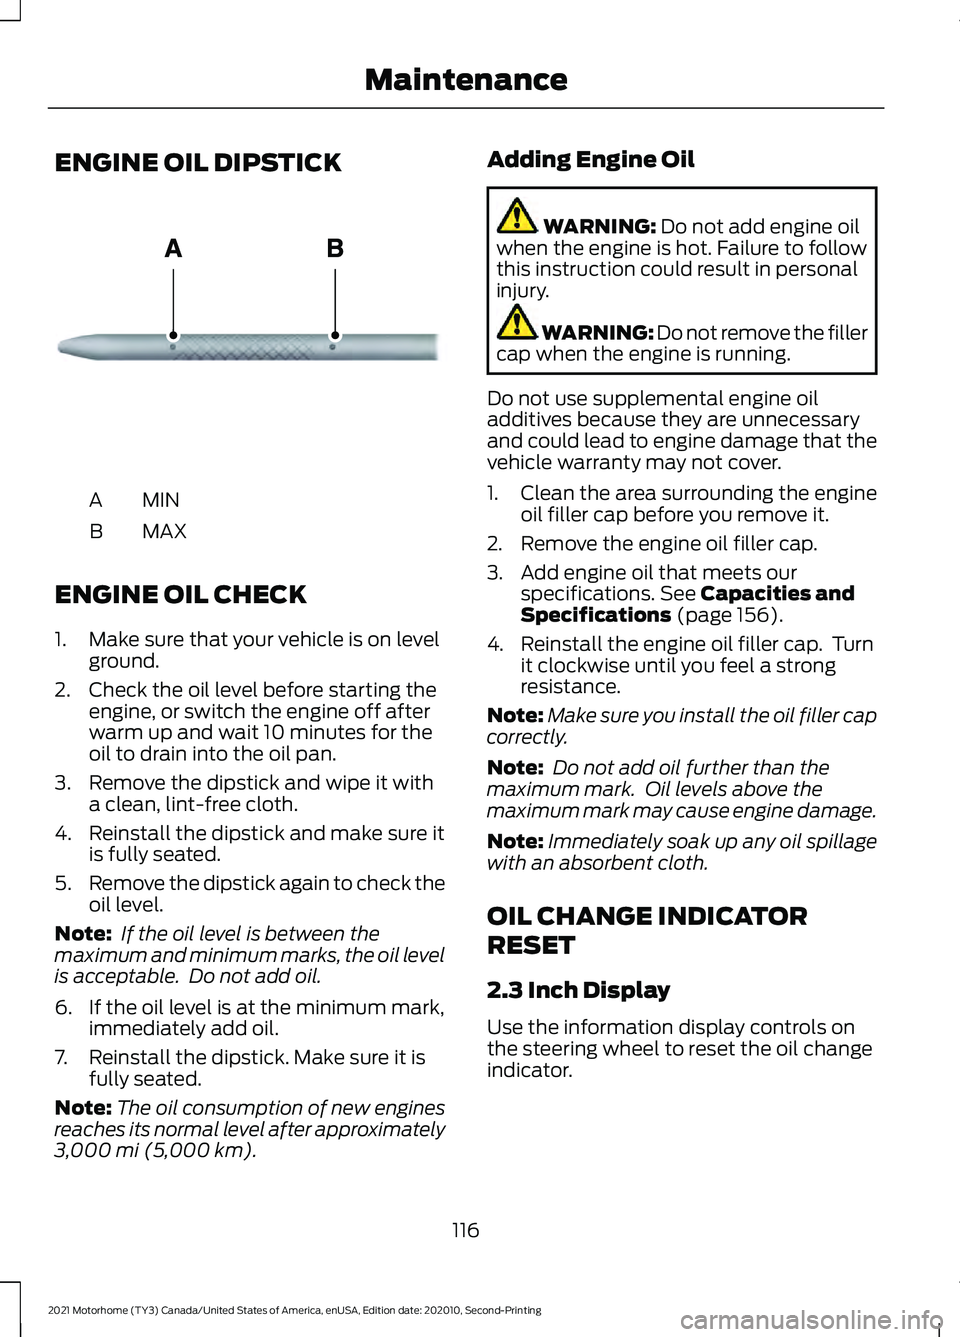
ENGINE OIL DIPSTICK
MINA
MAX
B
ENGINE OIL CHECK
1. Make sure that your vehicle is on level ground.
2. Check the oil level before starting the engine, or switch the engine off after
warm up and wait 10 minutes for the
oil to drain into the oil pan.
3. Remove the dipstick and wipe it with a clean, lint-free cloth.
4. Reinstall the dipstick and make sure it is fully seated.
5. Remove the dipstick again to check the
oil level.
Note: If the oil level is between the
maximum and minimum marks, the oil level
is acceptable. Do not add oil.
6. If the oil level is at the minimum mark, immediately add oil.
7. Reinstall the dipstick. Make sure it is fully seated.
Note: The oil consumption of new engines
reaches its normal level after approximately
3,000 mi (5,000 km). Adding Engine Oil WARNING:
Do not add engine oil
when the engine is hot. Failure to follow
this instruction could result in personal
injury. WARNING: Do not remove the filler
cap when the engine is running.
Do not use supplemental engine oil
additives because they are unnecessary
and could lead to engine damage that the
vehicle warranty may not cover.
1. Clean the area surrounding the engine oil filler cap before you remove it.
2. Remove the engine oil filler cap.
3. Add engine oil that meets our specifications.
See Capacities and
Specifications (page 156).
4. Reinstall the engine oil filler cap. Turn it clockwise until you feel a strong
resistance.
Note: Make sure you install the oil filler cap
correctly.
Note: Do not add oil further than the
maximum mark. Oil levels above the
maximum mark may cause engine damage.
Note: Immediately soak up any oil spillage
with an absorbent cloth.
OIL CHANGE INDICATOR
RESET
2.3 Inch Display
Use the information display controls on
the steering wheel to reset the oil change
indicator.
116
2021 Motorhome (TY3) Canada/United States of America, enUSA, Edition date: 202010, Second-Printing MaintenanceE161560
Page 120 of 191
From the main menu scroll to:
Action and Description
Message
Press the right arrow button,
then from this menu scroll
down to the following
message.
Driver
Assist
Press the right arrow button,
then from this menu scroll
down to the following
message.
Maint.
Monitor
Press and hold the OK
button until the instrument
cluster displays the
following message.
Oil Life %
Hold to
Reset
Reset Complete
If the instrument cluster
displays the following
message, repeat the
process.
Reset Cancelled
8 Inch Display
Use the information display controls on
the steering wheel to reset the oil change
indicator. From the main menu scroll to: Action and Description
Message
Press the down arrow
button, then from this menu
scroll to the following
message.
Vehicle
Info
Press the
OK button.
Mainten-
ance
Monitor
Press the down arrow
button, then from this menu
scroll to the following
message.
Oil Life:
xxx%
Press the
OK button.
Oil Life
Press and hold the
OK
button until the instrument
cluster displays the
following message.
Oil Life
Hold OK to
Reset
Oil Life: 100%
When the oil change indic-
ator resets, the instrument
cluster displays 100%.
Repeat the process if the oil
change indicator does not
reset.
CHANGING THE ENGINE AIR
FILTER WARNING:
To reduce the risk of
vehicle damage and personal burn
injuries, do not start your engine with the
air cleaner removed and do not remove
it while the engine is running.
Change the air filter element at the proper
interval. See
Scheduled Maintenance
(page 168).
117
2021 Motorhome (TY3) Canada/United States of America, enUSA, Edition date: 202010, Second-Printing Maintenance
Page 121 of 191
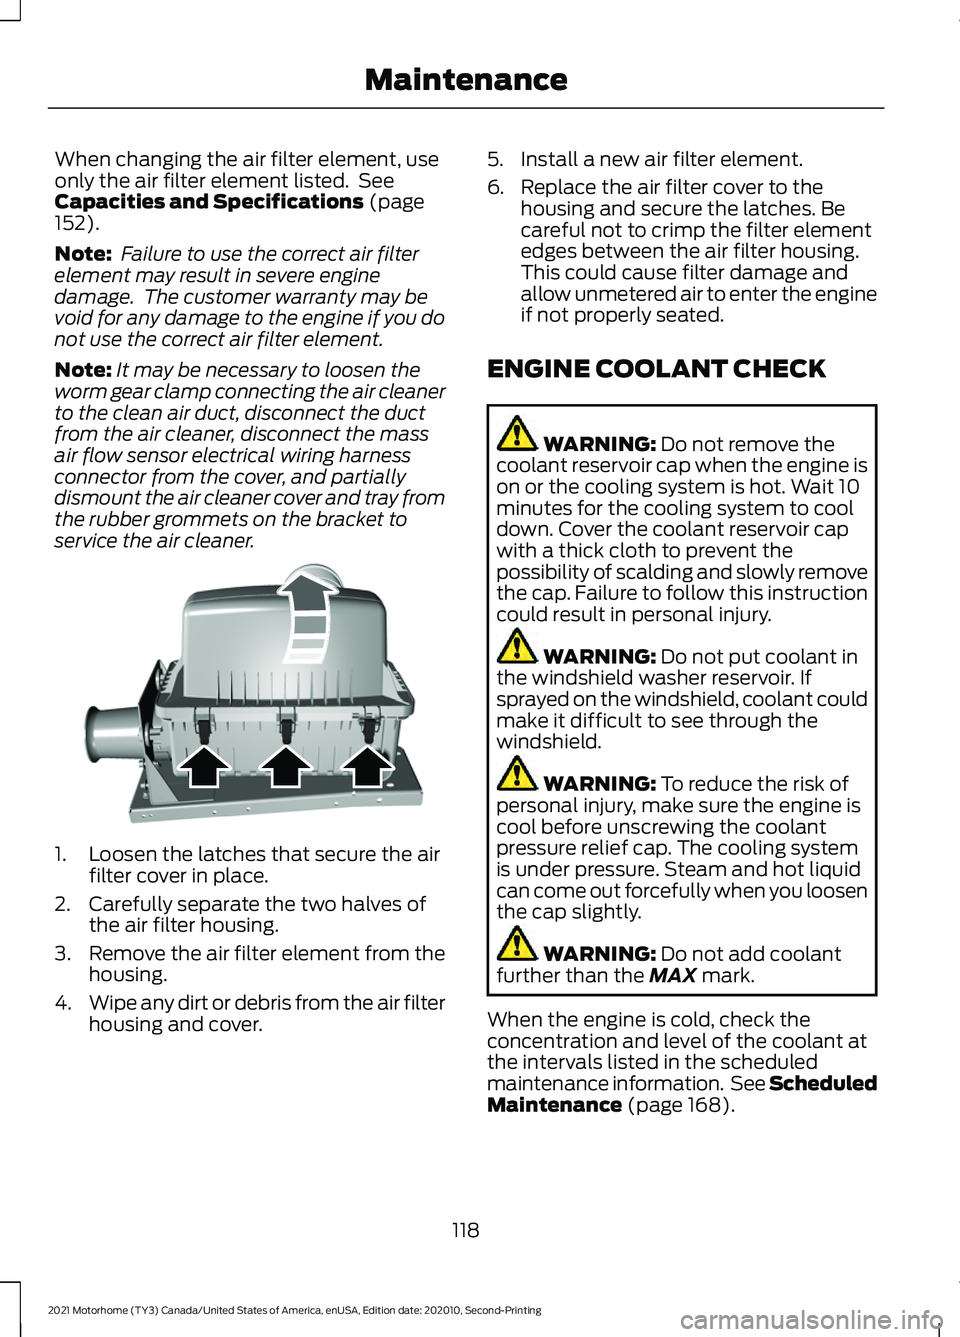
When changing the air filter element, use
only the air filter element listed. See
Capacities and Specifications (page
152).
Note: Failure to use the correct air filter
element may result in severe engine
damage. The customer warranty may be
void for any damage to the engine if you do
not use the correct air filter element.
Note: It may be necessary to loosen the
worm gear clamp connecting the air cleaner
to the clean air duct, disconnect the duct
from the air cleaner, disconnect the mass
air flow sensor electrical wiring harness
connector from the cover, and partially
dismount the air cleaner cover and tray from
the rubber grommets on the bracket to
service the air cleaner. 1. Loosen the latches that secure the air
filter cover in place.
2. Carefully separate the two halves of the air filter housing.
3. Remove the air filter element from the
housing.
4. Wipe any dirt or debris from the air filter
housing and cover. 5. Install a new air filter element.
6. Replace the air filter cover to the
housing and secure the latches. Be
careful not to crimp the filter element
edges between the air filter housing.
This could cause filter damage and
allow unmetered air to enter the engine
if not properly seated.
ENGINE COOLANT CHECK WARNING:
Do not remove the
coolant reservoir cap when the engine is
on or the cooling system is hot. Wait 10
minutes for the cooling system to cool
down. Cover the coolant reservoir cap
with a thick cloth to prevent the
possibility of scalding and slowly remove
the cap. Failure to follow this instruction
could result in personal injury. WARNING:
Do not put coolant in
the windshield washer reservoir. If
sprayed on the windshield, coolant could
make it difficult to see through the
windshield. WARNING:
To reduce the risk of
personal injury, make sure the engine is
cool before unscrewing the coolant
pressure relief cap. The cooling system
is under pressure. Steam and hot liquid
can come out forcefully when you loosen
the cap slightly. WARNING:
Do not add coolant
further than the MAX mark.
When the engine is cold, check the
concentration and level of the coolant at
the intervals listed in the scheduled
maintenance information. See Scheduled
Maintenance
(page 168).
118
2021 Motorhome (TY3) Canada/United States of America, enUSA, Edition date: 202010, Second-Printing MaintenanceE313332
Page 122 of 191
Note:
Make sure that the coolant level is
between the MIN and the MAX marks on
the coolant reservoir.
Note: Coolant expands when it is hot. The
level may extend beyond the
MAX mark.
Maintain coolant concentration within
48% to 50%, which equates to a freeze
point between
-29°F (-34°C) and -35°F
(-37°C). Check coolant concentration
using a refractometer. We do not
recommend the use of hydrometers or
coolant test strips for measuring coolant
concentration.
Adding Coolant WARNING:
Do not remove the
coolant reservoir cap when the engine is
on or the cooling system is hot. Wait 10
minutes for the cooling system to cool
down. Cover the coolant reservoir cap
with a thick cloth to prevent the
possibility of scalding and slowly remove
the cap. Failure to follow this instruction
could result in personal injury.
Note: Automotive fluids are not
interchangeable. Take care not to put
engine coolant in the windshield washer
fluid reservoir or windshield washer fluid in
the engine coolant reservoir.
Note: Do not use stop leak pellets, cooling
system sealants, or non-specified additives
as they can cause damage to the engine
cooling or heating systems. Resulting
component damage may not be covered by
the vehicle Warranty. It is very important to use prediluted
coolant approved to the correct
specification in order to avoid plugging the
small passageways in the engine cooling
system. See
Capacities and
Specifications (page 152). Do not mix
different colors or types of coolant in your
vehicle. Mixing of engine coolants or using
an incorrect coolant could harm the engine
or cooling system components and may
not be covered by the vehicle Warranty.
Note: If prediluted coolant is not available,
use the approved concentrated coolant
diluting it to 50/50 with deionized or
distilled water. See
Capacities and
Specifications (page 152). Using water that
has not been deionized may contribute to
deposit formation, corrosion and plugging
of the small cooling system passageways.
Note: Coolants marketed for all makes and
models may not be approved to our
specifications and could cause damage to
the cooling system. Resulting component
damage may not be covered by the vehicle
Warranty.
If the coolant level is at or below the
minimum mark, add prediluted coolant
immediately.
To top up the coolant level do the
following:
1. Unscrew the cap slowly. Any pressure escapes as you unscrew the cap.
2. Add prediluted coolant approved to the correct specification. See
Capacities and Specifications (page
152
).
3. Add enough prediluted coolant to reach the correct level.
4. Replace the coolant reservoir cap, turn
it clockwise until you feel a strong
resistance.
119
2021 Motorhome (TY3) Canada/United States of America, enUSA, Edition date: 202010, Second-Printing Maintenance