heating FORD F-600 2022 Owners Manual
[x] Cancel search | Manufacturer: FORD, Model Year: 2022, Model line: F-600, Model: FORD F-600 2022Pages: 740, PDF Size: 12.6 MB
Page 132 of 740
ADJUSTING THE EXTERIOR
MIRRORS
WARNING: Do not adjust the
mirrors when your vehicle is moving. This
could result in the loss of control of your
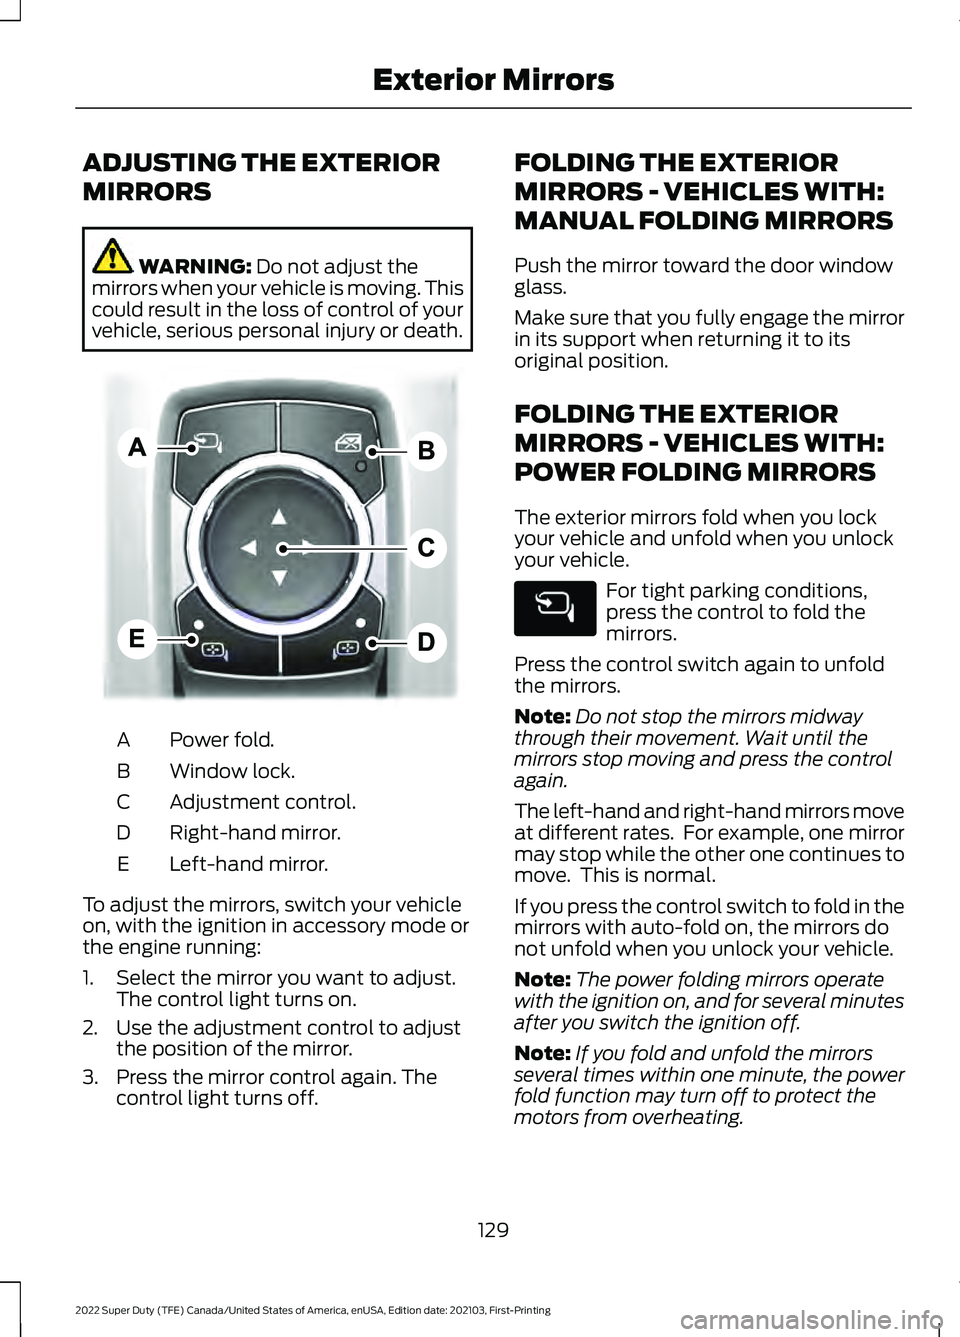
vehicle, serious personal injury or death. Power fold.
A
Window lock.
B
Adjustment control.
C
Right-hand mirror.
D
Left-hand mirror.
E
To adjust the mirrors, switch your vehicle
on, with the ignition in accessory mode or
the engine running:
1. Select the mirror you want to adjust. The control light turns on.
2. Use the adjustment control to adjust the position of the mirror.
3. Press the mirror control again. The control light turns off. FOLDING THE EXTERIOR
MIRRORS - VEHICLES WITH:
MANUAL FOLDING MIRRORS
Push the mirror toward the door window
glass.
Make sure that you fully engage the mirror
in its support when returning it to its
original position.
FOLDING THE EXTERIOR
MIRRORS - VEHICLES WITH:
POWER FOLDING MIRRORS
The exterior mirrors fold when you lock
your vehicle and unfold when you unlock
your vehicle.
For tight parking conditions,
press the control to fold the
mirrors.
Press the control switch again to unfold
the mirrors.
Note: Do not stop the mirrors midway
through their movement. Wait until the
mirrors stop moving and press the control
again.
The left-hand and right-hand mirrors move
at different rates. For example, one mirror
may stop while the other one continues to
move. This is normal.
If you press the control switch to fold in the
mirrors with auto-fold on, the mirrors do
not unfold when you unlock your vehicle.
Note: The power folding mirrors operate
with the ignition on, and for several minutes
after you switch the ignition off.
Note: If you fold and unfold the mirrors
several times within one minute, the power
fold function may turn off to protect the
motors from overheating.
129
2022 Super Duty (TFE) Canada/United States of America, enUSA, Edition date: 202103, First-Printing Exterior MirrorsE311081
Page 133 of 740
Switching Auto-fold On and Off
1. Press Settings on the touchscreen.
2. Press
Vehicle Settings.
3. Press
Mirrors.
4. Switch
Autofold on or off.
Loose Mirror
If you manually fold your power-folding
mirrors, they may not work properly even
after you re-position them. You need to
reset them if:
• The mirrors vibrate when you drive.
• The mirrors feel loose.
• The mirrors do not stay in the folded or
unfolded position.
• One of the mirrors is not in its normal
driving position.
To reset the mirrors, perform the following
steps:
1. By hand, fold or retract both mirrors.
2. Using the power folding/power telescoping mirror control switch,
operate the mirrors until you hear an
audible click.
3. Operate the power folding or power telescoping mirrors an additional 3 to
4 times to synchronize the mirrors.
EXTENDING THE EXTERIOR
MIRRORS
This optional feature lets you extend the
mirror about 3 in (75 mm). It is useful when
towing a trailer. You can manually pull out
or push in the mirrors to various positions.
Power Telescoping Mirrors
(If
Equipped)
This feature lets you position both mirrors
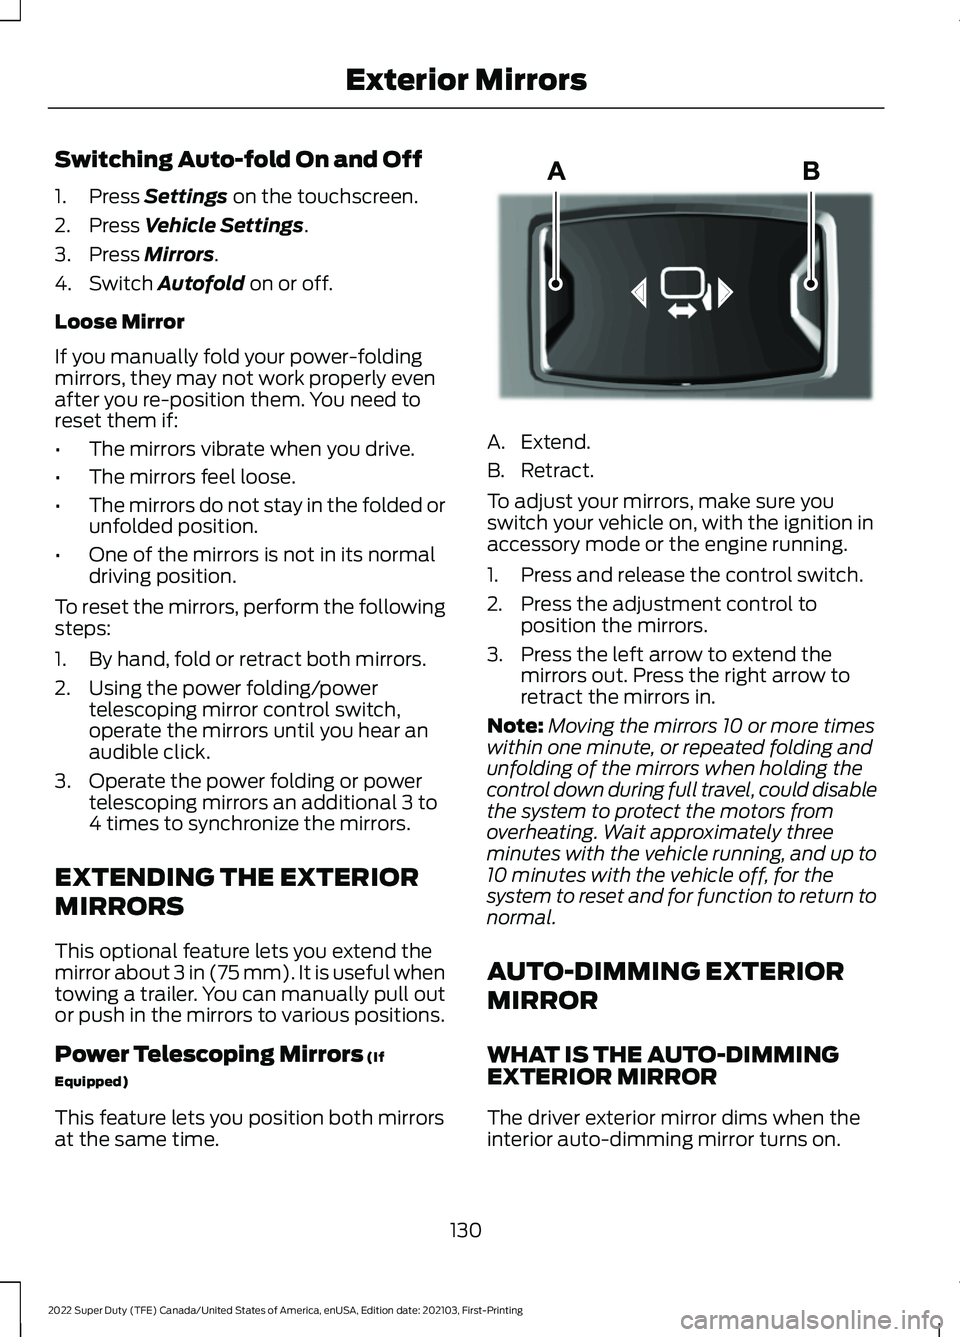
at the same time. A. Extend.
B. Retract.
To adjust your mirrors, make sure you
switch your vehicle on, with the ignition in
accessory mode or the engine running.
1. Press and release the control switch.
2. Press the adjustment control to
position the mirrors.
3. Press the left arrow to extend the mirrors out. Press the right arrow to
retract the mirrors in.
Note: Moving the mirrors 10 or more times
within one minute, or repeated folding and
unfolding of the mirrors when holding the
control down during full travel, could disable
the system to protect the motors from
overheating. Wait approximately three
minutes with the vehicle running, and up to
10 minutes with the vehicle off, for the
system to reset and for function to return to
normal.
AUTO-DIMMING EXTERIOR
MIRROR
WHAT IS THE AUTO-DIMMING
EXTERIOR MIRROR
The driver exterior mirror dims when the
interior auto-dimming mirror turns on.
130
2022 Super Duty (TFE) Canada/United States of America, enUSA, Edition date: 202103, First-Printing Exterior MirrorsE218902
Page 152 of 740
IDENTIFYING THE CLIMATE
CONTROL UNIT
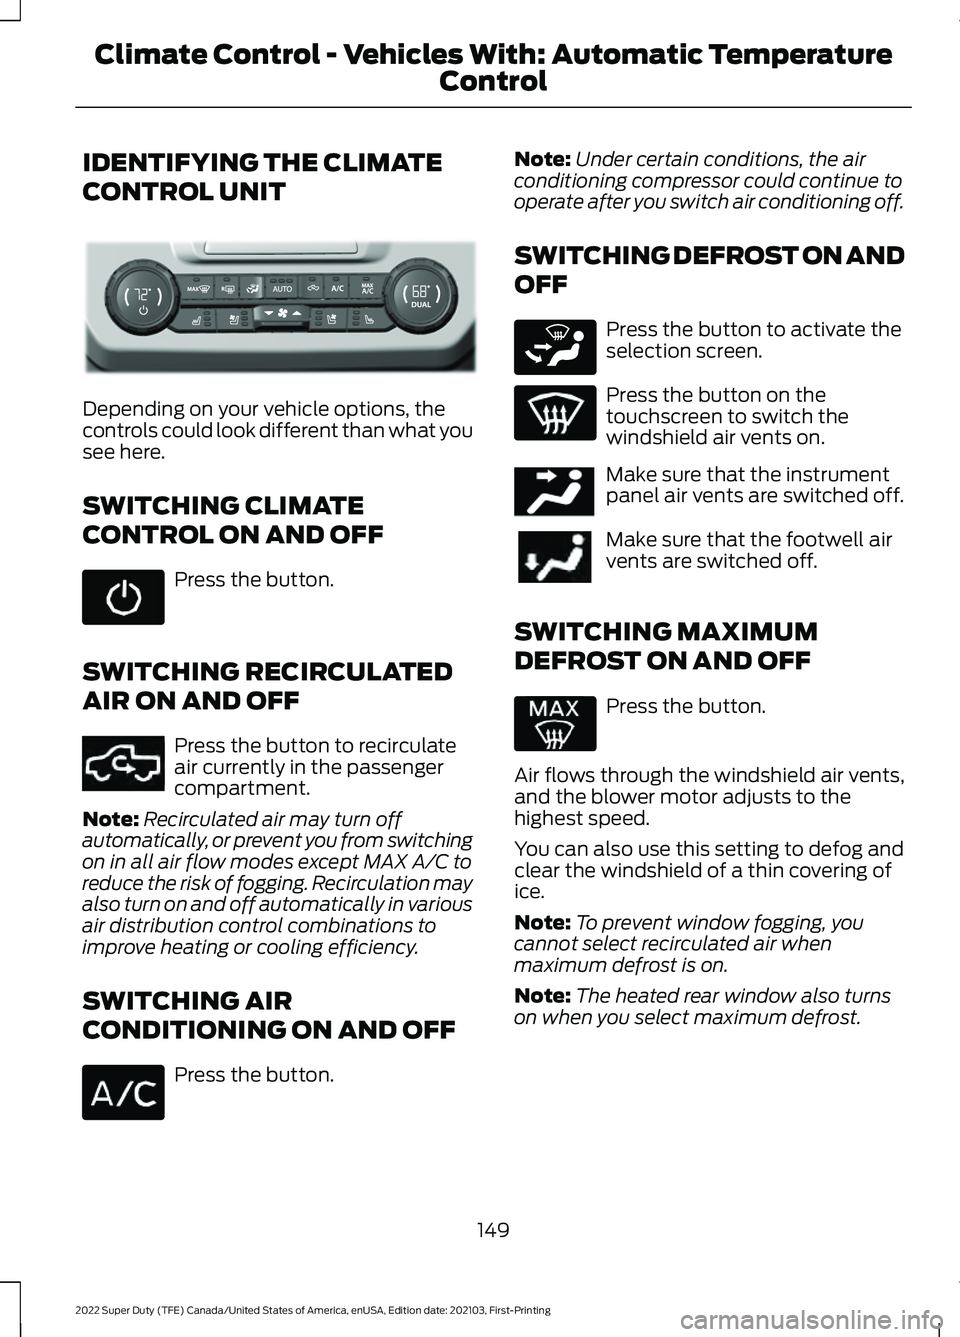
Depending on your vehicle options, the
controls could look different than what you
see here.
SWITCHING CLIMATE
CONTROL ON AND OFF
Press the button.
SWITCHING RECIRCULATED
AIR ON AND OFF Press the button to recirculate
air currently in the passenger
compartment.
Note: Recirculated air may turn off
automatically, or prevent you from switching
on in all air flow modes except MAX A/C to
reduce the risk of fogging. Recirculation may
also turn on and off automatically in various
air distribution control combinations to
improve heating or cooling efficiency.
SWITCHING AIR
CONDITIONING ON AND OFF Press the button. Note:
Under certain conditions, the air
conditioning compressor could continue to
operate after you switch air conditioning off.
SWITCHING DEFROST ON AND
OFF Press the button to activate the
selection screen.
Press the button on the
touchscreen to switch the
windshield air vents on.
Make sure that the instrument
panel air vents are switched off.
Make sure that the footwell air
vents are switched off.
SWITCHING MAXIMUM
DEFROST ON AND OFF Press the button.
Air flows through the windshield air vents,
and the blower motor adjusts to the
highest speed.
You can also use this setting to defog and
clear the windshield of a thin covering of
ice.
Note: To prevent window fogging, you
cannot select recirculated air when
maximum defrost is on.
Note: The heated rear window also turns
on when you select maximum defrost.
149
2022 Super Duty (TFE) Canada/United States of America, enUSA, Edition date: 202103, First-Printing Climate Control - Vehicles With: Automatic Temperature
ControlE351167 E351062 E265283 E244097
Page 155 of 740
SWITCHING DUAL MODE ON AND
OFF
Press the button.
CLIMATE CONTROL HINTS
General Hints
• Prolonged use of recirculated air may
cause the windows to fog up.
• You may feel a small amount of air
from the footwell air vents regardless
of the air distribution setting.
• To reduce humidity build-up inside your
vehicle, do not drive with the system
switched off or with recirculated air
always switched on.
• Do not place objects under the front
seats as this may interfere with the
airflow to the rear seats.
• Remove any snow, ice or leaves from
the air intake area at the base of the
windshield.
• To improve the time to reach a
comfortable temperature in hot
weather, drive with the windows open
until you feel cold air through the air
vents.
Automatic Climate Control
• Adjusting the settings when your
vehicle interior is extremely hot or cold
is not necessary. Automatic mode is
best recommended to maintain set
temperature.
• The system adjusts to heat or cool the
interior to the temperature you select
as quickly as possible.
• For the system to function efficiently,
the instrument panel and side air vents
should be fully open. •
If you press AUTO during cold outside
temperatures, the system directs air
flow to the windshield and side window
air vents. In addition, the blower motor
may run at a slower speed until the
engine warms up.
• If you press
AUTO during hot
temperatures and the inside of the
vehicle is hot, the system uses
recirculated air to maximize interior
cooling. Blower motor speed may also
reduce until the air cools.
Quickly Heating the Interior
1. Press
AUTO.
2. Adjust the temperature function to the
setting you prefer.
Recommended Settings for
Heating
1. Press
AUTO.
2. Adjust the temperature function to the
setting you prefer. Use
72°F (22°C) as
a starting point, then adjust the setting
as necessary.
Quickly Cooling the Interior
Press
MAX A/C.
Recommended Settings for
Cooling
1. Press
AUTO.
2. Adjust the temperature function to the
setting you prefer. Use
72°F (22°C) as
a starting point, then adjust the setting
as necessary.
Defogging the Side Windows in
Cold Weather
1. Press and release defrost or maximum
defrost.
152
2022 Super Duty (TFE) Canada/United States of America, enUSA, Edition date: 202103, First-Printing Climate Control - Vehicles With: Automatic Temperature
ControlE265280
Page 157 of 740
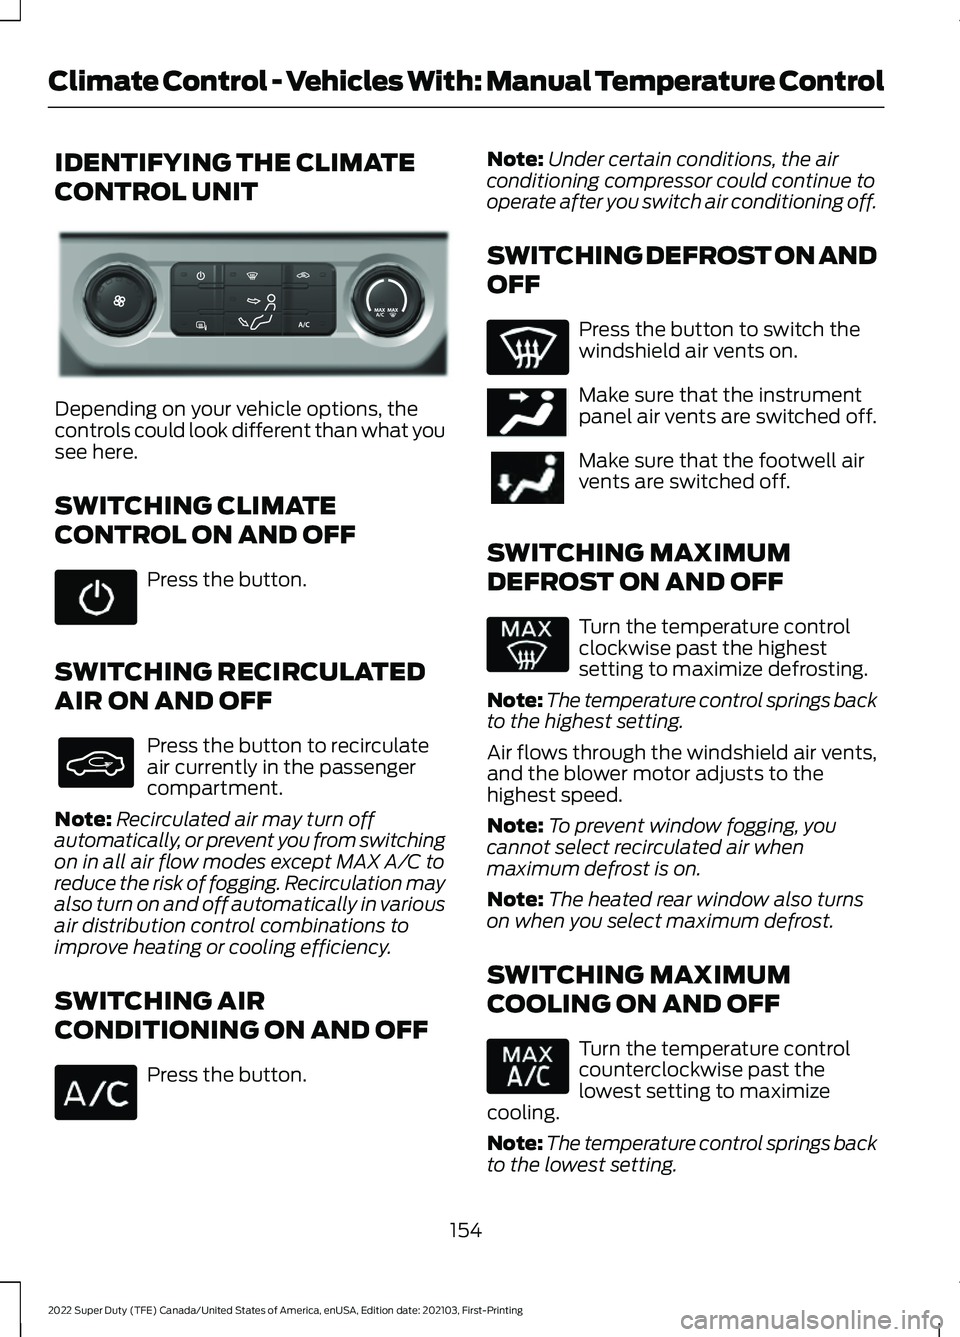
IDENTIFYING THE CLIMATE
CONTROL UNIT
Depending on your vehicle options, the
controls could look different than what you
see here.
SWITCHING CLIMATE
CONTROL ON AND OFF
Press the button.
SWITCHING RECIRCULATED
AIR ON AND OFF Press the button to recirculate
air currently in the passenger
compartment.
Note: Recirculated air may turn off
automatically, or prevent you from switching
on in all air flow modes except MAX A/C to
reduce the risk of fogging. Recirculation may
also turn on and off automatically in various
air distribution control combinations to
improve heating or cooling efficiency.
SWITCHING AIR
CONDITIONING ON AND OFF Press the button. Note:
Under certain conditions, the air
conditioning compressor could continue to
operate after you switch air conditioning off.
SWITCHING DEFROST ON AND
OFF Press the button to switch the
windshield air vents on.
Make sure that the instrument
panel air vents are switched off.
Make sure that the footwell air
vents are switched off.
SWITCHING MAXIMUM
DEFROST ON AND OFF Turn the temperature control
clockwise past the highest
setting to maximize defrosting.
Note: The temperature control springs back
to the highest setting.
Air flows through the windshield air vents,
and the blower motor adjusts to the
highest speed.
Note: To prevent window fogging, you
cannot select recirculated air when
maximum defrost is on.
Note: The heated rear window also turns
on when you select maximum defrost.
SWITCHING MAXIMUM
COOLING ON AND OFF Turn the temperature control
counterclockwise past the
lowest setting to maximize
cooling.
Note: The temperature control springs back
to the lowest setting.
154
2022 Super Duty (TFE) Canada/United States of America, enUSA, Edition date: 202103, First-Printing Climate Control - Vehicles With: Manual Temperature ControlE351180 E244097
Page 159 of 740
CLIMATE CONTROL HINTS
General Hints
•
Prolonged use of recirculated air may
cause the windows to fog up.
• You may feel a small amount of air
from the footwell air vents regardless
of the air distribution setting.
• To reduce humidity build-up inside your
vehicle, do not drive with the system
switched off or with recirculated air
always switched on.
• Do not place objects under the front
seats as this may interfere with the
airflow to the rear seats.
• Remove any snow, ice or leaves from
the air intake area at the base of the
windshield.
• To improve the time to reach a
comfortable temperature in hot
weather, drive with the windows open
until you feel cold air through the air
vents.
Quickly Heating the Interior
1. Adjust the blower motor speed to the highest speed setting.
2. Adjust the temperature control to the highest setting.
3. Direct air to the footwell air vents.
Recommended Settings for
Heating
1. Adjust the blower motor speed to the center setting.
2. Adjust the temperature control to the midway point of the hot settings.
3. Direct air to the footwell air vents. Quickly Cooling the Interior
1. Turn the temperature control
counterclockwise past the lowest
setting.
2. Drive with the windows open for a short
period of time.
Recommended Settings for
Cooling
1. Adjust the blower motor speed to the center setting.
2. Adjust the temperature control to the midway point of the cold settings.
3. Direct air to the instrument panel air vents.
Defogging the Side Windows in
Cold Weather
1. Direct air to the instrument panel and windshield air vents.
2. Press and release A/C.
3. Adjust the temperature control to the setting you prefer.
4. Adjust the blower motor speed to the highest setting.
5. Direct air toward the side windows.
6. Close the instrument panel air vents.
156
2022 Super Duty (TFE) Canada/United States of America, enUSA, Edition date: 202103, First-Printing Climate Control - Vehicles With: Manual Temperature Control
Page 180 of 740
Note:
If programming a garage door opener
or gate operator, it is advised to unplug the
device during the “cycling” process to
prevent possible overheating.
PROGRAMMING THE GARAGE
DOOR OPENER TO YOUR
HAND-HELD TRANSMITTER
This process is to program your in-vehicle
HomeLink function button with your
hand-held transmitter.
Note: The programming steps below
assume you will be programming HomeLink
that was not previously programmed. If your
HomeLink was previously programmed, you
may need to erase your HomeLink buttons.
See Clearing the Garage Door Opener
(page 178). 1.
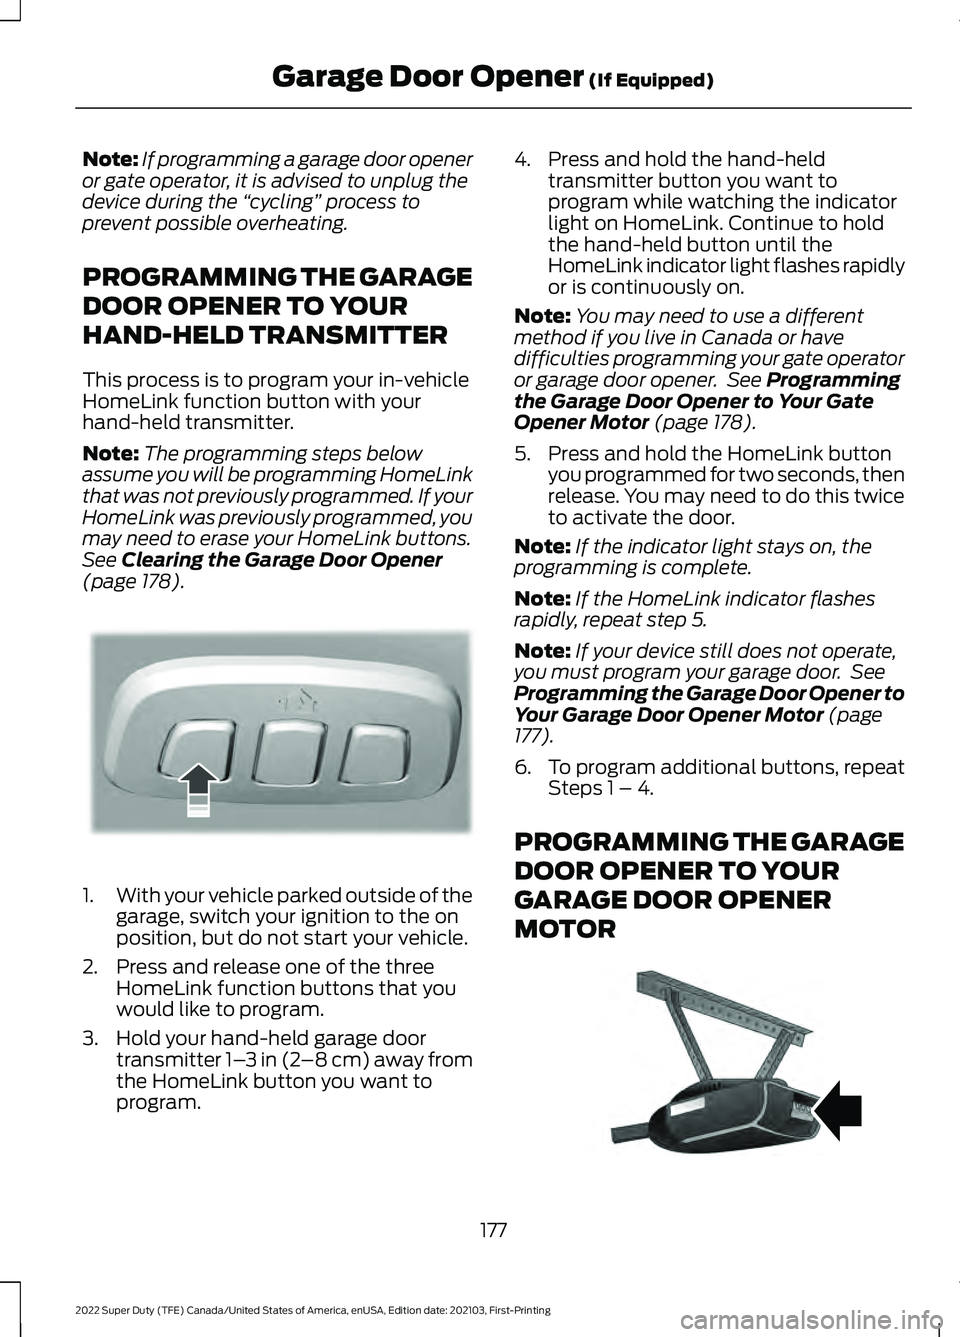
With your vehicle parked outside of the
garage, switch your ignition to the on
position, but do not start your vehicle.
2. Press and release one of the three HomeLink function buttons that you
would like to program.
3. Hold your hand-held garage door transmitter 1– 3 in (2–8 cm) away from
the HomeLink button you want to
program. 4. Press and hold the hand-held
transmitter button you want to
program while watching the indicator
light on HomeLink. Continue to hold
the hand-held button until the
HomeLink indicator light flashes rapidly
or is continuously on.
Note: You may need to use a different
method if you live in Canada or have
difficulties programming your gate operator
or garage door opener. See
Programming
the Garage Door Opener to Your Gate
Opener Motor
(page 178).
5. Press and hold the HomeLink button you programmed for two seconds, then
release. You may need to do this twice
to activate the door.
Note: If the indicator light stays on, the
programming is complete.
Note: If the HomeLink indicator flashes
rapidly, repeat step 5.
Note: If your device still does not operate,
you must program your garage door. See
Programming the Garage Door Opener to
Your Garage Door Opener Motor
(page
177).
6. To program additional buttons, repeat Steps 1 – 4.
PROGRAMMING THE GARAGE
DOOR OPENER TO YOUR
GARAGE DOOR OPENER
MOTOR 177
2022 Super Duty (TFE) Canada/United States of America, enUSA, Edition date: 202103, First-Printing Garage Door Opener
(If Equipped)E188212 E142659
Page 181 of 740
1. Press the learn button on the garage
door opener motor, you have 30
seconds to complete the next two
steps.
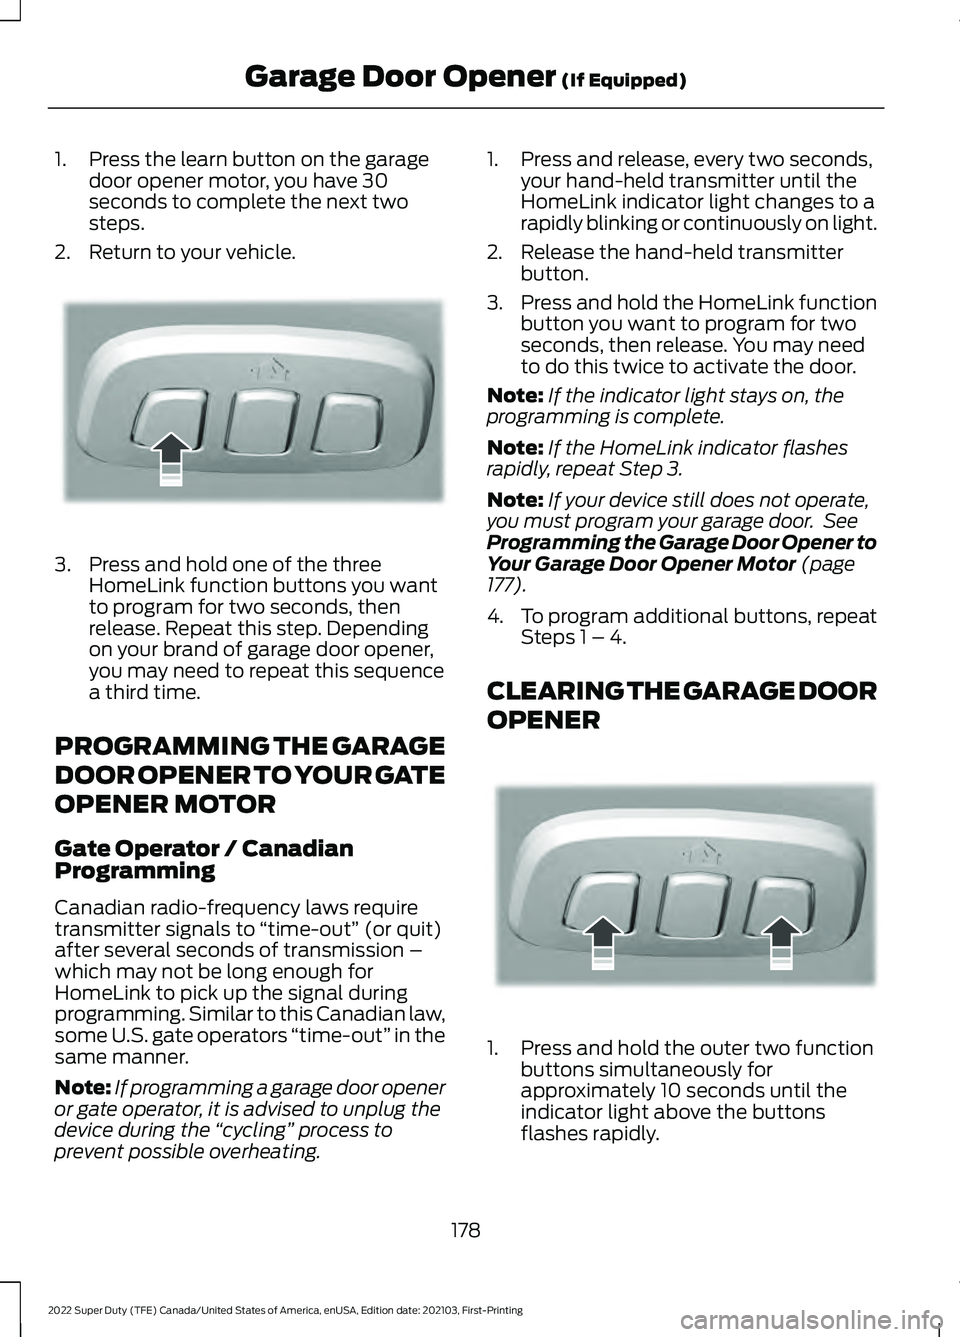
2. Return to your vehicle. 3. Press and hold one of the three
HomeLink function buttons you want
to program for two seconds, then
release. Repeat this step. Depending
on your brand of garage door opener,
you may need to repeat this sequence
a third time.
PROGRAMMING THE GARAGE
DOOR OPENER TO YOUR GATE
OPENER MOTOR
Gate Operator / Canadian
Programming
Canadian radio-frequency laws require
transmitter signals to “time-out” (or quit)
after several seconds of transmission –
which may not be long enough for
HomeLink to pick up the signal during
programming. Similar to this Canadian law,
some U.S. gate operators “time-out” in the
same manner.
Note: If programming a garage door opener
or gate operator, it is advised to unplug the
device during the “cycling” process to
prevent possible overheating. 1. Press and release, every two seconds,
your hand-held transmitter until the
HomeLink indicator light changes to a
rapidly blinking or continuously on light.
2. Release the hand-held transmitter button.
3. Press and hold the HomeLink function
button you want to program for two
seconds, then release. You may need
to do this twice to activate the door.
Note: If the indicator light stays on, the
programming is complete.
Note: If the HomeLink indicator flashes
rapidly, repeat Step 3.
Note: If your device still does not operate,
you must program your garage door. See
Programming the Garage Door Opener to
Your Garage Door Opener Motor (page
177).
4. To program additional buttons, repeat Steps 1 – 4.
CLEARING THE GARAGE DOOR
OPENER 1. Press and hold the outer two function
buttons simultaneously for
approximately 10 seconds until the
indicator light above the buttons
flashes rapidly.
178
2022 Super Duty (TFE) Canada/United States of America, enUSA, Edition date: 202103, First-Printing Garage Door Opener
(If Equipped)E188212 E188213
Page 209 of 740
Note:
Do not blend used engine oil with
diesel fuel under any circumstances.
Blending used oil with the fuel significantly
increases your vehicle ’s exhaust emissions
and reduce engine life due to increased
internal wear.
We recommend Top Tier diesel fuel where
available to help minimize engine deposits
and maintain optimal vehicle and engine
performance.
For additional information, visit
www .t op tier g a s. c om .
You should use ultra-low sulfur diesel fuel
designated as number 1-D or 2-D with a
maximum of 15-ppm sulfur in your diesel
vehicle. You can operate your vehicle on
diesel fuels containing up to 20%
biodiesel, also known as B20. These fuels
should meet the ASTM D975 diesel or the
ASTM D7467 B6-B20 biodiesel industry
specifications. Outside of North America,
use fuels meeting EN590 or equivalent
local market standard. Using low-sulfur diesel fuel
(16-500 ppm) or high-sulfur
diesel fuel (greater than 500
ppm) in your diesel engine will cause
certain emission components to
malfunction which could also cause the
service engine soon light to illuminate
indicating an emissions-related concern.
Diesel fuel is adjusted seasonally for cold
temperature. For best results at
temperatures below 19°F (-7°C), we
recommend using a diesel fuel which has
been seasonally adjusted for the ambient
conditions. Choosing the Right Fuel: Vehicles
Operated Where Ultra Low Sulfur
Diesel Fuel Is Not Required
For the engine to operate reliably on
low-sulfur or high-sulfur diesel fuel, the
engine must be a factory-built high-sulfur
engine (available as a dealer order option
for select markets) or an ultra-low sulfur
diesel fuel configured engine that has been
retrofitted for high-sulfur diesel fuel using
authorized dealer service parts. Failure to
use retrofit components other than those
available through your authorized dealer
results in coolant system damage, engine
overheating, selective catalyst reduction
system or diesel particulate filter damage
and possible base engine damage.
Use only a diesel engine configured for use
with high-sulfur diesel fuel in markets with
diesel fuel that has sulfur content greater
than 15 ppm. Using low-sulfur diesel fuel
(16–500 ppm) or high-sulfur diesel fuel
(greater than 500 ppm) in a diesel engine
designed to use only ultra-low sulfur diesel
fuel could result in damage to engine
emission control devices and the after
treatment system, potentially rendering
the vehicle inoperable.
Vehicles with engines configured for use
with high-sulfur diesel fuel are only
available for sale in countries where
ultra-low sulfur diesel fuel is generally not
available or mandated by the government.
Vehicles originally sold in an ultra-low
sulfur diesel fuel market that are
subsequently exported to non-ultra low
sulfur diesel fuel markets will need to be
retrofitted at the customer
’s expense using
Ford authorized dealer service parts in
order to be reliably operated on non-ultra
low sulfur diesel fuel.
206
2022 Super Duty (TFE) Canada/United States of America, enUSA, Edition date: 202103, First-Printing Fuel and Refueling
Page 210 of 740
Biodiesel
WARNING: Do not mix diesel with
gasoline, gasohol or alcohol. This could
cause an explosion.
Note: Do not use home heating oil,
agricultural fuel, raw fats and oils, waste
cooking greases, biodiesel greater than 20%
or any diesel not intended for highway use.
Damage to the fuel injection system, engine
and exhaust catalyst, and diesel particulate
filter can occur if you use an improper fuel.
Red dye is used to identify fuels intended
for agricultural and non-highway use.
You can operate your vehicle on diesel
fuels containing up to 20% biodiesel, also
known as B20.
Biodiesel fuel is a chemically converted
product from renewable fuel sources, such
as vegetable oils, animal fats and waste
cooking greases.
To help achieve acceptable engine
performance and durability when using
biodiesel in your vehicle:
• Confirm the biodiesel content of the
fuel to be B20 (20% biodiesel) or less.
• Only use biodiesel fuel of good quality
that complies with industry standards.
• Follow the recommended service
maintenance intervals. See
General
Maintenance Information (page 622).
• Do not store biodiesel fuel in the fuel
tank for more than 1 month.
• Consider changing brands or reducing
biodiesel content if you have cold
temperature fuel gelling issues or a
frequently appearing LOW FUEL
PRESSURE message. Use of biodiesel in concentrations greater
than 20% can cause damage to your
vehicle, including engine and/or exhaust
after-treatment hardware (exhaust
catalyst and particulate filter) failures.
Concentrations greater than 20% can also
cause fuel filter restrictions that could
result in a lack of power or damage to fuel
system components, including fuel pump
and fuel injector failures.
We recommend SAE 5W-40 oil for fuels
with greater than 5% biodiesel (B5). For
more information about oil change
intervals and other maintenance when
operating on biodiesel.
See Special
Operating Conditions Scheduled
Maintenance
(page 636).
Look for a label on the fuel pump to
confirm the amount of biodiesel contained
in diesel fuel. Ask the service station
attendant to confirm the biodiesel content
of diesel fuel, if you do not see a label on
the fuel pump.
If you plan to park or store your vehicle for
more than 1 month, then you should empty
your vehicle fuel tank of biodiesel fuel. You
should fill the tank with a pure
petroleum-based diesel fuel and run your
vehicle for a minimum of 30 minutes.
Note: Degraded or oxidized biodiesel can
damage fuel system seals and plastics and
corrode steel parts.
During cold weather, if you have problems
operating on biodiesel, you may need to
use diesel fuel with lower biodiesel
content, try another brand or discontinue
the use of biodiesel.
Diesel Fuel Additives
It should not be necessary to add any
aftermarket additives to your fuel if you
use a high-quality diesel fuel that conforms
to ASTM industry specifications.
Aftermarket additives can damage the fuel
injector system or engine.
207
2022 Super Duty (TFE) Canada/United States of America, enUSA, Edition date: 202103, First-Printing Fuel and Refueling