engine coolant FORD F-650/750 2018 User Guide
[x] Cancel search | Manufacturer: FORD, Model Year: 2018, Model line: F-650/750, Model: FORD F-650/750 2018Pages: 386, PDF Size: 9.01 MB
Page 93 of 386
ENGINE IDLE SHUTDOWN (If
Equipped) WARNING
In the event of engine shutdown,
make sure your vehicle is safely off
the road and the problem is resolved
before returning to the road. Failure to do
so may result in a crash, serious injury or
death. This feature automatically shuts down the
engine when it has been idling in park (P)
or neutral (N) for an extended period,
depending on the setting.
When the engine idle shutdown process
has started:
•
A chime sounds and a message
appears in the information display
showing a timer counting down from
30 seconds.
• You can reset the timer by pressing the
brake pedal, accelerator pedal, or by
shifting into another gear.
• If you do not intervene within 30
seconds, the engine shuts down and a
message appears in the information
display alerting you that the engine has
shut down.
• Shortly after the engine has shut down,
the electrical system simulates a key
off and even though the ignition is still
on, the electrical system simulates a
normal accessory delay period before
shutting down.
• You must switch the ignition off to
reset the system before restarting your
vehicle. The engine idle shutdown timer does not
start if:
•
The engine is operating in battery
charge protect or power take-off mode.
• The exhaust emission control device is
regenerating.
ENGINE BLOCK HEATER
(If
Equipped) WARNINGS
Failure to follow engine block heater
instructions could result in property
damage or serious personal injury.
Do not use your heater with
ungrounded electrical systems or
two-pronged adapters. There is a risk
of electrical shock. Note:
The heater is most effective when
outdoor temperatures are below
0°F
(-18°C).
The heater acts as a starting aid by
warming the engine coolant. This allows
the climate control system to respond
quickly. The equipment includes a heater
element (installed in the engine block) and
a wire harness. You can connect the
system to a grounded 120-volt AC
electrical source.
We recommend that you do the following
for a safe and correct operation:
• Use a 16-gauge outdoor extension cord
that is product certified by
Underwriter ’s Laboratory (UL) or
Canadian Standards Association
(CSA). This extension cord must be
suitable for use outdoors, in cold
90
F650750 (TBC) , enUSA, Edition date: 201708, First Printing Starting and Stopping the Engine
Page 97 of 386
Note:
Do not blend used engine oil with
diesel fuel under any circumstances.
Blending used oil with the fuel will
significantly increase your vehicle ’s exhaust
emissions and reduce engine life due to
increased internal wear. Using low sulfur diesel fuel
(16-500 ppm) or high sulfur
diesel fuel (greater than 500
ppm) in your diesel engine will cause
certain emission components to
malfunction which may also cause the
service engine soon light to illuminate
indicating an emissions-related concern.
Diesel fuel is adjusted seasonally for cold
temperature. For best results at
temperatures below 19°F (-7°C), it is
recommended to use a diesel fuel which
has been seasonally adjusted for the
ambient conditions.
Fuel Requirements - Choosing The
Right Fuel: Vehicles Operated
Where Ultra Low Sulfur Diesel Fuel
Is Not Required
For the engine to operate reliably on
low-sulfur or high-sulfur diesel fuel, the
engine must be a factory built high-sulfur
engine (available as a dealer order option
for select markets) or an ultra low sulfur
diesel fuel configured engine that has been
retrofitted for high-sulfur diesel fuel using
Ford Motor Company dealer service parts.
Failure to use retrofit components other
than those available through your
authorized dealer will result in coolant
system damage, engine overheating,
selective catalyst reduction system or
diesel particulate filter damage and
possible base engine damage. Use only a diesel engine configured for use
with high sulfur diesel fuel in markets with
diesel fuel that has sulfur content greater
than 15 ppm. Using low sulfur diesel fuel
(16–500 ppm) or high sulfur diesel fuel
(greater than 500 ppm) in a diesel engine
designed to use only Ultra Low Sulfur
Diesel fuel may result in damage to engine
emission control devices and the
aftertreatment system, potentially
rendering the vehicle inoperable.
Vehicles with engines configured for use
with high sulfur diesel fuel are only
available for sale in countries where ultra
low sulfur diesel fuel is generally not
available or mandated by the government.
Vehicles originally sold in a ultra low sulfur
diesel fuel market that are subsequently
exported to non- ultra low sulfur diesel fuel
markets will need to be retrofitted (at the
customer
’s expense using Ford authorized
dealer service parts) in order to be reliably
operated on non- ultra low sulfur diesel
fuel.
Biodiesel WARNING
Do not mix diesel with gasoline,
gasohol or alcohol. This could cause
an explosion.
Note:
Do not use home heating oil,
agricultural fuel, raw fats and oils, waste
cooking greases, biodiesel fuels greater than
20% or any diesel fuel not intended for
highway use. Red dye is used to identify
fuels intended for agricultural and
non-highway use. Damage to the fuel
injection system, engine and exhaust
catalyst can occur if an improper fuel is
used.
You may operate your vehicle on diesel
fuels containing up to 20% biodiesel, also
known as B20.
94
F650750 (TBC) , enUSA, Edition date: 201708, First Printing Fuel and Refueling
Page 154 of 386
In order to operate the engine in
temperatures of 32°F (0°C) or lower, read
the following instructions:
•
Make sure that the batteries are of
sufficient size and are fully charged.
Check other electrical components to
make sure they are in optimum
condition
• Use the proper coolant solution at the
concentration recommended
protecting the engine against damage
from freezing
• Try to keep the fuel tank full as much
as possible at the end of operation to
prevent condensation in the fuel
system
• Make sure you use proper cold weather
engine oil and that it is at its proper
level. Also, if necessary, make sure to
follow the engine oil and filter change
schedule found under the Special
operating conditions section listed in
the scheduled maintenance
information
• At temperatures of -9°F (-23°C) or
below, it is recommended that you use
an engine block heater to improve cold
engine starting
• If operating in arctic temperatures of
-20°F (-29°C)
or lower, consult your
truck dealer for information about
special cold weather equipment and
precautions
The following cold weather idling
guidelines are recommended:
• You can use Motorcraft® cetane
improvers or non-alcohol-based
cetane improvers from a reputable
manufacturer as needed.
• Maintain the engine cooling system
properly. •
Avoid shutting the engine down after
an extensive idling period. Drive your
vehicle for several miles with the
engine at normal operating
temperatures under a moderate load.
• Consider using an engine block heater.
• For extended idle times use an
approved idle speed increase device.
Winter Operating Tips for Arctic
Operation -20°F (-29°C) and
Below
The following information is a guideline
only and is not to be the only source of
possible solutions in resolving extreme
cold temperature issues.
Starting Aids WARNING
Do not use starting fluid, such as
ether, in the air intake system (see
air filter decal). Such fluid could
cause immediate explosive damage to the
engine and possible personal injury. The use of the factory engine block heater
assists in engine starting in extreme cold
ambient temperatures. See
Engine Block
Heater (page 90).
Idle Control
Your vehicle may have a factory option for
a stationary elevated idle control through
dash-mounted upfitter switches that
allows the operator to elevate the idle rpm
for extended idle periods, as well as
aftermarket equipment such as PTO
operation. You must configure this feature
even if ordered from the factory. See your
authorized dealer for required upfitting.
151
F650750 (TBC) , enUSA, Edition date: 201708, First Printing Driving Hints
Page 179 of 386
VEHICLE INSPECTION
INFORMATION
To make sure your vehicle is ready to
operate, conduct a pre-trip inspection at
the beginning of each work period. Follow
the steps listed in this section to verify a
proper vehicle inspection procedure.
WARNINGS
Exercise great caution when working
on a vehicle equipped with an
automatic fan clutch. The fan starts
in motion only after the engine coolant
reaches a predetermined temperature or
the refrigerant pressure (if equipped with
air conditioning) reaches a predetermined
setting. The fan starts at this point with no
advance warning. Never reach near, or
permit objects to protrude into, the fan
blade radius while the engine is running as
this could result in vehicle damage,
personal injury or death. WARNINGS
Do not operate the vehicle if any
suspension conditions listed in the
following charts are evident. Loss of
steering or suspension could result in
property damage, personal injury or death. If a wheel must be changed, obtain
expert tire service help. Mounting and
un-mounting of tires should only be
performed by a qualified technician using
necessary safety procedures and
equipment, otherwise the result could be
property damage, personal injury or death. Note:
Always make sure you apply the
parking brake before starting the engine. Engine compartment (with engine off)
Use the dipstick to verify the oil level is in the proper operating
range. See Engine Oil Dipstick (page 190).
Engine oil
Look through the plastic reservoir and verify the coolant level
is within the proper operating range. Do not remove the
pressure cap until the coolant has cooled. See
Engine
Coolant Check (page 198).
Engine coolant
Verify that the fluid level is in the proper operating range. See
Power Steering Fluid Check
(page 205).
Power steering fluid
Remove the master cylinder caps and inspect the fluid level.
See
Brake Fluid Check (page 205).
Brake fluid
176
F650750 (TBC) , enUSA, Edition date: 201708, First Printing Vehicle Inspection Guide
Page 191 of 386
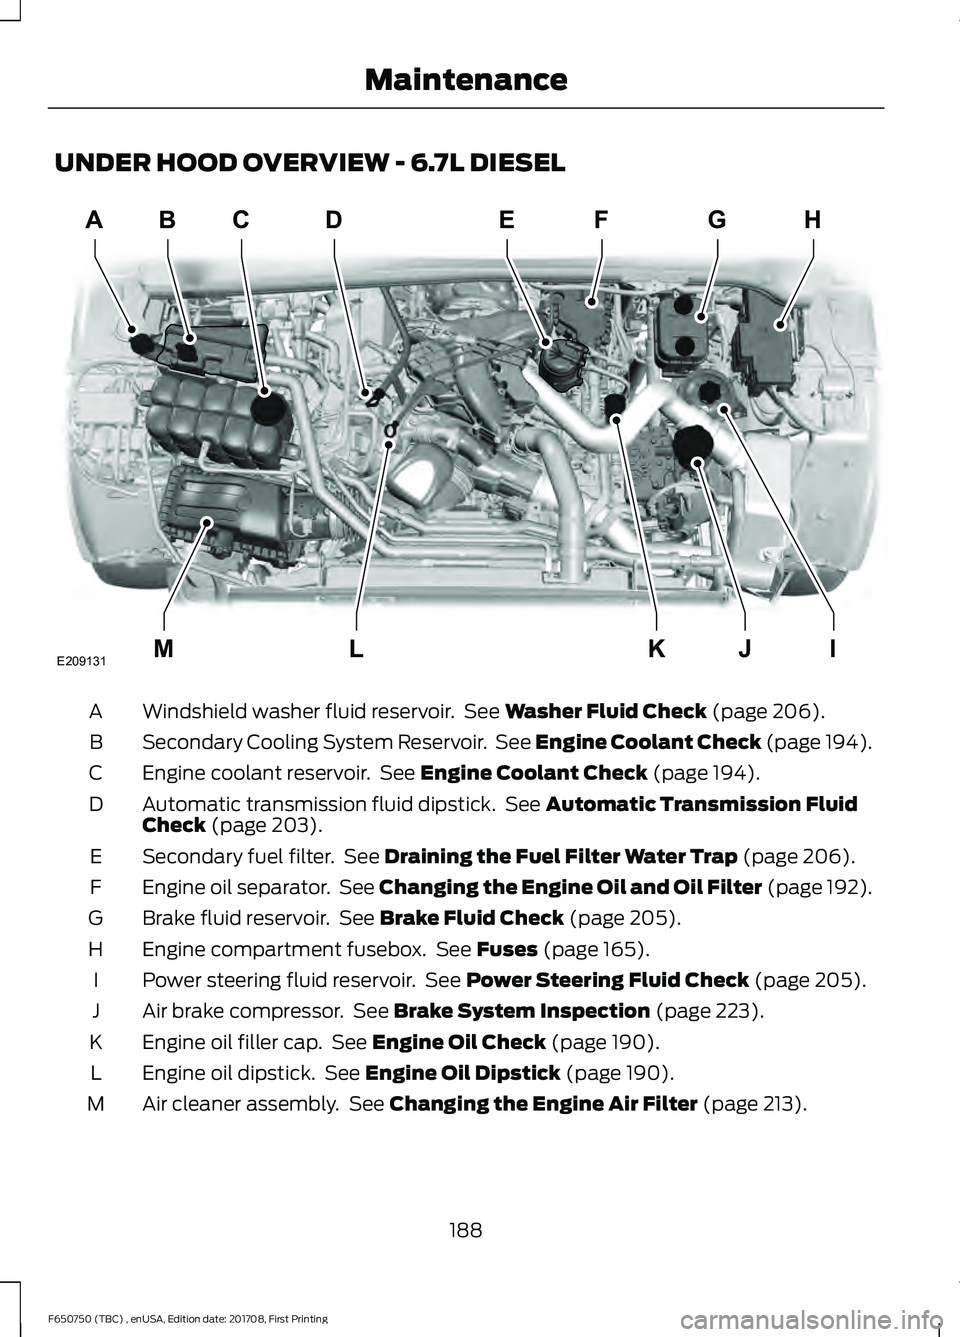
UNDER HOOD OVERVIEW - 6.7L DIESEL
Windshield washer fluid reservoir. See Washer Fluid Check (page 206).
A
Secondary Cooling System Reservoir. See Engine Coolant Check (page 194).
B
Engine coolant reservoir. See
Engine Coolant Check (page 194).
C
Automatic transmission fluid dipstick. See
Automatic Transmission Fluid
Check (page 203).
D
Secondary fuel filter. See
Draining the Fuel Filter Water Trap (page 206).
E
Engine oil separator. See Changing the Engine Oil and Oil Filter (page 192).
F
Brake fluid reservoir. See
Brake Fluid Check (page 205).
G
Engine compartment fusebox. See
Fuses (page 165).
H
Power steering fluid reservoir. See
Power Steering Fluid Check (page 205).
I
Air brake compressor. See
Brake System Inspection (page 223).
J
Engine oil filler cap. See
Engine Oil Check (page 190).
K
Engine oil dipstick. See
Engine Oil Dipstick (page 190).
L
Air cleaner assembly. See
Changing the Engine Air Filter (page 213).
M
188
F650750 (TBC) , enUSA, Edition date: 201708, First Printing MaintenanceABD
IJKLM
FEGH
E209131C
Page 192 of 386
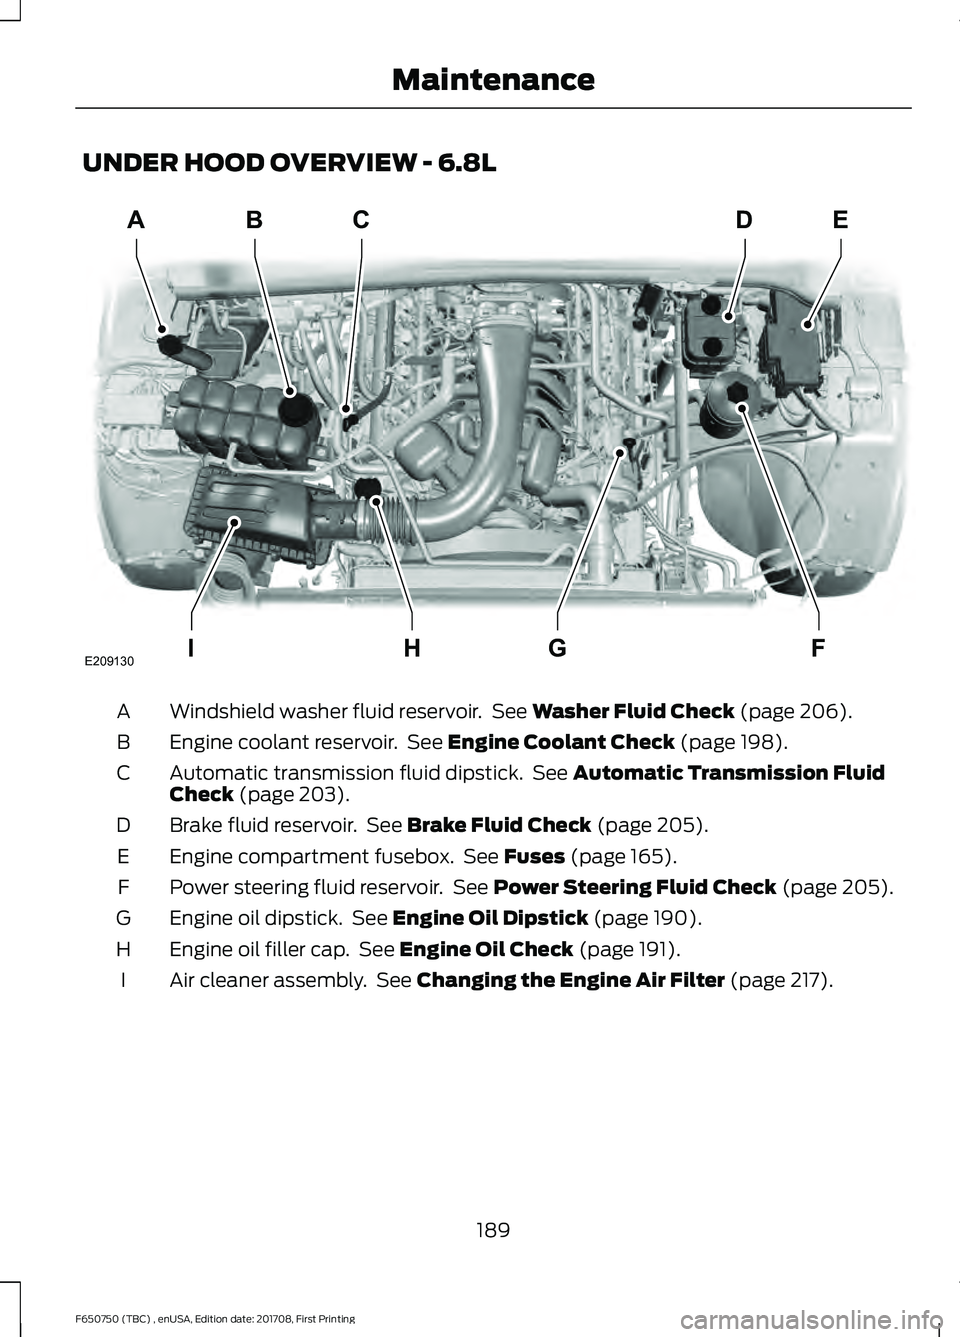
UNDER HOOD OVERVIEW - 6.8L
Windshield washer fluid reservoir. See Washer Fluid Check (page 206).
A
Engine coolant reservoir. See
Engine Coolant Check (page 198).
B
Automatic transmission fluid dipstick. See
Automatic Transmission Fluid
Check (page 203).
C
Brake fluid reservoir. See
Brake Fluid Check (page 205).
D
Engine compartment fusebox. See
Fuses (page 165).
E
Power steering fluid reservoir. See
Power Steering Fluid Check (page 205).
F
Engine oil dipstick. See
Engine Oil Dipstick (page 190).
G
Engine oil filler cap. See
Engine Oil Check (page 191).
H
Air cleaner assembly. See
Changing the Engine Air Filter (page 217).
I
189
F650750 (TBC) , enUSA, Edition date: 201708, First Printing MaintenanceABC
FGHI
DE
E209130
Page 197 of 386
4.
Make sure that the sealing surfaces on
the filter housing and cover are clean
and free of debris.
5. Install the new filter element.
6. Install the filter cover.
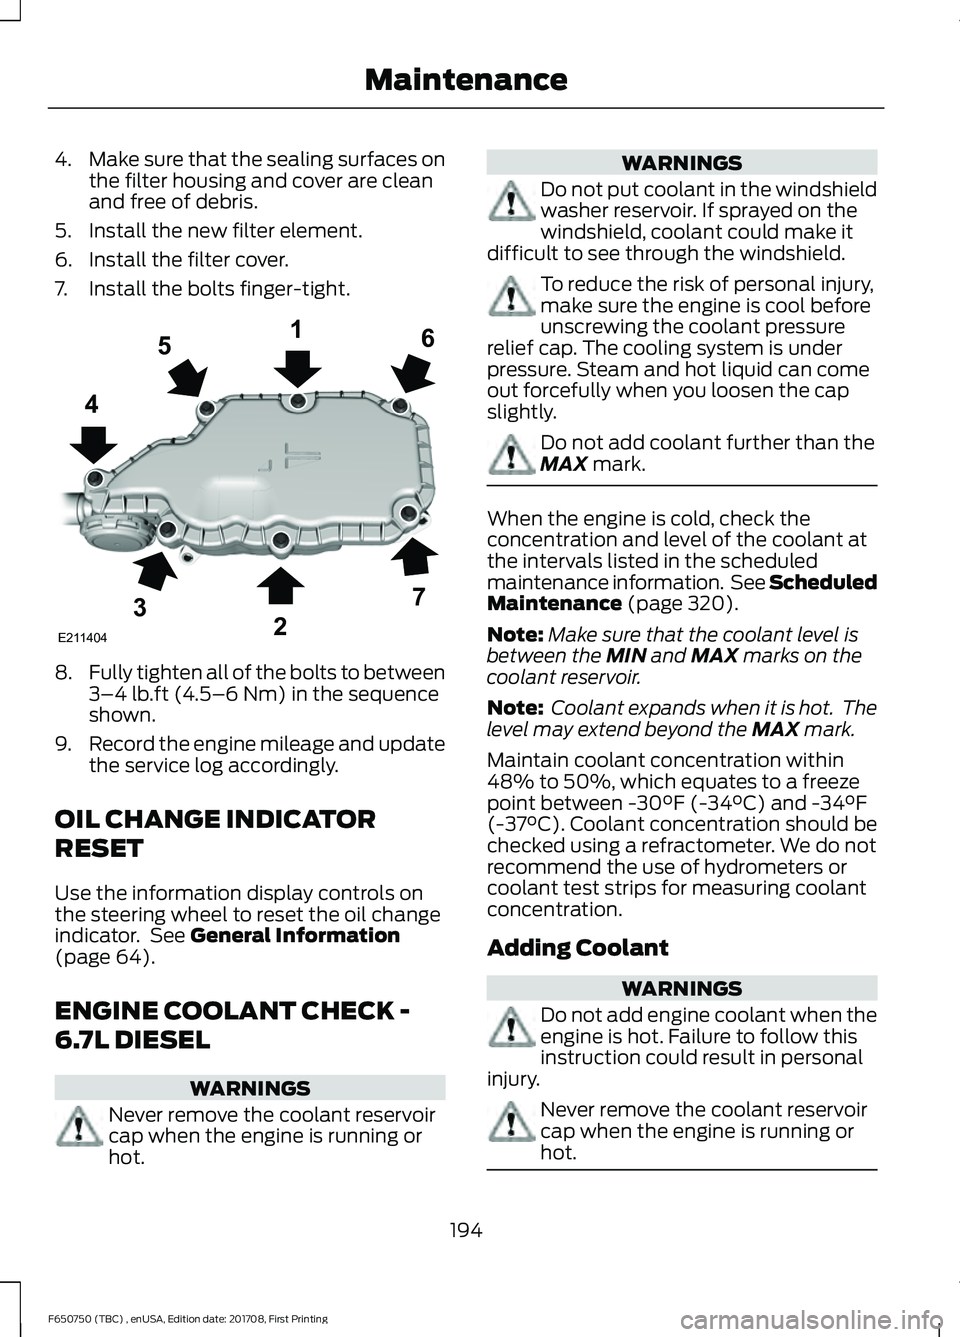
7. Install the bolts finger-tight. 8.
Fully tighten all of the bolts to between
3–4 lb.ft (4.5–6 Nm) in the sequence
shown.
9. Record the engine mileage and update
the service log accordingly.
OIL CHANGE INDICATOR
RESET
Use the information display controls on
the steering wheel to reset the oil change
indicator. See
General Information
(page 64).
ENGINE COOLANT CHECK -
6.7L DIESEL WARNINGS
Never remove the coolant reservoir
cap when the engine is running or
hot. WARNINGS
Do not put coolant in the windshield
washer reservoir. If sprayed on the
windshield, coolant could make it
difficult to see through the windshield. To reduce the risk of personal injury,
make sure the engine is cool before
unscrewing the coolant pressure
relief cap. The cooling system is under
pressure. Steam and hot liquid can come
out forcefully when you loosen the cap
slightly. Do not add coolant further than the
MAX
mark.
When the engine is cold, check the
concentration and level of the coolant at
the intervals listed in the scheduled
maintenance information. See Scheduled
Maintenance
(page 320).
Note: Make sure that the coolant level is
between the
MIN and MAX marks on the
coolant reservoir.
Note: Coolant expands when it is hot. The
level may extend beyond the
MAX mark.
Maintain coolant concentration within
48% to 50%, which equates to a freeze
point between -30°F (-34°C) and -34°F
(-37°C). Coolant concentration should be
checked using a refractometer. We do not
recommend the use of hydrometers or
coolant test strips for measuring coolant
concentration.
Adding Coolant WARNINGS
Do not add engine coolant when the
engine is hot. Failure to follow this
instruction could result in personal
injury. Never remove the coolant reservoir
cap when the engine is running or
hot.
194
F650750 (TBC) , enUSA, Edition date: 201708, First Printing MaintenanceE211404
165
4
32
7
Page 198 of 386
Note:
Automotive fluids are not
interchangeable. Do not use coolant or
windshield washer fluid outside of its
specified function and vehicle location.
Note: Do not use stop leak pellets, cooling
system sealants, or non-specified additives
as they can cause damage to the engine
cooling or heating systems. Resulting
component damage may not be covered by
the vehicle Warranty.
It is very important to use prediluted
coolant approved to the correct
specification in order to avoid plugging the
small passageways in the engine cooling
system. See Capacities and
Specifications (page 269). Do not mix
different colors or types of coolant in your
vehicle. Mixing of engine coolants or using
an incorrect coolant may harm the engine
or cooling system components and may
not be covered by the vehicle Warranty.
Note: Coolants marketed for all makes and
models may not be approved to Ford
specifications and may cause damage to
the cooling system. Resulting component
damage may not be covered by the vehicle
Warranty.
If the coolant level is at or below the
minimum mark, add prediluted coolant
immediately.
For vehicles with overflow coolant systems
with a non-pressurized cap on the coolant
recovery system, add coolant to the
coolant recovery reservoir when the engine
is cool. Add prediluted coolant to the
maximum level. For all vehicles which have
a coolant degas system with a pressurized
cap, or if it is necessary to remove the
coolant pressure relief cap on the radiator,
follow these steps to add engine coolant:
1. Turn the engine off and let it cool.
2. Unscrew the cap slowly. Any pressure escapes as you unscrew the cap. 3. Fill the coolant reservoir slowly with
prediluted engine coolant to within the
minimum and maximum range on the
engine coolant reservoir. If you
removed the radiator cap in an
overflow system, fill the radiator until
the coolant is visible and the radiator
is almost full. If coolant is added to
bring the level within the minimum and
maximum range when the engine is not
cold, the system may remain under
filled.
4. Replace the coolant reservoir cap, turn
it clockwise until you feel a strong
resistance.
5. Check the coolant level in the coolant reservoir the next few times you drive
your vehicle. If necessary, add enough
prediluted engine coolant to bring the
coolant level to the proper level.
Note: If prediluted coolant is not available,
use the approved antifreeze concentrate
diluting it to 50/50 with distilled water. See
Capacities and Specifications (page 269).
Using water that has not been deionized
may contribute to deposit formation,
corrosion or plugging of the small cooling
system passageways.
If you have to add more than
1.1 qt (1 L) of
engine coolant per month, have your
vehicle checked as soon as possible.
Operating an engine with a low level of
coolant can result in engine overheating
and possible engine damage.
Note: During normal vehicle operation, the
coolant may change color from orange to
pink or light red. As long as the coolant is
clear and uncontaminated, this color change
does not indicate the coolant has degraded
nor does it require the coolant to be drained,
the system to be flushed, or the coolant to
be replaced.
195
F650750 (TBC) , enUSA, Edition date: 201708, First Printing Maintenance
Page 199 of 386
Note:
In case of emergency, you can add a
large amount of water without coolant in
order to reach a vehicle service location.
Water alone, without coolant, can cause
engine damage from corrosion, overheating
or freezing. When you reach a service
location, you must have the cooling system
drained, flushed and refilled using the
correct specification prediluted coolant or
antifreeze concentrate. See Capacities and
Specifications (page 269).
Do not use the following as a coolant
substitute:
• Alcohol.
• Methanol.
• Brine.
• Any coolant mixed with alcohol or
methanol antifreeze.
Alcohol and other liquids can cause engine
damage from overheating or freezing.
Do not add extra inhibitors or non-specified
additives to the coolant. These can be
harmful and compromise the corrosion
protection of the coolant.
Engine and Secondary Cooling
System Refill Procedure
The following procedure should be used
when refilling the engine or secondary
cooling systems after it has been drained
or become extremely low:
1. Before you remove the cap, turn the engine off and let it cool.
2. When the engine is cool, wrap a thick cloth around the cap. Slowly turn cap
counterclockwise until pressure begins
to release.
3. Step back while the pressure releases.
4. When you are sure that all the pressure
has been released, use the cloth to turn
it counterclockwise and remove the
cap. 5. Slowly add prediluted engine coolant
to the coolant reservoir until the
coolant level is within the minimum
and maximum range as listed on the
reservoir.
6. Reinstall the pressure relief cap.
7. Start and run the engine at 2000 rpm for 2 minutes.
8. Shut engine off, and remove the pressure relief cap as previously
outlined.
9. If required, add prediluted engine coolant to the coolant reservoir until
the coolant level is within the minimum
and maximum range as listed on the
reservoir.
10. Engine cooling system:
Repeat
Step 5 until the coolant level has
stabilized (is no longer dropping after
each step) and the upper radiator
hose at the radiator is warm to the
touch (indicating that the engine
thermostat is open and coolant is
flowing through the radiator).
11. Check the secondary cooling system.
Repeat Step 5 until the coolant level
has stabilized (is no longer dropping
after each step) and the lower
passenger side of the secondary
radiator is warm to the touch
(indicating secondary thermostat is
open and coolant is flowing through
the entire system).
12. Reinstall the pressure relief cap. Shut
the engine off and let it cool.
13. Check the coolant level in the reservoir before you drive your vehicle
the next few times.
14. If necessary, add prediluted engine coolant to the coolant reservoir until
the coolant level is within the
minimum and maximum range as
listed on the reservoir. After any
coolant has been added, check the
coolant concentration.
196
F650750 (TBC) , enUSA, Edition date: 201708, First Printing Maintenance
Page 200 of 386
Recycled Coolant
We do not recommend the use of recycled
coolant as an approved recycling process
is not yet available.
Dispose of used engine coolant in an
appropriate manner. Follow your
community
’s regulations and standards
for recycling and disposing of automotive
fluids.
Severe Climates
If you drive in extremely cold climates:
• It may be necessary to increase the
coolant concentration above 50%.
• A coolant concentration of 60%
provides improved freeze point
protection. Coolant concentrations
above 60% decrease the overheat
protection characteristics of the
coolant and may cause engine
damage.
If you drive in extremely hot climates:
• You can decrease the coolant
concentration to 40%.
• Coolant concentrations below 40%
decrease the freeze and corrosion
protection characteristics of the
coolant and may cause engine
damage.
Vehicles driven year-round in non-extreme
climates should use prediluted engine
coolant for optimum cooling system and
engine protection.
Checking Coolant Corrosion
Inhibitor Additive Strength
At specific mileage intervals as listed in the
scheduled maintenance information
chapter, the coolant corrosion inhibitor
additive should be checked. An information
message may display in the optional
information display at this time. The purpose of checking is to verify the correct
engine coolant concentration (freeze point
protection) and corrosion inhibitor additive
level (strength) of the coolant for
maximum engine performance and
protection.
Three products are available to confirm
the life and health of the coolant, one tool,
a test kit and a coolant inhibitor additive:
197
F650750 (TBC) , enUSA, Edition date: 201708, First Printing Maintenance