service interval FORD F-650/750 2018 User Guide
[x] Cancel search | Manufacturer: FORD, Model Year: 2018, Model line: F-650/750, Model: FORD F-650/750 2018Pages: 386, PDF Size: 9.01 MB
Page 222 of 386
Regular fuel filter changes are an
important part of engine maintenance;
failing to keep with the scheduled
maintenance could lead to engine
performance issues and fuel injection
system damage. See Scheduled
Maintenance (page 320).
Use only recommended service parts
conforming to specifications. See
Motorcraft Parts
(page 257).
Note: Using fuel that has high levels of
impurities may require more frequent filter
replacements than the service interval
specifies.
Diesel Fuel Conditioner Module
Filter
Removal
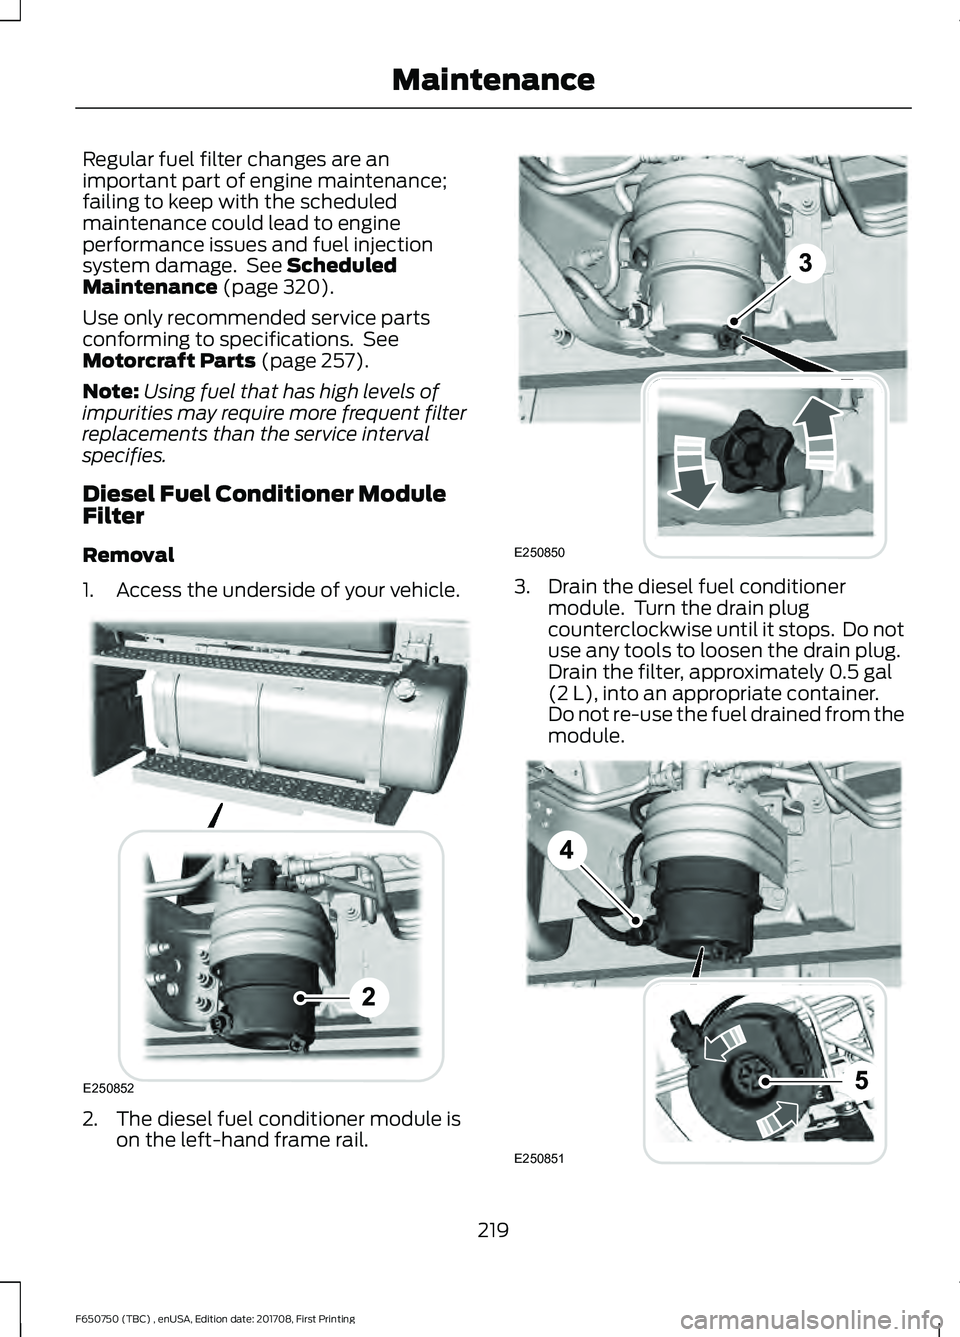
1. Access the underside of your vehicle. 2. The diesel fuel conditioner module is
on the left-hand frame rail. 3. Drain the diesel fuel conditioner
module. Turn the drain plug
counterclockwise until it stops. Do not
use any tools to loosen the drain plug.
Drain the filter, approximately
0.5 gal
(2 L), into an appropriate container.
Do not re-use the fuel drained from the
module. 219
F650750 (TBC) , enUSA, Edition date: 201708, First Printing MaintenanceE250852 E250850 E250851
Page 226 of 386
BRAKE SYSTEM INSPECTION
WARNING
Always wear a respirator approved
by the National Institute of
Occupational Studies of Health
(NIOSH) or Mine Safety and Appliance
(MSA) during all brake service procedures.
Wear the respirator from removal of the
wheels through assembly.
Never use compressed air or dry brushing
to clean brake parts or assemblies.
Clean brake parts and assemblies in open
air. During assembly, carefully place all
parts on the floor to avoid getting dust in
the air. Use an industrial vacuum cleaner
with a HEPA filter system to clean dust
from the brake drums, backing plates and
other brake parts. After using the vacuum,
remove any remaining dust with a rag
soaked in water and wrung until nearly dry.
Never use compressed air or dry sweeping
to clean the work area. Use an industrial
vacuum cleaner with a HEPA filter system
and rags soaked in water and wrung until
nearly dry. Dispose of used rags with care
to avoid getting dust in the air. Use an
approved respirator when emptying
vacuum cleaners and handling used rags.
Worker clean-up: Wash your hands before
eating, drinking or smoking. Vacuum your
work clothes after use and then launder
them separately, without shaking them, to
prevent fiber dust getting into the air. Your vehicle is equipped with
non-asbestos brake linings. However,
exposure to excessive amounts of brake
material (whether asbestos or
non-asbestos, fiberglass, mineral wool,
aramid or carbon) may be a serious health
hazard. Air Brakes WARNING
Do not manually adjust the
automatic slack adjusters to correct
excessive push rod stroke as it may
result in reduced brake effectiveness and
a vehicle crash. Excessive push rod stroke
indicates that a problem exists with the
automatic adjuster, with the installation
of the adjuster, or with foundation brake
components that manual adjustment does
not remedy. Seek service from a qualified
facility for excessive push rod stroke. Inspection and Adjustment
Establish a regular schedule for periodic
cleaning, lubrication and adjustment
inspection based on vehicle use. Exact
maintenance intervals are difficult to
predetermine due to vehicle applications
and operating conditions. If you are
uncertain of the proper schedule for your
vehicle, contact an authorized dealer.
Regular inspections should include:
•
Periodic checking (every service
interval) of push rod travel or brake
adjustment. This is essential for
effective braking. Brake chamber push
rods on original equipment chambers
now incorporate an orange paint
marker near the base of the push rod
223
F650750 (TBC) , enUSA, Edition date: 201708, First Printing Maintenance
Page 227 of 386
as a stroke indicator to aid in
adjustment checks. If the push rod is
clean and the brakes are out of
adjustment, you can see the orange
marker protruding from the chamber
when the brakes are applied.
• Checking the brake lining (every service
interval). When brake linings or blocks
wear within 0.063 in (1.6 mm) they
must be replaced.
• Periodic checking (every service
interval) of the air compressor filter.
Check the filter minder and when the
indicator is near or on the red line
marked
Service, replace the filter and
reset the service filter minder.
Do not back off or disconnect the front
brakes so that they are less effective,
letting the rear brakes do all the stopping
of your vehicle. Do not overlook the brakes
on the trailer either. Brake condition on the
trailer is just as important as the tractor.
Proper brake balance on trucks and
tractor-trailers is essential for effective
braking.
Once a year, inspect the entire brake
system:
• Rubber components for deterioration.
A qualified technician should inspect
these components and replace them
as necessary. Replacement intervals
vary according to the severity and
length of vehicle service.
• Condition of brake drums, brake
chambers and slack adjusters.
• System for air leaks.
• Hose or pipes for rust, damage and
deterioration.
• Operation of service and parking
brakes.
Periodically inspect parts such as air brake
chamber diaphragm, air compressor and
air cleaner. Replace any parts if you can
consider them unserviceable. Air Dryer
Climactic conditions affect performance
of desiccant or after-cooler type air dryers.
You must establish a maintenance
schedule for each specific operation.
The use of an air dryer on a vehicle does
not eliminate the need to drain the air
reservoirs periodically.
Inspect for moisture in the air system by
opening reservoirs, draincocks or valves
and checking for presence of water. The
presence of small amounts of water due
to condensation is normal and is not an
indication that the dryer is not functioning
properly.
Replace or rebuild the desiccant cartridge
when you determine that the desiccant is
contaminated and does not have adequate
water absorption capacity. The desiccant
change interval may vary. A general
recommendation is to replace the
desiccant every 12 months (yearly). If
experience has shown that extended or
shortened life has resulted for a particular
installation, then the yearly interval can be
increased or decreased accordingly.
Draining the Air Brake Reservoir
WARNING
Failure to drain air brake reservoirs
can result in a reduction or loss of
braking ability due to fluid
accumulation in the reservoir and/or
possible freeze-up during cold weather. Completely drain all the air brake reservoirs
daily by opening the draincock at the ends
of the tanks. (Where accessible.
Pull-chains are used when the drains are
undercab or otherwise inaccessible.) Close
the draincock after draining. Manually drain
224
F650750 (TBC) , enUSA, Edition date: 201708, First Printing Maintenance
Page 228 of 386
any air tanks equipped with automatic
moisture ejector valves, as required, to
maintain a dry air system. Contact an
authorized dealer if you are unsure of the
air reservoir locations or the draining
procedure.
Hydraulic Brakes
Establish a regular schedule for periodic
cleaning, lubrication and adjustment
inspection based on vehicle use. Exact
maintenance intervals are difficult to
predetermine due to vehicle applications
and operating conditions. If you are
uncertain of the proper schedule for your
vehicle, contact an authorized dealer.
Regular inspections should include:
•
Checking the brake lining (every service
interval). Establish inspection intervals
that provide for lining replacement
before damage to the disc occurs.
Excessive lining wear may expose the
backing plate to the disc causing
scoring of the disc faces. A qualified
technician should perform this inspection and keep to instructions
provided by the service manual.
Hydraulic brake systems are
power-assisted. There is a great
reduction in braking capabilities
without engine assist.
• Proper fluid level. The level should be
at the bottom edge of the ring on each
reservoir fill port. Do not fill the master
cylinder to the top of the reservoir. If
fluid level requires attention to
maintain a proper master cylinder level,
this is an indication of either severe
operation (pad wear) or fluid leakage.
A more frequent and thorough brake
inspection is required.
• Brake lines, hoses and fittings. Repair
or replace brake line tubes, hoses or
fittings as required. Inspect these
components every 4,000 mi
(6,000 km) for the following.
• Lines for kinks, dents, corrosion or
rupture.
• Hoses for abrasions, kinks, soft
spots or rupture, collapse, cracks,
twists or loose frame supports.
When replacing a hose, be sure
there is adequate clearance to the
hose to avoid an abrasion to the
new hose.
• All connections for leaks.
Driveline Parking Brake WARNING
Use wheel chocks and exercise
caution when inspecting under the
vehicle. A vehicle roll-away could
result in property damage, personal injury
or death. A qualified technician should adjust the
parking brake and keep to the instructions
in the service manual.
225
F650750 (TBC) , enUSA, Edition date: 201708, First Printing Maintenance
Page 230 of 386
•
Maintaining proper steering gear and
power steering pump lubricant levels.
• Checking steering column joint bolts
and steering linkage, particularly for
body-to-chassis clearance.
Steering Column Joint Bolts
As a good maintenance practice, check
steering column joint bolt tightness every
60,000 mi (96,000 km) or annually,
whichever occurs first. Do not overtighten
the bolts.
Hydraulic System
Whenever draining and refilling the power
steering's hydraulic system for any reason,
bleed air from the system before returning
the vehicle to service. Failure to bleed the
hydraulic system properly can result in
degradation of power system performance.
Consult an authorized dealer who is aware
of the proper procedures for filling and
bleeding the system.
SUSPENSION SYSTEM
INSPECTION
Note: Do not adjust air suspension height
to any setting other than the specified
setting. Altering the height setting changes
the driveline angle and may result in
unwarrantable component damage, such
as transmission component damage.
Verify drive axle air suspension height and
height control valve performance at engine
oil change intervals.
Periodically check:
• Condition of spring leaves for evidence
of fatigue, bending or breakage.
• Condition of suspension mounting
brackets and bushings.
• Torque rod mounting fasteners for
tightness. •
For proper suspension alignment.
Maintain proper alignment at all times.
• U-bolts. After the chassis has been
operating under load for
1,000 mi
(1,600 km) or six months (whichever
comes first), the U-bolt nuts must be
re-torqued. Re-torque the U-bolt nuts
every
37,000 mi (60,000 km)
thereafter. Clean and lubricate the
U-bolt and nut threads and seats to
make sure a like new condition when
re-torqueing. See
Spring U-Bolt
Check (page 228).
FRAME AND TOW HOOK
INSPECTION
Your vehicle's chassis is manufactured
with frame rails of either HSLA steel or
heat-treated steel. Handle each in a
specific manner to make sure maximum
service life. Consult the service manual or
an authorized dealer before attempting
frame repair or modification.
It is important, particularly on vehicles that
use tow hooks frequently, to inspect the
front and rear tow hooks for damage or a
loose mounting.
REAR AXLE FLUID CHECK
Your rear axle may have an optional
synthetic lubricant that allows the use of
extended service intervals. A tag on the
filler plug identifies the use of the synthetic
lubricant.
Only use a lubricant that meets
manufacturer specifications. Only use a
lubricant that meets manufacturer
specifications. Use of a non-approved rear
axle lubricant may cause internal axle
component damage. See Capacities and
Specifications
(page 269).
227
F650750 (TBC) , enUSA, Edition date: 201708, First Printing Maintenance
Page 271 of 386
•
Reduced engine performance.
• Reduced fuel economy.
• Degraded brake performance.
Note: An engine block heater is
recommended at temperatures below
– 10°F (– 23°C).
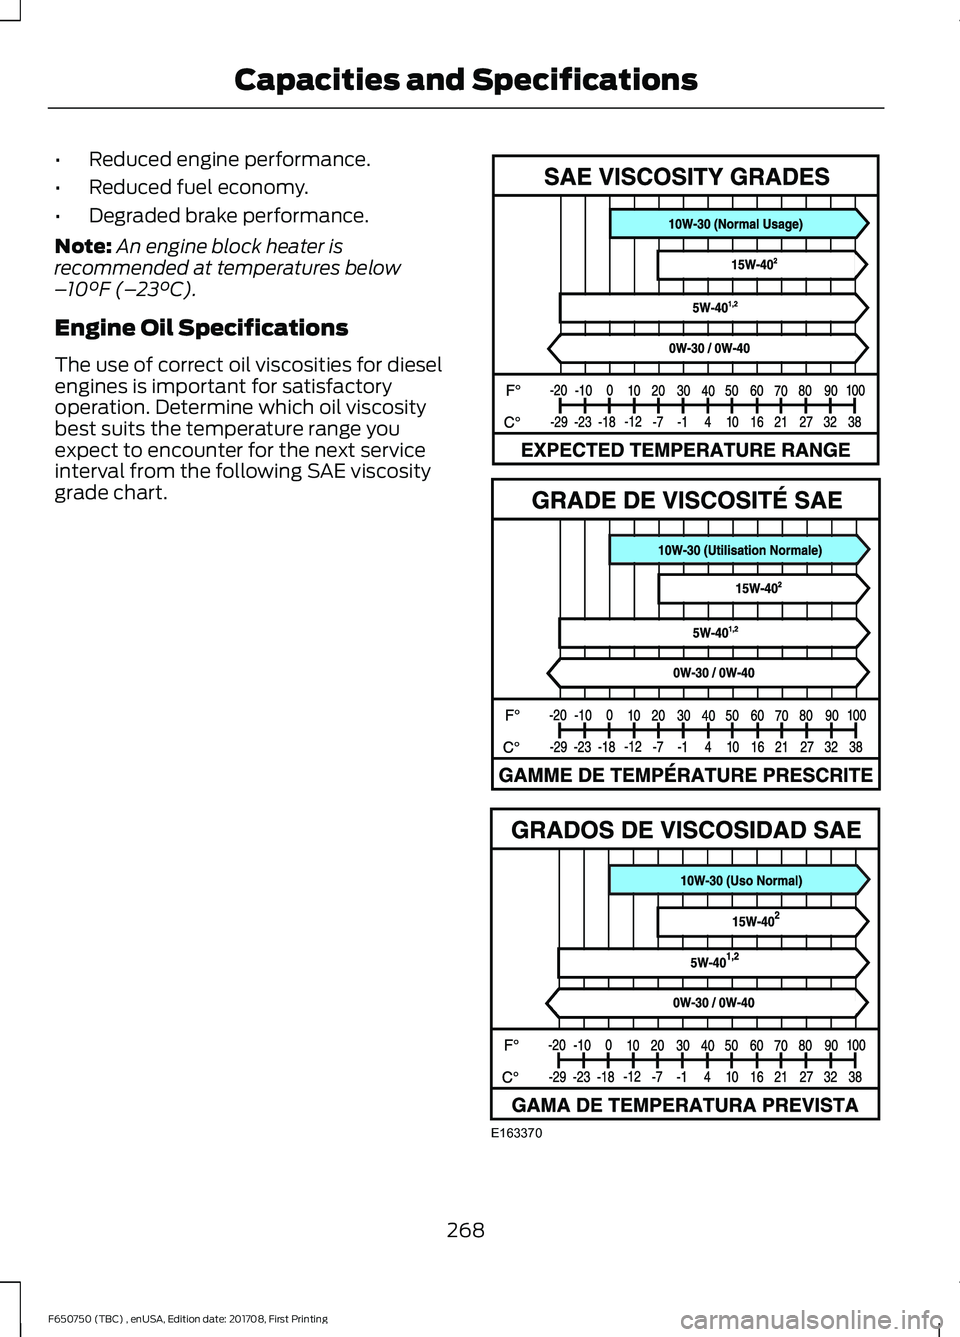
Engine Oil Specifications
The use of correct oil viscosities for diesel
engines is important for satisfactory
operation. Determine which oil viscosity
best suits the temperature range you
expect to encounter for the next service
interval from the following SAE viscosity
grade chart. 268
F650750 (TBC) , enUSA, Edition date: 201708, First Printing Capacities and SpecificationsE163370
Page 323 of 386

GENERAL MAINTENANCE
INFORMATION
Why Maintain Your Vehicle?
Carefully following the maintenance
schedule helps protect against major repair
expenses resulting from neglect or
inadequate maintenance and may help to
increase the value of your vehicle when
you sell or trade it. Keep all receipts for
completed maintenance with your vehicle.
We have established regular maintenance
intervals for your vehicle based upon
rigorous testing. It is important that you
have your vehicle serviced at the proper
times. These intervals serve two purposes;
one is to maintain the reliability of your
vehicle and the second is to keep your cost
of owning your vehicle down.
It is your responsibility to have all
scheduled maintenance performed and to
make sure that the materials used meet
the specifications identified in this owner's
manual. See Capacities and
Specifications (page 269).
Failure to perform scheduled maintenance
invalidates warranty coverage on parts
affected by the lack of maintenance.
Why Maintain Your Vehicle at Your
Dealership?
Factory-trained Technicians
Service technicians participate in extensive
factory-sponsored certification training to
help them become experts on the
operation of your vehicle. Ask your
dealership about the training and
certification their technicians have
received. Genuine Ford and Motorcraft
Replacement Parts
Dealerships stock Ford, Motorcraft and
Ford-authorized branded re-manufactured
replacement parts. These parts meet or
exceed our specifications. Parts installed
at your dealership carry a nationwide
12-month or 12,500 mi (20,000 km) parts
and labor limited warranty.
If you do not use Ford authorized parts they
may not meet our specifications and
depending on the part, it could affect
emissions compliance.
Convenience
Many dealerships have extended evening
and Saturday hours to make your service
visit more convenient and they offer one
stop shopping. They can perform any
services that are required on your vehicle,
from general maintenance to collision
repairs.
Note:
Not all dealers have extended hours
or body shops. Please contact your dealer
for details.
Protecting Your Investment
Maintenance is an investment that pays
dividends in the form of improved
reliability, durability and resale value. To
maintain the proper performance of your
vehicle and its emission control systems,
make sure you have scheduled
maintenance performed at the designated
intervals.
Diesel Engine
Your vehicle is equipped with the
Intelligent Oil-Life Monitor system, which
displays a message in the information
display at the proper oil change interval.
This interval may be up to one year or
10,000 mi (16,000 km)
.
320
F650750 (TBC) , enUSA, Edition date: 201708, First Printing Scheduled Maintenance
Page 324 of 386
A message appears in the information
display when it is time for an oil change.
Make sure you perform the oil change
within two weeks or 500 mi (800 km) of
the message appearing. Make sure you
reset the Intelligent Oil-Life Monitor after
each oil change. See Instrument Cluster
(page
56).
If your information display resets
prematurely or becomes inoperative, you
should perform the oil change interval at
six months or
5,000 mi (8,000 km) from
your last oil change. Never exceed one year
or
10,000 mi (16,000 km) between oil
change intervals.
All Vehicles
Your vehicle is very sophisticated and built
with multiple, complex, performance
systems. Every manufacturer develops
these systems using different
specifications and performance features.
That is why it is important to rely upon your
dealership to properly diagnose and repair
your vehicle.
Ford Motor Company has recommended
maintenance intervals for various parts
and component systems based upon
engineering testing. Ford Motor Company
relies upon this testing to determine the
most appropriate mileage for replacement
of oils and fluids to protect your vehicle at
the lowest overall cost to you and
recommends against maintenance
schedules that deviate from the scheduled
maintenance information.
We strongly recommend the use of only
genuine Ford, Motorcraft or
Ford-authorized re-manufactured
replacement parts engineered for your
vehicle. Additives and Chemicals
This owner's manual and the Ford
Workshop Manual list the recommended
additives and chemicals for your vehicle.
We do not recommend using chemicals or
additives not approved by us as part of
your vehicle
’s normal maintenance. Please
consult your warranty information.
Oils, Fluids and Flushing
In many cases, fluid discoloration is a
normal operating characteristic and, by
itself, does not necessarily indicate a
concern or that the fluid needs to be
changed. However, a qualified expert, such
as the factory-trained technicians at your
dealership, should inspect discolored fluids
that also show signs of overheating or
foreign material contamination
immediately.
Make sure to change your vehicle ’s oils and
fluids at the specified intervals or in
conjunction with a repair. Flushing is a
viable way to change fluid for many vehicle
sub-systems during scheduled
maintenance. It is critical that systems are
flushed only with new fluid that is the same
as that required to fill and operate the
system or using a Ford-approved flushing
chemical.
Scheduled Maintenance Services
Maintenance service adjustments must
conform to specifications contained in this
manual, and those shown on the Important
Engine Information decal. Perform the
following services at scheduled intervals
because they essential to the life and
performance of your vehicle. Ford
recommends that you perform
maintenance on all designated items to
achieve best vehicle operation.
321
F650750 (TBC) , enUSA, Edition date: 201708, First Printing Scheduled Maintenance
Page 325 of 386
There are three types of maintenance
intervals for general vehicle environments:
On-Highway, City and Severe Service. In
all applications, monitoring miles
(kilometers) and time and when the engine
is due for an oil change determine the
actual interval. When the engine oil change
is required before the truck lubrication
interval, perform the lubrication at the
same time in order to reduce your vehicle
’s
time out of service.
Air Brake Adjustment WARNING
Failure to maintain proper air brake
adjustment can result in reduction
or loss of braking ability.
A qualified service technician, keeping to
the instructions in the service manual,
should perform air brake inspection and
adjustment or repairs.
Cam Brakes - Automatic Slack
Adjusters
WARNING
Do not manually adjust the
automatic slack adjusters to correct
excessive push rod stroke as it may
result in reduced brake effectiveness and
a vehicle crash. Excessive push rod stroke
indicates that a problem exists with the
automatic adjuster, with the installation
of the adjuster, or with foundation brake
components that manual adjustment does
not remedy. Seek service from a qualified
facility for excessive push rod stroke. Inspect standard air brakes equipped with
automatic slack adjusters for proper brake
adjustment as listed in the maintenance
schedule charts.
However, inspect the brakes more
frequently when subjecting them to heavy
use or adverse operating conditions such
as:
•
Frequent brake applications while fully
loaded.
• Operation on hilly or mountainous
terrain.
• Frequent operation on dirt, gravel or
mud.
Some aftermarket brake linings also
require more frequent inspections.
Owner Checks and Services
Make sure you perform the following basic
maintenance checks and inspections every
month or at six-month intervals.
322
F650750 (TBC) , enUSA, Edition date: 201708, First Printing Scheduled Maintenance
Page 328 of 386
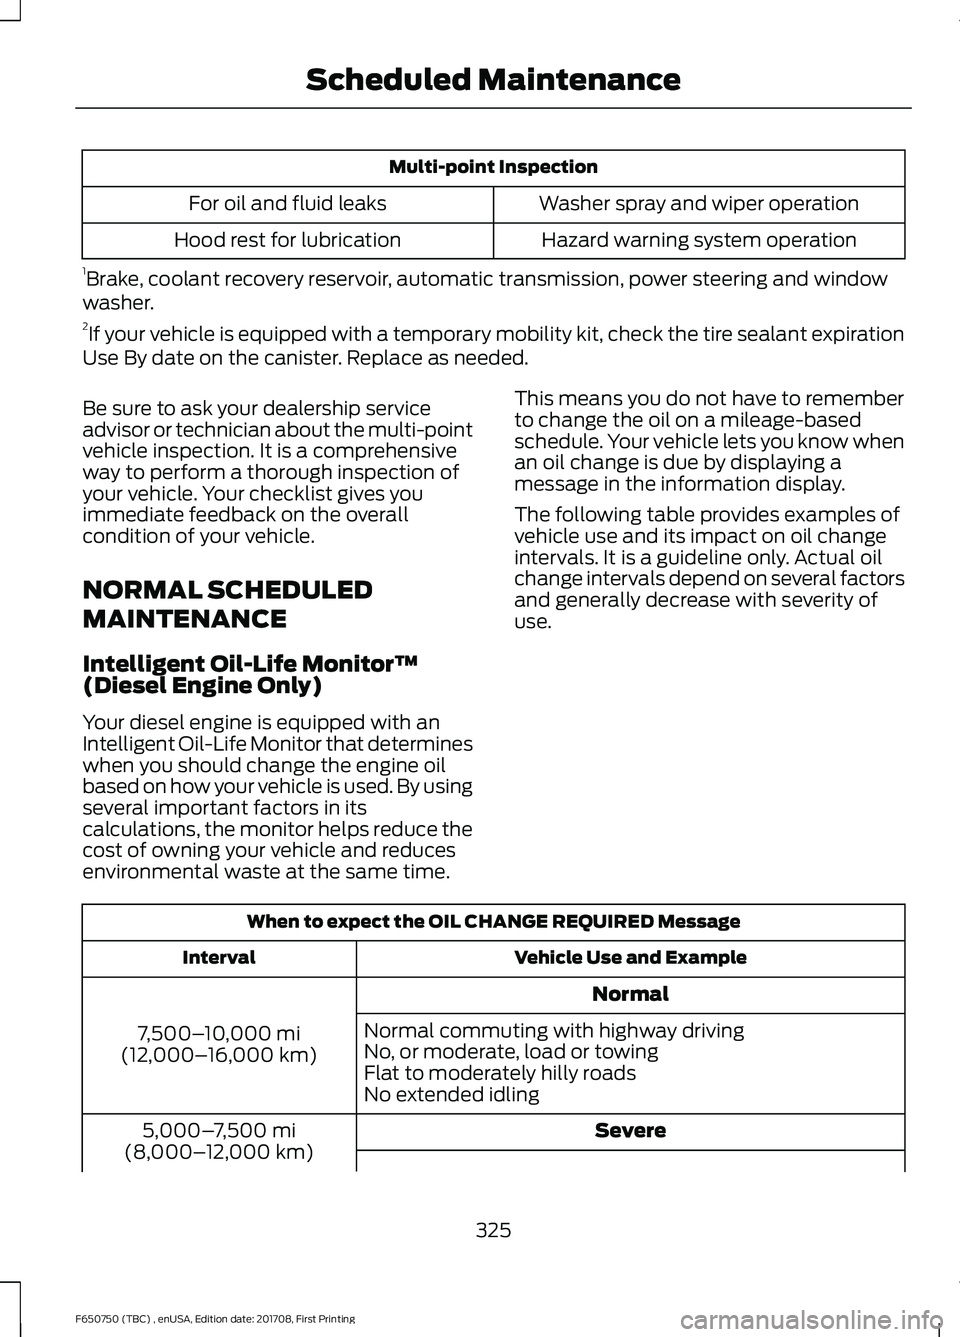
Multi-point Inspection
Washer spray and wiper operation
For oil and fluid leaks
Hazard warning system operation
Hood rest for lubrication
1 Brake, coolant recovery reservoir, automatic transmission, power steering and window
washer.
2 If your vehicle is equipped with a temporary mobility kit, check the tire sealant expiration
Use By date on the canister. Replace as needed.
Be sure to ask your dealership service
advisor or technician about the multi-point
vehicle inspection. It is a comprehensive
way to perform a thorough inspection of
your vehicle. Your checklist gives you
immediate feedback on the overall
condition of your vehicle.
NORMAL SCHEDULED
MAINTENANCE
Intelligent Oil-Life Monitor™
(Diesel Engine Only)
Your diesel engine is equipped with an
Intelligent Oil-Life Monitor that determines
when you should change the engine oil
based on how your vehicle is used. By using
several important factors in its
calculations, the monitor helps reduce the
cost of owning your vehicle and reduces
environmental waste at the same time. This means you do not have to remember
to change the oil on a mileage-based
schedule. Your vehicle lets you know when
an oil change is due by displaying a
message in the information display.
The following table provides examples of
vehicle use and its impact on oil change
intervals. It is a guideline only. Actual oil
change intervals depend on several factors
and generally decrease with severity of
use.
When to expect the OIL CHANGE REQUIRED Message
Vehicle Use and Example
Interval
Normal
7,500– 10,000 mi
(12,000– 16,000 km) Normal commuting with highway driving
No, or moderate, load or towing
Flat to moderately hilly roads
No extended idling
Severe
5,000– 7,500 mi
(8,000– 12,000 km)
325
F650750 (TBC) , enUSA, Edition date: 201708, First Printing Scheduled Maintenance