oil reset FORD F-650/750 2018 Owners Manual
[x] Cancel search | Manufacturer: FORD, Model Year: 2018, Model line: F-650/750, Model: FORD F-650/750 2018Pages: 386, PDF Size: 9.01 MB
Page 6 of 386
Using Traction Control - Vehicles With:
Air Brakes.....................................................132
Using Traction Control - Vehicles With: Hydraulic Brakes
.......................................132
Stability Control
Principle of Operation.................................134
Using Stability Control................................135
Cruise Control
Principle of Operation.................................137
Using Cruise Control....................................137
Driving Aids
Steering............................................................139
Load Carrying
Load Limit
.......................................................140
Air Suspension
................................................141
Towing
Towing a Trailer.............................................143
Recommended Towing Weights............144
Essential Towing Checks...........................145
Fifth Wheel Operation
................................146
Driving Hints
Breaking-In.....................................................148
General Driving Points
................................148
Economical Driving......................................149
Cold Weather Precautions........................150
Driving Through Water
................................152
Roadside Emergencies
Roadside Assistance
...................................153
Hazard Flashers
............................................154
Fuel Shutoff
....................................................154
Jump Starting the Vehicle.........................155
Transporting the Vehicle
............................157 Customer Assistance
Getting the Services You Need
...............159
In California (U.S. Only).............................160
The Better Business Bureau (BBB) Auto Line Program (U.S. Only).......................161
Utilizing the Mediation/Arbitration Program (Canada Only)
.........................161
Getting Assistance Outside the U.S. and Canada
.........................................................162
Ordering Additional Owner's Literature.....................................................163
Reporting Safety Defects (U.S. Only).............................................................163
Reporting Safety Defects (Canada Only).............................................................164
Fuses
Fuse Specification Chart...........................165
Changing a Fuse............................................174
Vehicle Inspection Guide
Vehicle Inspection Information...............176
Maintenance
General Information
....................................185
Opening and Closing the Hood..............186
Under Hood Overview - 6.7L Diesel......188
Under Hood Overview - 6.8L...................189
Engine Oil Dipstick - 6.7L Diesel.............190
Engine Oil Dipstick - 6.8L..........................190
Engine Oil Check - 6.7L Diesel.................190
Engine Oil Check - 6.8L
...............................191
Changing the Engine Oil and Oil Filter...............................................................192
Changing the Coalescer Filter Element........................................................193
Oil Change Indicator Reset.......................194
Engine Coolant Check - 6.7L Diesel......194
Engine Coolant Check - 6.8L...................198
Automatic Transmission Fluid Check...........................................................203
3
F650750 (TBC) , enUSA, Edition date: 201708, First Printing Table of Contents
Page 13 of 386
•
The gearshift lever must be in P (Park)
or N (Neutral) in order for the starter
to operate.
• Try operating the starter switch several
times. This operation may clean
potentially corroded contacts or make
the switch temporarily operable until
you can reach the dealer.
• If all electrical connections are tight
and you need assistance to start, See
Jump Starting the Vehicle (page 155).
If engine cranks but won ’t start
Prolonged starter cranking (in excess of 10
seconds) could cause damage to the
starter motor or the high-pressure fuel
pump.
• Check the fuel gauge. You may be out
of fuel. If the gauge shows that there
is fuel in the tank, the trouble may be
in the electrical system or the fuel
system. If equipped with an auxiliary
tank, be sure that the tank control
switch is set for the tank with fuel and
not on an empty tank.
• Leaving your ignition key turned to on
for over two minutes without starting
may make starting difficult because
the glow plugs will cease activation.
Reset the system by turning the ignition
key to off and then back to on again.
Note: If the system is out of fuel and the
engine will not start, do not continue
cranking the engine. Continued cranking can
damage the high-pressure fuel pump.
If the engine runs hot
The following could cause the engine to
overheat:
• Lack of coolant
• Dirty cooling system.
• Plugged radiator fins, A/C condenser
and/or oil cooler
• Malfunctioning fan drive •
Driving with frozen coolant
• Sticking thermostat
• Overloading or pulling heavy trailers
during hot weather
• Grill or radiator air blockage
• Slipping or missing drive belt
• Plugged or very dirty air filter
If fuses burn out WARNING
Replacement fuses and circuit
breakers must always be the same
rating as the original equipment
shown. Never replace a fuse or circuit
breaker with one of a higher rating. Higher
rated fuses or circuit breakers could allow
circuit overloading in the event of a circuit
malfunction, resulting in severe vehicle
damage or personal injury due to fire. Burned-out or blown fuses usually indicate
an electrical short-circuit, although a fuse
may occasionally burn out from vibration.
Insert a second fuse. If this fuse
immediately burns out and you cannot
locate the cause, return your vehicle to
your dealer for a circuit check. See
Changing a Fuse
(page 174).
Selective catalytic reduction system
speed limit and Idle-only modes
If the vehicle ’s speed is limited or in an
idle-only mode, the selective catalytic
reduction system may be limiting the
vehicle ’s functions due to low or
contaminated DEF. Check the DEF. See
Selective Catalytic Reductant System
(page
105).
SYMBOLS GLOSSARY
These are some of the symbols you may
see on your vehicle.
10
F650750 (TBC) , enUSA, Edition date: 201708, First Printing Introduction
Page 14 of 386
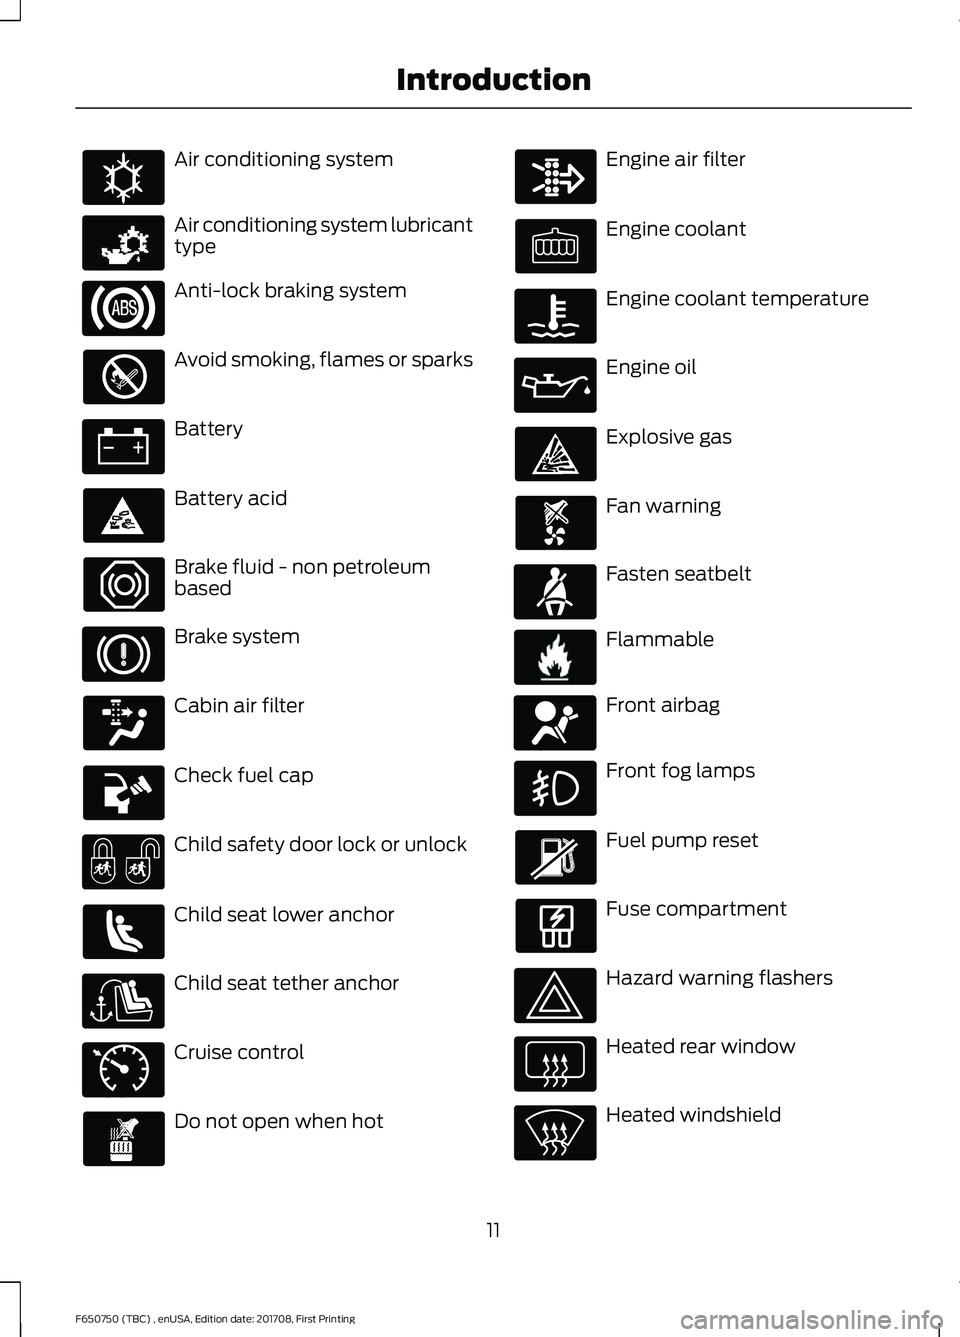
Air conditioning system
Air conditioning system lubricant
type
Anti-lock braking system
Avoid smoking, flames or sparks
Battery
Battery acid
Brake fluid - non petroleum
based
Brake system
Cabin air filter
Check fuel cap
Child safety door lock or unlock
Child seat lower anchor
Child seat tether anchor
Cruise control
Do not open when hot Engine air filter
Engine coolant
Engine coolant temperature
Engine oil
Explosive gas
Fan warning
Fasten seatbelt
Flammable
Front airbag
Front fog lamps
Fuel pump reset
Fuse compartment
Hazard warning flashers
Heated rear window
Heated windshield
11
F650750 (TBC) , enUSA, Edition date: 201708, First Printing IntroductionE162384 E231157 E71340 E71880 E231160 E67017
Page 68 of 386

TRIP A/B
Registers the distance of individual
journeys. Press and release the INFO
button until TRIP A/B appears in the
display (this represents the trip mode).
Press and hold the RESET button to reset.
XXX MILES (km) TO E
This displays an estimate of approximately
how far you can drive with the fuel
remaining in your tank under normal driving
conditions. Remember to turn the ignition
off when refueling to allow this feature to
detect the correct amount of added fuel.
The system calculates the distance to
empty by using a running average fuel
economy, which uses your recent driving
history of 500 miles (800 km).
This value is not the same as the average
fuel economy display. The running average
fuel economy resets to a factory default
value if the battery is disconnected.
XX.X AVG MPG (L/100km)
Average fuel economy displays your
average fuel economy in miles per gallon
or liters/100 km.
MPG (L/km)
Displays the instantaneous fuel economy
as a bar graph. Your vehicle must be
moving to calculate instantaneous fuel
economy. You cannot reset the
instantaneous fuel economy.
TIMER
Displays the trip elapsed drive time. Press
and release RESET to pause the timer.
Press and hold RESET to reset the timer.
EXHAUST FILTER
Displays information about the status of
the exhaust filter.
System Check and Vehicle Feature
Customization
Press the SETUP button repeatedly to
cycle the information display through the
following features:
Note:
Some options may appear slightly
different or not at all if the items are
optional.
Note: When returning to the SETUP menu
and you selected a non-English language,
HOLD RESET FOR ENGLISH displays to
change back to English. Press and hold the
RESET button to change back to English. SETUP
OIL LIFE
Press the RESET button
RESET FOR SYSTEM
CHECK
ENGINE HOURS
DEF LEVEL*
All DOORS CLOSED
CHECK BRAKE SYSTEM
HOLD RESET = NEW
OIL LIFE
English or Metric
UNITS
65
F650750 (TBC) , enUSA, Edition date: 201708, First Printing Information Displays
Page 69 of 386
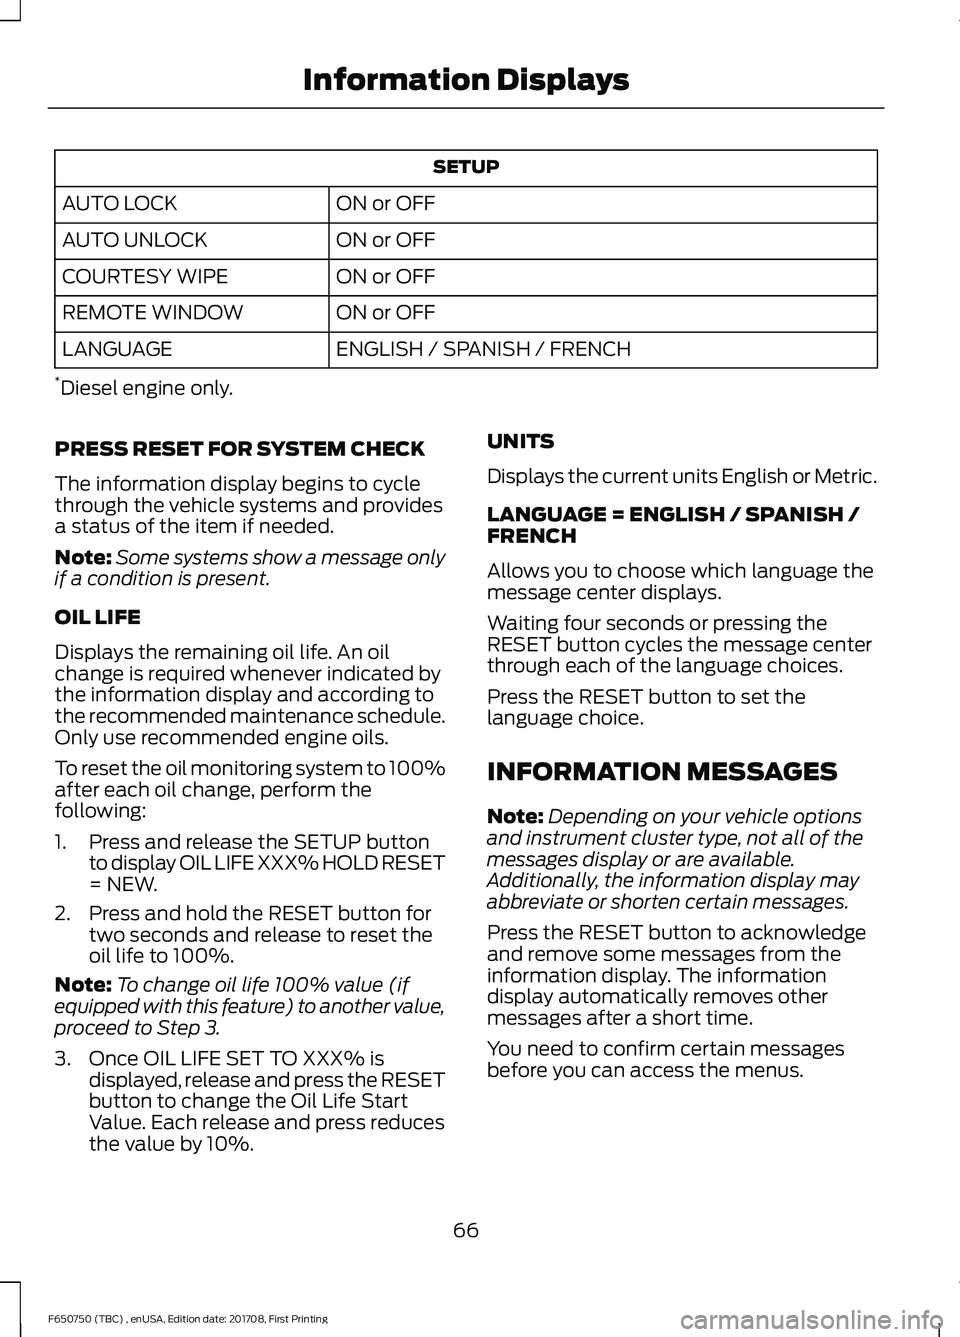
SETUP
ON or OFF
AUTO LOCK
ON or OFF
AUTO UNLOCK
ON or OFF
COURTESY WIPE
ON or OFF
REMOTE WINDOW
ENGLISH / SPANISH / FRENCH
LANGUAGE
* Diesel engine only.
PRESS RESET FOR SYSTEM CHECK
The information display begins to cycle
through the vehicle systems and provides
a status of the item if needed.
Note: Some systems show a message only
if a condition is present.
OIL LIFE
Displays the remaining oil life. An oil
change is required whenever indicated by
the information display and according to
the recommended maintenance schedule.
Only use recommended engine oils.
To reset the oil monitoring system to 100%
after each oil change, perform the
following:
1. Press and release the SETUP button to display OIL LIFE XXX% HOLD RESET
= NEW.
2. Press and hold the RESET button for two seconds and release to reset the
oil life to 100%.
Note: To change oil life 100% value (if
equipped with this feature) to another value,
proceed to Step 3.
3. Once OIL LIFE SET TO XXX% is displayed, release and press the RESET
button to change the Oil Life Start
Value. Each release and press reduces
the value by 10%. UNITS
Displays the current units English or Metric.
LANGUAGE = ENGLISH / SPANISH /
FRENCH
Allows you to choose which language the
message center displays.
Waiting four seconds or pressing the
RESET button cycles the message center
through each of the language choices.
Press the RESET button to set the
language choice.
INFORMATION MESSAGES
Note:
Depending on your vehicle options
and instrument cluster type, not all of the
messages display or are available.
Additionally, the information display may
abbreviate or shorten certain messages.
Press the RESET button to acknowledge
and remove some messages from the
information display. The information
display automatically removes other
messages after a short time.
You need to confirm certain messages
before you can access the menus.
66
F650750 (TBC) , enUSA, Edition date: 201708, First Printing Information Displays
Page 92 of 386
Cold Weather Starting
WARNINGS
Do not use starting fluid, for example
ether, in the air intake system (see
air filter decal). Such fluid could
cause immediate explosive damage to the
engine and possible personal injury. Do not add gasoline, gasohol, alcohol
or Kerosene to diesel fuel. This
practice creates a serious fire hazard
and causes engine performance problems. We recommend using the engine block
heater for starting when the ambient
temperature is at or below-9°F (-23°C)
See Engine Block Heater (page 90).
When operating in cold weather, you can
use Motorcraft® cetane improvers or
non-alcohol-based cetane improvers from
a reputable manufacturer as needed.
Do not crank the engine for more than 10
seconds as starter damage may occur. If
the engine fails to start, turn the key to the
off position and wait 30 seconds before
trying again.
Your vehicle may be equipped with a cold
weather starting strategy that prevents
severe engine damage by assisting in
engine lubrication warm-up. In extremely
cold ambient temperatures, this strategy
activates and prevents the accelerator
pedal use for 30 seconds after starting
your vehicle. A message appears in the
information display as your vehicle warms
up. By not allowing the accelerator pedal
use, the engine oil can properly lubricate
the bearings preventing engine damage
due to lack of proper lubrication. After the
30-second warm-up period, the
accelerator pedal is operational again and
a message appears informing you that your
vehicle is ok to drive. When starting the engine in extremely cold
temperatures, for example
-15°F (-26°C),
we recommend you allow the engine to
idle for several minutes before driving your
vehicle. Illuminates when you switch the
ignition on as part of the
pre-starting system.
1. Turn the key to the on position without
turning the key to the start position. Do
not start the engine until the wait to
start indicator turns off.
2. When the wait to start indicator turns off, turn the key to the start position
and release the key as soon as the
engine starts. After starting the engine,
the glow plugs may remain on for a
period. If you do not start the engine
before the glow plug activation time
ends, you need to reset the glow plugs
by turning the key to the off position.
3. After the engine starts, allow it to idle for about 15 seconds. This is to protect
the engine. Do not increase engine
speed until the oil pressure gauge
indicates normal pressure.
SWITCHING OFF THE ENGINE
Allow the engine to idle for three to five
minutes before shutting it down. The larger
the engine, the greater the need is for this
idling period.
Note: Try to limit engine idle to 10 minutes.
Excessive idling reduces fuel economy.
89
F650750 (TBC) , enUSA, Edition date: 201708, First Printing Starting and Stopping the Engine
Page 195 of 386
Do not use supplemental engine oil
additives because they are unnecessary
and could lead to engine damage that may
not be covered by the vehicle Warranty.
Only use oils certified for gasoline engines
by the American Petroleum Institute (API).
An oil with this trademark symbol
conforms to the current engine and
emission system protection standards and
fuel economy requirements of the
International Lubricants Specification
Advisory Committee (ILSAC).
To top up the engine oil level do the
following:
1. Clean the area surrounding the engine
oil filler cap before you remove it.
2. Remove the engine oil filler cap. See Under Hood Overview (page 188).
Turn it counterclockwise and remove
it.
3. Add engine oil that meets Ford specifications. See
Capacities and
Specifications (page 261). You may
have to use a funnel to pour the engine
oil into the opening.
4. Recheck the oil level.
5. If the oil level is correct, replace the dipstick and make sure it is fully seated.
6. Replace the engine oil filler cap. Turn it clockwise until you feel a strong
resistance. Note:
Do not add oil further than the
maximum mark. Oil levels above the
maximum mark may cause engine damage.
Note: Make sure you install the oil filler cap
correctly.
Note: Soak up any spillage with an
absorbent cloth immediately.
CHANGING THE ENGINE OIL
AND OIL FILTER WARNINGS
Do not handle a hot oil filter with
bare hands.
Continuous contact with used motor
oil has caused cancer in laboratory
mice. Protect your skin by washing
with soap and water. If your vehicle is equipped with a diesel
engine, an Intelligent Oil Life Monitor™
calculates the proper oil change service
interval. When the information display
indicates: OIL CHANGE REQUIRED, change
the engine oil and oil filter. See
Information Displays
(page 64).
The engine oil filter protects your engine
by filtering harmful, abrasive or sludge
particles and particles significantly smaller
than most available will-fit filters. See
Motorcraft Parts
(page 258).
1. Unscrew the oil filter and oil pan drain plug and wait for the oil to drain.
2. Replace the filter.
3. Reinstall the oil pan drain plug.
4. Refill the engine with new oil. See Capacities and Specifications (page
269
).
5. For diesel engines, you need to reset the Intelligent Oil Life Monitor™. See
Information Displays
(page 64).
192
F650750 (TBC) , enUSA, Edition date: 201708, First Printing MaintenanceE142732
Page 197 of 386
4.
Make sure that the sealing surfaces on
the filter housing and cover are clean
and free of debris.
5. Install the new filter element.
6. Install the filter cover.
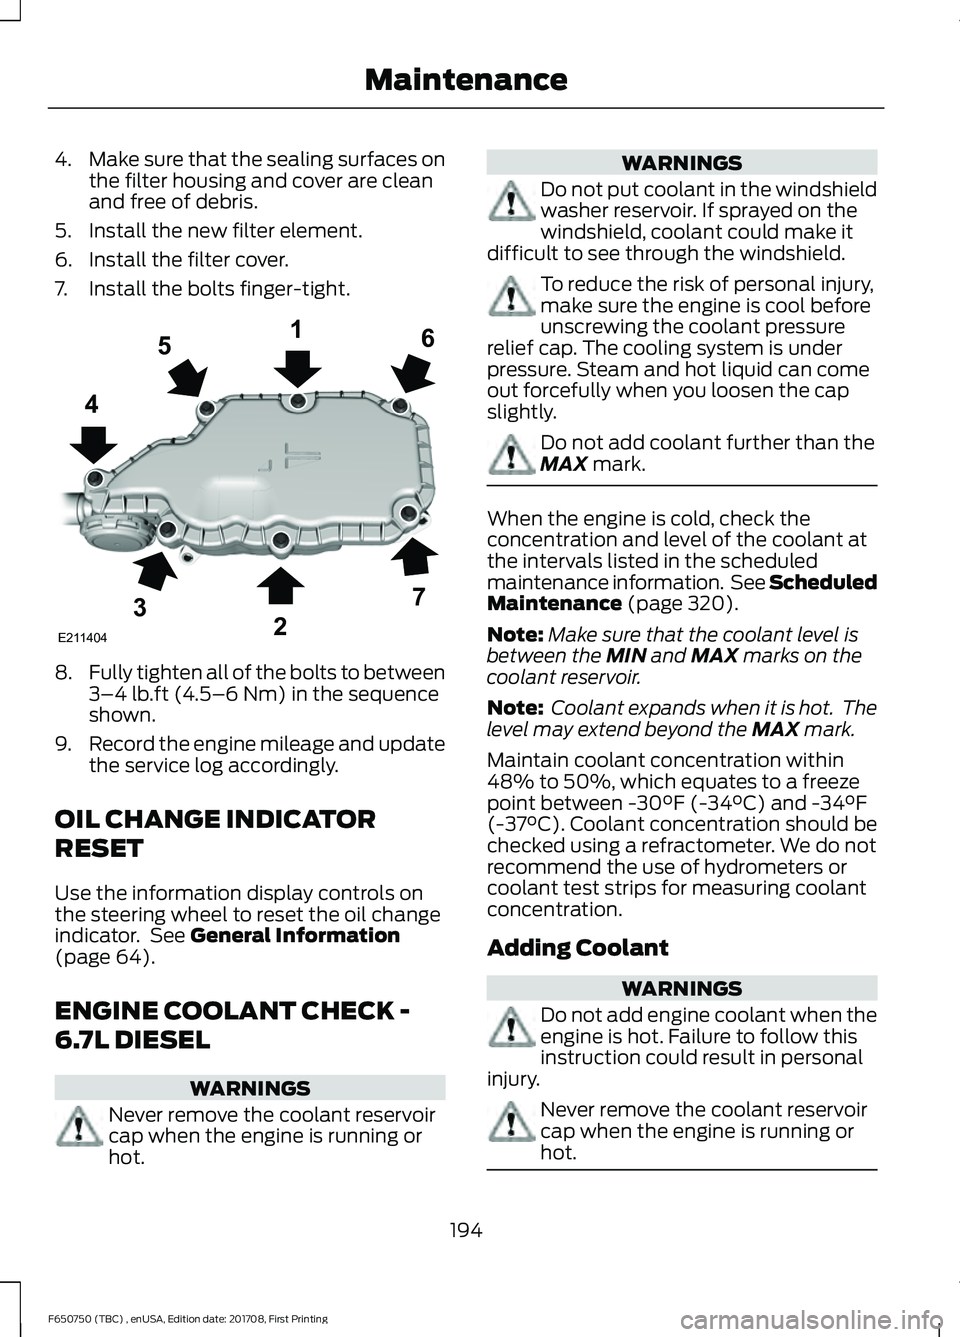
7. Install the bolts finger-tight. 8.
Fully tighten all of the bolts to between
3–4 lb.ft (4.5–6 Nm) in the sequence
shown.
9. Record the engine mileage and update
the service log accordingly.
OIL CHANGE INDICATOR
RESET
Use the information display controls on
the steering wheel to reset the oil change
indicator. See
General Information
(page 64).
ENGINE COOLANT CHECK -
6.7L DIESEL WARNINGS
Never remove the coolant reservoir
cap when the engine is running or
hot. WARNINGS
Do not put coolant in the windshield
washer reservoir. If sprayed on the
windshield, coolant could make it
difficult to see through the windshield. To reduce the risk of personal injury,
make sure the engine is cool before
unscrewing the coolant pressure
relief cap. The cooling system is under
pressure. Steam and hot liquid can come
out forcefully when you loosen the cap
slightly. Do not add coolant further than the
MAX
mark.
When the engine is cold, check the
concentration and level of the coolant at
the intervals listed in the scheduled
maintenance information. See Scheduled
Maintenance
(page 320).
Note: Make sure that the coolant level is
between the
MIN and MAX marks on the
coolant reservoir.
Note: Coolant expands when it is hot. The
level may extend beyond the
MAX mark.
Maintain coolant concentration within
48% to 50%, which equates to a freeze
point between -30°F (-34°C) and -34°F
(-37°C). Coolant concentration should be
checked using a refractometer. We do not
recommend the use of hydrometers or
coolant test strips for measuring coolant
concentration.
Adding Coolant WARNINGS
Do not add engine coolant when the
engine is hot. Failure to follow this
instruction could result in personal
injury. Never remove the coolant reservoir
cap when the engine is running or
hot.
194
F650750 (TBC) , enUSA, Edition date: 201708, First Printing MaintenanceE211404
165
4
32
7
Page 237 of 386
VEHICLE STORAGE
If you plan on storing your vehicle for 30
days or more, read the following
maintenance recommendations to make
sure your vehicle stays in good operating
condition.
We engineer and test all motor vehicles
and their components for reliable, regular
driving. Under various conditions,
long-term storage may lead to degraded
engine performance or failure unless you
use specific precautions to preserve engine
components.
General
•
Store all vehicles in a dry, ventilated
place.
• Protect from sunlight, if possible.
• If vehicles are stored outside, they
require regular maintenance to protect
against rust and damage.
Body
• Wash your vehicle thoroughly to
remove dirt, grease, oil, tar or mud from
exterior surfaces, rear-wheel housing
and the underside of front fenders.
• Periodically wash your vehicle if it is
stored in exposed locations.
• Touch-up exposed or primed metal to
prevent rust.
• Cover chrome and stainless steel parts
with a thick coat of auto wax to prevent
discoloration. Re-wax as necessary
when you wash your vehicle.
• Lubricate all hood, door and luggage
compartment hinges and latches with
a light grade oil.
• Cover interior trim to prevent fading.
• Keep all rubber parts free from oil and
solvents. Engine
•
Change the engine oil and filter prior to
storage because used engine oil
contains contaminates which may
cause engine damage.
• Start the engine every 15 days for a
minimum of 15 minutes. Run at fast idle
with the climate controls set to defrost
until the engine reaches normal
operating temperature.
• With your foot on the brake, shift
through all the gears while the engine
is running.
• We recommend that you change the
engine oil before you use your vehicle
again.
Fuel system
• Fill the fuel tank with high-quality fuel
until the first automatic shutoff of the
fuel pump nozzle.
Cooling system
• Protect against freezing temperatures.
• When removing your vehicle from
storage, check coolant fluid level.
Confirm that there are no cooling
system leaks and that fluid is at the
recommended level.
Battery
• Check and recharge as necessary. Keep
connections clean.
• If storing your vehicle for more than 30
days without recharging the battery,
we recommend that you disconnect
the battery cables to maintain battery
charge for quick starting.
Note: It is necessary to reset memory
features if battery cables are disconnected.
234
F650750 (TBC) , enUSA, Edition date: 201708, First Printing Vehicle Care
Page 324 of 386
A message appears in the information
display when it is time for an oil change.
Make sure you perform the oil change
within two weeks or 500 mi (800 km) of
the message appearing. Make sure you
reset the Intelligent Oil-Life Monitor after
each oil change. See Instrument Cluster
(page
56).
If your information display resets
prematurely or becomes inoperative, you
should perform the oil change interval at
six months or
5,000 mi (8,000 km) from
your last oil change. Never exceed one year
or
10,000 mi (16,000 km) between oil
change intervals.
All Vehicles
Your vehicle is very sophisticated and built
with multiple, complex, performance
systems. Every manufacturer develops
these systems using different
specifications and performance features.
That is why it is important to rely upon your
dealership to properly diagnose and repair
your vehicle.
Ford Motor Company has recommended
maintenance intervals for various parts
and component systems based upon
engineering testing. Ford Motor Company
relies upon this testing to determine the
most appropriate mileage for replacement
of oils and fluids to protect your vehicle at
the lowest overall cost to you and
recommends against maintenance
schedules that deviate from the scheduled
maintenance information.
We strongly recommend the use of only
genuine Ford, Motorcraft or
Ford-authorized re-manufactured
replacement parts engineered for your
vehicle. Additives and Chemicals
This owner's manual and the Ford
Workshop Manual list the recommended
additives and chemicals for your vehicle.
We do not recommend using chemicals or
additives not approved by us as part of
your vehicle
’s normal maintenance. Please
consult your warranty information.
Oils, Fluids and Flushing
In many cases, fluid discoloration is a
normal operating characteristic and, by
itself, does not necessarily indicate a
concern or that the fluid needs to be
changed. However, a qualified expert, such
as the factory-trained technicians at your
dealership, should inspect discolored fluids
that also show signs of overheating or
foreign material contamination
immediately.
Make sure to change your vehicle ’s oils and
fluids at the specified intervals or in
conjunction with a repair. Flushing is a
viable way to change fluid for many vehicle
sub-systems during scheduled
maintenance. It is critical that systems are
flushed only with new fluid that is the same
as that required to fill and operate the
system or using a Ford-approved flushing
chemical.
Scheduled Maintenance Services
Maintenance service adjustments must
conform to specifications contained in this
manual, and those shown on the Important
Engine Information decal. Perform the
following services at scheduled intervals
because they essential to the life and
performance of your vehicle. Ford
recommends that you perform
maintenance on all designated items to
achieve best vehicle operation.
321
F650750 (TBC) , enUSA, Edition date: 201708, First Printing Scheduled Maintenance