belt FORD F SERIES MOTORHOME AND COMMERCIAL CHASSIS 2001 10.G Owners Manual
[x] Cancel search | Manufacturer: FORD, Model Year: 2001, Model line: F SERIES MOTORHOME AND COMMERCIAL CHASSIS, Model: FORD F SERIES MOTORHOME AND COMMERCIAL CHASSIS 2001 10.GPages: 104, PDF Size: 1.32 MB
Page 4 of 104
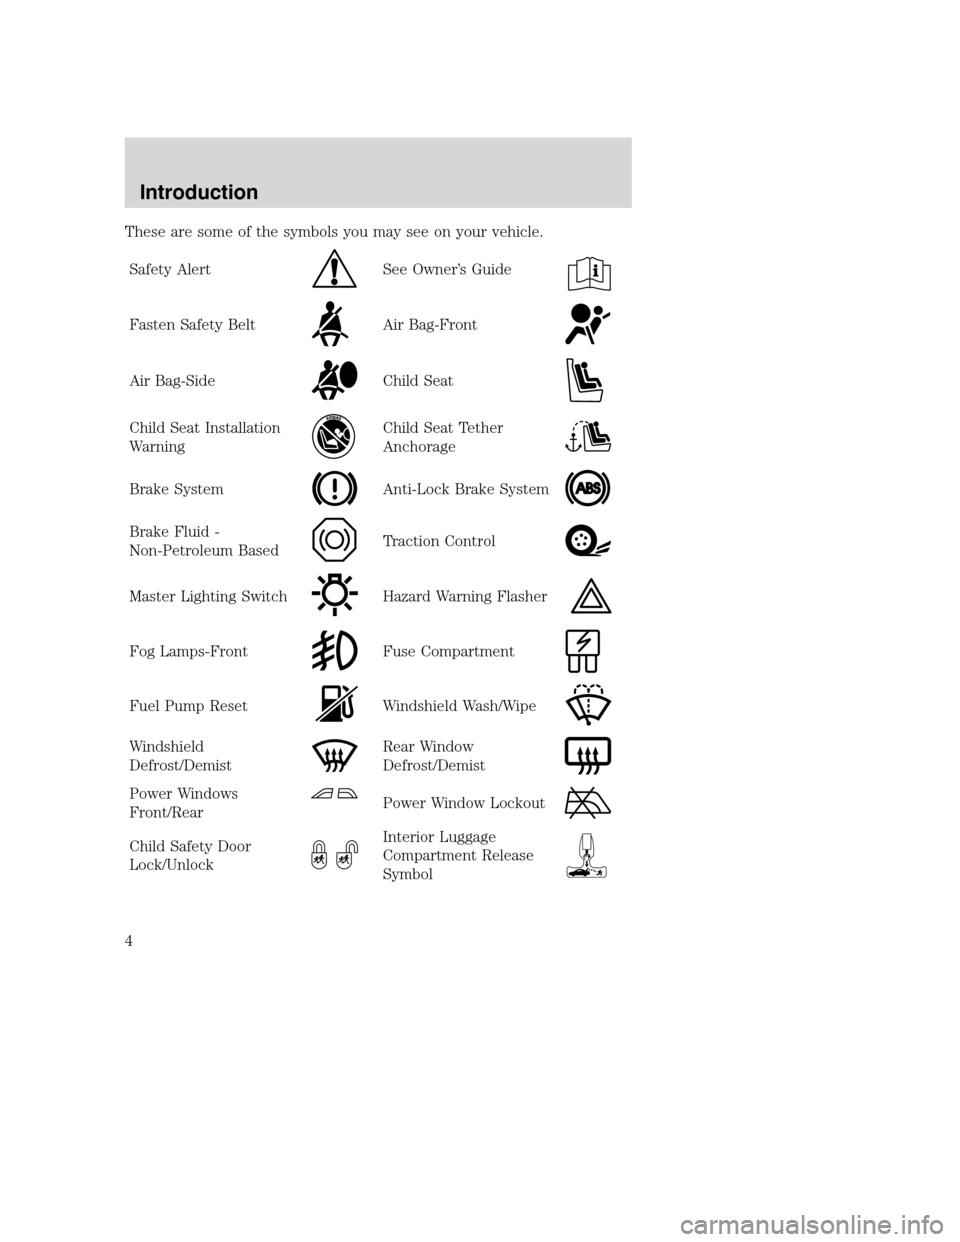
These are some of the symbols you may see on your vehicle.
Safety Alert
See Owner’s Guide
Fasten Safety BeltAir Bag-Front
Air Bag-SideChild Seat
Child Seat Installation
WarningChild Seat Tether
Anchorage
Brake SystemAnti-Lock Brake System
Brake Fluid -
Non-Petroleum BasedTraction Control
Master Lighting SwitchHazard Warning Flasher
Fog Lamps-FrontFuse Compartment
Fuel Pump ResetWindshield Wash/Wipe
Windshield
Defrost/DemistRear Window
Defrost/Demist
Power Windows
Front/RearPower Window Lockout
Child Safety Door
Lock/UnlockInterior Luggage
Compartment Release
Symbol
Introduction
4
Page 7 of 104
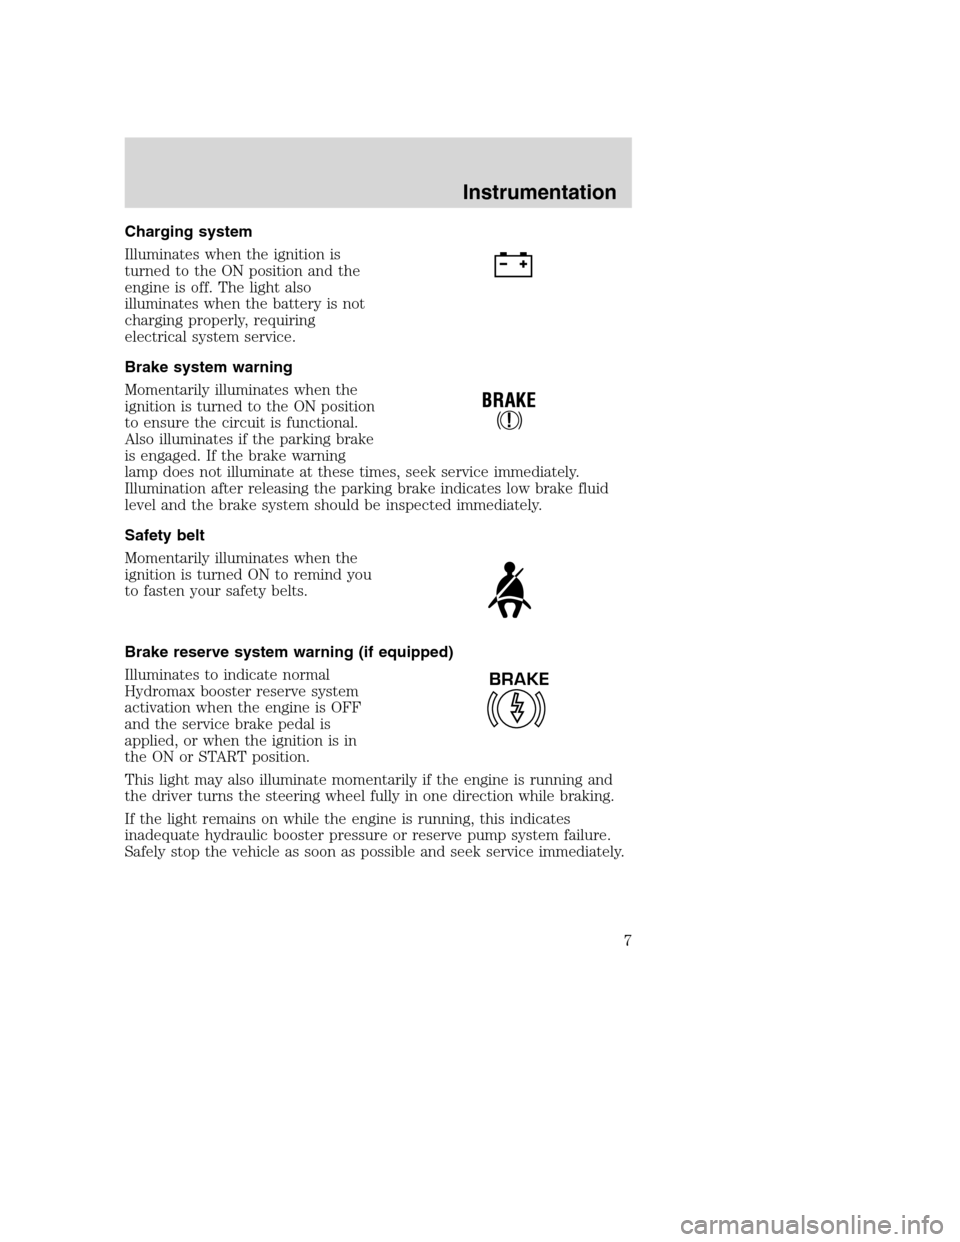
Charging system
Illuminates when the ignition is
turned to the ON position and the
engine is off. The light also
illuminates when the battery is not
charging properly, requiring
electrical system service.
Brake system warning
Momentarily illuminates when the
ignition is turned to the ON position
to ensure the circuit is functional.
Also illuminates if the parking brake
is engaged. If the brake warning
lamp does not illuminate at these times, seek service immediately.
Illumination after releasing the parking brake indicates low brake fluid
level and the brake system should be inspected immediately.
Safety belt
Momentarily illuminates when the
ignition is turned ON to remind you
to fasten your safety belts.
Brake reserve system warning (if equipped)
Illuminates to indicate normal
Hydromax booster reserve system
activation when the engine is OFF
and the service brake pedal is
applied, or when the ignition is in
the ON or START position.
This light may also illuminate momentarily if the engine is running and
the driver turns the steering wheel fully in one direction while braking.
If the light remains on while the engine is running, this indicates
inadequate hydraulic booster pressure or reserve pump system failure.
Safely stop the vehicle as soon as possible and seek service immediately.
BRAKE
Instrumentation
7
Page 10 of 104
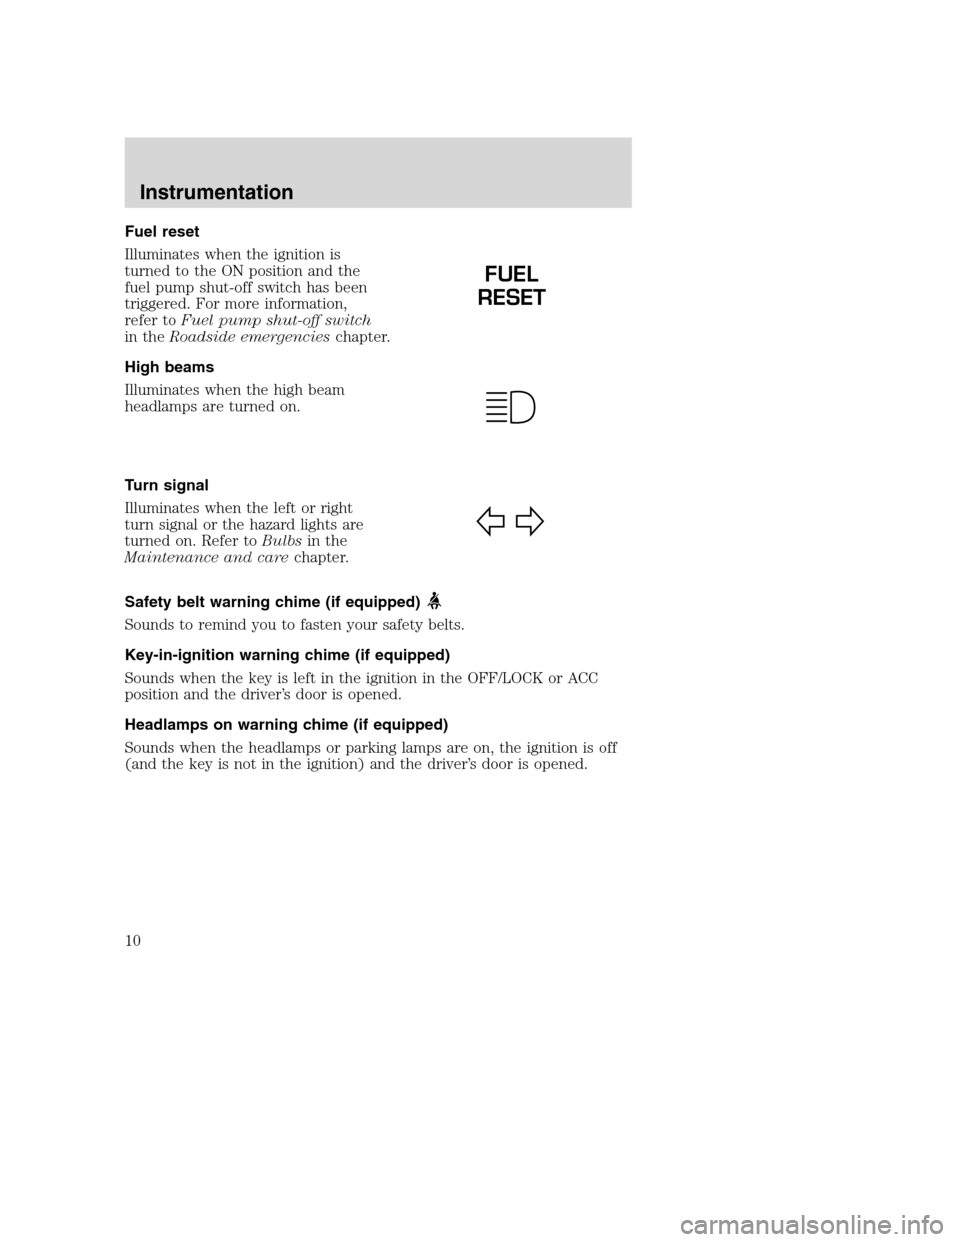
Fuel reset
Illuminates when the ignition is
turned to the ON position and the
fuel pump shut-off switch has been
triggered. For more information,
refer toFuel pump shut-off switch
in theRoadside emergencieschapter.
High beams
Illuminates when the high beam
headlamps are turned on.
Turn signal
Illuminates when the left or right
turn signal or the hazard lights are
turned on. Refer toBulbsin the
Maintenance and carechapter.
Safety belt warning chime (if equipped)
Sounds to remind you to fasten your safety belts.
Key-in-ignition warning chime (if equipped)
Sounds when the key is left in the ignition in the OFF/LOCK or ACC
position and the driver’s door is opened.
Headlamps on warning chime (if equipped)
Sounds when the headlamps or parking lamps are on, the ignition is off
(and the key is not in the ignition) and the driver’s door is opened.
FUEL
RESET
Instrumentation
10
Page 23 of 104
Important safety precautions
A computer system controls the engine’s idle revolutions per minute
(RPM). When the engine starts, the idle RPM runs faster to warm the
engine. If the engine idle speed does not slow down automatically, have
the vehicle checked. Do not allow the vehicle to idle for more than 10
minutes.
Before starting the vehicle:
1. Make sure all vehicle occupants have buckled their safety belts.
2. Make sure the headlamps and vehicle accessories are off.
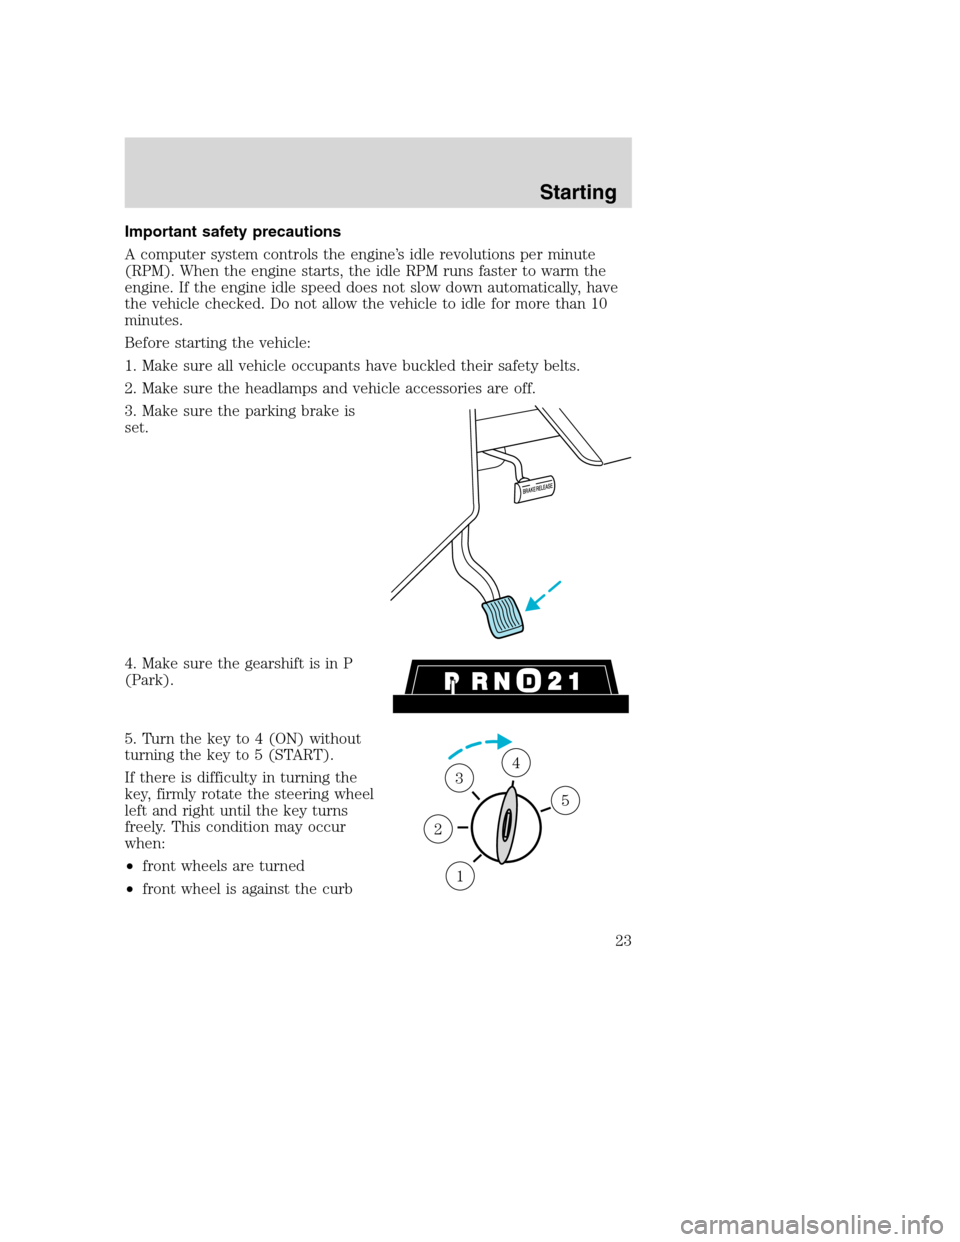
3. Make sure the parking brake is
set.
4. Make sure the gearshift is in P
(Park).
5. Turn the key to 4 (ON) without
turning the key to 5 (START).
If there is difficulty in turning the
key, firmly rotate the steering wheel
left and right until the key turns
freely. This condition may occur
when:
•front wheels are turned
•front wheel is against the curb
1
2
34
5
Starting
23
Page 24 of 104
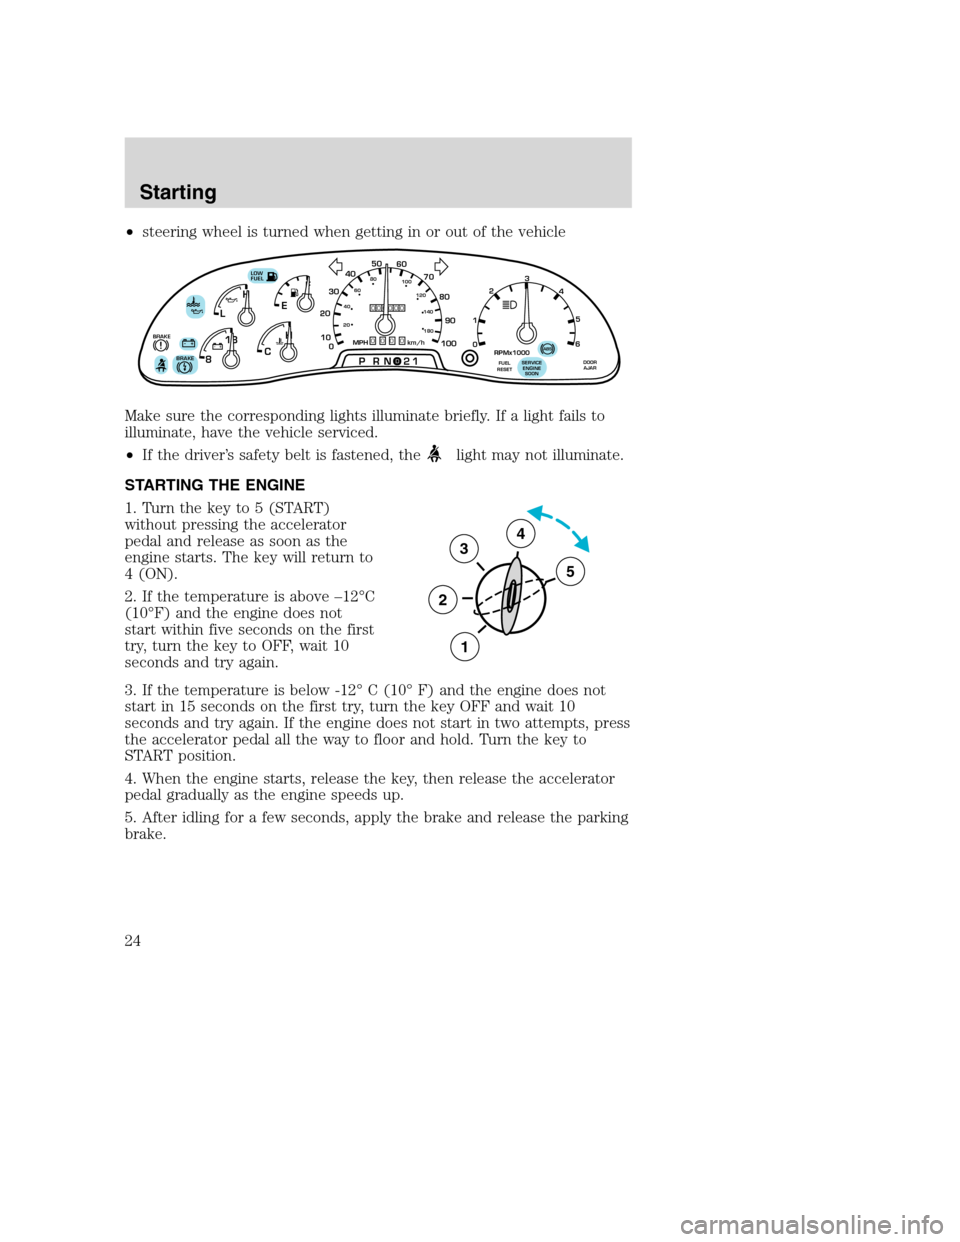
•steering wheel is turned when getting in or out of the vehicle
Make sure the corresponding lights illuminate briefly. If a light fails to
illuminate, have the vehicle serviced.
•If the driver’s safety belt is fastened, the
light may not illuminate.
STARTING THE ENGINE
1. Turn the key to 5 (START)
without pressing the accelerator
pedal and release as soon as the
engine starts. The key will return to
4 (ON).
2. If the temperature is above –12°C
(10°F) and the engine does not
start within five seconds on the first
try, turn the key to OFF, wait 10
seconds and try again.
3. If the temperature is below -12° C (10° F) and the engine does not
start in 15 seconds on the first try, turn the key OFF and wait 10
seconds and try again. If the engine does not start in two attempts, press
the accelerator pedal all the way to floor and hold. Turn the key to
START position.
4. When the engine starts, release the key, then release the accelerator
pedal gradually as the engine speeds up.
5. After idling for a few seconds, apply the brake and release the parking
brake.
F
E
CH H
L
18
8
PRN 21LOW
FUEL
+ -+ -000000000
0
50
60
70
20
10
0 3040
80
90
100
20406080
100
120
140
180
MPH km/hBRAKE!
1
02
RPMx1000
3
4
5
6
SERVICE
ENGINE
SOONABSFUEL
RESETDOOR
AJARBRAKE
3
2
1
5
4
Starting
24
Page 54 of 104
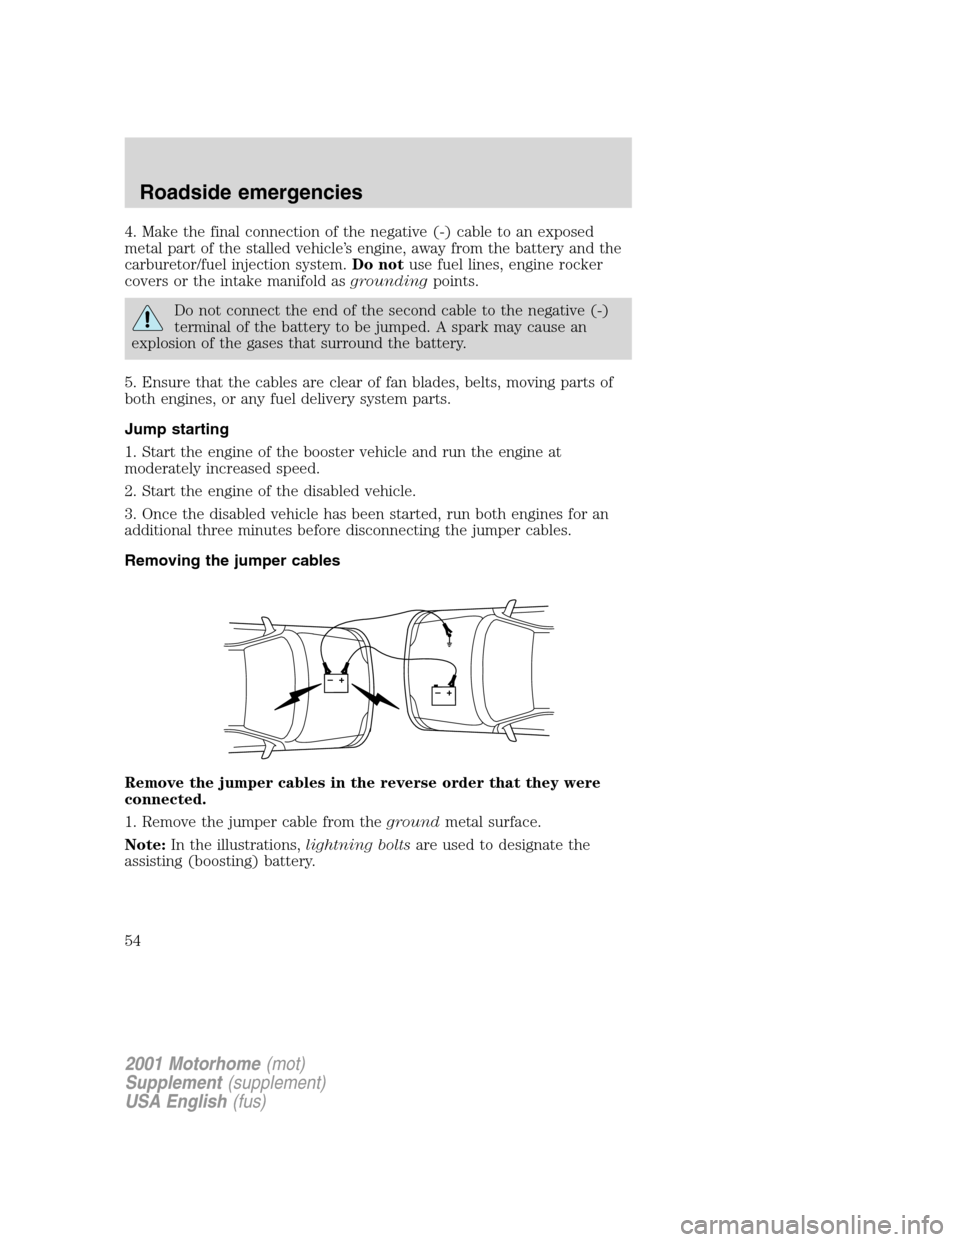
4. Make the final connection of the negative (-) cable to an exposed
metal part of the stalled vehicle’s engine, away from the battery and the
carburetor/fuel injection system.Do notuse fuel lines, engine rocker
covers or the intake manifold asgroundingpoints.
Do not connect the end of the second cable to the negative (-)
terminal of the battery to be jumped. A spark may cause an
explosion of the gases that surround the battery.
5. Ensure that the cables are clear of fan blades, belts, moving parts of
both engines, or any fuel delivery system parts.
Jump starting
1. Start the engine of the booster vehicle and run the engine at
moderately increased speed.
2. Start the engine of the disabled vehicle.
3. Once the disabled vehicle has been started, run both engines for an
additional three minutes before disconnecting the jumper cables.
Removing the jumper cables
Remove the jumper cables in the reverse order that they were
connected.
1. Remove the jumper cable from thegroundmetal surface.
Note:In the illustrations,lightning boltsare used to designate the
assisting (boosting) battery.
+–+–
2001 Motorhome(mot)
Supplement(supplement)
USA English(fus)
Roadside emergencies
54
Page 78 of 104
Tire rotation
Because your vehicle’s tires perform different jobs, they often wear
differently. To make sure your tires wear evenly and last longer, rotate
them as indicated in the scheduled maintenance guide. If you notice that
the tires wear unevenly, have them checked.
Your front tires should be rotated from side to side. If the spare tire is
used in the rotation, the pattern should be; left front to right front; right
front to the spare and the spare to left front.
Do not rotate the dual tires.
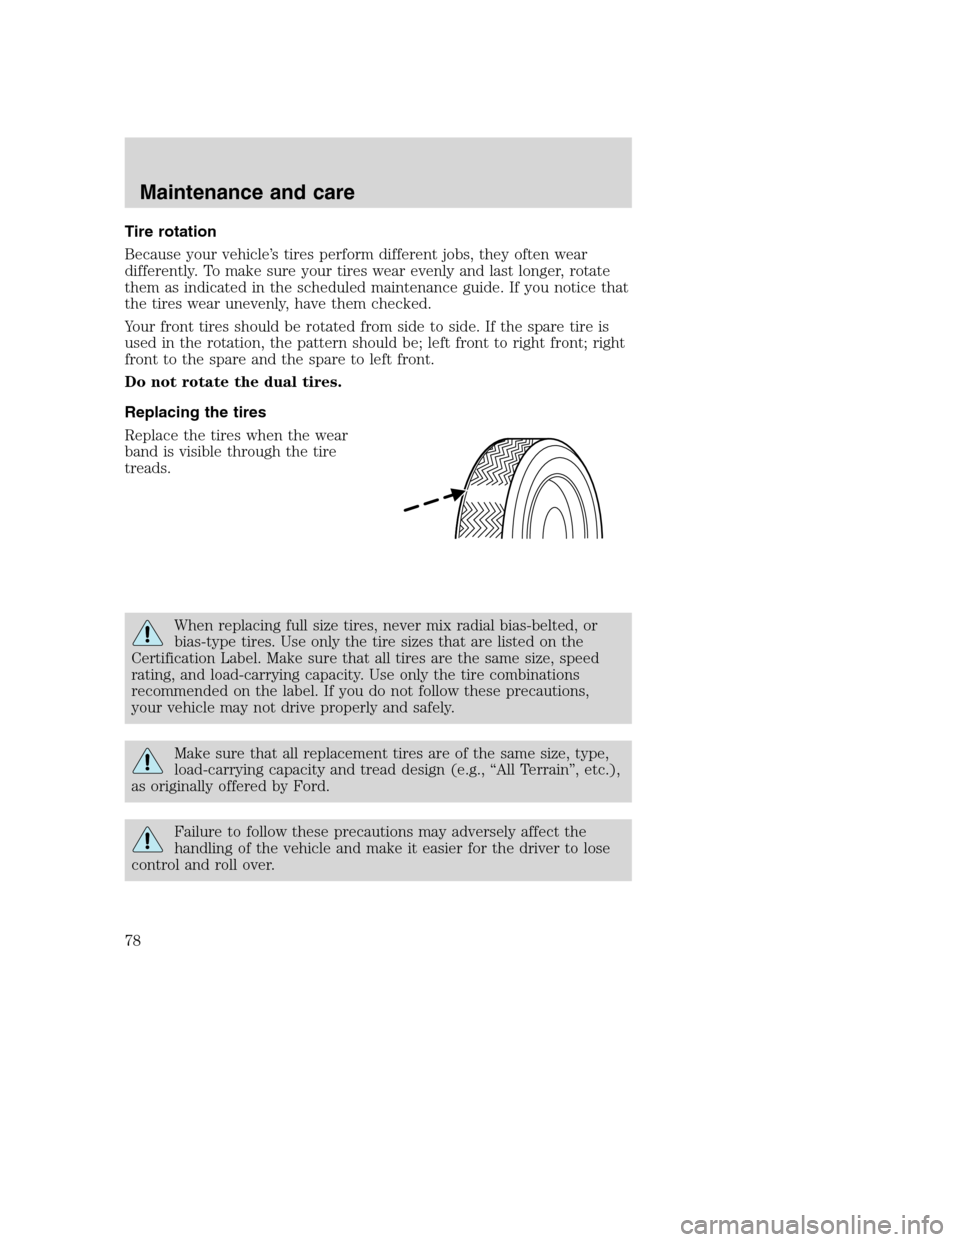
Replacing the tires
Replace the tires when the wear
band is visible through the tire
treads.
When replacing full size tires, never mix radial bias-belted, or
bias-type tires. Use only the tire sizes that are listed on the
Certification Label. Make sure that all tires are the same size, speed
rating, and load-carrying capacity. Use only the tire combinations
recommended on the label. If you do not follow these precautions,
your vehicle may not drive properly and safely.
Make sure that all replacement tires are of the same size, type,
load-carrying capacity and tread design (e.g., “All Terrain”, etc.),
as originally offered by Ford.
Failure to follow these precautions may adversely affect the
handling of the vehicle and make it easier for the driver to lose
control and roll over.
Maintenance and care
78
Page 102 of 104
warning chime ..........................10
I
Ignition .............................16, 96–97
Inspection/maintenance (I/M)
testing ..........................................90
Instrument panel
cluster ..........................................6
lighting up panel and
interior .......................................16
J
Jack ..............................................48
positioning .................................48
storage .......................................48
Jump-starting your vehicle ........52
K
Keys
key in ignition chime ...............10
positions of the ignition ...........16
L
Lamps
cargo lamps ...............................16
daytime running light ...............15
headlamps .................................15
headlamps, flash to pass ..........16
instrument panel, dimming .....16
replacing bulbs .........................91
Lights, warning and indicator ......6
anti-lock brakes (ABS) ........9, 28
brake ............................................7
charging system ..........................7
check coolant ..............................6
door ajar ......................................9engine oil pressure .....................6
fuel reset ...................................10
high beam .................................10
low fuel ........................................6
safety belt ...................................7
service engine soon ....................8
turn signal indicator .................10
Load limits ...................................33
GAWR ........................................33
GVWR ........................................33
trailer towing ............................33
Lubricant specifications .......95–96
M
Motorcraft parts ....................87, 93
O
Octane rating ..............................82
Odometer .....................................13
Oil (see Engine oil) ....................58
Overdrive .....................................21
P
Parking brake ..............................29
Parts (see Motorcraft parts) ......93
Power distribution box (see
Fuses) ..........................................44
Power steering
fluid, checking and adding ......70
fluid, refill capacity ..................94
fluid, specifications .............95–96
R
Relays ....................................41, 48
2001 Motorhome(mot)
Supplement(supplement)
USA English(fus)
Index
102
Page 103 of 104
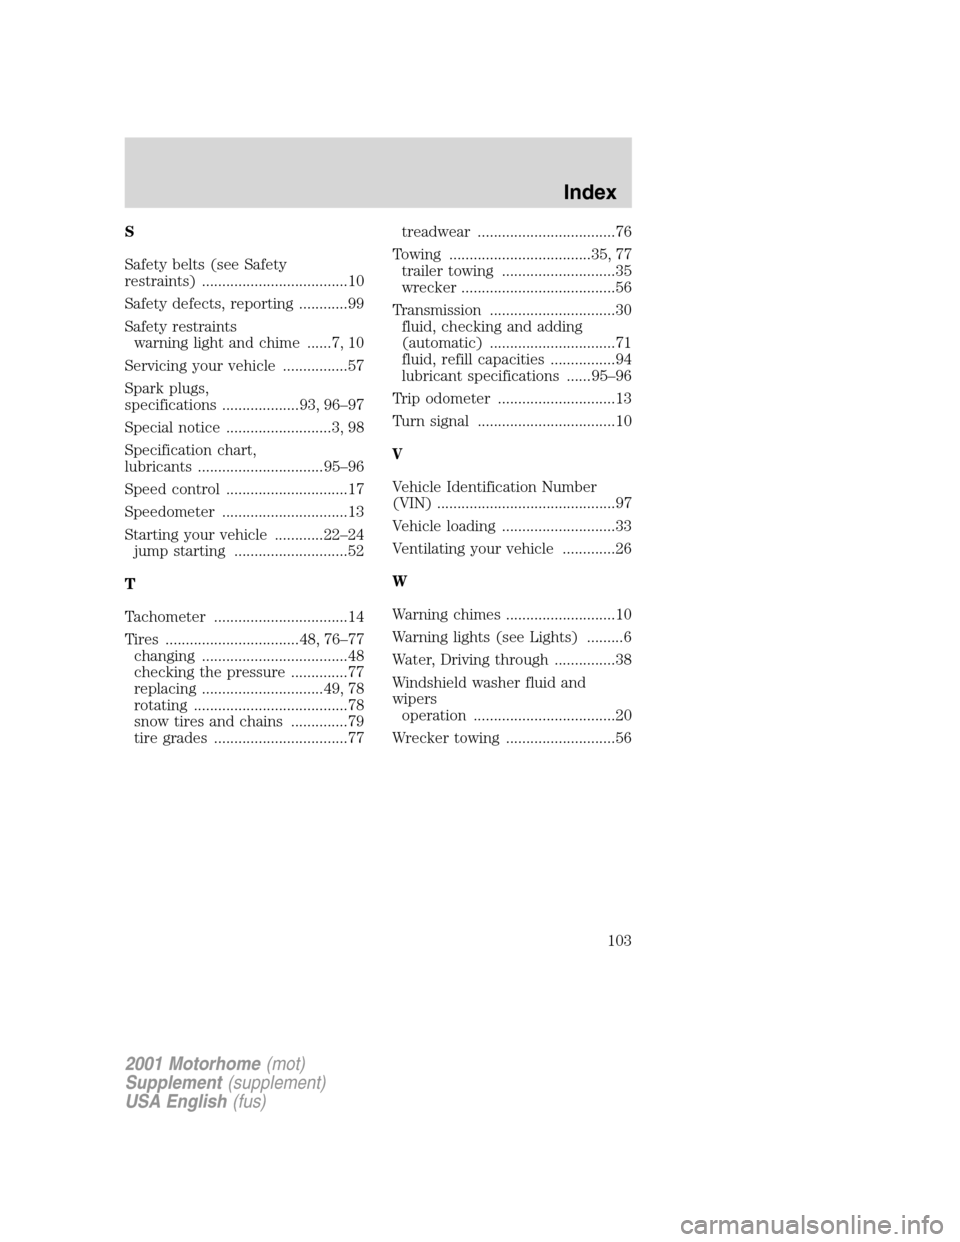
S
Safety belts (see Safety
restraints) ....................................10
Safety defects, reporting ............99
Safety restraints
warning light and chime ......7, 10
Servicing your vehicle ................57
Spark plugs,
specifications ...................93, 96–97
Special notice ..........................3, 98
Specification chart,
lubricants ...............................95–96
Speed control ..............................17
Speedometer ...............................13
Starting your vehicle ............22–24
jump starting ............................52
T
Tachometer .................................14
Tires .................................48, 76–77
changing ....................................48
checking the pressure ..............77
replacing ..............................49, 78
rotating ......................................78
snow tires and chains ..............79
tire grades .................................77treadwear ..................................76
Towing ...................................35, 77
trailer towing ............................35
wrecker ......................................56
Transmission ...............................30
fluid, checking and adding
(automatic) ...............................71
fluid, refill capacities ................94
lubricant specifications ......95–96
Trip odometer .............................13
Turn signal ..................................10
V
Vehicle Identification Number
(VIN) ............................................97
Vehicle loading ............................33
Ventilating your vehicle .............26
W
Warning chimes ...........................10
Warning lights (see Lights) .........6
Water, Driving through ...............38
Windshield washer fluid and
wipers
operation ...................................20
Wrecker towing ...........................56
2001 Motorhome(mot)
Supplement(supplement)
USA English(fus)
Index
103