ECO mode FORD F SERIES MOTORHOME AND COMMERCIAL CHASSIS 2006 11.G Owners Manual
[x] Cancel search | Manufacturer: FORD, Model Year: 2006, Model line: F SERIES MOTORHOME AND COMMERCIAL CHASSIS, Model: FORD F SERIES MOTORHOME AND COMMERCIAL CHASSIS 2006 11.GPages: 128, PDF Size: 1.14 MB
Page 8 of 128
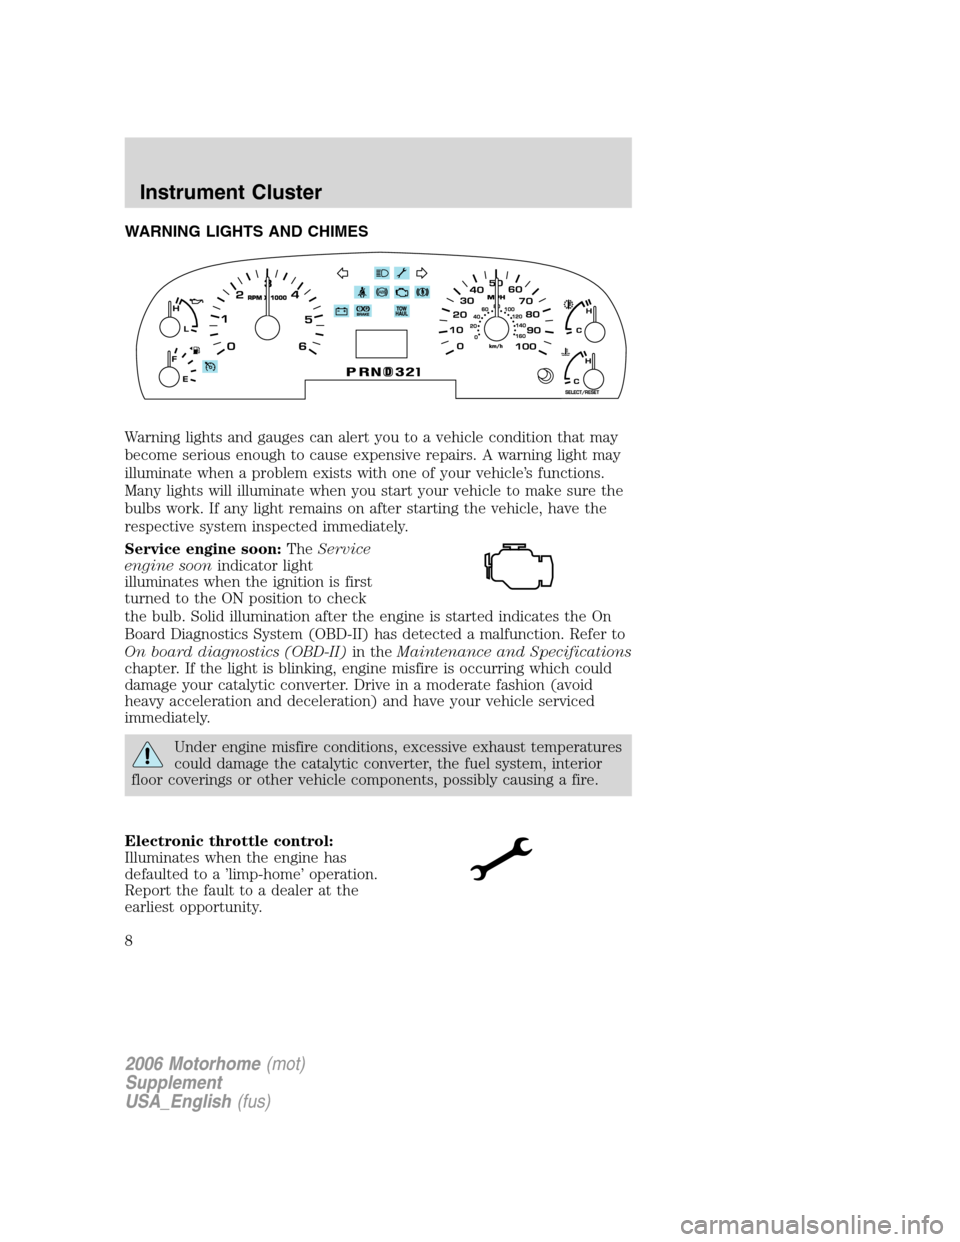
WARNING LIGHTS AND CHIMES
Warning lights and gauges can alert you to a vehicle condition that may
become serious enough to cause expensive repairs. A warning light may
illuminate when a problem exists with one of your vehicle’s functions.
Many lights will illuminate when you start your vehicle to make sure the
bulbs work. If any light remains on after starting the vehicle, have the
respective system inspected immediately.
Service engine soon:TheService
engine soonindicator light
illuminates when the ignition is first
turned to the ON position to check
the bulb. Solid illumination after the engine is started indicates the On
Board Diagnostics System (OBD-II) has detected a malfunction. Refer to
On board diagnostics (OBD-II)in theMaintenance and Specifications
chapter. If the light is blinking, engine misfire is occurring which could
damage your catalytic converter. Drive in a moderate fashion (avoid
heavy acceleration and deceleration) and have your vehicle serviced
immediately.
Under engine misfire conditions, excessive exhaust temperatures
could damage the catalytic converter, the fuel system, interior
floor coverings or other vehicle components, possibly causing a fire.
Electronic throttle control:
Illuminates when the engine has
defaulted to a ’limp-home’ operation.
Report the fault to a dealer at the
earliest opportunity.
2006 Motorhome(mot)
Supplement
USA_English(fus)
Instrument Cluster
Instrument Cluster
8
Page 61 of 128
the vehicle speed when descending a hill, without the accelerator pedal
being pressed. The amount of downshift braking provided will vary based
upon the amount the brake pedal is depressed.
Grade braking downshifts occur automatically when:
•positive vehicle acceleration (natural acceleration from driving on a
decline) is sensed.
•nearly all pressure is released from the accelerator pedal.
•a minimum amount of time has expired since the last grade braking
downshift.
Grade braking downshift mode is immediately exited if the Tow/Haul
mode is deactivated or if the accelerator pedal is depressed beyond a
minimum threshold.
To deactivate the Tow/Haul feature and return to normal driving mode,
press the button on the end of the gearshift lever. The TOW HAUL light
will no longer be illuminated.
When you shut-off and restart the engine, the transmission will
automatically return to normal D (Overdrive) mode (Tow/Haul OFF).
Do not use the Tow/Haul feature when driving in icy or slippery
conditions as the increased engine braking can cause the rear
wheels to slide and the vehicle to swing around with the possible loss
of vehicle control.
3 (Third)
Transmission operates up to third gear only.
Used for improved traction on slippery roads. Selecting 3 (Third)
provides engine braking.
2 (Second)
Use 2 (Second) to start-up on slippery roads or to provide additional
engine braking on downgrades.
1 (First)
•Provides maximum engine braking.
•Allows upshifts by moving gearshift lever.
•The transmission will not downshift into 1 (First) at high speeds; it
will downshift to a lower gear and then shift into 1 (First) when the
vehicle reaches slower speeds.
2006 Motorhome(mot)
Supplement
USA_English(fus)
Driving
61
Page 75 of 128
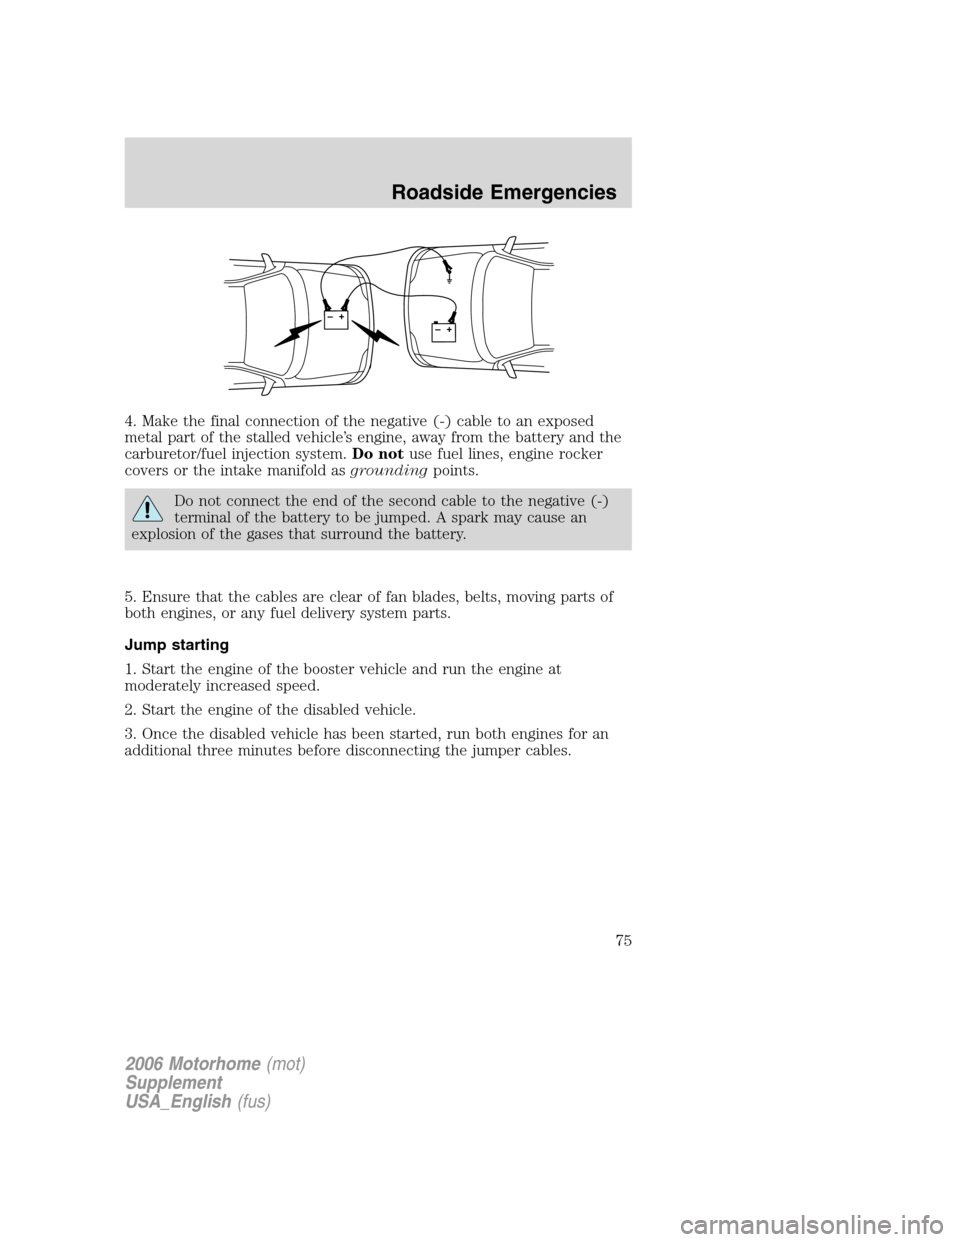
4. Make the final connection of the negative (-) cable to an exposed
metal part of the stalled vehicle’s engine, away from the battery and the
carburetor/fuel injection system.Do notuse fuel lines, engine rocker
covers or the intake manifold asgroundingpoints.
Do not connect the end of the second cable to the negative (-)
terminal of the battery to be jumped. A spark may cause an
explosion of the gases that surround the battery.
5. Ensure that the cables are clear of fan blades, belts, moving parts of
both engines, or any fuel delivery system parts.
Jump starting
1. Start the engine of the booster vehicle and run the engine at
moderately increased speed.
2. Start the engine of the disabled vehicle.
3. Once the disabled vehicle has been started, run both engines for an
additional three minutes before disconnecting the jumper cables.
+–+–
2006 Motorhome(mot)
Supplement
USA_English(fus)
Roadside Emergencies
75
Page 81 of 128
Board membership
The Board consists of:
•Three consumer representatives
•A Ford or Lincoln Mercury dealership representative
Consumer candidates for Board membership are recruited and trained by
an independent consulting firm. The dealership Board member is chosen
from Ford and Lincoln Mercury dealership management, recognized for
their business leadership qualities.
What the Board needs
To have your case reviewed you must complete the application in the
DSB brochure and mail it to the address provided on the application
form. Some states will require you to use certified mail, with return
receipt requested.
Your application is reviewed and, if it is determined to be eligible, you
will receive an acknowledgment indicating:
•The file number assigned to your application.
•The toll-free phone number of the DSB’s independent administrator.
Your dealership and a Ford Motor Company representative will then be
asked to submit statements.
To properly review your case, the Board needs the following information:
•Legible copies of all documents and maintenance or repair orders
relevant to the case.
•The year, make, model, and Vehicle Identification Number (VIN) listed
on your vehicle ownership license.
•The date of repair(s) and mileage at the time of occurrence(s).
•The current mileage.
•The name of the dealer(s) who sold or serviced the vehicle.
•A brief description of your unresolved concern.
•A brief summary of the action taken by the dealer(s) and Ford Motor
Company.
•The names (if known) of all the people you contacted at the
dealership(s).
•A description of the action you expect to resolve your concern.
You will receive a letter of explanation if your application does not
qualify for Board review.
2006 Motorhome(mot)
Supplement
USA_English(fus)
Customer Assistance
81
Page 105 of 128
•Use the same filling rate setting (low — medium — high) each time
the tank is filled.
•Allow no more than 2 automatic click-offs when filling.
•Always use fuel with the recommended octane rating.
•Use a known quality gasoline, preferably a national brand.
•Use the same side of the same pump and have the vehicle facing the
same direction each time you fill up.
•Have the vehicle loading and distribution the same every time.
Your results will be most accurate if your filling method is consistent.
Calculating fuel economy
1. Fill the fuel tank completely and record the initial odometer reading
(in miles or kilometers).
2. Each time you fill the tank, record the amount of fuel added (in
gallons or liters).
3. After at least three to five tank fill-ups, fill the fuel tank and record
the current odometer reading.
4. Subtract your initial odometer reading from the current odometer
reading.
5. Follow one of the simple calculations in order to determine fuel
economy:
Calculation 1:Divide total miles traveled by total gallons used.
Calculation 2:Multiply liters used by 100, then divide by total
kilometers traveled.
Keep a record for at least one month and record the type of driving (city
or highway). This will provide an accurate estimate of the vehicle’s fuel
economy under current driving conditions. Additionally, keeping records
during summer and winter will show how temperature impacts fuel
economy. In general, lower temperatures give lower fuel economy.
Driving style — good driving and fuel economy habits
Give consideration to the lists that follow and you may be able to change
a number of variables and improve your fuel economy.
Habits
•Smooth, moderate operation can yield up to 10% savings in fuel.
•Steady speeds without stopping will usually give the best fuel
economy.
2006 Motorhome(mot)
Supplement
USA_English(fus)
Maintenance and Specifications
105