engine FORD F SERIES MOTORHOME AND COMMERCIAL CHASSIS 2008 11.G Owner's Manual
[x] Cancel search | Manufacturer: FORD, Model Year: 2008, Model line: F SERIES MOTORHOME AND COMMERCIAL CHASSIS, Model: FORD F SERIES MOTORHOME AND COMMERCIAL CHASSIS 2008 11.GPages: 130, PDF Size: 1.24 MB
Page 58 of 130
N (Neutral)
With the gearshift lever in N (Neutral), the vehicle can be started and is
free to roll. Hold the brake pedal down while in this position.
D (Overdrive) with Tow/Haul OFF
D (Overdrive) with Tow/Haul OFF is the normal driving position for the
best fuel economy. The overdrive function allows automatic upshifts and
downshifts through gears one through five.
D (Overdrive) with Tow/Haul ON
The Tow/Haul feature improves transmission operation when towing a
trailer or a heavy load. All transmission gear ranges are available when
using Tow/Haul.
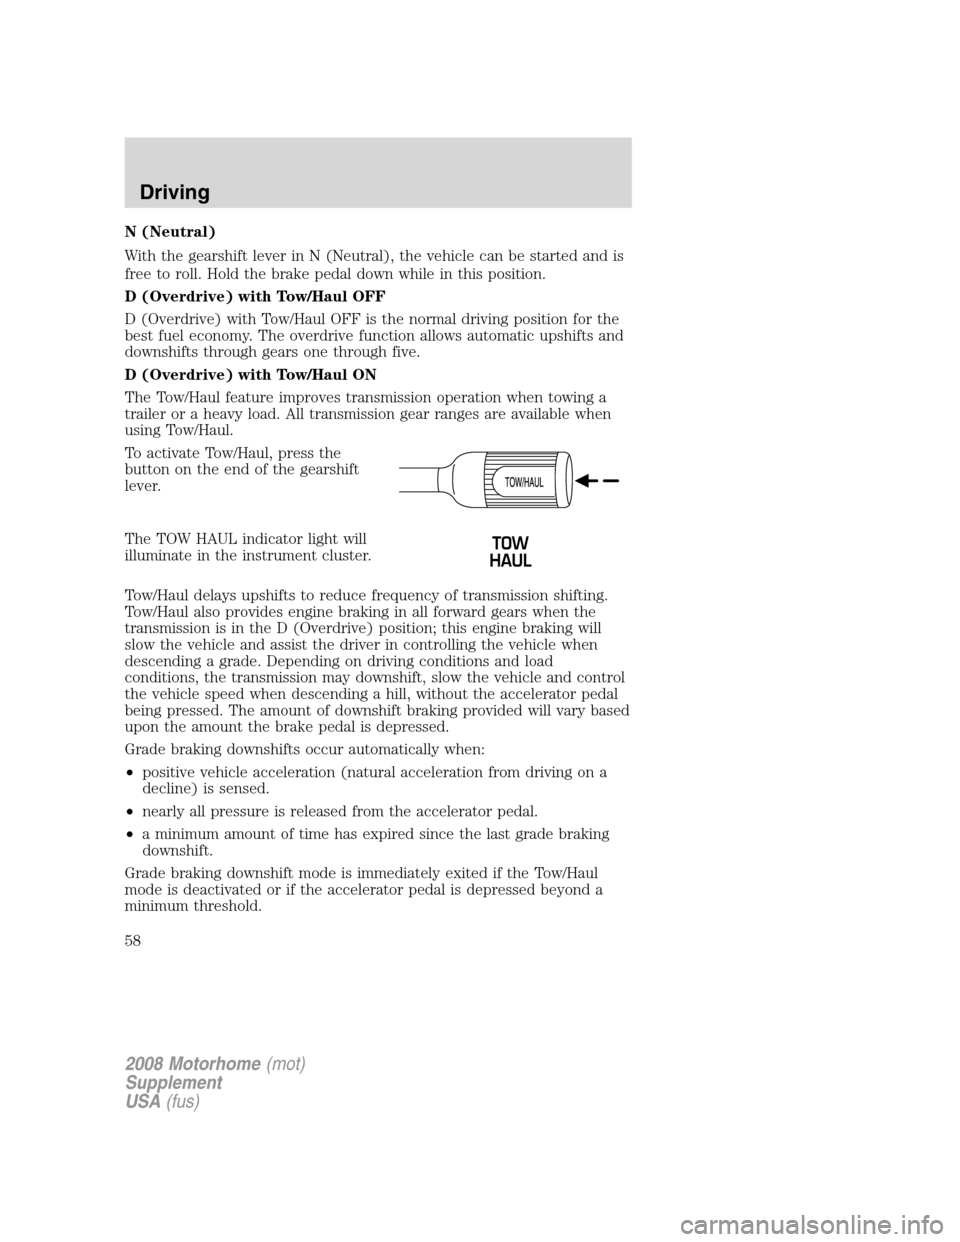
To activate Tow/Haul, press the
button on the end of the gearshift
lever.
The TOW HAUL indicator light will
illuminate in the instrument cluster.
Tow/Haul delays upshifts to reduce frequency of transmission shifting.
Tow/Haul also provides engine braking in all forward gears when the
transmission is in the D (Overdrive) position; this engine braking will
slow the vehicle and assist the driver in controlling the vehicle when
descending a grade. Depending on driving conditions and load
conditions, the transmission may downshift, slow the vehicle and control
the vehicle speed when descending a hill, without the accelerator pedal
being pressed. The amount of downshift braking provided will vary based
upon the amount the brake pedal is depressed.
Grade braking downshifts occur automatically when:
•positive vehicle acceleration (natural acceleration from driving on a
decline) is sensed.
•nearly all pressure is released from the accelerator pedal.
•a minimum amount of time has expired since the last grade braking
downshift.
Grade braking downshift mode is immediately exited if the Tow/Haul
mode is deactivated or if the accelerator pedal is depressed beyond a
minimum threshold.
2008 Motorhome(mot)
Supplement
USA(fus)
Driving
58
Page 59 of 130
To deactivate the Tow/Haul feature and return to normal driving mode,
press the button on the end of the gearshift lever. The TOW HAUL light
will no longer be illuminated.
When you shut-off and restart the engine, the transmission will
automatically return to normal D (Overdrive) mode (Tow/Haul OFF).
WARNING:Do not use the Tow/Haul feature when driving in icy
or slippery conditions as the increased engine braking can cause
the rear wheels to slide and the vehicle to swing around with the
possible loss of vehicle control.
3 (Third)
Transmission starts and operates in third gear only.
Used for improved traction on slippery roads. Selecting 3 (Third)
provides engine braking.
2 (Second)
Use 2 (Second) to start-up on slippery roads or to provide additional
engine braking on downgrades.
1 (First)
•Provides maximum engine braking.
•Allows upshifts by moving gearshift lever.
•The transmission will not downshift into 1 (First) at high speeds; it
will downshift to a lower gear and then shift into 1 (First) when the
vehicle reaches slower speeds.
Forced downshifts
•Allowed in D (Overdrive) with the Tow/Haul feature on or off.
•Depress the accelerator to the floor.
•Allows transmission to select an appropriate gear.
If your vehicle gets stuck in mud or snow
If your vehicle gets stuck in mud or snow, it may be rocked out by
shifting between forward and reverse gears, stopping between shifts in a
steady pattern. Press lightly on the accelerator in each gear.
Do not rock the vehicle if the engine is not at normal operating
temperature or damage to the transmission may occur.
Do not rock the vehicle for more than a minute or damage to the
transmission and tires may occur, or the engine may overheat.
2008 Motorhome(mot)
Supplement
USA(fus)
Driving
59
Page 60 of 130
DRIVING THROUGH WATER
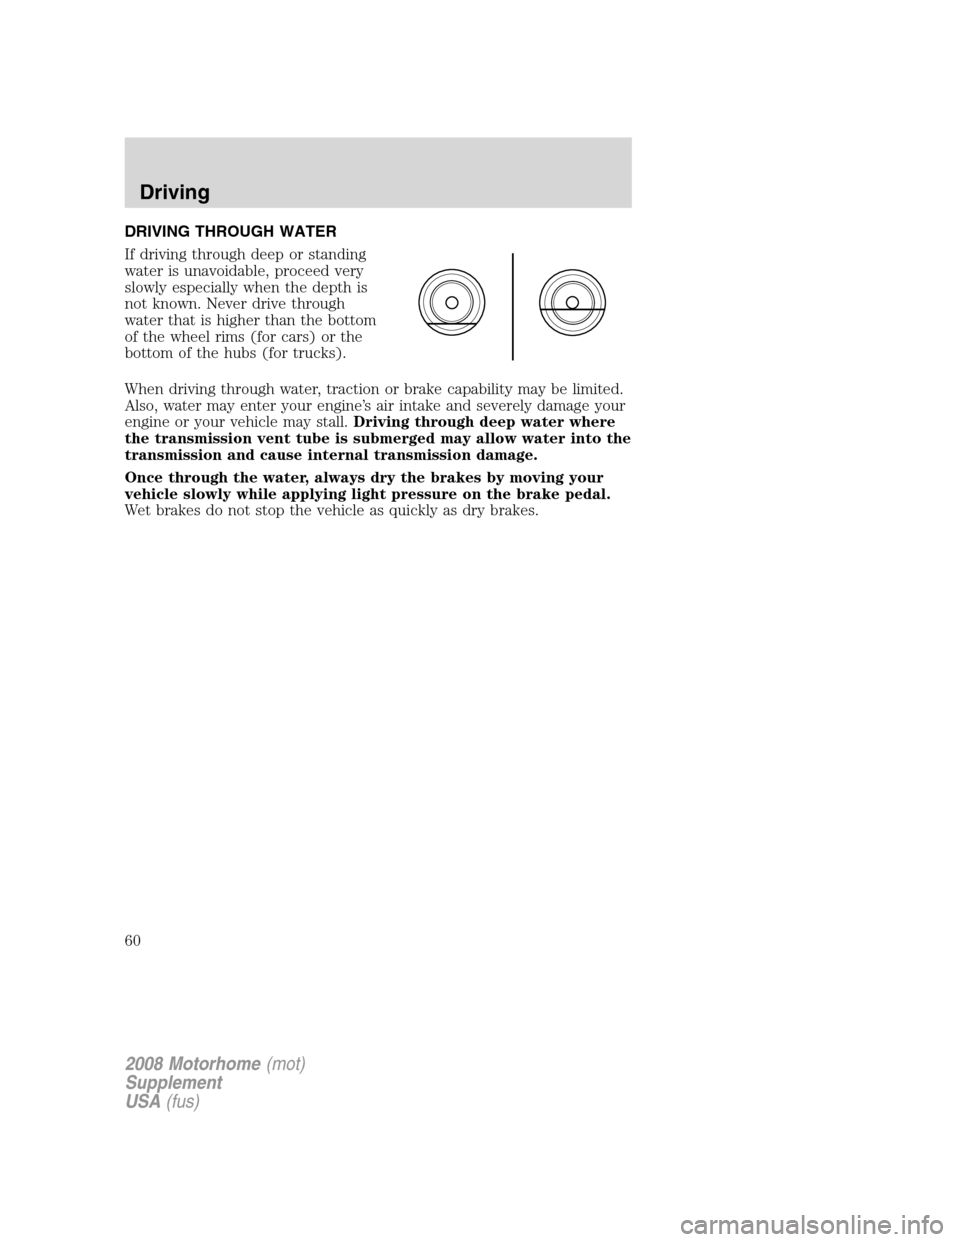
If driving through deep or standing
water is unavoidable, proceed very
slowly especially when the depth is
not known. Never drive through
water that is higher than the bottom
of the wheel rims (for cars) or the
bottom of the hubs (for trucks).
When driving through water, traction or brake capability may be limited.
Also, water may enter your engine’s air intake and severely damage your
engine or your vehicle may stall.Driving through deep water where
the transmission vent tube is submerged may allow water into the
transmission and cause internal transmission damage.
Once through the water, always dry the brakes by moving your
vehicle slowly while applying light pressure on the brake pedal.
Wet brakes do not stop the vehicle as quickly as dry brakes.
2008 Motorhome(mot)
Supplement
USA(fus)
Driving
60
Page 66 of 130
Power distribution box
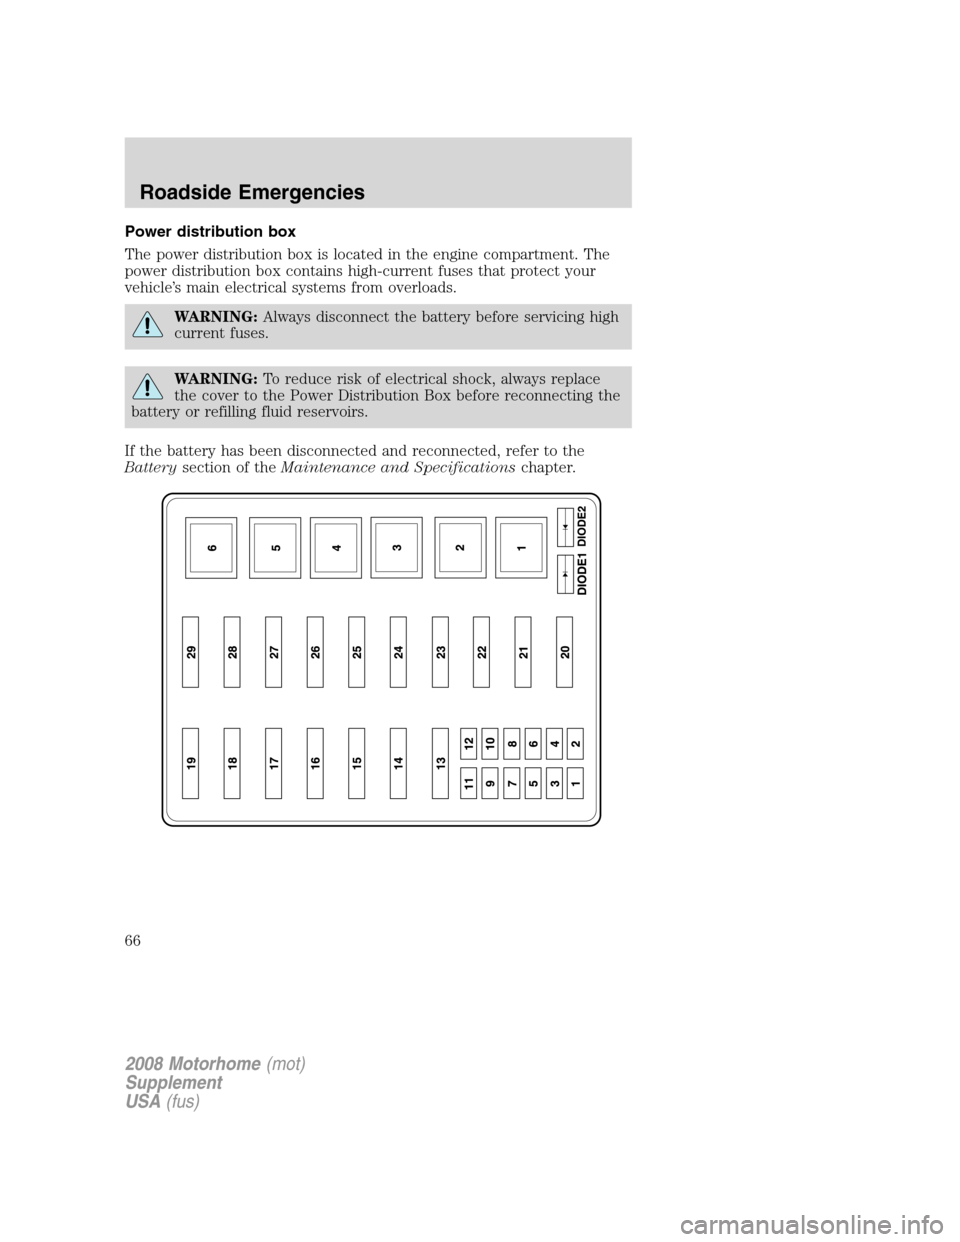
The power distribution box is located in the engine compartment. The
power distribution box contains high-current fuses that protect your
vehicle’s main electrical systems from overloads.
WARNING:Always disconnect the battery before servicing high
current fuses.
WARNING:To reduce risk of electrical shock, always replace
the cover to the Power Distribution Box before reconnecting the
battery or refilling fluid reservoirs.
If the battery has been disconnected and reconnected, refer to the
Batterysection of theMaintenance and Specificationschapter.
2008 Motorhome(mot)
Supplement
USA(fus)
Roadside Emergencies
66
Page 67 of 130
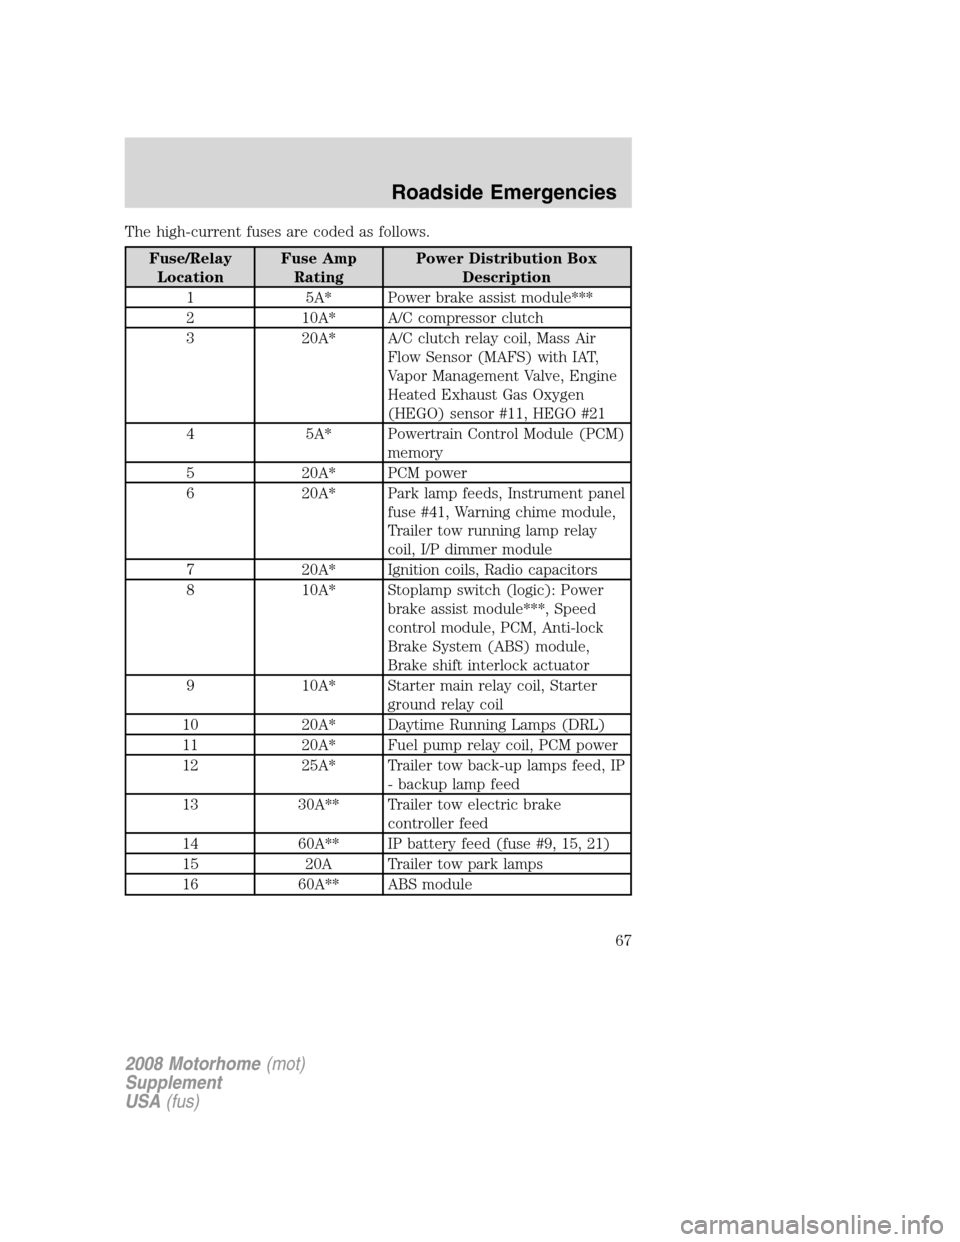
The high-current fuses are coded as follows.
Fuse/Relay
LocationFuse Amp
RatingPower Distribution Box
Description
1 5A* Power brake assist module***
2 10A* A/C compressor clutch
3 20A* A/C clutch relay coil, Mass Air
Flow Sensor (MAFS) with IAT,
Vapor Management Valve, Engine
Heated Exhaust Gas Oxygen
(HEGO) sensor #11, HEGO #21
4 5A* Powertrain Control Module (PCM)
memory
5 20A* PCM power
6 20A* Park lamp feeds, Instrument panel
fuse #41, Warning chime module,
Trailer tow running lamp relay
coil, I/P dimmer module
7 20A* Ignition coils, Radio capacitors
8 10A* Stoplamp switch (logic): Power
brake assist module***, Speed
control module, PCM, Anti-lock
Brake System (ABS) module,
Brake shift interlock actuator
9 10A* Starter main relay coil, Starter
ground relay coil
10 20A* Daytime Running Lamps (DRL)
11 20A* Fuel pump relay coil, PCM power
12 25A* Trailer tow back-up lamps feed, IP
- backup lamp feed
13 30A** Trailer tow electric brake
controller feed
14 60A** IP battery feed (fuse #9, 15, 21)
15 20A Trailer tow park lamps
16 60A** ABS module
2008 Motorhome(mot)
Supplement
USA(fus)
Roadside Emergencies
67
Page 69 of 130
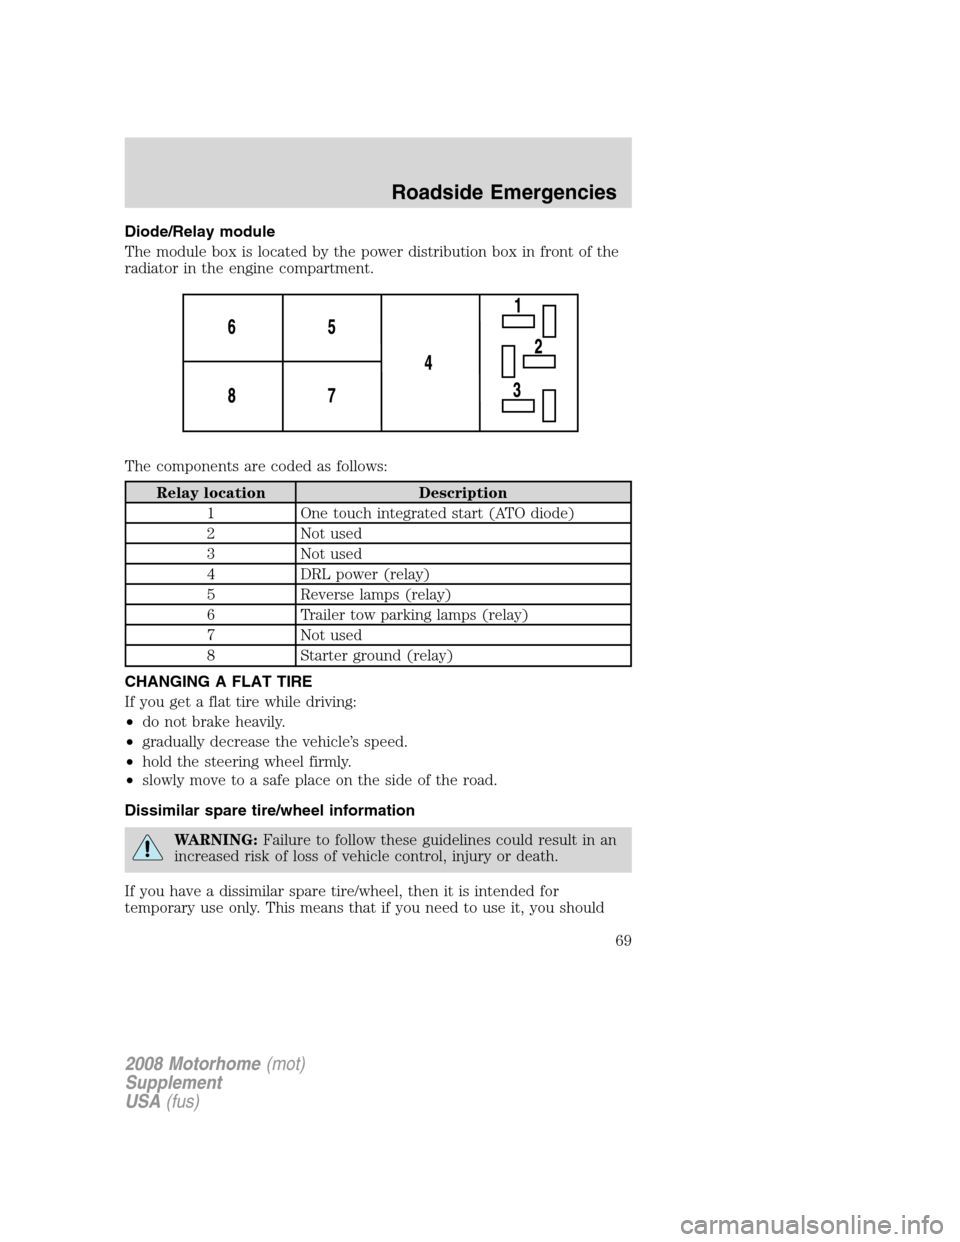
Diode/Relay module
The module box is located by the power distribution box in front of the
radiator in the engine compartment.
The components are coded as follows:
Relay location Description
1 One touch integrated start (ATO diode)
2 Not used
3 Not used
4 DRL power (relay)
5 Reverse lamps (relay)
6 Trailer tow parking lamps (relay)
7 Not used
8 Starter ground (relay)
CHANGING A FLAT TIRE
If you get a flat tire while driving:
•do not brake heavily.
•gradually decrease the vehicle’s speed.
•hold the steering wheel firmly.
•slowly move to a safe place on the side of the road.
Dissimilar spare tire/wheel information
WARNING:Failure to follow these guidelines could result in an
increased risk of loss of vehicle control, injury or death.
If you have a dissimilar spare tire/wheel, then it is intended for
temporary use only. This means that if you need to use it, you should
2008 Motorhome(mot)
Supplement
USA(fus)
Roadside Emergencies
69
Page 72 of 130
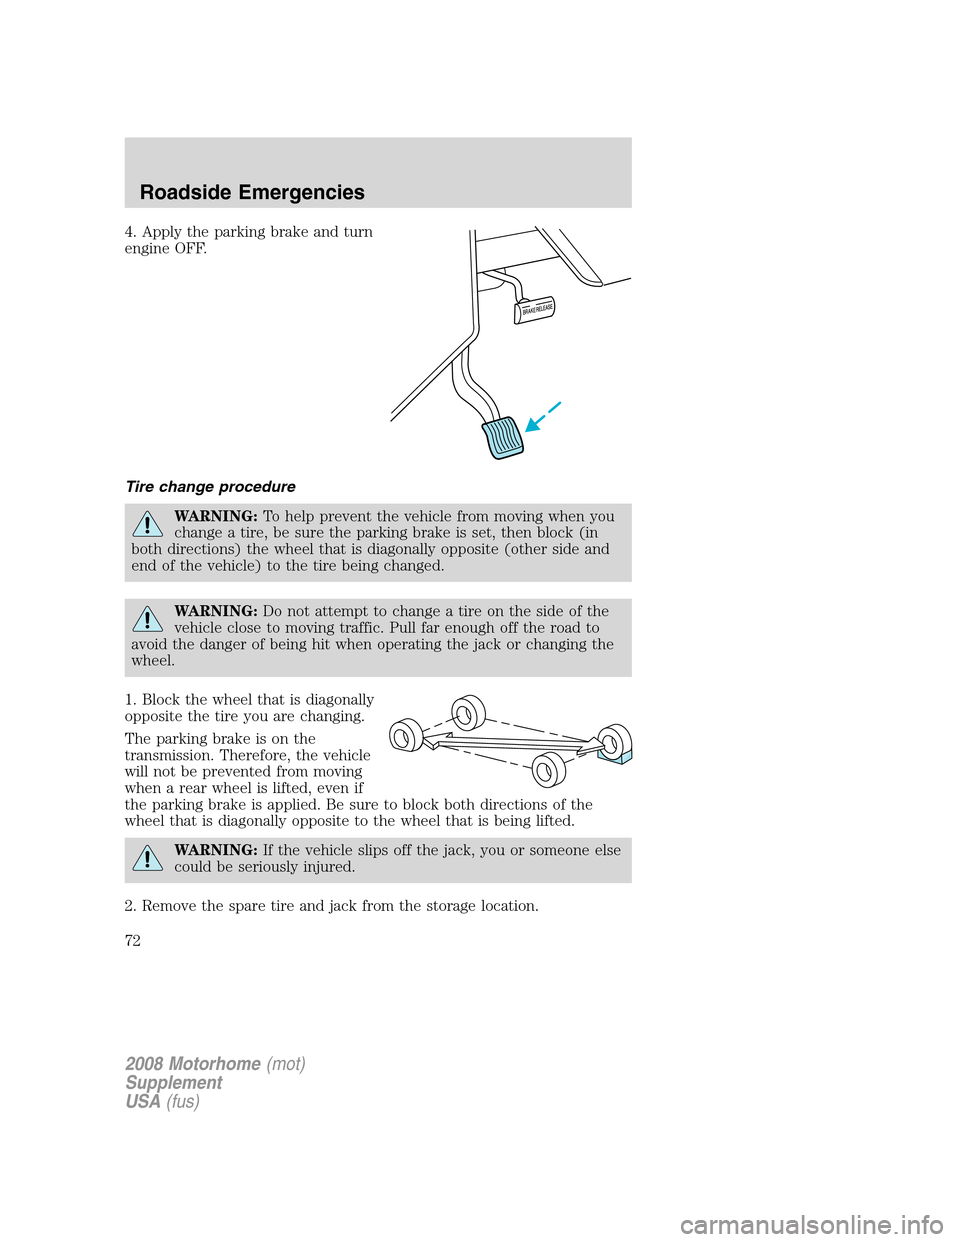
4. Apply the parking brake and turn
engine OFF.
Tire change procedure
WARNING:To help prevent the vehicle from moving when you
change a tire, be sure the parking brake is set, then block (in
both directions) the wheel that is diagonally opposite (other side and
end of the vehicle) to the tire being changed.
WARNING:Do not attempt to change a tire on the side of the
vehicle close to moving traffic. Pull far enough off the road to
avoid the danger of being hit when operating the jack or changing the
wheel.
1. Block the wheel that is diagonally
opposite the tire you are changing.
The parking brake is on the
transmission. Therefore, the vehicle
will not be prevented from moving
when a rear wheel is lifted, even if
the parking brake is applied. Be sure to block both directions of the
wheel that is diagonally opposite to the wheel that is being lifted.
WARNING:If the vehicle slips off the jack, you or someone else
could be seriously injured.
2. Remove the spare tire and jack from the storage location.
2008 Motorhome(mot)
Supplement
USA(fus)
Roadside Emergencies
72
Page 73 of 130
3. Loosen the wheel nut by pulling up on the handle of the lug nut
wrench about one-half turn (counterclockwise). Do not remove the
wheel lug nuts until you raise the tire off the ground.
Replacing the tire
WARNING:Failure to follow the instructions below may result
in serious personal injury. Do not put any part of your body
under the vehicle while the vehicle is on a jack. Do not start the
engine while the vehicle is on a jack. Only use the jack for emergency
wheel and tire changing. Only select a jack with a rated capacity
sufficient to lift and hold up the vehicle.
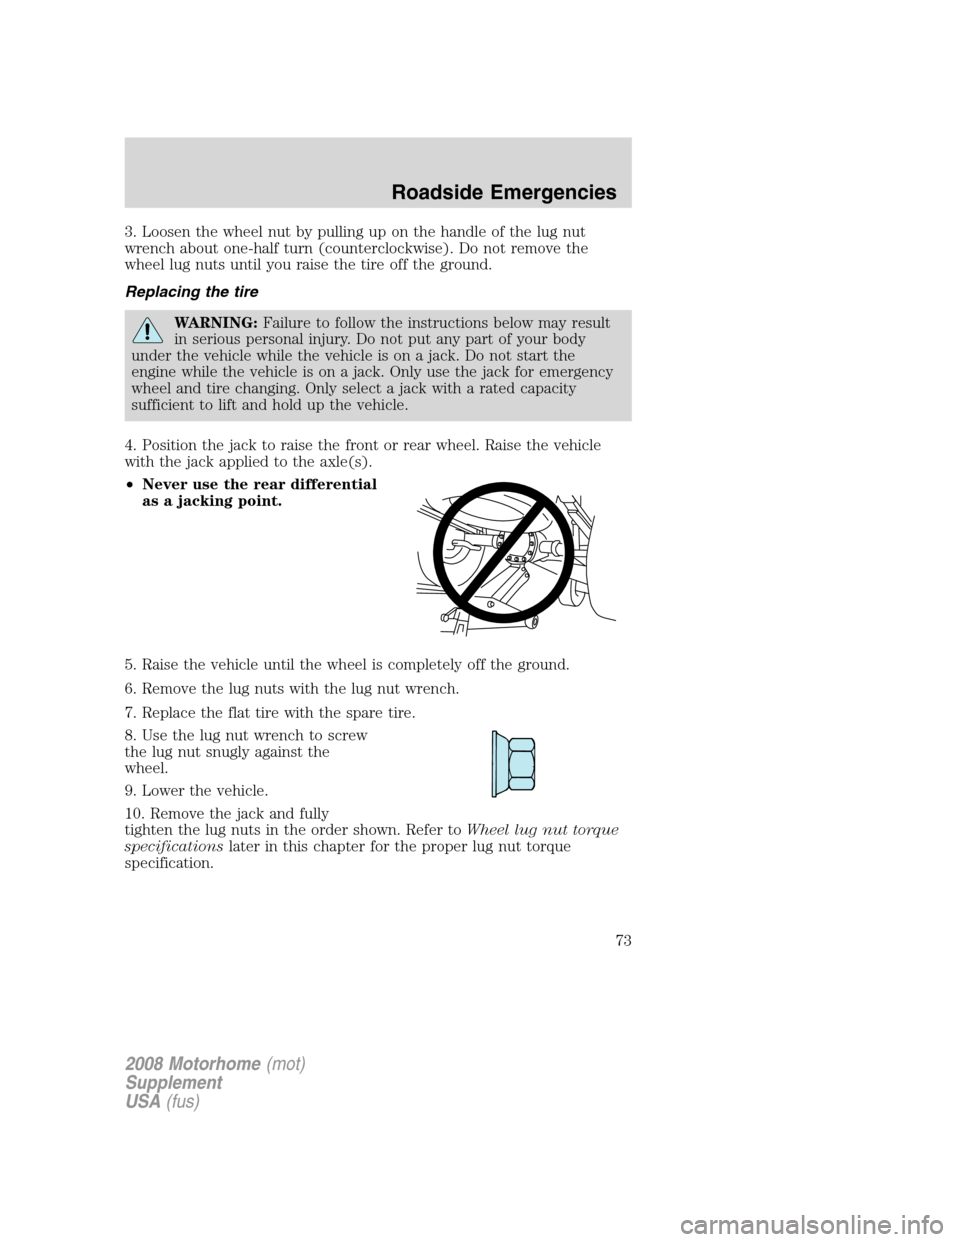
4. Position the jack to raise the front or rear wheel. Raise the vehicle
with the jack applied to the axle(s).
•Never use the rear differential
as a jacking point.
5. Raise the vehicle until the wheel is completely off the ground.
6. Remove the lug nuts with the lug nut wrench.
7. Replace the flat tire with the spare tire.
8. Use the lug nut wrench to screw
the lug nut snugly against the
wheel.
9. Lower the vehicle.
10. Remove the jack and fully
tighten the lug nuts in the order shown. Refer toWheel lug nut torque
specificationslater in this chapter for the proper lug nut torque
specification.
2008 Motorhome(mot)
Supplement
USA(fus)
Roadside Emergencies
73
Page 76 of 130
WARNING:Batteries contain sulfuric acid which can burn skin,
eyes and clothing, if contacted.
Do not attempt to push-start your automatic transmission
vehicle. Automatic transmissions do not have push-start
capability. Attempting to push-start a vehicle with an automatic
transmission may cause transmission damage.
Preparing your vehicle
When the battery is disconnected or a new battery is installed, the
automatic transmission must relearn its shift strategy. As a result, the
transmission may have firm and/or soft shifts. This operation is
considered normal and will not affect function or durability of the
transmission. Over time, the adaptive learning process will fully update
transmission operation.
1.Use only a 12–volt supply to start your vehicle.
2. Do not disconnect the battery of the disabled vehicle as this could
damage the vehicle’s electrical system.
3. Park the booster vehicle close to the hood of the disabled vehicle
making sure the two vehiclesdo nottouch. Set the parking brake on
both vehicles and stay clear of the engine cooling fan and other moving
parts.
4. Check all battery terminals and remove any excessive corrosion before
you attach the battery cables. Ensure that vent caps are tight and level.
5. Turn the heater fan on in both vehicles to protect from any electrical
surges. Turn all other accessories off.
2008 Motorhome(mot)
Supplement
USA(fus)
Roadside Emergencies
76
Page 78 of 130
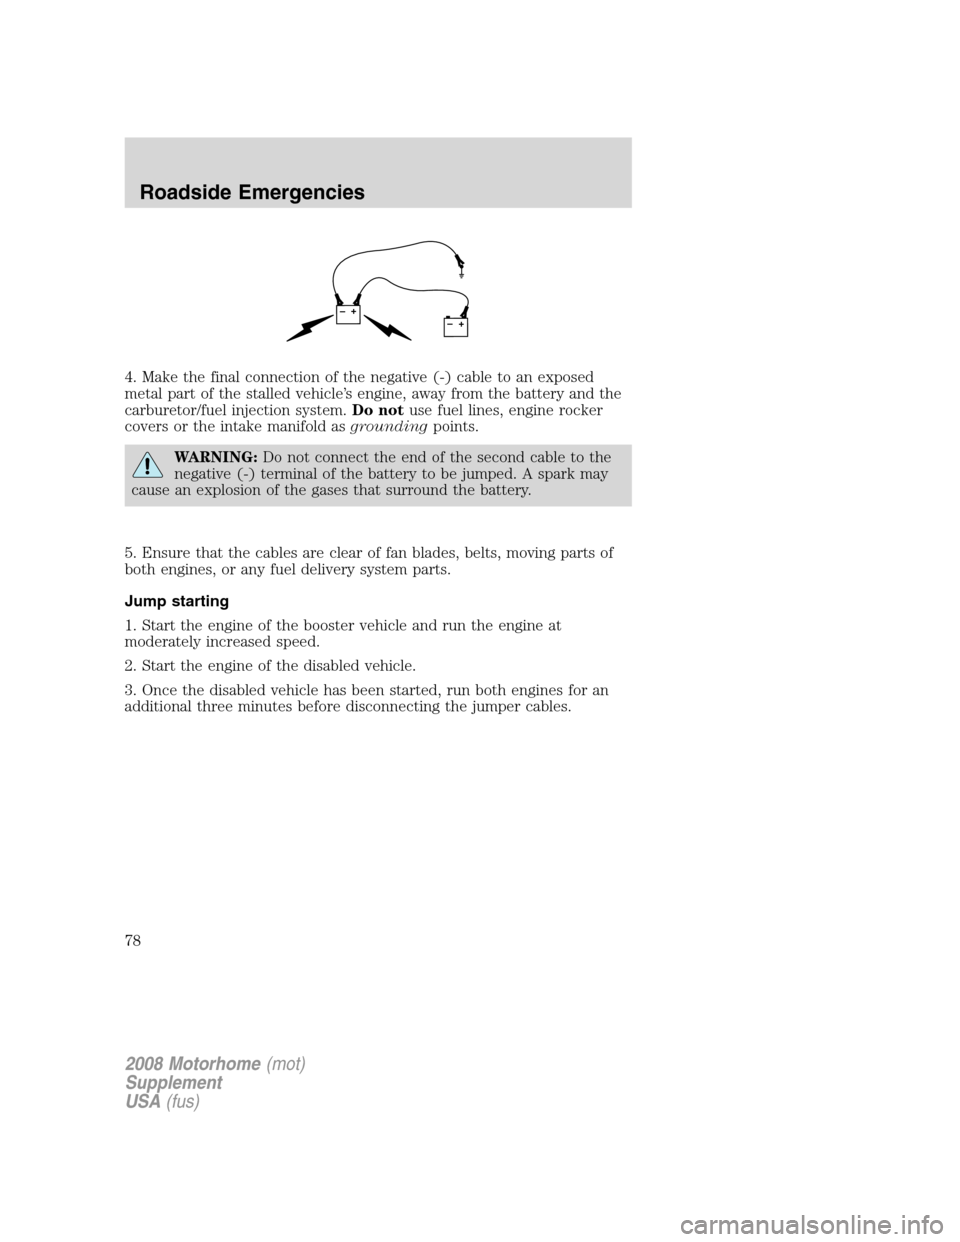
4. Make the final connection of the negative (-) cable to an exposed
metal part of the stalled vehicle’s engine, away from the battery and the
carburetor/fuel injection system.Do notuse fuel lines, engine rocker
covers or the intake manifold asgroundingpoints.
WARNING:Do not connect the end of the second cable to the
negative (-) terminal of the battery to be jumped. A spark may
cause an explosion of the gases that surround the battery.
5. Ensure that the cables are clear of fan blades, belts, moving parts of
both engines, or any fuel delivery system parts.
Jump starting
1. Start the engine of the booster vehicle and run the engine at
moderately increased speed.
2. Start the engine of the disabled vehicle.
3. Once the disabled vehicle has been started, run both engines for an
additional three minutes before disconnecting the jumper cables.
+–+–
2008 Motorhome(mot)
Supplement
USA(fus)
Roadside Emergencies
78