ECU FORD F SERIES MOTORHOME AND COMMERCIAL CHASSIS 2008 11.G Owners Manual
[x] Cancel search | Manufacturer: FORD, Model Year: 2008, Model line: F SERIES MOTORHOME AND COMMERCIAL CHASSIS, Model: FORD F SERIES MOTORHOME AND COMMERCIAL CHASSIS 2008 11.GPages: 130, PDF Size: 1.24 MB
Page 39 of 130

The tires on your vehicle have all weather treads to provide traction in
rain and snow. However, in some climates, you may need to use snow
tires and chains. If you need to use chains, it is recommended that steel
wheels (of the same size and specifications) be used, as chains may chip
aluminum wheels.
Follow these guidelines when using snow tires and chains:
•Use only SAE Class S chains.
•Install chains securely, verifying that the chains do not touch any
wiring, brake lines or fuel lines.
•Drive cautiously. If you hear the chains rub or bang against your
vehicle, stop and re-tighten the chains. If this does not work, remove
the chains to prevent damage to your vehicle.
•If possible, avoid fully loading your vehicle.
•Remove the tire chains when they are no longer needed. Do not use
tire chains on dry roads.
•The suspension insulation and bumpers will help prevent vehicle
damage. Do not remove these components from your vehicle when
using snow tires and chains.
VEHICLE LOADING – WITH AND WITHOUT A TRAILER
This section will guide you in the proper loading of your vehicle and/or
trailer, to keep your loaded vehicle weight within its design rating
capability, with or without a trailer. Properly loading your vehicle will
provide maximum return of vehicle design performance. Before loading
your vehicle, familiarize yourself with the following terms for determining
your vehicle’s weight ratings, with or without a trailer, from the vehicle’s
Safety Compliance Certification Label:
Base Curb Weight– is the weight of the vehicle including a full tank of
fuel and all standard equipment. It does not include passengers, cargo, or
optional equipment.
Vehicle Curb Weight– is the weight of your new vehicle when you
picked it up from your authorized dealer plus any aftermarket
equipment.
2008 Motorhome(mot)
Supplement
USA(fus)
Tires, Wheels and Loading
39
Page 57 of 130

Understanding the shift positions of the 5–speed automatic
transmission
This vehicle is equipped with an adaptive Transmission Shift Strategy.
Adaptive Shift Strategy offers the optimal transmission operation and
shift quality. When the vehicle’s battery has been disconnected for any
type of service or repair, the transmission will need to relearn the normal
shift strategy parameters, much like having to reset your radio stations
when your vehicle battery has been disconnected. The Adaptive
Transmission Strategy allows the transmission to relearn these operating
parameters. This learning process could take several transmission
upshifts and downshifts; during this learning process, slightly firmer
shifts may occur. After this learning process, normal shift feel and shift
scheduling will resume.
P (Park)
This position locks the transmission and prevents the rear wheels from
turning.
To put your vehicle in gear:
•Start the engine
•Depress the brake pedal
•Move the gearshift lever into the desired gear
To put your vehicle in P (Park):
•Come to a complete stop
•Move the gearshift lever and securely latch it in P (Park)
WARNING:Always set the parking brake fully and make sure
the gearshift is latched in P (Park). Turn the ignition to the
LOCK position and remove the key whenever you leave your vehicle.
R (Reverse)
With the gearshift lever in R (Reverse), the vehicle will move backward.
Always come to a complete stop before shifting into and out of R
(Reverse).
2008 Motorhome(mot)
Supplement
USA(fus)
Driving
57
Page 71 of 130

•Use snow chains on the end of the vehicle with the dissimilar spare
tire/wheel
The usage of a full-size dissimilar spare tire/wheel can lead to
impairment of the following:
•Handling, stability and braking performance
•Comfort and noise
•Ground clearance and parking at curbs
•Winter weather driving capability
•Wet weather driving capability
•All-Wheel driving capability (if applicable)
•Load leveling adjustment (if applicable)
When driving with the full-size dissimilar spare tire/wheel additional
caution should be given to:
•Towing a trailer
•Driving vehicles equipped with a camper body
•Driving vehicles with a load on the cargo rack
Drive cautiously when using a full-size dissimilar spare tire/wheel and
seek service as soon as possible.
Stopping and securing the vehicle
1. Park on a level surface.
2. Activate the warning flashers.
3. Place the gearshift in P (Park).
2008 Motorhome(mot)
Supplement
USA(fus)
Roadside Emergencies
71
Page 75 of 130

WHEEL LUG NUT TORQUE SPECIFICATIONS
On vehicles equipped with dual rear wheels, retighten the wheel lug nuts
to the specified torque at 100 miles (160 km), and again at 500 miles
(800 km) of new vehicle operation and after any wheel disturbance (tire
rotation, changing a flat tire, wheel removal, etc.).
Bolt size Wheel lug nut torque*
lb.ft. N•m
19.5 in. wheels: M14 x
1.5150 200
22.5 in. wheels: M22 x
1.5450 610
* Torque specifications are for nut and bolt threads free of dirt and
rust. Use only Ford recommended replacement fasteners.
On all two-piece flat wheel nuts,
apply one drop of motor oil between
the flat washer and the nut. Do not
apply motor oil to the wheel nut
threads or the wheel stud threads.
WARNING:When a wheel is installed, always remove any
corrosion, dirt or foreign materials present on the mounting
surfaces of the wheel or the surface of the wheel hub, brake drum or
brake disc that contacts the wheel. Ensure that any fasteners that
attach the rotor to the hub are secured so they do not interfere with
the mounting surfaces of the wheel. Installing wheels without correct
metal-to-metal contact at the wheel mounting surfaces can cause the
wheel nuts to loosen and the wheel to come off while the vehicle is in
motion, resulting in loss of control.
JUMP STARTING
WARNING:The gases around the battery can explode if
exposed to flames, sparks, or lit cigarettes. An explosion could
result in injury or vehicle damage.
2008 Motorhome(mot)
Supplement
USA(fus)
Roadside Emergencies
75
Page 82 of 130

In order to help service your motorhome vehicle, please have the
following information available when contacting the Motorhome
Customer Assistance Center:
•telephone number where you can be reached
•vehicle location (city and state)
•year and make of your vehicle
•date of vehicle purchase
•current odometer reading
•vehicle identification number (VIN).
IN CALIFORNIA (U.S. ONLY)
California Civil Code Section 1793.2(d) requires that, if a manufacturer
or its representative is unable to repair a motor vehicle to conform to the
vehicle’s applicable express warranty after a reasonable number of
attempts, the manufacturer shall be required to either replace the
vehicle with one substantially identical or repurchase the vehicle and
reimburse the buyer in an amount equal to the actual price paid or
payable by the consumer (less a reasonable allowance for consumer
use). The consumer has the right to choose whether to receive a refund
or replacement vehicle.
California Civil Code Section 1793.22(b) presumes that the manufacturer
has had a reasonable number of attempts to conform the vehicle to its
applicable express warranties if, within the first 18 months of ownership
of a new vehicle or the first 18,000 miles (29,000 km), whichever occurs
first:
1. Two or more repair attempts are made on the same non-conformity
likely to cause death or serious bodily injury OR
2. Four or more repair attempts are made on the same nonconformity (a
defect or condition that substantially impairs the use, value or safety of
the vehicle) OR
3. The vehicle is out of service for repair of nonconformities for a total of
more than 30 calendar days (not necessarily all at one time)
In the case of 1 or 2 above, the consumer must also notify the
manufacturer of the need for the repair of the nonconformity at the
following address:
Ford Motor Company
16800 Executive Plaza Drive
Mail Drop 3NE-B
Dearborn, MI 48126
2008 Motorhome(mot)
Supplement
USA(fus)
Customer Assistance
82
Page 91 of 130

ENGINE OIL
Checking the engine oil
Refer toscheduled maintenance informationfor the appropriate
intervals for checking the engine oil.
1. Make sure the vehicle is on level ground.
2. Turn the engine off and wait a few minutes for the oil to drain into the
oil pan.
3. Set the parking brake and ensure the gearshift is securely latched in P
(Park).
4. Open the hood. Protect yourself from engine heat.
5. Locate and carefully remove the
engine oil level dipstick.
6. Wipe the dipstick clean. Insert the dipstick fully, then remove it again.
•If the oil level iswithin the lower and upper holes,the oil level is
acceptable.DO NOT ADD OIL.
•If the oil level isbelow the lower hole,engine oil must be added to
raise the level within the normal operating range.
•Do not overfill the engine with oil. Oil levels above the upper
hole mark may cause engine damage.If the engine is overfilled,
some oil must be removed from the engine by an authorized dealer.
7. Put the dipstick back in and ensure it is fully seated.
Adding engine oil
1. Check the engine oil. For instructions, refer toChecking the engine
oilin this chapter.
2008 Motorhome(mot)
Supplement
USA(fus)
Maintenance and Specifications
91
Page 111 of 130
On board diagnostics (OBD-II)
Your vehicle is equipped with a computer that monitors the engine’s
emission control system. This system is commonly known as the On
Board Diagnostics System (OBD-II). The OBD-II system protects the
environment by ensuring that your vehicle continues to meet
government emission standards. The OBD-II system also assists your
authorized dealer in properly servicing your vehicle. When theService
engine soon
indicator illuminates, the OBD-II system has detected
a malfunction. Temporary malfunctions may cause theService engine
soon
indicator to illuminate. Examples are:
1. The vehicle has run out of fuel—the engine may misfire or run poorly.
2. Poor fuel quality or water in the fuel—the engine may misfire or run
poorly.
3. The fuel cap may not have been securely tightened. SeeFuel filler
capin this chapter.
4. Driving through deep water—the electrical system may be wet.
These temporary malfunctions can be corrected by filling the fuel tank
with good quality fuel, properly tightening the fuel cap or letting the
electrical system dry out. After three driving cycles without these or any
other temporary malfunctions present, theService engine soon
indicator should stay off the next time the engine is started. A driving
cycle consists of a cold engine startup followed by mixed city/highway
driving. No additional vehicle service is required.
If theService engine soon
indicator remains on, have your vehicle
serviced at the first available opportunity. Although some malfunctions
detected by the OBD-II may not have symptoms that are apparent,
continued driving with theService engine soon
indicator on can
result in increased emissions, lower fuel economy, reduced engine and
transmission smoothness, and lead to more costly repairs.
2008 Motorhome(mot)
Supplement
USA(fus)
Maintenance and Specifications
111
Page 119 of 130
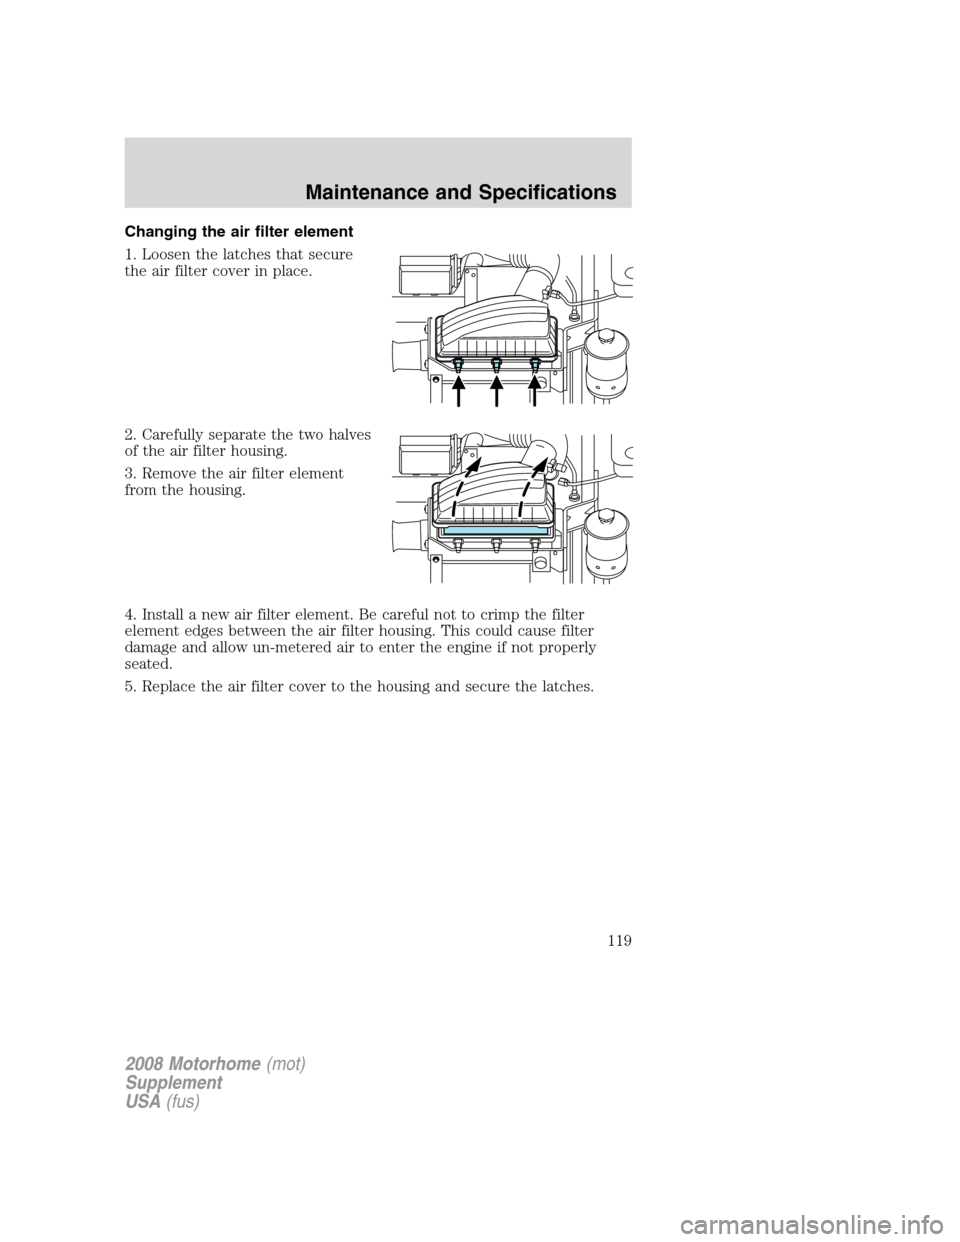
Changing the air filter element
1. Loosen the latches that secure
the air filter cover in place.
2. Carefully separate the two halves
of the air filter housing.
3. Remove the air filter element
from the housing.
4. Install a new air filter element. Be careful not to crimp the filter
element edges between the air filter housing. This could cause filter
damage and allow un-metered air to enter the engine if not properly
seated.
5. Replace the air filter cover to the housing and secure the latches.
2008 Motorhome(mot)
Supplement
USA(fus)
Maintenance and Specifications
119