FORD F SERIES MOTORHOME AND COMMERCIAL CHASSIS 2016 13.G User Guide
Manufacturer: FORD, Model Year: 2016, Model line: F SERIES MOTORHOME AND COMMERCIAL CHASSIS, Model: FORD F SERIES MOTORHOME AND COMMERCIAL CHASSIS 2016 13.GPages: 154, PDF Size: 3.44 MB
Page 11 of 154
PROTECTING THE
ENVIRONMENT
You must play your part in protecting theenvironment. Correct vehicle usage andthe authorized disposal of waste, cleaningand lubrication materials are significantsteps toward this aim.
8Motorhome (TY3) , enUSA, First PrintingEnvironment
Page 12 of 154
ADJUSTING THE STEERING
WHEEL
WARNING
Do not adjust the steering wheelwhen your vehicle is moving.
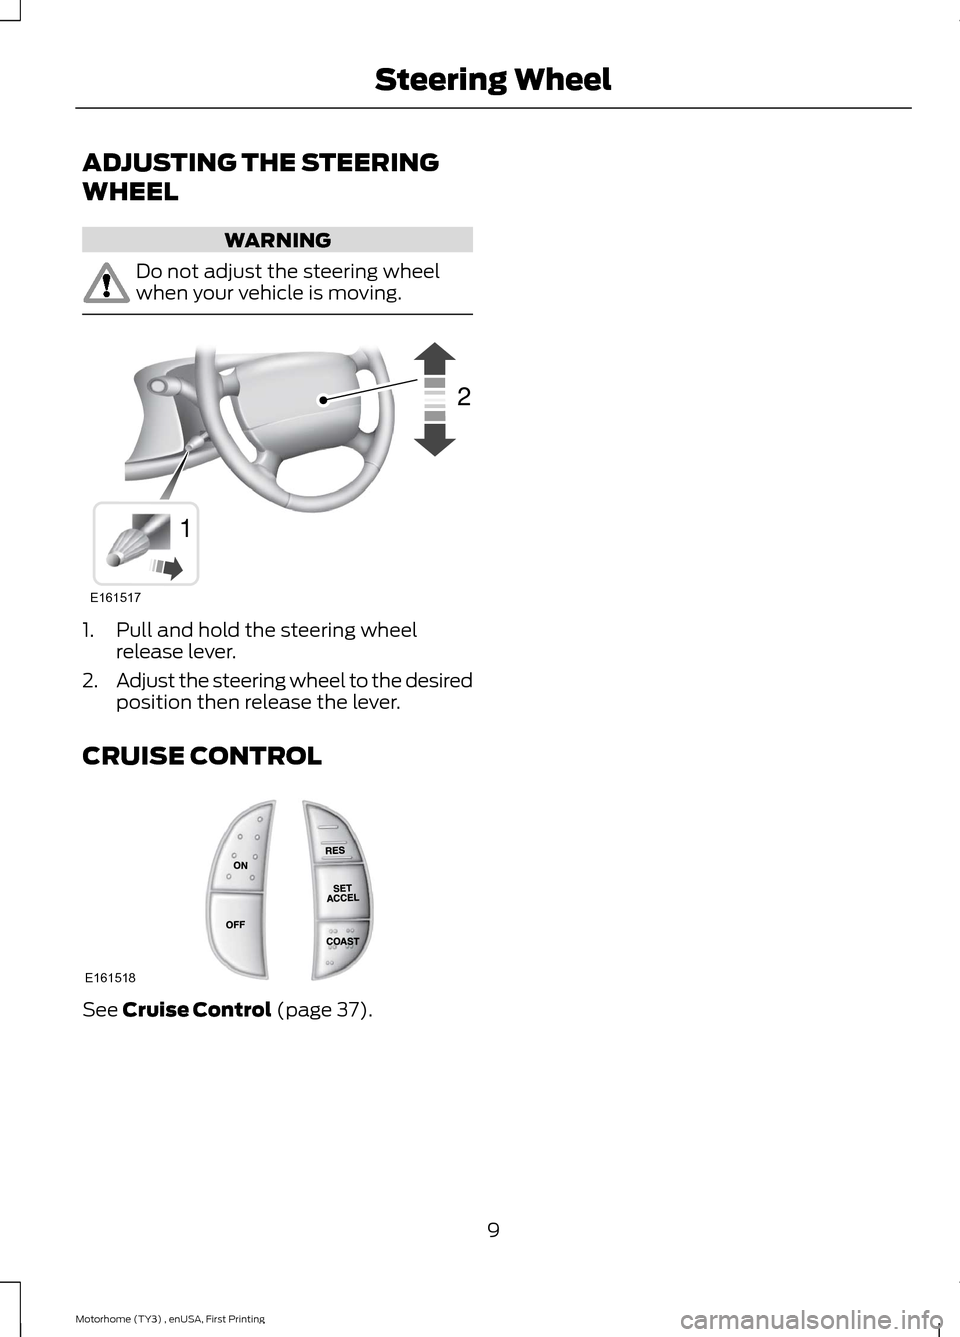
1.Pull and hold the steering wheelrelease lever.
2.Adjust the steering wheel to the desiredposition then release the lever.
CRUISE CONTROL
See Cruise Control (page 37).
9Motorhome (TY3) , enUSA, First PrintingSteering WheelE16151712 E161518
Page 13 of 154
WINDSHIELD WIPERS
Note:Fully defrost the windshield beforeswitching on the windshield wipers.
Note:Make sure the windshield wipers areswitched off before entering a car wash.
Note:Clean the windshield and wiperblades if they begin to leave streaks orsmears. If that doesn't resolve the issue,install new wiper blades.
Note:Do not operate the wipers on a drywindshield. This may scratch the glass,damage the wiper blades or cause the wipermotor to burn out. Always use thewindshield washers before wiping a drywindshield.
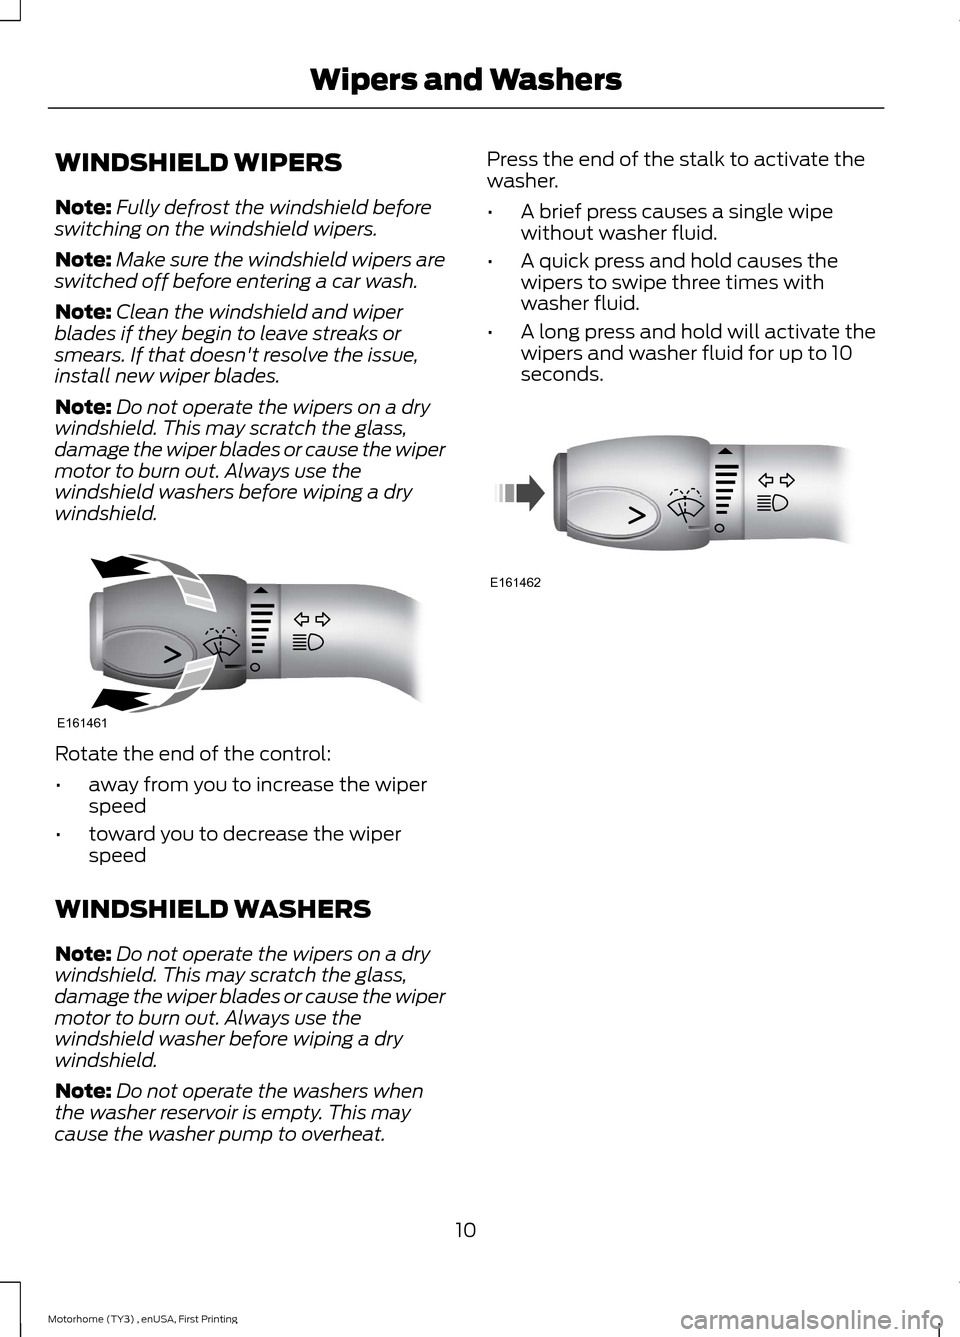
Rotate the end of the control:
•away from you to increase the wiperspeed
•toward you to decrease the wiperspeed
WINDSHIELD WASHERS
Note:Do not operate the wipers on a drywindshield. This may scratch the glass,damage the wiper blades or cause the wipermotor to burn out. Always use thewindshield washer before wiping a drywindshield.
Note:Do not operate the washers whenthe washer reservoir is empty. This maycause the washer pump to overheat.
Press the end of the stalk to activate thewasher.
•A brief press causes a single wipewithout washer fluid.
•A quick press and hold causes thewipers to swipe three times withwasher fluid.
•A long press and hold will activate thewipers and washer fluid for up to 10seconds.
10Motorhome (TY3) , enUSA, First PrintingWipers and WashersE161461 E161462
Page 14 of 154
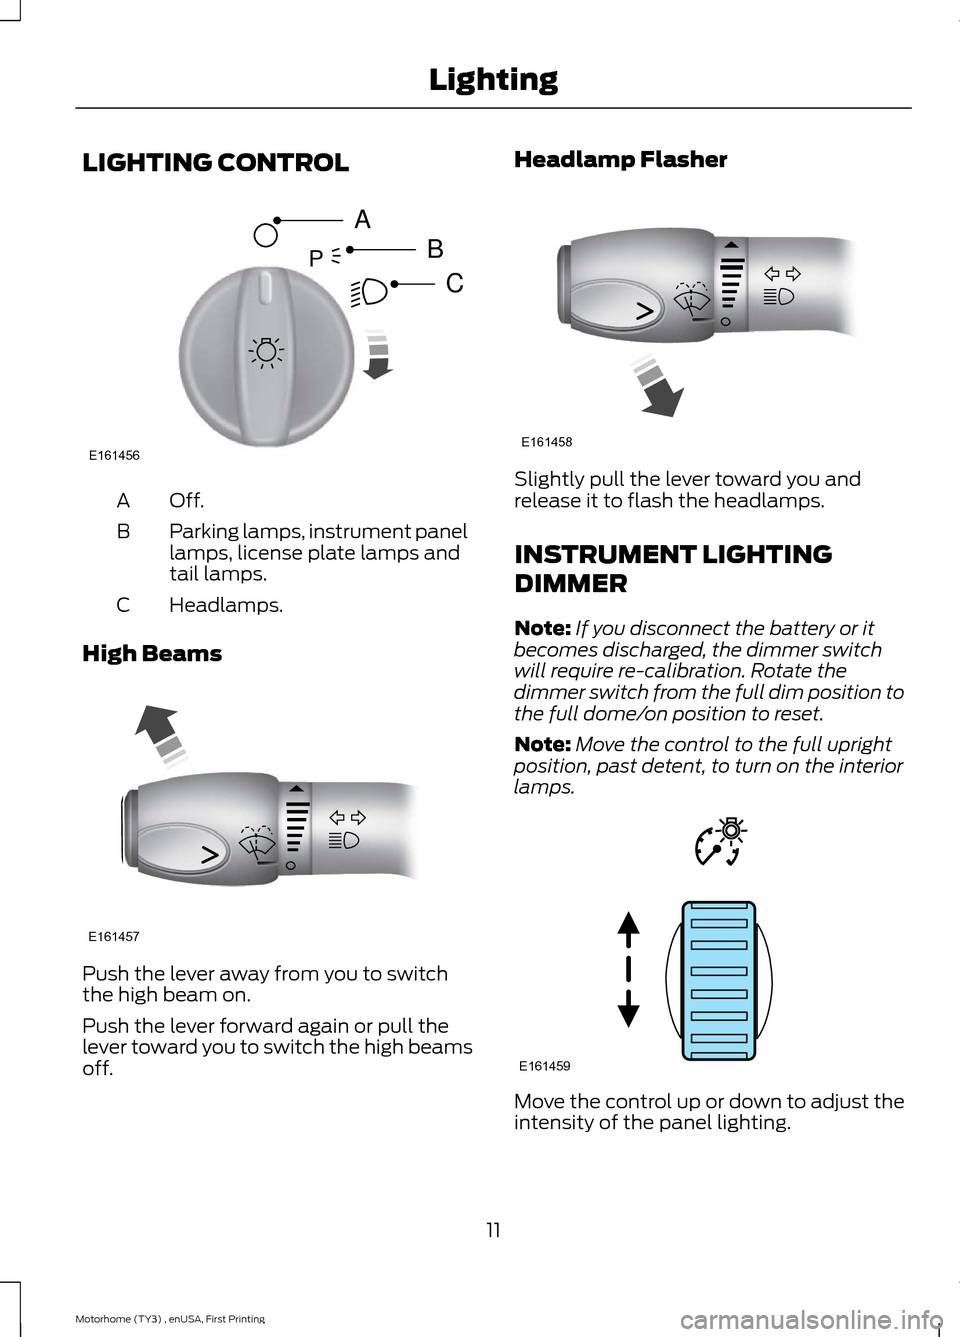
LIGHTING CONTROL
Off.A
Parking lamps, instrument panellamps, license plate lamps andtail lamps.
B
Headlamps.C
High Beams
Push the lever away from you to switchthe high beam on.
Push the lever forward again or pull thelever toward you to switch the high beamsoff.
Headlamp Flasher
Slightly pull the lever toward you andrelease it to flash the headlamps.
INSTRUMENT LIGHTING
DIMMER
Note:If you disconnect the battery or itbecomes discharged, the dimmer switchwill require re-calibration. Rotate thedimmer switch from the full dim position tothe full dome/on position to reset.
Note:Move the control to the full uprightposition, past detent, to turn on the interiorlamps.
Move the control up or down to adjust theintensity of the panel lighting.
11Motorhome (TY3) , enUSA, First PrintingLightingE161456ABCP E161457 E161458 E161459
Page 15 of 154
DAYTIME RUNNING LAMPS (If
Equipped)
WARNING
The daytime running lamps systemdoes not activate the rear lamps andmay not provide adequate lightingduring low visibility driving conditions. Also,the autolamps switch position may notactivate the headlamps in all low visibilityconditions, such as daytime fog. Make surethe headlamps are switched to auto or on,as appropriate, during all low visibilityconditions. Failure to do so may result in acrash.
The system switches the low beamheadlamps on at a reduced intensity indaylight conditions.
To switch the system on, switch theignition on, and switch the lighting controlto the off or parking lamp position.
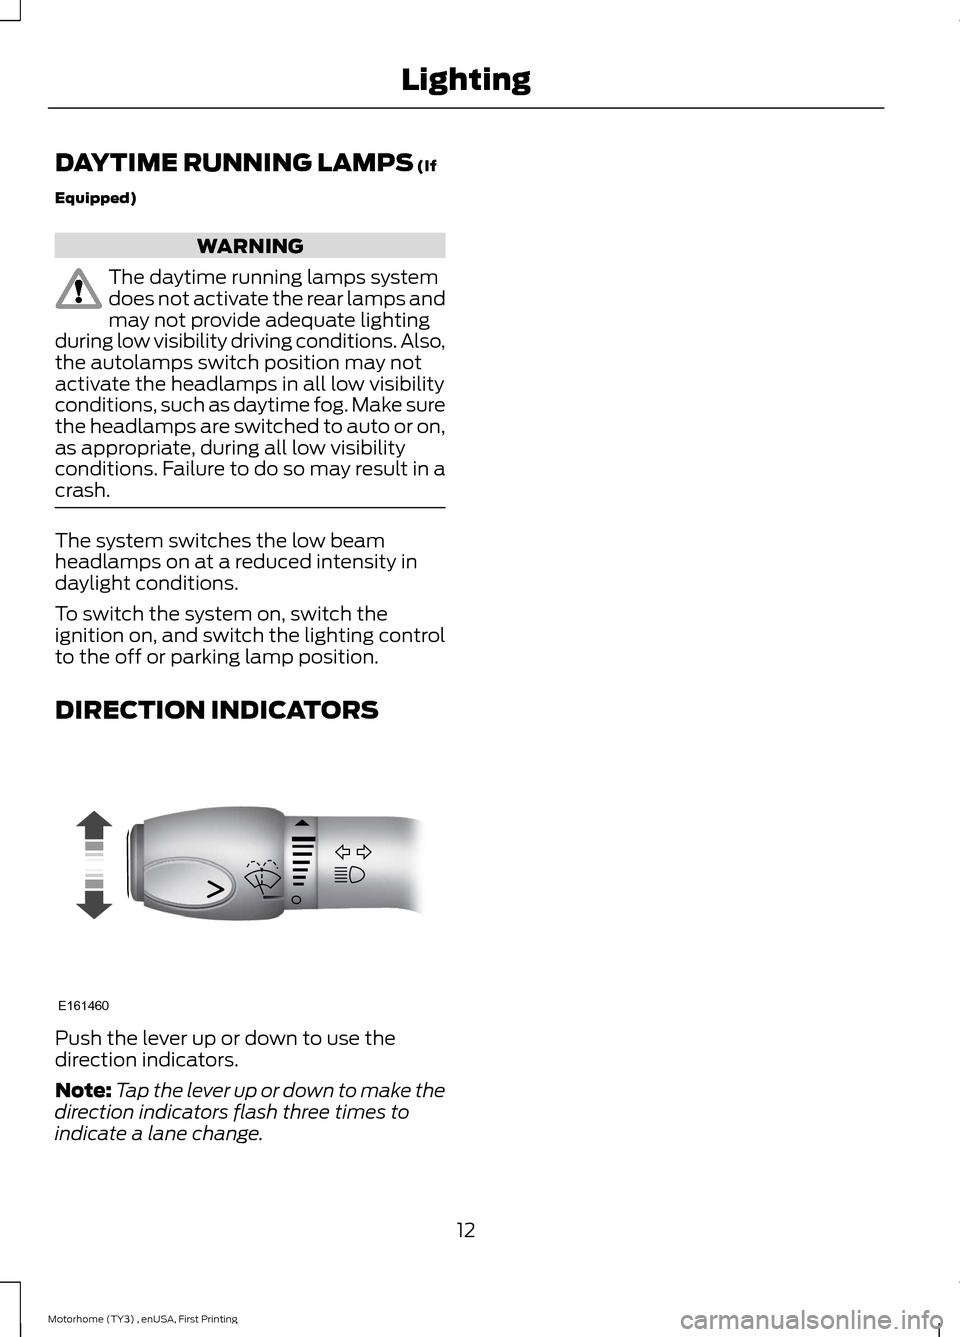
DIRECTION INDICATORS
Push the lever up or down to use thedirection indicators.
Note:Tap the lever up or down to make thedirection indicators flash three times toindicate a lane change.
12Motorhome (TY3) , enUSA, First PrintingLightingE161460
Page 16 of 154
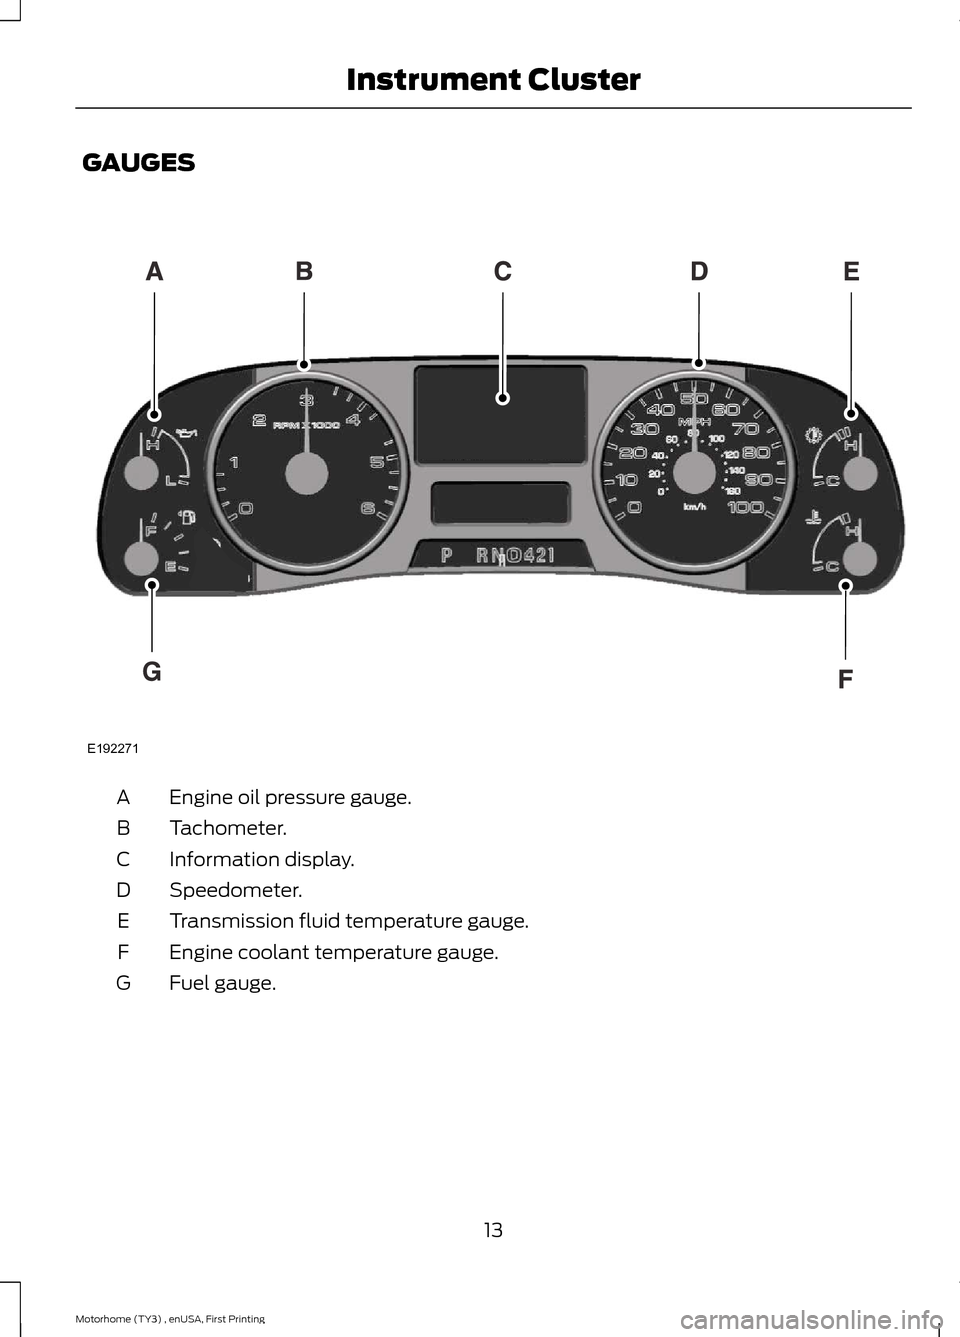
GAUGES
Engine oil pressure gauge.A
Tachometer.B
Information display.C
Speedometer.D
Transmission fluid temperature gauge.E
Engine coolant temperature gauge.F
Fuel gauge.G
13Motorhome (TY3) , enUSA, First PrintingInstrument ClusterE192271
Page 17 of 154
Engine Oil Pressure Gauge
Indicates engine oil pressure. The needleshould stay in the normal operating range(between L and H). If the needle fallsbelow the normal range, stop the vehicle,turn off the engine and check the engineoil level. Add oil if needed. If the oil level iscorrect, have your vehicle checked by yourauthorized dealer.
Speedometer
Indicates vehicle speed. Vehicle speed islimited to either 65 mph (105 km/h) or 75mph (120 km/h).
Transmission Fluid TemperatureGauge
Normal area
The transmission fluid is within the normaloperating temperature (between H andC).
Yellow area
The transmission fluid is higher thannormal operating temperature. This canbe caused by special operation conditions(i.e. snowplowing, towing or off-road use).Operating the transmission for extendedperiods of time with the gauge in theyellow area may cause internaltransmission damage. Altering the severityof the driving conditions is recommendedto lower the transmission temperature intothe normal range.
Red area
The transmission fluid is overheating. Stopthe vehicle to allow the temperature toreturn to normal range.
If the gauge is operating in the yellow orred area, stop the vehicle and verify theairflow is not restricted such as snow ordebris blocking airflow through the grill. Ifthe gauge continues to show hightemperatures, see your authorized dealer.
Engine Coolant TemperatureGauge
WARNING
Never remove the coolant reservoircap while the engine is running or hot.
At normal operating temperature, theneedle will remain in the center section.
Note:Do not restart the engine until thecause of overheating has been resolved.
If the needle enters the red section, theengine is overheating. Stop the engine,switch the ignition off and determine thecause once the engine has cooled down.
Fuel Gauge
Note:The fuel gauge may vary slightlywhen your vehicle is moving or on a slope.
Switch the ignition on. The fuel gaugeindicates approximately how much fuelyou have left in the fuel tank. The arrowadjacent to the fuel pump symbolindicates on which side of your vehicle thefuel filler door is located.
The needle should move toward F whenyou refuel your vehicle. If the needle pointsto E after adding fuel, have an authorizeddealer check the system soon.
After refueling, some variability in theposition of the needle is normal:
14Motorhome (TY3) , enUSA, First PrintingInstrument Cluster
Page 18 of 154
•It may take a short time for the needleto reach F after leaving the gas station.This is normal and depends upon theslope of the pavement at the gasstation.
•The fuel amount dispensed into thetank is a little less or more than thegauge indicated. This is normal anddepends upon the slope of thepavement at the gas station.
•If the gas station nozzle shuts offbefore the tank is full, try a differentgas pump nozzle.
•There is a small reserve left in the tankwhen the fuel gauge reaches empty.
Low Fuel Reminder
A low fuel reminder triggers when the fuelgauge needle is at one-sixteenth or about50 miles (80 km) to empty, whicheveroccurs first.
Variations:
Note:The low fuel warning and distance-to-empty warning can appear at different fuelgauge positions depending on fuel economy conditions. This variation is normal.
Distance-to-emptyFuel gauge positionDriving type (fuel economyconditions)
30 miles to 80 miles (48 kmto 129 km)1/16thHighway driving
10 miles to 35 miles (16 kmto 56 km)1/16th-1/4Severe duty driving (trailertowing, extended idle)
WARNING LAMPS AND
INDICATORS
The following warning lamps andindicators will alert you to a vehiclecondition that may become serious. Somelamps will illuminate when you start yourvehicle to make sure they work. If anylamps remain on after starting your vehicle,refer to the respective system warninglamp for further information.
Note:Some warning indicators appear inthe information display and function thesame as a warning lamp but do not displaywhen you start your vehicle.
Anti-Lock Braking System
If it illuminates when you aredriving, this indicates amalfunction. You will continueto have the normal braking system(without ABS) unless the brake systemwarning lamp is also illuminated. Have thesystem checked by your authorized dealer.
Battery
If it illuminates while driving, itindicates a malfunction. Switchoff all unnecessary electricalequipment and have the system checkedby your authorized dealer immediately.
15Motorhome (TY3) , enUSA, First PrintingInstrument Cluster
Page 19 of 154
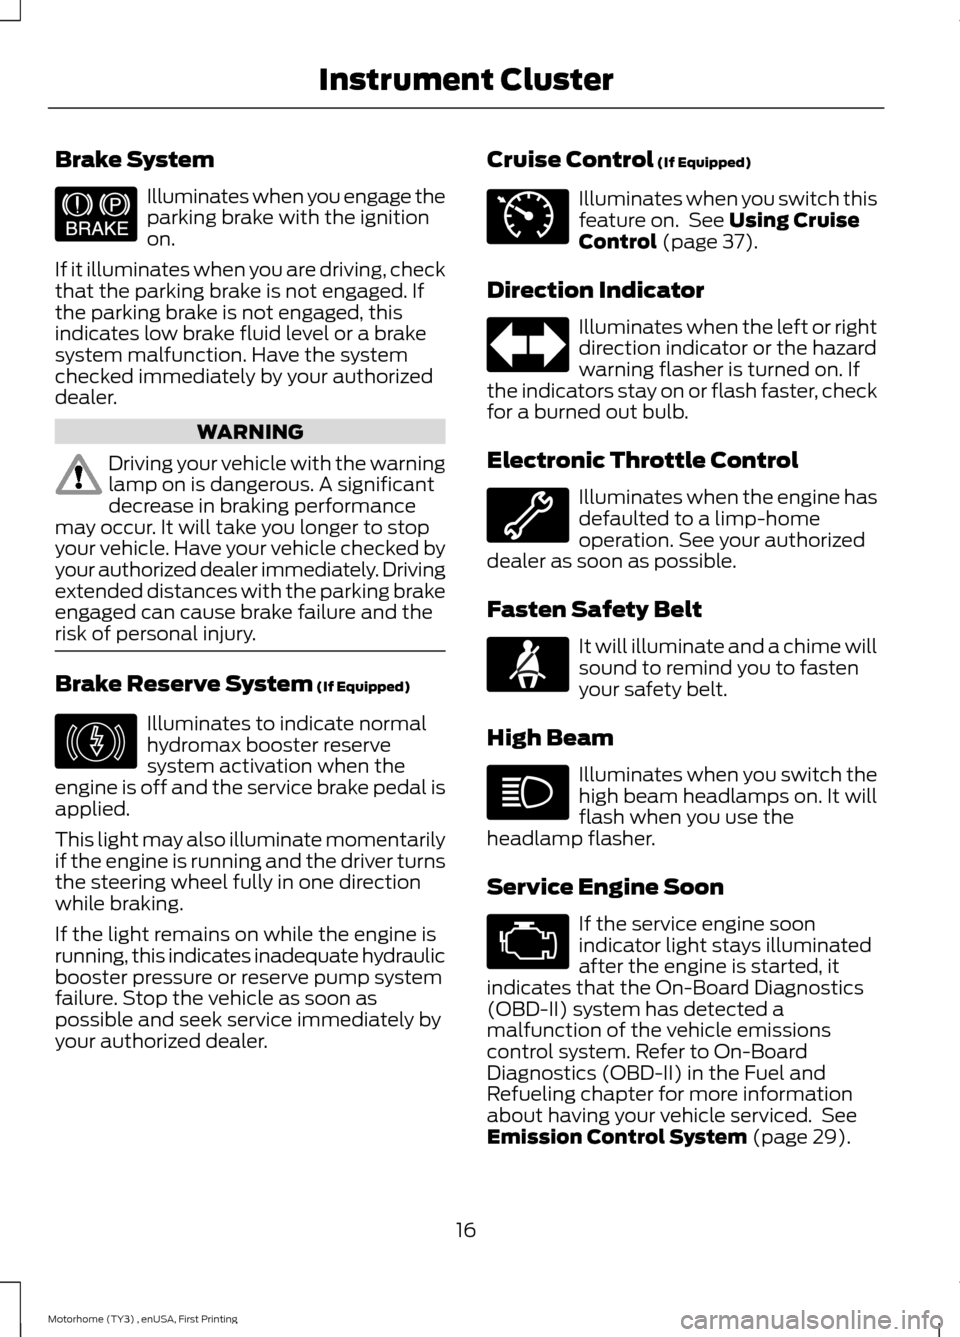
Brake System
Illuminates when you engage theparking brake with the ignitionon.
If it illuminates when you are driving, checkthat the parking brake is not engaged. Ifthe parking brake is not engaged, thisindicates low brake fluid level or a brakesystem malfunction. Have the systemchecked immediately by your authorizeddealer.
WARNING
Driving your vehicle with the warninglamp on is dangerous. A significantdecrease in braking performancemay occur. It will take you longer to stopyour vehicle. Have your vehicle checked byyour authorized dealer immediately. Drivingextended distances with the parking brakeengaged can cause brake failure and therisk of personal injury.
Brake Reserve System (If Equipped)
Illuminates to indicate normalhydromax booster reservesystem activation when theengine is off and the service brake pedal isapplied.
This light may also illuminate momentarilyif the engine is running and the driver turnsthe steering wheel fully in one directionwhile braking.
If the light remains on while the engine isrunning, this indicates inadequate hydraulicbooster pressure or reserve pump systemfailure. Stop the vehicle as soon aspossible and seek service immediately byyour authorized dealer.
Cruise Control (If Equipped)
Illuminates when you switch thisfeature on. See Using CruiseControl (page 37).
Direction Indicator
Illuminates when the left or rightdirection indicator or the hazardwarning flasher is turned on. Ifthe indicators stay on or flash faster, checkfor a burned out bulb.
Electronic Throttle Control
Illuminates when the engine hasdefaulted to a limp-homeoperation. See your authorizeddealer as soon as possible.
Fasten Safety Belt
It will illuminate and a chime willsound to remind you to fastenyour safety belt.
High Beam
Illuminates when you switch thehigh beam headlamps on. It willflash when you use theheadlamp flasher.
Service Engine Soon
If the service engine soonindicator light stays illuminatedafter the engine is started, itindicates that the On-Board Diagnostics(OBD-II) system has detected amalfunction of the vehicle emissionscontrol system. Refer to On-BoardDiagnostics (OBD-II) in the Fuel andRefueling chapter for more informationabout having your vehicle serviced. SeeEmission Control System (page 29).
16Motorhome (TY3) , enUSA, First PrintingInstrument ClusterE144522 E146190 E71340
Page 20 of 154
If the light is blinking, engine misfire isoccurring which could damage yourcatalytic converter. Drive in a moderatefashion (avoid heavy acceleration anddeceleration) and have your vehicleserviced immediately.
WARNING
Under engine misfire conditions,excessive exhaust temperaturescould damage the catalyticconverter, the fuel system, interior floorcoverings or other vehicle components,possibly causing a fire. Have your vehicleserviced immediately.
The service engine soon indicator lightilluminates when the ignition is first turnedon prior to engine start to check the bulband to indicate whether the vehicle is readyfor Inspection/Maintenance (I/M) testing.
Normally, the service engine soon light willstay on until the engine is cranked, thenturn itself off if no malfunctions arepresent. However, if after 15 seconds theservice engine soon light blinks eight times,it means that the vehicle is not ready forI/M testing. See Emission ControlSystem (page 29).
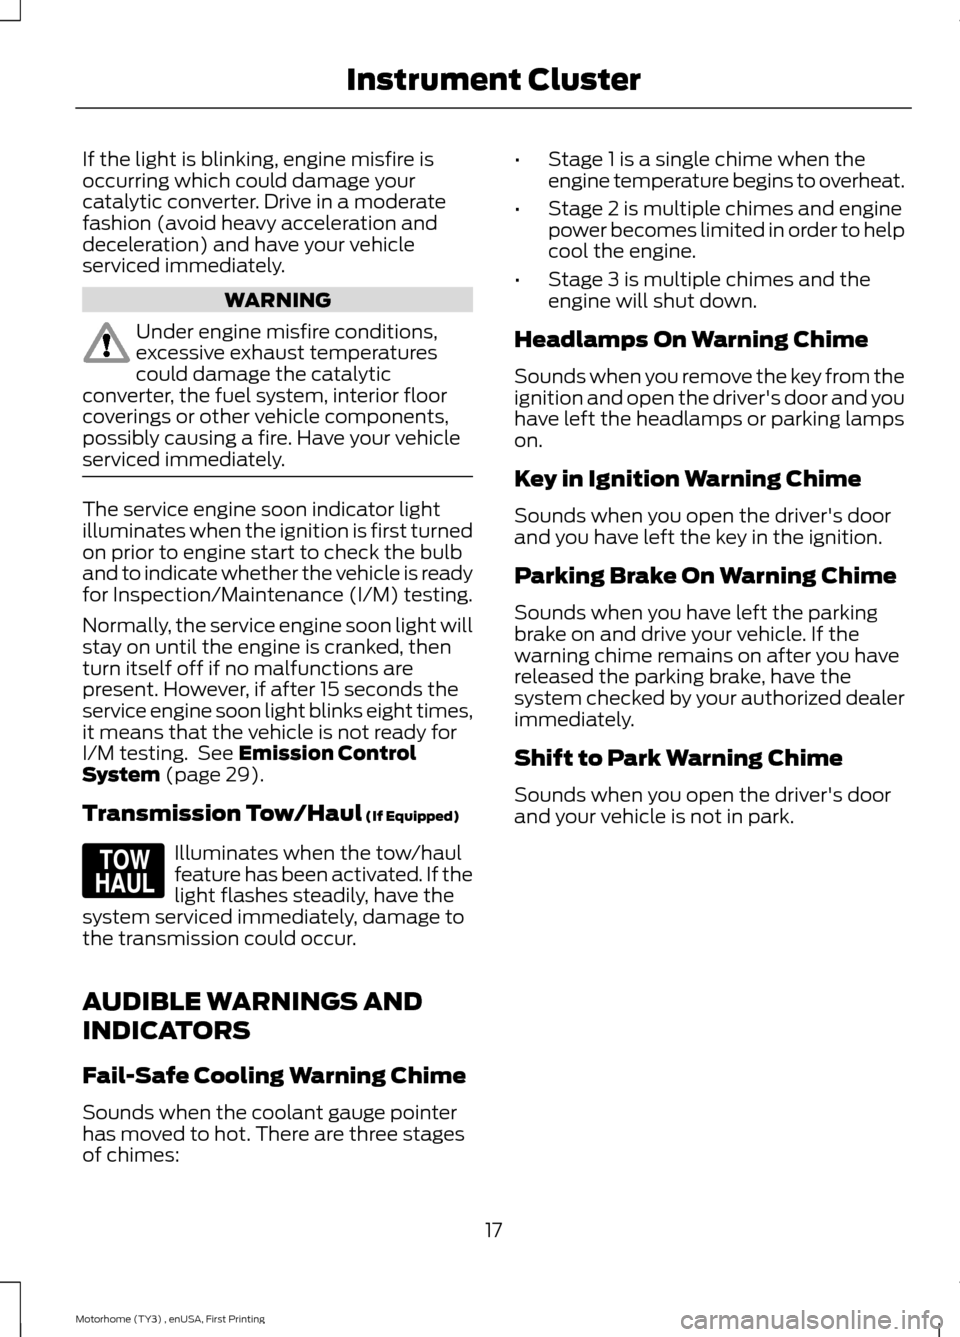
Transmission Tow/Haul (If Equipped)
Illuminates when the tow/haulfeature has been activated. If thelight flashes steadily, have thesystem serviced immediately, damage tothe transmission could occur.
AUDIBLE WARNINGS AND
INDICATORS
Fail-Safe Cooling Warning Chime
Sounds when the coolant gauge pointerhas moved to hot. There are three stagesof chimes:
•Stage 1 is a single chime when theengine temperature begins to overheat.
•Stage 2 is multiple chimes and enginepower becomes limited in order to helpcool the engine.
•Stage 3 is multiple chimes and theengine will shut down.
Headlamps On Warning Chime
Sounds when you remove the key from theignition and open the driver's door and youhave left the headlamps or parking lampson.
Key in Ignition Warning Chime
Sounds when you open the driver's doorand you have left the key in the ignition.
Parking Brake On Warning Chime
Sounds when you have left the parkingbrake on and drive your vehicle. If thewarning chime remains on after you havereleased the parking brake, have thesystem checked by your authorized dealerimmediately.
Shift to Park Warning Chime
Sounds when you open the driver's doorand your vehicle is not in park.
17Motorhome (TY3) , enUSA, First PrintingInstrument ClusterE161509