instrument cluster FORD F150 2000 10.G Owners Manual
[x] Cancel search | Manufacturer: FORD, Model Year: 2000, Model line: F150, Model: FORD F150 2000 10.GPages: 280, PDF Size: 1.89 MB
Page 8 of 280
0E
L
LH H
F
CH
DPRND2CRUISEDOOR
AJARSELECT
RESET
4X4
LOW
RANGE
20406080
00
20
40
60
BRAKEMPHkm/h
THEFT
LOW
FUEL
FUEL DOOR SERVICE
ENGINE
SOON
ON
OFFRES
SET
ACCEL
COAST
A
P
PEDALS
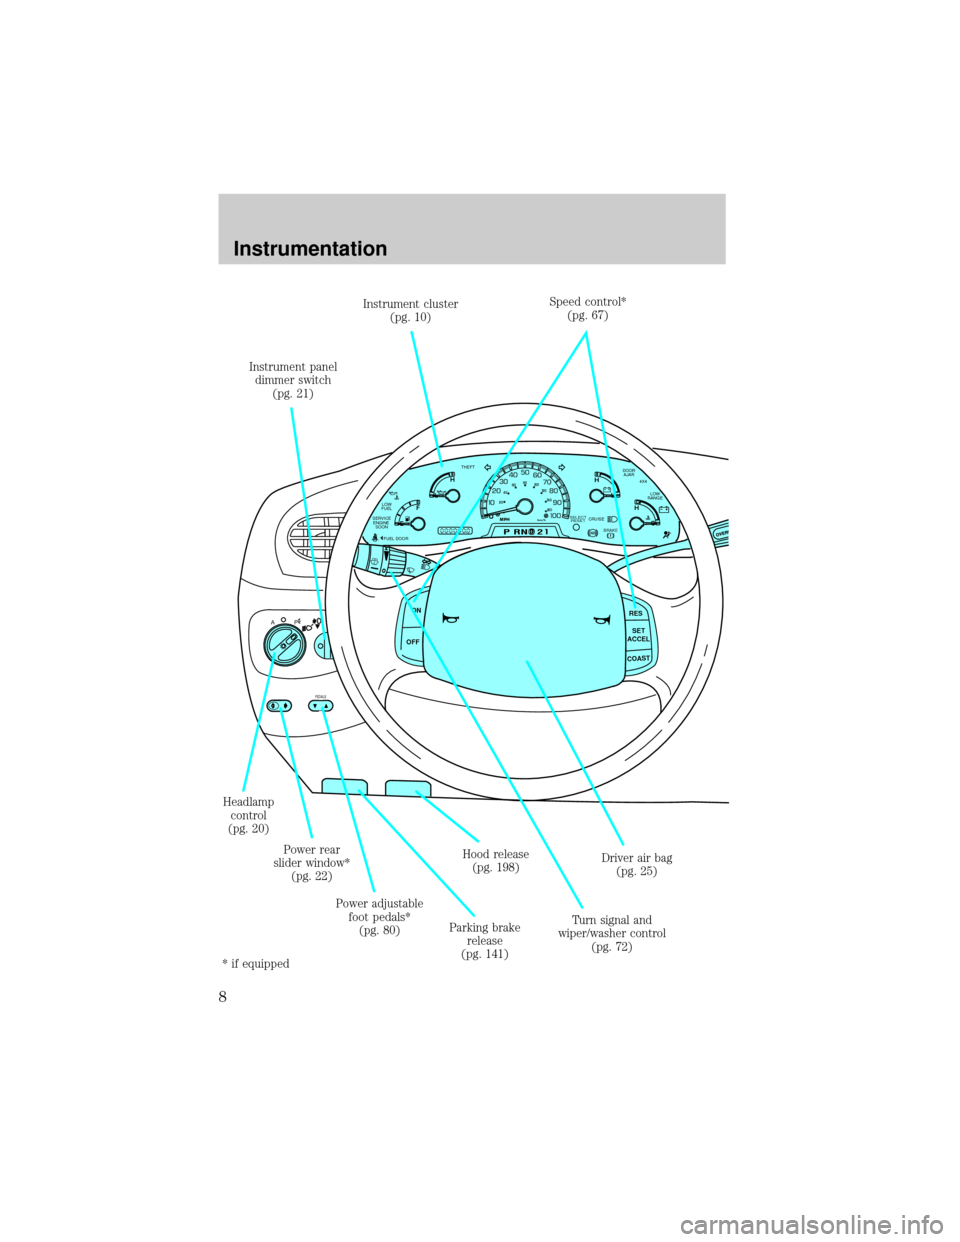
Headlamp
control
(pg. 20)Instrument panel
dimmer switch
(pg. 21)
Turn signal and
wiper/washer control
(pg. 72) Instrument cluster
(pg. 10)Speed control*
(pg. 67)
Driver air bag
(pg. 25)
Parking brake
release
(pg. 141)Hood release
(pg. 198)
Power adjustable
foot pedals*
(pg. 80) Power rear
slider window*
(pg. 22)
* if equipped
Instrumentation
8
Page 10 of 280
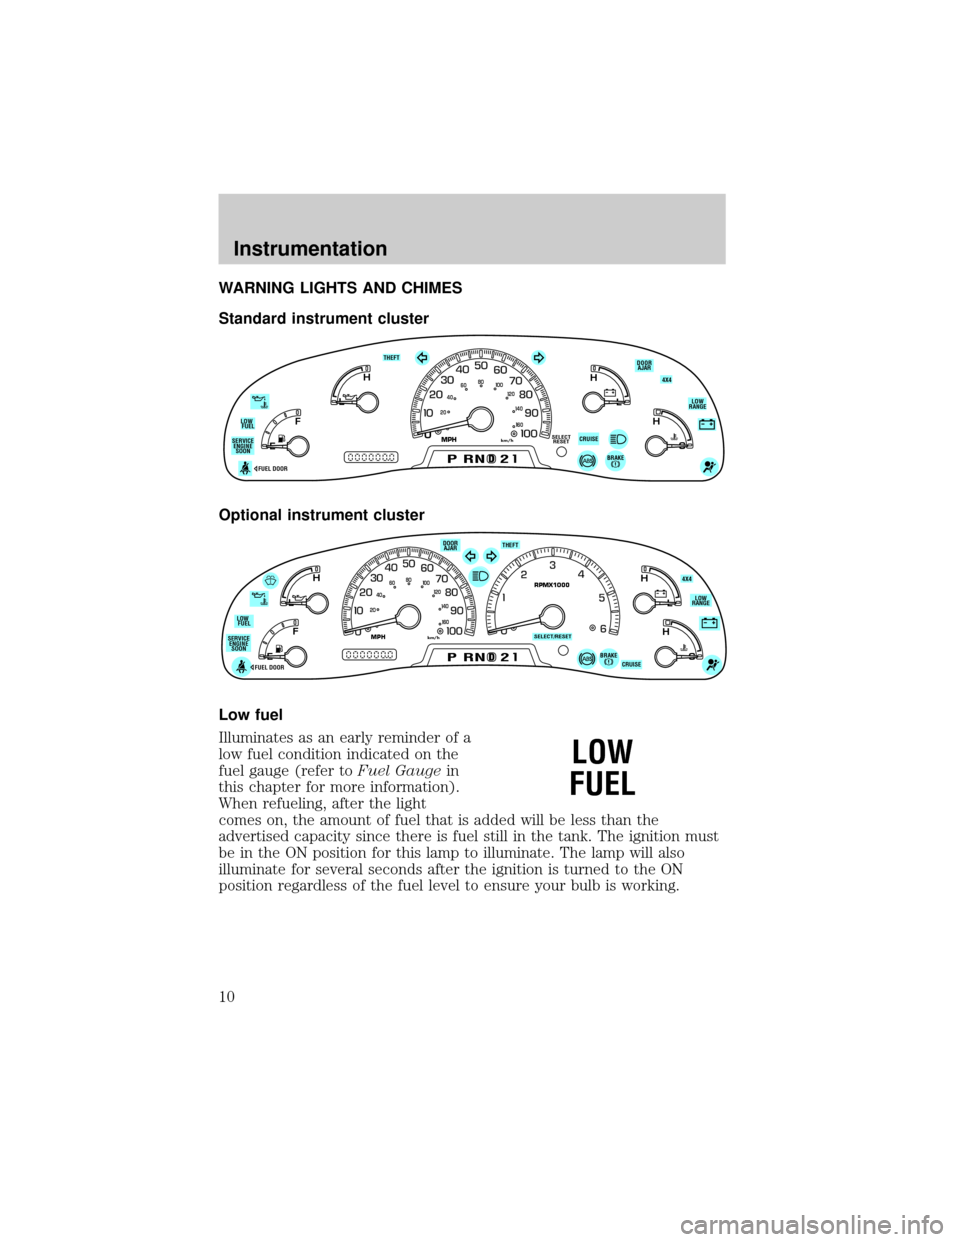
WARNING LIGHTS AND CHIMES
Standard instrument cluster
Optional instrument cluster
Low fuel
Illuminates as an early reminder of a
low fuel condition indicated on the
fuel gauge (refer toFuel Gaugein
this chapter for more information).
When refueling, after the light
comes on, the amount of fuel that is added will be less than the
advertised capacity since there is fuel still in the tank. The ignition must
be in the ON position for this lamp to illuminate. The lamp will also
illuminate for several seconds after the ignition is turned to the ON
position regardless of the fuel level to ensure your bulb is working.
0
E
L
L
H H
F
CH
DPRND2
CRUISEDOOR
AJARSELECT
RESET
4X4
LOW
RANGE THEFT
FUEL DOOR SERVICE
ENGINE
SOONLOW
FUEL
20406080
00
20
40
60
BRAKE
MPHkm/h
D
L
H
L
H
E
F
C
H
BRAKEPRND2CRUISE DOOR
AJAR
SELECT/RESET
4X4
LOW
RANGE THEFT
FUEL DOOR SERVICE
ENGINE
SOONLOW
FUEL
0MPHRPMX1000km/h
20406080
00
20
40
60
LOW
FUEL
Instrumentation
10
Page 16 of 280
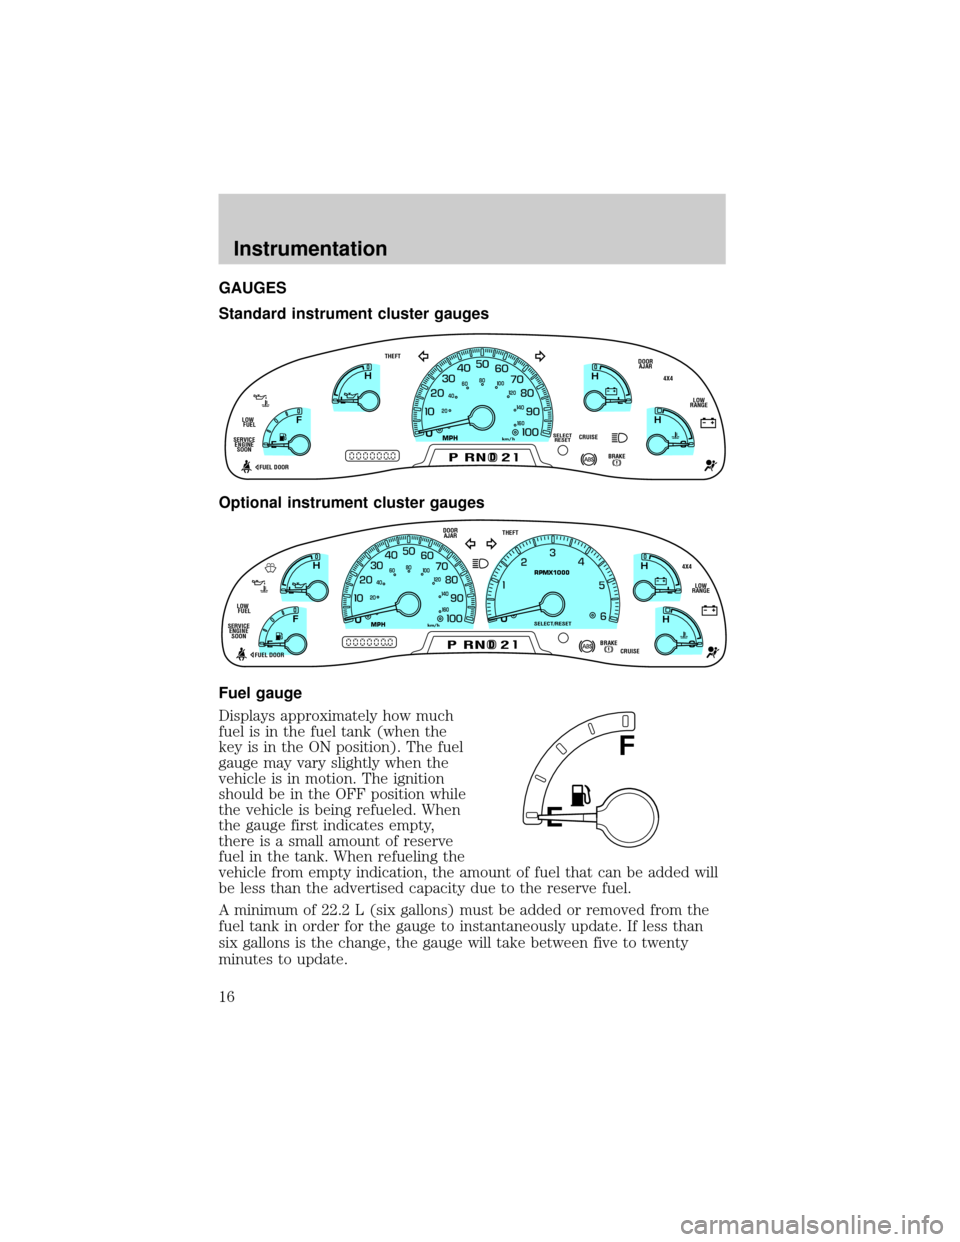
GAUGES
Standard instrument cluster gauges
Optional instrument cluster gauges
Fuel gauge
Displays approximately how much
fuel is in the fuel tank (when the
key is in the ON position). The fuel
gauge may vary slightly when the
vehicle is in motion. The ignition
should be in the OFF position while
the vehicle is being refueled. When
the gauge first indicates empty,
there is a small amount of reserve
fuel in the tank. When refueling the
vehicle from empty indication, the amount of fuel that can be added will
be less than the advertised capacity due to the reserve fuel.
A minimum of 22.2 L (six gallons) must be added or removed from the
fuel tank in order for the gauge to instantaneously update. If less than
six gallons is the change, the gauge will take between five to twenty
minutes to update.
0
E
L
L
H H
F
CH
D
CRUISE
BRAKE
MPHkm/h
PRND2
DOOR
AJAR
SELECT
RESET
4X4
LOW
RANGE THEFT
FUEL DOOR SERVICE
ENGINE
SOONLOW
FUEL
20406080
00
20
40
60
D
L
H
L
H
E
F
C
H
BRAKEPRND2CRUISE DOOR
AJAR
SELECT/RESET
4X4
LOW
RANGE THEFT
FUEL DOOR SERVICE
ENGINE
SOONLOW
FUEL
0MPHRPMX1000km/h
20406080
00
20
40
60
E
F
Instrumentation
16
Page 88 of 280

objects on the key ring held away from the ignition key. Check to make
sure the encoded ignition key is an approved Ford encoded ignition key.
Spare coded keys can be purchased from your dealership and
programmed to your anti-theft system. Refer toProgramming spare
SecuriLockykeysfor more information.
If one or both of your coded keys are lost or stolen and you want to
ensure the lost or stolen key will not operate your vehicle, bring your
vehicle and all available coded keys to your dealership for reinitialization.
Theft indicator
The theft indicator in the instrument cluster will operate as follows:
²When the ignition is OFF, the theft indicator will flash briefly every
two seconds to indicate the anti-theft system is protecting your
vehicle.
²When the ignition is turned to ON or START, the theft indicator will
light for three seconds and then go out. If the theft indicator stays on
for an extended period of time or flashes rapidly, have the system
serviced by your dealership or a qualified technician.
Programming spare SecuriLockYkeys
Spare coded keys can be purchased from your dealership and
programmed to your anti-theft system (up to a total of eight keys). Your
dealership can program your new coded key(s) to your vehicle or you
can do it yourself using the following simple procedure. To program a
new coded key yourself, you will need two previously programmed coded
keys (keys that already operate your vehicle's engine). If two previously
programmed coded keys are not available (one or both of your original
keys were lost or stolen), you must bring your vehicle to your dealership
to have the spare coded key(s) programmed.
Procedure to program spare SecuriLockYkeys to your vehicle
New coded keys must have the correct mechanical key cut for your vehicle.
Conventional (non-coded) keyscannotbe programmed to your vehicle.
You will need to have two previously programmed coded keys and the
new unprogrammed SecuriLockykey readily accessible for timely
implementation of each step in the procedure. Please read and
understand the entire procedure before you begin.
Controls and features
88
Page 108 of 280
Use only extensions manufactured by the same supplier as the safety
belt. Manufacturer identification is located at the end of the webbing on
the label. Also, use the safety belt extension only if the safety belt is too
short for you when fully extended. Do not use extensions to change the
fit of the shoulder belt across the torso.
Safety belt warning light and indicator chime
The seat belt warning light illuminates in the instrument cluster and a
chime sounds to remind the occupants to fasten their safety belts.
Conditions of operation
If... Then...
The driver's safety belt is not
buckled before the ignition
switch is turned to the ON
position...The safety belt warning light
illuminates1-2 minutes and the
warning chime sounds 4-8 seconds.
The driver's safety belt is
buckled while the indicator
light is illuminated and the
warning chime is sounding...The safety belt warning light and
warning chime turn off.
The driver's safety belt is
buckled before the ignition
switch is turned to the ON
position...The safety belt warning light and
indicator chime remain off.
Belt minder (if equipped)
The Belt Minder feature is a supplemental warning to the safety belt
warning function. This feature provides additional reminders to the
driver that the driver's safety belt is unbuckled by intermittently
sounding a chime and illuminating the safety belt warning lamp in the
instrument cluster.
Seating and safety restraints
108
Page 116 of 280
Several air bag system components get hot after inflation. Do not
touch them after inflation.
If the air bag has deployed,the air bag will not function
again and must be replaced immediately.If the air bag is not
replaced, the unrepaired area will increase the risk of injury in a
collision.
The SRS consists of:
²driver and passenger air bag modules (which include the inflators and
air bags),
²one or more impact and safing sensors, passenger air bag deactivation
switch and diagnostic monitor (RCM)
²a readiness light and tone,
²and the electrical wiring which connects the components.
The RCM (restraints control module) monitors its own internal circuits
and the supplemental air bag electrical system warning (including the
passenger air bag deactivation switch, the impact sensors, the system
wiring, the air bag system readiness light, the air bag back up power and
the air bag ignitors).
Determining if the system is operational
The SRS uses readiness lights in the instrument cluster and the
passenger air bag deactivate switch or a tone to indicate the condition of
the system. Refer to theAir bag readinesssection in the
Instrumentationchapter orPassenger air bag deactivate switch
section in this chapter. Routine maintenance of the air bag is not
required.
A difficulty with the system is indicated by one or more of the following:
²The readiness lights will either
flash or stay lit.
²The readiness lights will not
illuminate immediately after
ignition is turned on.
²A series of five beeps will be heard. The tone pattern will repeat
periodically until the problem and/or light are repaired.
Seating and safety restraints
116
Page 138 of 280
BRAKES
Your service brakes are self-adjusting. Refer to the scheduled
maintenance guide for scheduled maintenance.
Occasional brake noise is normal and often does not indicate a
performance concern with the vehicle's brake system. In normal
operation, automotive brake systems may emit occasional or intermittent
squeal or groan noises when the brakes are applied. Such noises are
usually heard during the first few brake applications in the morning;
however, they may be heard at any time while braking and can be
aggravated by environmental conditions such as cold, heat, moisture,
road dust, salt or mud. If a ªmetal-to-metal,º ªcontinuous grindingº or
ªcontinuous squealº sound is present while braking, the brake linings
may be worn-out and should be inspected by a qualified service
technician.
Rear anti-lock brake system (RABS)
Rear Anti-lock Brake System (RABS) is standard equipment on this
vehicle. RABS is designed to help you maintain directional stability in
emergency stopping situations. With RABS, the rear brakes are kept from
locking during panic stops; however, the front wheels can lock because
they are not controlled by RABS.
A clicking noise and slight pedal pulsation during RABS braking events
indicates the RABS is functioning. Pedal pulsation coupled with clicking
noise while braking under panic conditions on loose gravel, wet or snowy
roads is normal and indicates proper functioning of the vehicle's RABS. If
the vehicle has continuous vibration or shudder in the steering wheel
while braking, the vehicle should be inspected by a qualified service
technician.
The RABS operates by detecting the onset of rear wheel lockup during
brake applications and compensating for this tendency.
RABS warning lamp
TheABSwarning lamp in the instrument cluster momentarily illuminates
when the ignition is turned to the ON position. If the light does not
illuminate momentarily at start up, remains on or continues to flash, the
ABS needs to be serviced.
Driving
138
Page 140 of 280
ABS warning lampABS
TheABSwarning lamp in the instrument cluster momentarily illuminates
when the ignition is turned to the ON position. If the light does not
illuminate momentarily at start up, remains on or continues to flash, the
ABS needs to be serviced.
With the ABS light on, the anti-lock
brake system is disabled and normal
braking is still effective unless the
brake warning light also remains
illuminated with parking brake
released. (If your brake warning lamp illuminates, have your vehicle
serviced immediately.)
Using ABS
²In an emergency or when maximum efficiency from the four wheel
ABS is required, apply continuous force on the brake. The four wheel
ABS will be activated immediately, thus allowing you to retain full
steering control of your vehicle and, providing there is sufficient
space, will enable you to avoid obstacles and bring the vehicle to a
controlled stop.
²The Anti-Lock system does not decrease the time necessary to apply
the brakes or always reduce stopping distance. Always leave enough
room between your vehicle and the vehicle in front of you to stop.
²We recommend that you familiarize yourself with this braking
technique. However, avoid taking any unnecessary risks.
!
BRAKE
Driving
140
Page 141 of 280
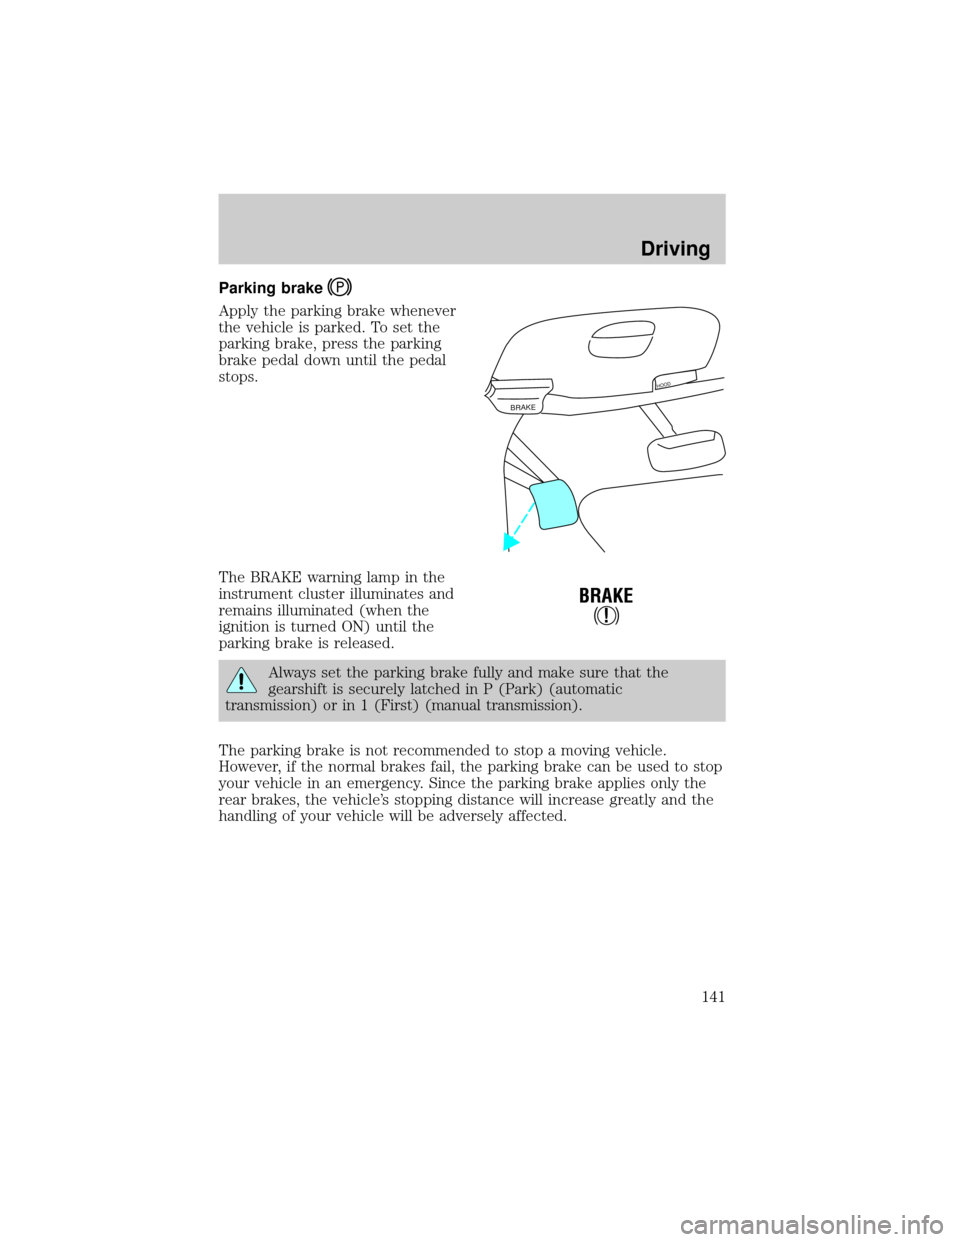
Parking brake
Apply the parking brake whenever
the vehicle is parked. To set the
parking brake, press the parking
brake pedal down until the pedal
stops.
The BRAKE warning lamp in the
instrument cluster illuminates and
remains illuminated (when the
ignition is turned ON) until the
parking brake is released.
Always set the parking brake fully and make sure that the
gearshift is securely latched in P (Park) (automatic
transmission) or in 1 (First) (manual transmission).
The parking brake is not recommended to stop a moving vehicle.
However, if the normal brakes fail, the parking brake can be used to stop
your vehicle in an emergency. Since the parking brake applies only the
rear brakes, the vehicle's stopping distance will increase greatly and the
handling of your vehicle will be adversely affected.
BRAKE
HOOD
!
BRAKE
Driving
141
Page 181 of 280
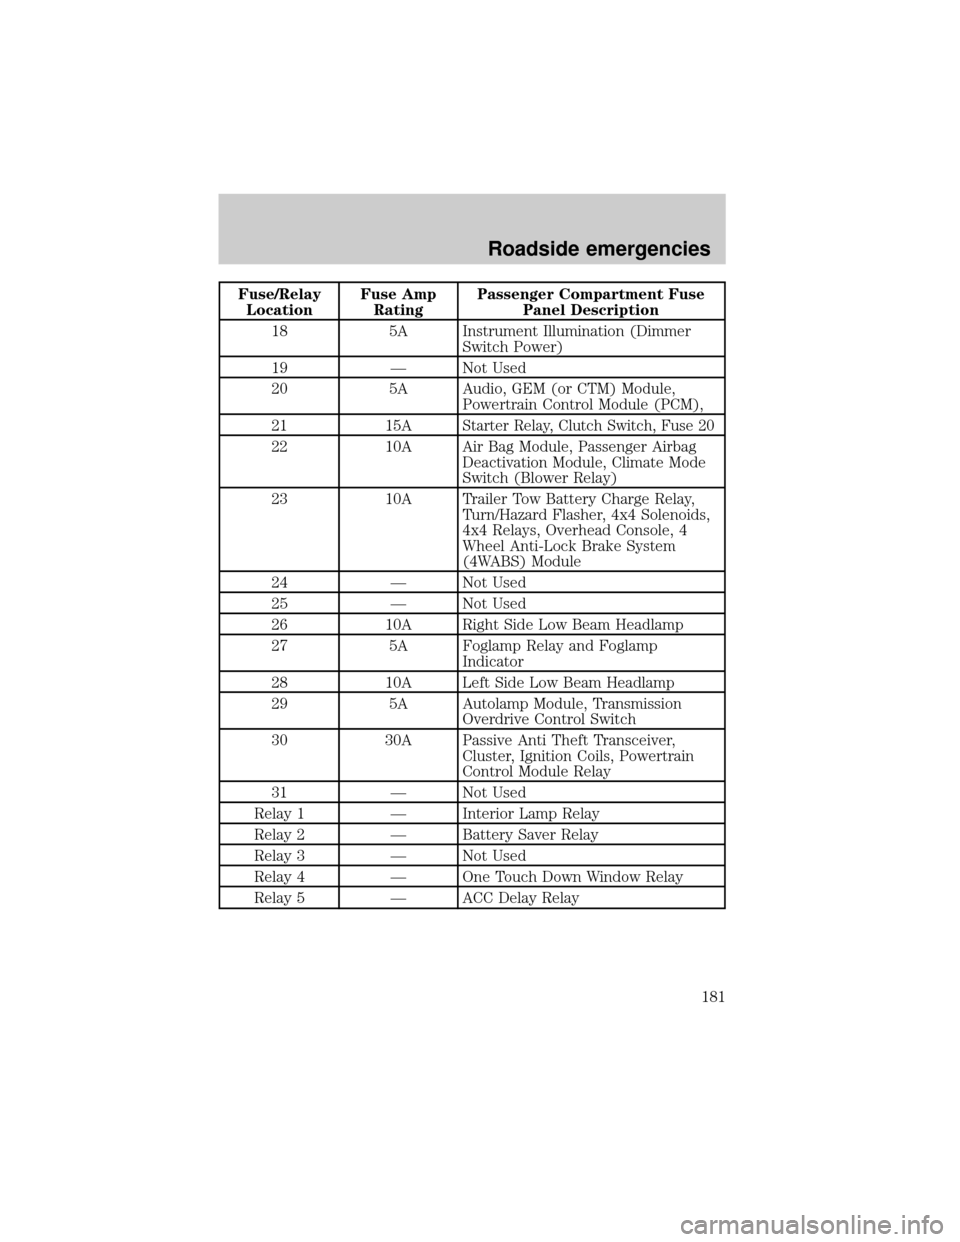
Fuse/Relay
LocationFuse Amp
RatingPassenger Compartment Fuse
Panel Description
18 5A Instrument Illumination (Dimmer
Switch Power)
19 Ð Not Used
20 5A Audio, GEM (or CTM) Module,
Powertrain Control Module (PCM),
21 15A
Starter Relay, Clutch Switch, Fuse 20
22 10A Air Bag Module, Passenger Airbag
Deactivation Module, Climate Mode
Switch (Blower Relay)
23 10A Trailer Tow Battery Charge Relay,
Turn/Hazard Flasher, 4x4 Solenoids,
4x4 Relays, Overhead Console, 4
Wheel Anti-Lock Brake System
(4WABS) Module
24 Ð Not Used
25 Ð Not Used
26 10A Right Side Low Beam Headlamp
27 5A Foglamp Relay and Foglamp
Indicator
28 10A Left Side Low Beam Headlamp
29 5A Autolamp Module, Transmission
Overdrive Control Switch
30 30A Passive Anti Theft Transceiver,
Cluster, Ignition Coils, Powertrain
Control Module Relay
31 Ð Not Used
Relay 1 Ð Interior Lamp Relay
Relay 2 Ð Battery Saver Relay
Relay 3 Ð Not Used
Relay 4 Ð One Touch Down Window Relay
Relay 5 Ð ACC Delay Relay
Roadside emergencies
181