warning lights FORD F150 2017 13.G User Guide
[x] Cancel search | Manufacturer: FORD, Model Year: 2017, Model line: F150, Model: FORD F150 2017 13.GPages: 599, PDF Size: 7.34 MB
Page 240 of 599
For manual transmissions, the Blind Spot
Information System is on for all gears
except the reverse (R).
Note:
For automatic transmissions, the
Blind Spot Information System does not
function in reverse (R) or park (P).
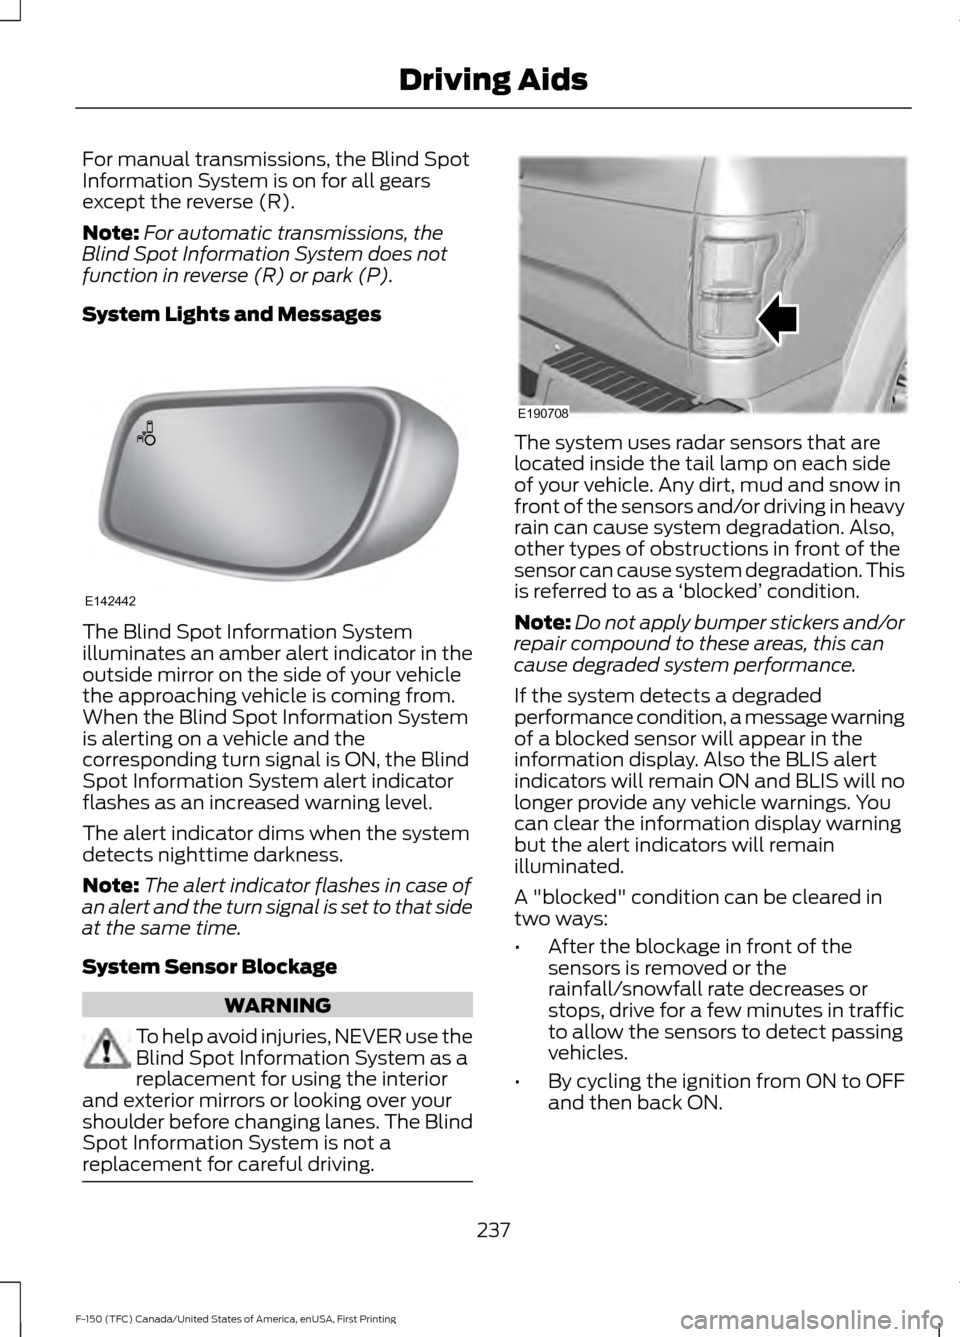
System Lights and Messages The Blind Spot Information System
illuminates an amber alert indicator in the
outside mirror on the side of your vehicle
the approaching vehicle is coming from.
When the Blind Spot Information System
is alerting on a vehicle and the
corresponding turn signal is ON, the Blind
Spot Information System alert indicator
flashes as an increased warning level.
The alert indicator dims when the system
detects nighttime darkness.
Note:
The alert indicator flashes in case of
an alert and the turn signal is set to that side
at the same time.
System Sensor Blockage WARNING
To help avoid injuries, NEVER use the
Blind Spot Information System as a
replacement for using the interior
and exterior mirrors or looking over your
shoulder before changing lanes. The Blind
Spot Information System is not a
replacement for careful driving. The system uses radar sensors that are
located inside the tail lamp on each side
of your vehicle. Any dirt, mud and snow in
front of the sensors and/or driving in heavy
rain can cause system degradation. Also,
other types of obstructions in front of the
sensor can cause system degradation. This
is referred to as a
‘blocked ’ condition.
Note: Do not apply bumper stickers and/or
repair compound to these areas, this can
cause degraded system performance.
If the system detects a degraded
performance condition, a message warning
of a blocked sensor will appear in the
information display. Also the BLIS alert
indicators will remain ON and BLIS will no
longer provide any vehicle warnings. You
can clear the information display warning
but the alert indicators will remain
illuminated.
A "blocked" condition can be cleared in
two ways:
• After the blockage in front of the
sensors is removed or the
rainfall/snowfall rate decreases or
stops, drive for a few minutes in traffic
to allow the sensors to detect passing
vehicles.
• By cycling the ignition from ON to OFF
and then back ON.
237
F-150 (TFC) Canada/United States of America, enUSA, First Printing Driving AidsE142442 E190708
Page 282 of 599
Function
Color
Battery (+)*
Orange
Running lights
Brown
Reverse lights
Grey
*Your vehicle must recognize the trailer
before the trailer can receive power.
Recognizing a Trailer
1. Attach the trailer and wiring connector
to your vehicle.
2. Switch on your vehicle.
3. Press the brake pedal for a few seconds.
A confirmation message appears in the
information display. See Information
Messages (page 126).
Hitches
Do not use a hitch that either clamps onto
the bumper or attaches to the axle. You
must distribute the load in your trailer so
that 10-15% of the total weight of the
trailer is on the tongue.
Weight-distributing Hitches WARNING
Do not adjust the spring bars so that
your vehicle's rear bumper is higher
than before attaching the trailer.
Doing so will defeat the function of the
weight-distributing hitch, which may cause
unpredictable handling, and could result
in serious personal injury. When hooking-up a trailer using a
weight-distributing hitch, always use the
following procedure:
1. Park the loaded vehicle, without the
trailer, on a level surface. 2. Measure the height to the top of your
vehicle's front wheel opening on the
fender. This is H1.
3. Attach the loaded trailer to your vehicle
without the weight-distributing bars
connected.
4. Measure the height to the top of your vehicle's front wheel opening on the
fender a second time. This is H2.
5. Install and adjust the tension in the weight-distributing bars so that the
height of your vehicle's front wheel
opening on the fender is approximately
a quarter the way down from H2,
toward H1.
6. Check that the trailer is level or slightly
nose down toward your vehicle. If not,
adjust the ball height accordingly and
repeat Steps 2-6.
Once the trailer is level or slightly nose
down toward the vehicle:
• Lock the bar tension adjuster in place.
• Check that the trailer tongue securely
attaches and locks onto the hitch.
• Install safety chains, lighting, and trailer
brake controls as required by law or the
trailer manufacturer.
Safety Chains
Note: Do not attach safety chains to the
bumper.
Always connect the safety chains to the
frame or hook retainers of your vehicle
hitch.
To connect the safety chains, cross the
chains under the trailer tongue and allow
enough slack for turning tight corners. Do
not allow the chains to drag on the ground.
279
F-150 (TFC) Canada/United States of America, enUSA, First Printing Towing
Page 286 of 599
•
Only use the manual control lever for
proper adjustment of the gain during
trailer setup. Misuse, such as
application during trailer sway, could
cause instability of trailer or tow
vehicle.
• Avoid towing in adverse weather
conditions. The trailer brake controller
does not provide anti-lock control of
the trailer wheels. Trailer wheels can
lock up on slippery surfaces, resulting
in reduced stability of trailer and tow
vehicle.
• The trailer brake controller is equipped
with a feature that reduces output at
vehicle speeds below 11 mph (18 km/h)
so trailer and vehicle braking is not jerky
or harsh. This feature is only available
when applying the brakes using your
vehicle's brake pedal, not the
controller.
• The controller interacts with the brake
control system and powertrain control
system of your vehicle to provide the
best performance on different road
conditions.
• Your vehicle's brake system and the
trailer brake system work
independently of each other. Changing
the gain setting on the controller does
not affect the operation of your
vehicle's brakes whether you attach a
trailer or not.
• When you switch the engine off, the
controller output is disabled and the
display and module shut down. The
controller module and display turn on
when you switch the ignition on.
• The trailer brake controller is only a
factory-installed or dealer-installed
item. Ford is not responsible for
warranty or performance of the
controller due to misuse or customer
installation. Trailer Lamps WARNING
Never connect any trailer lamp wiring
to the vehicle's tail lamp wiring; this
may damage the electrical system
resulting in fire. Contact your authorized
dealer as soon as possible for assistance
in proper trailer tow wiring installation.
Additional electrical equipment may be
required. Trailer lamps are required on most towed
vehicles. Make sure all running lights, brake
lights, turn signals and hazard lights are
working.
Using a Step Bumper (If Equipped)
The rear bumper is equipped with an
integral hitch and only requires a ball with
a one-inch (25.4 millimeter) shank
diameter. The bumper has a 5000-pound
(2268 kilogram) trailer weight and a
500-pound (227 kilogram) tongue weight
capacity.
If it is necessary to relocate the hitch ball
position, you must install a frame-mounted
trailer hitch.
Before Towing a Trailer
Practice turning, stopping and backing up
to get the feel of your vehicle-trailer
combination before starting on a trip.
When turning, make wider turns so the
trailer wheels clear curbs and other
obstacles.
When Towing a Trailer
• Do not drive faster than 70 mph (113
km/h) during the first 500 miles (800
kilometers).
• Do not make full-throttle starts.
283
F-150 (TFC) Canada/United States of America, enUSA, First Printing Towing
Page 292 of 599
•
Transmissions give their best fuel
economy when operated in the top
cruise gear and with steady pressure
on the gas pedal.
• Four-wheel-drive operation (if
equipped) is less fuel efficient than
two-wheel-drive operation.
• Close the windows for high-speed
driving.
DRIVING THROUGH WATER WARNING
Do not drive through flowing or deep
water as you may lose control of your
vehicle.
Note:
Driving through standing water can
cause vehicle damage.
Note: Engine damage can occur if water
enters the air filter.
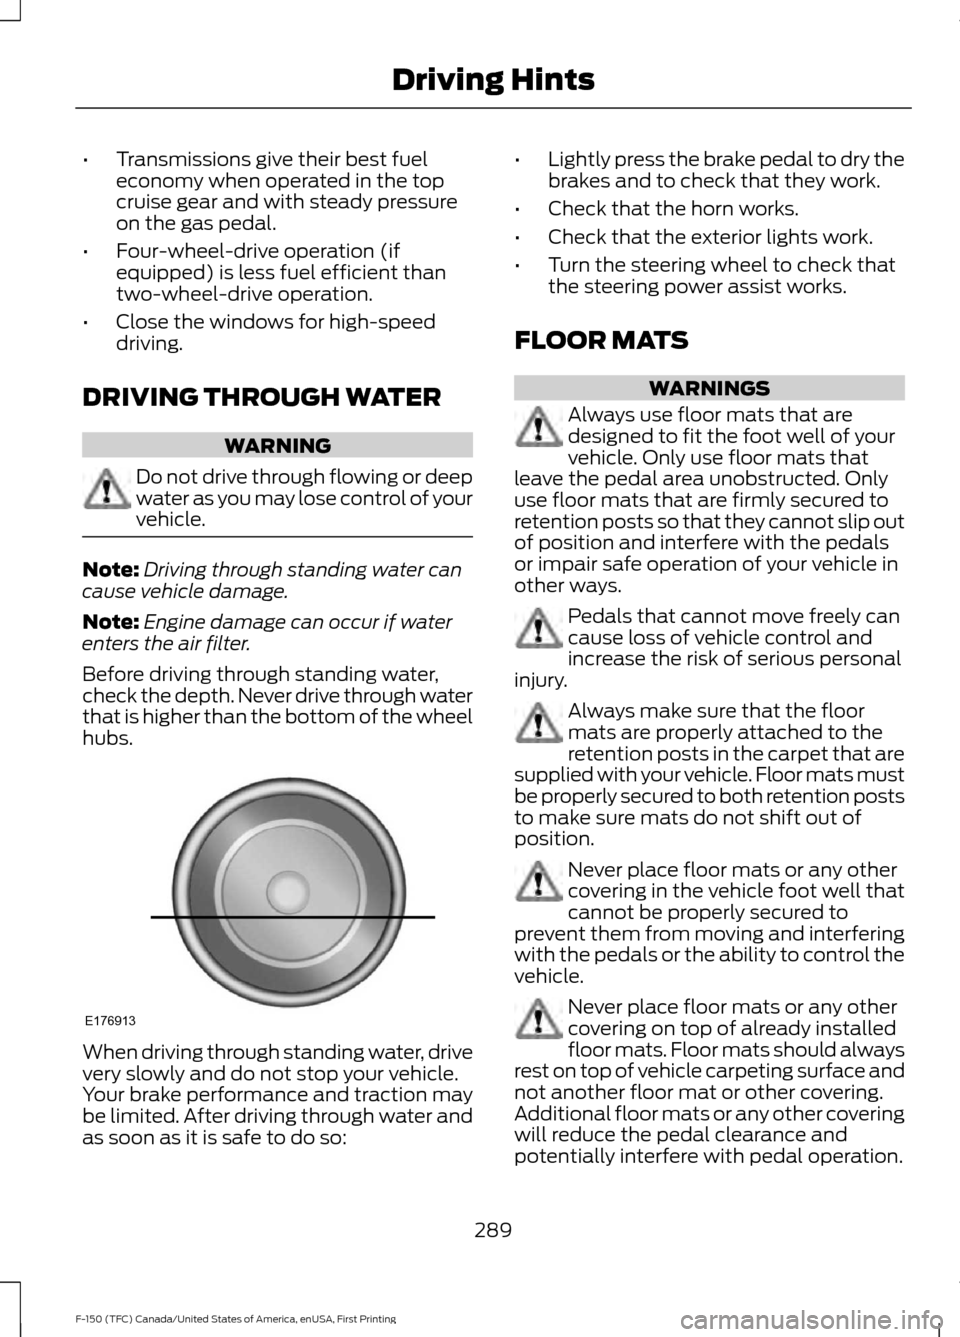
Before driving through standing water,
check the depth. Never drive through water
that is higher than the bottom of the wheel
hubs. When driving through standing water, drive
very slowly and do not stop your vehicle.
Your brake performance and traction may
be limited. After driving through water and
as soon as it is safe to do so: •
Lightly press the brake pedal to dry the
brakes and to check that they work.
• Check that the horn works.
• Check that the exterior lights work.
• Turn the steering wheel to check that
the steering power assist works.
FLOOR MATS WARNINGS
Always use floor mats that are
designed to fit the foot well of your
vehicle. Only use floor mats that
leave the pedal area unobstructed. Only
use floor mats that are firmly secured to
retention posts so that they cannot slip out
of position and interfere with the pedals
or impair safe operation of your vehicle in
other ways. Pedals that cannot move freely can
cause loss of vehicle control and
increase the risk of serious personal
injury. Always make sure that the floor
mats are properly attached to the
retention posts in the carpet that are
supplied with your vehicle. Floor mats must
be properly secured to both retention posts
to make sure mats do not shift out of
position. Never place floor mats or any other
covering in the vehicle foot well that
cannot be properly secured to
prevent them from moving and interfering
with the pedals or the ability to control the
vehicle. Never place floor mats or any other
covering on top of already installed
floor mats. Floor mats should always
rest on top of vehicle carpeting surface and
not another floor mat or other covering.
Additional floor mats or any other covering
will reduce the pedal clearance and
potentially interfere with pedal operation.
289
F-150 (TFC) Canada/United States of America, enUSA, First Printing Driving HintsE176913
Page 294 of 599
•
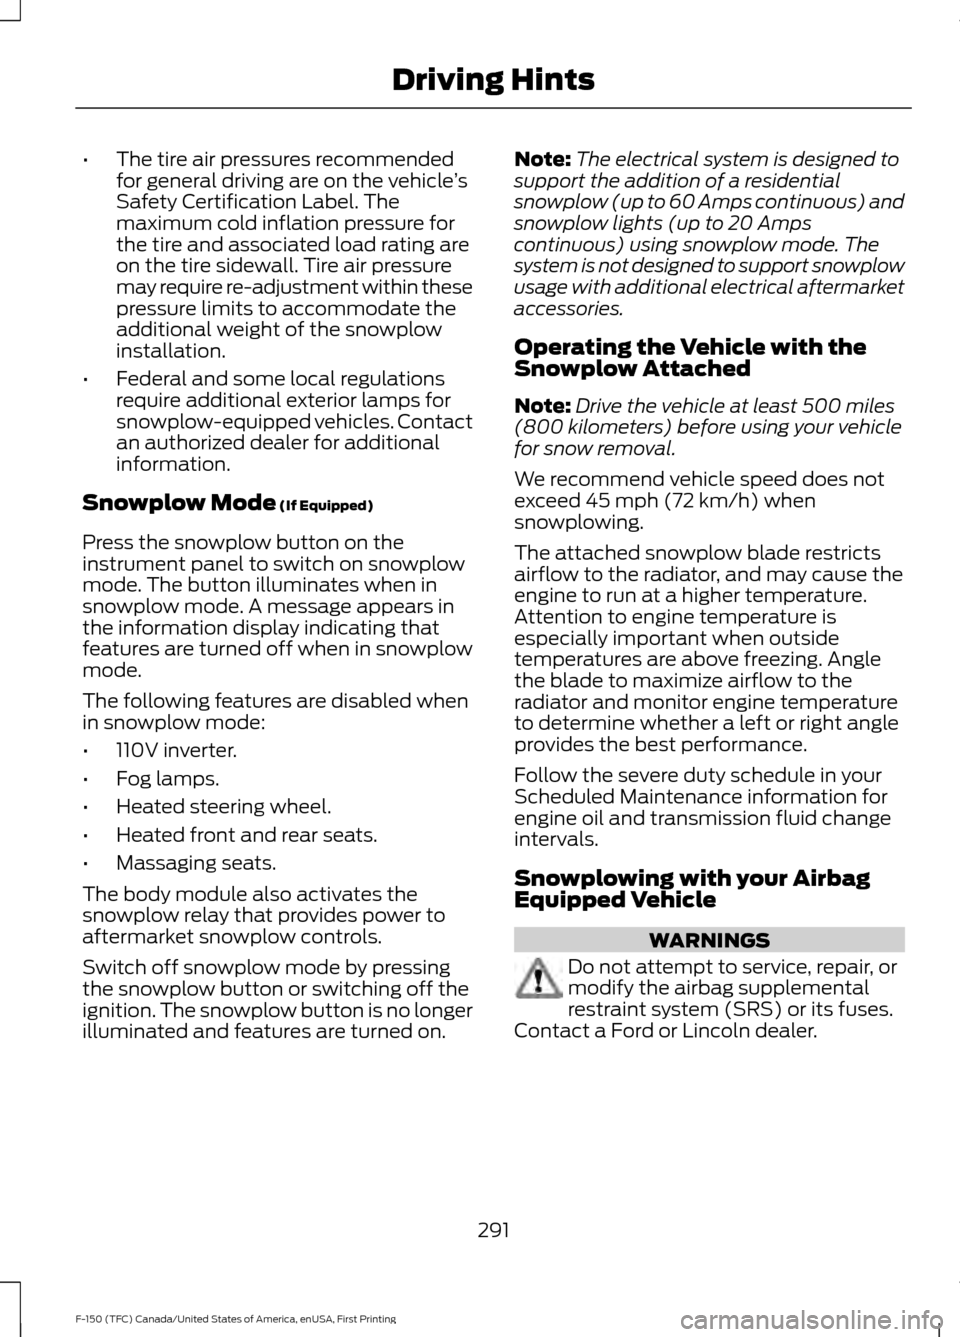
The tire air pressures recommended
for general driving are on the vehicle ’s
Safety Certification Label. The
maximum cold inflation pressure for
the tire and associated load rating are
on the tire sidewall. Tire air pressure
may require re-adjustment within these
pressure limits to accommodate the
additional weight of the snowplow
installation.
• Federal and some local regulations
require additional exterior lamps for
snowplow-equipped vehicles. Contact
an authorized dealer for additional
information.
Snowplow Mode (If Equipped)
Press the snowplow button on the
instrument panel to switch on snowplow
mode. The button illuminates when in
snowplow mode. A message appears in
the information display indicating that
features are turned off when in snowplow
mode.
The following features are disabled when
in snowplow mode:
• 110V inverter.
• Fog lamps.
• Heated steering wheel.
• Heated front and rear seats.
• Massaging seats.
The body module also activates the
snowplow relay that provides power to
aftermarket snowplow controls.
Switch off snowplow mode by pressing
the snowplow button or switching off the
ignition. The snowplow button is no longer
illuminated and features are turned on. Note:
The electrical system is designed to
support the addition of a residential
snowplow (up to 60 Amps continuous) and
snowplow lights (up to 20 Amps
continuous) using snowplow mode. The
system is not designed to support snowplow
usage with additional electrical aftermarket
accessories.
Operating the Vehicle with the
Snowplow Attached
Note: Drive the vehicle at least 500 miles
(800 kilometers) before using your vehicle
for snow removal.
We recommend vehicle speed does not
exceed 45 mph (72 km/h) when
snowplowing.
The attached snowplow blade restricts
airflow to the radiator, and may cause the
engine to run at a higher temperature.
Attention to engine temperature is
especially important when outside
temperatures are above freezing. Angle
the blade to maximize airflow to the
radiator and monitor engine temperature
to determine whether a left or right angle
provides the best performance.
Follow the severe duty schedule in your
Scheduled Maintenance information for
engine oil and transmission fluid change
intervals.
Snowplowing with your Airbag
Equipped Vehicle WARNINGS
Do not attempt to service, repair, or
modify the airbag supplemental
restraint system (SRS) or its fuses.
Contact a Ford or Lincoln dealer.
291
F-150 (TFC) Canada/United States of America, enUSA, First Printing Driving Hints
Page 544 of 599
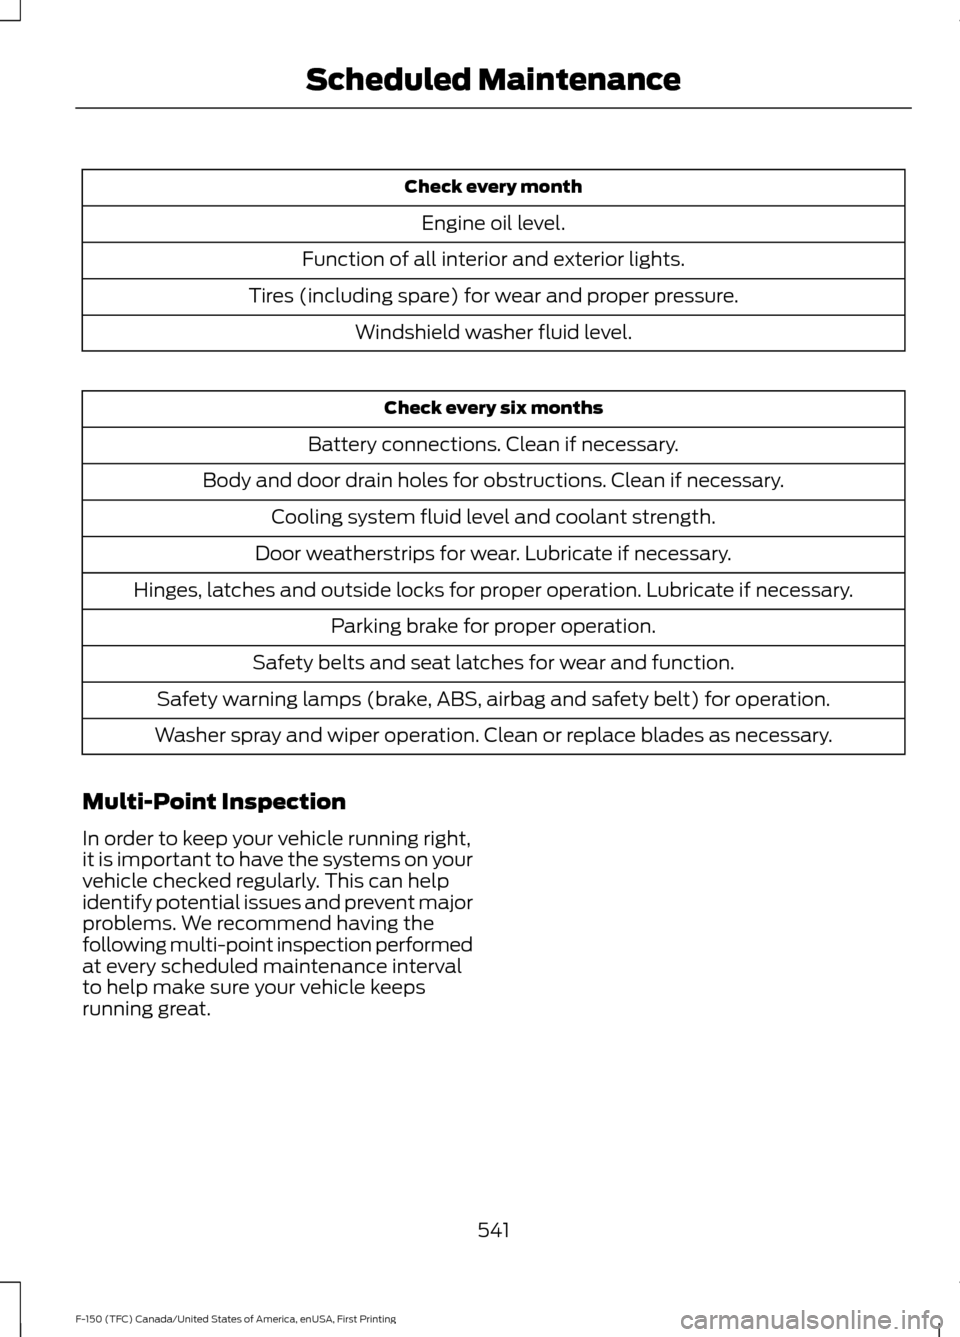
Check every month
Engine oil level.
Function of all interior and exterior lights.
Tires (including spare) for wear and proper pressure. Windshield washer fluid level. Check every six months
Battery connections. Clean if necessary.
Body and door drain holes for obstructions. Clean if necessary. Cooling system fluid level and coolant strength.
Door weatherstrips for wear. Lubricate if necessary.
Hinges, latches and outside locks for proper operation. Lubricate if necessary. Parking brake for proper operation.
Safety belts and seat latches for wear and function.
Safety warning lamps (brake, ABS, airbag and safety belt) for operation.
Washer spray and wiper operation. Clean or replace blades as necessary.
Multi-Point Inspection
In order to keep your vehicle running right,
it is important to have the systems on your
vehicle checked regularly. This can help
identify potential issues and prevent major
problems. We recommend having the
following multi-point inspection performed
at every scheduled maintenance interval
to help make sure your vehicle keeps
running great.
541
F-150 (TFC) Canada/United States of America, enUSA, First Printing Scheduled Maintenance
Page 590 of 599
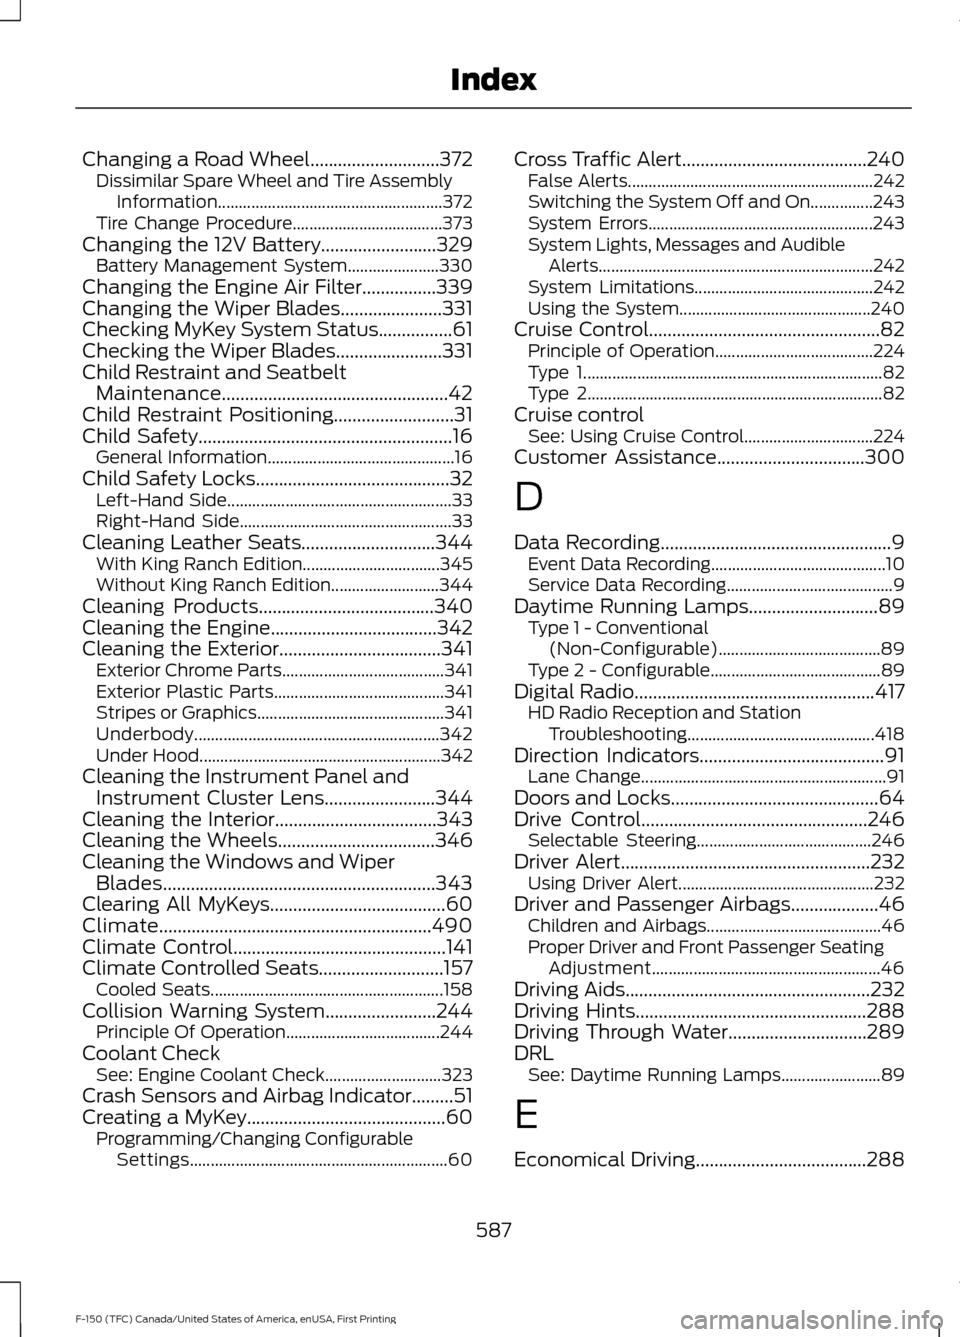
Changing a Road Wheel............................372
Dissimilar Spare Wheel and Tire Assembly
Information...................................................... 372
Tire Change Procedure.................................... 373
Changing the 12V Battery.........................329 Battery Management System...................... 330
Changing the Engine Air Filter................339
Changing the Wiper Blades......................331
Checking MyKey System Status................61
Checking the Wiper Blades.......................331
Child Restraint and Seatbelt Maintenance.................................................42
Child Restraint Positioning..........................31
Child Safety.......................................................16 General Information............................................. 16
Child Safety Locks..........................................32 Left-Hand Side...................................................... 33
Right-Hand Side................................................... 33
Cleaning Leather Seats.............................344 With King Ranch Edition................................. 345
Without King Ranch Edition.......................... 344
Cleaning Products
......................................340
Cleaning the Engine....................................342
Cleaning the Exterior...................................341 Exterior Chrome Parts....................................... 341
Exterior Plastic Parts......................................... 341
Stripes or Graphics............................................. 341
Underbody........................................................... 342
Under Hood.......................................................... 342
Cleaning the Instrument Panel and Instrument Cluster Lens........................344
Cleaning the Interior...................................343
Cleaning the Wheels
..................................346
Cleaning the Windows and Wiper Blades...........................................................343
Clearing All MyKeys......................................60
Climate...........................................................490
Climate Control
..............................................141
Climate Controlled Seats...........................157 Cooled Seats........................................................ 158
Collision Warning System
........................244
Principle Of Operation..................................... 244
Coolant Check See: Engine Coolant Check............................ 323
Crash Sensors and Airbag Indicator.........51
Creating a MyKey...........................................60 Programming/Changing Configurable
Settings.............................................................. 60Cross Traffic Alert
........................................240
False Alerts........................................................... 242
Switching the System Off and On...............243
System Errors...................................................... 243
System Lights, Messages and Audible Alerts.................................................................. 242
System Limitations........................................... 242
Using the System.............................................. 240
Cruise Control..................................................82 Principle of Operation...................................... 224
Type 1........................................................................\
82
Type 2....................................................................... 82
Cruise control See: Using Cruise Control............................... 224
Customer Assistance
................................300
D
Data Recording
..................................................9
Event Data Recording.......................................... 10
Service Data Recording........................................ 9
Daytime Running Lamps............................89 Type 1 - Conventional
(Non-Configurable)....................................... 89
Type 2 - Configurable......................................... 89
Digital Radio
....................................................417
HD Radio Reception and Station
Troubleshooting............................................. 418
Direction Indicators
........................................91
Lane Change........................................................... 91
Doors and Locks.............................................64
Drive Control.................................................246 Selectable Steering.......................................... 246
Driver Alert
......................................................232
Using Driver Alert............................................... 232
Driver and Passenger Airbags...................46 Children and Airbags.......................................... 46
Proper Driver and Front Passenger Seating Adjustment....................................................... 46
Driving Aids
.....................................................232
Driving Hints..................................................288
Driving Through Water..............................289
DRL See: Daytime Running Lamps........................ 89
E
Economical Driving
.....................................288
587
F-150 (TFC) Canada/United States of America, enUSA, First Printing Index