brake light FORD F150 2017 13.G Owners Manual
[x] Cancel search | Manufacturer: FORD, Model Year: 2017, Model line: F150, Model: FORD F150 2017 13.GPages: 599, PDF Size: 7.34 MB
Page 40 of 599
Seatbelt Locking Modes
WARNING
After a crash, have a qualified
technician check all the seatbelts to
make sure the seatbelts including
the automatic locking retractor feature for
child restraints operate properly. We
recommend replacing any system that has
damage or does not operate properly.
Failure to do so can result in personal injury
or death in the event of a sudden stop or
another crash. All safety restraints in the vehicle are
combination lap and shoulder belts. The
driver seatbelt has the first type of locking
mode, and the front outboard passenger
and rear seat seatbelts have both types of
locking modes described as follows:
Vehicle Sensitive Mode
This is the normal retractor mode, which
allows free shoulder belt length
adjustment to your movements and
locking in response to vehicle movement.
For example, if the driver brakes suddenly,
turns a corner sharply, or the vehicle
receives an impact of about 5 mph
(8 km/h) or more, the combination
seatbelts lock to help reduce forward
movement of the driver and passengers.
In addition, the retractor is designed to lock
if you pull the webbing out too quickly. If
this occurs, let the belt retract slightly and
pull the webbing out again in a slow and
controlled manner.
Automatic Locking Mode
In this mode, the shoulder belt
automatically pre-locks. The belt still
retracts to remove any slack in the
shoulder belt. The automatic locking mode
is not available on the driver seatbelt. When to Use the Automatic Locking
Mode
Use this mode any time you install a child
safety seat in a front outboard passenger
seating position in a Regular Cab,
SuperCab, SuperCrew or any rear seating
position of a SuperCab or SuperCrew. The
optional front seat center seatbelt has a
cinch mechanism. Properly restrain
children 12 years old and under in a rear
seat whenever possible. See
Child Safety
(page 16).
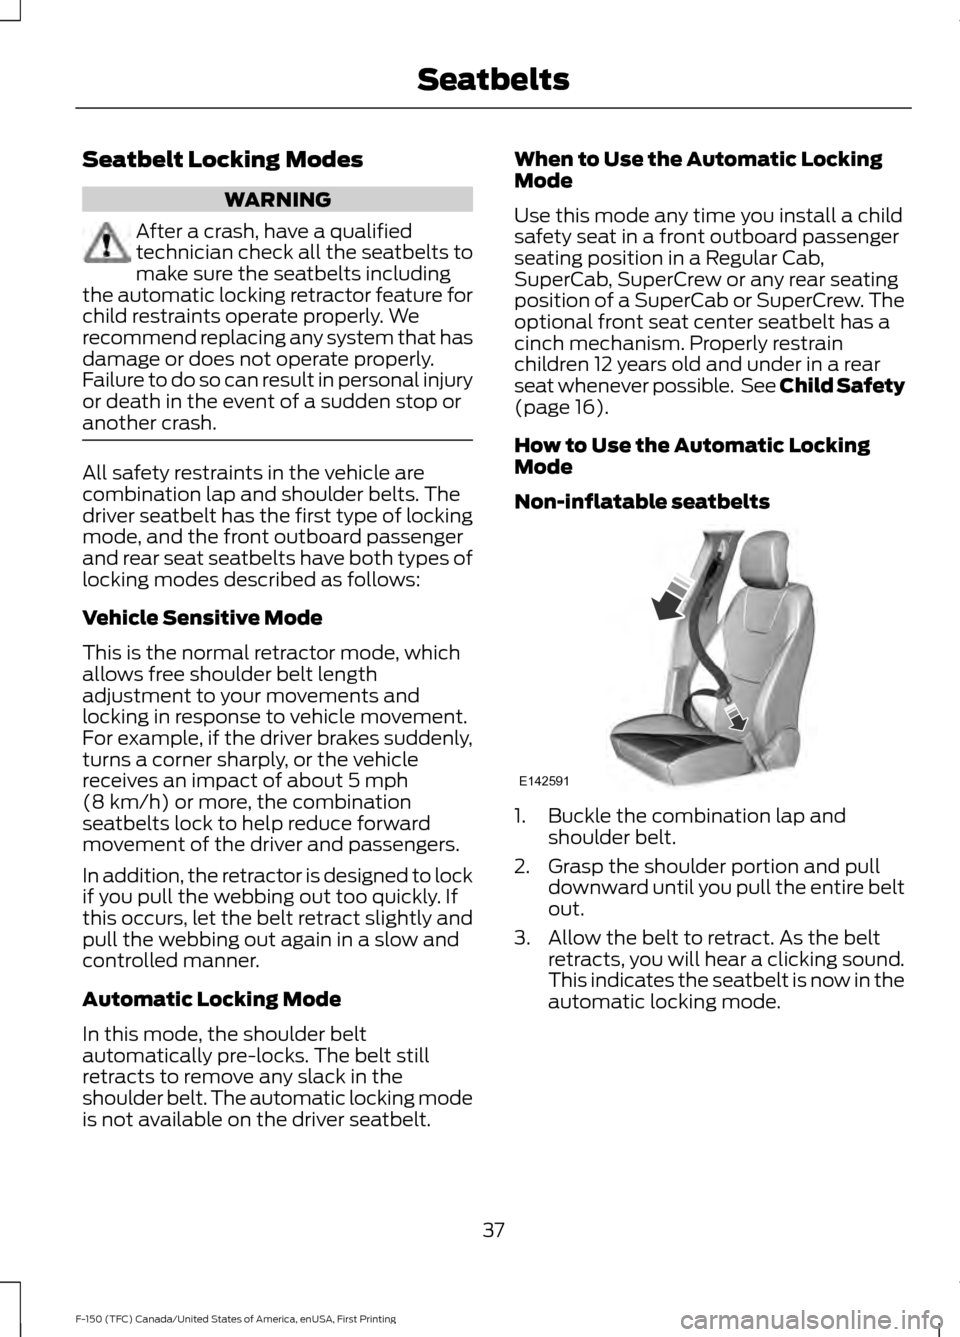
How to Use the Automatic Locking
Mode
Non-inflatable seatbelts 1. Buckle the combination lap and
shoulder belt.
2. Grasp the shoulder portion and pull downward until you pull the entire belt
out.
3. Allow the belt to retract. As the belt retracts, you will hear a clicking sound.
This indicates the seatbelt is now in the
automatic locking mode.
37
F-150 (TFC) Canada/United States of America, enUSA, First Printing SeatbeltsE142591
Page 44 of 599
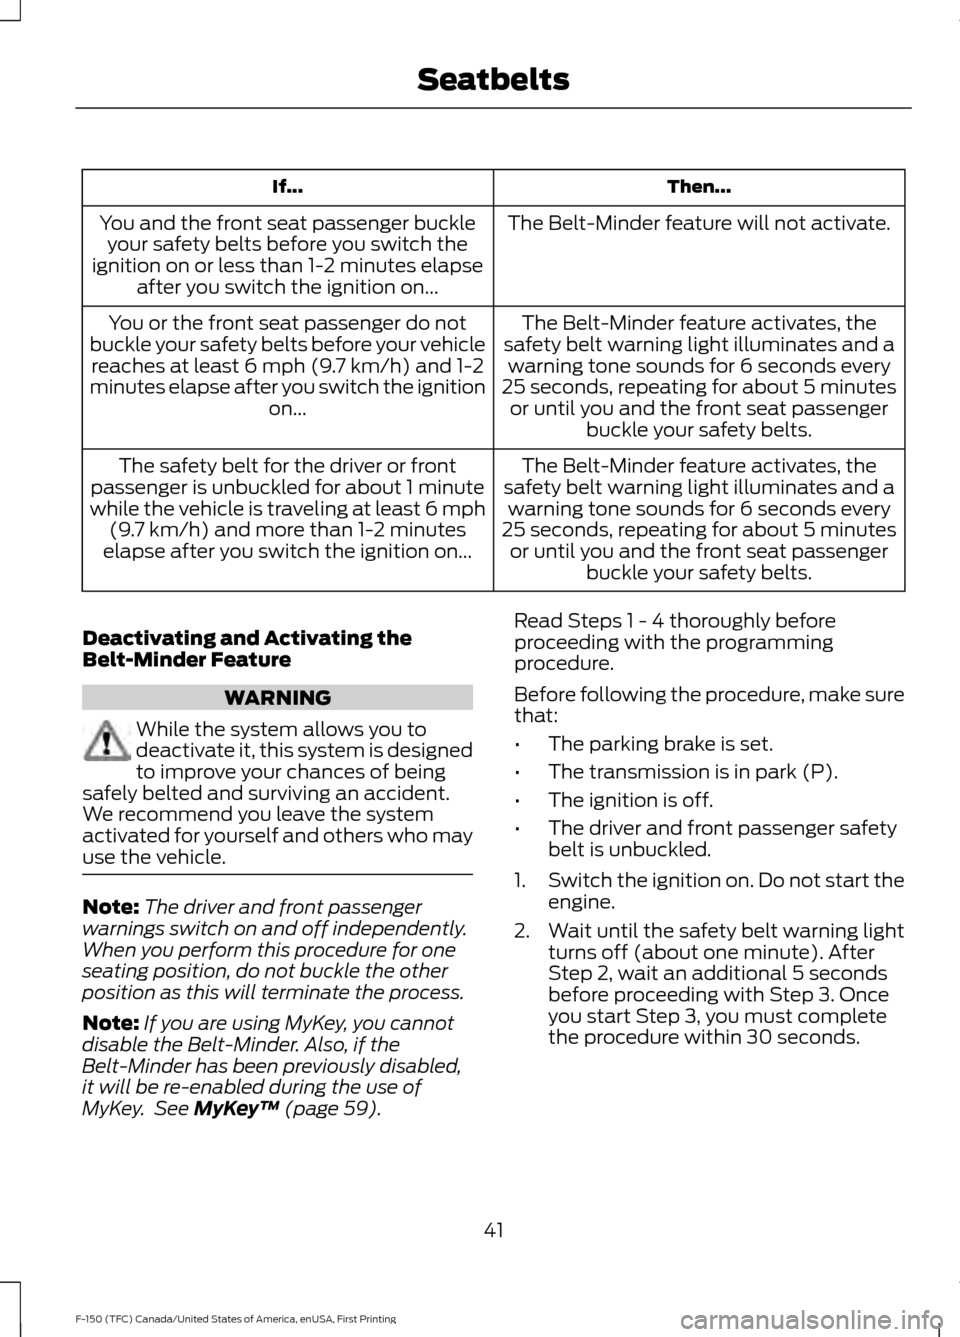
Then...
If...
The Belt-Minder feature will not activate.
You and the front seat passenger buckle
your safety belts before you switch the
ignition on or less than 1-2 minutes elapse after you switch the ignition on...
The Belt-Minder feature activates, the
safety belt warning light illuminates and a warning tone sounds for 6 seconds every
25 seconds, repeating for about 5 minutes or until you and the front seat passenger buckle your safety belts.
You or the front seat passenger do not
buckle your safety belts before your vehicle reaches at least 6 mph (9.7 km/h) and 1-2
minutes elapse after you switch the ignition on...
The Belt-Minder feature activates, the
safety belt warning light illuminates and a warning tone sounds for 6 seconds every
25 seconds, repeating for about 5 minutes or until you and the front seat passenger buckle your safety belts.
The safety belt for the driver or front
passenger is unbuckled for about 1 minute
while the vehicle is traveling at least 6 mph (9.7 km/h) and more than 1-2 minutes
elapse after you switch the ignition on...
Deactivating and Activating the
Belt-Minder Feature WARNING
While the system allows you to
deactivate it, this system is designed
to improve your chances of being
safely belted and surviving an accident.
We recommend you leave the system
activated for yourself and others who may
use the vehicle. Note:
The driver and front passenger
warnings switch on and off independently.
When you perform this procedure for one
seating position, do not buckle the other
position as this will terminate the process.
Note: If you are using MyKey, you cannot
disable the Belt-Minder. Also, if the
Belt-Minder has been previously disabled,
it will be re-enabled during the use of
MyKey. See MyKey ™ (page 59). Read Steps 1 - 4 thoroughly before
proceeding with the programming
procedure.
Before following the procedure, make sure
that:
•
The parking brake is set.
• The transmission is in park (P).
• The ignition is off.
• The driver and front passenger safety
belt is unbuckled.
1. Switch the ignition on. Do not start the
engine.
2. Wait until the safety belt warning light turns off (about one minute). After
Step 2, wait an additional 5 seconds
before proceeding with Step 3. Once
you start Step 3, you must complete
the procedure within 30 seconds.
41
F-150 (TFC) Canada/United States of America, enUSA, First Printing Seatbelts
Page 92 of 599
DAYTIME RUNNING LAMPS (If
Equipped) WARNING
The daytime running lamps system
does not activate the rear lamps and
may not provide adequate lighting
during low visibility driving conditions. Also,
the autolamps switch position may not
activate the headlamps in all low visibility
conditions, such as daytime fog. Make sure
the headlamps are switched to auto or on,
as appropriate, during all low visibility
conditions. Failure to do so may result in a
crash. Type 1 - Conventional (Non-
Configurable)
The daytime running lamps turn on when:
1. The ignition is switched to the on
position.
2. The transmission is not in park (P) for vehicles with automatic transmissions
or the parking brake is released for
vehicles with manual transmissions.
3. The lighting control is in the off, parking
lamp or autolamps positions.
4. The headlamps are off.
Type 2 - Configurable
Switch the daytime running lamps on or
off using the information display controls.
See
Information Displays (page 110).
The daytime running lamps turn on when:
1. They are switched on in the information
display. See
Information Displays
(page 110).
2. The ignition is switched to the on position. 3. The transmission is not in park (P) for
vehicles with automatic transmissions
or the parking brake is released for
vehicles with manual transmissions.
4. The lighting control is in the autolamps
position.
5. The headlamps are off.
The other lighting control switch positions
do not activate the daytime running lamps,
and you can use them to temporarily
override autolamp control.
When switched off in the information
display, the daytime running lamps are off
in all lighting control switch positions.
AUTOMATIC HIGH BEAM
CONTROL
(If Equipped)
The system automatically turns on the high
beams if it is dark enough and no other
traffic is present. When it detects the
headlights of an approaching vehicle, the
tail lamps of the preceding vehicle or street
lighting, the system turns off the high
beams before they distract other drivers.
The low beams remain on.
Note: If it appears that automatic high
beam is not functioning properly, check the
windshield in front of the camera for a
blockage. A clear view of the road is required
for proper system operation. Make sure that
authorized personnel repair any windshield
damage in the area of the camera's field of
view.
Note: If the system detects a blockage such
as bird droppings, bug splatter, snow or ice,
and you do not observe changes, the system
may go into low beam mode until you clear
the blockage. A message may also appear
in the information display noting the front
camera is blocked.
89
F-150 (TFC) Canada/United States of America, enUSA, First Printing Lighting
Page 108 of 599
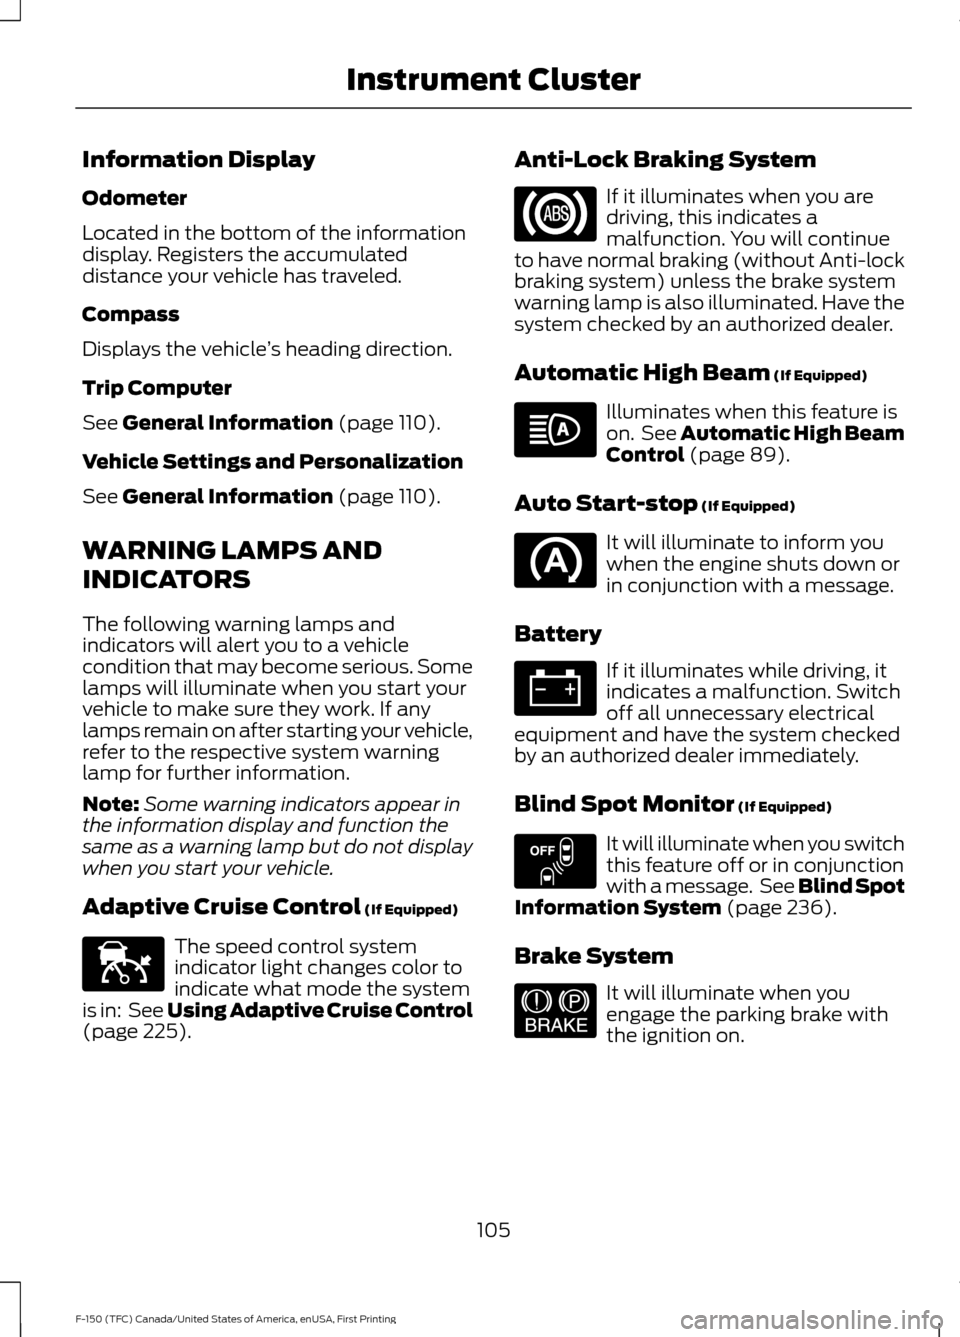
Information Display
Odometer
Located in the bottom of the information
display. Registers the accumulated
distance your vehicle has traveled.
Compass
Displays the vehicle
’s heading direction.
Trip Computer
See General Information (page 110).
Vehicle Settings and Personalization
See
General Information (page 110).
WARNING LAMPS AND
INDICATORS
The following warning lamps and
indicators will alert you to a vehicle
condition that may become serious. Some
lamps will illuminate when you start your
vehicle to make sure they work. If any
lamps remain on after starting your vehicle,
refer to the respective system warning
lamp for further information.
Note: Some warning indicators appear in
the information display and function the
same as a warning lamp but do not display
when you start your vehicle.
Adaptive Cruise Control
(If Equipped) The speed control system
indicator light changes color to
indicate what mode the system
is in: See Using Adaptive Cruise Control
(page
225). Anti-Lock Braking System If it illuminates when you are
driving, this indicates a
malfunction. You will continue
to have normal braking (without Anti-lock
braking system) unless the brake system
warning lamp is also illuminated. Have the
system checked by an authorized dealer.
Automatic High Beam
(If Equipped) Illuminates when this feature is
on. See
Automatic High Beam
Control (page 89).
Auto Start-stop
(If Equipped) It will illuminate to inform you
when the engine shuts down or
in conjunction with a message.
Battery If it illuminates while driving, it
indicates a malfunction. Switch
off all unnecessary electrical
equipment and have the system checked
by an authorized dealer immediately.
Blind Spot Monitor
(If Equipped) It will illuminate when you switch
this feature off or in conjunction
with a message. See Blind Spot
Information System
(page 236).
Brake System It will illuminate when you
engage the parking brake with
the ignition on.
105
F-150 (TFC) Canada/United States of America, enUSA, First Printing Instrument ClusterE144524 E151262 E144522
Page 115 of 599
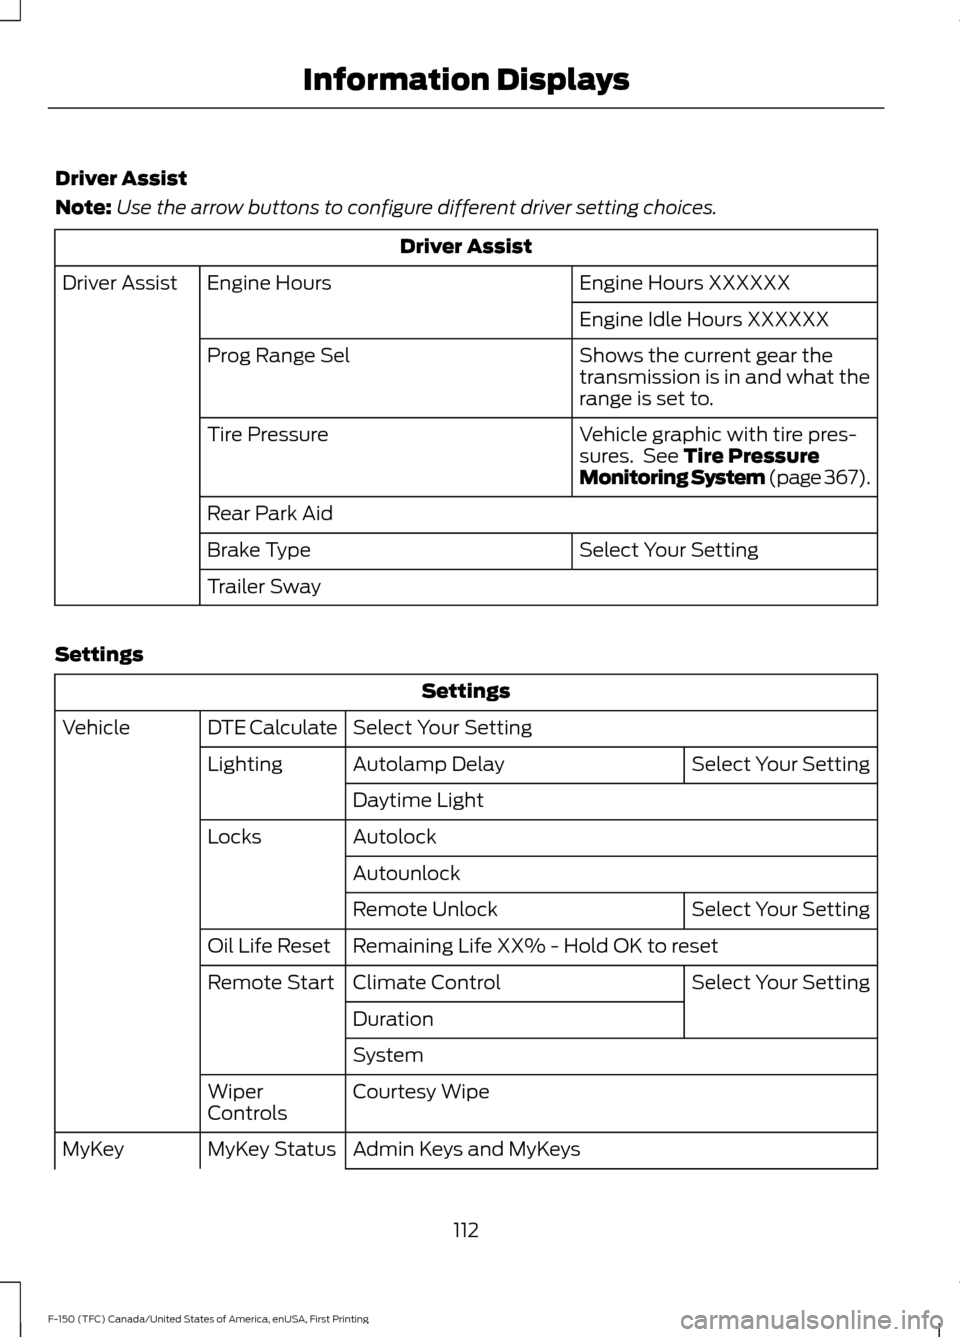
Driver Assist
Note:
Use the arrow buttons to configure different driver setting choices. Driver Assist
Engine Hours XXXXXX
Engine Hours
Driver Assist
Engine Idle Hours XXXXXX
Shows the current gear the
transmission is in and what the
range is set to.
Prog Range Sel
Vehicle graphic with tire pres-
sures. See Tire Pressure
Monitoring System (page 367).
Tire Pressure
Rear Park Aid
Select Your Setting
Brake Type
Trailer Sway
Settings Settings
Select Your Setting
DTE Calculate
Vehicle
Select Your Setting
Autolamp Delay
Lighting
Daytime Light
Autolock
Locks
Autounlock Select Your Setting
Remote Unlock
Remaining Life XX% - Hold OK to reset
Oil Life Reset
Select Your Setting
Climate Control
Remote Start
Duration
System
Courtesy Wipe
Wiper
Controls
Admin Keys and MyKeys
MyKey Status
MyKey
112
F-150 (TFC) Canada/United States of America, enUSA, First Printing Information Displays
Page 125 of 599
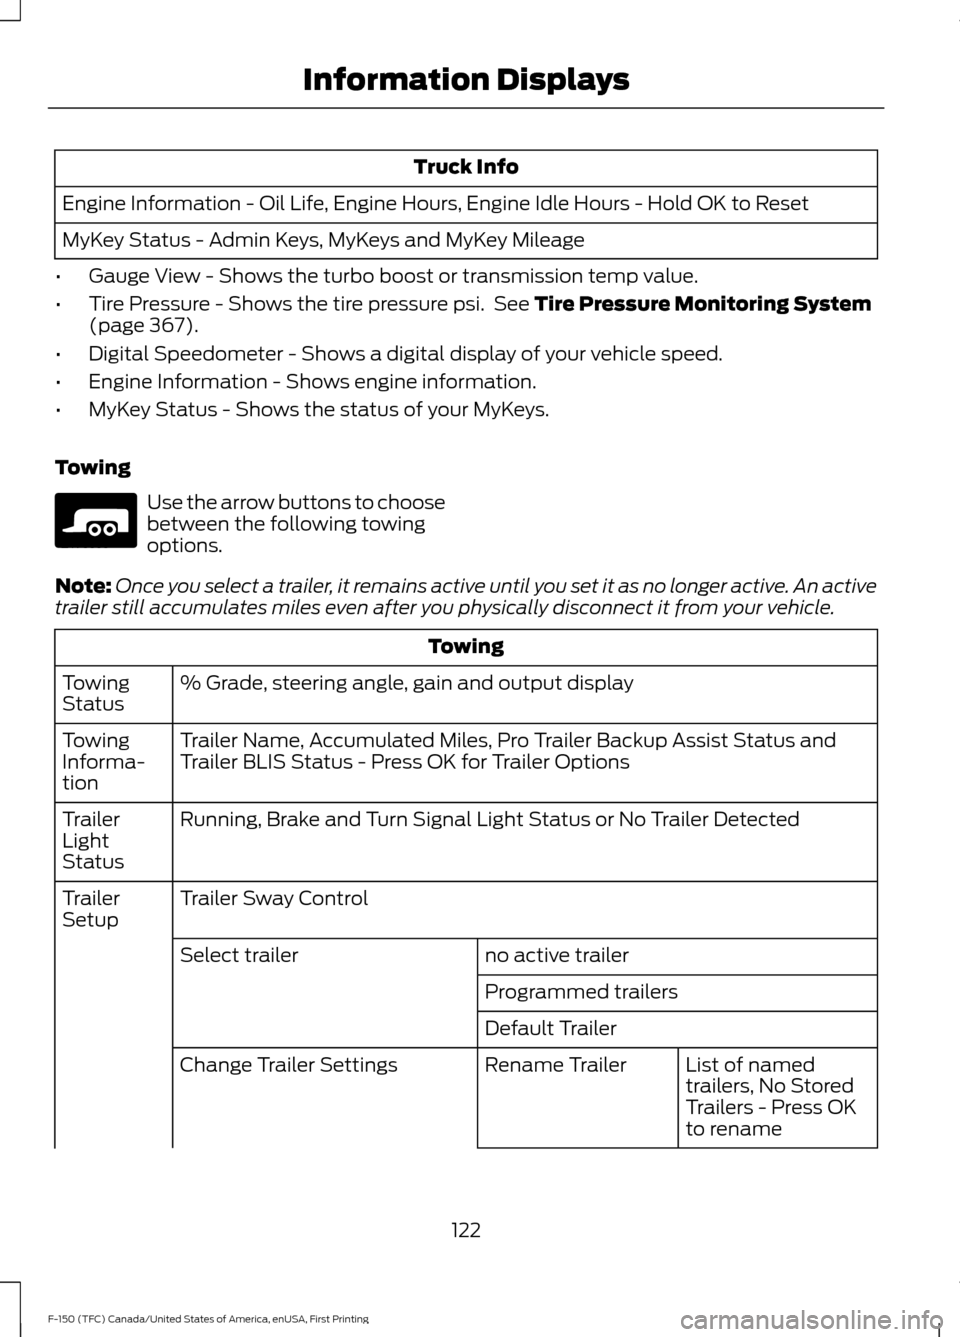
Truck Info
Engine Information - Oil Life, Engine Hours, Engine Idle Hours - Hold OK to Reset
MyKey Status - Admin Keys, MyKeys and MyKey Mileage
• Gauge View - Shows the turbo boost or transmission temp value.
• Tire Pressure - Shows the tire pressure psi. See Tire Pressure Monitoring System
(page 367).
• Digital Speedometer - Shows a digital display of your vehicle speed.
• Engine Information - Shows engine information.
• MyKey Status - Shows the status of your MyKeys.
Towing Use the arrow buttons to choose
between the following towing
options.
Note: Once you select a trailer, it remains active until you set it as no longer active. An active
trailer still accumulates miles even after you physically disconnect it from your vehicle. Towing
% Grade, steering angle, gain and output display
Towing
Status
Trailer Name, Accumulated Miles, Pro Trailer Backup Assist Status and
Trailer BLIS Status - Press OK for Trailer Options
Towing
Informa-
tion
Running, Brake and Turn Signal Light Status or No Trailer Detected
Trailer
Light
Status
Trailer Sway Control
Trailer
Setup
no active trailer
Select trailer
Programmed trailers
Default TrailerList of named
trailers, No Stored
Trailers - Press OK
to rename
Rename Trailer
Change Trailer Settings
122
F-150 (TFC) Canada/United States of America, enUSA, First Printing Information DisplaysE176096
Page 172 of 599
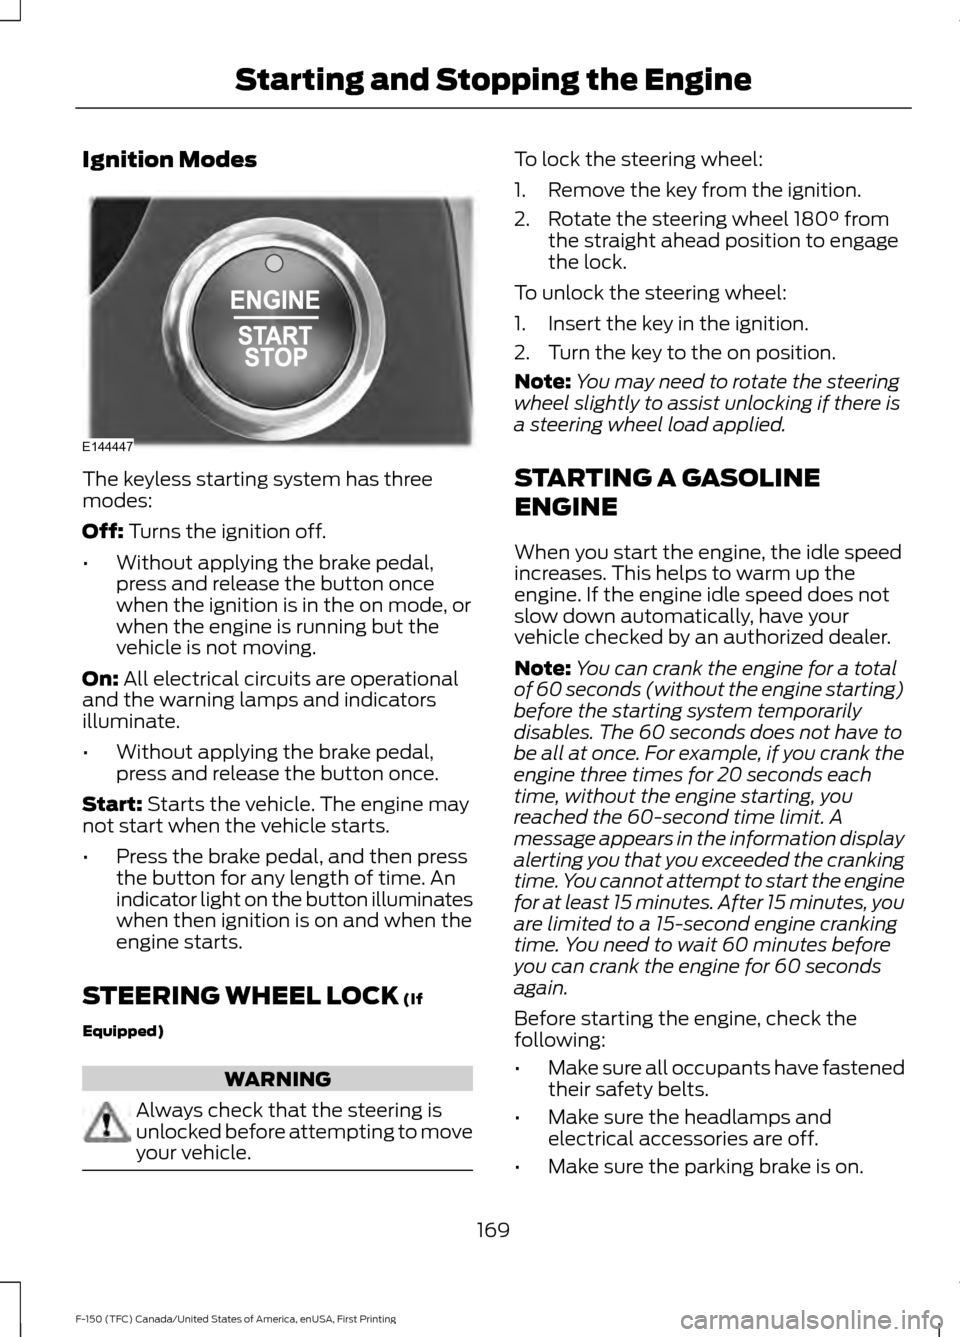
Ignition Modes
The keyless starting system has three
modes:
Off: Turns the ignition off.
• Without applying the brake pedal,
press and release the button once
when the ignition is in the on mode, or
when the engine is running but the
vehicle is not moving.
On:
All electrical circuits are operational
and the warning lamps and indicators
illuminate.
• Without applying the brake pedal,
press and release the button once.
Start:
Starts the vehicle. The engine may
not start when the vehicle starts.
• Press the brake pedal, and then press
the button for any length of time. An
indicator light on the button illuminates
when then ignition is on and when the
engine starts.
STEERING WHEEL LOCK
(If
Equipped) WARNING
Always check that the steering is
unlocked before attempting to move
your vehicle. To lock the steering wheel:
1. Remove the key from the ignition.
2. Rotate the steering wheel 180° from
the straight ahead position to engage
the lock.
To unlock the steering wheel:
1. Insert the key in the ignition.
2. Turn the key to the on position.
Note: You may need to rotate the steering
wheel slightly to assist unlocking if there is
a steering wheel load applied.
STARTING A GASOLINE
ENGINE
When you start the engine, the idle speed
increases. This helps to warm up the
engine. If the engine idle speed does not
slow down automatically, have your
vehicle checked by an authorized dealer.
Note: You can crank the engine for a total
of 60 seconds (without the engine starting)
before the starting system temporarily
disables. The 60 seconds does not have to
be all at once. For example, if you crank the
engine three times for 20 seconds each
time, without the engine starting, you
reached the 60-second time limit. A
message appears in the information display
alerting you that you exceeded the cranking
time. You cannot attempt to start the engine
for at least 15 minutes. After 15 minutes, you
are limited to a 15-second engine cranking
time. You need to wait 60 minutes before
you can crank the engine for 60 seconds
again.
Before starting the engine, check the
following:
• Make sure all occupants have fastened
their safety belts.
• Make sure the headlamps and
electrical accessories are off.
• Make sure the parking brake is on.
169
F-150 (TFC) Canada/United States of America, enUSA, First Printing Starting and Stopping the EngineE144447
Page 177 of 599
AUTO-START-STOP (If Equipped)
The system helps reduce fuel consumption
by automatically stopping and restarting
the engine when your vehicle has stopped.
The engine restarts automatically when
you release the brake pedal.
In some situations, your vehicle may restart
automatically, for example:
• To maintain interior comfort.
• To recharge the battery.
Note: Power assist steering turns off when
the engine is off. WARNINGS
The engine may restart
automatically if required by the
system.
Switch the ignition off before
opening the hood or performing any
maintenance. Failure to do so may
result in serious injuries due to automatic
engine restart. Always switch the ignition off before
leaving your vehicle, as the system
may have turned the engine off, but
the ignition will still be on and automatic
restart may occur. The Auto StartStop system status is
available at a glance within the information
display. See Information Displays (page
110
).
Enabling Auto StartStop
The system automatically enables every
time you start your vehicle if:
• You do not press the Auto StartStop
button (not illuminated).
• Your vehicle exceeds an initial speed
of
3 mph (5 km/h) after you have
initially started your vehicle.
• You have stopped your vehicle. •
Your foot is on the brake pedal.
• The transmission is in drive (D) or Sport
mode (enable by pressing the Auto
StartStop button).
• The driver door is closed.
• There is adequate brake vacuum.
• The interior compartment has cooled
or warmed to an acceptable level.
• The front windshield defroster is off.
• You have not turned the steering wheel
rapidly or you do not have it at a sharp
angle.
• The vehicle is not on a steep road
grade.
• The battery is within optimal operating
conditions (battery state of charge and
temperature in range).
• The engine coolant is at operating
temperature.
• Elevation is below about 10000 feet
(3048 meters).
• Ambient temperature is moderate.
• You have selected 4X2 or Auto mode.
• If equipped with Terrain mode, and you
select auto snow/ice mode only.
• The trailer is not connected.
• You have not selected Tow haul.
• You have not selected Manual mode.
Note: The system allows multiple
successive Auto StartStop events, but it
may not operate in conditions of heavy
traffic or in extended low speed operation. The green Auto StartStop
indicator light on the instrument
cluster will illuminate to indicate
when the automatic engine stop occurs.
174
F-150 (TFC) Canada/United States of America, enUSA, First Printing Unique Driving Characteristics
Page 178 of 599
If the instrument cluster is
equipped with a grey Auto
StartStop indicator light, it
illuminates when automatic engine stop
is not available due to one of the above
noted conditions not being met.
Automatic Engine Restart
Any of the following conditions will result
in an automatic restart of the engine:
• You have removed your foot from the
brake pedal.
• You press the accelerator pedal.
• You press the accelerator and the
brake pedal at the same time.
• The driver safety belt becomes
unfastened or the driver door is ajar.
• You have moved the transmission from
drive (D) to any gear except park (P).
• Your vehicle is moving.
• The interior compartment does not
meet customer comfort when air
conditioning or heat is on.
• Fogging of the windows could occur
and the air conditioning is on.
• The battery is not within optimal
operating conditions.
• You have exceeded the maximum
engine off time.
• When you press the Auto StartStop
button with the engine automatically
stopped.
• The front defroster is turned to the Max
setting.
Any of the following conditions may result
in an automatic restart of the engine:
• You have increased the blower fan
speed or changed the climate control
temperature.
• You have an electrical accessory
turned on or plugged in. Note:
You may notice that the climate seat
fan fluctuates during an automatic restart.
Disabling Auto StartStop Press the Auto StartStop button located
on the center console to switch the system
off. The button will illuminate. This will only
deactivate the system for the current
ignition cycle. Press the button again to
restore Auto StartStop function.
Note:
If the Shift to P, Restart Engine
message appears and the amber Auto
StartStop indicator light is flashing,
automatic restart is not available. You must
restart the vehicle manually. See
Information Displays (page 110).
If your vehicle is in an engine off Auto
StartStop state and you change the
transmission to reverse (R) while the brake
pedal is not pressed, the message Auto
StartStop Press Brake to Start Engine will
appear. You must press the brake pedal
within 10 seconds or a shift to park (P) and
a manual restart will be required.
175
F-150 (TFC) Canada/United States of America, enUSA, First Printing Unique Driving CharacteristicsE146361 E181352
Page 185 of 599
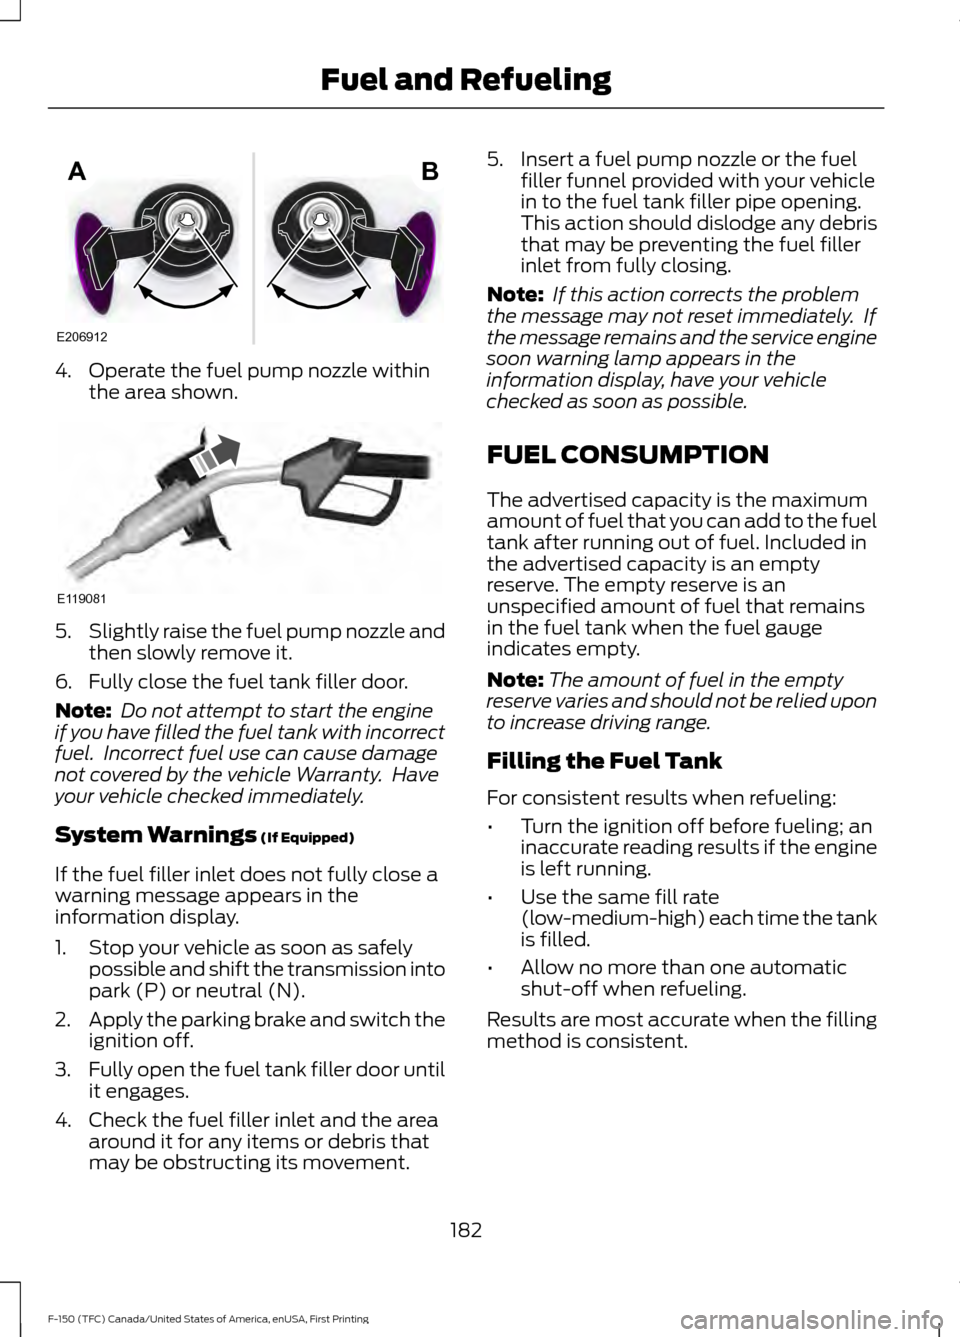
4. Operate the fuel pump nozzle within
the area shown. 5.
Slightly raise the fuel pump nozzle and
then slowly remove it.
6. Fully close the fuel tank filler door.
Note: Do not attempt to start the engine
if you have filled the fuel tank with incorrect
fuel. Incorrect fuel use can cause damage
not covered by the vehicle Warranty. Have
your vehicle checked immediately.
System Warnings (If Equipped)
If the fuel filler inlet does not fully close a
warning message appears in the
information display.
1. Stop your vehicle as soon as safely possible and shift the transmission into
park (P) or neutral (N).
2. Apply the parking brake and switch the
ignition off.
3. Fully open the fuel tank filler door until
it engages.
4. Check the fuel filler inlet and the area around it for any items or debris that
may be obstructing its movement. 5. Insert a fuel pump nozzle or the fuel
filler funnel provided with your vehicle
in to the fuel tank filler pipe opening.
This action should dislodge any debris
that may be preventing the fuel filler
inlet from fully closing.
Note: If this action corrects the problem
the message may not reset immediately. If
the message remains and the service engine
soon warning lamp appears in the
information display, have your vehicle
checked as soon as possible.
FUEL CONSUMPTION
The advertised capacity is the maximum
amount of fuel that you can add to the fuel
tank after running out of fuel. Included in
the advertised capacity is an empty
reserve. The empty reserve is an
unspecified amount of fuel that remains
in the fuel tank when the fuel gauge
indicates empty.
Note: The amount of fuel in the empty
reserve varies and should not be relied upon
to increase driving range.
Filling the Fuel Tank
For consistent results when refueling:
• Turn the ignition off before fueling; an
inaccurate reading results if the engine
is left running.
• Use the same fill rate
(low-medium-high) each time the tank
is filled.
• Allow no more than one automatic
shut-off when refueling.
Results are most accurate when the filling
method is consistent.
182
F-150 (TFC) Canada/United States of America, enUSA, First Printing Fuel and RefuelingE206912
AB E119081