key FORD F250 2001 User Guide
[x] Cancel search | Manufacturer: FORD, Model Year: 2001, Model line: F250, Model: FORD F250 2001Pages: 288, PDF Size: 2.07 MB
Page 128 of 288
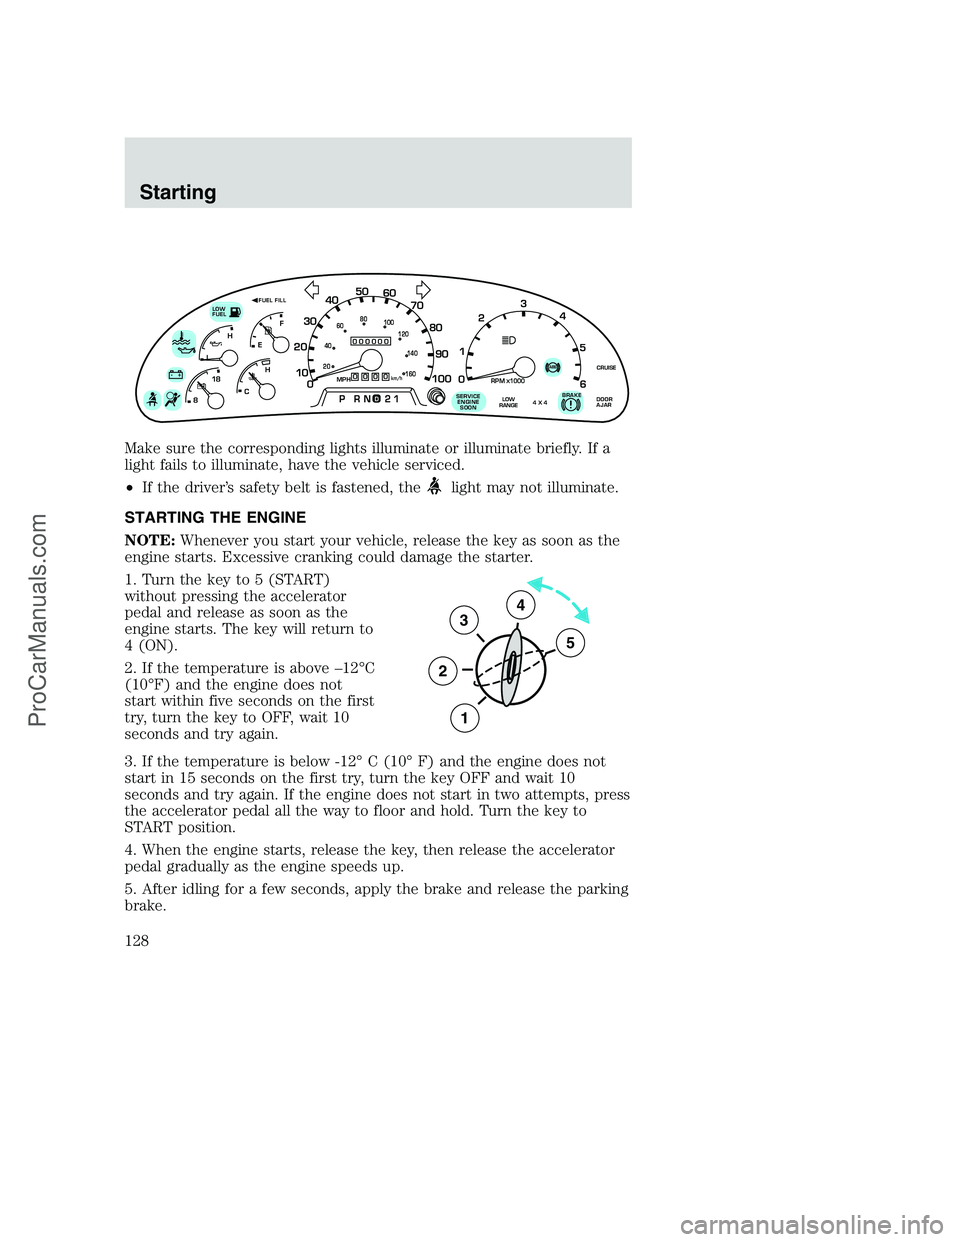
Make sure the corresponding lights illuminate or illuminate briefly. If a
light fails to illuminate, have the vehicle serviced.
•If the driver’s safety belt is fastened, the
light may not illuminate.
STARTING THE ENGINE
NOTE:Whenever you start your vehicle, release the key as soon as the
engine starts. Excessive cranking could damage the starter.
1. Turn the key to 5 (START)
without pressing the accelerator
pedal and release as soon as the
engine starts. The key will return to
4 (ON).
2. If the temperature is above –12°C
(10°F) and the engine does not
start within five seconds on the first
try, turn the key to OFF, wait 10
seconds and try again.
3. If the temperature is below -12° C (10° F) and the engine does not
start in 15 seconds on the first try, turn the key OFF and wait 10
seconds and try again. If the engine does not start in two attempts, press
the accelerator pedal all the way to floor and hold. Turn the key to
START position.
4. When the engine starts, release the key, then release the accelerator
pedal gradually as the engine speeds up.
5. After idling for a few seconds, apply the brake and release the parking
brake.
0
000000000
MPH20km/h
406080
100
120
140
160
010 20304050
60
70
80
90
100
LOW
FUEL
CRUISEABS+ -
LEF
H
RPM1000X0123
5
6 4
PRN 218C 18
H
D
FUEL FILL
DOOR
AJARLOW
RANGE4 X 4BRAKE!SERVICE
ENGINE
SOON
3
2
1
5
4
Starting
128
ProCarManuals.com
Page 136 of 288
AUTOMATIC TRANSMISSION OPERATION (IF EQUIPPED)
Brake-shift interlock
This vehicle is equipped with a brake-shift interlock feature that prevents
the gearshift lever from being moved from P (Park) when the ignition is
in the ON position unless brake pedal is depressed.
If you cannot move the gearshift lever out of P (Park) with ignition in
the ON position and the brake pedal depressed:
1. Apply the parking brake, turn ignition to the LOCK position, then
remove the key.
2. Reinsert the key and turn the ignition to the OFF position.
3. Press and hold down the brake pedal and shift into N (Neutral).
4. Start the vehicle.
If it is necessary to use the above procedure to move the gearshift lever,
it is possible that a fuse has blown or the vehicle’s brakelamps are not
operating properly. Refer toFuses and relaysin theRoadside
emergencieschapter.
Do not drive your vehicle until you verify that the brakelamps
are working.
If your vehicle gets stuck in mud or snow it may be rocked out by
shifting from forward and reverse gears, stopping between shifts, in a
steady pattern. Press lightly on the accelerator in each gear.
Do not rock the vehicle for more than a few minutes. The
transmission and tires may be damaged or the engine may
overheat.
Always set the parking brake fully and make sure the gearshift is
latched in P (Park). Turn off the ignition whenever you leave
your vehicle.
If the parking brake is fully released, but the brake warning lamp
remains illuminated, the brakes may not be working properly.
See your dealer or a qualified service technician.
Driving
136
ProCarManuals.com
Page 142 of 288
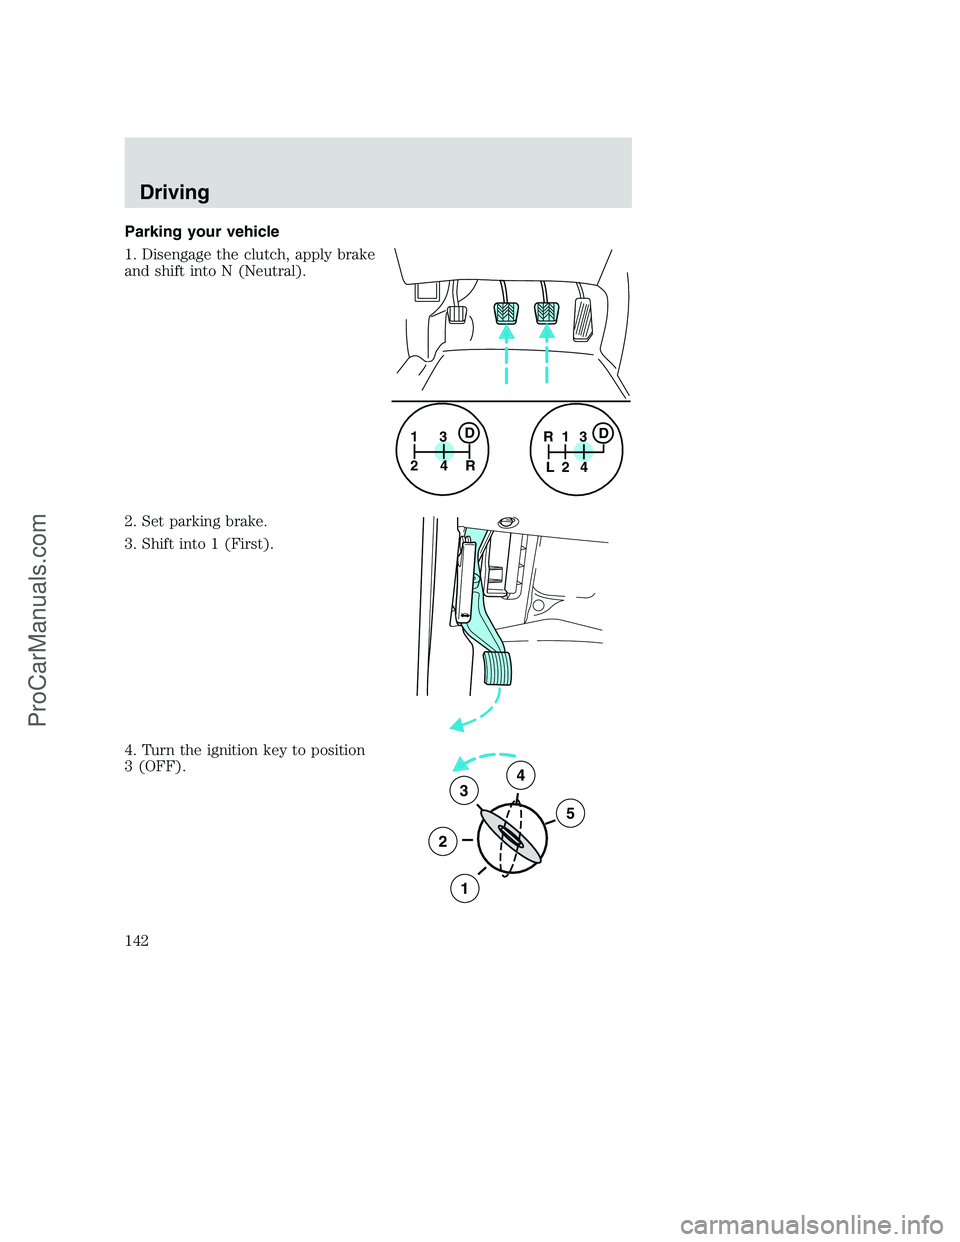
Parking your vehicle
1. Disengage the clutch, apply brake
and shift into N (Neutral).
2. Set parking brake.
3. Shift into 1 (First).
4. Turn the ignition key to position
3 (OFF).
1
24R3D1
24 R
L3D
3
2
1
5
4
Driving
142
ProCarManuals.com
Page 144 of 288
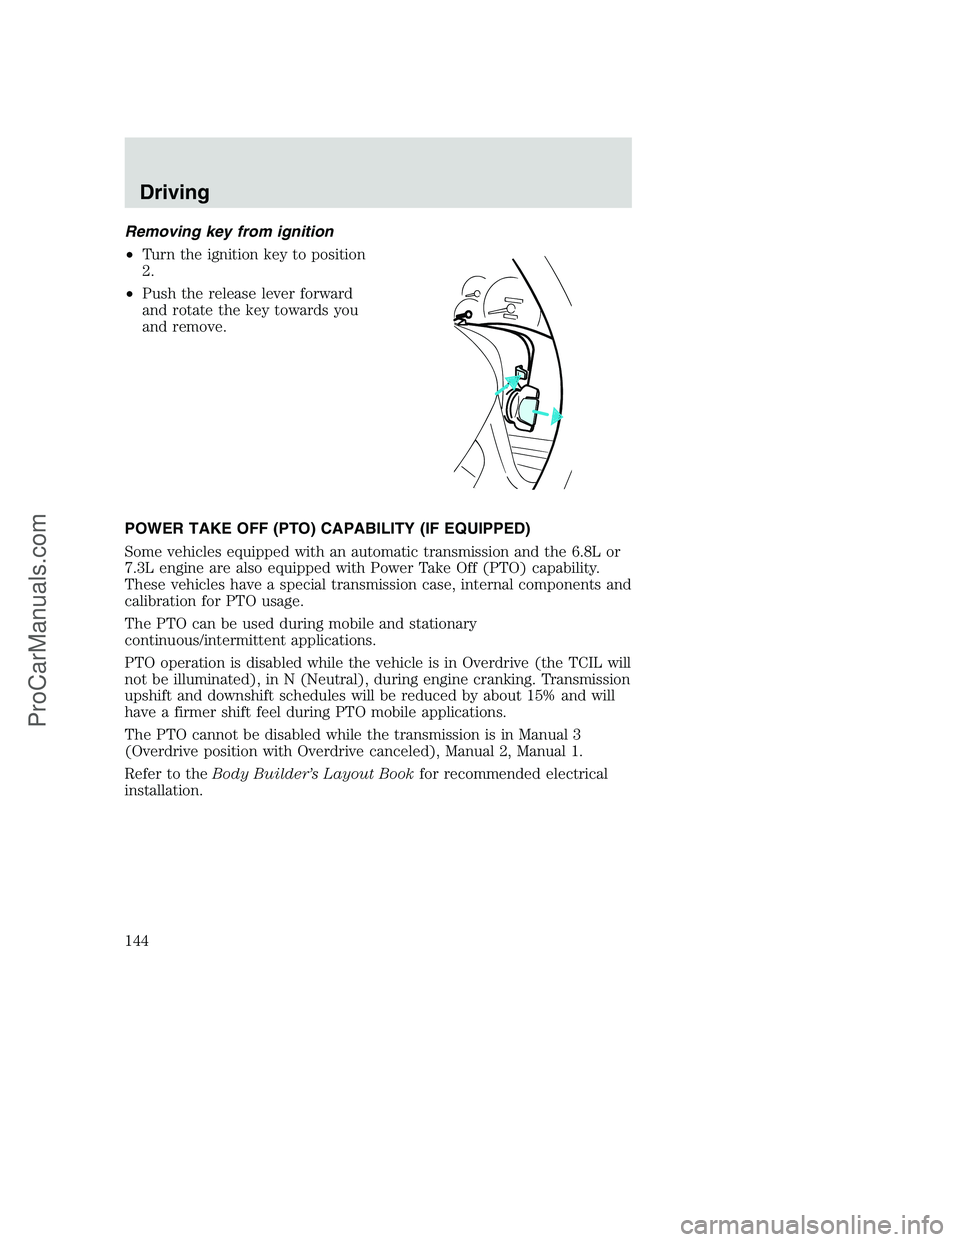
Removing key from ignition
•Turn the ignition key to position
2.
•Push the release lever forward
and rotate the key towards you
and remove.
POWER TAKE OFF (PTO) CAPABILITY (IF EQUIPPED)
Some vehicles equipped with an automatic transmission and the 6.8L or
7.3L engine are also equipped with Power Take Off (PTO) capability.
These vehicles have a special transmission case, internal components and
calibration for PTO usage.
The PTO can be used during mobile and stationary
continuous/intermittent applications.
PTO operation is disabled while the vehicle is in Overdrive (the TCIL will
not be illuminated), in N (Neutral), during engine cranking. Transmission
upshift and downshift schedules will be reduced by about 15% and will
have a firmer shift feel during PTO mobile applications.
The PTO cannot be disabled while the transmission is in Manual 3
(Overdrive position with Overdrive canceled), Manual 2, Manual 1.
Refer to theBody Builder’s Layout Bookfor recommended electrical
installation.
Driving
144
ProCarManuals.com
Page 169 of 288
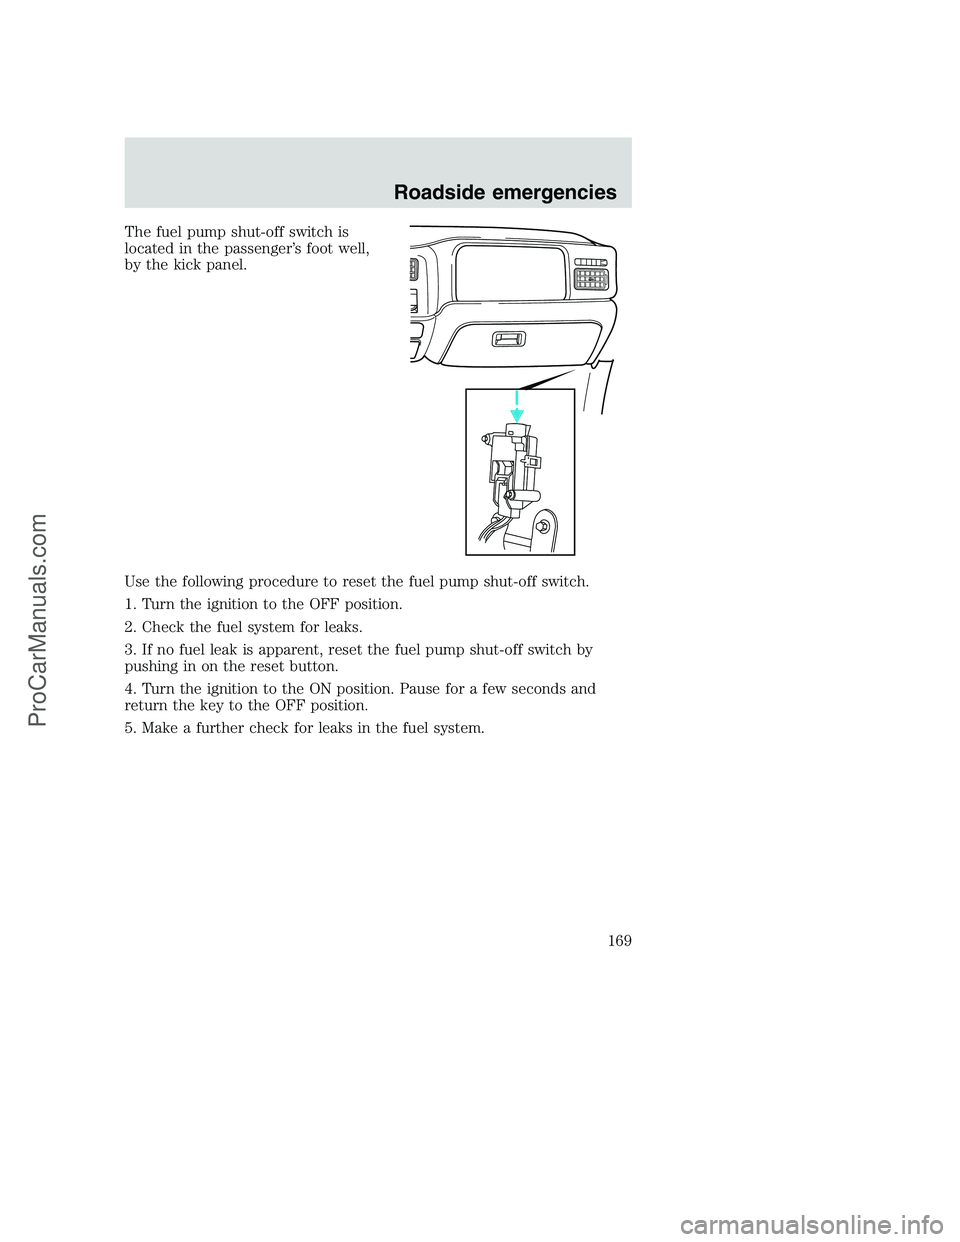
The fuel pump shut-off switch is
located in the passenger’s foot well,
by the kick panel.
Use the following procedure to reset the fuel pump shut-off switch.
1. Turn the ignition to the OFF position.
2. Check the fuel system for leaks.
3. If no fuel leak is apparent, reset the fuel pump shut-off switch by
pushing in on the reset button.
4. Turn the ignition to the ON position. Pause for a few seconds and
return the key to the OFF position.
5. Make a further check for leaks in the fuel system.
Roadside emergencies
169
ProCarManuals.com
Page 178 of 288
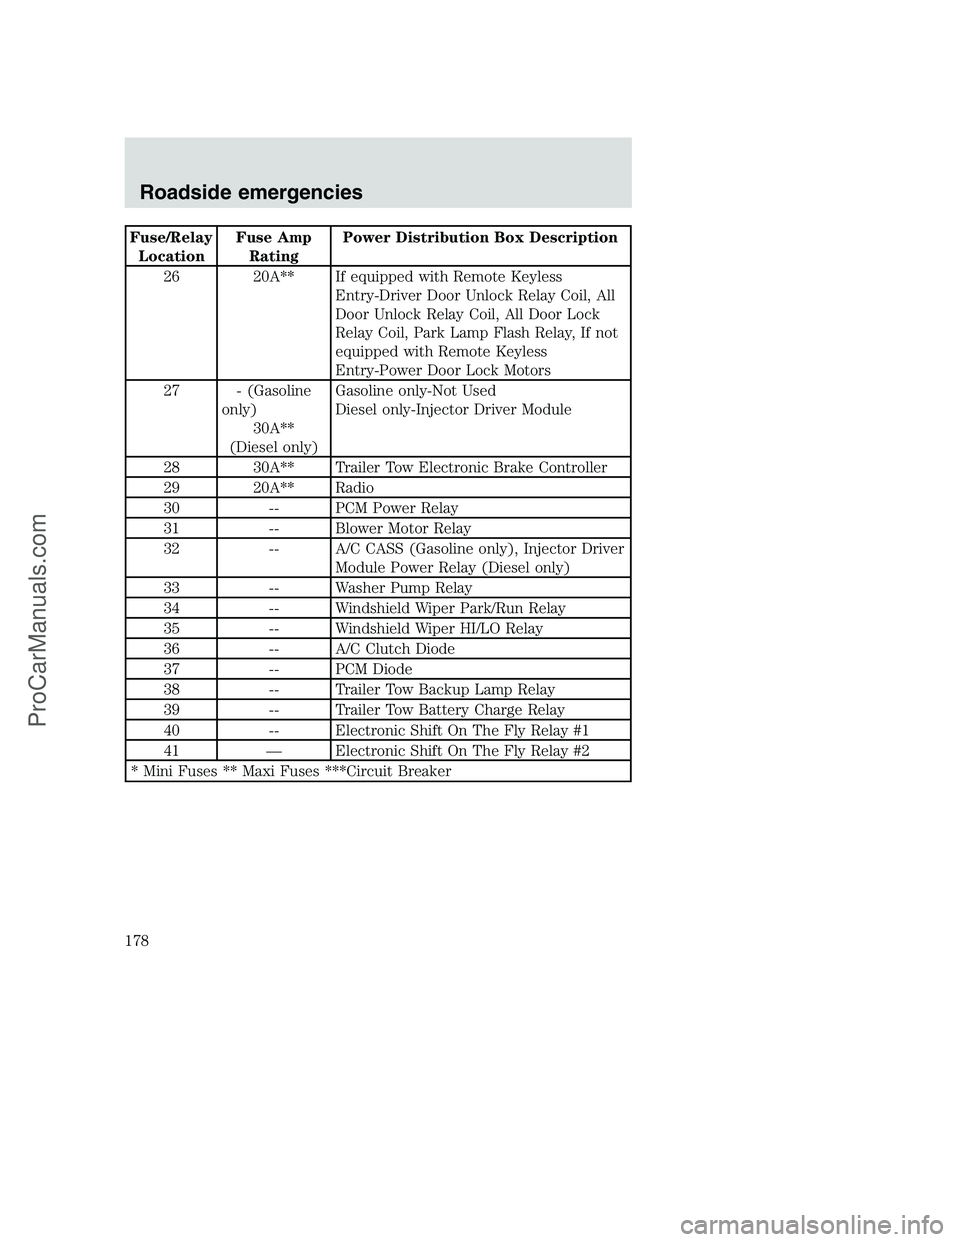
Fuse/Relay
LocationFuse Amp
RatingPower Distribution Box Description
26 20A** If equipped with Remote Keyless
Entry-Driver Door Unlock Relay Coil, All
Door Unlock Relay Coil, All Door Lock
Relay Coil, Park Lamp Flash Relay, If not
equipped with Remote Keyless
Entry-Power Door Lock Motors
27 - (Gasoline
only)
30A**
(Diesel only)Gasoline only-Not Used
Diesel only-Injector Driver Module
28 30A** Trailer Tow Electronic Brake Controller
29 20A** Radio
30 -- PCM Power Relay
31 -- Blower Motor Relay
32 -- A/C CASS (Gasoline only), Injector Driver
Module Power Relay (Diesel only)
33 -- Washer Pump Relay
34 -- Windshield Wiper Park/Run Relay
35 -- Windshield Wiper HI/LO Relay
36 -- A/C Clutch Diode
37 -- PCM Diode
38 -- Trailer Tow Backup Lamp Relay
39 -- Trailer Tow Battery Charge Relay
40 -- Electronic Shift On The Fly Relay #1
41 — Electronic Shift On The Fly Relay #2
* Mini Fuses ** Maxi Fuses ***Circuit Breaker
Roadside emergencies
178
ProCarManuals.com
Page 179 of 288
CHANGING THE TIRES
If you get a flat tire while driving, do not apply the brake heavily.
Instead, gradually decrease your speed. Hold the steering wheel firmly
and slowly move to a safe place on the side of the road.
Spare tire information
Your vehicle may be equipped with a spare tire that can be used as
either a spare or a regular tire. The spare tire is not equipped with wheel
trim. The wheel trim from the original wheel/tire may be used on the
spare.
If your vehicle is equipped with 4WD, a spare tire of a different
size than the road tires should not be used. Such a tire could
result in damage to driveline components and make the vehicle
difficult to control.
Location of the spare tire and tools
The spare tire and tools for your vehicle are stowed in the following
locations:
Tool Location
Spare tire
(pick-up trucks only)Under the vehicle, just forward of the rear
bumper
Jack Regular cab, crew cab and SuperCab
without rear bench seat: Fastened to floor
pan behind rearmost seat on passenger side
SuperCab with rear bench seat: Under rear
bench on passenger side
Jack handle and lug
wrenchOn top of the radiator support at the front
of the engine compartment
Key, spare tire lock
(if equipped)In the glove box
Removing the spare tire (with spare tire carrier only)
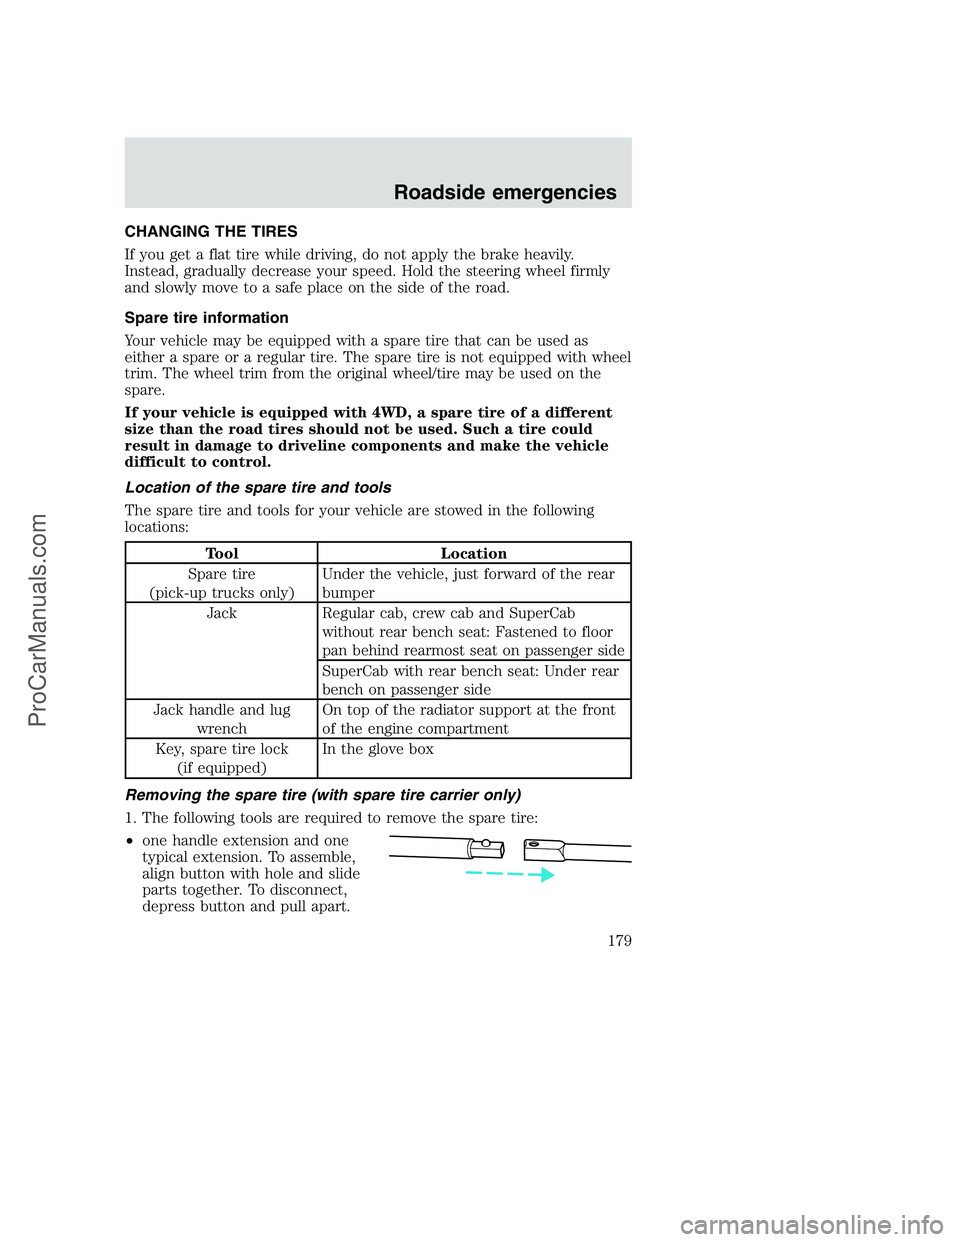
1. The following tools are required to remove the spare tire:
•one handle extension and one
typical extension. To assemble,
align button with hole and slide
parts together. To disconnect,
depress button and pull apart.
Roadside emergencies
179
ProCarManuals.com
Page 180 of 288
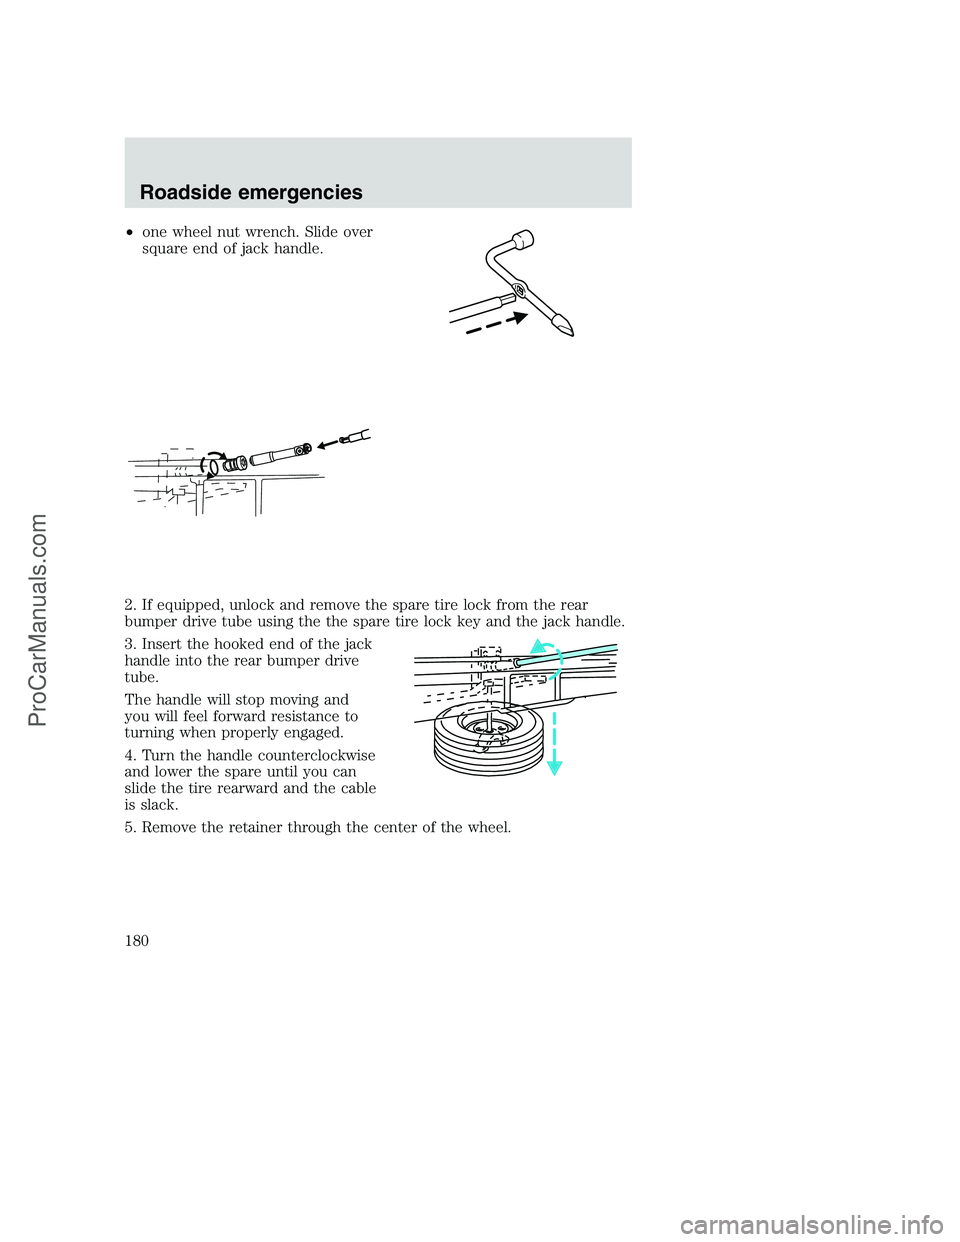
•one wheel nut wrench. Slide over
square end of jack handle.
2. If equipped, unlock and remove the spare tire lock from the rear
bumper drive tube using the the spare tire lock key and the jack handle.
3. Insert the hooked end of the jack
handle into the rear bumper drive
tube.
The handle will stop moving and
you will feel forward resistance to
turning when properly engaged.
4. Turn the handle counterclockwise
and lower the spare until you can
slide the tire rearward and the cable
is slack.
5. Remove the retainer through the center of the wheel.
Roadside emergencies
180
ProCarManuals.com
Page 181 of 288
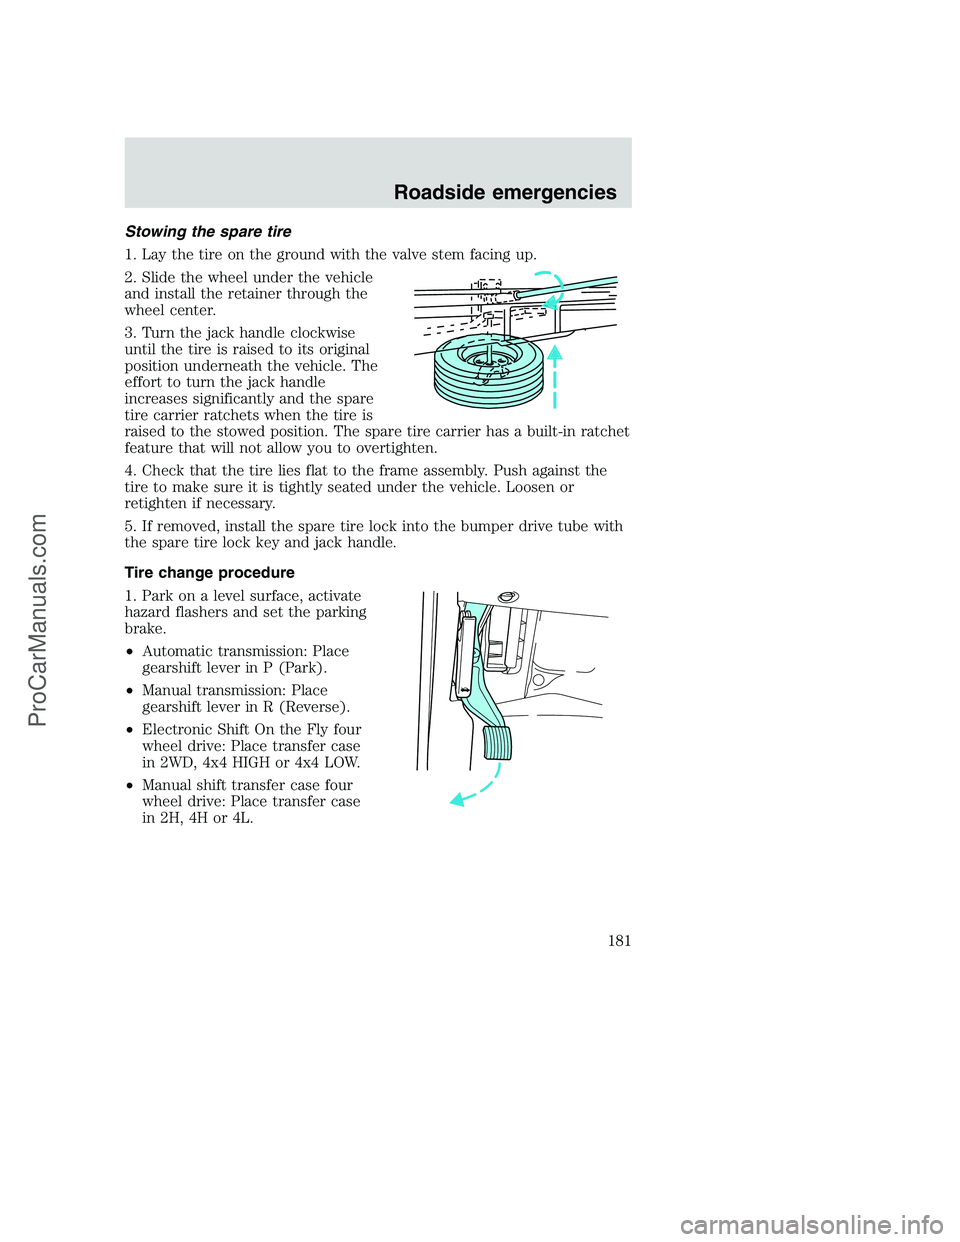
Stowing the spare tire
1. Lay the tire on the ground with the valve stem facing up.
2. Slide the wheel under the vehicle
and install the retainer through the
wheel center.
3. Turn the jack handle clockwise
until the tire is raised to its original
position underneath the vehicle. The
effort to turn the jack handle
increases significantly and the spare
tire carrier ratchets when the tire is
raised to the stowed position. The spare tire carrier has a built-in ratchet
feature that will not allow you to overtighten.
4. Check that the tire lies flat to the frame assembly. Push against the
tire to make sure it is tightly seated under the vehicle. Loosen or
retighten if necessary.
5. If removed, install the spare tire lock into the bumper drive tube with
the spare tire lock key and jack handle.
Tire change procedure
1. Park on a level surface, activate
hazard flashers and set the parking
brake.
•Automatic transmission: Place
gearshift lever in P (Park).
•Manual transmission: Place
gearshift lever in R (Reverse).
•Electronic Shift On the Fly four
wheel drive: Place transfer case
in 2WD, 4x4 HIGH or 4x4 LOW.
•Manual shift transfer case four
wheel drive: Place transfer case
in 2H, 4H or 4L.
Roadside emergencies
181
ProCarManuals.com
Page 198 of 288
Working with the engine off
•Automatic transmission:
1. Set the parking brake and ensure the gearshift is securely latched in P
(Park).
2. Turn off the engine and remove the key.
3. Block the wheels to prevent the vehicle from moving unexpectedly.
•Manual transmission:
1. Set the parking brake.
2. Depress the clutch and place the gearshift in 1 (First).
3. Turn off the engine and remove the key.
4. Block the wheels to prevent the vehicle from moving unexpectedly.
Working with the engine on
•Automatic transmission:
1. Set the parking brake and ensure the gearshift is securely latched in P
(Park).
2. Block the wheels to prevent the vehicle from moving unexpectedly.
NOTE:Do not start your engine with the air cleaner removed and do not
remove it while the engine is running.
•Manual transmission:
1. Set the parking brake, depress the clutch and place the gearshift in
neutral.
2. Block the wheels to prevent the vehicle from moving unexpectedly.
NOTE:Do not start your engine with the air cleaner removed and do not
remove it while the engine is running.
The cooling fan is automatic and may come on at any time.
Always disconnect the negative terminal of the battery before
working near the fan.
Maintenance and care
198
ProCarManuals.com