park assist FORD F250 2016 Owners Manual
[x] Cancel search | Manufacturer: FORD, Model Year: 2016, Model line: F250, Model: FORD F250 2016Pages: 507, PDF Size: 6.81 MB
Page 6 of 507
Fuel Consumption........................................147
Emission Control System..........................148
Transmission
Automatic Transmission.............................151
Power Take-Off.............................................156
Four-Wheel Drive
Using Four-Wheel Drive.............................158
Rear Axle
Limited Slip Differential.............................167
Electronic Locking Differential
.................167
Brakes
General Information
....................................169
Hints on Driving With Anti-Lock Brakes...........................................................169
Parking Brake
.................................................170
Hill Start Assist..............................................170
Traction Control
Principle of Operation
.................................172
Using Traction Control................................172
Stability Control
Principle of Operation.................................174
Using Stability Control
................................174
Terrain Response
Principle of Operation..................................177
Using Hill Descent Control.........................177
Parking Aids
Parking Aid
......................................................179
Rear View Camera.......................................180
Cruise Control
Principle of Operation.................................183
Using Cruise Control
....................................183 Driving Aids
Steering............................................................184
Load Carrying
Load Limit
.......................................................185
Towing
Towing a Trailer.............................................192
Trailer Sway Control....................................193
Recommended Towing Weights............193
Essential Towing Checks...........................196
Towing Points
...............................................204
Transporting the Vehicle..........................205
Towing the Vehicle on Four Wheels......206
Driving Hints
Breaking-In
.....................................................207
Economical Driving
.....................................207
Driving Through Water..............................208
Floor Mats
......................................................208
Snowplowing................................................209
Roadside Emergencies
Roadside Assistance
...................................212
Hazard Warning Flashers
...........................213
Fuel Shutoff
....................................................213
Jump Starting the Vehicle.........................214
Post-Crash Alert System...........................216
Customer Assistance
Getting the Services You Need................217
In California (U.S. Only)
.............................218
The Better Business Bureau (BBB) Auto Line Program (U.S. Only)......................219
Utilizing the Mediation/Arbitration Program (Canada Only)........................219
Getting Assistance Outside the U.S. and Canada........................................................220
Ordering Additional Owner's Literature......................................................221
3
Super Duty (TFA) Canada/United States of America, enUSA, First Printing Table of Contents
Page 12 of 507
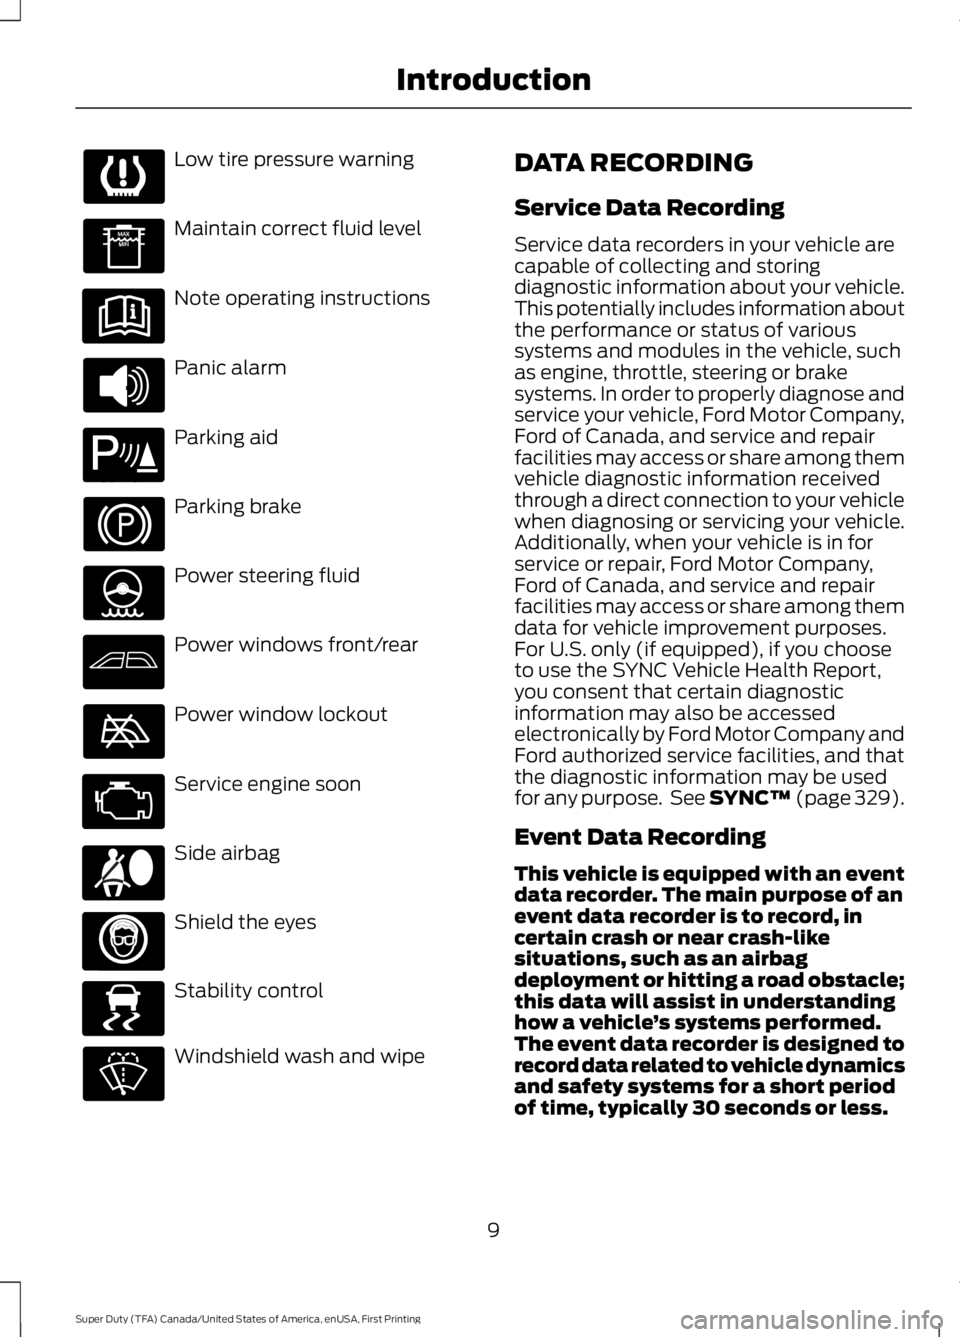
Low tire pressure warning
Maintain correct fluid level
Note operating instructions
Panic alarm
Parking aid
Parking brake
Power steering fluid
Power windows front/rear
Power window lockout
Service engine soon
Side airbag
Shield the eyes
Stability control
Windshield wash and wipe DATA RECORDING
Service Data Recording
Service data recorders in your vehicle are
capable of collecting and storing
diagnostic information about your vehicle.
This potentially includes information about
the performance or status of various
systems and modules in the vehicle, such
as engine, throttle, steering or brake
systems. In order to properly diagnose and
service your vehicle, Ford Motor Company,
Ford of Canada, and service and repair
facilities may access or share among them
vehicle diagnostic information received
through a direct connection to your vehicle
when diagnosing or servicing your vehicle.
Additionally, when your vehicle is in for
service or repair, Ford Motor Company,
Ford of Canada, and service and repair
facilities may access or share among them
data for vehicle improvement purposes.
For U.S. only (if equipped), if you choose
to use the SYNC Vehicle Health Report,
you consent that certain diagnostic
information may also be accessed
electronically by Ford Motor Company and
Ford authorized service facilities, and that
the diagnostic information may be used
for any purpose. See SYNC™ (page 329).
Event Data Recording
This vehicle is equipped with an event
data recorder. The main purpose of an
event data recorder is to record, in
certain crash or near crash-like
situations, such as an airbag
deployment or hitting a road obstacle;
this data will assist in understanding
how a vehicle
’s systems performed.
The event data recorder is designed to
record data related to vehicle dynamics
and safety systems for a short period
of time, typically 30 seconds or less.
9
Super Duty (TFA) Canada/United States of America, enUSA, First Printing Introduction E139213 E167012 E138639
Page 54 of 507
PRINCIPLE OF OPERATION
MyKey allows you to program keys with
restricted driving modes to promote good
driving habits. All but one of the keys
programmed to the vehicle can be
activated with these restricted modes.
Any keys that have not been programmed
are referred to as administrator keys or
admin keys. They can be used to:
•
create a MyKey
• program configurable MyKey settings
• clear all MyKey features.
When you have programmed a MyKey, you
can access the following information using
the information display:
• How many admin keys and MyKeys are
programmed to your vehicle.
• The total distance your vehicle has
traveled using a MyKey.
Note: All MyKeys are programmed to the
same settings. You cannot program them
individually.
Non-configurable Settings
The following settings cannot be changed
by an admin key user:
• Belt-Minder. You cannot disable this
feature. The audio system will mute
when the front seat occupants’ safety
belts are not fastened. Note: If your
vehicle is equipped with AM/FM radio
only, then the radio will not mute.
• Early low fuel. The low fuel warning is
activated earlier, giving the MyKey user
more time to refuel.
• Driver assist features, if equipped on
your vehicle, are forced on: parking aid,
blind spot information system (BLIS)
with cross traffic alert, lane departure
warning and forward collision warning
system. Configurable Settings
With an admin key, you can configure
certain MyKey settings when you first
create a MyKey and before you recycle the
key or restart the vehicle. You can also
change the settings afterward with an
admin key:
•
A vehicle speed limit can be set.
Warnings will be shown in the display
followed by an audible tone when your
vehicle reaches the set speed. You
cannot override the set speed by fully
depressing the accelerator pedal or by
setting cruise control. WARNING
Do not set MyKey maximum speed
limit to a limit that will prevent the
driver from maintaining a safe speed
considering posted speed limits and
prevailing road conditions. The driver is
always responsible to drive in accordance
with local laws and prevailing conditions.
Failure to do so could result in accident or
injury. •
Various vehicle speed minders can be
set. Once you select a speed, it will be
shown in the display, followed by an
audible tone when the preselected
vehicle speed is exceeded.
• Audio system maximum volume of
45%. A message will be shown in the
display when you attempt to exceed
the limited volume. Also, the
speed-sensitive or compensated
automatic volume control will be
disabled. Note:
If your vehicle is
equipped with AM/FM radio only, then
the radio volume will not be limited.
• Always on setting. When this is
selected, you will not be able to turn
off AdvanceTrac (if your vehicle is
equipped with this feature).
51
Super Duty (TFA) Canada/United States of America, enUSA, First Printing MyKey
™
Page 101 of 507
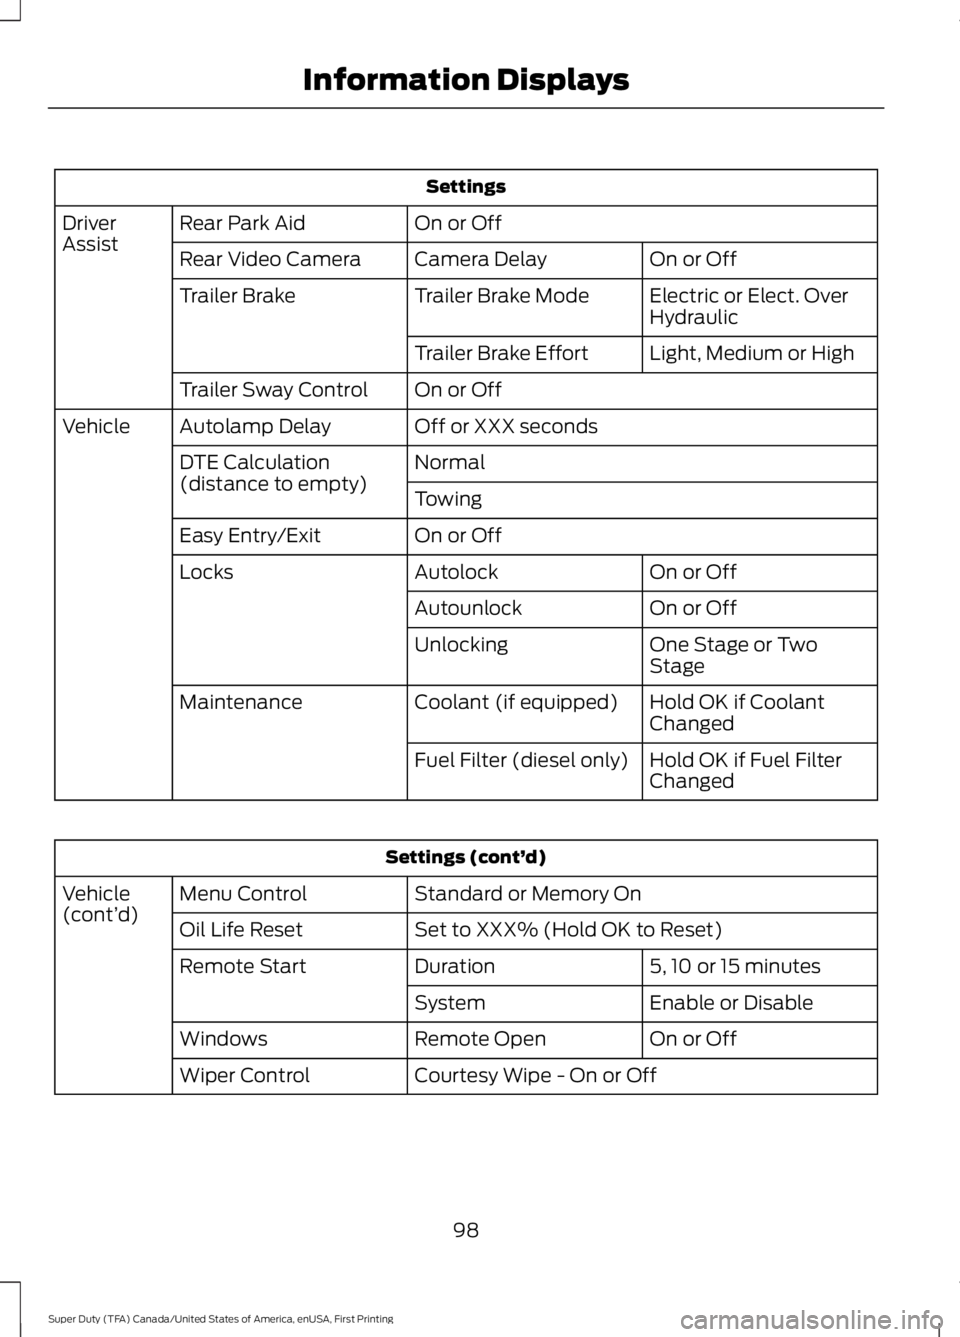
Settings
On or Off
Rear Park Aid
Driver
Assist
On or Off
Camera Delay
Rear Video Camera
Electric or Elect. Over
Hydraulic
Trailer Brake Mode
Trailer Brake
Light, Medium or High
Trailer Brake Effort
On or Off
Trailer Sway Control
Off or XXX seconds
Autolamp Delay
Vehicle
Normal
DTE Calculation
(distance to empty)
Towing
On or Off
Easy Entry/Exit
On or Off
Autolock
Locks
On or Off
Autounlock
One Stage or Two
Stage
Unlocking
Hold OK if Coolant
Changed
Coolant (if equipped)
Maintenance
Hold OK if Fuel Filter
Changed
Fuel Filter (diesel only) Settings (cont’
d)
Standard or Memory On
Menu Control
Vehicle
(cont’ d)
Set to XXX% (Hold OK to Reset)
Oil Life Reset
5, 10 or 15 minutes
Duration
Remote Start
Enable or Disable
System
On or Off
Remote Open
Windows
Courtesy Wipe - On or Off
Wiper Control
98
Super Duty (TFA) Canada/United States of America, enUSA, First Printing Information Displays
Page 110 of 507
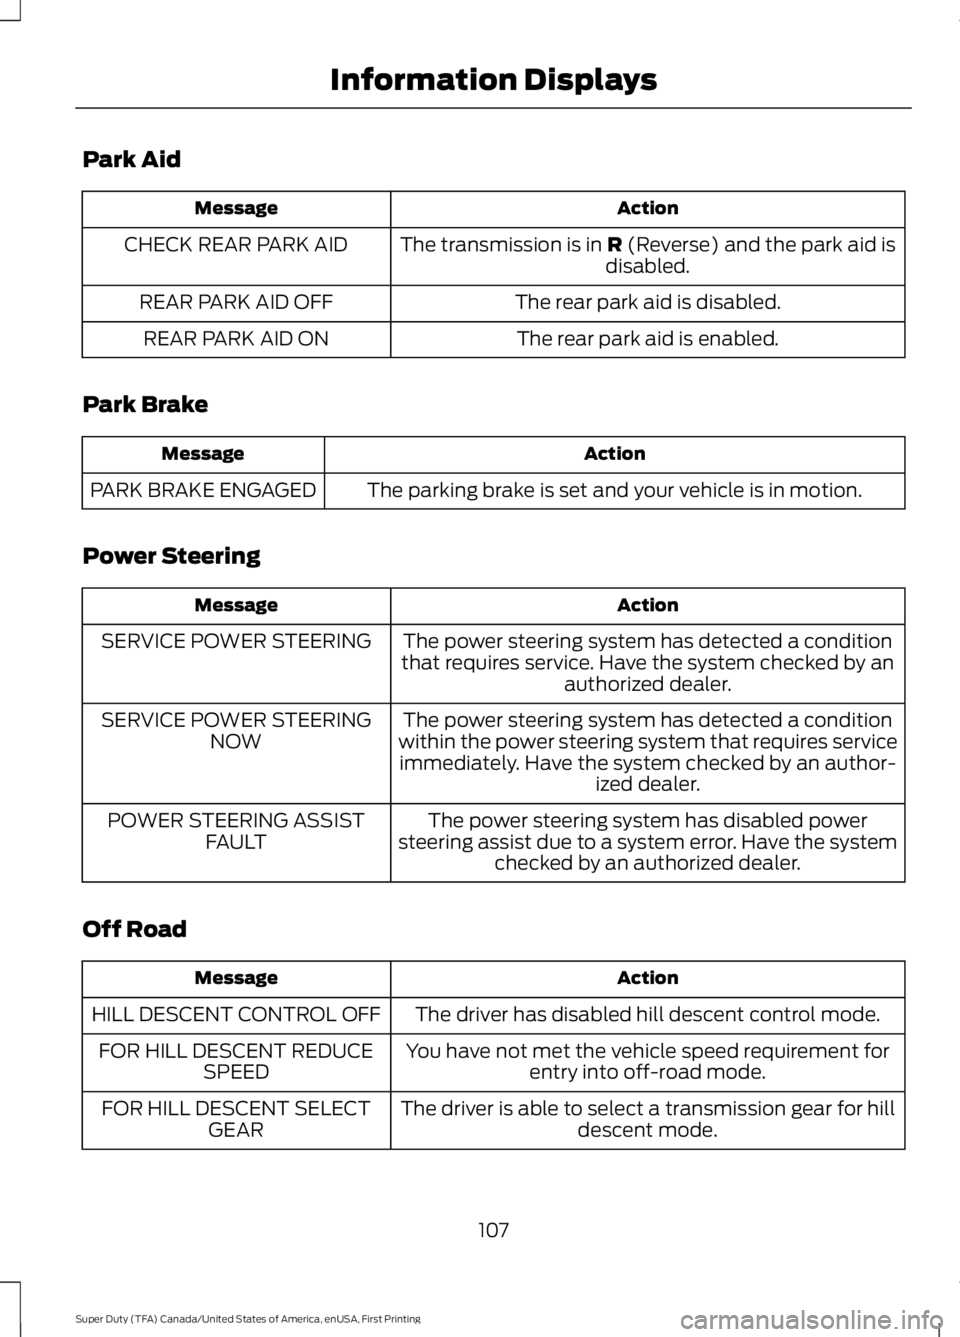
Park Aid
Action
Message
The transmission is in R (Reverse) and the park aid is
disabled.
CHECK REAR PARK AID
The rear park aid is disabled.
REAR PARK AID OFF
The rear park aid is enabled.
REAR PARK AID ON
Park Brake Action
Message
The parking brake is set and your vehicle is in motion.
PARK BRAKE ENGAGED
Power Steering Action
Message
The power steering system has detected a condition
that requires service. Have the system checked by an authorized dealer.
SERVICE POWER STEERING
The power steering system has detected a condition
within the power steering system that requires service immediately. Have the system checked by an author- ized dealer.
SERVICE POWER STEERING
NOW
The power steering system has disabled power
steering assist due to a system error. Have the system checked by an authorized dealer.
POWER STEERING ASSIST
FAULT
Off Road Action
Message
The driver has disabled hill descent control mode.
HILL DESCENT CONTROL OFF
You have not met the vehicle speed requirement forentry into off-road mode.
FOR HILL DESCENT REDUCE
SPEED
The driver is able to select a transmission gear for hilldescent mode.
FOR HILL DESCENT SELECT
GEAR
107
Super Duty (TFA) Canada/United States of America, enUSA, First Printing Information Displays
Page 144 of 507
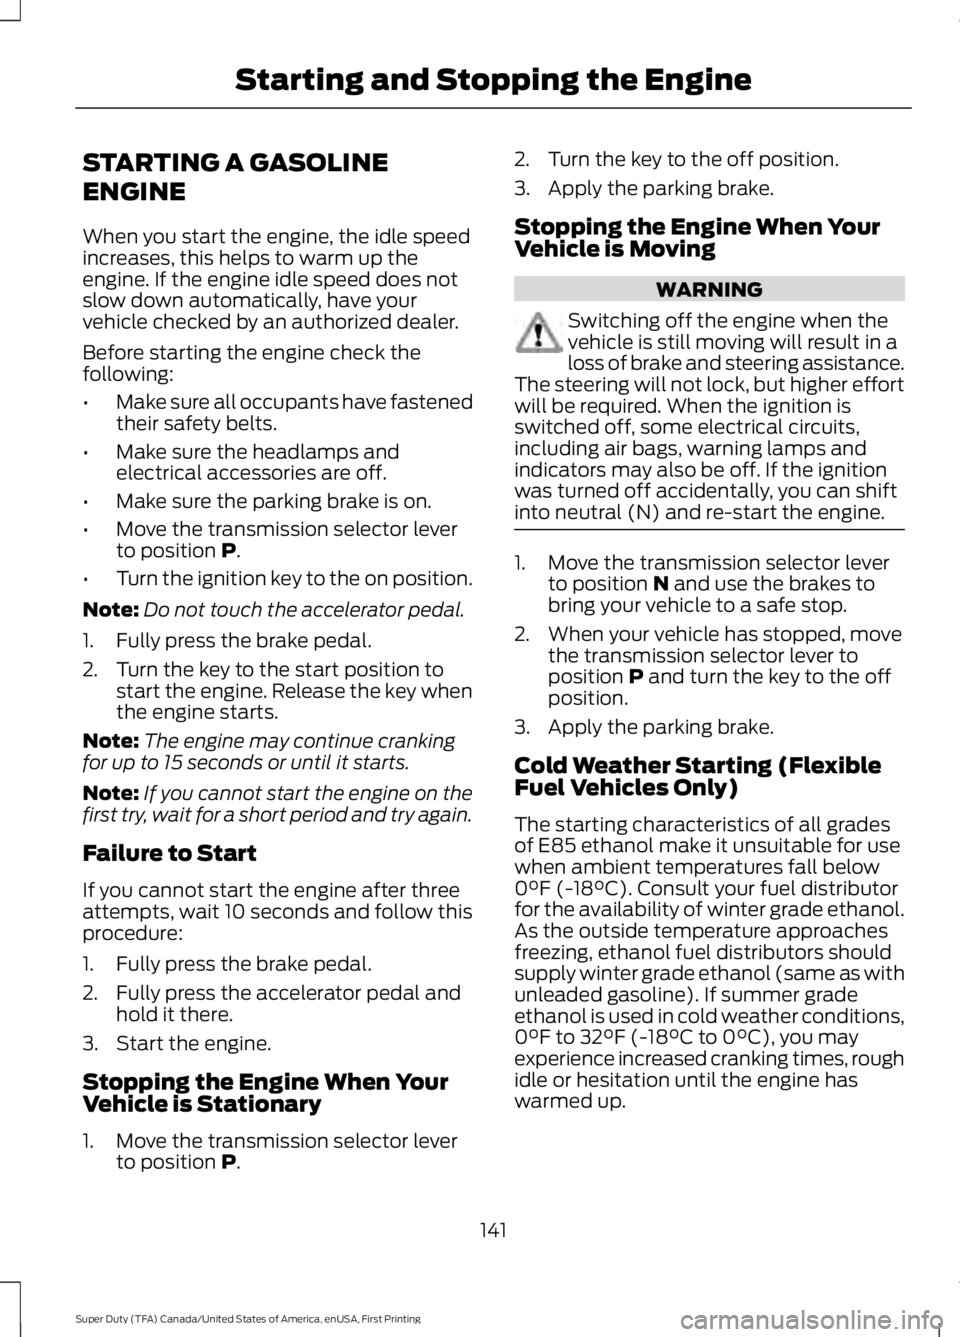
STARTING A GASOLINE
ENGINE
When you start the engine, the idle speed
increases, this helps to warm up the
engine. If the engine idle speed does not
slow down automatically, have your
vehicle checked by an authorized dealer.
Before starting the engine check the
following:
•
Make sure all occupants have fastened
their safety belts.
• Make sure the headlamps and
electrical accessories are off.
• Make sure the parking brake is on.
• Move the transmission selector lever
to position P.
• Turn the ignition key to the on position.
Note: Do not touch the accelerator pedal.
1. Fully press the brake pedal.
2. Turn the key to the start position to start the engine. Release the key when
the engine starts.
Note: The engine may continue cranking
for up to 15 seconds or until it starts.
Note: If you cannot start the engine on the
first try, wait for a short period and try again.
Failure to Start
If you cannot start the engine after three
attempts, wait 10 seconds and follow this
procedure:
1. Fully press the brake pedal.
2. Fully press the accelerator pedal and hold it there.
3. Start the engine.
Stopping the Engine When Your
Vehicle is Stationary
1. Move the transmission selector lever to position
P. 2. Turn the key to the off position.
3. Apply the parking brake.
Stopping the Engine When Your
Vehicle is Moving
WARNING
Switching off the engine when the
vehicle is still moving will result in a
loss of brake and steering assistance.
The steering will not lock, but higher effort
will be required. When the ignition is
switched off, some electrical circuits,
including air bags, warning lamps and
indicators may also be off. If the ignition
was turned off accidentally, you can shift
into neutral (N) and re-start the engine. 1. Move the transmission selector lever
to position
N and use the brakes to
bring your vehicle to a safe stop.
2. When your vehicle has stopped, move the transmission selector lever to
position
P and turn the key to the off
position.
3. Apply the parking brake.
Cold Weather Starting (Flexible
Fuel Vehicles Only)
The starting characteristics of all grades
of E85 ethanol make it unsuitable for use
when ambient temperatures fall below
0°F (-18°C). Consult your fuel distributor
for the availability of winter grade ethanol.
As the outside temperature approaches
freezing, ethanol fuel distributors should
supply winter grade ethanol (same as with
unleaded gasoline). If summer grade
ethanol is used in cold weather conditions,
0°F to 32°F (-18°C to 0°C), you may
experience increased cranking times, rough
idle or hesitation until the engine has
warmed up.
141
Super Duty (TFA) Canada/United States of America, enUSA, First Printing Starting and Stopping the Engine
Page 155 of 507
Tow/Haul Mode
To activate tow/haul, press the
button on the gearshift lever
once. The TOW HAUL indicator
light illuminates in the instrument cluster.
The tow/haul feature:
• Delays upshifts to reduce the frequency
of transmission shifting.
• Provides engine braking in all forward
gears, which slows your vehicle and
assists you in controlling your vehicle
when descending a grade.
• Depending on driving conditions and
load conditions, may downshift the
transmission, slow your vehicle and
control your vehicle speed when
descending a hill, without pressing the
accelerator pedal. The amount of
downshift braking provided varies
based upon the amount you press the
brake pedal.
The tow/haul feature improves
transmission operation when towing a
trailer or a heavy load. All transmission
gear ranges are available when using
tow/haul.
To deactivate the tow/haul feature and
return to normal driving mode, press the
button on the gearshift lever twice. The
TOW HAUL light deactivates. Tow/haul
also deactivates when you power down
your vehicle. WARNING
Do not use the tow/haul feature
when driving in icy or slippery
conditions as the increased engine
braking can cause the rear wheels to slide
and your vehicle to swing around with the
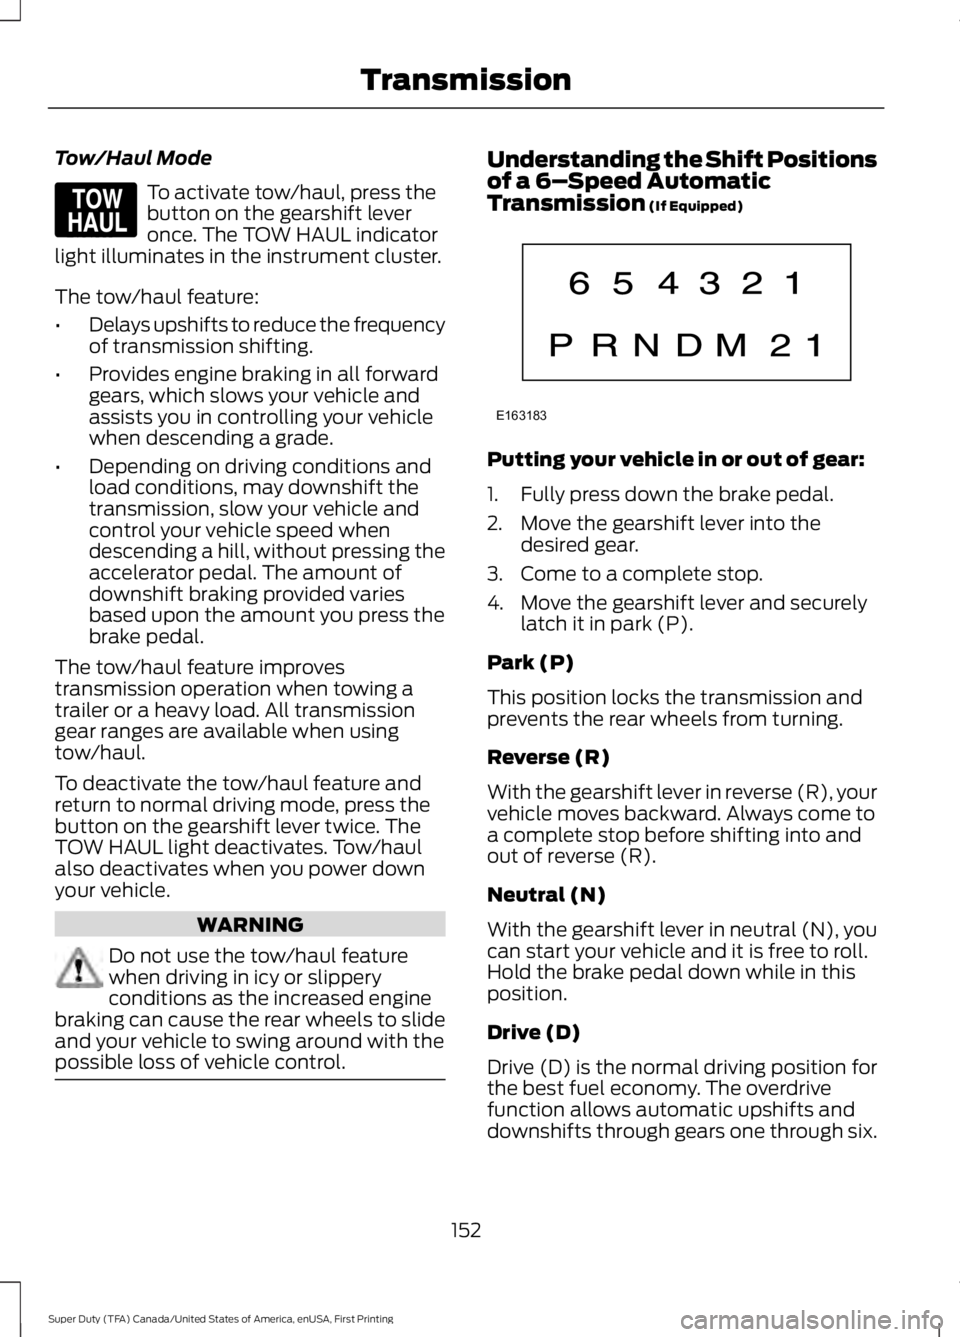
possible loss of vehicle control. Understanding the Shift Positions
of a 6–
Speed Automatic
Transmission (If Equipped) Putting your vehicle in or out of gear:
1. Fully press down the brake pedal.
2. Move the gearshift lever into the
desired gear.
3. Come to a complete stop.
4. Move the gearshift lever and securely latch it in park (P).
Park (P)
This position locks the transmission and
prevents the rear wheels from turning.
Reverse (R)
With the gearshift lever in reverse (R), your
vehicle moves backward. Always come to
a complete stop before shifting into and
out of reverse (R).
Neutral (N)
With the gearshift lever in neutral (N), you
can start your vehicle and it is free to roll.
Hold the brake pedal down while in this
position.
Drive (D)
Drive (D) is the normal driving position for
the best fuel economy. The overdrive
function allows automatic upshifts and
downshifts through gears one through six.
152
Super Duty (TFA) Canada/United States of America, enUSA, First Printing TransmissionE161509 E163183
Page 172 of 507
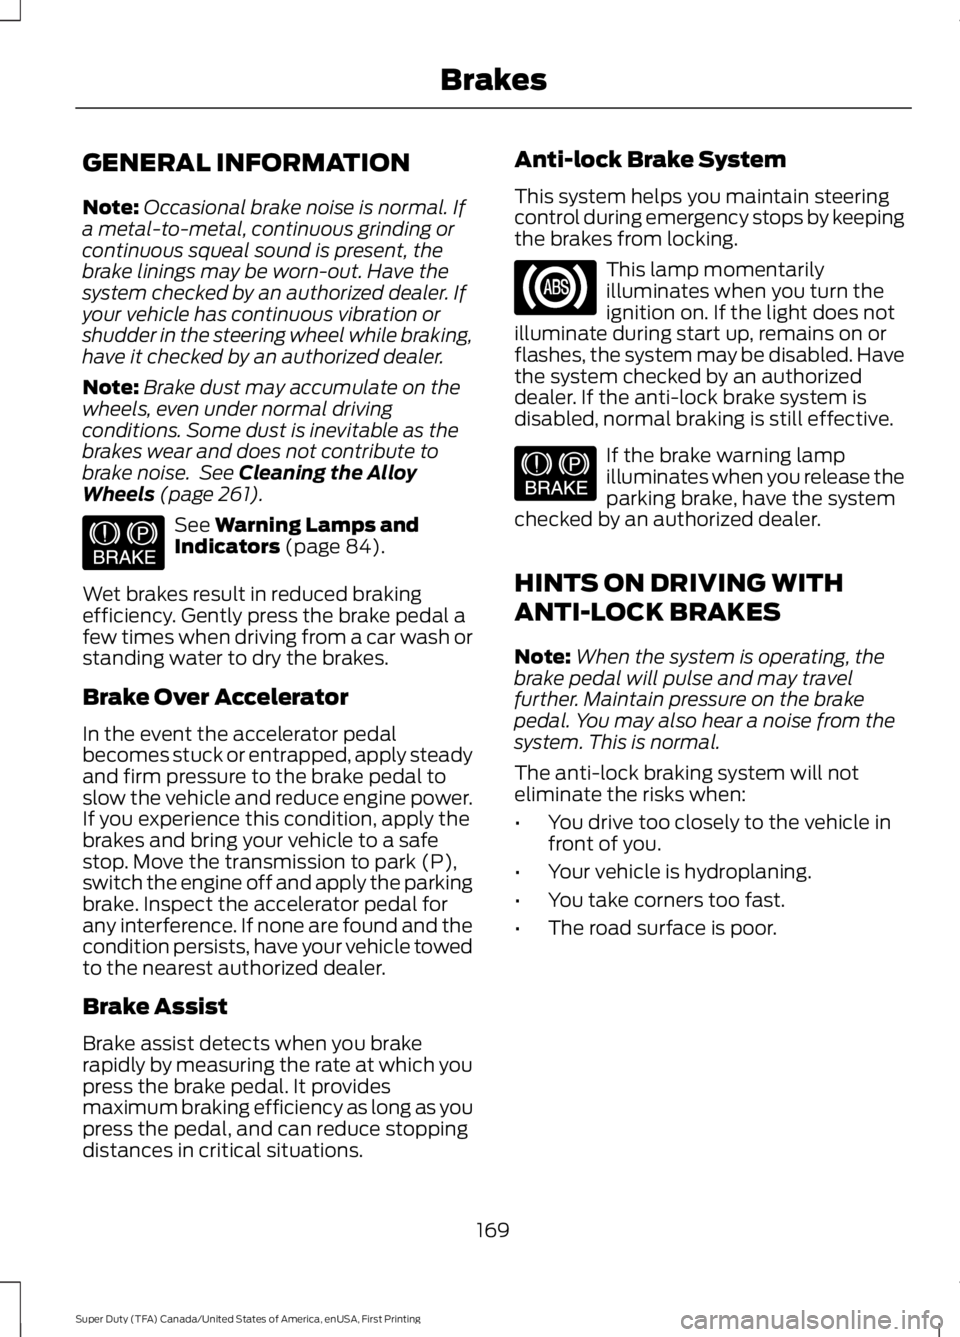
GENERAL INFORMATION
Note:
Occasional brake noise is normal. If
a metal-to-metal, continuous grinding or
continuous squeal sound is present, the
brake linings may be worn-out. Have the
system checked by an authorized dealer. If
your vehicle has continuous vibration or
shudder in the steering wheel while braking,
have it checked by an authorized dealer.
Note: Brake dust may accumulate on the
wheels, even under normal driving
conditions. Some dust is inevitable as the
brakes wear and does not contribute to
brake noise. See Cleaning the Alloy
Wheels (page 261). See
Warning Lamps and
Indicators (page 84).
Wet brakes result in reduced braking
efficiency. Gently press the brake pedal a
few times when driving from a car wash or
standing water to dry the brakes.
Brake Over Accelerator
In the event the accelerator pedal
becomes stuck or entrapped, apply steady
and firm pressure to the brake pedal to
slow the vehicle and reduce engine power.
If you experience this condition, apply the
brakes and bring your vehicle to a safe
stop. Move the transmission to park (P),
switch the engine off and apply the parking
brake. Inspect the accelerator pedal for
any interference. If none are found and the
condition persists, have your vehicle towed
to the nearest authorized dealer.
Brake Assist
Brake assist detects when you brake
rapidly by measuring the rate at which you
press the brake pedal. It provides
maximum braking efficiency as long as you
press the pedal, and can reduce stopping
distances in critical situations. Anti-lock Brake System
This system helps you maintain steering
control during emergency stops by keeping
the brakes from locking. This lamp momentarily
illuminates when you turn the
ignition on. If the light does not
illuminate during start up, remains on or
flashes, the system may be disabled. Have
the system checked by an authorized
dealer. If the anti-lock brake system is
disabled, normal braking is still effective. If the brake warning lamp
illuminates when you release the
parking brake, have the system
checked by an authorized dealer.
HINTS ON DRIVING WITH
ANTI-LOCK BRAKES
Note: When the system is operating, the
brake pedal will pulse and may travel
further. Maintain pressure on the brake
pedal. You may also hear a noise from the
system. This is normal.
The anti-lock braking system will not
eliminate the risks when:
• You drive too closely to the vehicle in
front of you.
• Your vehicle is hydroplaning.
• You take corners too fast.
• The road surface is poor.
169
Super Duty (TFA) Canada/United States of America, enUSA, First Printing BrakesE144522 E144522
Page 173 of 507
PARKING BRAKE
WARNING
Always set the parking brake fully
and make sure the transmission is
placed in park (P). Failure to set the
parking brake and engage park could result
in vehicle roll-away, property damage or
bodily injury. Turn the ignition to the lock
position and remove the key whenever you
leave your vehicle. Apply the parking brake whenever your
vehicle is parked. Press the pedal
downward to set the parking brake. The
brake warning lamp in the instrument
cluster will illuminate and remains
illuminated until the parking brake is
released.
To release, pull the brake release lever
located at the lower left side of the
instrument panel.
If you are parking your vehicle on a grade
or with a trailer, press and hold the brake
pedal down, then set the parking brake.
There may be a little vehicle movement as
the parking brake sets to hold the vehicle's
weight. This is normal and should be no
reason for concern. If needed, press and
hold the service brake pedal down, then
try reapplying the parking brake. Chock the
wheels if required. If the parking brake
cannot hold the weight of the vehicle, the
parking brake may need to be serviced or
the vehicle may be overloaded.
HILL START ASSIST
WARNINGS
The system does not replace the
parking brake. When you leave your
vehicle, always apply the parking
brake. Failure to leave your vehicle securely
parked may lead to a crash or injury. See
Parking Brake (page 170). WARNINGS
You must remain in your vehicle
when the system turns on. At all
times, you are responsible for
controlling your vehicle, supervising the
system and intervening, if required. Failure
to take care may result in the loss of
control of your vehicle, serious personal
injury or death. The system will turn off if a
malfunction is apparent or if you rev
the engine excessively. Failure to
take care may result in the loss of control
of your vehicle, serious personal injury or
death. The system makes it easier to pull away
when your vehicle is on a slope without the
need to use the parking brake.
When the system is active, your vehicle
remains stationary on the slope for two to
three seconds after you release the brake
pedal. This allows time to move your foot
from the brake to the accelerator pedal.
The system releases the brakes
automatically once the engine has
developed sufficient drive to prevent your
vehicle from rolling down the slope. This
is an advantage when pulling away on a
slope, for example from a car park ramp,
traffic lights or when reversing uphill into
a parking space.
Note:
The system only functions when you
bring your vehicle to a complete standstill
in an uphill gear (for example, drive when
facing uphill or reverse when facing
downhill).
Note: There is no warning light to indicate
the system is either on or off.
Using Hill Start Assist
1. Press the brake pedal to bring your vehicle to a complete standstill. Keep
the brake pedal pressed.
170
Super Duty (TFA) Canada/United States of America, enUSA, First Printing Brakes
Page 180 of 507
PRINCIPLE OF OPERATION
WARNINGS
Hill descent control cannot control
descent in all surface conditions and
circumstances, such as ice or
extremely steep grades. Hill descent
control is a driver assist system and cannot
substitute for good judgment by the driver.
Failure to do so may result in loss of vehicle
control, crash or serious injury. Hill descent control does not provide
hill hold at zero miles per hour (0
kilometers per hour). When stopped,
the parking brake must be applied or the
vehicle must be placed in P (Park) or it
may roll away. Hill descent control allows the driver to set
and maintain vehicle speed while
descending steep grades in various surface
conditions.
Hill descent control can maintain vehicle
speeds on downhill grades between 2 mph
(3 km/h) and 12 mph (20 km/h). Above 20
mph (32 km/h), the system remains
armed, but descent speed cannot be set
or maintained.
Hill descent control requires a cooling
down interval after a period of sustained
use. The amount of time that the feature
can remain active before cooling varies
with conditions. The system will provide a
warning in the message center and a chime
will sound when the system is about to
disengage for cooling. At this time,
manually apply the brakes as needed to
maintain descent speed. USING HILL DESCENT
CONTROL Press and release the hill
descent button located on the
instrument panel. A light in the
cluster will illuminate and a chime will
sound when this feature is activated.
To increase descent speed, press the
accelerator pedal until the desired speed
is reached. To decrease descent speed,
press the brake pedal until the desired
speed is reached.
Whether accelerating or decelerating, once
the desired descent speed is reached,
remove your feet from the pedals and the
chosen vehicle speed will be maintained.
Note: Noise from the ABS pump motor may
be observed during hill descent control
operation. This is a normal characteristic of
the ABS and should be no reason for
concern.
Hill descent modes
• At speeds below 20 mph (32 km/h):
When the Hill Descent Control switch
is pressed and Hill Descent Control is
active, the Hill Descent Control telltale
will flash.
• At speeds below 20 mph (32 km/h):
When the Hill Descent Control switch
is pressed and conditions are not
correct for hill descent activation, the
Hill Descent Control system will be
enabled, the Hill Descent Control
telltale will be solid and a message will
display in the information display.
• At speeds above 20 mph (32 km/h):
When the Hill Descent Control switch
is pressed, the Hill Descent Control
system will be enabled, the telltale in
the cluster will not be illuminated and
a message will be displayed in the
information display.
177
Super Duty (TFA) Canada/United States of America, enUSA, First Printing Terrain Response
(If Equipped)E163957