clutch FORD F250 SUPER DUTY 2006 Owners Manual
[x] Cancel search | Manufacturer: FORD, Model Year: 2006, Model line: F250 SUPER DUTY, Model: FORD F250 SUPER DUTY 2006Pages: 312, PDF Size: 5.15 MB
Page 63 of 312
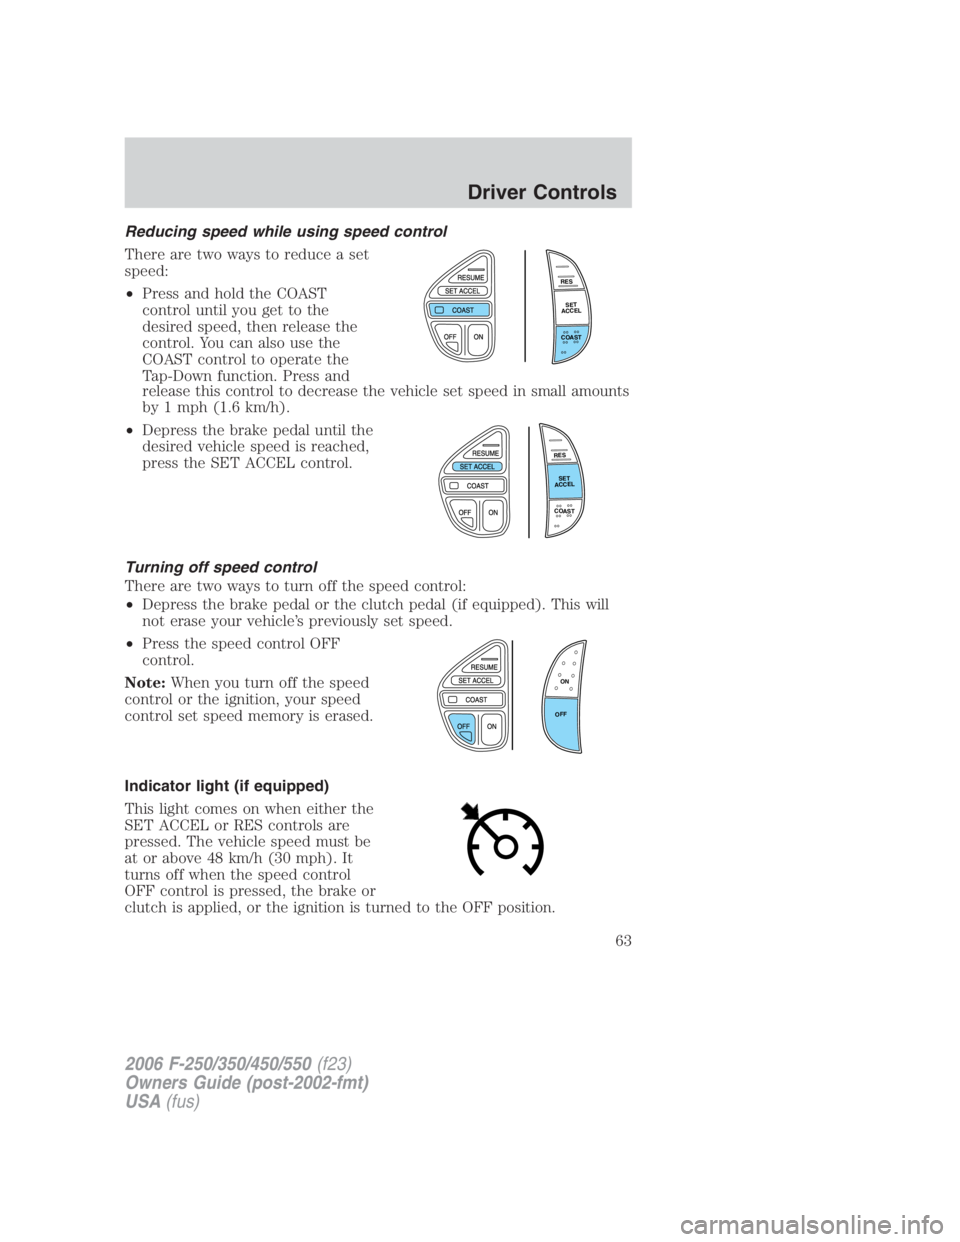
Reducing speed while using speed control
There are two ways to reduce a set
speed:
• Press and hold the COAST
control until you get to the
desired speed, then release the
control. You can also use the
COAST control to operate the
Tap-Down function. Press and
release this control to decrease the vehicle set speed in small amounts
by 1 mph (1.6 km/h).
• Depress the brake pedal until the
desired vehicle speed is reached,
press the SET ACCEL control.
Turning off speed control
There are two ways to turn off the speed control:
• Depress the brake pedal or the clutch pedal (if equipped). This will
not erase your vehicle’s previously set speed.
• Press the speed control OFF
control.
Note: When you turn off the speed
control or the ignition, your speed
control set speed memory is erased.
Indicator light (if equipped)
This light comes on when either the
SET ACCEL or RES controls are
pressed. The vehicle speed must be
at or above 48 km/h (30 mph). It
turns off when the speed control
OFF control is pressed, the brake or
clutch is applied, or the ignition is turned to the OFF position. R E S
S E T
A C C E L
C O A S T
R E S
S E T
A C C E L
C O A S T
ON
OFF
2006 F-250/350/450/550 (f23)
Owners Guide (post-2002-fmt)
USA (fus) Driver Controls
63
Page 169 of 312
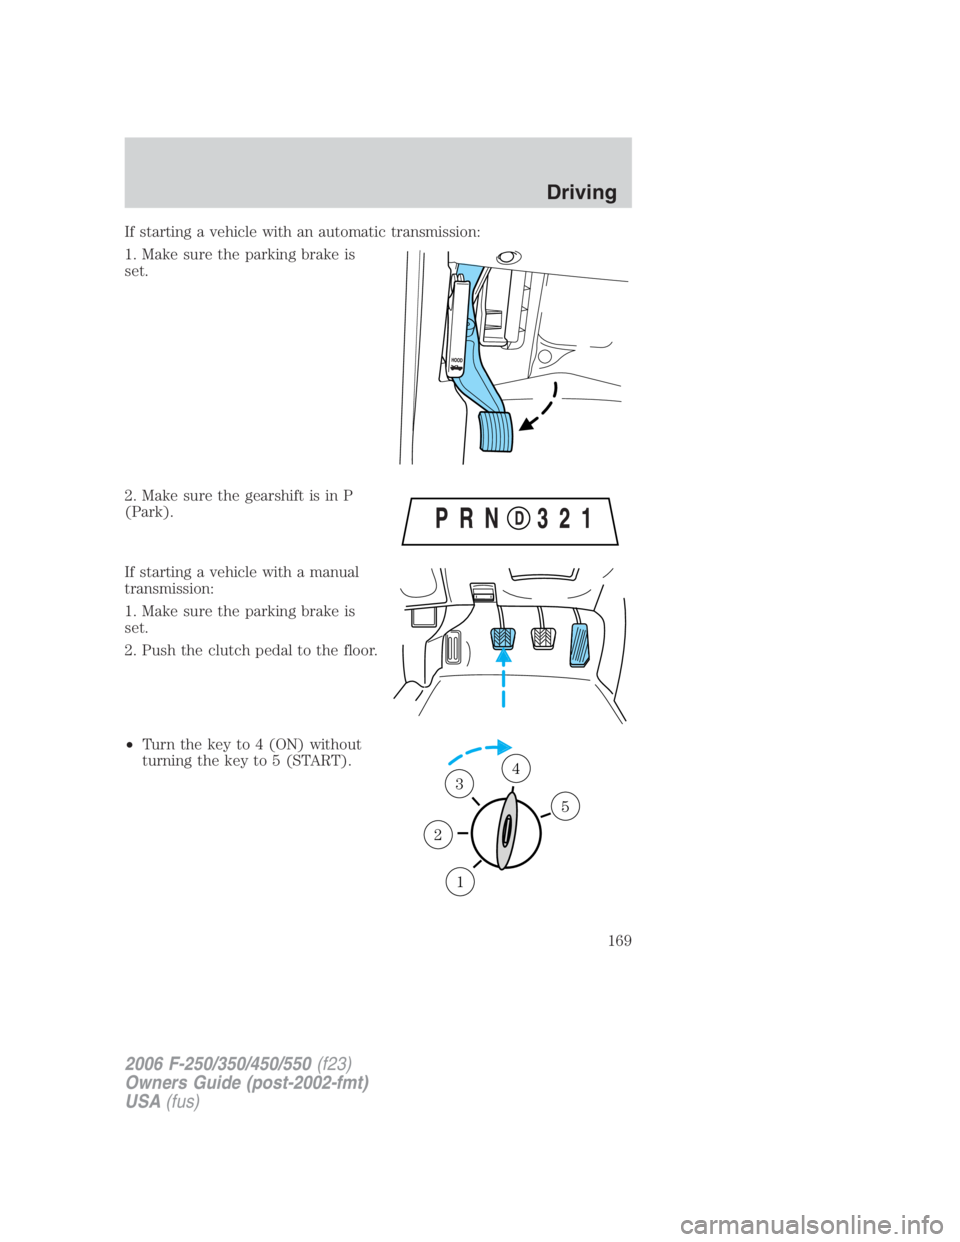
If starting a vehicle with an automatic transmission:
1. Make sure the parking brake is
set.
2. Make sure the gearshift is in P
(Park).
If starting a vehicle with a manual
transmission:
1. Make sure the parking brake is
set.
2. Push the clutch pedal to the floor.
• Turn the key to 4 (ON) without
turning the key to 5 (START).
12 3 4
5
2006 F-250/350/450/550 (f23)
Owners Guide (post-2002-fmt)
USA (fus) Driving
169
Page 180 of 312
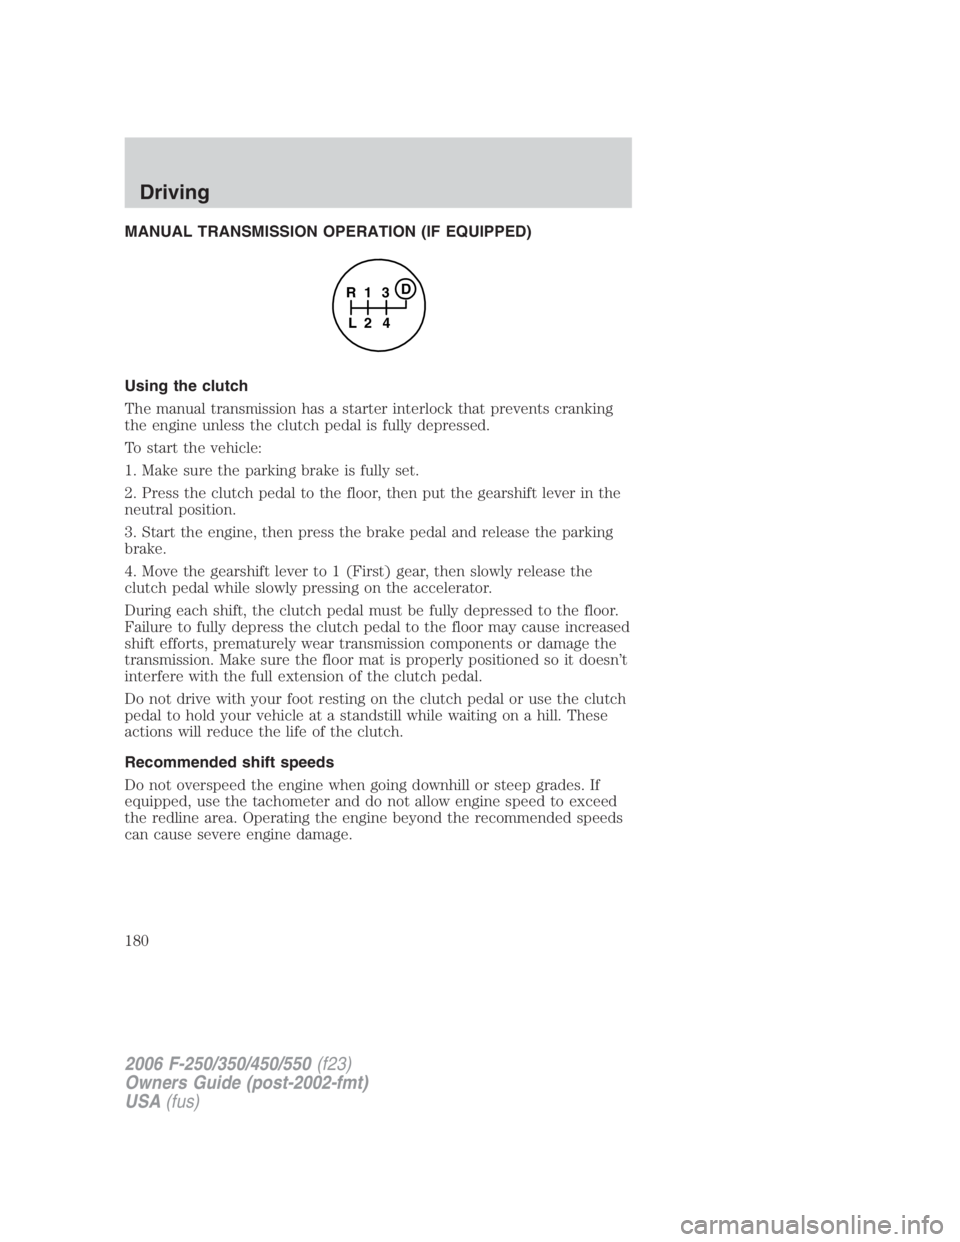
MANUAL TRANSMISSION OPERATION (IF EQUIPPED)
Using the clutch
The manual transmission has a starter interlock that prevents cranking
the engine unless the clutch pedal is fully depressed.
To start the vehicle:
1. Make sure the parking brake is fully set.
2. Press the clutch pedal to the floor, then put the gearshift lever in the
neutral position.
3. Start the engine, then press the brake pedal and release the parking
brake.
4. Move the gearshift lever to 1 (First) gear, then slowly release the
clutch pedal while slowly pressing on the accelerator.
During each shift, the clutch pedal must be fully depressed to the floor.
Failure to fully depress the clutch pedal to the floor may cause increased
shift efforts, prematurely wear transmission components or damage the
transmission. Make sure the floor mat is properly positioned so it doesn’t
interfere with the full extension of the clutch pedal.
Do not drive with your foot resting on the clutch pedal or use the clutch
pedal to hold your vehicle at a standstill while waiting on a hill. These
actions will reduce the life of the clutch.
Recommended shift speeds
Do not overspeed the engine when going downhill or steep grades. If
equipped, use the tachometer and do not allow engine speed to exceed
the redline area. Operating the engine beyond the recommended speeds
can cause severe engine damage. 1
24R
L 3 D
2006 F-250/350/450/550 (f23)
Owners Guide (post-2002-fmt)
USA (fus)Driving
180
Page 199 of 312
SNOWPLOWING
Ford recommends that the Super Duty F-Series used for snow removal
include a snow plow package option.
Installing the snowplow
Weight limits and guidelines for selecting and installing the snowplow can
be found in the Ford Truck Body Builders Layout Book, Snowplow
section, found at www.fleet.ford.com/truckbbas. A typical installation
affects the following:
• Certification to government safety laws such as occupant protection
and airbag deployment, braking, and lighting. Look for an “Alterer’s
Label” on the vehicle from the snowplow installer certifying that the
installation meets all applicable Federal Motor Vehicle Safety
Standards (FMVSS).
• The Total Accessory Reserve Capacity (TARC) is shown on the lower
right side of the vehicle’s Safety Compliance Certification Label. This
applies to Ford-completed vehicles of 10,000 lb. (4,536 kg) GVWR or
less. This is the weight of permanently-attached auxiliary equipment,
such as snowplow frame-mounting hardware, that can be added to the
vehicle and satisfy Ford compliance certification to FMVSS. Exceeding
this weight may require the auxiliary equipment installer additional
safety certification responsibility. The Front Accessory Reserve
Capacity (FARC) is added for customer convenience.
• Rear ballast weight behind the rear axle may be required to prevent
exceeding the FGAWR, and provide front-to-rear weight balance for
proper braking and steering.
• Front wheel toe may require re-adjustment to prevent premature
uneven tire wear. Specifications are found in the Ford Workshop
Manual .
• Headlight aim may require re-adjustment.
• Federal and some local regulations require additional exterior lamps
for snowplow-equipped vehicles. Consult your authorized dealer for
additional information.
• Snowplowing with vehicles equipped with a 6.0 Liter Power Stroke
diesel engine may result in engine overheating under certain operating
conditions unless equipped with the special engine cooling fan clutch
that is included with a snow plow package option.
2006 F-250/350/450/550 (f23)
Owners Guide (post-2002-fmt)
USA (fus) Driving
199
Page 213 of 312
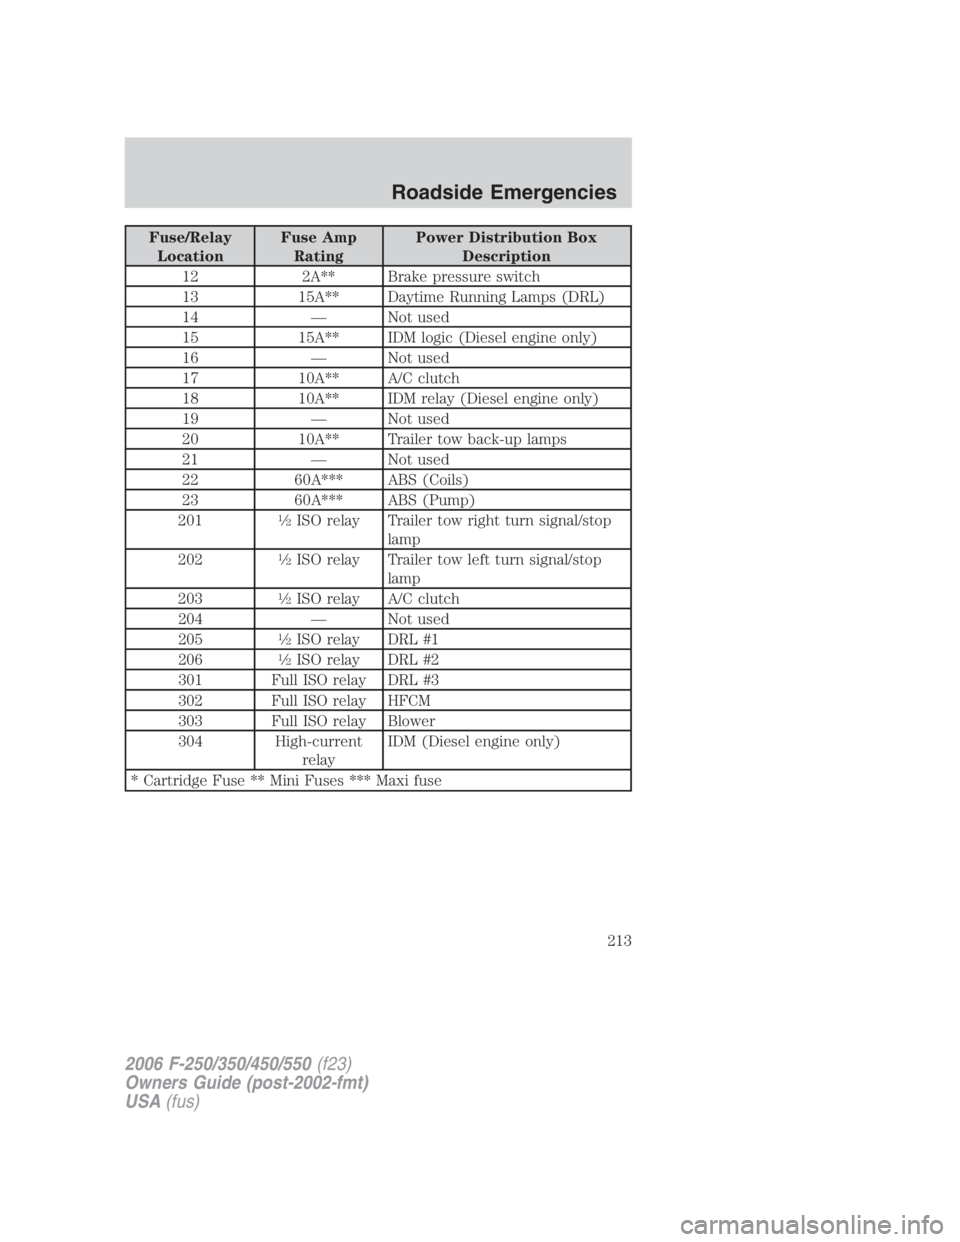
Fuse/Relay
Location Fuse Amp
Rating Power Distribution Box
Description
12 2A** Brake pressure switch
13 15A** Daytime Running Lamps (DRL)
14 — Not used
15 15A** IDM logic (Diesel engine only)
16 — Not used
17 10A** A/C clutch
18 10A** IDM relay (Diesel engine only)
19 — Not used
20 10A** Trailer tow back-up lamps
21 — Not used
22 60A*** ABS (Coils)
23 60A*** ABS (Pump)
201 1
� 2
ISO relay Trailer tow right turn signal/stop
lamp
202 1
� 2
ISO relay Trailer tow left turn signal/stop
lamp
203 1
� 2
ISO relay A/C clutch
204 — Not used
205 1
� 2
ISO relay DRL #1
206 1
� 2
ISO relay DRL #2
301 Full ISO relay DRL #3
302 Full ISO relay HFCM
303 Full ISO relay Blower
304 High-current
relay IDM (Diesel engine only)
* Cartridge Fuse ** Mini Fuses *** Maxi fuse
2006 F-250/350/450/550 (f23)
Owners Guide (post-2002-fmt)
USA (fus) Roadside Emergencies
213
Page 249 of 312
SERVICE RECOMMENDATIONS
To help you service your vehicle:
• We highlight do-it-yourself items in the engine compartment for easy
location.
• We provide a scheduled maintenance guide which makes tracking
routine service easy.
If your vehicle requires professional service, your authorized dealer can
provide the necessary parts and service. Check your Warranty
Guide/Owner Information Guide to find out which parts and services
are covered.
Use only recommended fuels, lubricants, fluids and service parts
conforming to specifications. Motorcraft parts are designed and built to
provide the best performance in your vehicle.
PRECAUTIONS WHEN SERVICING YOUR VEHICLE
• Do not work on a hot engine.
• Make sure that nothing gets caught in moving parts.
• Do not work on a vehicle with the engine running in an enclosed
space, unless you are sure you have enough ventilation.
• Keep all open flames and other burning (cigarettes) material away
from the battery and all fuel related parts.
Working with the engine off
• Automatic transmission:
1. Set the parking brake and shift to P (Park).
2. Turn off the engine and remove the key.
3. Block the wheels.
• Manual transmission:
1. Set the parking brake, depress the clutch and place the gearshift in 1
(First).
2. Turn off the engine and remove the key.
3. Block the wheels.
2006 F-250/350/450/550 (f23)
Owners Guide (post-2002-fmt)
USA (fus) Maintenance and Specifications
249
Page 250 of 312
Working with the engine on
• Automatic transmission:
1. Set the parking brake and shift to P (Park).
2. Block the wheels.
• Manual transmission:
1. Set the parking brake, depress the clutch and place the gearshift in N
(Neutral).
2. Block the wheels.
Note: Do not start your engine with the air cleaner removed and do not
remove it while the engine is running.
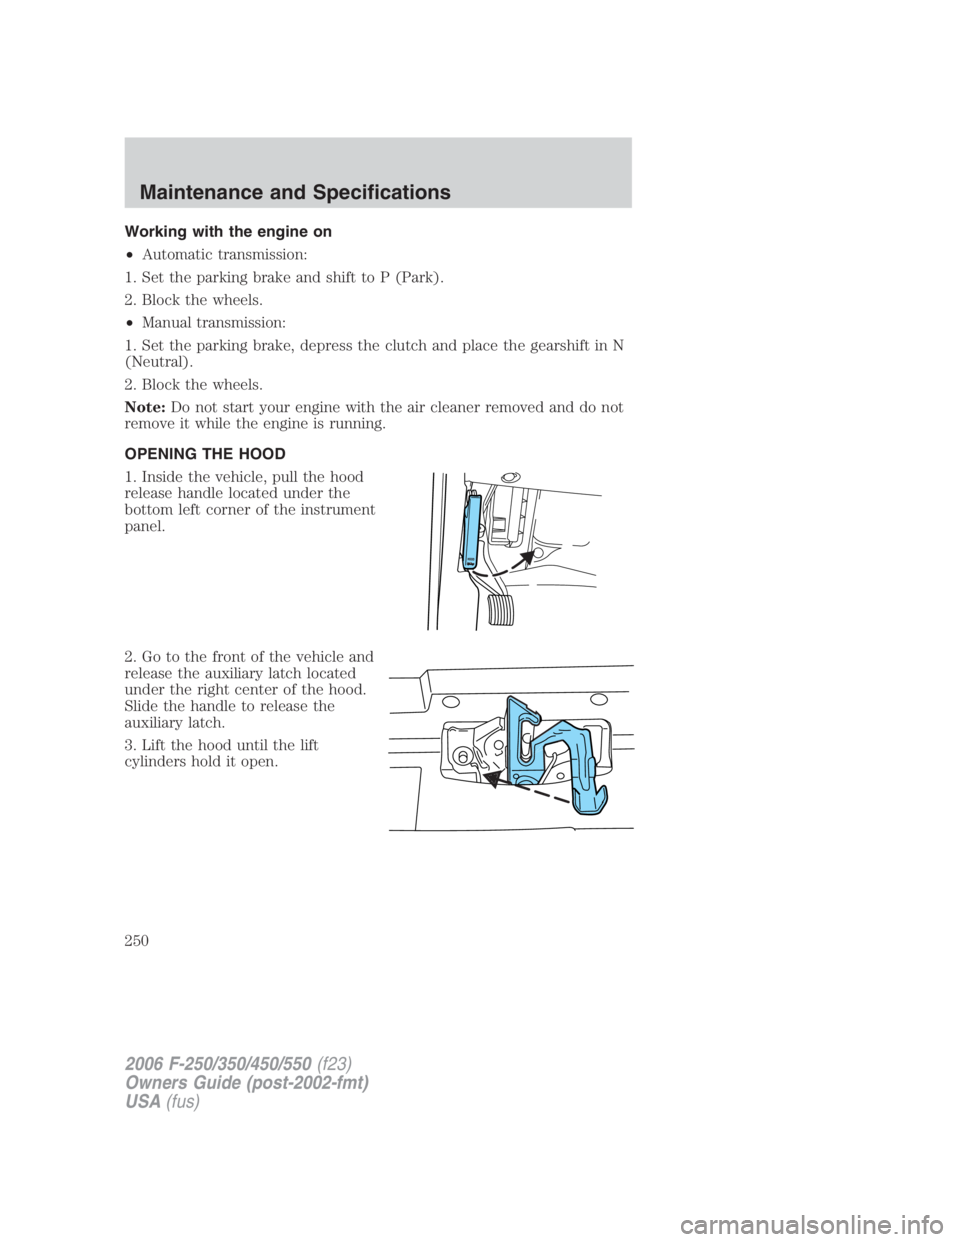
OPENING THE HOOD
1. Inside the vehicle, pull the hood
release handle located under the
bottom left corner of the instrument
panel.
2. Go to the front of the vehicle and
release the auxiliary latch located
under the right center of the hood.
Slide the handle to release the
auxiliary latch.
3. Lift the hood until the lift
cylinders hold it open.
2006 F-250/350/450/550 (f23)
Owners Guide (post-2002-fmt)
USA (fus)Maintenance and Specifications
250
Page 251 of 312
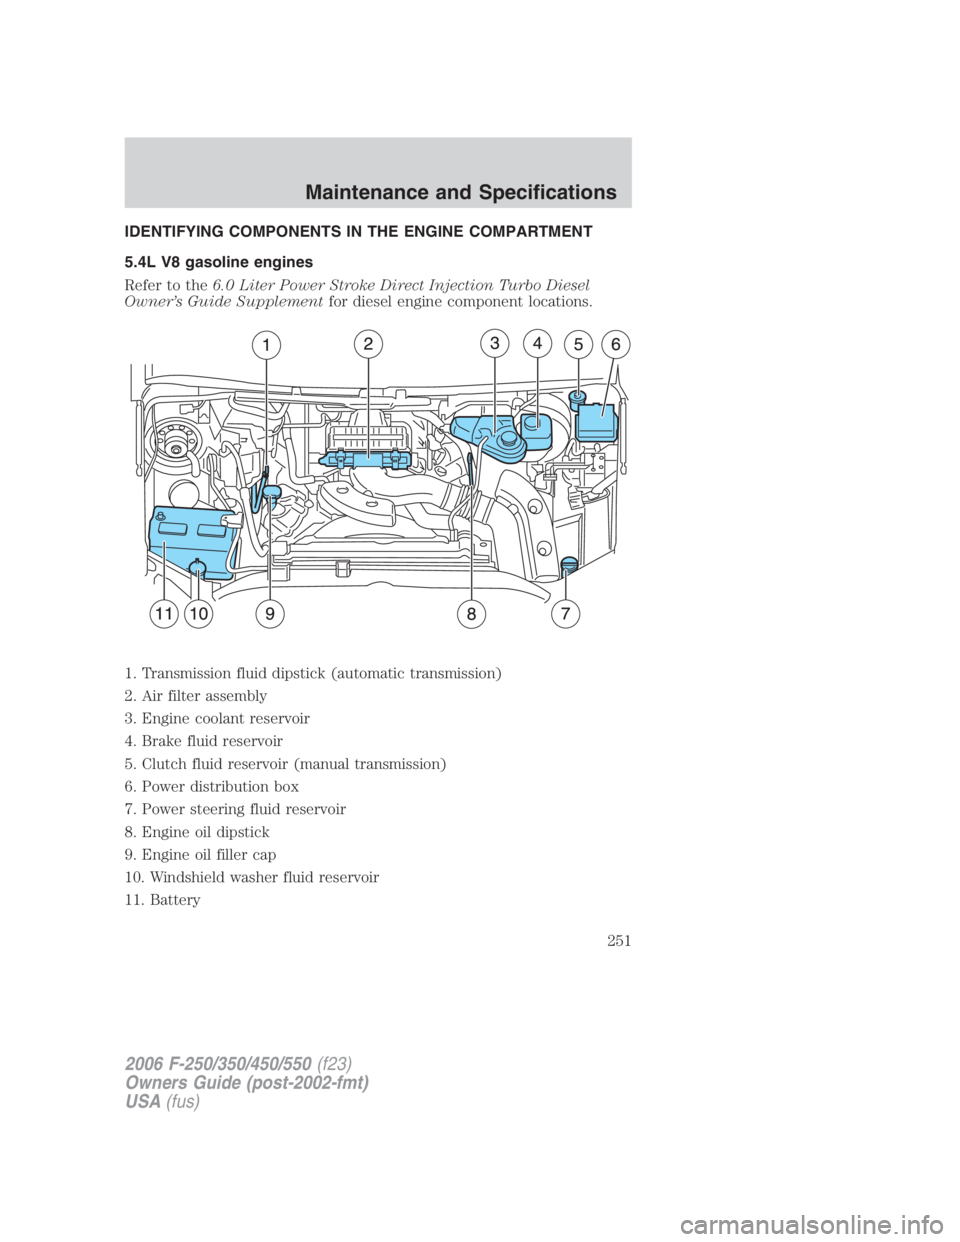
IDENTIFYING COMPONENTS IN THE ENGINE COMPARTMENT
5.4L V8 gasoline engines
Refer to the 6.0 Liter Power Stroke Direct Injection Turbo Diesel
Owner’s Guide Supplement for diesel engine component locations.
1. Transmission fluid dipstick (automatic transmission)
2. Air filter assembly
3. Engine coolant reservoir
4. Brake fluid reservoir
5. Clutch fluid reservoir (manual transmission)
6. Power distribution box
7. Power steering fluid reservoir
8. Engine oil dipstick
9. Engine oil filler cap
10. Windshield washer fluid reservoir
11. Battery
2006 F-250/350/450/550 (f23)
Owners Guide (post-2002-fmt)
USA (fus) Maintenance and Specifications
251
Page 252 of 312
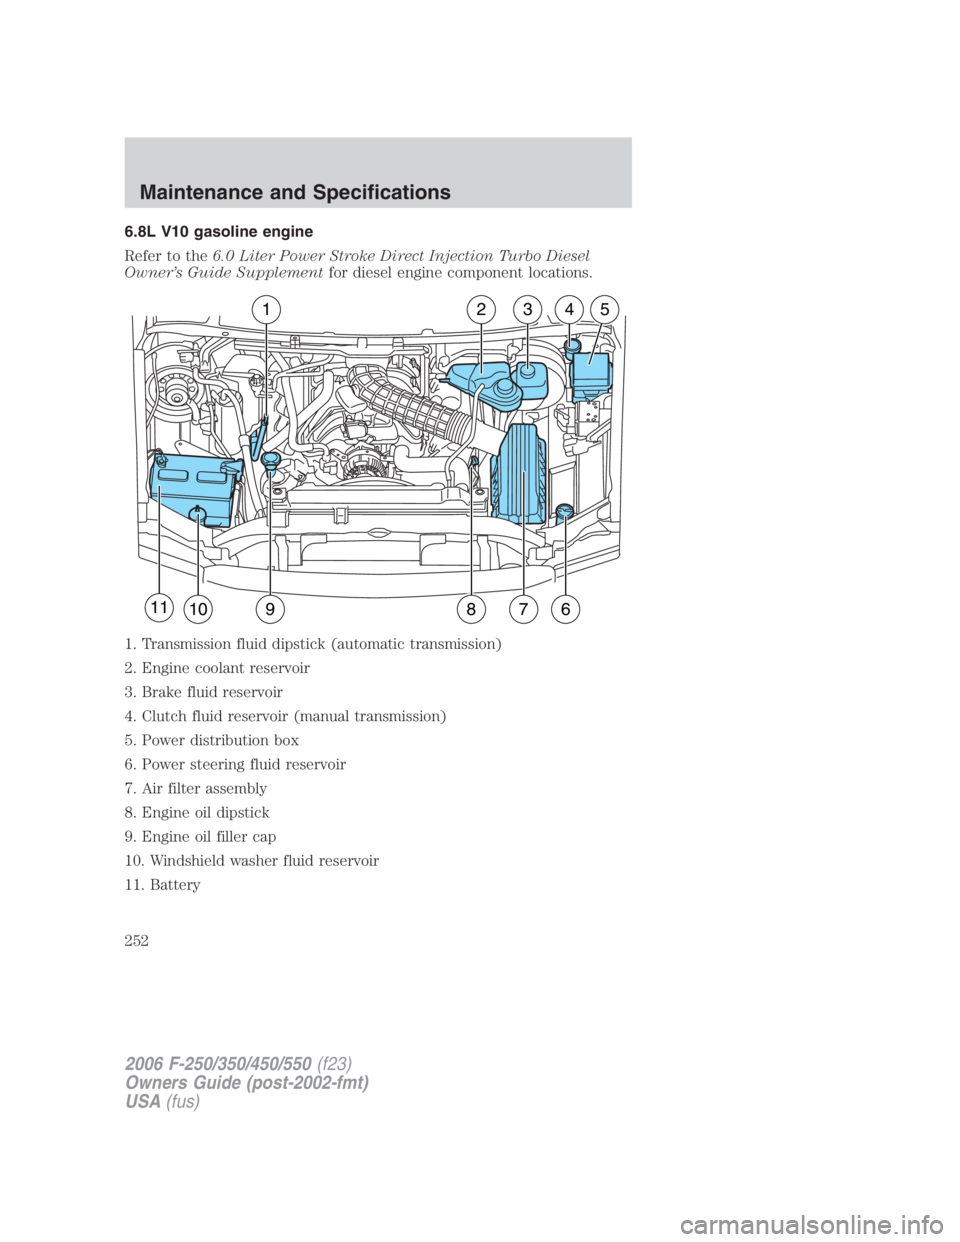
6.8L V10 gasoline engine
Refer to the 6.0 Liter Power Stroke Direct Injection Turbo Diesel
Owner’s Guide Supplement for diesel engine component locations.
1. Transmission fluid dipstick (automatic transmission)
2. Engine coolant reservoir
3. Brake fluid reservoir
4. Clutch fluid reservoir (manual transmission)
5. Power distribution box
6. Power steering fluid reservoir
7. Air filter assembly
8. Engine oil dipstick
9. Engine oil filler cap
10. Windshield washer fluid reservoir
11. Battery 1 2 3 4 5
10 9 8 7 611
2006 F-250/350/450/550 (f23)
Owners Guide (post-2002-fmt)
USA (fus)Maintenance and Specifications
252
Page 278 of 312
7. If the fluid is low, add fluid in small amounts, continuously checking
the level until it reaches the FULL COLD range. Be sure to put the
dipstick back in the reservoir.
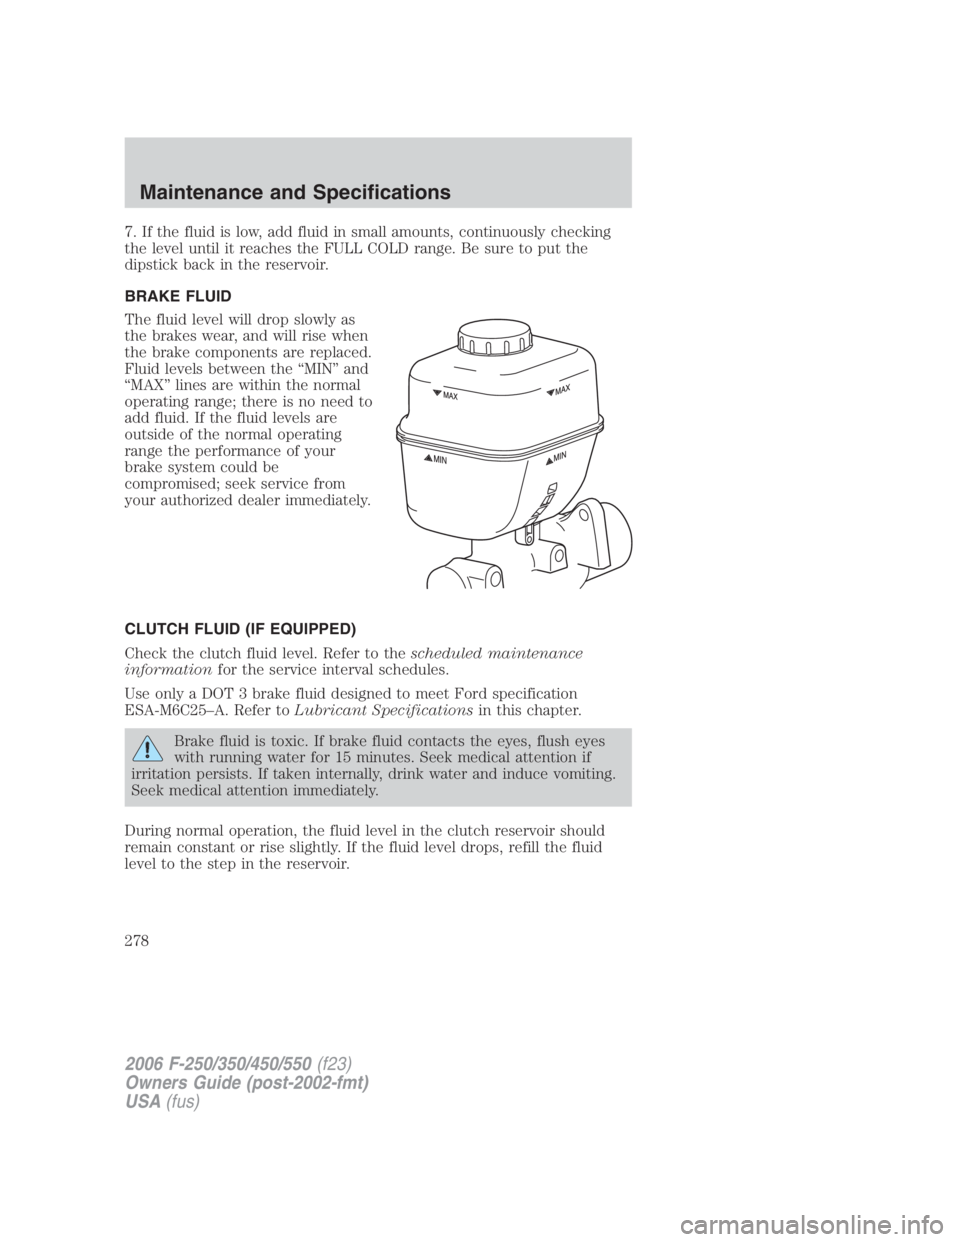
BRAKE FLUID
The fluid level will drop slowly as
the brakes wear, and will rise when
the brake components are replaced.
Fluid levels between the “MIN” and
“MAX” lines are within the normal
operating range; there is no need to
add fluid. If the fluid levels are
outside of the normal operating
range the performance of your
brake system could be
compromised; seek service from
your authorized dealer immediately.
CLUTCH FLUID (IF EQUIPPED)
Check the clutch fluid level. Refer to the scheduled maintenance
information for the service interval schedules.
Use only a DOT 3 brake fluid designed to meet Ford specification
ESA-M6C25–A. Refer to Lubricant Specifications in this chapter.
Brake fluid is toxic. If brake fluid contacts the eyes, flush eyes
with running water for 15 minutes. Seek medical attention if
irritation persists. If taken internally, drink water and induce vomiting.
Seek medical attention immediately.
During normal operation, the fluid level in the clutch reservoir should
remain constant or rise slightly. If the fluid level drops, refill the fluid
level to the step in the reservoir.
2006 F-250/350/450/550 (f23)
Owners Guide (post-2002-fmt)
USA (fus)Maintenance and Specifications
278