sensor FORD F250 SUPER DUTY 2018 Service Manual
[x] Cancel search | Manufacturer: FORD, Model Year: 2018, Model line: F250 SUPER DUTY, Model: FORD F250 SUPER DUTY 2018Pages: 656, PDF Size: 9.34 MB
Page 268 of 656
System Limitations
WARNING
The collision warning system
’s brake
support only reduces collision speed
if you first apply your brakes. You
must brake as you would in any typical
braking situation. Due to the nature of radar technology,
there may be certain instances where
vehicles do not provide a collision warning.
These include:
•
Stationary vehicles or vehicles moving
below 6 mph (10 km/h).
• Pedestrians or objects in the roadway.
• Oncoming vehicles in the same lane.
• Severe weather conditions (see
blocked sensor section).
• Debris build-up on the grille near the
headlamps (see blocked sensor
section).
• Small distance to vehicle ahead.
• Large steering wheel and pedal
movements (very active driving style).
Damage to the front end of your vehicle
may alter the radar sensor's coverage area.
This may result in missed or false collision
warnings. Have an authorized dealer check
your radar sensor for proper coverage and
operation.
265
Super Duty (TFE) Canada/United States of America, enUSA, Edition date: 201709, First Printing Driving Aids
Page 305 of 656
•
The tire air pressures recommended
for general driving are on the vehicle ’s
Safety Certification Label. The
maximum cold inflation pressure for
the tire and associated load rating is
on the tire sidewall. Tire air pressure
may require re-adjustment within these
pressure limits to accommodate the
additional weight of the snowplow
installation.
• Federal and some local regulations
require additional exterior lamps for
snowplow-equipped vehicles. Consult
your authorized dealer for additional
information.
Operating the Vehicle with the
Snowplow Attached
Note: Do not use your vehicle for snow
removal until you have driven at least
500 mi (800 km).
Ford recommends vehicle speed does not
exceed
45 mph (72 km/h) when
snowplowing.
The attached snowplow blade restricts
airflow to the radiator, and may cause the
engine to run at a higher temperature:
Attention to engine temperature is
especially important when outside
temperatures are above freezing. Angle
the blade to maximize airflow to the
radiator and monitor engine temperature
to determine whether a left or right angle
provides the best performance.
Follow the severe duty schedule in your
Scheduled Maintenance information for
engine oil and transmission fluid change
intervals. Snowplowing with your Airbag
Equipped Vehicle WARNINGS
Do not attempt to service, repair, or
modify the airbag supplemental
restraint system (SRS) or its fuses.
Contact an authorized dealer. Additional equipment for example
snowplow equipment may affect the
performance of the airbag sensors
increasing the risk of injury. Please refer to
the Body Builders Layout Book for
instructions about the appropriate
installation of additional equipment. All occupants of the vehicle,
including the driver, should always
properly wear their seatbelt, even
when provided with an airbag
supplemental restraint system (SRS). Your vehicle is equipped with a driver and
passenger airbag supplemental restraint
system. The supplemental restraint system
will activate in certain frontal and offset
frontal collisions when the vehicle sustains
sufficient frontal deceleration.
Careless or high speed driving while
plowing snow that results in sufficient
vehicle decelerations can deploy the
airbags. Such driving also increases the risk
of accidents.
Never remove or defeat the tripping
mechanisms designed into the snow
removal equipment by its manufacturer.
Doing so may cause damage to the vehicle
and the snow removal equipment as well
as possible airbag deployment.
Engine temperature while plowing
When driving with a plow, your engine may
run at a higher temperature than normal
because the attached snowplow blade will
restrict airflow to the radiator.
302
Super Duty (TFE) Canada/United States of America, enUSA, Edition date: 201709, First Printing Driving Hints
Page 322 of 656
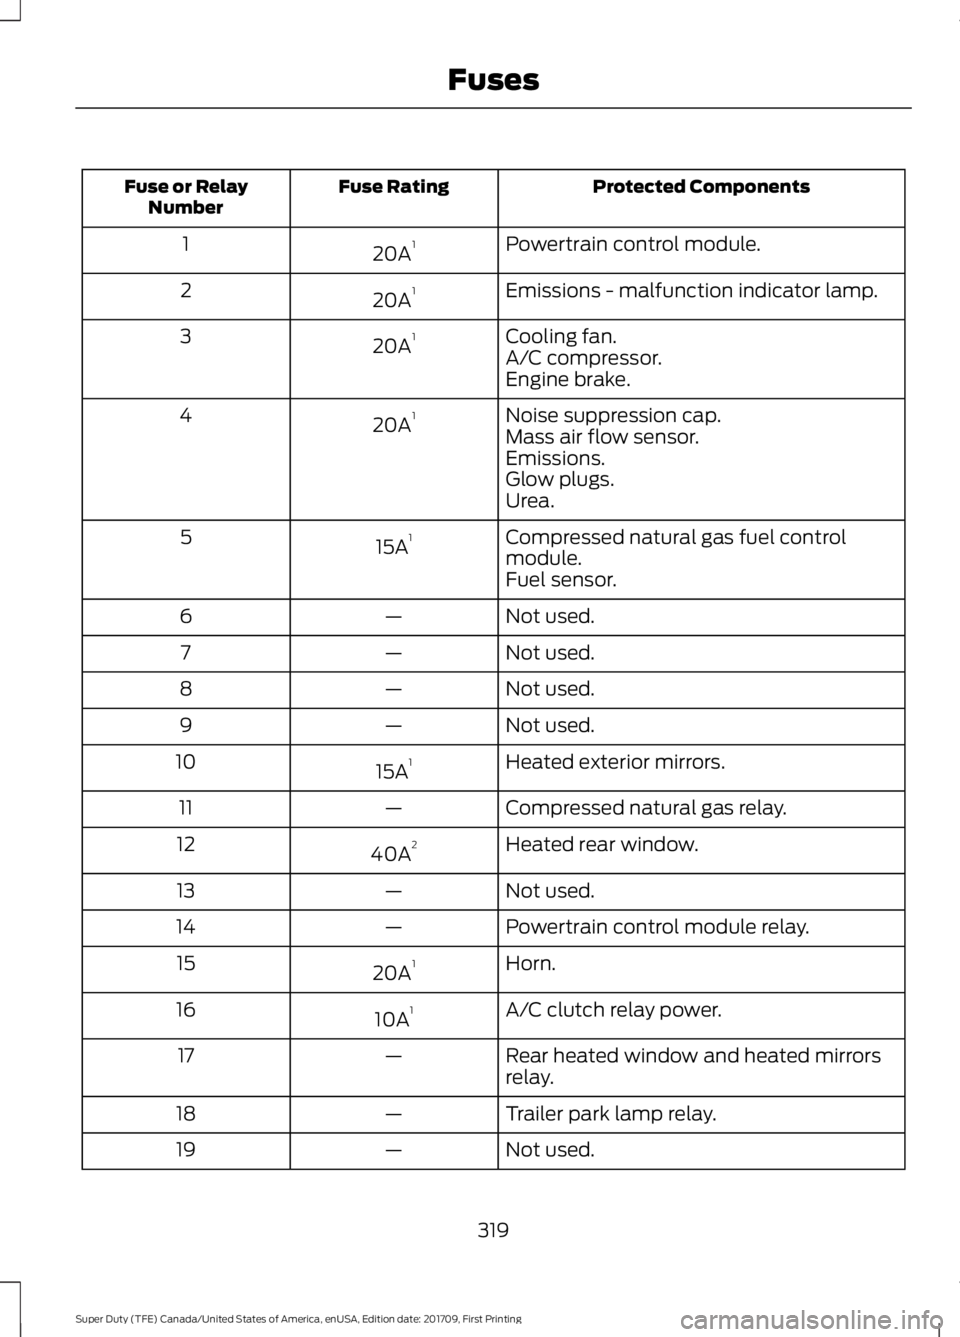
Protected Components
Fuse Rating
Fuse or Relay
Number
Powertrain control module.
20A 1
1
Emissions - malfunction indicator lamp.
20A 1
2
Cooling fan.
20A 1
3
A/C compressor.
Engine brake.
Noise suppression cap.
20A 1
4
Mass air flow sensor.
Emissions.
Glow plugs.
Urea.
Compressed natural gas fuel control
module.
15A 1
5
Fuel sensor.
Not used.
—
6
Not used.
—
7
Not used.
—
8
Not used.
—
9
Heated exterior mirrors.
15A 1
10
Compressed natural gas relay.
—
11
Heated rear window.
40A 2
12
Not used.
—
13
Powertrain control module relay.
—
14
Horn.
20A 1
15
A/C clutch relay power.
10A 1
16
Rear heated window and heated mirrors
relay.
—
17
Trailer park lamp relay.
—
18
Not used.
—
19
319
Super Duty (TFE) Canada/United States of America, enUSA, Edition date: 201709, First Printing Fuses
Page 326 of 656
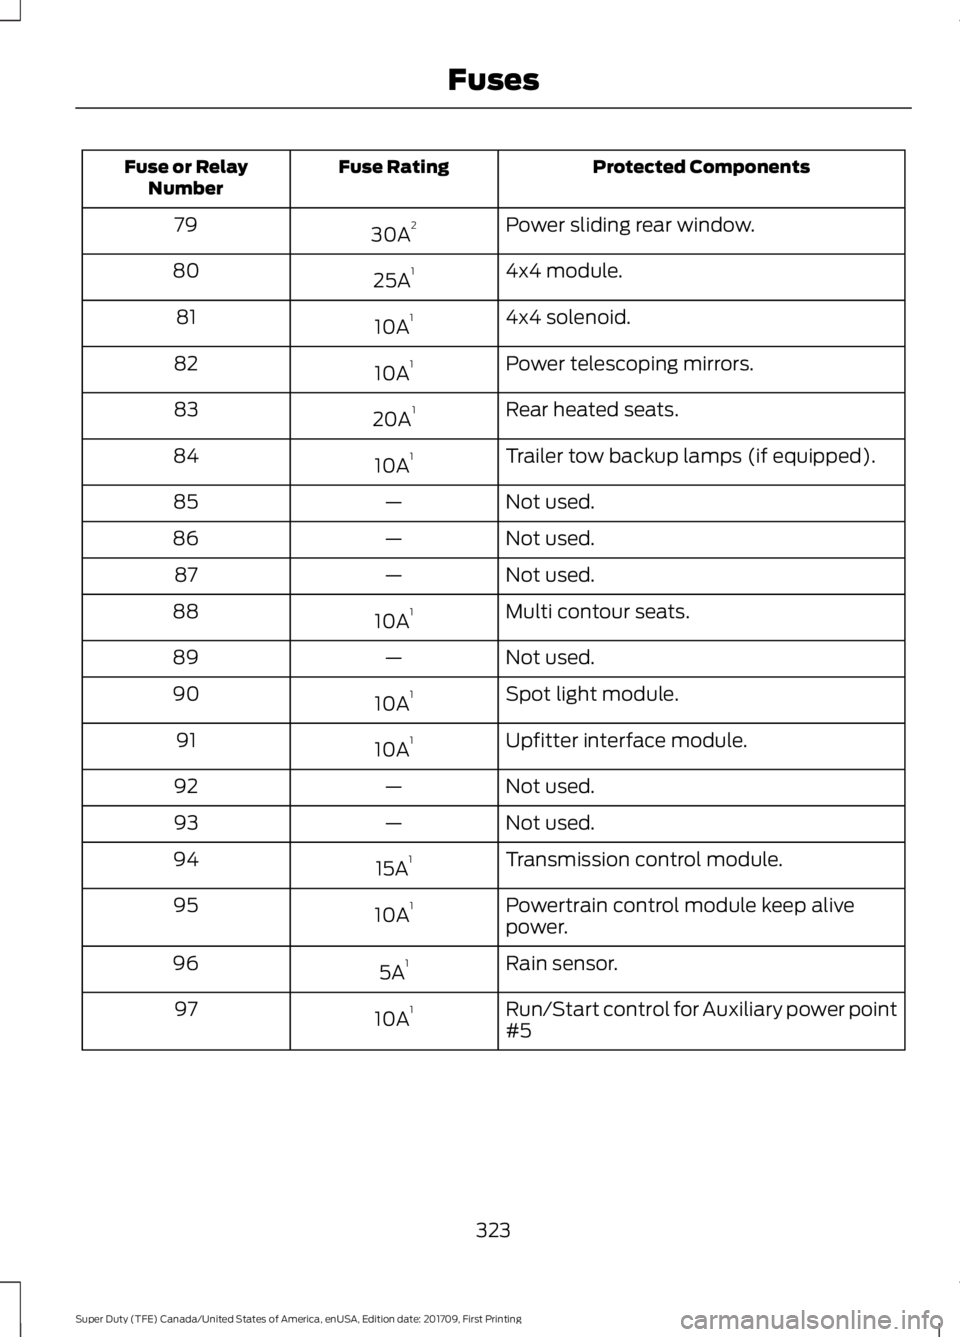
Protected Components
Fuse Rating
Fuse or Relay
Number
Power sliding rear window.
30A 2
79
4x4 module.
25A 1
80
4x4 solenoid.
10A 1
81
Power telescoping mirrors.
10A 1
82
Rear heated seats.
20A 1
83
Trailer tow backup lamps (if equipped).
10A 1
84
Not used.
—
85
Not used.
—
86
Not used.
—
87
Multi contour seats.
10A 1
88
Not used.
—
89
Spot light module.
10A 1
90
Upfitter interface module.
10A 1
91
Not used.
—
92
Not used.
—
93
Transmission control module.
15A 1
94
Powertrain control module keep alive
power.
10A 1
95
Rain sensor.
5A 1
96
Run/Start control for Auxiliary power point
#5
10A 1
97
323
Super Duty (TFE) Canada/United States of America, enUSA, Edition date: 201709, First Printing Fuses
Page 329 of 656
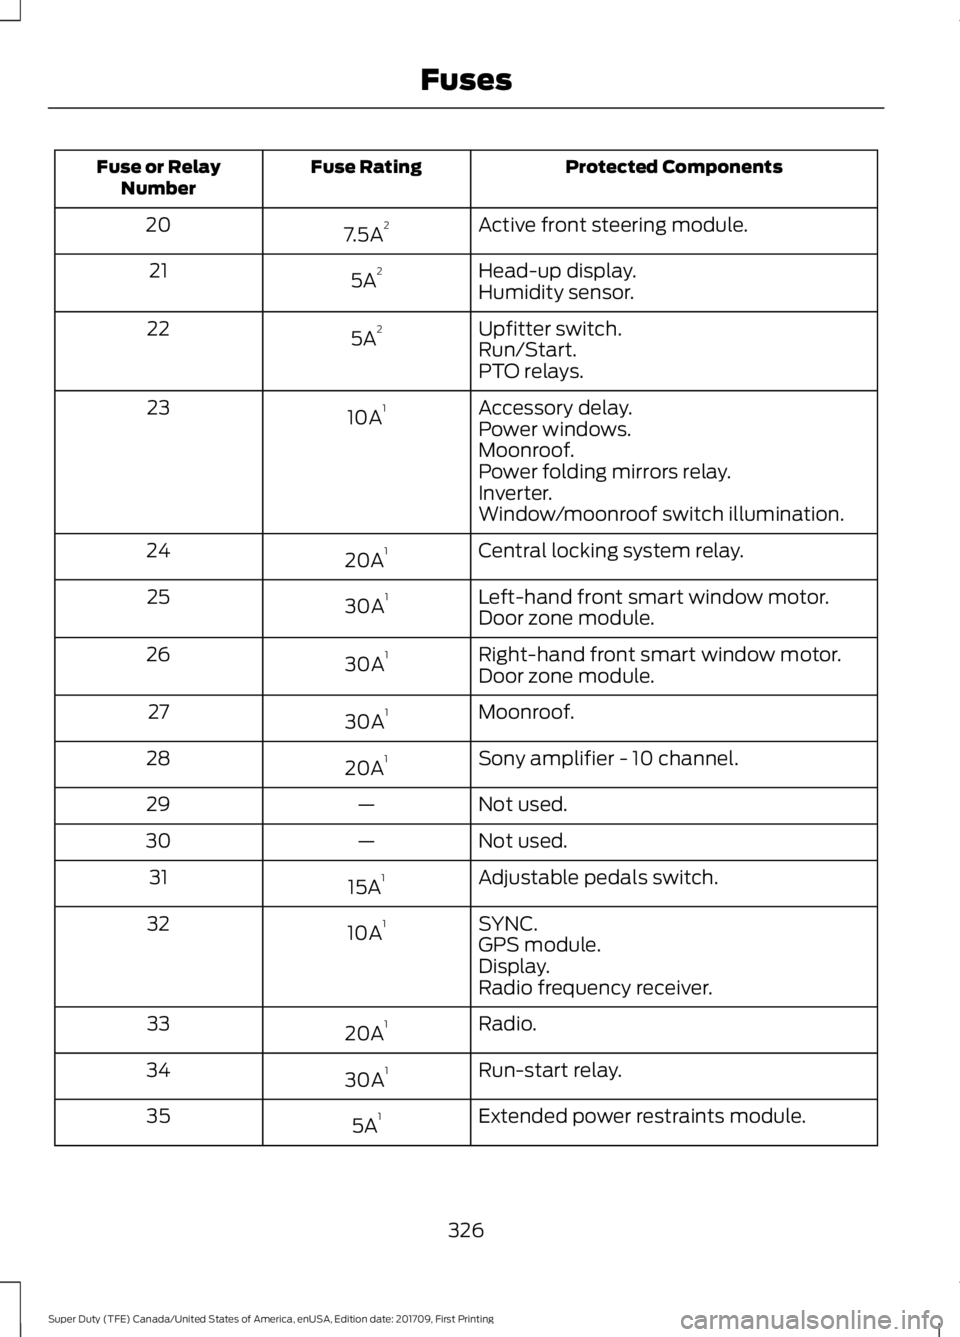
Protected Components
Fuse Rating
Fuse or Relay
Number
Active front steering module.
7.5A 2
20
Head-up display.
5A 2
21
Humidity sensor.
Upfitter switch.
5A 2
22
Run/Start.
PTO relays.
Accessory delay.
10A 1
23
Power windows.
Moonroof.
Power folding mirrors relay.
Inverter.
Window/moonroof switch illumination.
Central locking system relay.
20A 1
24
Left-hand front smart window motor.
30A 1
25
Door zone module.
Right-hand front smart window motor.
30A 1
26
Door zone module.
Moonroof.
30A 1
27
Sony amplifier - 10 channel.
20A 1
28
Not used.
—
29
Not used.
—
30
Adjustable pedals switch.
15A 1
31
SYNC.
10A 1
32
GPS module.
Display.
Radio frequency receiver.
Radio.
20A 1
33
Run-start relay.
30A 1
34
Extended power restraints module.
5A 1
35
326
Super Duty (TFE) Canada/United States of America, enUSA, Edition date: 201709, First Printing Fuses
Page 366 of 656
CHANGING THE ENGINE AIR
FILTER - 6.2L/6.8L
WARNING
To reduce the risk of vehicle damage
and personal burn injuries, do not
start your engine with the air cleaner
removed and do not remove it while the
engine is running. Use the correct specification air filter
element. See Motorcraft Parts (page
423).
Note: Failure to use the correct air filter
element may result in severe engine
damage. Resulting component damage
may not be covered by the vehicle Warranty.
Change the air filter element at the correct
service interval. See
Scheduled
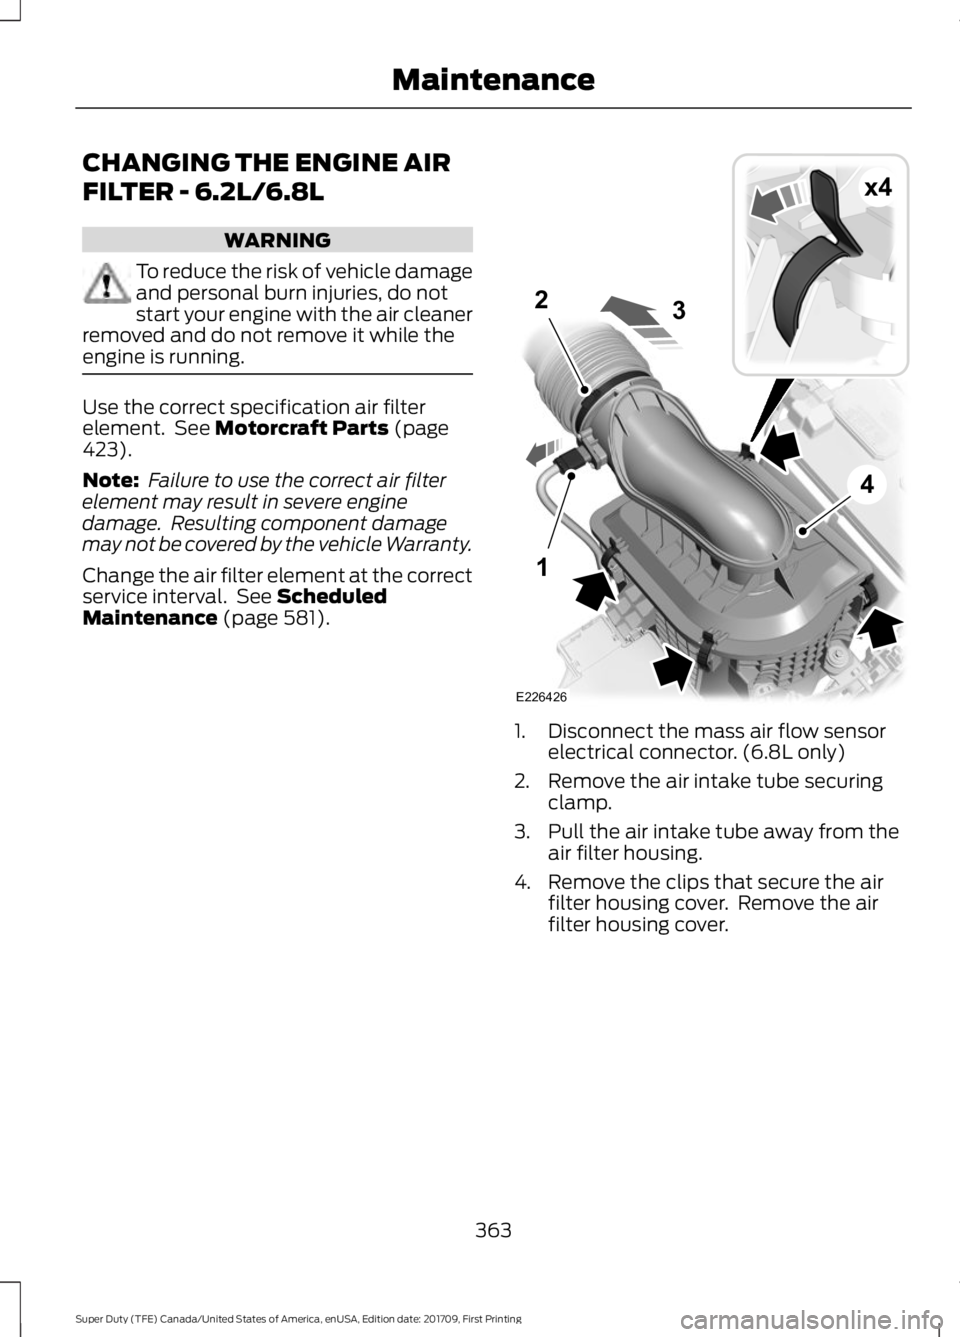
Maintenance (page 581). 1. Disconnect the mass air flow sensor
electrical connector. (6.8L only)
2. Remove the air intake tube securing clamp.
3. Pull the air intake tube away from the air filter housing.
4. Remove the clips that secure the air filter housing cover. Remove the air
filter housing cover.
363
Super Duty (TFE) Canada/United States of America, enUSA, Edition date: 201709, First Printing MaintenanceE226426
x4
1
2
4
3
Page 367 of 656
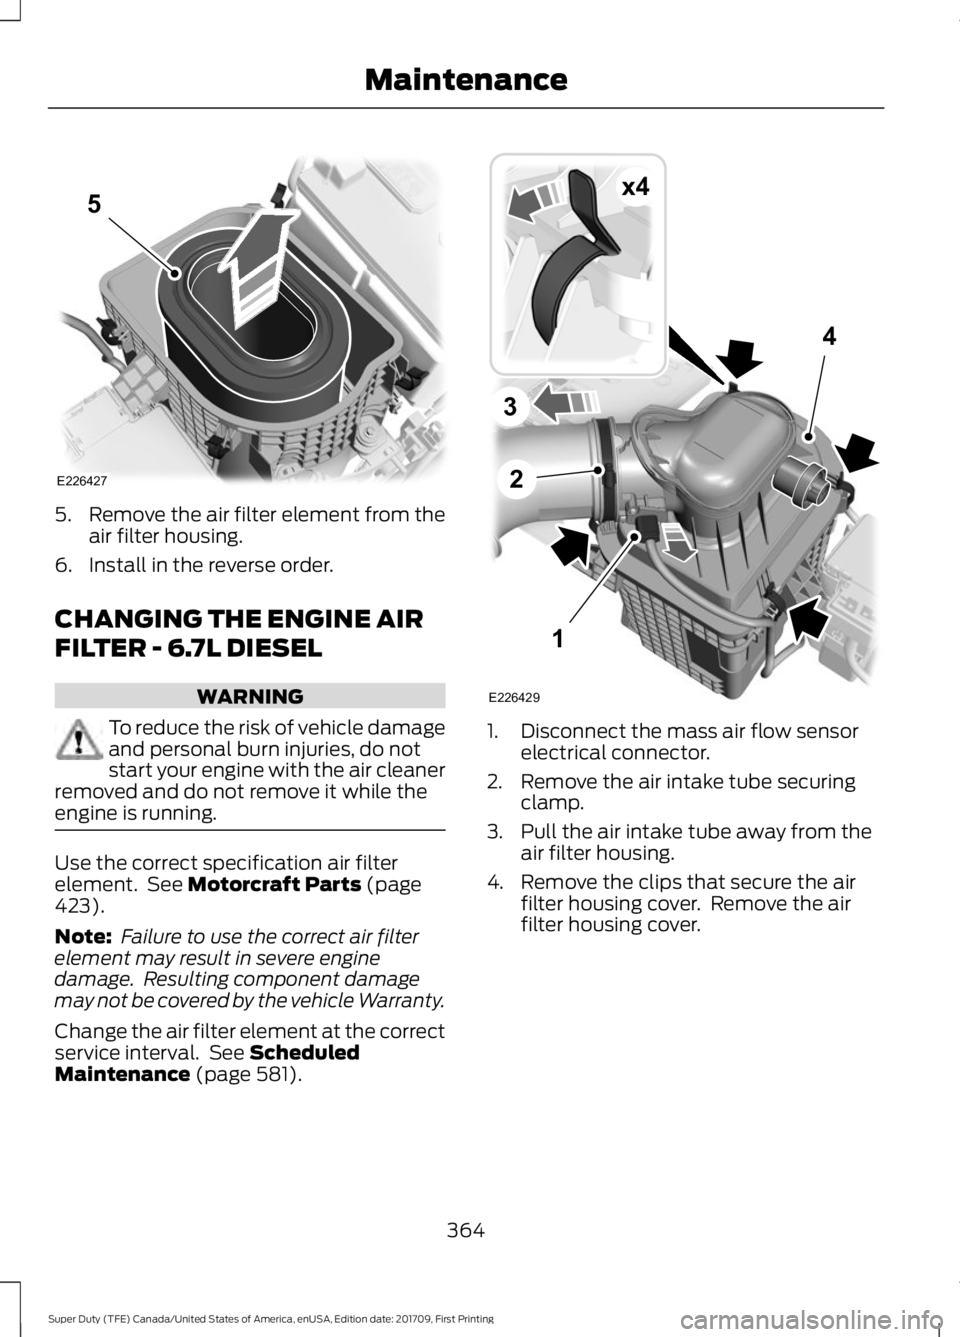
5.
Remove the air filter element from the
air filter housing.
6. Install in the reverse order.
CHANGING THE ENGINE AIR
FILTER - 6.7L DIESEL WARNING
To reduce the risk of vehicle damage
and personal burn injuries, do not
start your engine with the air cleaner
removed and do not remove it while the
engine is running. Use the correct specification air filter
element. See Motorcraft Parts (page
423).
Note: Failure to use the correct air filter
element may result in severe engine
damage. Resulting component damage
may not be covered by the vehicle Warranty.
Change the air filter element at the correct
service interval. See
Scheduled
Maintenance (page 581). 1. Disconnect the mass air flow sensor
electrical connector.
2. Remove the air intake tube securing clamp.
3. Pull the air intake tube away from the air filter housing.
4. Remove the clips that secure the air filter housing cover. Remove the air
filter housing cover.
364
Super Duty (TFE) Canada/United States of America, enUSA, Edition date: 201709, First Printing MaintenanceE226427
5 1
2
4
3
E226429
x4
Page 399 of 656
WARNINGS
When inflating the tire for
mounting pressures up to 20 psi
(1.38 bar) greater than the
maximum pressure on the tire
sidewall, the following
precautions must be taken to
protect the person mounting the
tire:
1. Make sure that you have the
correct tire and wheel size.
2. Lubricate the tire bead and
wheel bead seat area again.
3. Stand at a minimum of
12 ft
(3.66 m) away from the wheel
and tire assembly.
4. Use both eye and ear
protection. For a mounting pressure
more than
20 psi (1.38 bar)
greater than the maximum
pressure, a Ford dealer or other
tire service professional should do
the mounting. Always inflate steel carcass
tires with a remote air fill with
the person inflating standing at a
minimum of
12 ft (3.66 m) away
from the wheel and tire assembly. Important: Remember to replace
the wheel valve stems when the
road tires are replaced on your
vehicle. The two front tires or two rear tires
should generally be replaced as a
pair.
The tire pressure sensors mounted
in the wheels are not designed to
be used in aftermarket wheels.
The use of wheels or tires not
recommended by Ford Motor
Company may affect the
operation of your tire pressure
monitoring system.
If the tire pressure monitoring
system indicator is flashing, the
system is malfunctioning. Your
replacement tire might be
incompatible with your tire
pressure monitoring system, or
some component of the system
may be damaged.
Replacing a Tire That is
Greenhouse Gas Certified
The tires installed on this vehicle
at the factory as original
equipment are certified for
Greenhouse Gas and Fuel
Efficiency regulations.
Replacement tires must be of
equal or lower rolling resistance
level (TRRL or Crr). Consult with
your tire supplier(s) for
appropriate replacement tires.
396
Super Duty (TFE) Canada/United States of America, enUSA, Edition date: 201709, First Printing Wheels and Tires
Page 401 of 656
Tire Rotation
WARNING
If the tire label shows
different tire pressures for the
front and rear tires and the vehicle
has a tire pressure monitoring
system, then you need to update
the settings for the system
sensors. Always perform the
system reset procedure after tire
rotation. If you do not reset the
system, it may not provide a low
tire pressure warning when
necessary. Note:
If your tires show uneven
wear ask an authorized dealer to
check for and correct any wheel
misalignment, tire imbalance or
mechanical problem involved
before tire rotation.
Note: Your vehicle may be
equipped with a dissimilar spare
wheel and tire assembly. A
dissimilar spare wheel and tire
assembly is defined as a spare
wheel and tire assembly that is
different in brand, size or
appearance from the road tires and
wheels. If you have a dissimilar
spare wheel and tire assembly it is
intended for temporary use only
and should not be used in a tire
rotation.
Note: After having your tires
rotated, inflation pressure must be
checked and adjusted to the
vehicle requirements. Rotating your tires at the
recommended interval (as
indicated in the Scheduled
Maintenance chapter) will help
your tires wear more evenly,
providing better tire performance
and longer tire life. Sometime
irregular tire wear can be
corrected by rotating the tires.
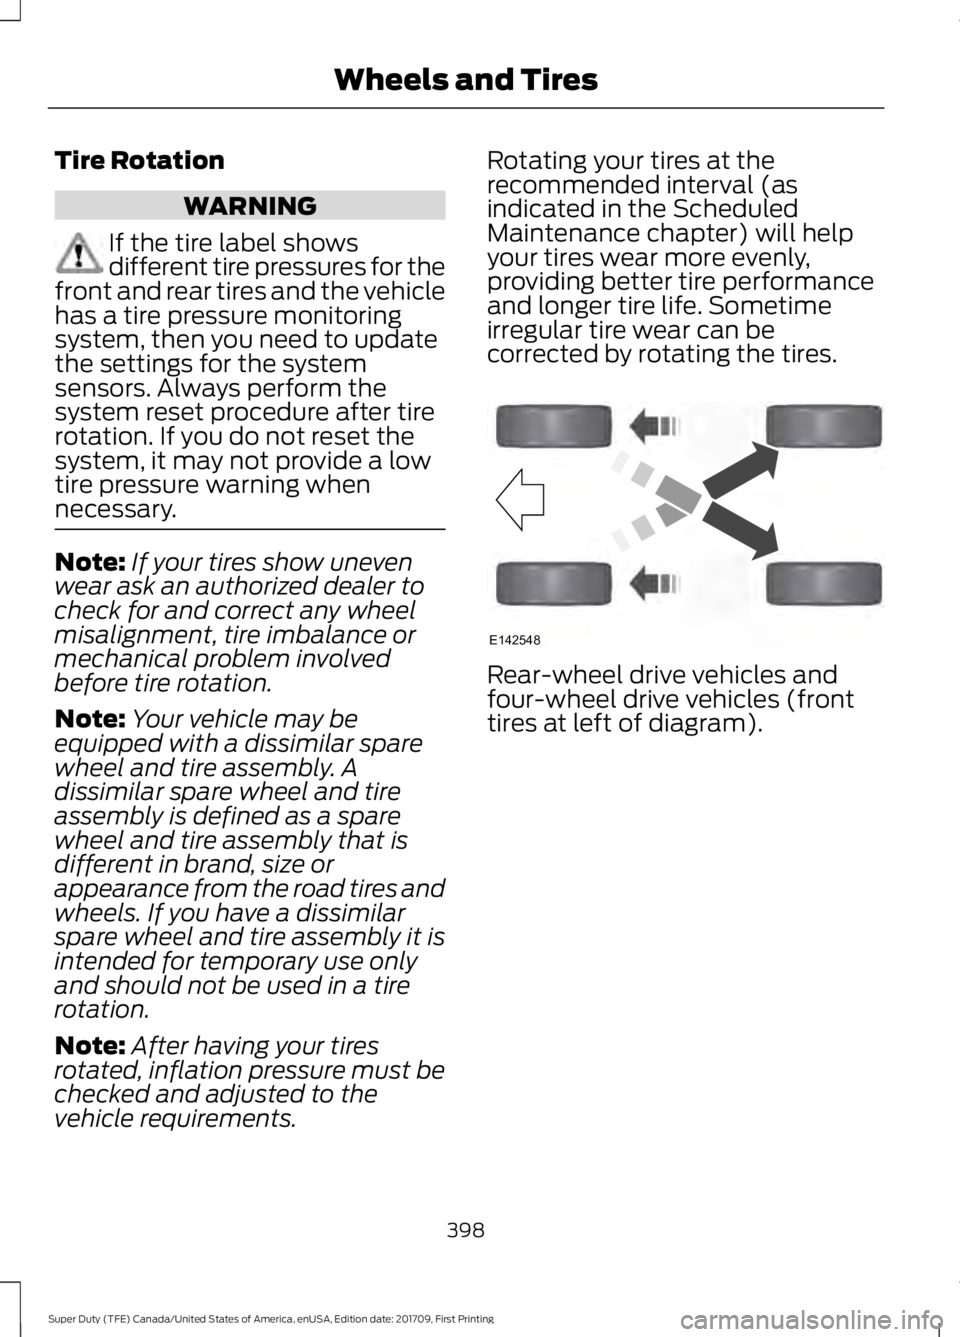
Rear-wheel drive vehicles and
four-wheel drive vehicles (front
tires at left of diagram).
398
Super Duty (TFE) Canada/United States of America, enUSA, Edition date: 201709, First Printing Wheels and TiresE142548
Page 404 of 656
As an added safety feature, your vehicle
has been equipped with a Tire Pressure
Monitoring System (TPMS) that
illuminates a low tire pressure telltale
when one or more of your tires is
significantly under-inflated. Accordingly,
when the low tire pressure telltale
illuminates, you should stop and check
your tires as soon as possible, and inflate
them to the proper pressure. Driving on a
significantly under-inflated tire causes the
tire to overheat and can lead to tire failure.
Under-inflation also reduces fuel efficiency
and tire tread life, and may affect the
vehicle
’s handling and stopping ability.
Please note that the TPMS is not a
substitute for proper tire maintenance, and
it is the driver ’s responsibility to maintain
correct tire pressure, even if under-inflation
has not reached the level to trigger
illumination of the TPMS low tire pressure
telltale.
Your vehicle has also been equipped with
a TPMS malfunction indicator to indicate
when the system is not operating properly.
The TPMS malfunction indicator is
combined with the low tire pressure
telltale. When the system detects a
malfunction, the telltale will flash for
approximately one minute and then remain
continuously illuminated. This sequence
will continue upon subsequent vehicle
start-ups as long as the malfunction exists.
When the malfunction indicator is
illuminated, the system may not be able
to detect or signal low tire pressure as
intended. TPMS malfunctions may occur
for a variety of reasons, including the
installation of replacement or alternate
tires or wheels on the vehicle that prevent
the TPMS from functioning properly.
Always check the TPMS malfunction
telltale after replacing one or more tires or
wheels on your vehicle to ensure that the
replacement or alternate tires and wheels
allow the TPMS to continue to function
properly. This device complies with Part 15 of the
FCC Rules and with Industry Canada
license-exempt RSS standard(s).
Operation is subject to the following two
conditions:
•
This device may not cause harmful
interference.
• This device must accept any
interference received, including
interference that may cause undesired
operation.
Changing Tires With a Tire Pressure
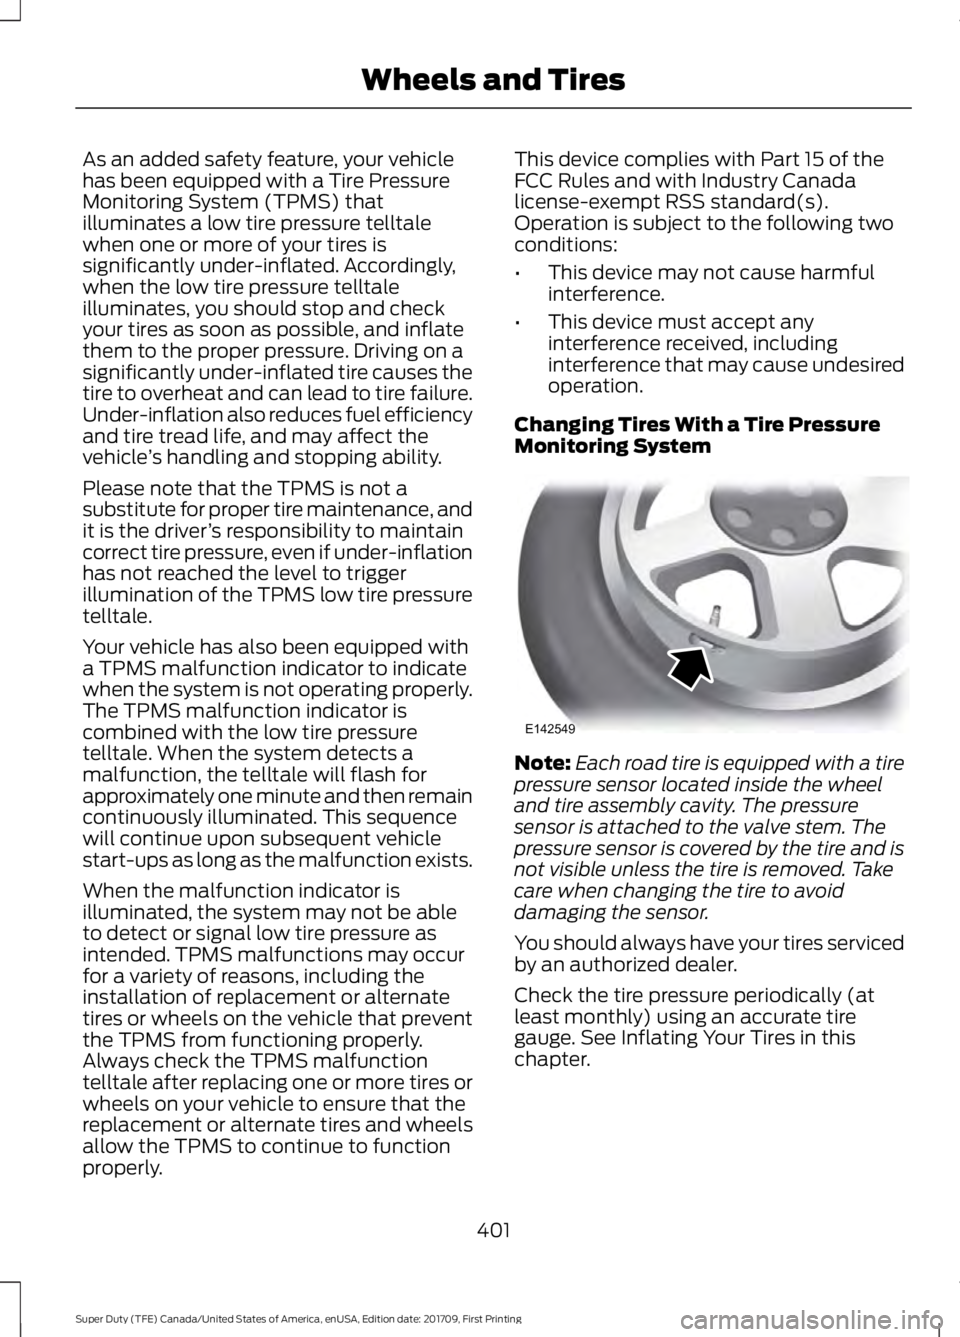
Monitoring System Note:
Each road tire is equipped with a tire
pressure sensor located inside the wheel
and tire assembly cavity. The pressure
sensor is attached to the valve stem. The
pressure sensor is covered by the tire and is
not visible unless the tire is removed. Take
care when changing the tire to avoid
damaging the sensor.
You should always have your tires serviced
by an authorized dealer.
Check the tire pressure periodically (at
least monthly) using an accurate tire
gauge. See Inflating Your Tires in this
chapter.
401
Super Duty (TFE) Canada/United States of America, enUSA, Edition date: 201709, First Printing Wheels and TiresE142549