clutch FORD F350 1999 Owners Manual
[x] Cancel search | Manufacturer: FORD, Model Year: 1999, Model line: F350, Model: FORD F350 1999Pages: 248, PDF Size: 1.72 MB
Page 70 of 248
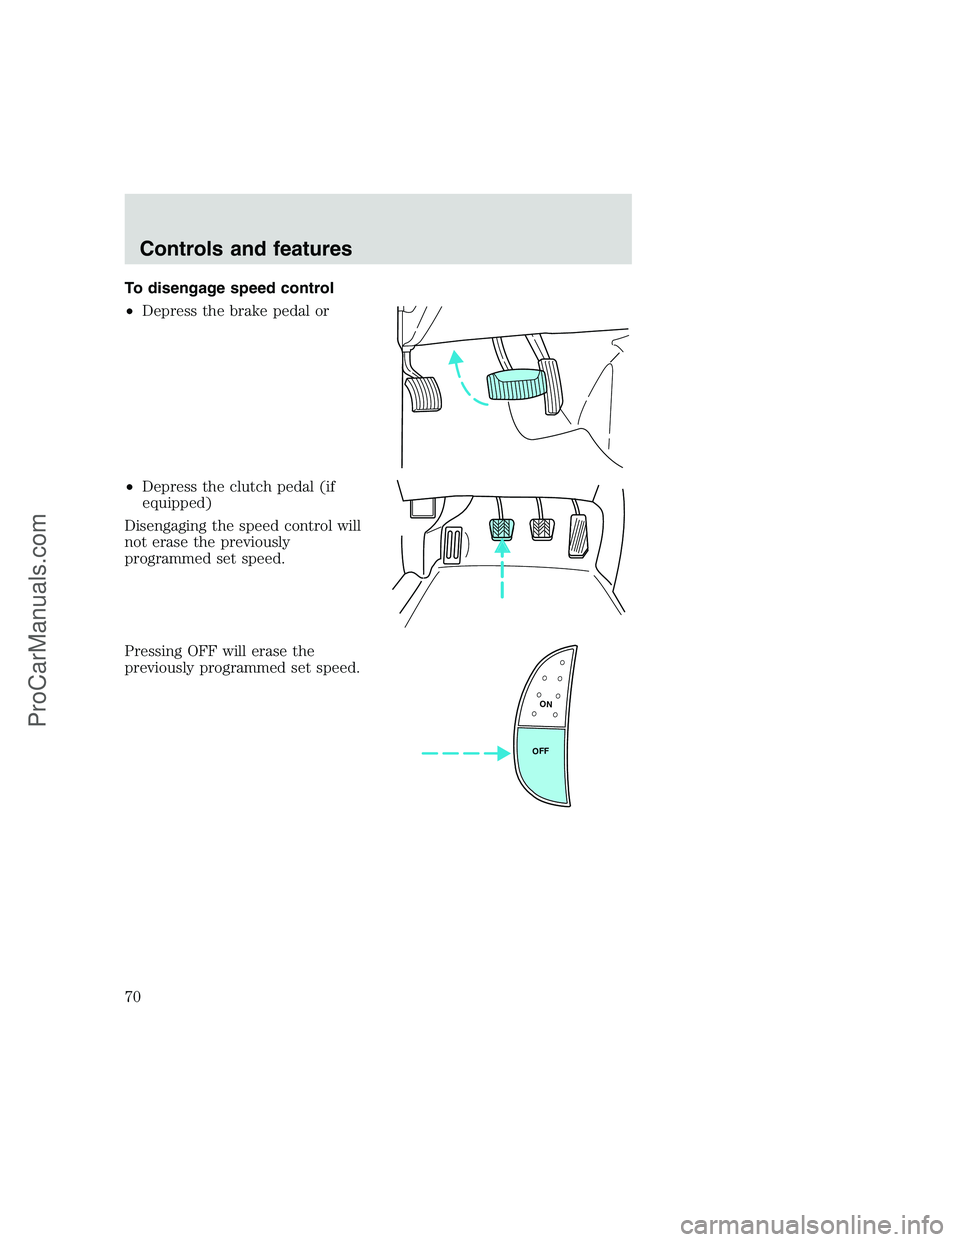
To disengage speed control
•Depress the brake pedal or
•Depress the clutch pedal (if
equipped)
Disengaging the speed control will
not erase the previously
programmed set speed.
Pressing OFF will erase the
previously programmed set speed.
ON
OFF
Controls and features
70
ProCarManuals.com
Page 108 of 248
2. Make sure the headlamps and vehicle accessories are off.
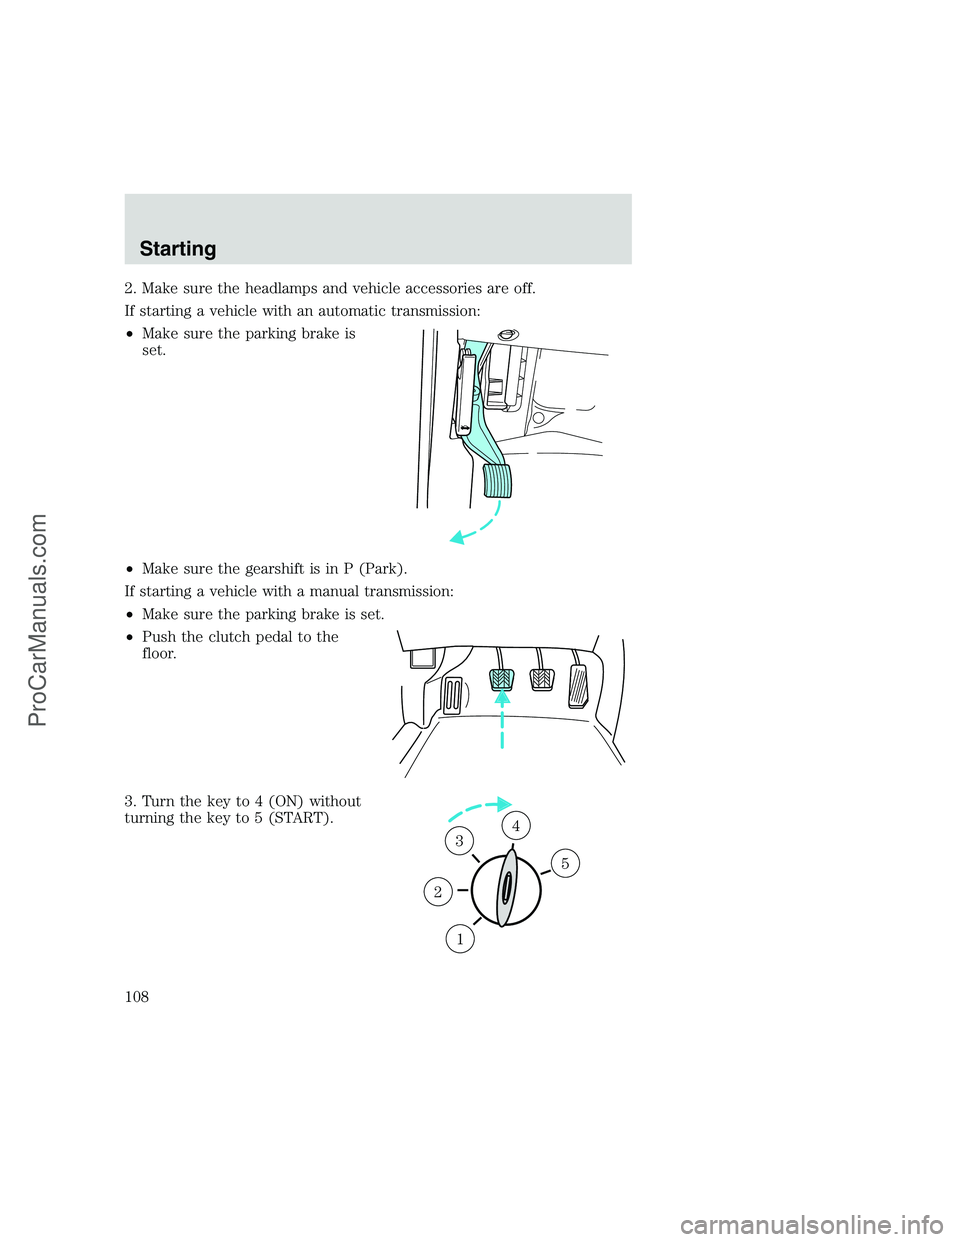
If starting a vehicle with an automatic transmission:
•Make sure the parking brake is
set.
•Make sure the gearshift is in P (Park).
If starting a vehicle with a manual transmission:
•Make sure the parking brake is set.
•Push the clutch pedal to the
floor.
3. Turn the key to 4 (ON) without
turning the key to 5 (START).
1
2
34
5
Starting
108
ProCarManuals.com
Page 119 of 248
2 (Second)
Use 2 (Second) to start-up on
slippery roads or to provide
additional engine braking on
downgrades.
1 (First)
Use 1 (Low) to provide maximum
engine braking on steep
downgrades. Upshifts can be made
by shifting to 2 (Second) or to
(Overdrive). Selecting 1 (Low)
at higher speeds causes the transmission to shift to a lower gear, and will
shift to 1 (Low) after vehicle decelerates to the proper speed.
MANUAL TRANSMISSION OPERATION (IF EQUIPPED)
Using the clutch
Vehicles equipped with a manual transmission have a starter interlock
that prevents cranking the engine unless the clutch pedal is fully
depressed.
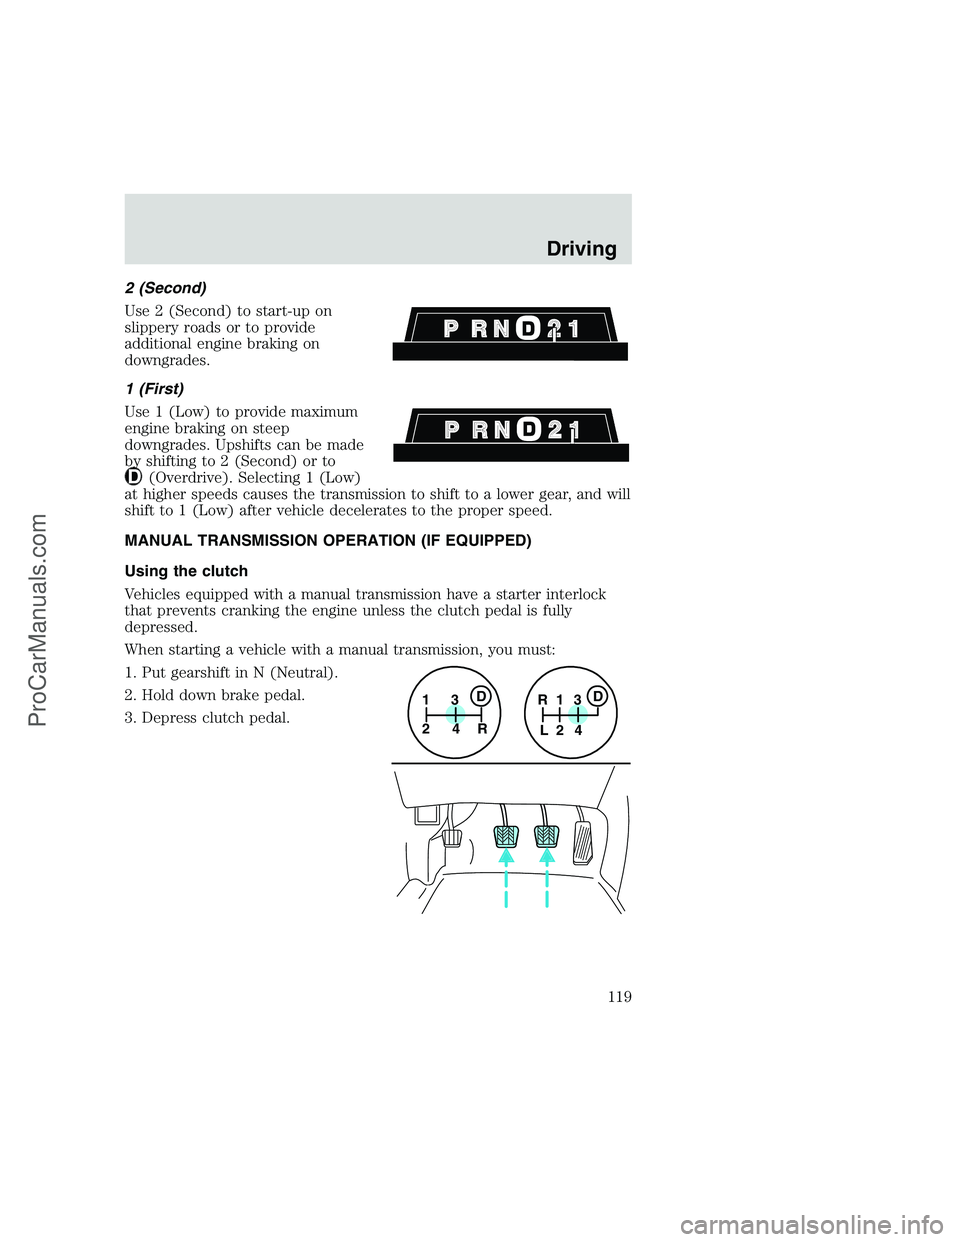
When starting a vehicle with a manual transmission, you must:
1. Put gearshift in N (Neutral).
2. Hold down brake pedal.
3. Depress clutch pedal.
1
24R3D1
24 R
L3D
Driving
119
ProCarManuals.com
Page 120 of 248
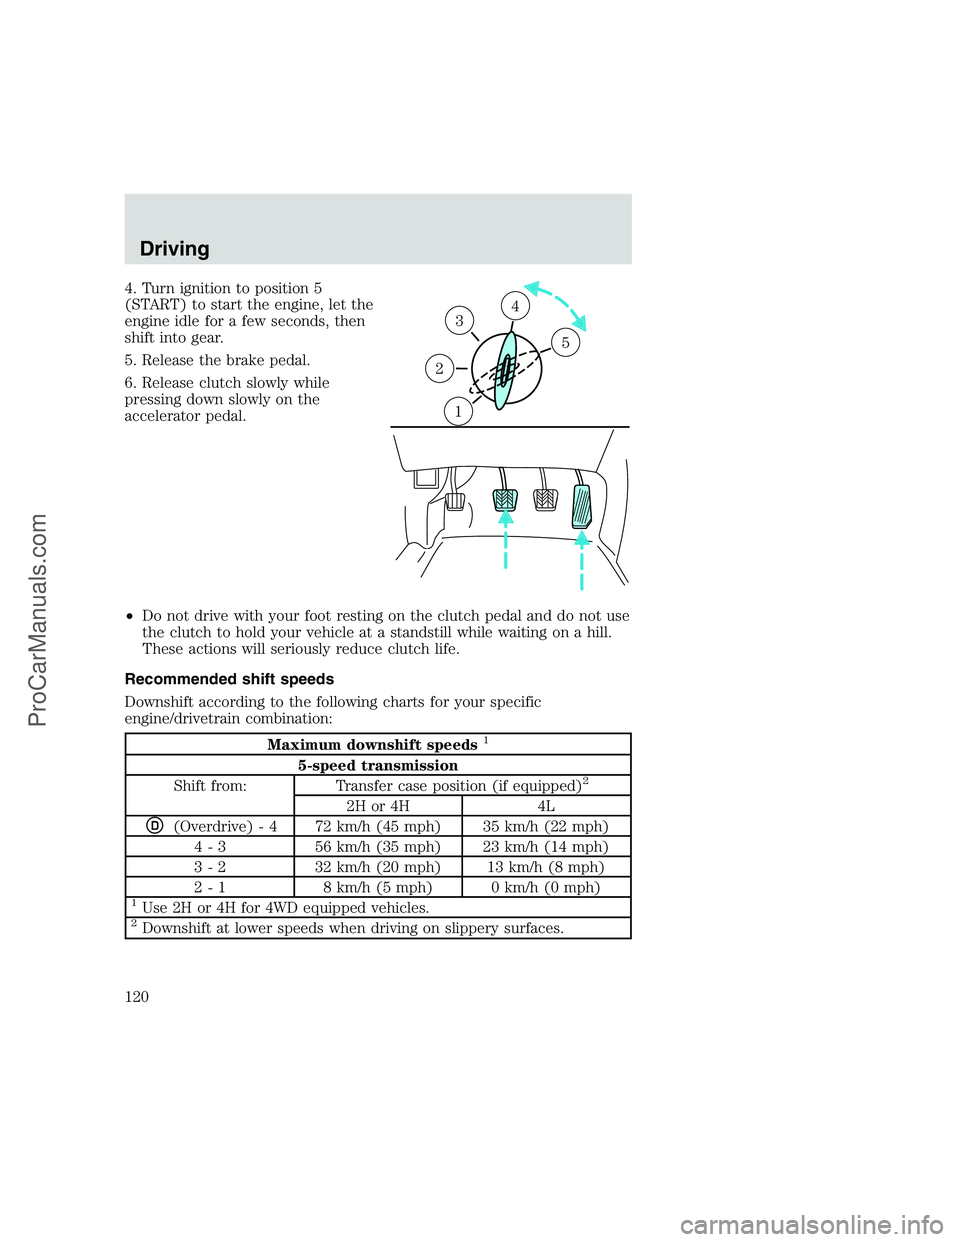
4. Turn ignition to position 5
(START) to start the engine, let the
engine idle for a few seconds, then
shift into gear.
5. Release the brake pedal.
6. Release clutch slowly while
pressing down slowly on the
accelerator pedal.
•Do not drive with your foot resting on the clutch pedal and do not use
the clutch to hold your vehicle at a standstill while waiting on a hill.
These actions will seriously reduce clutch life.
Recommended shift speeds
Downshift according to the following charts for your specific
engine/drivetrain combination:
Maximum downshift speeds1
5-speed transmission
Shift from: Transfer case position (if equipped)2
2H or 4H 4L
D(Overdrive) - 4 72 km/h (45 mph) 35 km/h (22 mph)
4 - 3 56 km/h (35 mph) 23 km/h (14 mph)
3 - 2 32 km/h (20 mph) 13 km/h (8 mph)
2 - 1 8 km/h (5 mph) 0 km/h (0 mph)
1Use 2H or 4H for 4WD equipped vehicles.2Downshift at lower speeds when driving on slippery surfaces.
1
2
34
5
Driving
120
ProCarManuals.com
Page 121 of 248
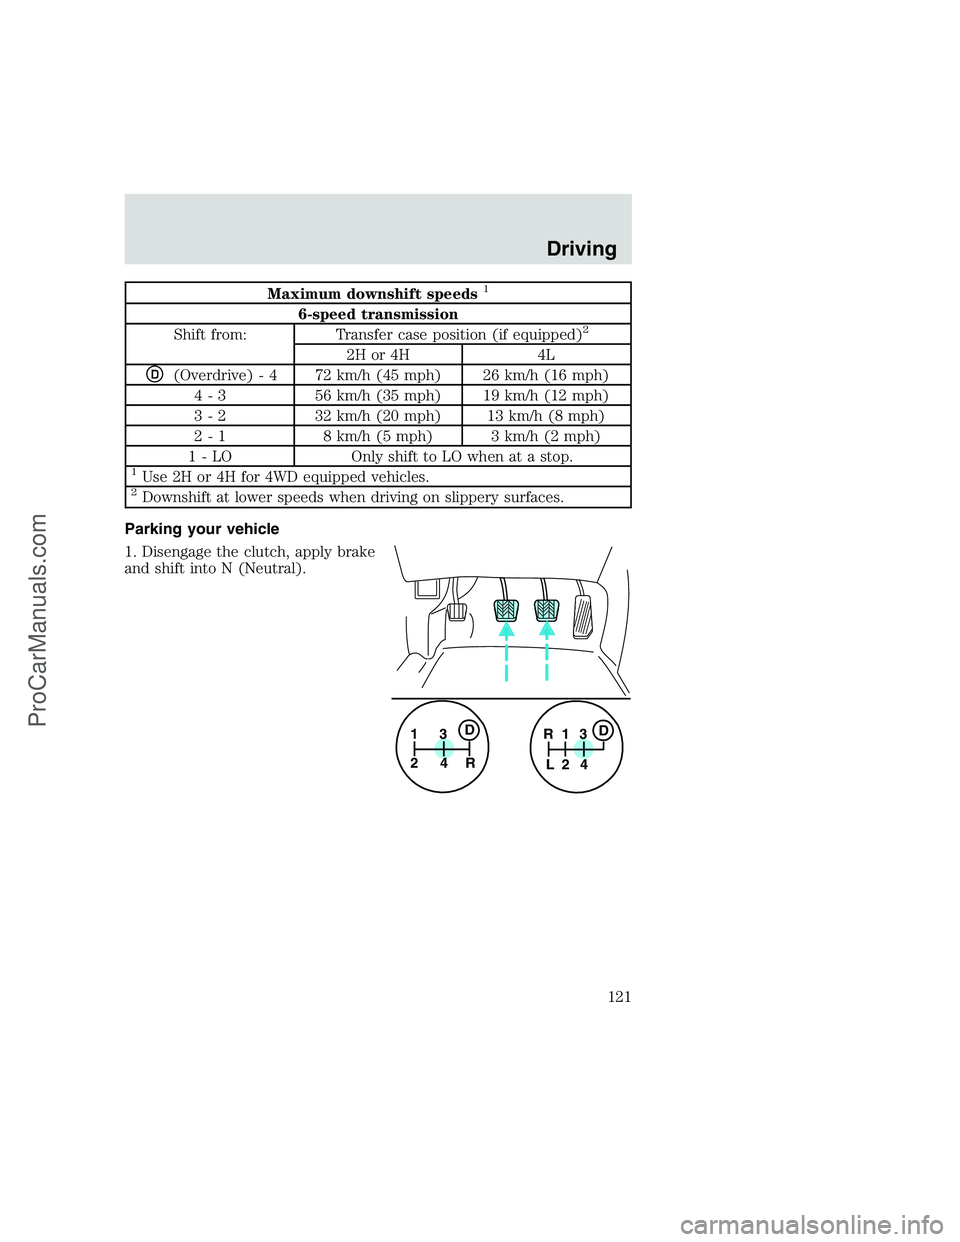
Maximum downshift speeds1
6-speed transmission
Shift from: Transfer case position (if equipped)2
2H or 4H 4L
D(Overdrive) - 4 72 km/h (45 mph) 26 km/h (16 mph)
4 - 3 56 km/h (35 mph) 19 km/h (12 mph)
3 - 2 32 km/h (20 mph) 13 km/h (8 mph)
2 - 1 8 km/h (5 mph) 3 km/h (2 mph)
1 - LO Only shift to LO when at a stop.
1Use 2H or 4H for 4WD equipped vehicles.2Downshift at lower speeds when driving on slippery surfaces.
Parking your vehicle
1. Disengage the clutch, apply brake
and shift into N (Neutral).
1
24R3D1
24 R
L3D
Driving
121
ProCarManuals.com
Page 127 of 248
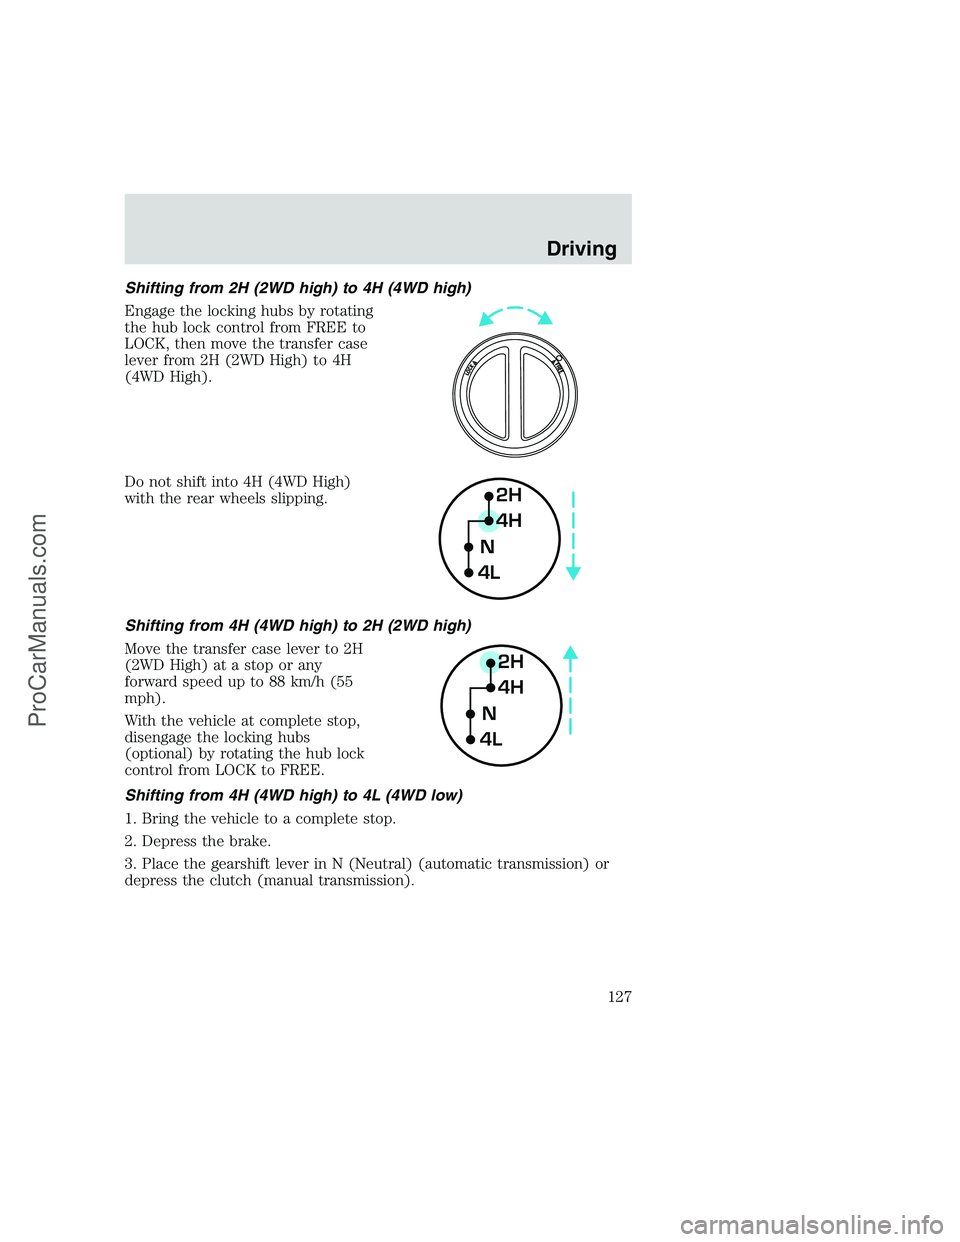
Shifting from 2H (2WD high) to 4H (4WD high)
Engage the locking hubs by rotating
the hub lock control from FREE to
LOCK, then move the transfer case
lever from 2H (2WD High) to 4H
(4WD High).
Do not shift into 4H (4WD High)
with the rear wheels slipping.
Shifting from 4H (4WD high) to 2H (2WD high)
Move the transfer case lever to 2H
(2WD High) at a stop or any
forward speed up to 88 km/h (55
mph).
With the vehicle at complete stop,
disengage the locking hubs
(optional) by rotating the hub lock
control from LOCK to FREE.
Shifting from 4H (4WD high) to 4L (4WD low)
1. Bring the vehicle to a complete stop.
2. Depress the brake.
3. Place the gearshift lever in N (Neutral) (automatic transmission) or
depress the clutch (manual transmission).
2H
4H
4LN
2H
4H
4LN
Driving
127
ProCarManuals.com
Page 129 of 248
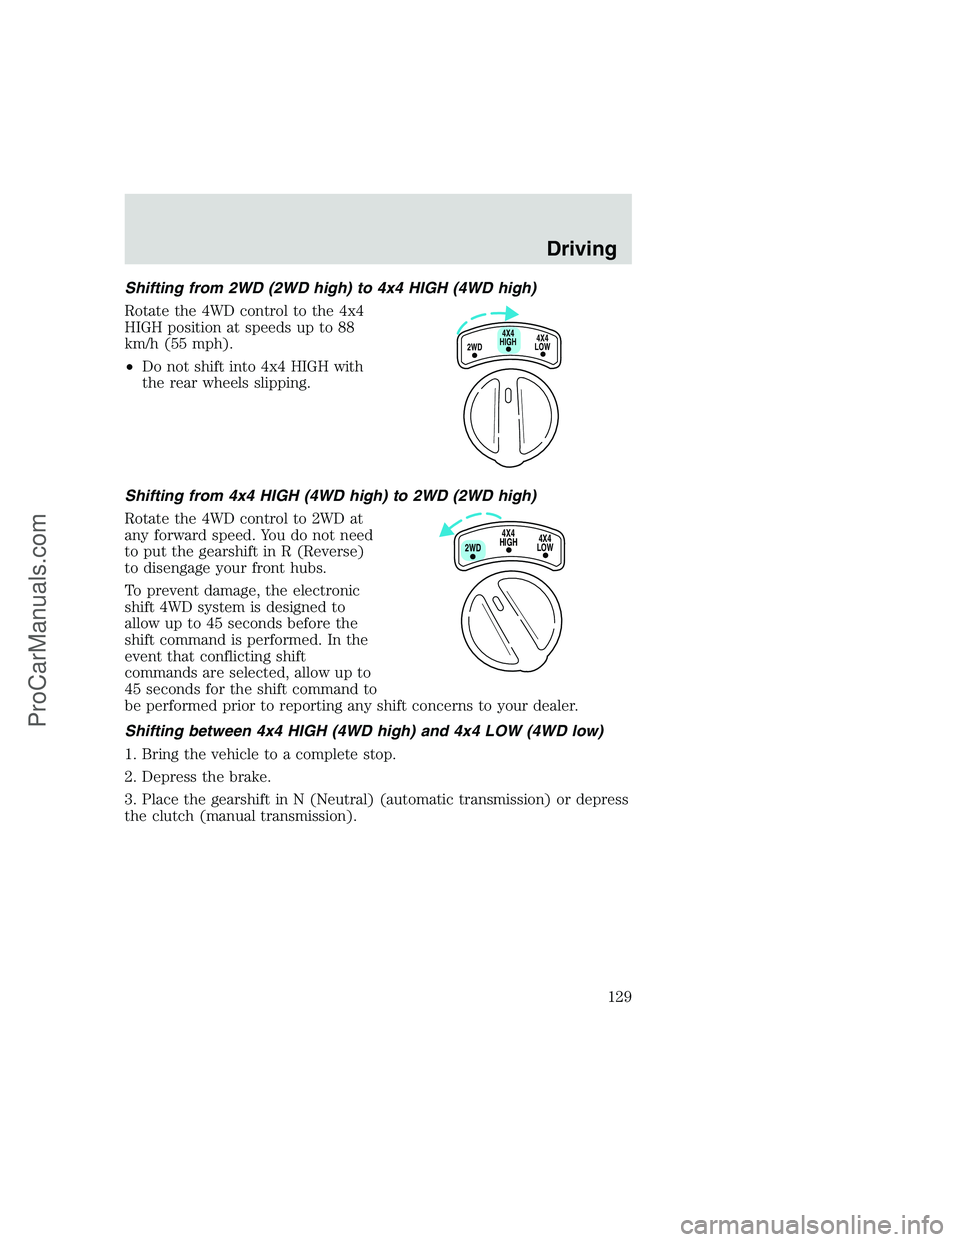
Shifting from 2WD (2WD high) to 4x4 HIGH (4WD high)
Rotate the 4WD control to the 4x4
HIGH position at speeds up to 88
km/h (55 mph).
•Do not shift into 4x4 HIGH with
the rear wheels slipping.
Shifting from 4x4 HIGH (4WD high) to 2WD (2WD high)
Rotate the 4WD control to 2WD at
any forward speed. You do not need
to put the gearshift in R (Reverse)
to disengage your front hubs.
To prevent damage, the electronic
shift 4WD system is designed to
allow up to 45 seconds before the
shift command is performed. In the
event that conflicting shift
commands are selected, allow up to
45 seconds for the shift command to
be performed prior to reporting any shift concerns to your dealer.
Shifting between 4x4 HIGH (4WD high) and 4x4 LOW (4WD low)
1. Bring the vehicle to a complete stop.
2. Depress the brake.
3. Place the gearshift in N (Neutral) (automatic transmission) or depress
the clutch (manual transmission).
4X4
HIGH
2WD4X4
LOW
4X4
HIGH
2WD4X4
LOW
Driving
129
ProCarManuals.com
Page 170 of 248
Working with the engine off
•Automatic transmission:
1. Set the parking brake and ensure the gearshift is securely latched in P
(Park).
2. Turn off the engine and remove the key.
3. Block the wheels to prevent the vehicle from moving unexpectedly.
•Manual transmission:
1. Set the parking brake.
2. Depress the clutch and place the gearshift in 1 (First).
3. Turn off the engine and remove the key.
4. Block the wheels to prevent the vehicle from moving unexpectedly.
Working with the engine on
•Automatic transmission:
1. Set the parking brake and ensure the gearshift is securely latched in P
(Park).
2. Block the wheels to prevent the vehicle from moving unexpectedly.
Do not start your engine with the air cleaner removed and do
not remove it while the engine is running.
•Manual transmission:
1. Set the parking brake, depress the clutch and place the gearshift in N
(Neutral).
2. Block the wheels to prevent the vehicle from moving unexpectedly.
Do not start your engine with the air cleaner removed and do
not remove it while the engine is running.
Maintenance and care
170
ProCarManuals.com
Page 172 of 248
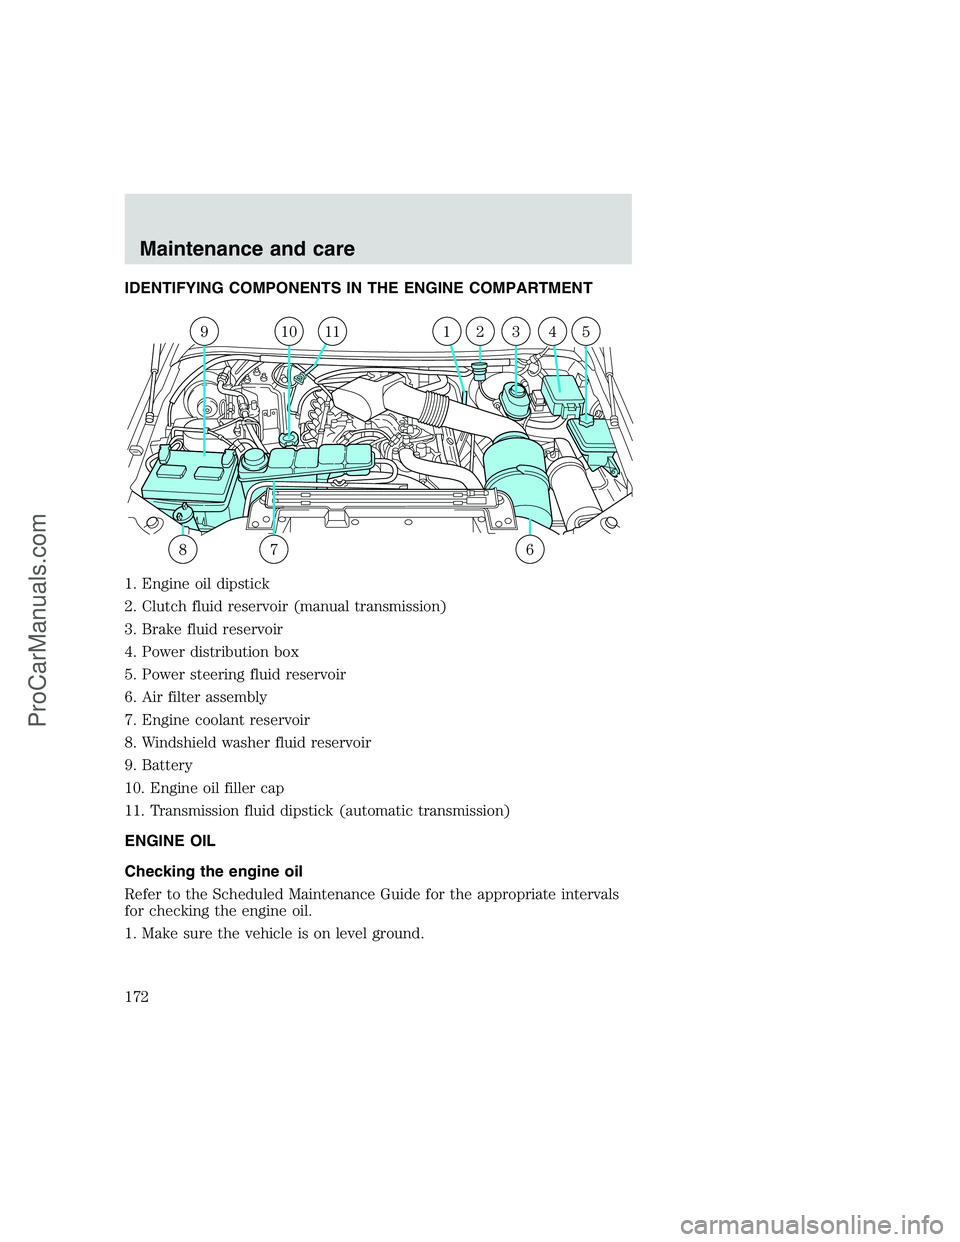
IDENTIFYING COMPONENTS IN THE ENGINE COMPARTMENT
1. Engine oil dipstick
2. Clutch fluid reservoir (manual transmission)
3. Brake fluid reservoir
4. Power distribution box
5. Power steering fluid reservoir
6. Air filter assembly
7. Engine coolant reservoir
8. Windshield washer fluid reservoir
9. Battery
10. Engine oil filler cap
11. Transmission fluid dipstick (automatic transmission)
ENGINE OIL
Checking the engine oil
Refer to the Scheduled Maintenance Guide for the appropriate intervals
for checking the engine oil.
1. Make sure the vehicle is on level ground.
910111234
867
5
Maintenance and care
172
ProCarManuals.com
Page 176 of 248
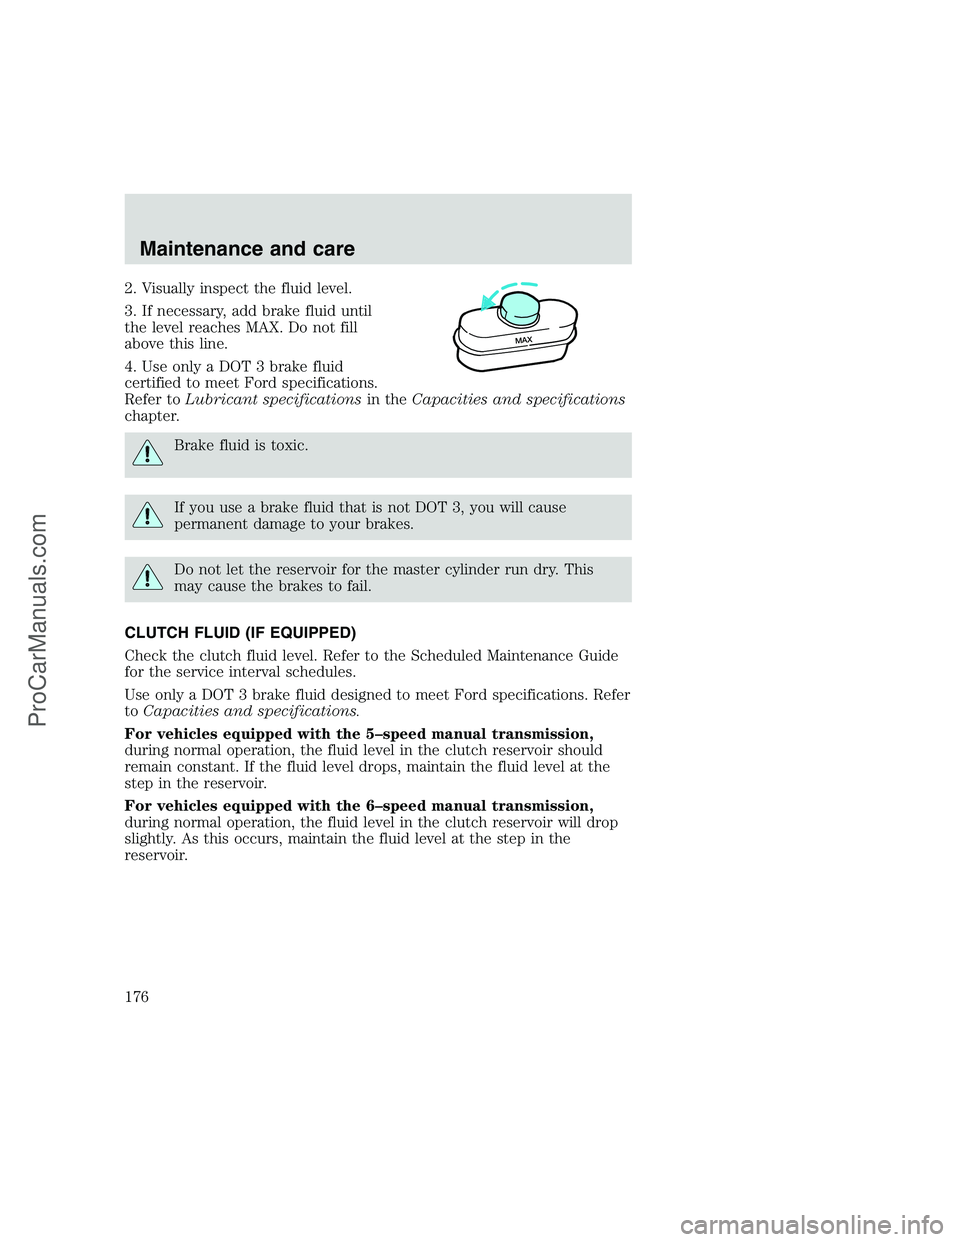
2. Visually inspect the fluid level.
3. If necessary, add brake fluid until
the level reaches MAX. Do not fill
above this line.
4. Use only a DOT 3 brake fluid
certified to meet Ford specifications.
Refer toLubricant specificationsin theCapacities and specifications
chapter.
Brake fluid is toxic.
If you use a brake fluid that is not DOT 3, you will cause
permanent damage to your brakes.
Do not let the reservoir for the master cylinder run dry. This
may cause the brakes to fail.
CLUTCH FLUID (IF EQUIPPED)
Check the clutch fluid level. Refer to the Scheduled Maintenance Guide
for the service interval schedules.
Use only a DOT 3 brake fluid designed to meet Ford specifications. Refer
toCapacities and specifications.
For vehicles equipped with the 5–speed manual transmission,
during normal operation, the fluid level in the clutch reservoir should
remain constant. If the fluid level drops, maintain the fluid level at the
step in the reservoir.
For vehicles equipped with the 6–speed manual transmission,
during normal operation, the fluid level in the clutch reservoir will drop
slightly. As this occurs, maintain the fluid level at the step in the
reservoir.
M
A
X
Maintenance and care
176
ProCarManuals.com