child lock FORD F350 2000 Owners Manual
[x] Cancel search | Manufacturer: FORD, Model Year: 2000, Model line: F350, Model: FORD F350 2000Pages: 256, PDF Size: 1.82 MB
Page 6 of 256
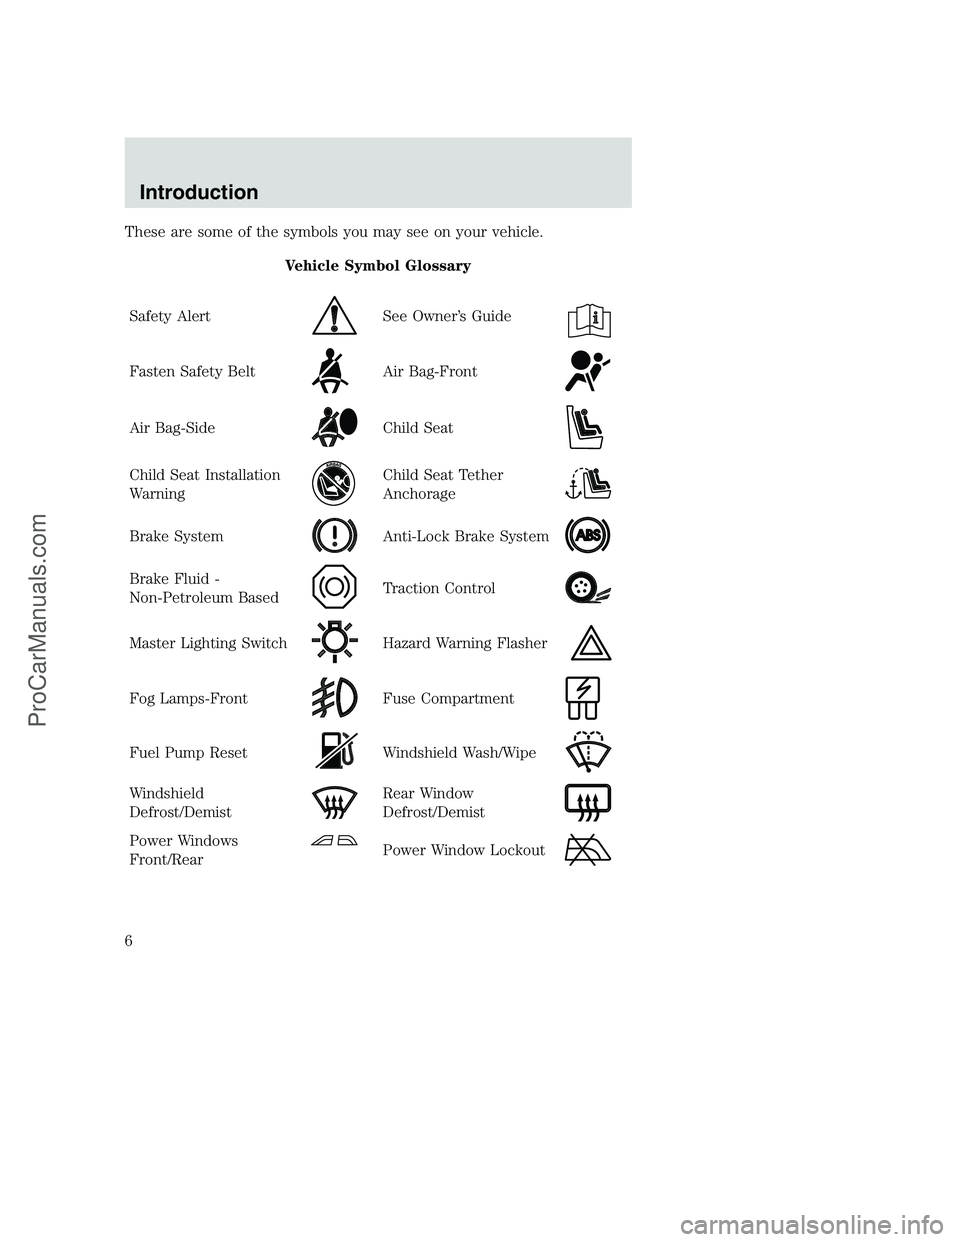
These are some of the symbols you may see on your vehicle.
Vehicle Symbol Glossary
Safety Alert
See Owner’s Guide
Fasten Safety BeltAir Bag-Front
Air Bag-SideChild Seat
Child Seat Installation
WarningChild Seat Tether
Anchorage
Brake SystemAnti-Lock Brake System
Brake Fluid -
Non-Petroleum BasedTraction Control
Master Lighting SwitchHazard Warning Flasher
Fog Lamps-FrontFuse Compartment
Fuel Pump ResetWindshield Wash/Wipe
Windshield
Defrost/DemistRear Window
Defrost/Demist
Power Windows
Front/RearPower Window Lockout
Introduction
6
ProCarManuals.com
Page 7 of 256
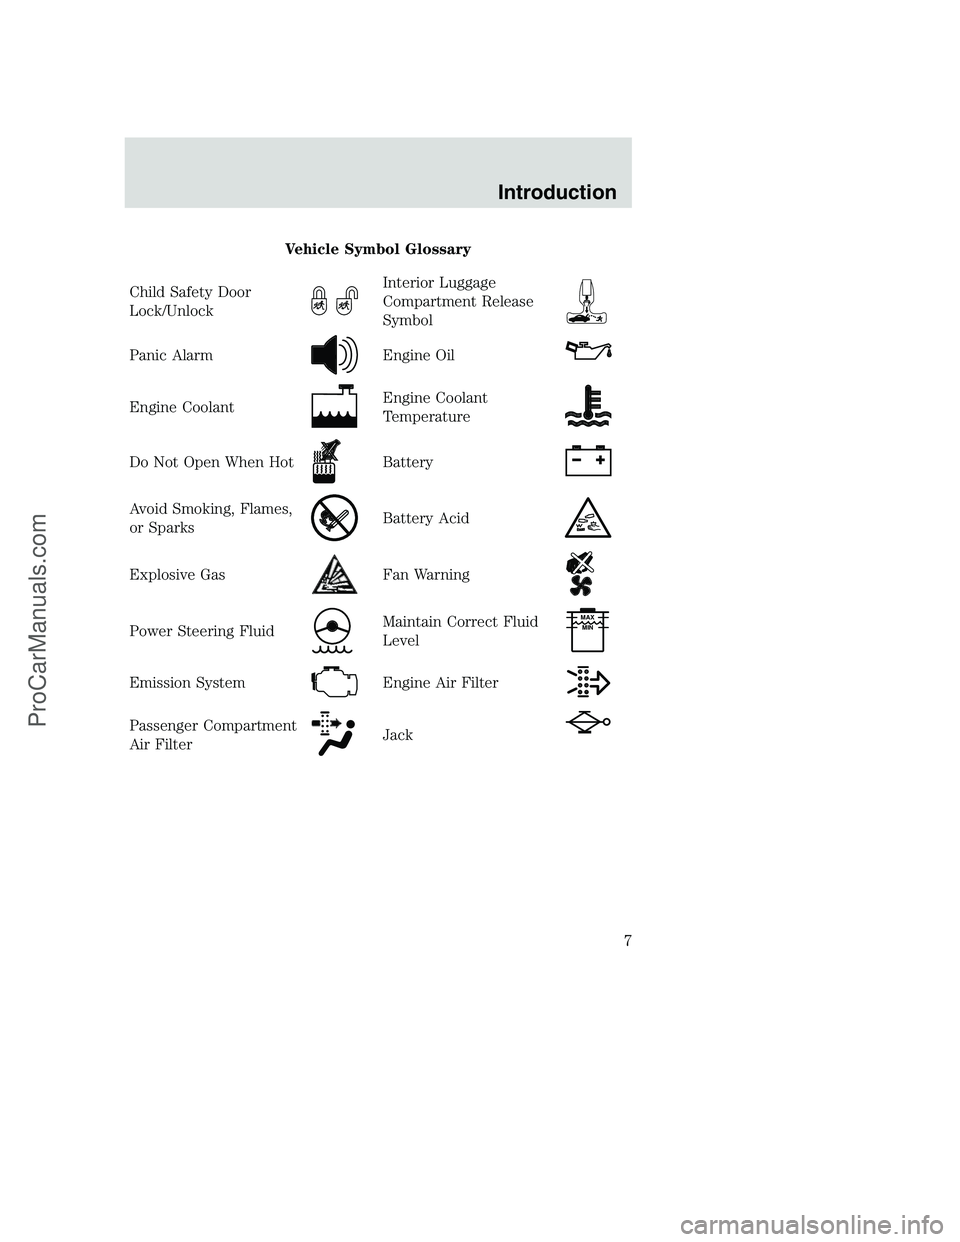
Vehicle Symbol Glossary
Child Safety Door
Lock/Unlock
Interior Luggage
Compartment Release
Symbol
Panic AlarmEngine Oil
Engine CoolantEngine Coolant
Temperature
Do Not Open When HotBattery
Avoid Smoking, Flames,
or SparksBattery Acid
Explosive GasFan Warning
Power Steering FluidMaintain Correct Fluid
LevelMAX
MIN
Emission SystemEngine Air Filter
Passenger Compartment
Air FilterJack
Introduction
7
ProCarManuals.com
Page 64 of 256
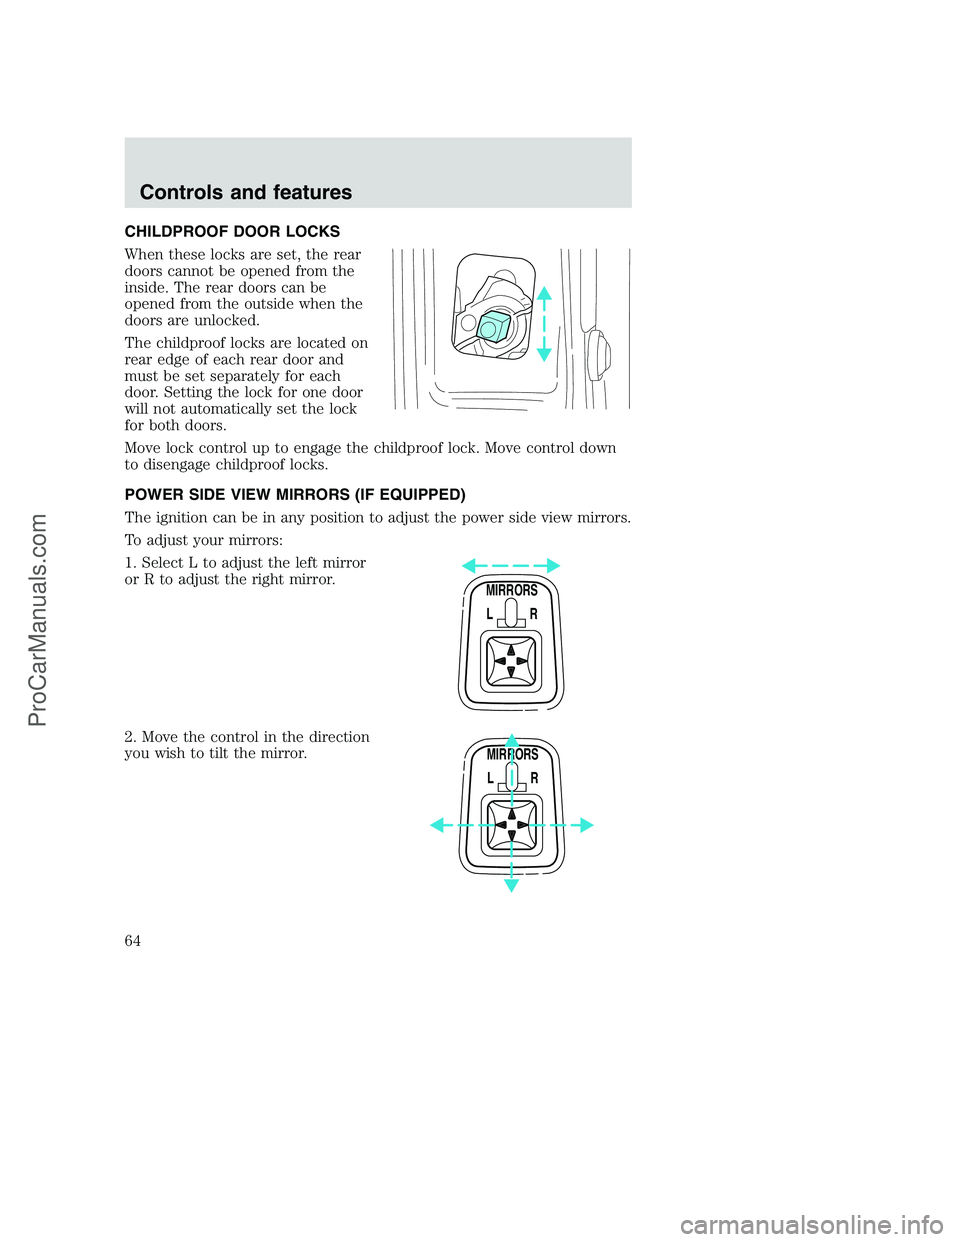
CHILDPROOF DOOR LOCKS
When these locks are set, the rear
doors cannot be opened from the
inside. The rear doors can be
opened from the outside when the
doors are unlocked.
The childproof locks are located on
rear edge of each rear door and
must be set separately for each
door. Setting the lock for one door
will not automatically set the lock
for both doors.
Move lock control up to engage the childproof lock. Move control down
to disengage childproof locks.
POWER SIDE VIEW MIRRORS (IF EQUIPPED)
The ignition can be in any position to adjust the power side view mirrors.
To adjust your mirrors:
1. Select L to adjust the left mirror
or R to adjust the right mirror.
2. Move the control in the direction
you wish to tilt the mirror.
MIRRORS
L R
MIRRORS
L R
Controls and features
64
ProCarManuals.com
Page 75 of 256
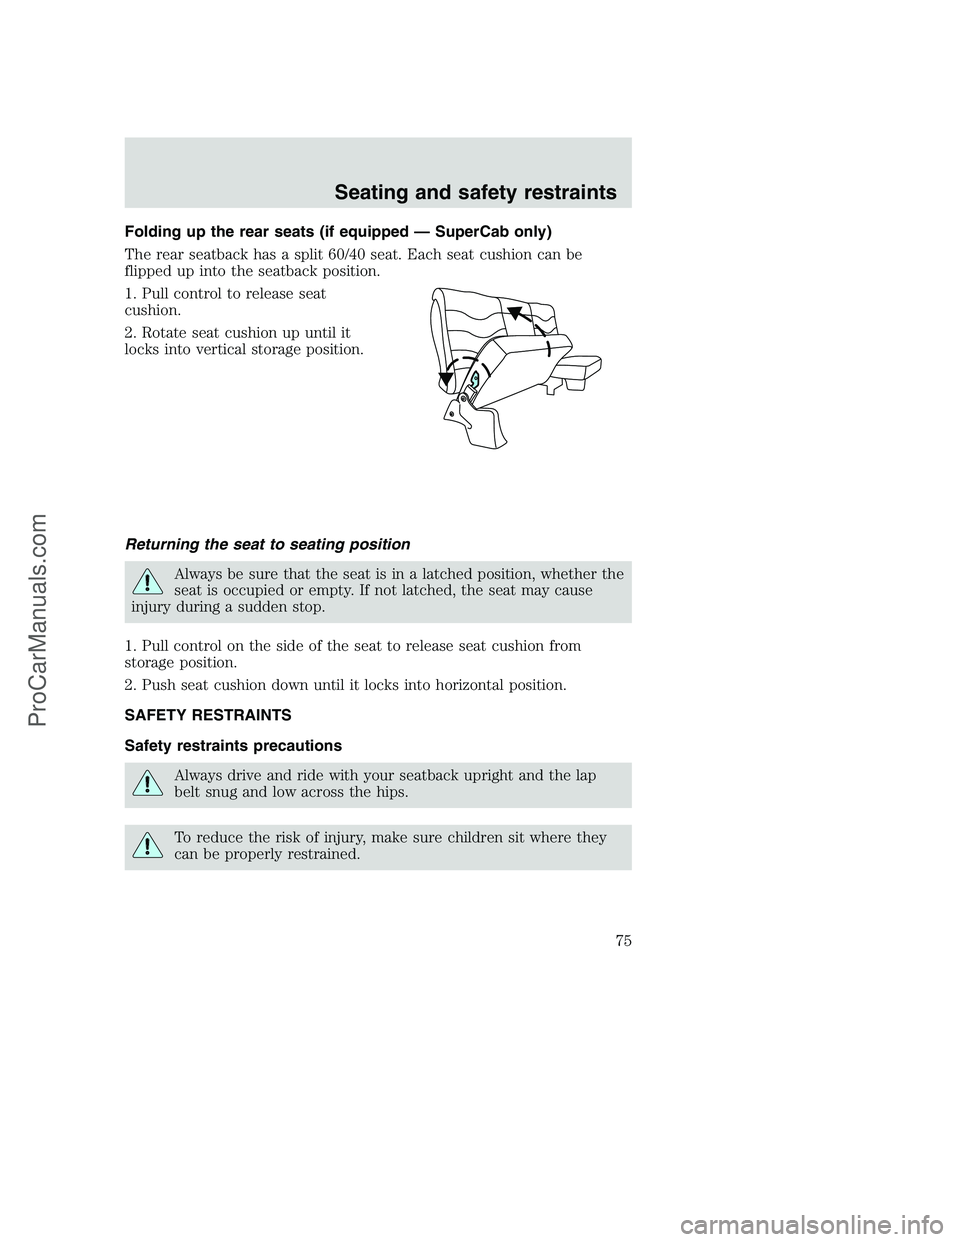
Folding up the rear seats (if equipped — SuperCab only)
The rear seatback has a split 60/40 seat. Each seat cushion can be
flipped up into the seatback position.
1. Pull control to release seat
cushion.
2. Rotate seat cushion up until it
locks into vertical storage position.
Returning the seat to seating position
Always be sure that the seat is in a latched position, whether the
seat is occupied or empty. If not latched, the seat may cause
injury during a sudden stop.
1. Pull control on the side of the seat to release seat cushion from
storage position.
2. Push seat cushion down until it locks into horizontal position.
SAFETY RESTRAINTS
Safety restraints precautions
Always drive and ride with your seatback upright and the lap
belt snug and low across the hips.
To reduce the risk of injury, make sure children sit where they
can be properly restrained.
Seating and safety restraints
75
ProCarManuals.com
Page 78 of 256
Automatic locking mode
In this mode, the shoulder belt is automatically pre-locked. The belt will
still retract to remove any slack in the shoulder belt.
The automatic locking mode is not available on the driver safety belt.
When to use the automatic locking mode
•Anytimea child safety seat is installed in a passenger front or
outboard rear seating position (if equipped). Children 12 years old and
under should be properly restrained in the rear seat whenever
possible. Refer toSafety Restraints for ChildrenorSafety Seats for
Childrenlater in this chapter.
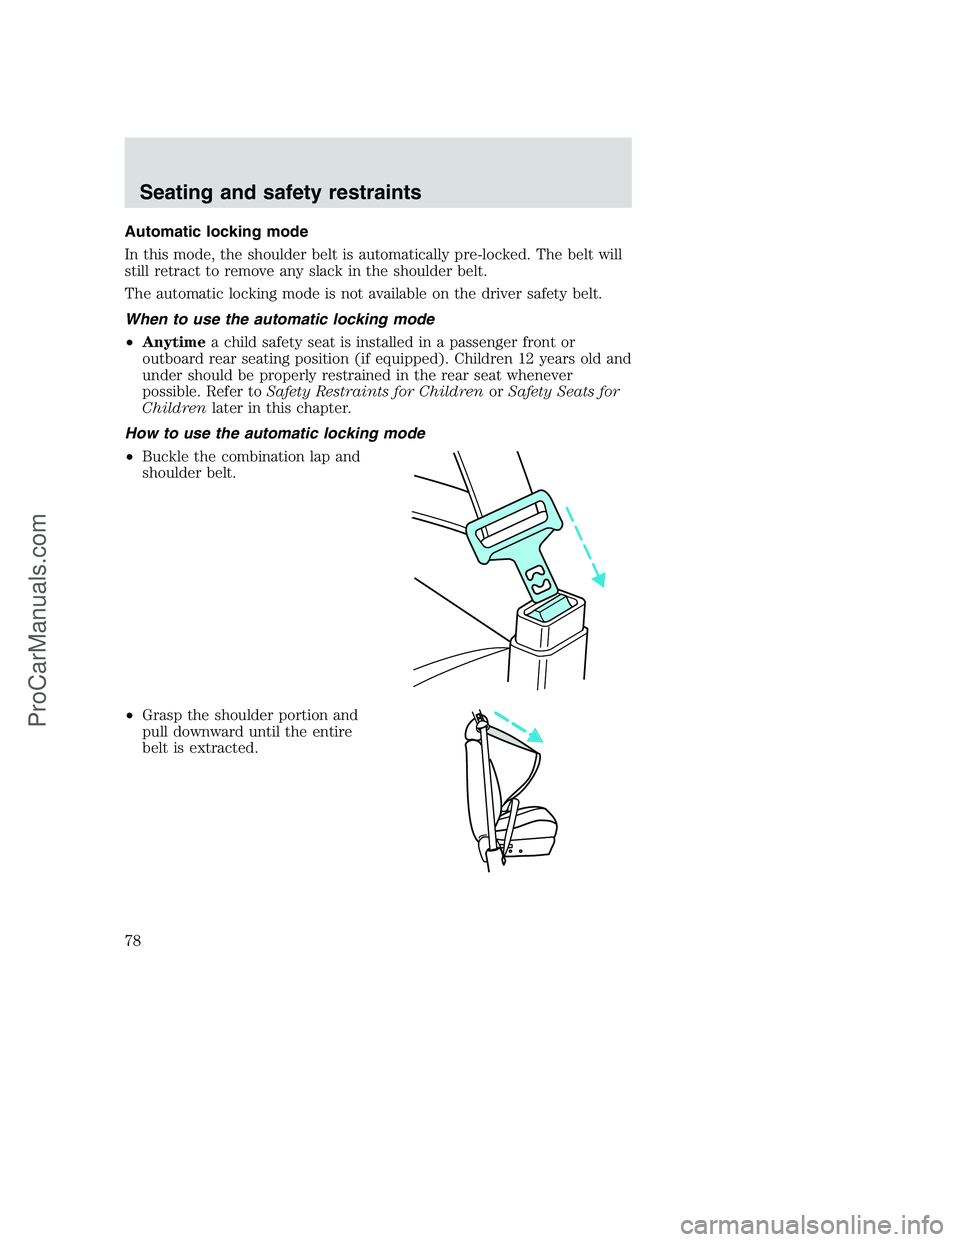
How to use the automatic locking mode
•Buckle the combination lap and
shoulder belt.
•Grasp the shoulder portion and
pull downward until the entire
belt is extracted.
Seating and safety restraints
78
ProCarManuals.com
Page 79 of 256
•Allow the belt to retract. As the belt retracts, you will hear a clicking
sound. This indicates the safety belt is now in the automatic locking
mode.
How to disengage the automatic locking mode
Disconnect the combination lap/shoulder belt and allow it to retract
completely to disengage the automatic locking mode and activate the
vehicle sensitive (emergency) locking mode.
Energy Management Feature
•This vehicle has a seat belt system with an energy management
feature at the front outboard seating position to help further reduce
the risk of injury in the event of a head-on collision.
•The front outboard seat belt system has a retractor assembly that is
designed to pay out webbing in a controlled manner. This feature is
designed to help reduce the belt force acting on the occupant’s chest.
After any vehicle collision, the seat belt system at all outboard
seating positions (except driver, which has no “automatic locking
retractor” feature) must be checked by a qualified technician to verify
that the “automatic locking retractor” feature for child seats is still
functioning properly. In addition, all seat belts should be checked for
proper function.
BELT AND RETRACTOR ASSEMBLY MUST BE REPLACED if
the seat belt assembly “automatic locking retractor” feature or
any other seat belt function is not operating properly when checked
according to the procedures in Workshop Manual.
Failure to replace the Belt and Retractor assembly could
increase the risk of injury in collisions.
Seating and safety restraints
79
ProCarManuals.com
Page 99 of 256
•Keep the buckle release button pointing up and away from the safety
seat, with the tongue between the child seat and the release button,
to prevent accidental unbuckling.
•Place seat back in upright position.
•Put the safety belt in the automatic locking mode. Refer toAutomatic
locking mode(passenger side front and outboard rear seating
positions) (if equipped).
Ford recommends the use of a child safety seat having a top tether
strap. Install the child safety seat in a seating position which is capable
of providing a tether anchorage. For more information on top tether
straps, refer toAttaching safety seats with tether straps.
Carefully follow all of the manufacturer’s instructions included
with the safety seat you put in your vehicle. If you do not install
and use the safety seat properly, the child may be injured in a sudden
stop or collision.
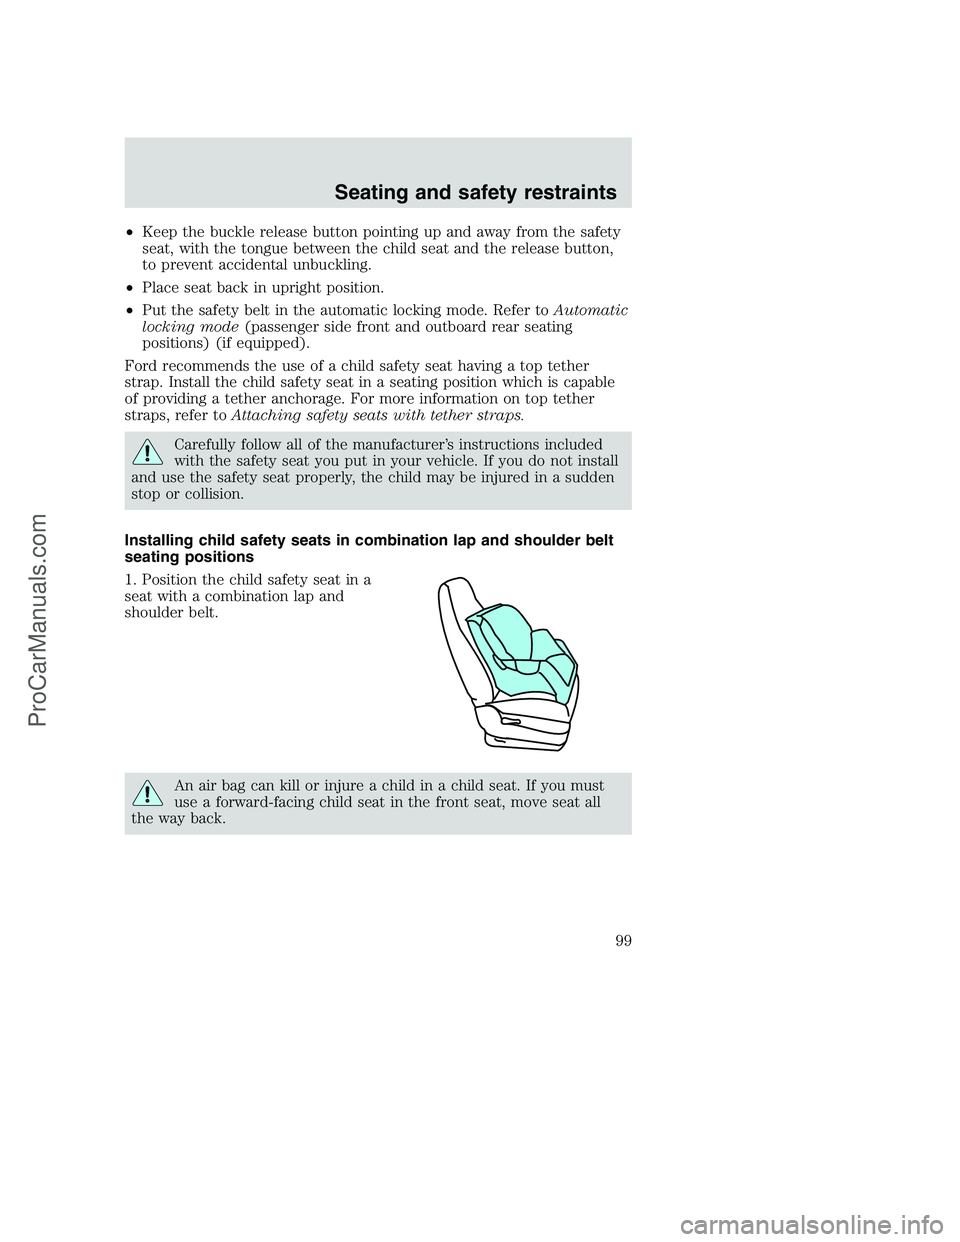
Installing child safety seats in combination lap and shoulder belt
seating positions
1. Position the child safety seat in a
seat with a combination lap and
shoulder belt.
An air bag can kill or injure a child in a child seat. If you must
use a forward-facing child seat in the front seat, move seat all
the way back.
Seating and safety restraints
99
ProCarManuals.com
Page 101 of 256
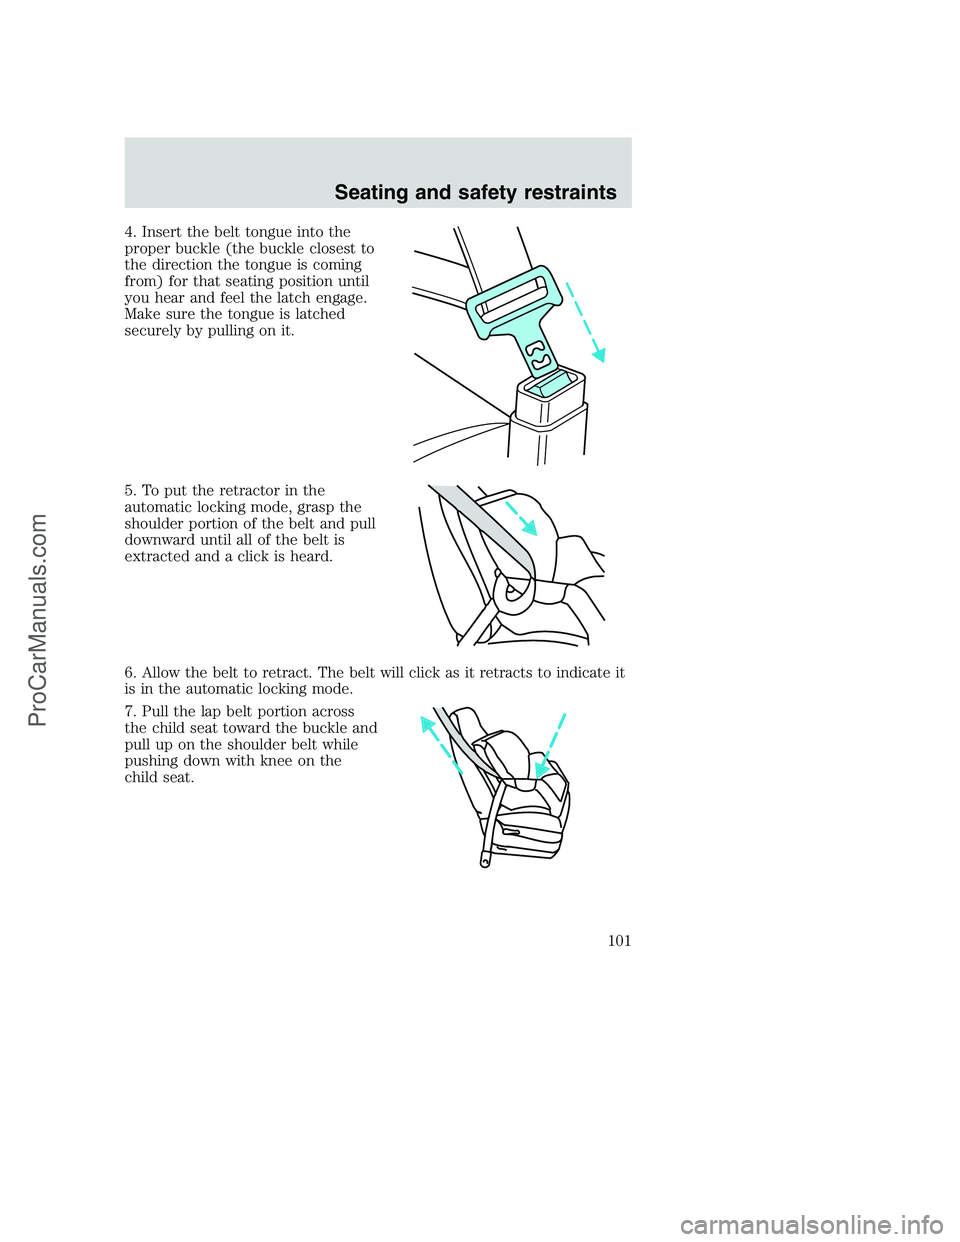
4. Insert the belt tongue into the
proper buckle (the buckle closest to
the direction the tongue is coming
from) for that seating position until
you hear and feel the latch engage.
Make sure the tongue is latched
securely by pulling on it.
5. To put the retractor in the
automatic locking mode, grasp the
shoulder portion of the belt and pull
downward until all of the belt is
extracted and a click is heard.
6. Allow the belt to retract. The belt will click as it retracts to indicate it
is in the automatic locking mode.
7. Pull the lap belt portion across
the child seat toward the buckle and
pull up on the shoulder belt while
pushing down with knee on the
child seat.
Seating and safety restraints
101
ProCarManuals.com
Page 102 of 256
8. Allow the safety belt to retract to
remove any slack in the belt.
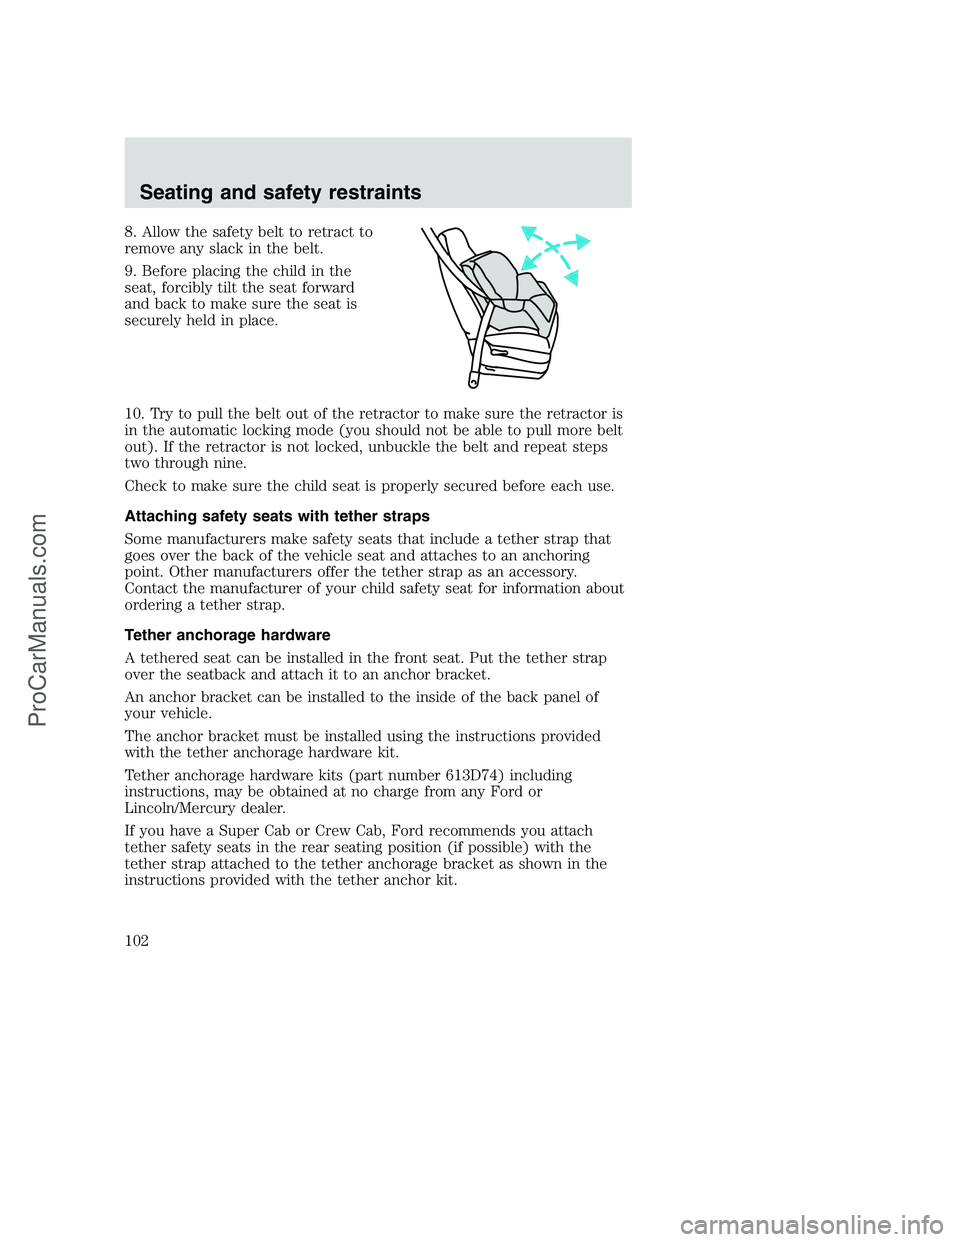
9. Before placing the child in the
seat, forcibly tilt the seat forward
and back to make sure the seat is
securely held in place.
10. Try to pull the belt out of the retractor to make sure the retractor is
in the automatic locking mode (you should not be able to pull more belt
out). If the retractor is not locked, unbuckle the belt and repeat steps
two through nine.
Check to make sure the child seat is properly secured before each use.
Attaching safety seats with tether straps
Some manufacturers make safety seats that include a tether strap that
goes over the back of the vehicle seat and attaches to an anchoring
point. Other manufacturers offer the tether strap as an accessory.
Contact the manufacturer of your child safety seat for information about
ordering a tether strap.
Tether anchorage hardware
A tethered seat can be installed in the front seat. Put the tether strap
over the seatback and attach it to an anchor bracket.
An anchor bracket can be installed to the inside of the back panel of
your vehicle.
The anchor bracket must be installed using the instructions provided
with the tether anchorage hardware kit.
Tether anchorage hardware kits (part number 613D74) including
instructions, may be obtained at no charge from any Ford or
Lincoln/Mercury dealer.
If you have a Super Cab or Crew Cab, Ford recommends you attach
tether safety seats in the rear seating position (if possible) with the
tether strap attached to the tether anchorage bracket as shown in the
instructions provided with the tether anchor kit.
Seating and safety restraints
102
ProCarManuals.com
Page 212 of 256
BULBS
Replacing exterior bulbs
Check the operation of the following lamps frequently:
•Headlamps
•High-mount brakelamp
•Brakelamps
•Turn signals
•License plate lamp
•Tail lamps
•Back-up lamps
Do not remove lamp bulbs unless they can be replaced immediately with
new ones. If a bulb is removed for an extended period of time,
contaminants may enter the lamp housings and affect lamp performance.
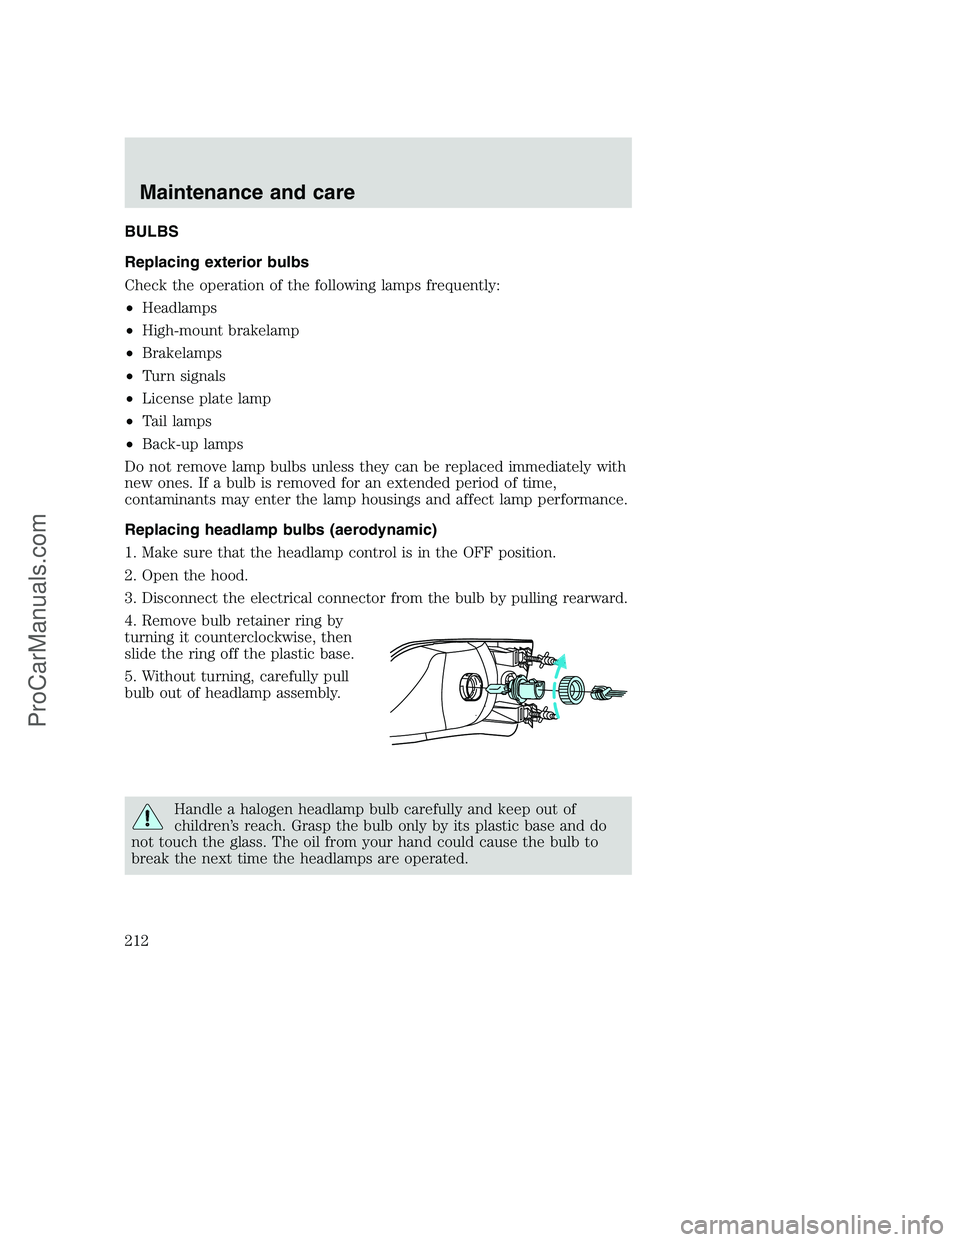
Replacing headlamp bulbs (aerodynamic)
1. Make sure that the headlamp control is in the OFF position.
2. Open the hood.
3. Disconnect the electrical connector from the bulb by pulling rearward.
4. Remove bulb retainer ring by
turning it counterclockwise, then
slide the ring off the plastic base.
5. Without turning, carefully pull
bulb out of headlamp assembly.
Handle a halogen headlamp bulb carefully and keep out of
children’s reach. Grasp the bulb only by its plastic base and do
not touch the glass. The oil from your hand could cause the bulb to
break the next time the headlamps are operated.
Maintenance and care
212
ProCarManuals.com