FORD F350 2001 Owners Manual
Manufacturer: FORD, Model Year: 2001, Model line: F350, Model: FORD F350 2001Pages: 288, PDF Size: 2.07 MB
Page 141 of 288
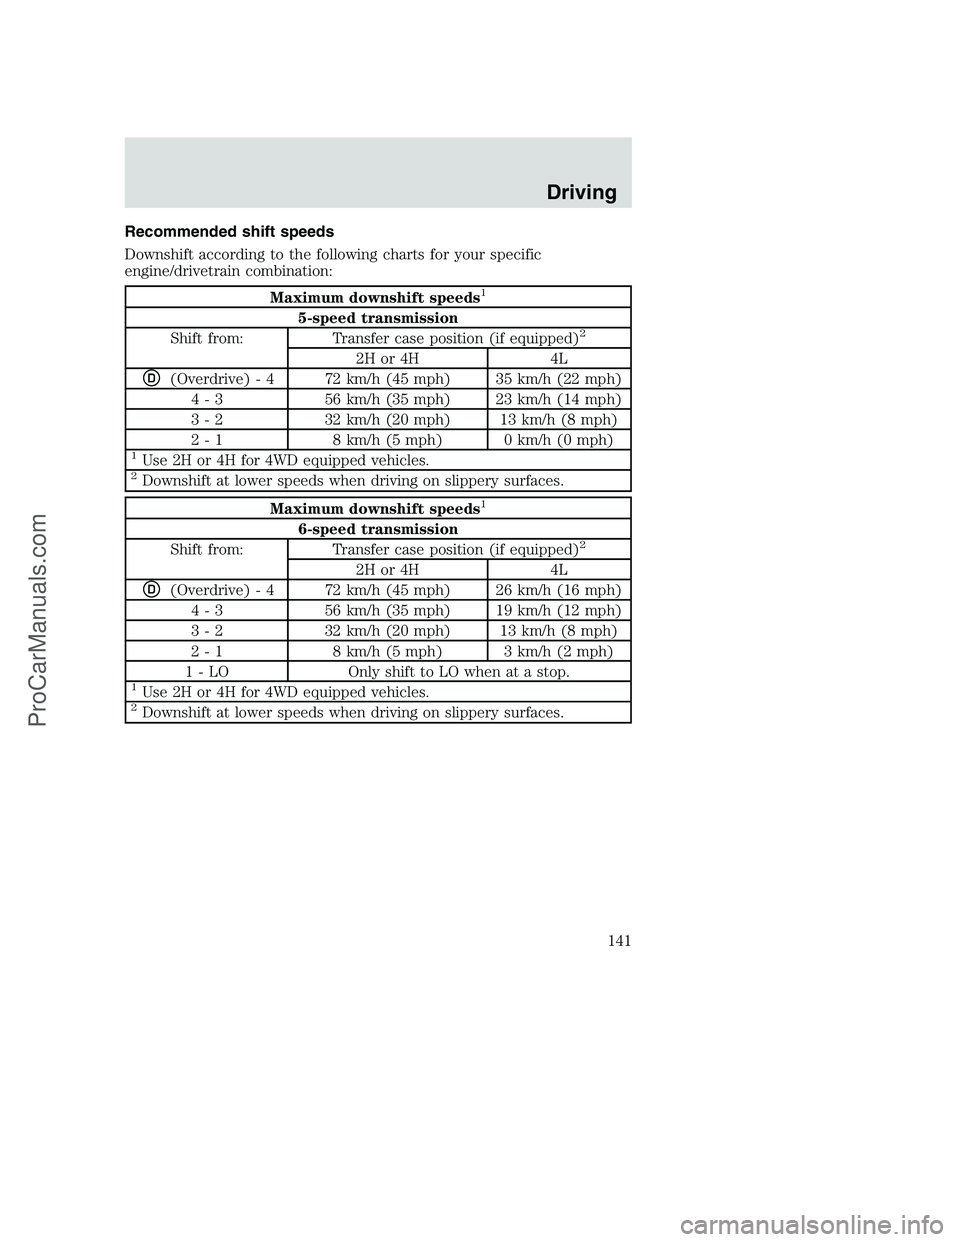
Recommended shift speeds
Downshift according to the following charts for your specific
engine/drivetrain combination:
Maximum downshift speeds1
5-speed transmission
Shift from: Transfer case position (if equipped)2
2H or 4H 4L
D(Overdrive) - 4 72 km/h (45 mph) 35 km/h (22 mph)
4 - 3 56 km/h (35 mph) 23 km/h (14 mph)
3 - 2 32 km/h (20 mph) 13 km/h (8 mph)
2 - 1 8 km/h (5 mph) 0 km/h (0 mph)
1Use 2H or 4H for 4WD equipped vehicles.2Downshift at lower speeds when driving on slippery surfaces.
Maximum downshift speeds1
6-speed transmission
Shift from: Transfer case position (if equipped)2
2H or 4H 4L
D(Overdrive) - 4 72 km/h (45 mph) 26 km/h (16 mph)
4 - 3 56 km/h (35 mph) 19 km/h (12 mph)
3 - 2 32 km/h (20 mph) 13 km/h (8 mph)
2 - 1 8 km/h (5 mph) 3 km/h (2 mph)
1 - LO Only shift to LO when at a stop.
1Use 2H or 4H for 4WD equipped vehicles.2Downshift at lower speeds when driving on slippery surfaces.
Driving
141
ProCarManuals.com
Page 142 of 288
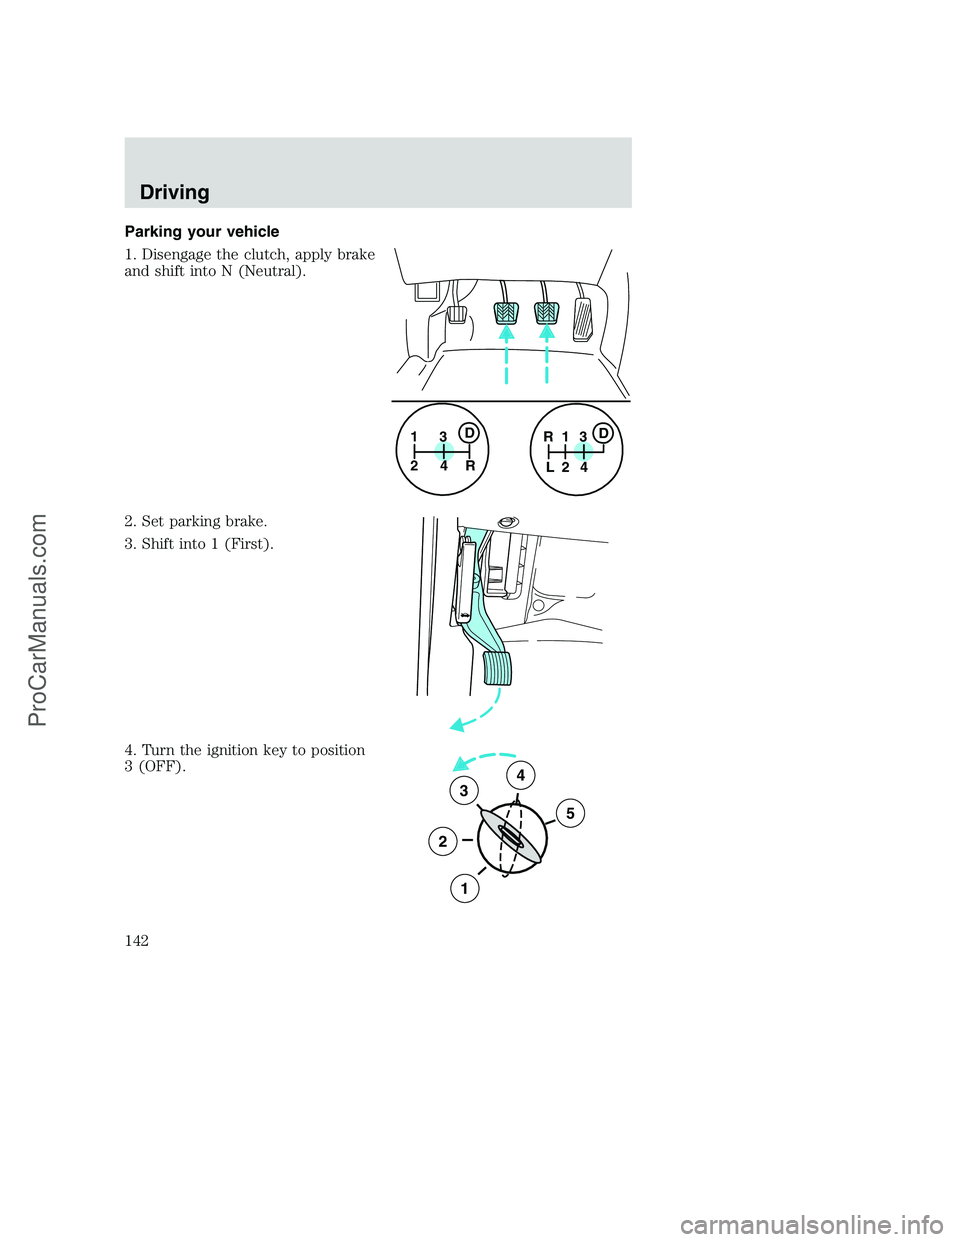
Parking your vehicle
1. Disengage the clutch, apply brake
and shift into N (Neutral).
2. Set parking brake.
3. Shift into 1 (First).
4. Turn the ignition key to position
3 (OFF).
1
24R3D1
24 R
L3D
3
2
1
5
4
Driving
142
ProCarManuals.com
Page 143 of 288
Do not park your vehicle in Neutral, it may move unexpectedly
and injure someone. Use 1 (First) gear and set the parking brake
fully.
Reverse
Make sure that your vehicle is at a complete stop before you shift into R
(Reverse). Failure to do so may damage the transmission.
Put the gearshift lever in N (Neutral) and wait at least three seconds
before shifting into R (Reverse).
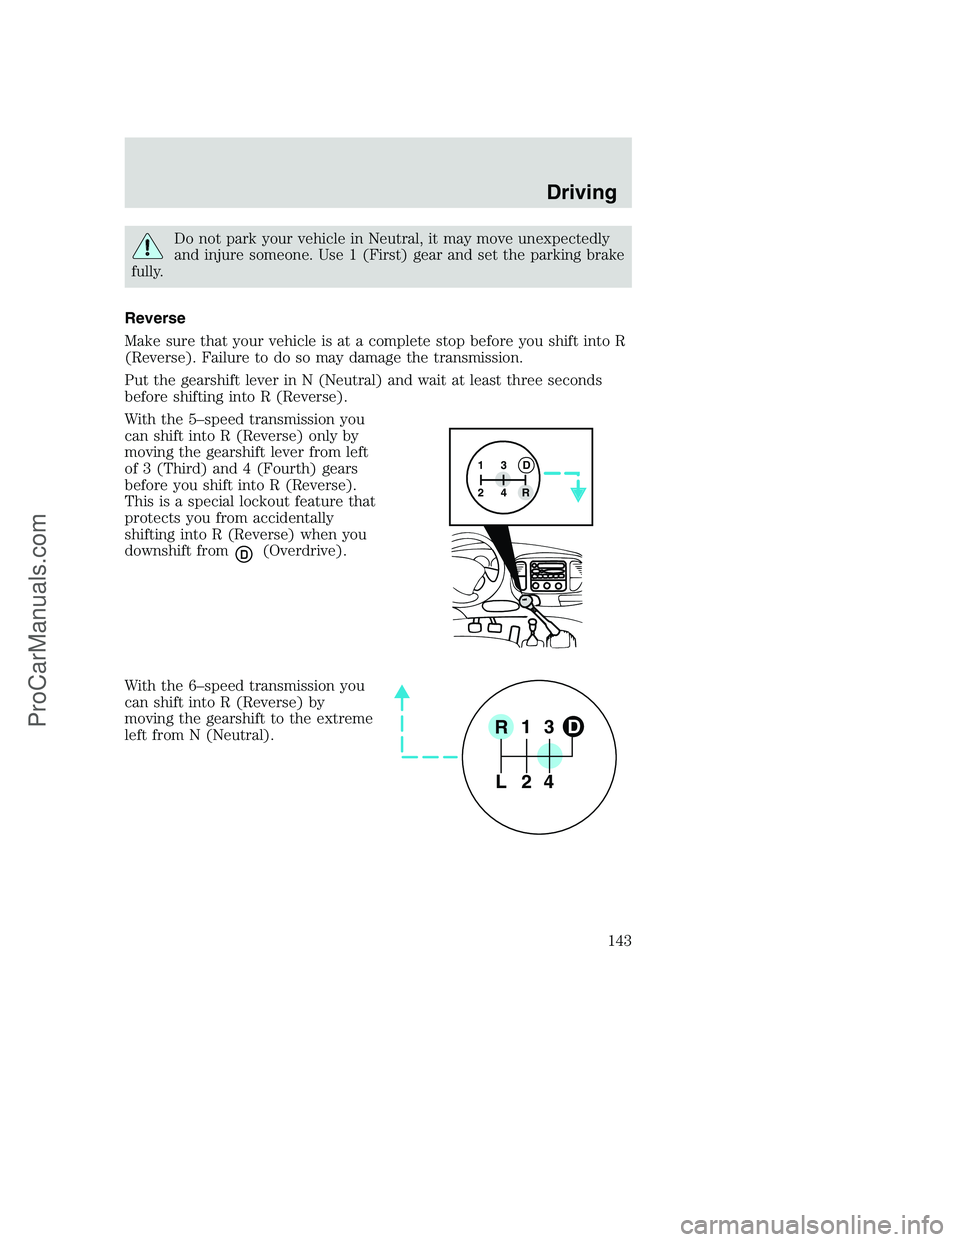
With the 5–speed transmission you
can shift into R (Reverse) only by
moving the gearshift lever from left
of 3 (Third) and 4 (Fourth) gears
before you shift into R (Reverse).
This is a special lockout feature that
protects you from accidentally
shifting into R (Reverse) when you
downshift from
D(Overdrive).
With the 6–speed transmission you
can shift into R (Reverse) by
moving the gearshift to the extreme
left from N (Neutral).
13
24RD
R1
L3
4 2D
Driving
143
ProCarManuals.com
Page 144 of 288
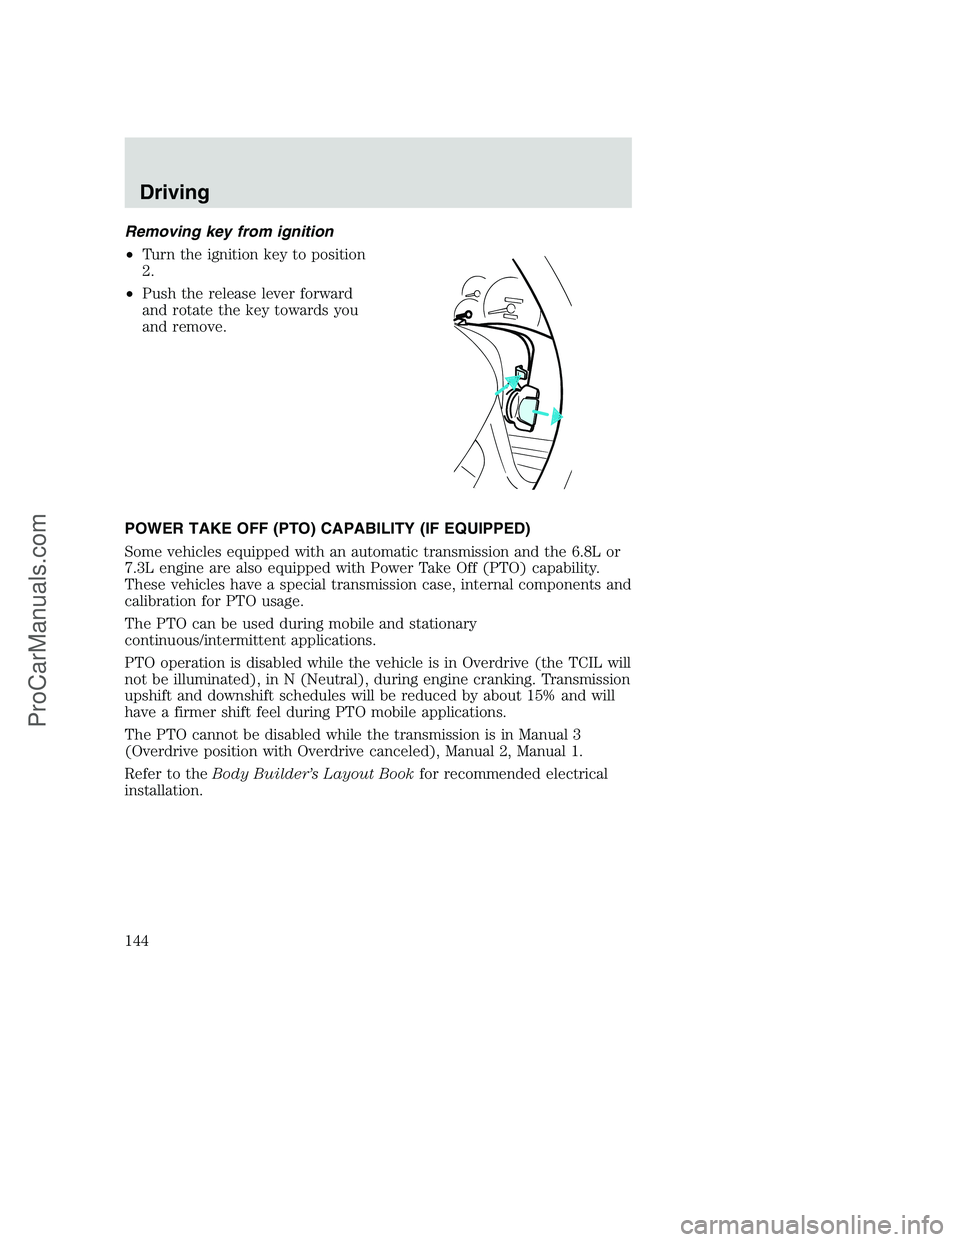
Removing key from ignition
•Turn the ignition key to position
2.
•Push the release lever forward
and rotate the key towards you
and remove.
POWER TAKE OFF (PTO) CAPABILITY (IF EQUIPPED)
Some vehicles equipped with an automatic transmission and the 6.8L or
7.3L engine are also equipped with Power Take Off (PTO) capability.
These vehicles have a special transmission case, internal components and
calibration for PTO usage.
The PTO can be used during mobile and stationary
continuous/intermittent applications.
PTO operation is disabled while the vehicle is in Overdrive (the TCIL will
not be illuminated), in N (Neutral), during engine cranking. Transmission
upshift and downshift schedules will be reduced by about 15% and will
have a firmer shift feel during PTO mobile applications.
The PTO cannot be disabled while the transmission is in Manual 3
(Overdrive position with Overdrive canceled), Manual 2, Manual 1.
Refer to theBody Builder’s Layout Bookfor recommended electrical
installation.
Driving
144
ProCarManuals.com
Page 145 of 288
FOUR-WHEEL DRIVE (4WD) OPERATION (IF EQUIPPED)
For important information regarding safe operation of this type
of vehicle, seePreparing to drive your vehiclein this chapter.
When four–wheel drive (4WD) is engaged, power is supplied to all four
wheels through a transfer case. 4WD power can be selected when
additional driving power is desired.
If equipped with the Electronic Shift 4WD System, and the
instrument panel control is moved to 4WD Low while the vehicle
is moving, the system will not engage and no damage will occur to
the 4WD system. Before 4WD Low can be engaged, the vehicle
must be brought to a complete stop with the brake pedal
depressed and the transmission placed in neutral (or the clutch
pedal depressed on manual transmissions).
4WD operation is not recommended on dry pavement. Doing so could
result in difficult disengagement of the transfer case, increased tire wear
and decreased fuel economy.
Electronic shift on the fly (ESOF) 4x4 system (if equipped)
The 4WD system:
•provides 4x4 High engagement and disengagement while the vehicle is
moving.
•is operated by a rotary control located on the instrument panel that
allows you select 2WD, 4x4 High or 4x4 Low operation.
•uses hub locks that can be engaged and disengaged automatically by
using a rotary control located on the instrument panel.
Driving
145
ProCarManuals.com
Page 146 of 288
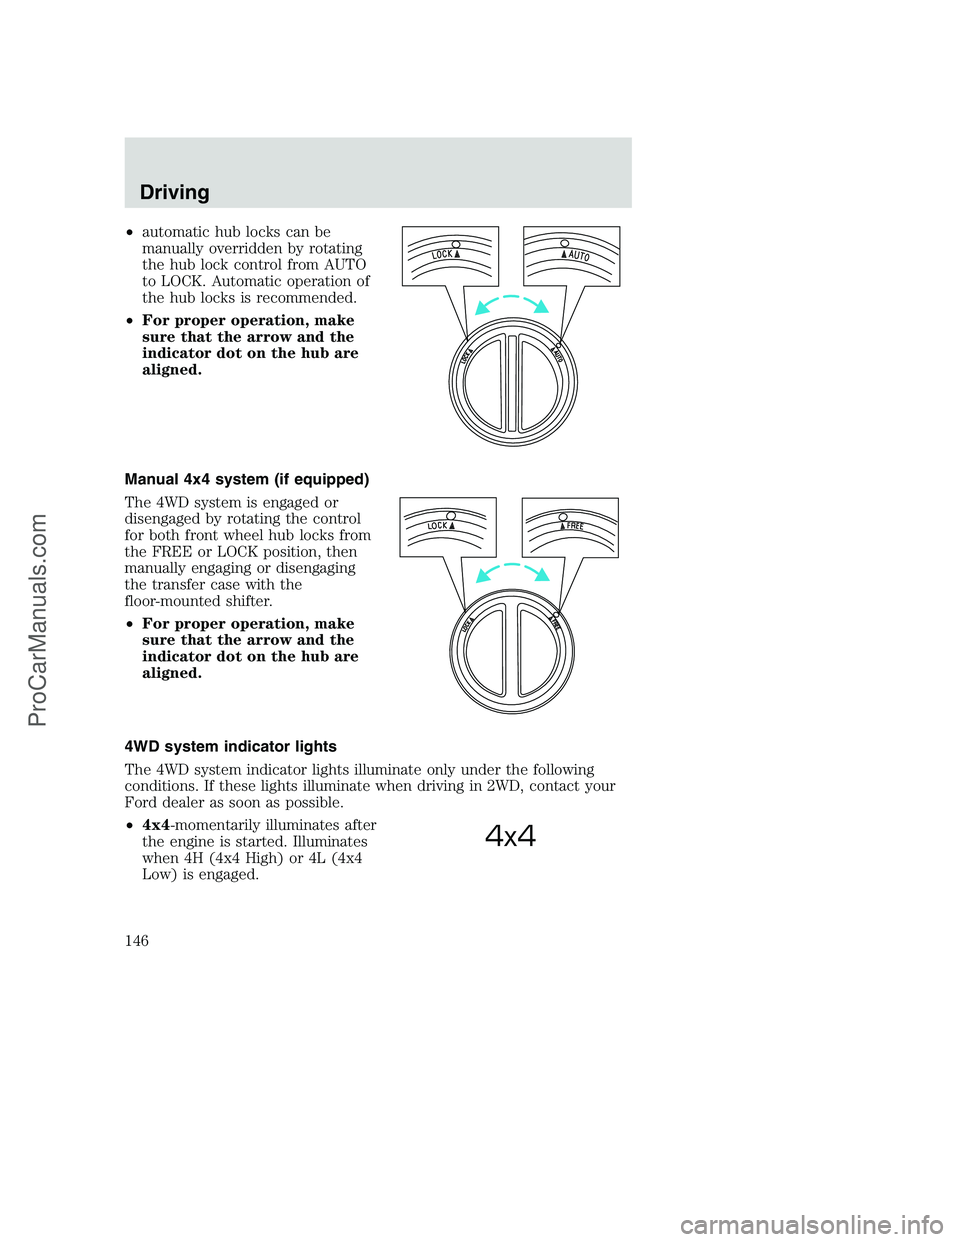
•automatic hub locks can be
manually overridden by rotating
the hub lock control from AUTO
to LOCK. Automatic operation of
the hub locks is recommended.
•For proper operation, make
sure that the arrow and the
indicator dot on the hub are
aligned.
Manual 4x4 system (if equipped)
The 4WD system is engaged or
disengaged by rotating the control
for both front wheel hub locks from
the FREE or LOCK position, then
manually engaging or disengaging
the transfer case with the
floor-mounted shifter.
•For proper operation, make
sure that the arrow and the
indicator dot on the hub are
aligned.
4WD system indicator lights
The 4WD system indicator lights illuminate only under the following
conditions. If these lights illuminate when driving in 2WD, contact your
Ford dealer as soon as possible.
•4x4-momentarily illuminates after
the engine is started. Illuminates
when 4H (4x4 High) or 4L (4x4
Low) is engaged.
4x4
Driving
146
ProCarManuals.com
Page 147 of 288
•LOW RANGE–momentarily
illuminates when the ignition is
turned to the ON position.
Illuminates when 4L (4x4 Low) is
engaged.
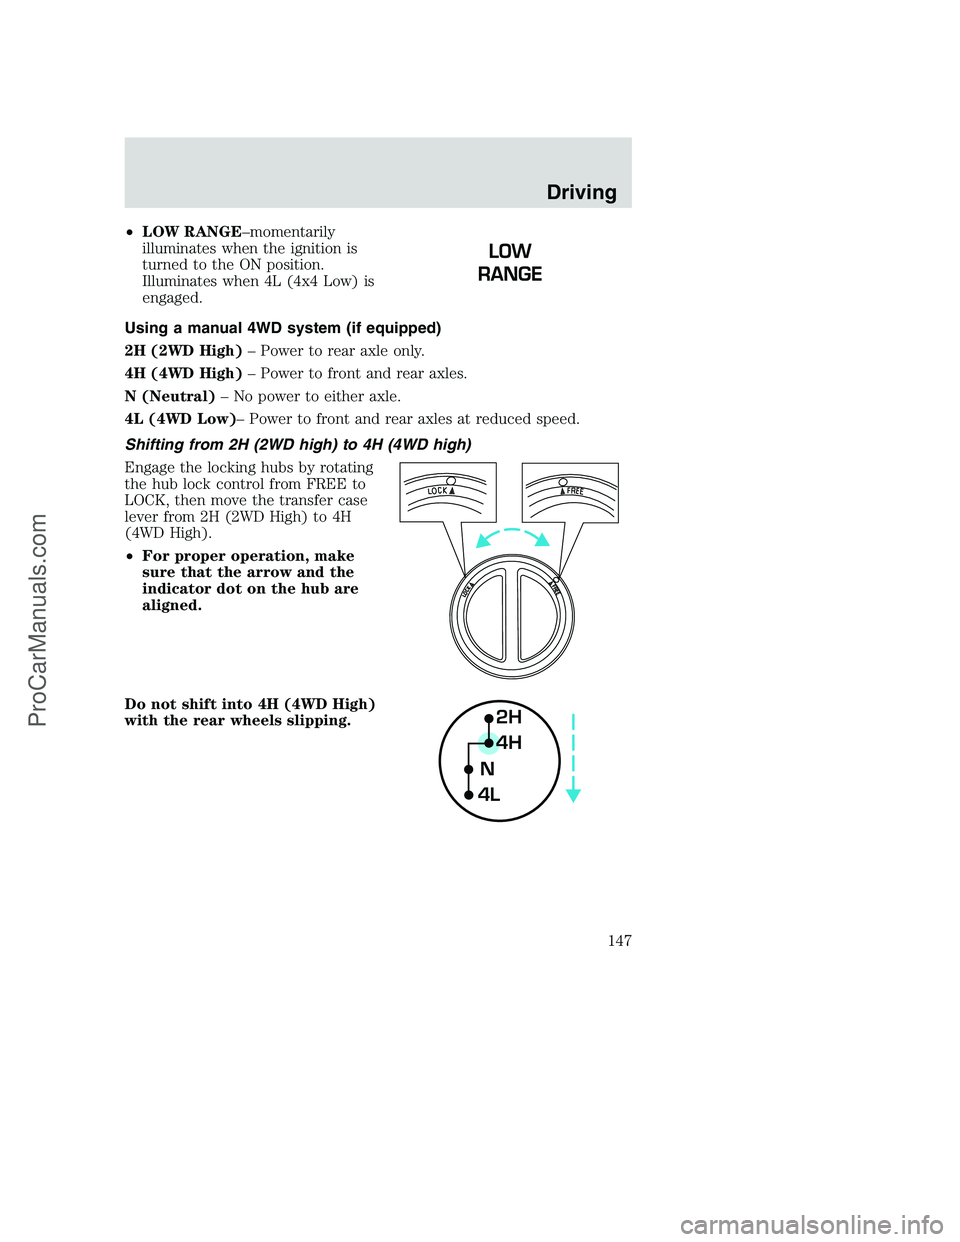
Using a manual 4WD system (if equipped)
2H (2WD High)– Power to rear axle only.
4H (4WD High)– Power to front and rear axles.
N (Neutral)– No power to either axle.
4L (4WD Low)– Power to front and rear axles at reduced speed.
Shifting from 2H (2WD high) to 4H (4WD high)
Engage the locking hubs by rotating
the hub lock control from FREE to
LOCK, then move the transfer case
lever from 2H (2WD High) to 4H
(4WD High).
•For proper operation, make
sure that the arrow and the
indicator dot on the hub are
aligned.
Do not shift into 4H (4WD High)
with the rear wheels slipping.
2H
4H
4LN
Driving
147
ProCarManuals.com
Page 148 of 288
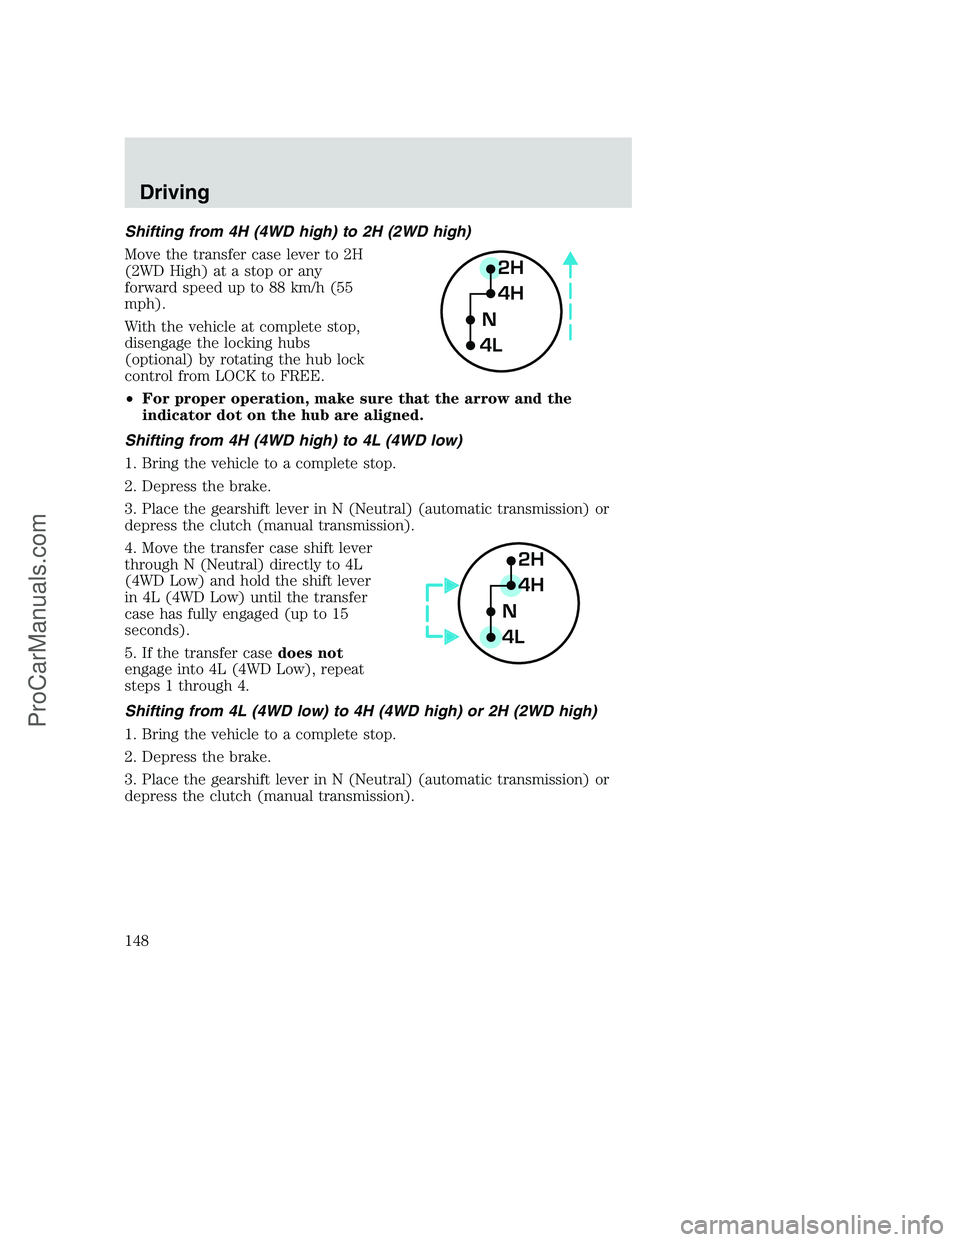
Shifting from 4H (4WD high) to 2H (2WD high)
Move the transfer case lever to 2H
(2WD High) at a stop or any
forward speed up to 88 km/h (55
mph).
With the vehicle at complete stop,
disengage the locking hubs
(optional) by rotating the hub lock
control from LOCK to FREE.
•For proper operation, make sure that the arrow and the
indicator dot on the hub are aligned.
Shifting from 4H (4WD high) to 4L (4WD low)
1. Bring the vehicle to a complete stop.
2. Depress the brake.
3. Place the gearshift lever in N (Neutral) (automatic transmission) or
depress the clutch (manual transmission).
4. Move the transfer case shift lever
through N (Neutral) directly to 4L
(4WD Low) and hold the shift lever
in 4L (4WD Low) until the transfer
case has fully engaged (up to 15
seconds).
5. If the transfer casedoes not
engage into 4L (4WD Low), repeat
steps 1 through 4.
Shifting from 4L (4WD low) to 4H (4WD high) or 2H (2WD high)
1. Bring the vehicle to a complete stop.
2. Depress the brake.
3. Place the gearshift lever in N (Neutral) (automatic transmission) or
depress the clutch (manual transmission).
2H
4H
4LN
2H
4H
4LN
Driving
148
ProCarManuals.com
Page 149 of 288
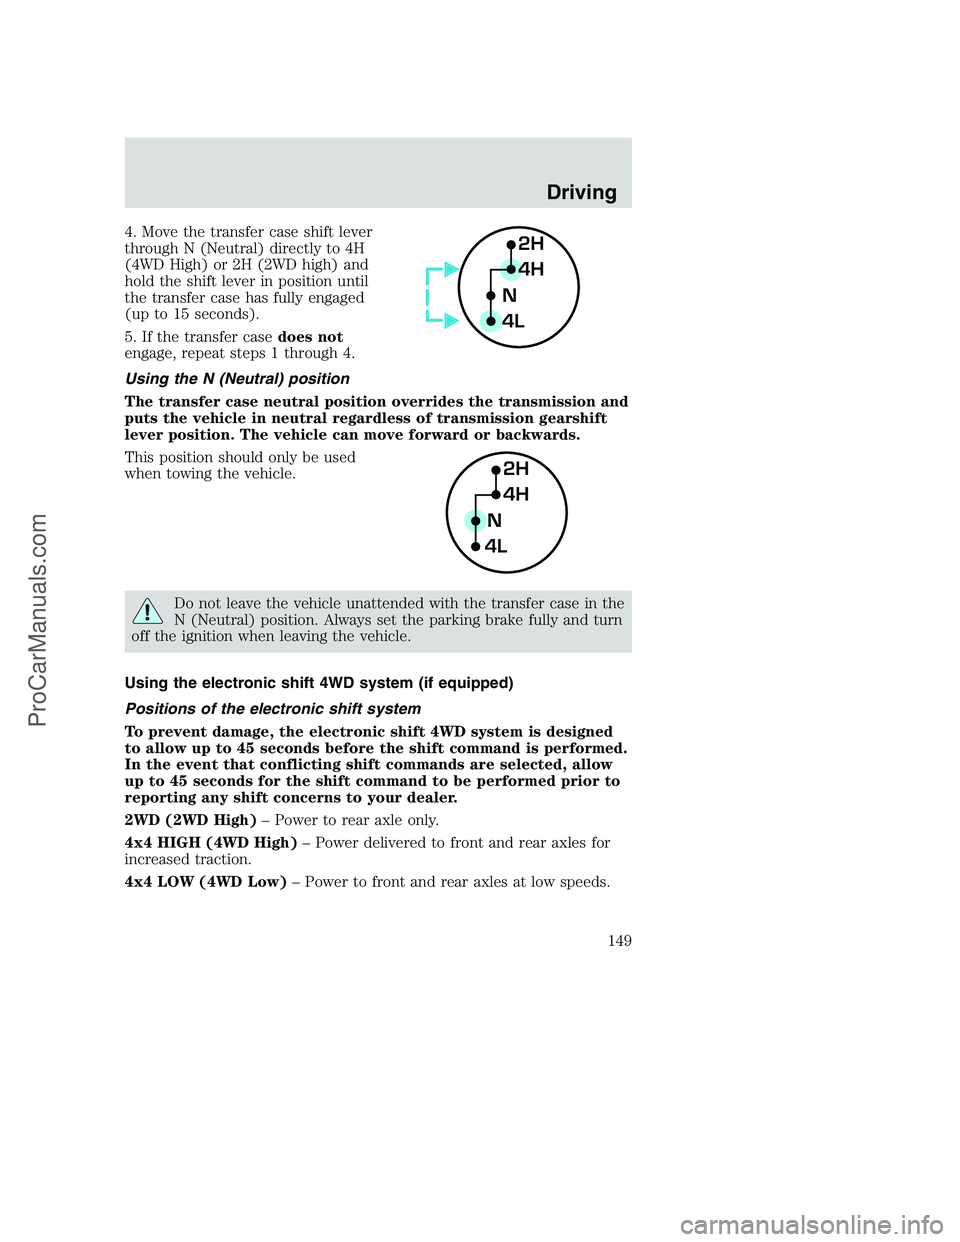
4. Move the transfer case shift lever
through N (Neutral) directly to 4H
(4WD High) or 2H (2WD high) and
hold the shift lever in position until
the transfer case has fully engaged
(up to 15 seconds).
5. If the transfer casedoes not
engage, repeat steps 1 through 4.
Using the N (Neutral) position
The transfer case neutral position overrides the transmission and
puts the vehicle in neutral regardless of transmission gearshift
lever position. The vehicle can move forward or backwards.
This position should only be used
when towing the vehicle.
Do not leave the vehicle unattended with the transfer case in the
N (Neutral) position. Always set the parking brake fully and turn
off the ignition when leaving the vehicle.
Using the electronic shift 4WD system (if equipped)
Positions of the electronic shift system
To prevent damage, the electronic shift 4WD system is designed
to allow up to 45 seconds before the shift command is performed.
In the event that conflicting shift commands are selected, allow
up to 45 seconds for the shift command to be performed prior to
reporting any shift concerns to your dealer.
2WD (2WD High)– Power to rear axle only.
4x4 HIGH (4WD High)– Power delivered to front and rear axles for
increased traction.
4x4 LOW (4WD Low)– Power to front and rear axles at low speeds.
2H
4H
4LN
2H
4H
4LN
Driving
149
ProCarManuals.com
Page 150 of 288
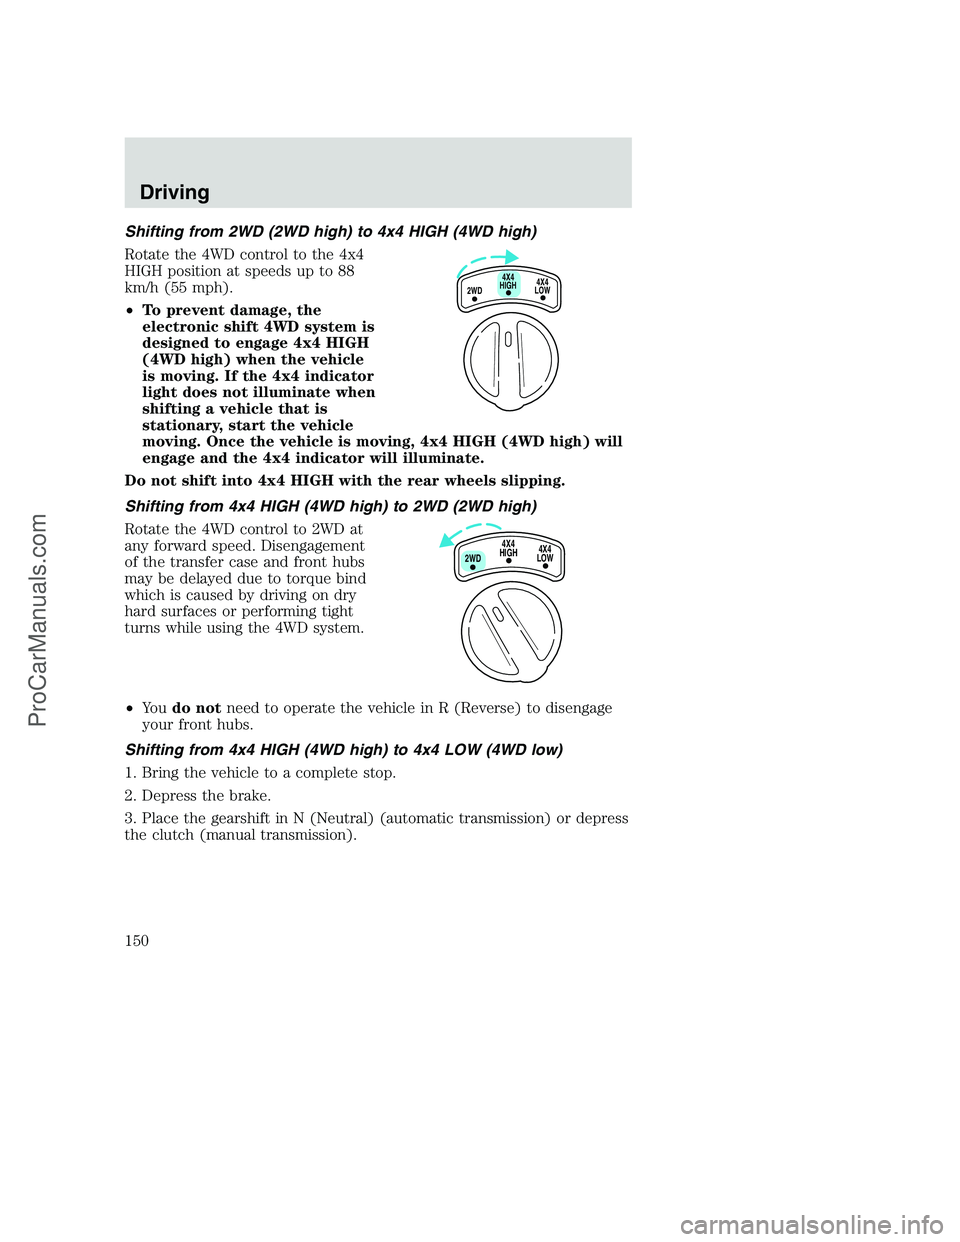
Shifting from 2WD (2WD high) to 4x4 HIGH (4WD high)
Rotate the 4WD control to the 4x4
HIGH position at speeds up to 88
km/h (55 mph).
•To prevent damage, the
electronic shift 4WD system is
designed to engage 4x4 HIGH
(4WD high) when the vehicle
is moving. If the 4x4 indicator
light does not illuminate when
shifting a vehicle that is
stationary, start the vehicle
moving. Once the vehicle is moving, 4x4 HIGH (4WD high) will
engage and the 4x4 indicator will illuminate.
Do not shift into 4x4 HIGH with the rear wheels slipping.
Shifting from 4x4 HIGH (4WD high) to 2WD (2WD high)
Rotate the 4WD control to 2WD at
any forward speed. Disengagement
of the transfer case and front hubs
may be delayed due to torque bind
which is caused by driving on dry
hard surfaces or performing tight
turns while using the 4WD system.
•Yo udo notneed to operate the vehicle in R (Reverse) to disengage
your front hubs.
Shifting from 4x4 HIGH (4WD high) to 4x4 LOW (4WD low)
1. Bring the vehicle to a complete stop.
2. Depress the brake.
3. Place the gearshift in N (Neutral) (automatic transmission) or depress
the clutch (manual transmission).
4X4
HIGH
2WD4X4
LOW
4X4
HIGH
2WD4X4
LOW
Driving
150
ProCarManuals.com