instrument panel FORD F350 2004 Owners Manual
[x] Cancel search | Manufacturer: FORD, Model Year: 2004, Model line: F350, Model: FORD F350 2004Pages: 312, PDF Size: 2.89 MB
Page 38 of 312

HEATER ONLY SYSTEM
(IF EQUIPPED)
1.Fan speed adjustment:Controls
the volume of air circulated in the
vehicle.
2.Temperature selection:
Controls the temperature of the
airflow in the vehicle.
3.Air flow selections:Controls the direction of the airflow in the
vehicle. See the following for a brief description on each control:
:Distributes outside air through the instrument panel vents.
OFF:Outside air is shut out and the fan will not operate.
:Distributes outside air through the instrument panel vents and the
floor vents.
:Distributes outside air through the floor vents.
:Distributes outside air through the windshield defroster vents and
floor vents.
:Distributes outside air through the windshield defroster vents.
Operating tips
•To reduce fog build up on the windshield during humid weather, place
the air flow selector in the
position.
•To reduce humidity build up inside the vehicle during cold or warm
weather, do not drive or leave the vehicle parked with the air flow
selector in the OFF position.
•Do not put objects under the front seats that will interfere with the air
flow to the rear seats.
•Remove any snow, ice or leaves from the air intake area at the base of
the windshield.
To aid in side window defogging/demisting in cold weather:
1. Select
.
2. Modulate the temperature control to maintain comfort.
3. Set the fan speed to the highest setting.
4. Direct the outer instrument panel vents toward the side windows.
To increase airflow to the outer instrument panel vents, close the vents
located in the middle of the instrument panel.
2004 F250/350/450/550(f23)
Owners Guide (post-2002-fmt)
USA English(fus)
Climate Controls
Climate Controls
38
ProCarManuals.com
Page 39 of 312
Do not place objects on top of the instrument panel as these
objects may become projectiles in a collision or sudden stop.
MANUAL HEATING AND AIR CONDITIONING SYSTEM
(IF EQUIPPED)
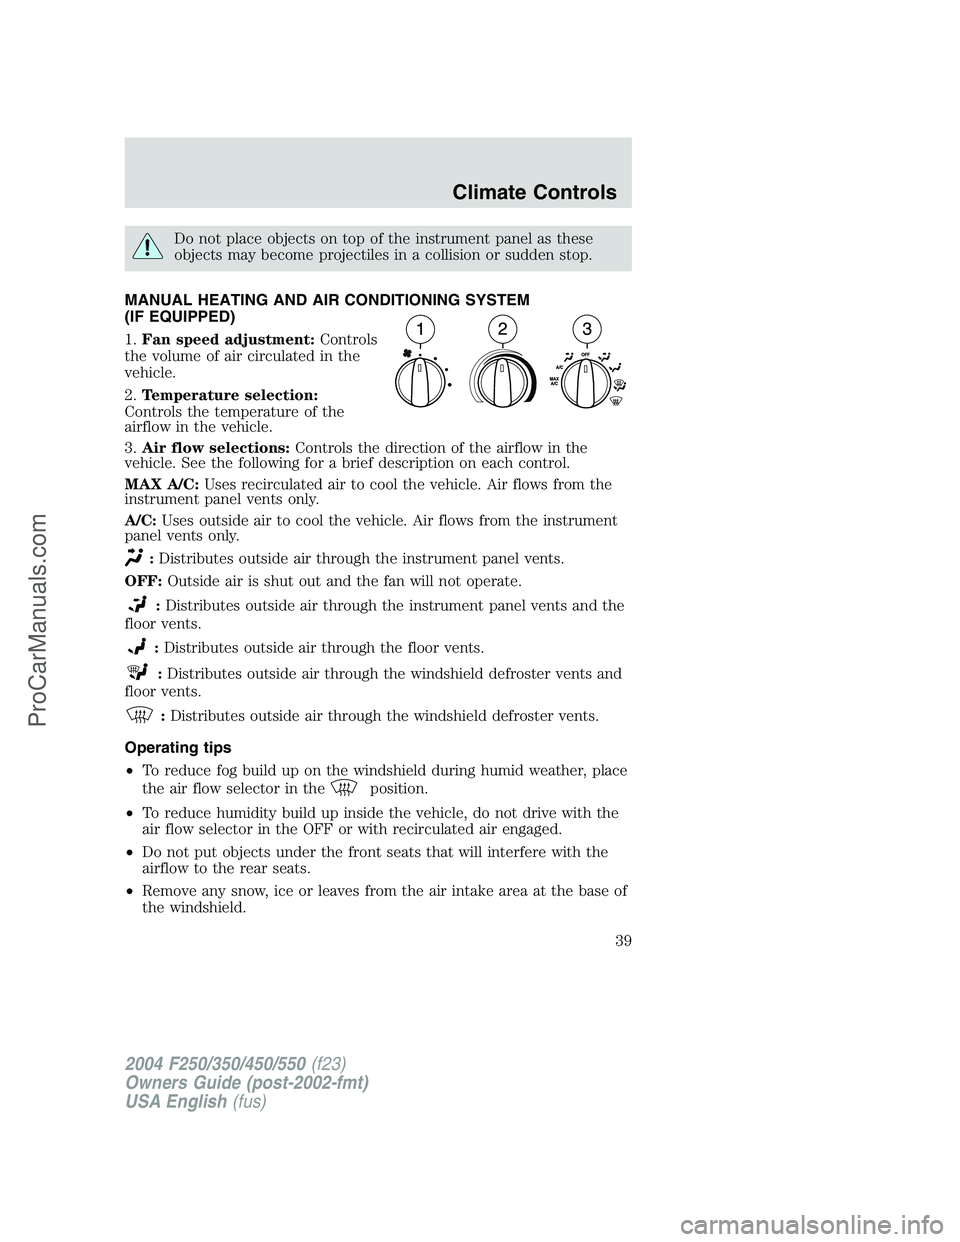
1.Fan speed adjustment:Controls
the volume of air circulated in the
vehicle.
2.Temperature selection:
Controls the temperature of the
airflow in the vehicle.
3.Air flow selections:Controls the direction of the airflow in the
vehicle. See the following for a brief description on each control.
MAX A/C:Uses recirculated air to cool the vehicle. Air flows from the
instrument panel vents only.
A/C:Uses outside air to cool the vehicle. Air flows from the instrument
panel vents only.
:Distributes outside air through the instrument panel vents.
OFF:Outside air is shut out and the fan will not operate.
:Distributes outside air through the instrument panel vents and the
floor vents.
:Distributes outside air through the floor vents.
:Distributes outside air through the windshield defroster vents and
floor vents.
:Distributes outside air through the windshield defroster vents.
Operating tips
•To reduce fog build up on the windshield during humid weather, place
the air flow selector in the
position.
•To reduce humidity build up inside the vehicle, do not drive with the
air flow selector in the OFF or with recirculated air engaged.
•Do not put objects under the front seats that will interfere with the
airflow to the rear seats.
•Remove any snow, ice or leaves from the air intake area at the base of
the windshield.
2004 F250/350/450/550(f23)
Owners Guide (post-2002-fmt)
USA English(fus)
Climate Controls
39
ProCarManuals.com
Page 40 of 312

•To improve the A/C cool down, drive with the windows slightly open
for 2–3 minutes after start up or until the vehicle has been“aired out.”
For maximum cooling performance (MAX A/C) in MAX A/C mode:
•Move the temperature control to the coolest setting.
•Set the fan to the highest speed initially, then adjust in order to
maintain comfort.
For maximum cooling performance in panel (
) and panel/floor ()
modes:
•Move the temperature control to the coolest setting.
•Select A/C and recirculated air . Use recirculated air with A/C to
provide a cooler airflow.
•Set the fan to the highest speed initially, then adjust in order to
maintain comfort.
To allow side window defogging and demisting while warming up the
vehicle cabin:
1. Select
.
2. Select A/C.
3. Set the temperature control to maintain comfort.
4. Set the fan speed to highest setting.
5. Direct the outer instrument panel vents towards the side windows. To
increase airflow to the outer instrument panel vents, close the vents
located in the middle of the instrument panel.
To increase airflow to the outer instrument panel vents, close the vents
located in the middle of the instrument panel.
Do not place objects on top of the instrument panel as these
objects may become projectiles in a collision or sudden stop.
2004 F250/350/450/550(f23)
Owners Guide (post-2002-fmt)
USA English(fus)
Climate Controls
40
ProCarManuals.com
Page 41 of 312
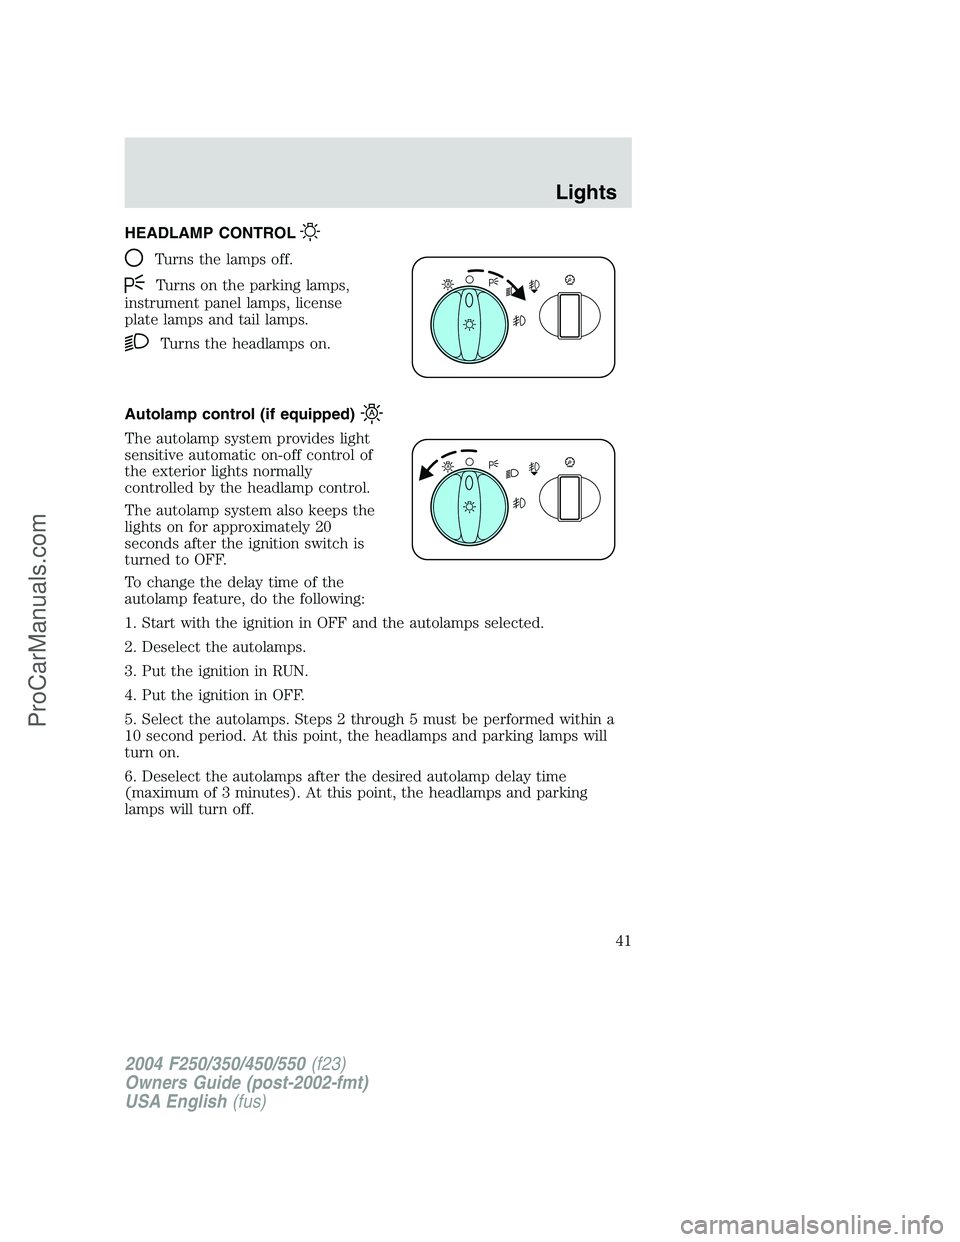
HEADLAMP CONTROL
Turns the lamps off.
Turns on the parking lamps,
instrument panel lamps, license
plate lamps and tail lamps.
Turns the headlamps on.
Autolamp control (if equipped)
The autolamp system provides light
sensitive automatic on-off control of
the exterior lights normally
controlled by the headlamp control.
The autolamp system also keeps the
lights on for approximately 20
seconds after the ignition switch is
turned to OFF.
To change the delay time of the
autolamp feature, do the following:
1. Start with the ignition in OFF and the autolamps selected.
2. Deselect the autolamps.
3. Put the ignition in RUN.
4. Put the ignition in OFF.
5. Select the autolamps. Steps 2 through 5 must be performed within a
10 second period. At this point, the headlamps and parking lamps will
turn on.
6. Deselect the autolamps after the desired autolamp delay time
(maximum of 3 minutes). At this point, the headlamps and parking
lamps will turn off.
A
A
2004 F250/350/450/550(f23)
Owners Guide (post-2002-fmt)
USA English(fus)
Lights
Lights
41
ProCarManuals.com
Page 43 of 312
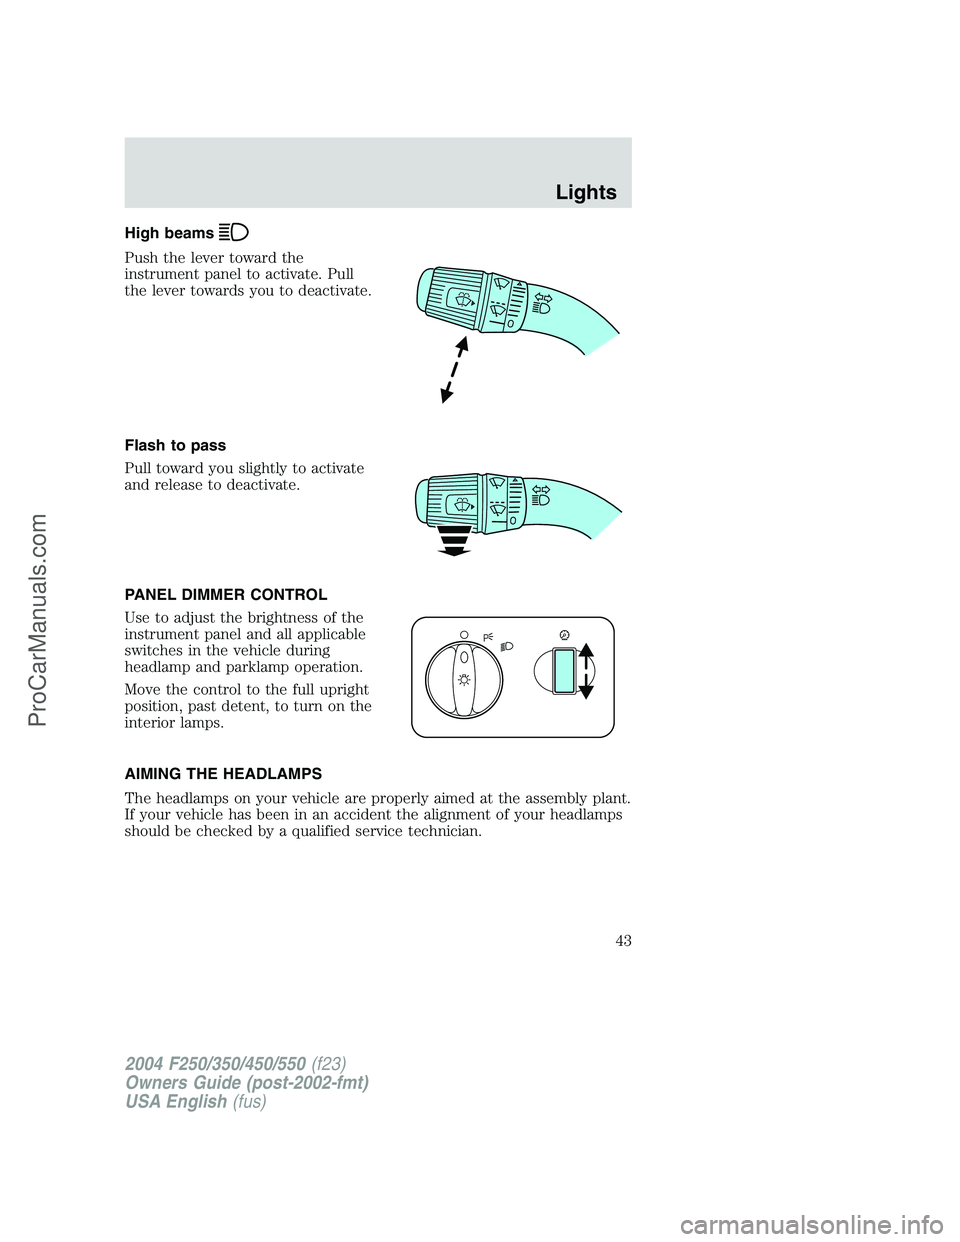
High beams
Push the lever toward the
instrument panel to activate. Pull
the lever towards you to deactivate.
Flash to pass
Pull toward you slightly to activate
and release to deactivate.
PANEL DIMMER CONTROL
Use to adjust the brightness of the
instrument panel and all applicable
switches in the vehicle during
headlamp and parklamp operation.
Move the control to the full upright
position, past detent, to turn on the
interior lamps.
AIMING THE HEADLAMPS
The headlamps on your vehicle are properly aimed at the assembly plant.
If your vehicle has been in an accident the alignment of your headlamps
should be checked by a qualified service technician.
2004 F250/350/450/550(f23)
Owners Guide (post-2002-fmt)
USA English(fus)
Lights
43
ProCarManuals.com
Page 44 of 312
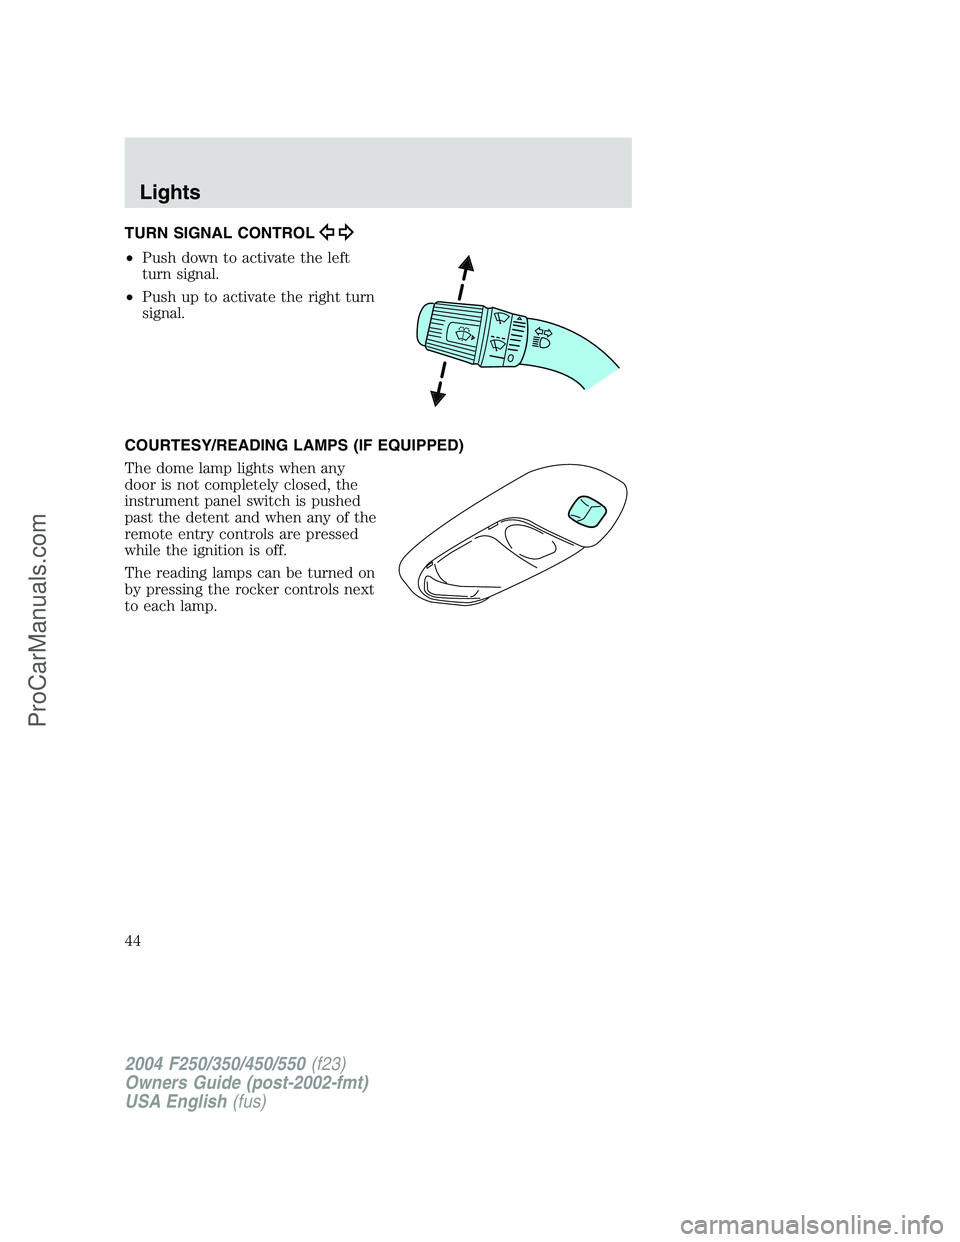
TURN SIGNAL CONTROL
•Push down to activate the left
turn signal.
•Push up to activate the right turn
signal.
COURTESY/READING LAMPS (IF EQUIPPED)
The dome lamp lights when any
door is not completely closed, the
instrument panel switch is pushed
past the detent and when any of the
remote entry controls are pressed
while the ignition is off.
The reading lamps can be turned on
by pressing the rocker controls next
to each lamp.
2004 F250/350/450/550(f23)
Owners Guide (post-2002-fmt)
USA English(fus)
Lights
44
ProCarManuals.com
Page 46 of 312
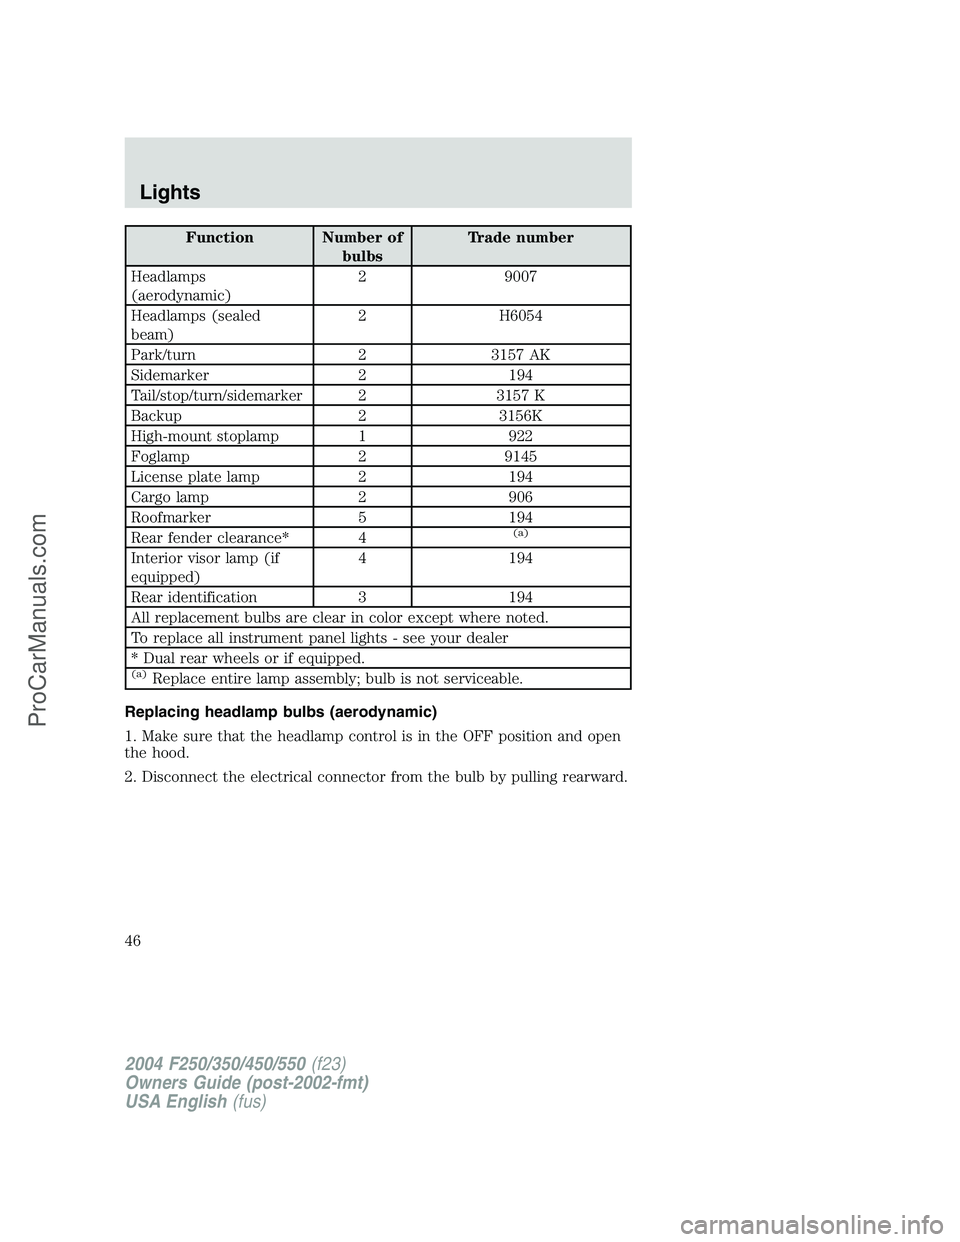
Function Number of
bulbsTrade number
Headlamps
(aerodynamic)2 9007
Headlamps (sealed
beam)2 H6054
Park/turn 2 3157 AK
Sidemarker 2 194
Tail/stop/turn/sidemarker 2 3157 K
Backup 2 3156K
High-mount stoplamp 1 922
Foglamp 2 9145
License plate lamp 2 194
Cargo lamp 2 906
Roofmarker 5 194
Rear fender clearance* 4
(a)
Interior visor lamp (if
equipped)4 194
Rear identification 3 194
All replacement bulbs are clear in color except where noted.
To replace all instrument panel lights - see your dealer
* Dual rear wheels or if equipped.
(a)Replace entire lamp assembly; bulb is not serviceable.
Replacing headlamp bulbs (aerodynamic)
1. Make sure that the headlamp control is in the OFF position and open
the hood.
2. Disconnect the electrical connector from the bulb by pulling rearward.
2004 F250/350/450/550(f23)
Owners Guide (post-2002-fmt)
USA English(fus)
Lights
46
ProCarManuals.com
Page 57 of 312
When closing the moon roof, you should verify that it is free of
obstructions and ensure that children and/or pets are not in the
proximity of the moon roof opening.
AUXILIARY POWER POINT
Power outlets are designed for
accessory plugs only. Do not
hang any type of accessory or
accessory bracket from the plug.
Improper use of the power
outlet can cause damage not
covered by your warranty.
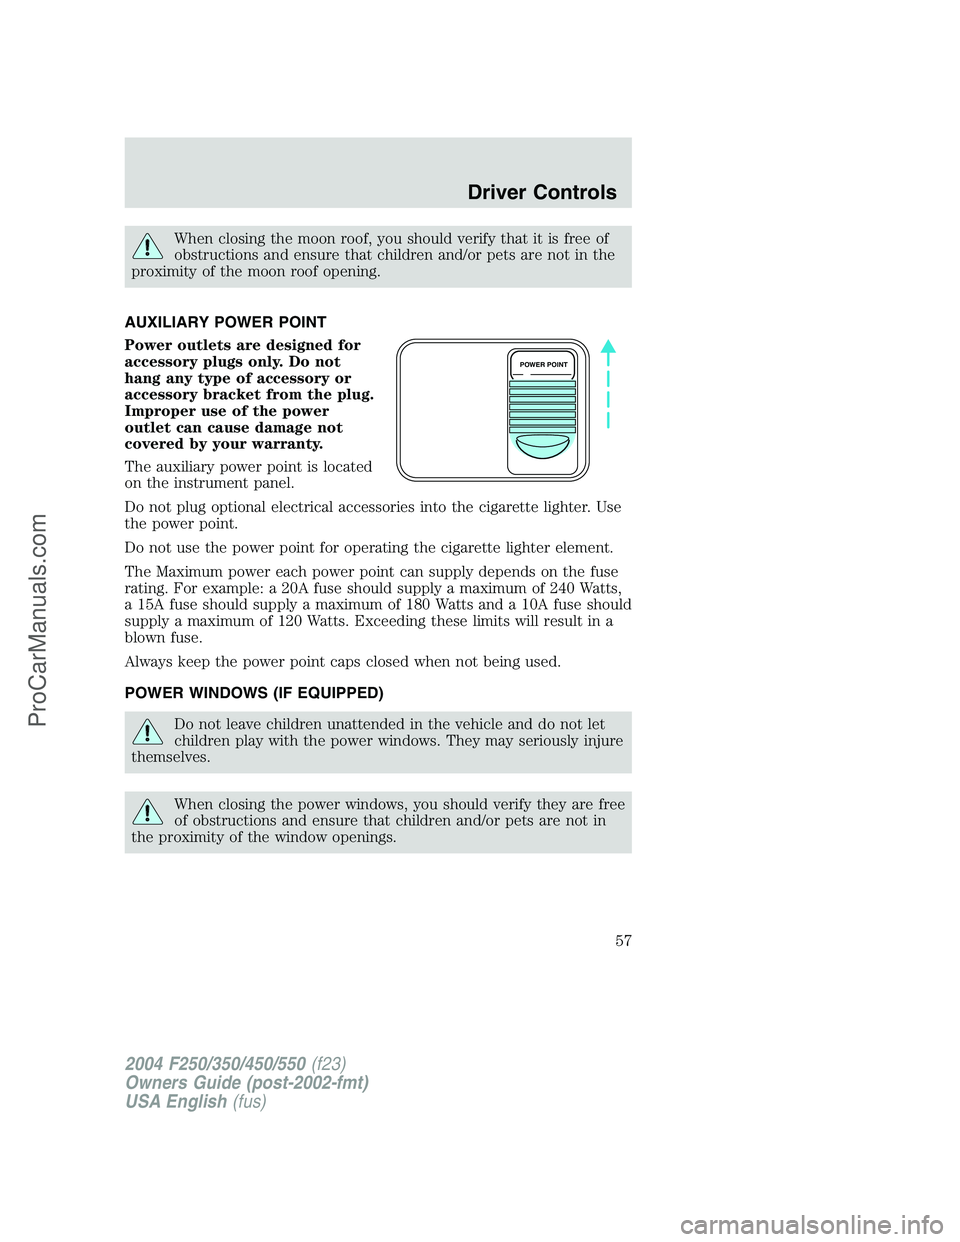
The auxiliary power point is located
on the instrument panel.
Do not plug optional electrical accessories into the cigarette lighter. Use
the power point.
Do not use the power point for operating the cigarette lighter element.
The Maximum power each power point can supply depends on the fuse
rating. For example: a 20A fuse should supply a maximum of 240 Watts,
a 15A fuse should supply a maximum of 180 Watts and a 10A fuse should
supply a maximum of 120 Watts. Exceeding these limits will result in a
blown fuse.
Always keep the power point caps closed when not being used.
POWER WINDOWS (IF EQUIPPED)
Do not leave children unattended in the vehicle and do not let
children play with the power windows. They may seriously injure
themselves.
When closing the power windows, you should verify they are free
of obstructions and ensure that children and/or pets are not in
the proximity of the window openings.
POWER POINT
2004 F250/350/450/550(f23)
Owners Guide (post-2002-fmt)
USA English(fus)
Driver Controls
57
ProCarManuals.com
Page 145 of 312
•Some vehicles may be equipped with wheel ornaments that cover the
4x4 manual hub lock. These ornaments must be removed to access
the manual hub locks.
Electronic shift on the fly (ESOF) 4x4 system (if equipped)
If equipped with the Electronic Shift 4WD System, and 4WD Low
is selected while the vehicle is moving, the 4WD system will not
engage. This is normal and should be no reason for concern.
Before 4WD Low can be engaged, the vehicle must be brought to
a complete stop, the brake pedal depressed and the transmission
placed in N (Neutral ) (on automatic transmissions or the clutch
pedal depressed on manual transmissions).
The 4WD system:
•provides 4x4 High engagement and disengagement while the vehicle is
moving.
•is operated by a rotary control located on the instrument panel that
allows you select 2WD, 4x4 High or 4x4 Low operation.
•uses auto-manual hub locks that can be engaged and disengaged
automatically based on the 4x4 mode selected.
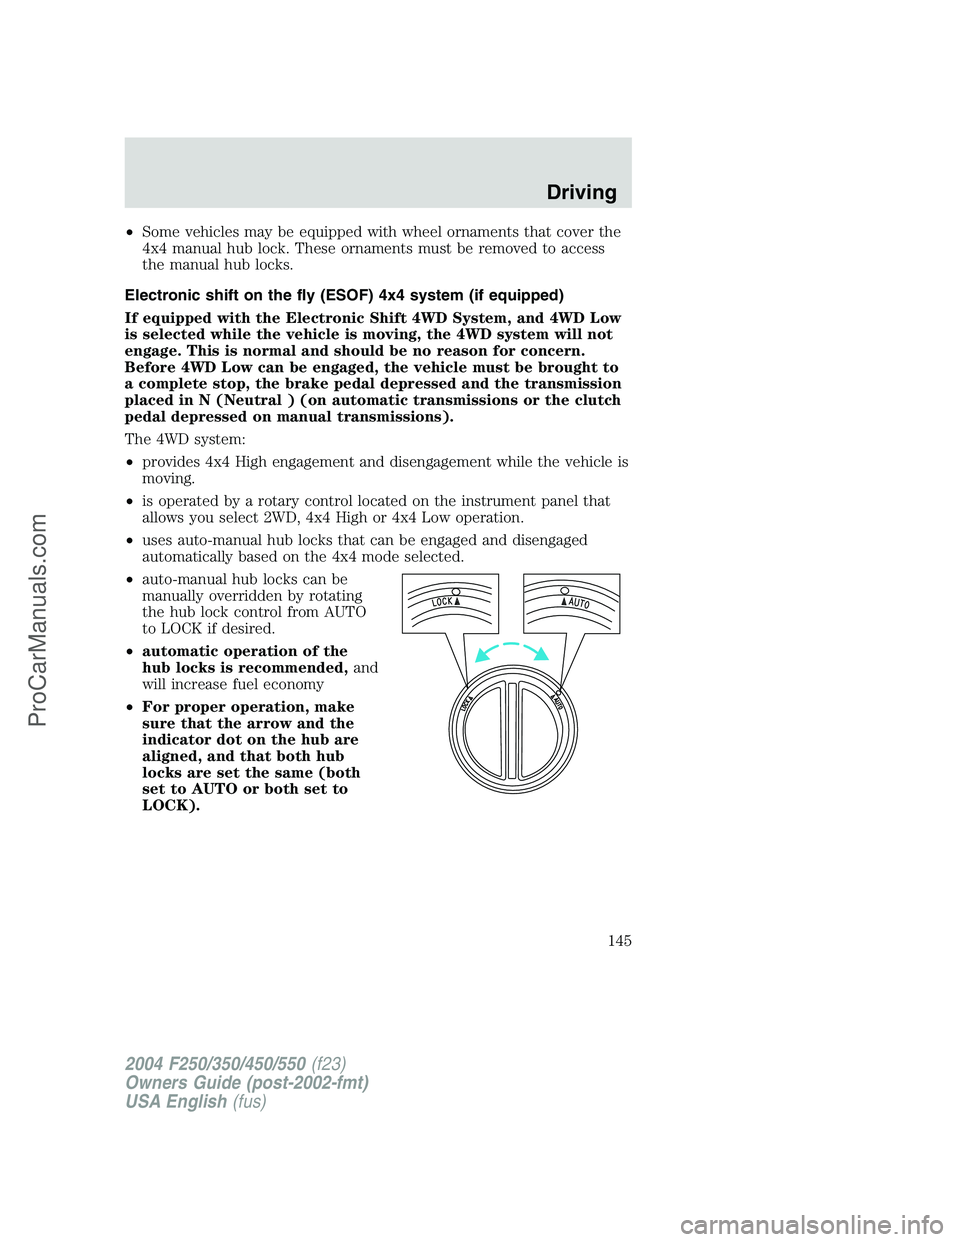
•auto-manual hub locks can be
manually overridden by rotating
the hub lock control from AUTO
to LOCK if desired.
•automatic operation of the
hub locks is recommended,and
will increase fuel economy
•For proper operation, make
sure that the arrow and the
indicator dot on the hub are
aligned, and that both hub
locks are set the same (both
set to AUTO or both set to
LOCK).
2004 F250/350/450/550(f23)
Owners Guide (post-2002-fmt)
USA English(fus)
Driving
145
ProCarManuals.com
Page 196 of 312
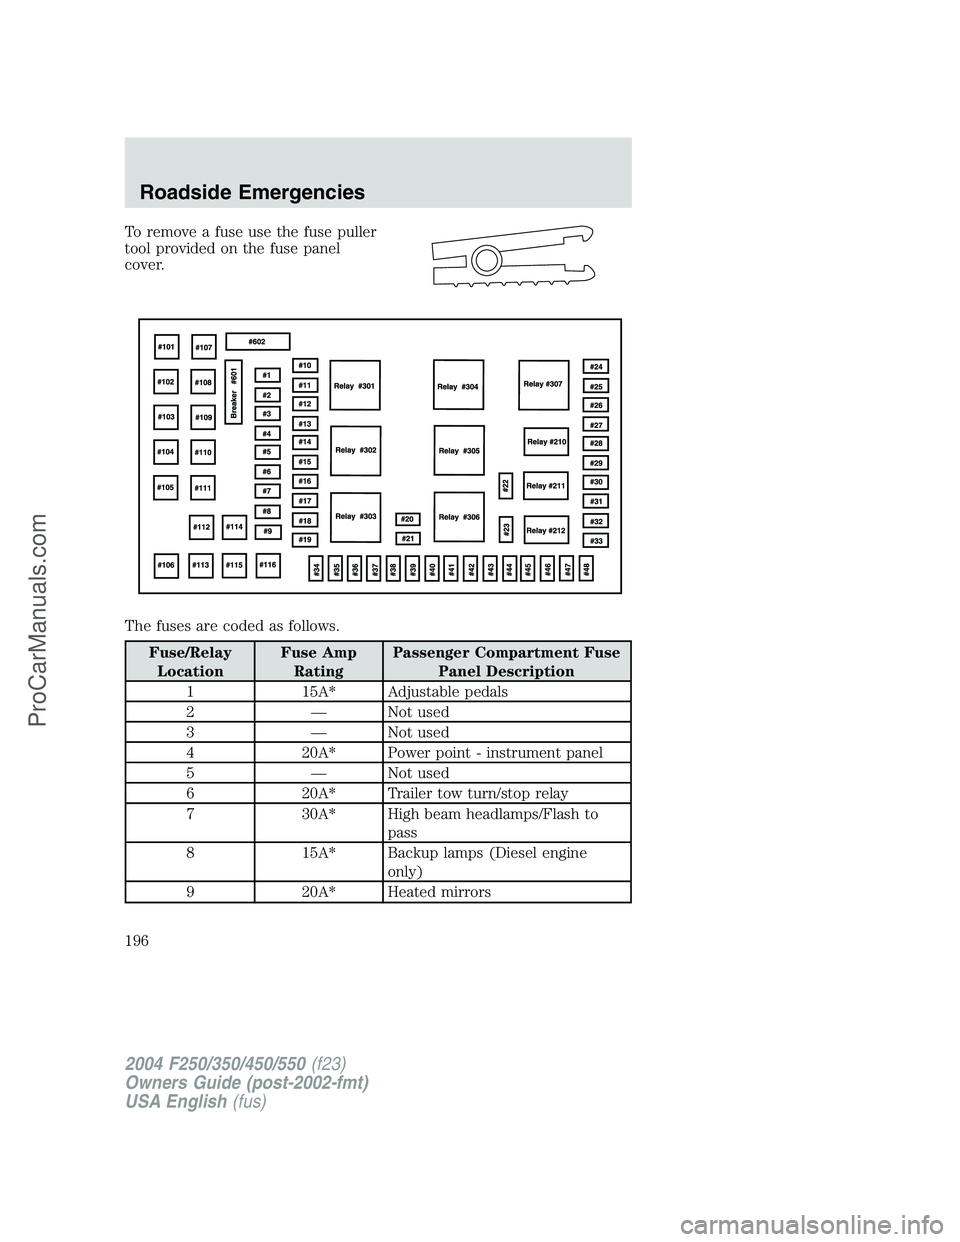
To remove a fuse use the fuse puller
tool provided on the fuse panel
cover.
The fuses are coded as follows.
Fuse/Relay
LocationFuse Amp
RatingPassenger Compartment Fuse
Panel Description
1 15A* Adjustable pedals
2—Not used
3—Not used
4 20A* Power point - instrument panel
5—Not used
6 20A* Trailer tow turn/stop relay
7 30A* High beam headlamps/Flash to
pass
8 15A* Backup lamps (Diesel engine
only)
9 20A* Heated mirrors
2004 F250/350/450/550(f23)
Owners Guide (post-2002-fmt)
USA English(fus)
Roadside Emergencies
196
ProCarManuals.com